Read The Arch Way, fall in.
I can’t believe how smoothly this went…
- suspend - seems to work after installing gnome, pm-suspend works too… I have my eye on you. <.<
systemctl suspendworks, but doesn’t wake properly.
- power management
- trackpad
Read The Arch Way, fall in.
I can’t believe how smoothly this went…
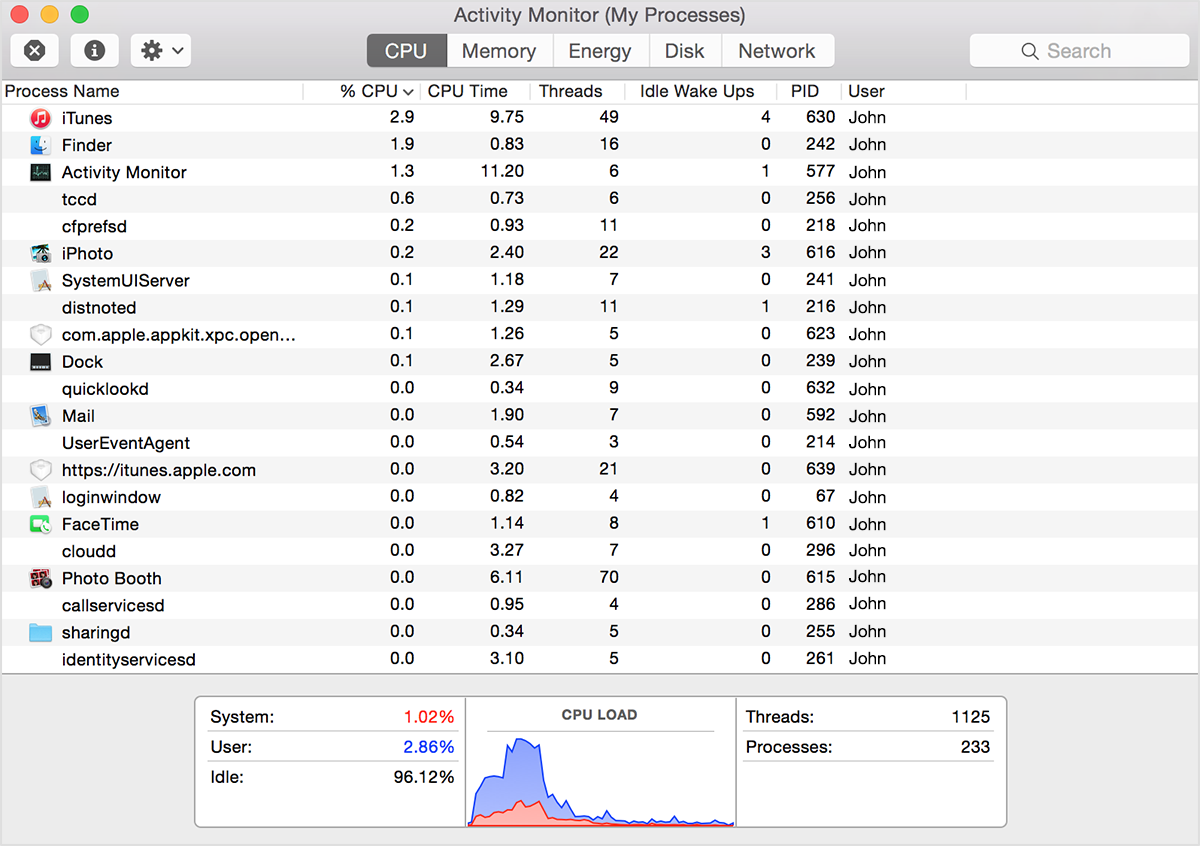
systemctl suspend works, but doesn’t wake properly.If your system is running slowly, perhaps a process is using too much CPU time and won't let other processes run smoothly. To find out which processes are taking up a lot of CPU time, you can use Apple's Activity Monitor.
The CPU pane shows how processes are affecting CPU (processor) activity:
| #!/bin/bash | |
| ############################################################################## | |
| # Install system packages # | |
| ############################################################################## | |
| xcode-select --install | |
| sudo installer -pkg /Library/Developer/CommandLineTools/Packages/macOS_SDK_headers_for_macOS_10.14.pkg -target / | |
| # install homebrew |
With autofs you can easily mount network volumes upon first access to the folder where you want to mount the volume. Autofs is available for many OS and is preinstalled on Mac OS X so I show you how I mounted my iTunes library folder using this method.
autofs needs to be configured so that it knows where to gets its configuration. Edit the file /etc/auto_master and add the last line:
#
# Automounter master map
#
+auto_master # Use directory service
| #!/usr/bin/env python | |
| import errno | |
| import os | |
| import plistlib | |
| import sys | |
| import urllib | |
| def makedirs_if_absent(path): | |
| try: |
| local alert = require("hs.alert") | |
| local timer = require("hs.timer") | |
| local eventtap = require("hs.eventtap") | |
| local events = eventtap.event.types | |
| local module = {} | |
| -- Save this in your Hammerspoon configuration directiorn (~/.hammerspoon/) | |
| -- You either override timeFrame and action here or after including this file from another, e.g. |
| # The trick is to link the DeviceSupport folder from the beta to the stable version. | |
| # sudo needed if you run the Mac App Store version. Always download the dmg instead... you'll thank me later :) | |
| # Support iOS 15 devices (Xcode 13.0) with Xcode 12.5: | |
| sudo ln -s /Applications/Xcode-beta.app/Contents/Developer/Platforms/iPhoneOS.platform/DeviceSupport/15.0 /Applications/Xcode.app/Contents/Developer/Platforms/iPhoneOS.platform/DeviceSupport | |
| # Then restart Xcode and reconnect your devices. You will need to do that for every beta of future iOS versions | |
| # (A similar approach works for older versions too, just change the version number after DeviceSupport) |
I just put the finishing touches on my Raspberry Pi 3 emulation machine running RetroArch. I was not a huge fan of RetroPie due to the reliance on Emulation Station - more moving parts meant that there were more things that could potentially break. I just wanted something that would run raw RetroArch, no frills.
This tutorial is mostly recreated from memory and was most recently tested with a Raspberry Pi 3 running Raspbian Stretch and RetroArch 1.7.7. If there is a mistake or a broken link, PLEASE message me and I will fix it.
I used Raspbian Stretch Lite from this page. Write the image to your SD card using something like Win32 Disk Imager, or if you're using OSX/Linux follow a tutorial on how to write the image using dd.