# nicematrix で行列をよりナイスに書く
なんか,nicematrix パッケージを使えばいろんなことが出来ますという話.
## ○ 前提
amsmath パッケージとmathtools パッケージを利用することを前提とします.
- [amsmath \| CTAN](https://www.ctan.org/pkg/amsmath)
- [mathtools \| CTAN](https://www.ctan.org/pkg/mathtools)
行列環境を拡張的に書くために,nicematrix パッケージを利用します.
- [nicematrix \| CTAN](https://www.ctan.org/pkg/nicematrix)
nicematrix パッケージではl3key2e, array, amsmath, xparse, pgfcore (shapes of PGF) が読み込まれる.
注意が必要なのは,nicematrix パッケージではTikZ を読み込まないということである.読み込むのはTikZ の基盤となるPGF である.
それぞれの節で参照したパッケージガイドの見出しを出しているので,分からない場合はそちらを参照してください.
- The package nicematrix
- F. Pantigny
- October 18, 2021
- Version 6.3 of nicematrix
- 2021/10/18
### ■ nicematrix の概要
nicematrix パッケージでは,PGF を利用することでさまざまな行列を実現している.
nicematrix パッケージではよく行列内のドットについての記事があるが,行列環境に追加されている機能はこれ以外もさまざまある.
例えば以下のようなものがある.
- 長い省略のためのドット
- 線を引く
- 行と列にラベルを付ける
- 色を付ける
- 部分行列を挿入する
- 行列要素を囲む
nicematrix パッケージから提供される行列環境は以下のとおりである.
それぞれの先頭の"p" などはamsmath パッケージの行列環境と同等の命名規則にしたがっている.
| 括弧の種類 | amsmath | nicematrix | |
| :-----------------------: | :-----: | :---------: | :--------: |
| 括弧なし | matrix | NiceMatrix | NiceArray |
| 丸括弧 <br>(parenthesis) | pmatrix | pNiceMatrix | pNiceArray |
| 波括弧 <br>(bracket) | bmatrix | bNiceMatrix | bNiceArray |
| 角括弧 <br>(brace) | Bmatrix | BNiceMatrix | BNiceArray |
| 垂直棒 <br>(vertical bar) | vmatrix | vNiceMatrix | vNiceArray |
| 2重の垂直棒 | Vmatrix | VNiceMatrix | VNiceArray |
このパッケージから提供される環境は行列環境にとどまらず,NiceTabular 環境も提供されている.すなわち,表に関しても同じような操作が可能になっている.
ただし,これらは本記事では紹介しない.
また,XNiceArray 環境ではarray パッケージに由来する環境のプリアンブルオプションが利用可能になっている.
このオプションはblkarray パッケージに触発された`{(c)(c)(c)}` のような記述も可能になっている.
基本的な使用方法は,それぞれの環境にkey-value 形式でオプションを付与する.文書全体のオプションは`\NiceMatrixOptions` からkey-value 形式で指定することが出来る.
### ※ 注意点
いくつかの注意点がある.
- amsmath パッケージから提供される行列環境をすべてXNiceMatrix 環境に置き換えるべきではない (タイプセットが重くなるだけ)
- nicematrix パッケージから提供されるコマンドはnicematrix パッケージから提供される環境内のみで利用可能となっている
- 正しい出力を得るには,複数回のタイプセットが必要になる
以下のような警告がなくなるまでタイプセットを繰り返す.
```
Label(s) may have changed. Rerun to get cross-references right.
```
また,パッケージガイドは一読しておくと良いだろう.この記事ですべてを網羅的に紹介出来ているわけではない.
TikZ/PGF を利用するパッケージガイドあるあるだが,ページ数がべらぼうに多い.しかしながら,実際は50ページ程度であり,残りは実装されているコードが5分の4を占める.
## ○ 整列
> *cf.* The package nicematrix §13.2 Alignment option in {NiceMatrix}
mathtools パッケージから提供されるXmatrix\* 環境と同じように行列要素を右揃えや左揃えにすることが出来る.
```latex
\begin{equation}
\begin{bNiceMatrix}[r]
\cos x & - \sin x \\
\sin x & \cos x
\end{bNiceMatrix}
\end{equation}
```
## ○ 幅を整える
> *cf.* The package nicematrix §8 The width of the columns
デフォルトでは次のようになる行列を考えて見る.

`columns-width` からそれぞれの行列要素の幅を決めることが出来る.
```latex
\begin{equation}
\begin{pNiceMatrix}[columns-width = 1cm]
1 & 12 & -123 \\
12 & 0 & 0 \\
4 & 1 & 2
\end{pNiceMatrix}
\end{equation}
```

これには`auto` を持つことも出来る.
```latex
\begin{equation}
\begin{pNiceMatrix}[columns-width = auto]
1 & 12 & -123 \\
12 & 0 & 0 \\
4 & 1 & 2
\end{pNiceMatrix}
\end{equation}
```

## ○ 省略のためのドット
> *cf.* The package nicematrix §10 The continuous dotted lines
LaTeX デフォルトでは`\cdots`, `\vdots`, `\ddots` の3つが与えられている.これに対して,nicematrix パッケージでは`\Cdots`, `\Vdots`, `\Ddots` を提供している.
これらnicematrix パッケージから提供されているドットは複数の行列要素をまたぐ際に大きな効力を発揮する.
| ドットの方向 | デフォルト | nicematrix |
| :-------------------: | :--------: | :--------: |
| よこ <br>(crosswise) | `\cdots` | `\Cdots` |
| たて <br>(vertical) | `\vdots` | `\Vdots` |
| ななめ <br>(diagonal) | `\ddots` | `\Ddots` |
デフォルトでは各行列要素にコマンドをおく必要があるが,nicematrix では行や列に1つコマンドを置くだけで必要な長さのドットが引かれるようになる.
> `\cdots` を複数利用する
```latex
\begin{equation}
D
=
\begin{pmatrix}
h & i & j & k & l & m \\
x & \cdots &\cdots &\cdots &\cdots & x
\end{pmatrix}
\end{equation}
```
> `\Cdots` を利用する
```latex
\begin{equation}
D
=
\begin{pNiceMatrix}
h & i & j & k & l & m \\
x & \Cdots & & & & x
\end{pNiceMatrix}
\end{equation}
```
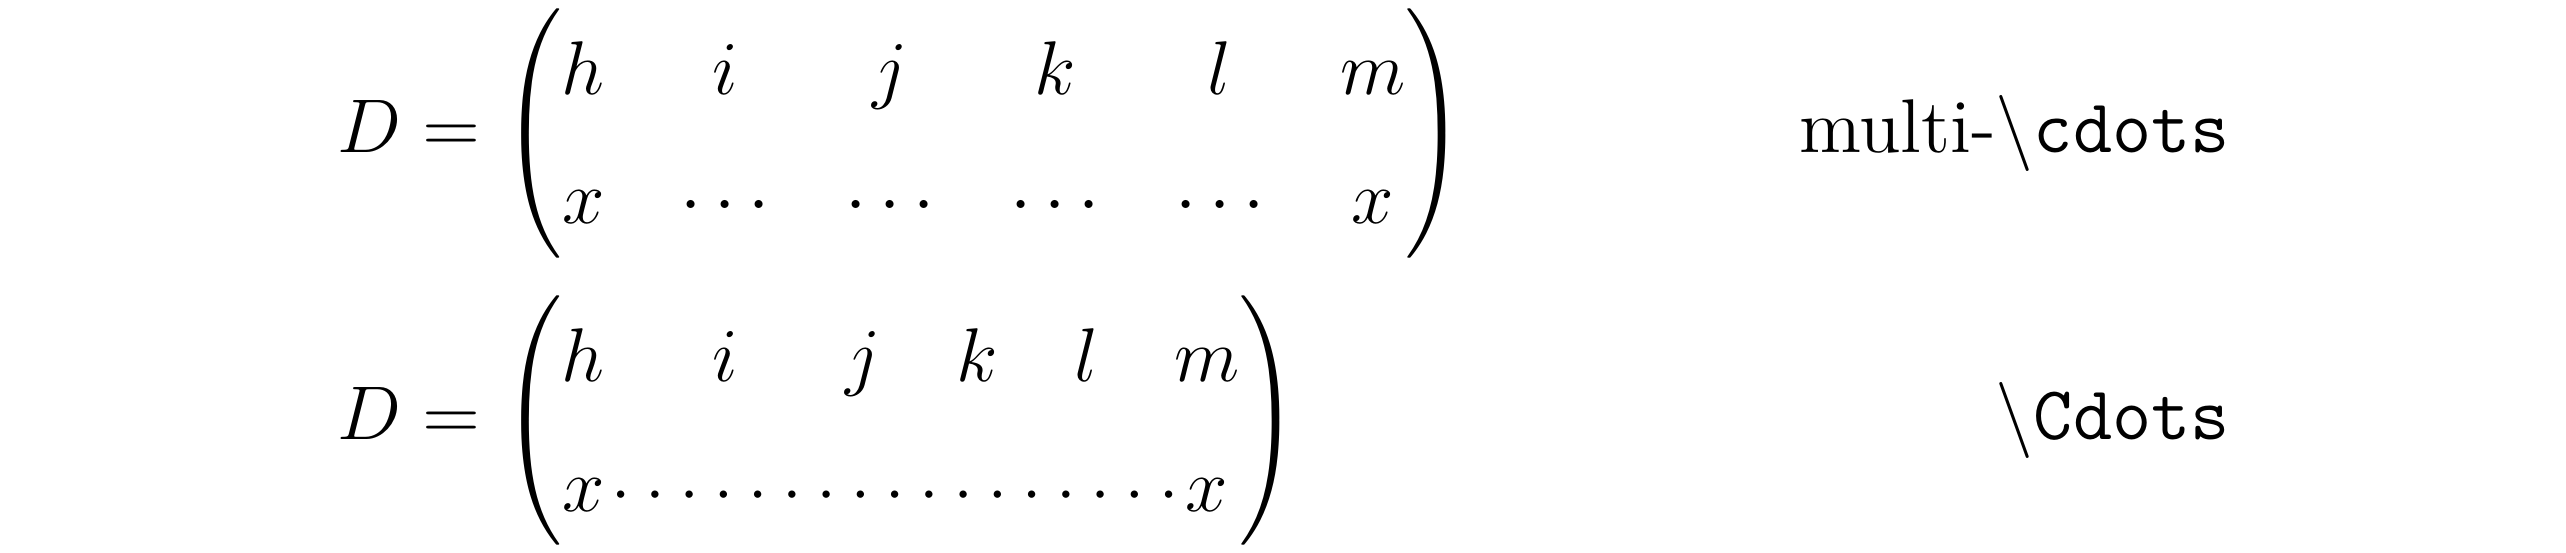
ただし,これを利用する場合,要素の幅が少しだけ広く使われる.
nicematrix パッケージではこれに`nullify-dots` オプションを有効にすることでタイトなものになる.
```latex
\begin{equation}
D
=
\begin{pNiceMatrix}[nullify-dots]
h & i & j & k & l & m \\
x & \Cdots & & & & x
\end{pNiceMatrix}
\end{equation}
```

nicematrix パッケージで提供されているこれらのコマンドに続けて`\Ddots[color=red]` からドットに色を付けることも出来る.(*cf.* §10 The continuous dotted lines)
また,`\Ddots^{n \text{ times}}` などするとドットの上下に文字を挿入することも出来る.(*cf.* §10.4 The labels of the dotted lines)
また,amsmath パッケージには`\hdotsfor` コマンドがあるが,これと似た`\Hdotsfor` コマンドが用意されている.これは,`\Cdots` を`nullify-dots` を有効にして利用する場合と同じようになる.(*cf.* §10.1 The option nullify-dots)
> `\hdotsfor` を利用する
```latex
\begin{equation}
D
& =
\begin{pmatrix}
h & i & j & k & l & m \\
x & \hdotsfor{4} & x
\end{pmatrix}
\end{equation}
```
> `\Hdotsfor` を利用する
```latex
\begin{equation}
D
& =
\begin{pNiceMatrix}
h & i & j & k & l & m \\
x & \Hdotsfor{4} & x
\end{pNiceMatrix}
\end{equation}
```
これと同様のコマンドの`\Vdotsfor` も提供されている.
(*cf.* §10.2 The commands `\Hdotsfor` and `\Vdotsfor`)
## ○ 行列内に線を引く
nicematrix パッケージから提供される環境を利用する.
> *cf.* The package nicematrix
> §5.2 The thickness and the color of the rules,
> §5.3 The tools of nicematrix for the rules
- `vlines`: 縦線
- `hlines`: 横線
- `rules/width`: 線の幅
横線は行列中で`\Hline` を利用しても良い.
また,このとき`margin` オプションも利用しておく.これによって,横線が左右の括弧と重なるようことを防ぐことが出来る.
場合によっては突き抜ける.
次のように利用する.
```latex
\begin{equation}
\begin{pNiceMatrix}[vlines=2,hlines=3,margin]
1 & 2 & 3 & 4 & 5 & 6 \\
1 & 2 & 3 & 4 & 5 & 6 \\
1 & 2 & 3 & 4 & 5 & 6
\end{pNiceMatrix}
\end{equation}
```

引かれる線が何番目の線に対応しているのか注意してほしい.
<details>
<summary>array 環境で代替する (折りたたみ)</summary><div><br>
実は,array 環境を利用すれば,同じように作成することが出来る.
しかしながら,いくつかの点でnicematrix パッケージを利用した方が簡便に書くことが出来ると思われる.
```latex
\begin{equation}
\left(
\begin{array}{ccccc|c}
1 & 2 & 3 & 4 & 5 & 6 \\
\hline
1 & 2 & 3 & 4 & 5 & 6 \\
1 & 2 & 3 & 4 & 5 & 6
\end{array}
\right)
\end{equation}
```
NiceArray 環境を利用することでもarray 環境と同じように記述することが出来るものの,上のように環境のオプションとして線を引く方が簡便のように思われる.array 環境のように列数分の横配置を指定するのも面倒である.
ただし,破線にしたい場合にはarray 環境やNiceArray 環境を利用する必要があるようだ.
</div></details><br>
線の太さを変更する場合には,`rules/width` を使って変更する.
また,線の色は`rules/color` を使って変更することが出来る.
```latex
\begin{equation}
\begin{pNiceMatrix}[vlines=6,hlines=2,rules/width=0.2pt,margin]
1 & 2 & 3 & 4 & 5 & 6 \\
1 & 2 & 3 & 4 & 5 & 6 \\
1 & 2 & 3 & 4 & 5 & 6
\end{pNiceMatrix}
\end{equation}
```

複数の線を引きたい場合には,`vlines={2,4}` などとすれば良い.
また,線の色やスタイルを変更することも可能である.
## ○ 行や列にラベルを付ける
nicematrix パッケージから提供される環境を利用する.
> *cf.* The package nicematrix §9 The exterior rows and columns
次のオプションを利用することで,XNiceMatrix 環境外部の行と列を構成することが出来る.
- `first-row`: 行の上側
- `last-row`: 行の下側
- `first-col`: 列の左側
- `last-col`: 列の右側
例えば,次のような行列を試してみる.
```latex
\begin{equation}
\begin{pNiceMatrix}[first-row,last-row,first-col,last-col,nullify-dots]
& C_1 & \Cdots & & C_4 & \\
L_1 & a_{11} & a_{12} & a_{13} & a_{14} & L_1 \\
\Vdots & a_{21} & a_{22} & a_{23} & a_{24} & \Vdots \\
& a_{31} & a_{32} & a_{33} & a_{34} & \\
L_4 & a_{41} & a_{42} & a_{43} & a_{44} & L_4 \\
& C_1 & \Cdots & & C_4 &
\end{pNiceMatrix}
\end{equation}
```

XNiceMatrix 環境内に行列の外のラベルを記すので,実際の整列や改行の数が異なるようになることに注意が必要である.
これらの周囲に配置された文字の装飾を行うことも可能である.(`code-for-`)
### ■ 行の数と列の数
> *cf.* §17.4 Dotted lines which are no longer dotted
`\Xdots` に`line-style={solid,<->}` オプションを与えると矢印になる.
これを利用して以下のようなことが出来る.見やすさのために`&` を揃えたが,余計に見づらいかも.
```latex
\begin{equation}
\begin{pNiceMatrix}[first-row,first-col]
& \Ldots[line-style={solid,<->},shorten=0pt]^{n \text{ columns}}
& & \\
\Vdots[line-style={solid,<->}]_{4 \text{ rows}}
& a_{11} & \Cdots & a_{1n} \\
& \Vdots & \hspace*{2cm} & \Vdots \\
& a_{41} & \Cdots & a_{4n} \\
\Vdots[line-style={solid,<->}]_{5 \text{ rows}}
& b_{51} & \Cdots & b_{5n} \\
& \Vdots & \hspace*{2cm} & \Vdots \\
& b_{91} & \Cdots & b_{9n}
\end{pNiceMatrix}
\end{equation}
```
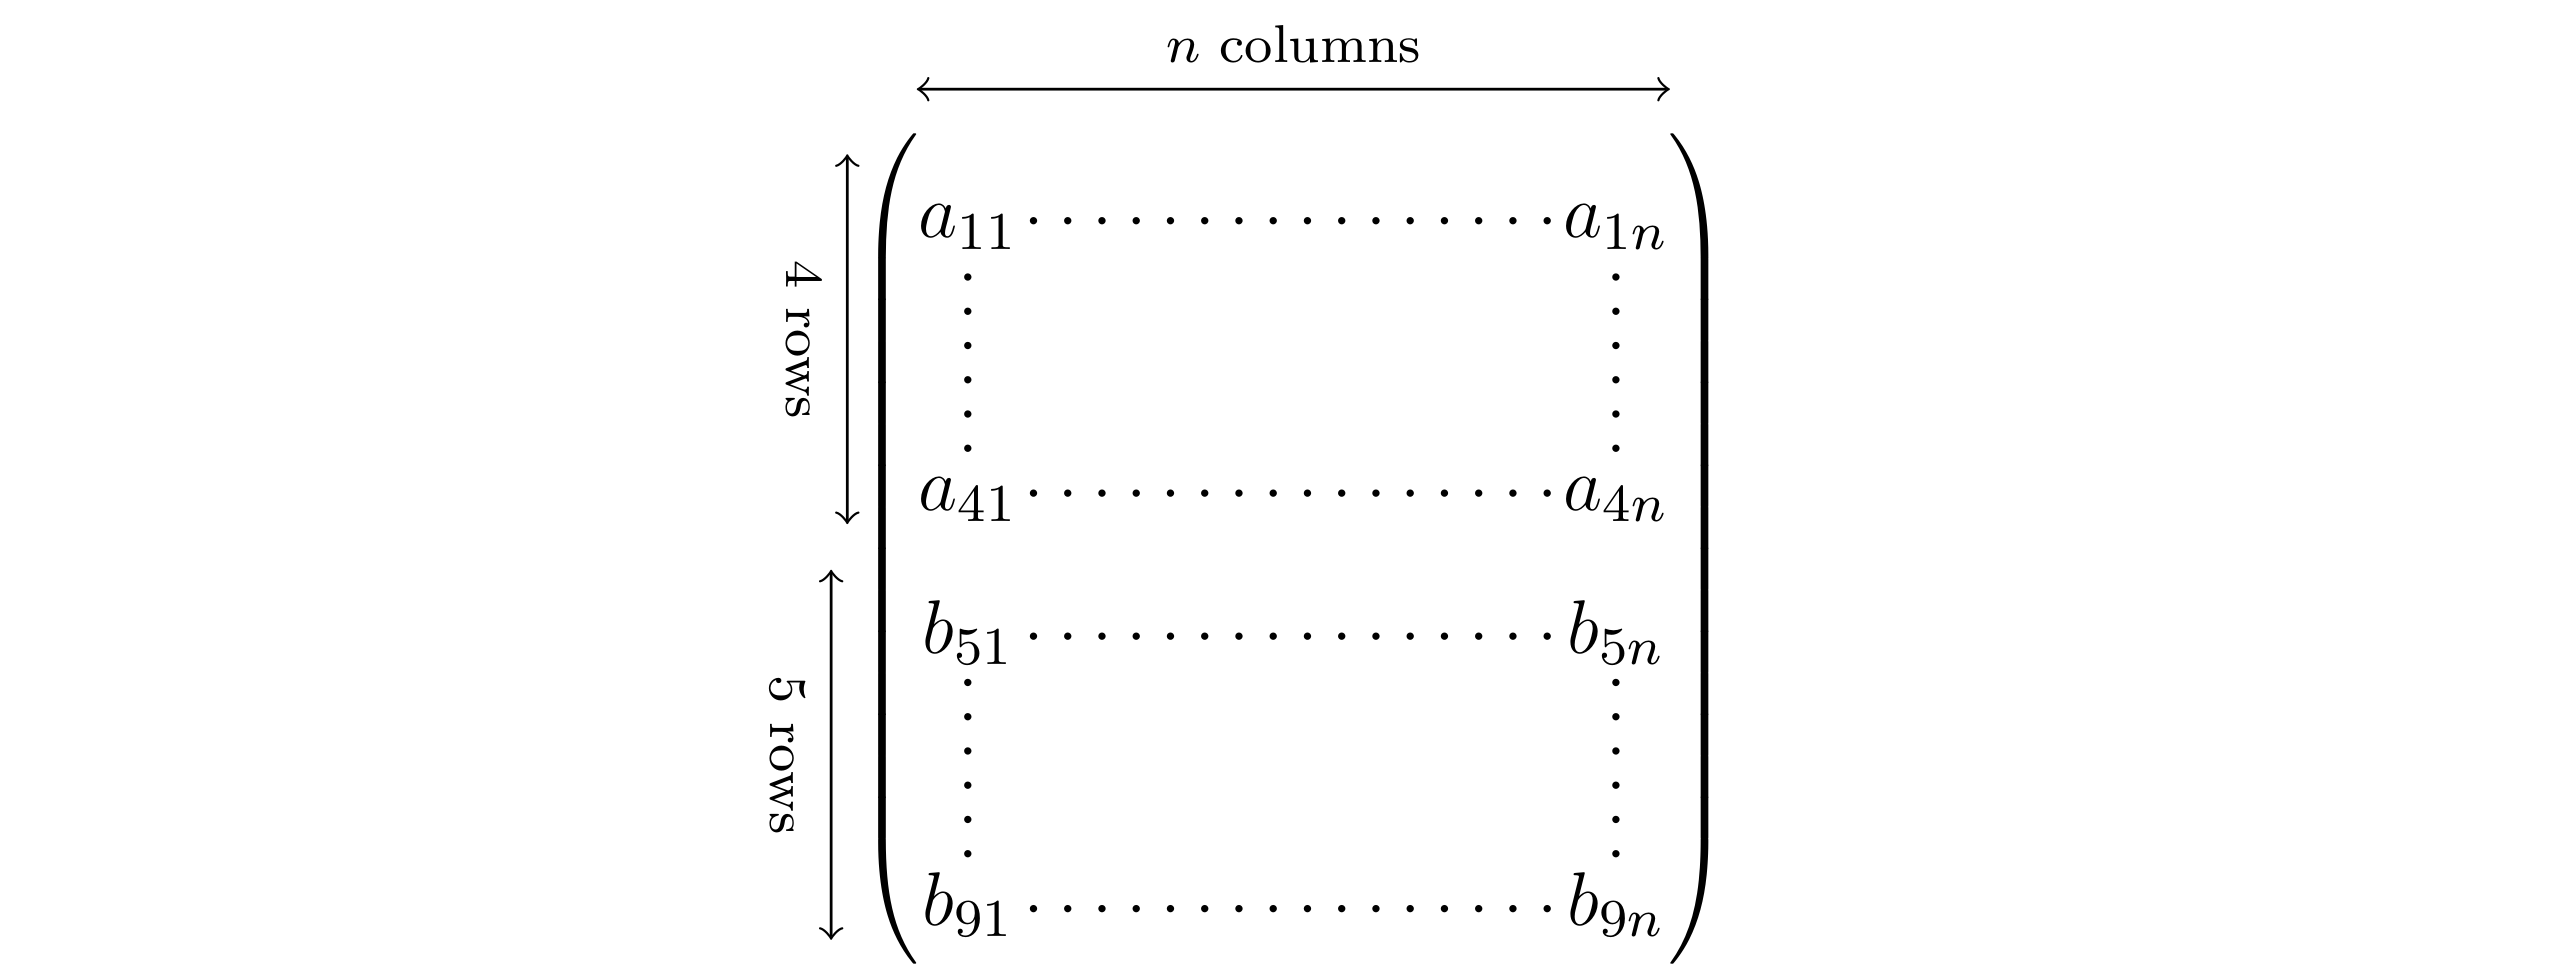
縦向き矢印がなぜか若干ズレてしまう.
## ○ 部分行列を挿入する
> *cf.* The package nicematrix §11.2 The command `\SubMatrix` in the `\CodeAfter`
`\CodeAfter` のあとで`\SubMatrix` を使う.
`\SubMatrix` によって部分行列となる箇所を括弧で囲うことが出来る.
以下の具体例から使い方を見てみよう.
```latex
\begin{equation}
\begin{NiceArray}{ccc@{\hspace{1.5em}}c}[cell-space-limits=2pt,margin]
1 & 1 & 1 & x \\
\frac{1}{4} & \frac{1}{2} & \frac{1}{4} & y \\
1 & 2 & 3 & z
\CodeAfter
\SubMatrix({1-1}{3-3})
\SubMatrix({1-4}{3-4})
\end{NiceArray}
\end{equation}
```

ここでは*NiceArray* 環境を利用していることに注意したい.ただし,これは2つのpmatrix 環境を並べても同じことが再現できるだろう.(この場合は,むしろpmatrix の方が簡単)
あるいは,次のようなことも出来る.
(このようなことは,matrix 環境内でmatrix 環境を利用しても上手くいかない)
```latex
\begin{equation}
\begin{bNiceMatrix}[right-margin=1em]
1 & 1 & 1 \\
1 & a & b \\
1 & c & d
\CodeAfter
\SubMatrix[{2-2}{3-3}]^{T}
\end{bNiceMatrix}
\end{equation}
```

`\SubMatrix` に続くデリミタが部分行列の括弧に対応する.また,`{2-2}{3-3}` は(2,2) 成分から(3,3) 成分までを示している.
これらを囲う`[]` によって部分行列が囲われていることに注意してほしい.
`\SubMatrix` の記述の正式な方法は`\SubMatrix{[}{2-2}{3-3}{]}` であり,1番目と4番目の引数が部分行列を囲うデリミタに対応している.
また,これに続けてkey-value のオプションを付与することが出来る.そのため,`\SubMatrix` が採れる引数の数は最大5つ最小4つである.(*cf.* §11.2 The command `\SubMatrix` in the `\CodeAfter`)
したがって,`\SubMatrix` の片側のデリミタを表示させないようにするには`.` を用いて,`\SubMatrix{.}{1-3}{3-3}{\rbrace}` などとすれば良い.
また,次のような芸当も可能である.
```latex
\begin{equation}
\begin{NiceArray}{cc@{\hspace{5mm}}l}[cell-space-limits=2pt]
& & \frac{1}{2} \\
& & \frac{1}{4} \\
a & b & \frac{1}{2}a + \frac{1}{4}b \\
c & d & \frac{1}{2}c + \frac{1}{4}d \\
\CodeAfter
\SubMatrix({1-3}{2-3})[slim]
\SubMatrix({3-1}{4-2})
\SubMatrix({3-3}{4-3})
\end{NiceArray}
\end{equation}
```

ここで,`slim` オプションを付けることで行列がスリムになっていることに注意してほしい.
このオプション無しでは,デリミタの幅が下の行列と同幅となってしまう.
また,ここで出てきた`\CodeAfter` はこの後ろでtikzpicture 環境を利用することも出来る.
### ■ ブロック
> *cf.* The package nicematrix §4.1 General case
`\Block` を利用すると,部分行列を1つの文字で表現できるようになる.
```latex
\begin{equation}
\begin{pNiceMatrix}[vlines=4,hlines=4,margin]
\Block{3-3}{A} & & & 0 \\
& \hspace*{1cm} & & \Vdots \\
& & & 0 \\
0 & \Cdots & 0 & 0
\end{pNiceMatrix}
\end{equation}
```

ちなみに,この状況であれば,`vlines=4,hlines=4` を`hvlines` と置き換えても同じような結果を得る.(*cf.* §10.6 The dotted lines and the rules)
`\Block` の基本的な使用方法は以下のようである.
```latex
\Block[position]{row-col}<size>{Matrix}
```
`[position]` と`<size>` はオプションになっている.
| 引数 | 説明 |
| :----------: | :-------------------------------------------------------- |
| `[position]` | `[r]`, `[c]`(デフォルト) , `[l]` のいずれかを採る |
| `row-col` | `\Block` が置かれた位置から支配する行列の大きさを指定する |
| `<size>` | `<\Large>` などとして装飾が出来る |
したがって,`\Block[r]{3-3}<\Large>{A}` などとすることが出来る.
## ○ 行列要素を囲む
`\Block` コマンドを利用すればある程度行列要素を囲むようにすることも出来る.
`\Block[draw,rounded-corners,color=red]{row-col}{}` とすることで,赤線で囲うことが出来る.
以下に例を示しておく.
```latex
\begin{equation}
m =
\begin{pNiceMatrix}[margin]
1 & \Cdots & \Block[draw,rounded-corners,color=red]{*-1}{}3 \\
\Vdots & & \Vdots \\
4 & \Cdots & 5
\end{pNiceMatrix}
\end{equation}
```

`row-col` では`*` を使うことでn行1列を囲うようにしている.
また,2つ目の`{}` には引数を挿入しない.
対角成分をそれぞれ`\Block` で囲えば,次のようになる.
```latex
\begin{equation}
\begin{pNiceArray}{>{\strut}cccc}[margin,rules/color=blue]
\Block[draw]{}{a_{11}} & a_{12} & a_{13} & a_{14} \\
a_{21} & \Block[draw]{}{a_{22}} & a_{23} & a_{24} \\
a_{31} & a_{32} & \Block[draw]{}{a_{33}} & a_{34} \\
a_{41} & a_{42} & a_{43} & \Block[draw]{}{a_{44}}
\end{pNiceArray}
\end{equation}
```

対角成分を滑らかに1つの四角で囲いたい場合には,TikZ を読み込んで`\CodeAfter` の後でtikzpicture 環境を利用することで実現するだろう.
> *cf.* [matrices - Rectangle box around elements of matrix - TeX - LaTeX Stack Exchange](https://tex.stackexchange.com/questions/522507/rectangle-box-around-elements-of-matrix)
>
> *Answer* https://tex.stackexchange.com/a/522509
<!--
Like this?
[![Output of the first code][1]][1]
With use of `nicematrix ` package you obtain above result after two compilation ot he following MWE:
```latex
\documentclass{article}
\usepackage{nicematrix}
\begin{document}
\[
\begin{bNiceArray}{>{\strut}llll}[margin=3mm]
\Block[draw=red]{}{1} & 2 & 3 & 4 \\
1 & \Block[draw=red]{}{2} & 3 & 4 \\
1 & 2 & \Block[draw=red]{}{3} & 4 \\
1 & 2 & 3 & \Block[draw=red]{}{4} \\
\end{bNiceArray}
\]
\end{document}
```
or like this:
[![enter image description here][2]][2]
```latex
\documentclass{article}
\usepackage{nicematrix,tikz}
\usetikzlibrary{fit}
\begin{document}
\[
\begin{bNiceArray}{>{\strut}cccc}[margin,extra-margin = 1pt]
1 & 2 & 3 & 4 \\
1 & 2 & 3 & 4 \\
1 & 2 & 3 & 4 \\
1 & 2 & 3 & 4 \\
\CodeAfter
\begin{tikzpicture}
\node [draw=red, rounded corners=2pt, inner ysep = 0pt,
rotate fit=-38, fit = (1-1) (4-4) ] {} ;
\end{tikzpicture}
\end{bNiceArray}
\]
\end{document}
```
[1]: https://i.stack.imgur.com/GUXfW.png
[2]: https://i.stack.imgur.com/AOCQ6.png -->
もちろん手動で適宜調整する必要があるため,ちょっと面倒くさい.
行列要素に囲み線が重ならないように作ろうと思うと骨が折れるかもしれない.また,TikZ に関する知識も少し必要になる.
## ○ ハイライトを付ける
> *cf.* The package nicematrix §17.6 How to highlight cells of a matrix
>
> *cf.* TikZ & PGF Manual for Version 3.1.9a §54 Fitting Library
TikZ とfit ライブラリを利用すればハイライトを付けることも出来る.
プリアンブルで次のようにする.
例としてそれぞれ行を赤,列を青,対角成分を緑として決めている.
```latex
\usepackage{nicematrix}
\usepackage{tikz}
\usetikzlibrary{fit}
\tikzset{
rowHighlight/.style = {
rectangle, % 長方形
fill = red!50, fill opacity = 0.5, % 塗りつぶし赤50%,透明度50%
rounded corners = 0.5 mm, % 角の丸み
inner sep = 1pt, % 中のテキストとの間隔
fit = #1,
},
colHighlight/.style = {
rectangle,
fill = blue!50, fill opacity = 0.5,
rounded corners = 0.5 mm, inner sep = 1pt,
fit = #1,
},
diagonalHighlight/.style = {
rectangle,
fill = green!30, fill opacity = 0.5,
rounded corners = 0.5 mm, inner sep = 1pt,
rotate fit = -20, % 四角を左回り20度回転
fit = #1,
},
}
```
`\CodeBefore` と`\Body` の間にtikzpicture 環境を利用することが出来る.
ここでハイライトを設定する.
(`\CodeAfter` 以降でtikzpicture 環境を利用するとハイライトと行列の文字の順序が逆になる)
```latex
\begin{equation}
\begin{pNiceArray}{ccc}[last-col, create-medium-nodes]
\CodeBefore [create-cell-nodes]
\begin{tikzpicture} [name suffix = -medium]
\node [rowHighlight = (1-1) (1-3)] {} ; % fit highlight
\node [rowHighlight = (3-1.west) (3-3.east)] {} ; % thin line
\node [colHighlight = (1-1) (3-1)] {} ; % fit highlight
\node [colHighlight = (1-2.north) (3-2.south)] {} ; % thin line
\node [diagonalHighlight = (1-1.west) (3-3.south)] {} ; % thin line
\end{tikzpicture}
\Body
a_{11} & a_{12} + b_{12} & a_{13} + b_{13} + c_{13} & L_1 \\
a_{21} & a_{22} & a_{23} + b_{23} & L_2 \\
a_{31} & a_{32} & a_{33} & L_3
\end{pNiceArray}
\end{equation}
```

あるノードを次のように示した場合,それぞれは表のような意味を成している:
`\node [styleName = (cell_s) (cell_f)] {} ;`
| | 説明 |
| :---------: | :------------------------------ |
| `styleName` | `\tikzset` で設定したスタイル名 |
| `cell_s` | ハイライトの開始成分 |
| `cell_f` | ハイライトの終了成分 |
`.north` や`.south` などの東西南北によって行列要素の上下左右のアンカーを指定することで,細いハイライトにすることも出来る.
また,対角成分にハイライトを付ける場合には少し気を付ける必要がある.行と列には自動的に上手く対応しているが,対角成分には自動的に上手く対応出来ていない.
今回,対角成分のハイライトは`diagonalHighlight` によってスタイルを決めている.ここで`rotate fit = <angle>` オプションによって手動で調整することになる.`<angle>` は度数法による角度を指定する.もちろん,これにはそれぞれの行列でスタイルを変更する必要がある.
(と言うか,スタイルとして定義しない方が良いかもしれない)
TikZ のmatrix ライブラリなどを使えばもっとすごい行列のハイライトも可能.
> *cf.* [matrices - How to scale a TikZ matrix? - TeX - LaTeX Stack Exchange](https://tex.stackexchange.com/questions/467657/how-to-scale-a-tikz-matrix/467703#467703)
>
> *Ansewer* https://tex.stackexchange.com/a/467703
## ○ その他に出来ること
行列に関して有用な見出しをピックアップしてみた.
興味があれば.
- §6.2 The tools of nicematrix in the `\CodeBefore`
- 行列要素に色付けする
- §10.5 Customisation of the dotted lines
- 省略のためのドットを装飾する
- §13.3 The command `\rotate`
- `first-col` などの要素を回転させる
- §13.4 The option small
- `small` オプションからsmallmatrix 環境のようにする
- §13.5 The counters iRow and jCol
- `first-col` や`last-row` などでカウンタを利用する
- §13.6 The option `light-syntax`
- `light-syntax` オプションからspalign パッケージと同じような軽量記法による記述をすることも出来る
- §13.7 Color of the delimiters
- 括弧の色を変更する
- §13.8 The environment `{NiceArrayWithDelims}`
- 任意の括弧で行列を囲む
- §14 Use of Tikz with nicematrix
- TikZ を利用して行列要素を囲う/網掛けを行う
§17 Examples ではさまざまな例を見ることが出来る.ここだけ見ていても面白いだろう.
逆に,現状TikZ なしで難しいことは以下のようなことだった.
- 対角行列を囲む/網掛け を行う
- 行列の外で波括弧を用いて部分的にコメントを挿入する (`\underbrace` のようなこと)
<details>
<summary>波括弧でコメントを挿入する (折りたたみ)</summary><div><br>
悪い使い方をするならば,見た目をそれっぽくできる.
次のように行列外の右側で左向き波括弧を用いてコメントを挿入するように見せることも出来る.
> *cf.* https://tex.stackexchange.com/a/616656
```latex
\begin{equation}
A =
\begin{NiceArray}{(ccc)@{\qquad}l}[nullify-dots]
a1 & \Cdots & aN & \\
b1 & \Cdots & bN & \\
\Vdots & \hspace*{1cm} & \Vdots & n_1 \text{ times}\\
z1 & \Cdots & zN \\
\CodeAfter
\SubMatrix{.}{2-3}{4-3}{\rbrace}[xshift=3mm]
\end{NiceArray}
\end{equation}
```

</div></details><br>
# 参考
- [The package 'nicematrix'](https://ftp.jaist.ac.jp/pub/CTAN/macros/latex/contrib/nicematrix/nicematrix.pdf) [PDF]
- [matrices - Rectangle box around elements of matrix - TeX - LaTeX Stack Exchange](https://tex.stackexchange.com/questions/522507/rectangle-box-around-elements-of-matrix)
# 余談
kbordermatrix パッケージやblkarray パッケージを利用した解決法を多数見かけるが,nicematrix パッケージでも同じようなことが出来る.
筆者はTikZ があまり得意ではないので極力使いたくはないが,nicematrix パッケージくらいの使い勝手はちょうど良いと感じる.
なんかいっぱいできてスゴイ!!