Configuring Android Studio with Kotlin
-
-
Save Bhavdip/259088e0f5745e1a3bb9a4db85357acc to your computer and use it in GitHub Desktop.
Variables
In kotlin, we have two types of variables: var or val.
The first one, var is a mutable reference (read-write) that can be update after initialization.
The var keyword is used to define variable in kotlin. It is equivalent to a normal (non-final) java variable.
If our variable needs to change at some point, we should declare it using var keyword.
fun main(args: Array<String>){
  var fruitName = "orange"
   fruitName = "bannan"
}
val keyword is equivalent of a java variable with the final modifier. Using immutable variables is useful. it make sure that variable will never be updated by mistake. The concept is very helpful for working with multiple threads without worrying about proper synchronization.
fun main(args: Array<String>){
  val fruitName : String = "orange"
   fruitName = "bannan" //error
}
Strict Null safety
Strict Null safety is part of kotlin type system. By default regular type cannot be null.(can't store null references) unless they explicitly allowed. To store null references, we must variable as nullable( allow it to store null references) by adding question mark suffix to variable type declaration.
val age : Int = 1 // Compiler will thrown error because this type does not allow null.
val age : string? = null // Compiler will allow assigned null because type is marked as nullable using question mark suffix.
We are not allow to call method on a potentially nullable object, unless nullity check is performed before a call:
val name : String? = null
..
..
name.upperCase() // error, these reference may be null
Elivs operator
The Elivs operator is represented by a question mark followed by colon (?:) and has such syntax:
first operand ?: second operand
The elvis operator works follows: if first operand is not null, then this operand will be returned, otherwise second operand will be returned.
Note that the right hand side expression is evaluated only if left-hand side is null.
val correct = quiz.currentQuestion?.answer?.correct ?: false
Android Studio 3.x

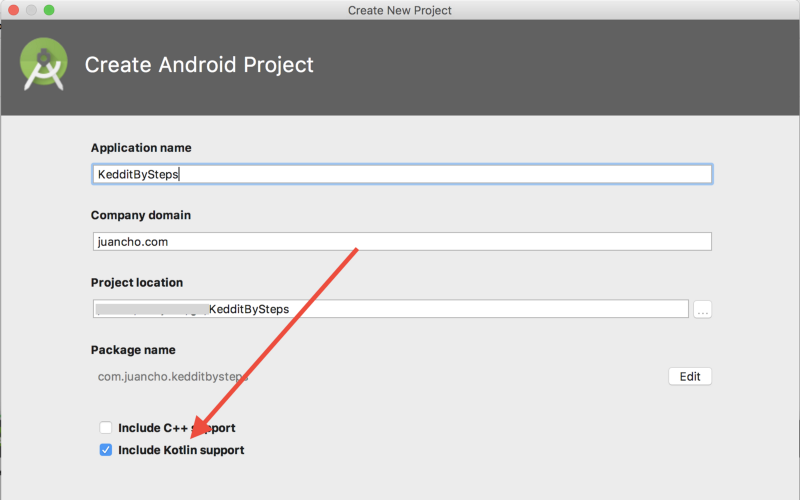
In Android Studio 3.0 the plugin is already built-in there and while creating the new project you just have to make sure to check “Include Kotlin support” and the complete project will just support Kotlin from the beginning without requiring you any extra steps:
_
Android Studio 2.x
If you are using with Android studio 2.x then you can download the kotlin plugin by browsing plugins.
Kotlin Plugin
Android Studio Pref > Plugins > Browse Repositories > search for “Kotlin”Install only the Plugin called “Kotlin” and restart Android StudioThere are other Kotlin plugins but we only need this one as the Kotlin Extensions Plugin was already integrated in the first plugin so we are OK with this one.
Note Updated: Now you can use Android Studio 2.0 that was released with the Kotlin Plugin.
Configure Project with Kotlin — “first attempt”
If you already read something on how to configure Kotlin, maybe you feel tempted to execute the plugin action to “Configure Kotlin in Project” which is accessible from Tools > Kotlin or by Android Studio Find Actions (pressing Shift button twice) and searching for “Configure Kotlin…” like in this image:
Configure Project with Kotlin — “Last one :)”
Now we are ready to configure it. Let’s run again the “Configure Project with Kotlin” action:
A new message will appear allowing us to select which modules we would like to convert and also the Kotlin plugin version that we want to use (just pick the latest one in this case).
You will notice that the build.gradle file from your module was updated. It will have new configurations like this:
Original source : https://android.jlelse.eu/learn-kotlin-while-developing-an-android-app-part-1-e0f51fc1a8b3