- Local Use
- Remote Use
Git is a system to use that helps track and save changes made to a file or a project. Files can range from anything to simple text, to videos and photos, to pages of software code. For students of Turing, we are given a Mac, so here I will be discussing how to use the Mac Terminal to perform git actions locally. There are several important functions of git to understand:
git initgit initis the command to tell git to start tracking a particular file. Once initialized, git can then track everything within the directory. In the terminal, it will look like this:
dustinmikusko~/guide_to_git$ git init
Initialized empty Git repository in /Users/dustinmikusko/guide_to_git/.git/
get statusgit statusshows you what git is trtacking and the current status of the files. This command can be typed anytime, whenever and wherever, as it does not change anyting about your tracking.
git add <filename>git add <filename>is the command that adds a file to the staging area. Think of this as putting something into a box, but not sealing the box yet. You can still remove the item from the box. The terminal should look like this:
As seen here, both thedustinmikusko~/guide_to_git$ git add sample_file.txt dustinmikusko~/guide_to_git$ git status On branch master No commits yet Changes to be committed: (use "git rm --cached <file>..." to unstage) new file: sample_file.txtgit addandgit statuswere used. Thesample_file.txthas been added to the staging area, but not committed to be saved yet.git commit -m <Message>git commitis the "save" function. This tells git to take a snapshot of what this file looks like right now. You can take several snapshots along the way for projects so as to see changes and progress. When committing, you want to add a message detailing what was added/changed, and why. It is good practice to use "Initial Commit" on the first commit for each repository. It will look like this in the terminal:
dustinmikusko~/guide_to_git$ git commit -m "Initial Commit"
[master (root-commit) 195774b] Initial Commit
 1 file changed, 0 insertions(+), 0 deletions(-)
 create mode 100644 sample_file.txt
dustinmikusko~/guide_to_git[master]$ git status
On branch master
nothing to commit, working tree clean
dustinmikusko~/guide_to_git[master]$
git diffgit diff <filename>shows any changes made to a file since the last commit. If you wish to commit these changes, follow thegit addandgit commitcommands as before.
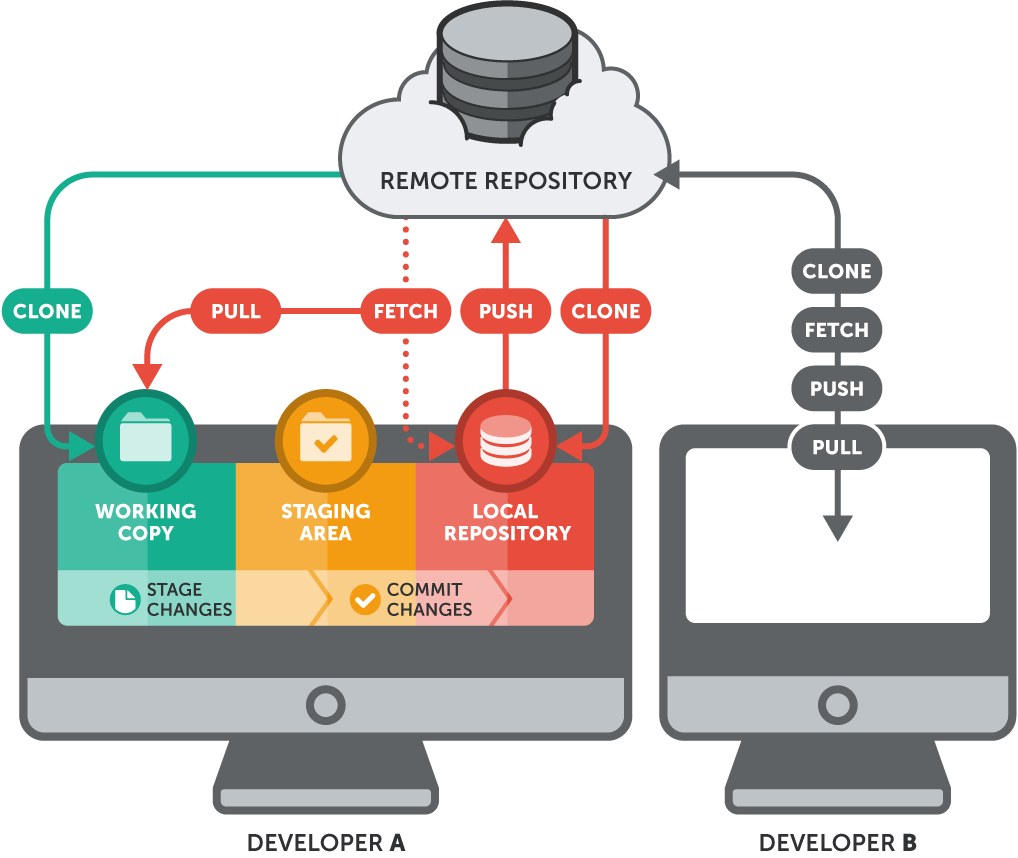
Using git with remote repositories (GitHub being the most popular, and the one discussed here) is vital to a team of developers working on the same project. GitHub serves as a cloud service that stores all the changes and info made along the way in a project, allows each member of the team to have access and make changes to the project, all in basically real-time. This is the process:
- Git origin is the URL where the code is hosted on GitHub. Each repo will have its own origin URL.
- Git pull is what a user would do to download all of the changes and updates on the repo that aren't currently stored on the user's local repo. This is done after a teammate makes a change to the code and you want to bring those changes into your own code.
- Git push is how you share/update changes you've made to the code back to the GitHub remote repo, so other teammates have access to it as well. The image below offers a visual reprensentation of the GitHub workflow: