WSA or Windows Subsystem for Android is a Tool that allows Windows to run Android Apps directly without using any emulator. The problem is Windows Subsystem for Android is currently only available through preview via the Beta Channel of the Windows Insider Program. But if you follow my guide, you don't have to be in Windows Insider Program to try it out. The only thing you need is Windows 11 installed and some patience.
- Windows Subsystem for Android or WSA must be Installed.
Click here to view the guide that shows how to install Windows Subsystem for Android in any Edition of Windows 11 (including Windows 11 Home) non Inider or stable release.
- First install Windows Subsystem for Android. Click here to know how to do that.
- Search and run
Windows Subsystem for Android Settingfrom Windows start menu. - The window shown in the screenshot below will appear. There, click on the icon in the extreme left side of the Files box. This will start Windows Subsystem for Android and open the
File ManagerApp in Android. This can take some time so be patient.
- Keep
File Managerrunning otherwise Windows Subsystem for Android will terminate itself. - Enable
Optional Diagnostic DataandDeveloper modeinWindows Subsystem for Android SettingWindow and click theRefreshbutton in theIP addressSection. - Click here to download the latest version of adb and extract the downloaded zip file.
- Inside the extracted folder, there should be a file named
adb.exealong with a plenty of other files. - Put the apk files of the Android apps that you want to install in this folder, and rename them to names that are easier to remember.
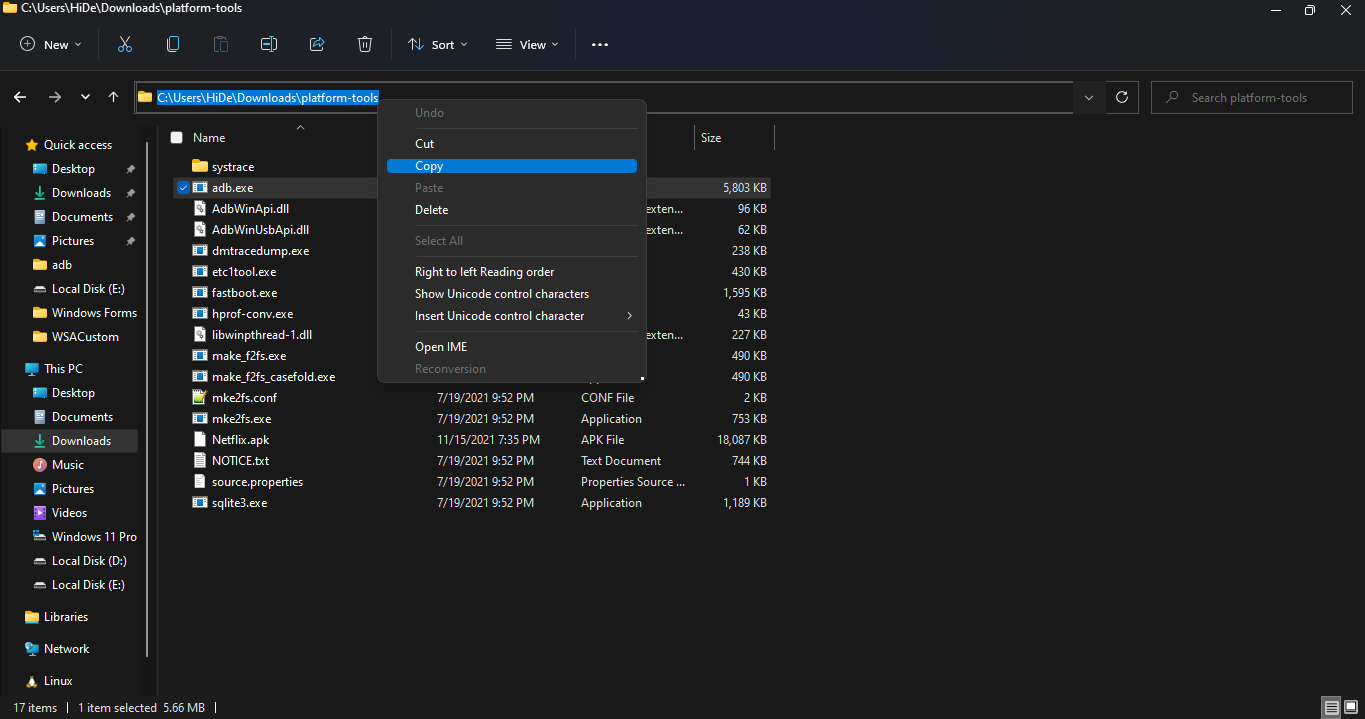
- Copy the path of this folder from the pathbox in Windows File Explorer as shown in the screenshot below:

- Search for
Command Promptin Windows Start Menu and Open it. - Type
cd ""in the command prompt. Inside those"", paste the copied path by pressingCtrl + V. The windows should look something like the below screenshot. Then pressEnter.
- Now, type
adb connect 127.0.0.1:58526in the Command Prompt Window. PressEnterand wait for the connection. - Once connected, type
adb install "name.apk"in the Command Prompt. Replacenamewith the name of the apk file that you want to install and pressEnter. After successful install, the installed App will appear in Windows Start Menu. Repeat this step for all the apk files that you want to install and they will appear in Windows Start Menu as well.

How to Install Wink Video Editor APK on Windows 11 Using Windows Subsystem for Android (WSA)
Windows Subsystem for Android (WSA) enables you to run Android apps on Windows 11 seamlessly. If you're interested in video editing, you can install the Wink Video Editor APK using this method. Follow these steps:
Step 1: Install Windows Subsystem for Android (WSA)
Ensure that WSA is installed on your Windows 11 system. If you haven’t set it up yet, follow a guide to install and configure it properly.
Step 2: Prepare the APK
Download the Wink Video Editor APK from a reliable source like winkmodapk.pro, APKPure, or APKMirror.
Place the APK file in a folder along with adb.exe from the latest version of ADB.
Step 3: Set Up WSA
Open Windows Subsystem for Android Settings from the Start menu.
Enable Optional Diagnostic Data and Developer Mode.
Click the Refresh button under the IP address section.
Open the File Manager in WSA and keep it running.
Step 4: Install the APK
Open Command Prompt and navigate to the folder containing the APK and adb.exe using:
bash
Copy
Edit
cd "path_to_folder"
(Replace path_to_folder with the actual folder path.)
Connect to WSA by entering:
nginx
Copy
Edit
adb connect 127.0.0.1:58526
Install the APK by running:
nginx
Copy
Edit
adb install "wink_video_editor.apk"
(Replace wink_video_editor.apk with the actual APK file name.)
Step 5: Verify Installation
Once the installation is complete, you should find Wink Video Editor in your Windows Start Menu. Now, you can enjoy video editing on a larger screen with the power of your PC’s hardware.
Happy editing! 🎬
4o