Original Articles:
SSL termination refers to the process of decrypting encrypted traffic before passing it along to a web server.
Approximately 90% of web pages are now encrypted with the SSL (Secure Sockets Layer) protocol and its modern, more secure replacement TLS (Transport Layer Security). This is a positive development in terms of security because it prevents attackers from stealing or tampering with data exchanged between a web browser and a web or application server. But, decrypting all that encrypted traffic takes a lot of computational power—and the more encrypted pages your server needs to decrypt, the larger the burden.
SSL termination (or SSL offloading) is the process of decrypting this encrypted traffic. Instead of relying upon the web server to do this computationally intensive work, you can use SSL termination to reduce the load on your servers, speed up the process, and allow the web server to focus on its core responsibility of delivering web content.
Many security inspection devices have trouble scaling to handle the tidal wave of malicious traffic, much less decrypting, inspecting, and then re-encrypting it again. Using an ADC or dedicated SSL termination device to decrypt encrypted traffic ensures that your security devices can focus on the work they were built to do.
In addition, by using SSL termination, you can empower your web or app servers to manage many connections at one time, while simplifying complexity and eliminating performance degradation. SSL termination is particularly useful when used with clusters of SSL VPNs, because it greatly increases the number of connections a cluster can handle.
Offloading SSL or TLS traffic to an ADC or dedicated device enables you to boost the performance of your web applications while ensuring that encrypted traffic remains secure.
SSL termination works by intercepting the encrypted traffic before it hits your servers, then decrypting and analyzing that traffic on an Application Delivery Controller (ADC) or dedicated SSL termination device instead of the app server. An ADC is much better equipped to handle the demanding task of decrypting multiple SSL connections, leaving the server free to work on application processing.
BIG-IP Local Traffic Manager (available in hardware or software) offers efficient and easy-to-implement SSL termination/offload that relieves web servers of the processing burden of decrypting and re-encrypting traffic while improving application performance.
Alternatively, SSL Orchestrator delivers dynamic service chaining and policy-based traffic steering, applying context-based intelligence to encrypted traffic handling to allow you to intelligently manage the flow of encrypted traffic across your entire security chain, ensuring optimal availability.
This ultimate guide covers all the important aspects of setup Nginx with SSL termination on the load balancer, find out how to set up to make yours even better. At Bobcares, we will help our customers with any sort of queries as a part of our Server Management Services.
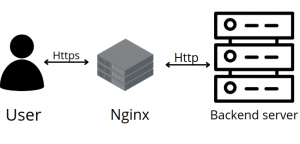
Nginx is a popular reverse proxy and load balancer that focuses on level 7 application traffic and determines pooled backend server which is the best available to serve the request. Relieving on the upstream web and application servers for the computational load SSL/TLS encryption.
This will reduce your SSL management overhead since the OpenSSL updates the keys and certificates which accordingly can be managed from the load balancer itself.
The SSL termination is the process that occurs on the load balancer which handles the SSL encryption/decryption so that traffic between the load balancer and backend servers in HTTP. To be specific the Nginx can be configured as a load balancer to distribute incoming traffic around several backend servers.
Indeed the backends must be also secured by restricting access to the load balancer’s IP.
Let’s take a look at the steps involved in the process of Nginx load balancing with SSL termination.
This article makes use of the following 3 Parts:
Section1 (Frontend)
-
Hostname: loadbalancer
-
Private IP: 10.130.227.31
Section2 (Backend)
-
Hostname: web1
-
Private IP: 10.130.227.12
Section3 (Backend)
-
Hostname: web2
-
Private IP: 10.130.227.23
Domain name – website.com
Note that private networking must be enabled to all these sections.Even more, you can use the below command to upgrade your OS.
apt-get update && apt-get upgrade -y
Reboot each server to apply the upgrades. Eventually, this is important since OpenSSL helps to keep secure and have the better version. Also, have Nginx virtual host setup for the domain with the upstream module load balancing backends server.
Prior to setting up the Nginx load balancing, you should have Nginx installed on your VPS. You can simply install it quickly with the command “apt-get ”
apt-get install nginx
On the other two backend servers, update and install Apache:
apt-get install apache2
Later finish up with installing PHP on both backend servers:
apt-get install php5 libapache2-mod-php5 php5-mcrypt
We will now go through the SSL certificate generation process:
First, create an SSL certificate directory.
mkdir -p /etc/nginx/ssl/website.com
cd /etc/nginx/ssl/website.com
In addition, Create a private key:
openssl genrsa -des3 -out private key.key 2048
now remove its passphrase:
openssl rsa -in privatekey.key -out privatekey.key
The next step is to create a CSR (Certificate Signing Request) you can request this from any SSL service provider or can also generate a self-signed certificate with the following command.
openssl req -new -key privatekey.key -out server.csr
openssl x509 -req -days 365 -in server.csr -signkey privatekey.key -out SSLcertificate.crt
Once this is done new directory will be created with the following files:
-
privatekey.key
-
CAcertificate.pem
-
SSLcertificate.crt
Furthermore, we need to create a virtual hosts file inside the Nginx directory
nano /etc/nginx/sites-available/website.com
Now add the upstream module containing the private IP addresses of the backend servers and save this file.
upstream mywebapp1 {
server 10.130.227.12;
 server 10.130.227.23;
}
server {
    listen 80;
    server_name website.com www.website.com;
    location / {
        proxy_pass http://mywebapp1;
        proxy_set_header Host $host;
        proxy_set_header X-Real-IP $remote_addr;
        proxy_set_header X-Forwarded-For $proxy_add_x_forwarded_for;
        proxy_set_header X-Forwarded-Proto $scheme;
    }
}
Moreover, perform a configuration test to check for errors and then reload the Nginx server and as result, the load balancing will be configured.
service nginx configtest
service nginx reload
Additionally, we can now take a quick look at enabling SSL by adding the following directives to the virtual hosts file ” /etc/nginx/sites-available/website.com”.
 listen 443 ssl;
ssl on;
ssl_certificate      /etc/nginx/ssl/website.com/SSLcertificate.crt;
ssl_certificate_key    /etc/nginx/ssl/website.com/privatekey.key;
ssl_trusted_certificate /etc/nginx/ssl/website.com/CAcertificate.pem;
You will be getting server block like this:
server {
    listen 80;
    listen 443 ssl;
    server_name website.com www.website.com;
    ssl on;
    ssl_certificate         /etc/nginx/ssl/website.com/SSLcertificate.crt;
    ssl_certificate_key     /etc/nginx/ssl/website.com/privatekey.key;
    ssl_trusted_certificate /etc/nginx/ssl/website.com/CAcertificate.pem;
    location / {
        proxy_pass http://mywebapp1;
        proxy_set_header Host $host;
        proxy_set_header X-Real-IP $remote_addr;
        proxy_set_header X-Forwarded-For $proxy_add_x_forwarded_for;
        proxy_set_header X-Forwarded-Proto $scheme;
    }
}
Finally, Check for configuration errors and reload the Nginx service.
service nginx configtest
service Nginx reload
Currently, the website hosted on the backend servers can be directly accessed by anyone who knows the public IP, we can prevent it by configuring the web servers on the backends to listen to the private interface.
You can follow the given steps to do this in Apache:
First, search for “Listen 80” in the ports.conf file and replace with your backend private IP:
nano /etc/apache2/ports.conf
Listen 10.130.227.23:80
Further, you have to restart Apache.
service apache2 restart
The next step is to have HTTP restricted for the load balancer’s private IP. The following firewall rule achieves this.
iptables -I INPUT \! --src LB_IP_ADDRESS-p tcp --dport 80 -j DROP
This section explains how to configure SSL.
Enabling SSL session cache improves the performance the HTTPS websites. This must be placed with “ssl_trusted_certificate” in the directive.
ssl_session_cache shared:SSL:20m;
ssl_session_timeout 10m;
For the SSL connection, you need to specify the protocols and ciphers.
ssl_prefer_server_ciphers       on;
ssl_protocols                   TLSv1 TLSv1.1 TLSv1.2;
ssl_ciphers                     ECDH+AESGCM:DH+AESGCM:ECDH+AES256:DH+AES256:ECDH+AES128:DH+AES:ECDH+3DES:DH+3DES:RSA+AESGCM:RSA+AES:RSA+3DES:!aNULL:!MD5:!DSS;
Enable it with the add_header directive.
add_header Strict-Transport-Security "max-age=31536000";
Check for any configuration errors and later reload the Nginx service.
service nginx configtest && service nginx reload
After hardening the SSL termination, the configuration file will be resulted as below:
/etc/nginx/sites-available/website.com
upstream mywebapp1 {
    server 10.130.227.12;
    server 10.130.227.23;
}

server {
    listen 80;
    listen 443 ssl;
    server_name website.com www.website.com;
    ssl on;
    ssl_certificate         /etc/nginx/ssl/website.com/SSLcertificate.crt;
    ssl_certificate_key     /etc/nginx/ssl/website.com/privatekey.key;
    ssl_trusted_certificate /etc/nginx/ssl/website.com/CAcertificate.pem;

    ssl_session_cache shared:SSL:20m;
    ssl_session_timeout 10m;

    ssl_prefer_server_ciphers       on;
    ssl_protocols                   TLSv1 TLSv1.1 TLSv1.2;
    ssl_ciphers                     ECDH+AESGCM:DH+AESGCM:ECDH+AES256:DH+AES256:ECDH+AES128:DH+AES:ECDH+3DES:DH+3DES:RSA+AESGCM:RSA+AES:RSA+3DES:!aNULL:!MD5:!DSS;

    add_header Strict-Transport-Security "max-age=31536000";

    location / {
        proxy_pass http://mywebapp1;
        proxy_set_header Host $host;
        proxy_set_header X-Real-IP $remote_addr;
        proxy_set_header X-Forwarded-For $proxy_add_x_forwarded_for;
        proxy_set_header X-Forwarded-Proto $scheme;
    }
}
In the final analysis, do an SSL server test and this progress should get an A+ grade. Meanwhile, run the curl test again to check if everything is working correctly.
curl https://website.com/test.php https://website.com/test.php https://website.com/test.php
[Need assistance with a different issue? We are available 24/7.]
To conclude, The Nginx load balancer with SSL termination is the process that works to reduce SSL management overhead and terminate HTTPS traffic from clients which can also be managed from the load balancer itself.