reference:

Driver:
https://www.st.com/en/development-tools/stsw-link009.html#get-software
Download:
https://www.st.com/en/development-tools/stm32cubeprog.html
https://www.st.com/en/development-tools/stm32cubeide.html
https://blog.hobbycomponents.com/?p=758
File->Preferenece->URL-> https://github.com/stm32duino/BoardManagerFiles/raw/main/package_stmicroelectronics_index.jsonTool->Board->Board Manager->STM32 MCU based boards`->installTool->Board->STM32 MCU based boards->Generic STM32F4 series
Board Config:
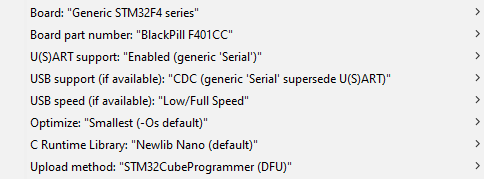 Note: If using the STM32F411 version of the black pill select “BlackPill F411CE” for the Board part number.
- press
bootbutton,
Demo:
/*
  Blink

  Turns an LED on for one second, then off for one second, repeatedly.

  Most Arduinos have an on-board LED you can control. On the UNO, MEGA and ZERO
  it is attached to digital pin 13, on MKR1000 on pin 6. LED_BUILTIN is set to
  the correct LED pin independent of which board is used.
  If you want to know what pin the on-board LED is connected to on your Arduino
  model, check the Technical Specs of your board at:
  https://www.arduino.cc/en/Main/Products

  modified 8 May 2014
  by Scott Fitzgerald
  modified 2 Sep 2016
  by Arturo Guadalupi
  modified 8 Sep 2016
  by Colby Newman

  This example code is in the public domain.

  https://www.arduino.cc/en/Tutorial/BuiltInExamples/Blink
*/

// the setup function runs once when you press reset or power the board
void setup() {
  // initialize digital pin LED_BUILTIN as an output.
  pinMode(LED_BUILTIN, OUTPUT);
}

// the loop function runs over and over again forever
void loop() {
  digitalWrite(LED_BUILTIN, HIGH);  // turn the LED on (HIGH is the voltage level)
  delay(1000);                      // wait for a second
  digitalWrite(LED_BUILTIN, LOW);   // turn the LED off by making the voltage LOW
  delay(1000);                      // wait for a second
}

int ledPin = 13;

void setup() {
  pinMode(ledPin, OUTPUT);
}

void loop() {
  digitalWrite(ledPin, HIGH);  // 点亮LED
  delay(1000);                 // 延迟1秒
  digitalWrite(ledPin, LOW);   // 熄灭LED
  delay(1000);                 // 延迟1秒
}

press boot button,
demo in Arduino IDE:
// define led according to pin diagram
int led = 8;

void setup() {
  // initialize digital pin led as an output
  pinMode(led, OUTPUT);
}

void loop() {
  digitalWrite(led, HIGH);   // turn the LED on
  delay(100);               // wait for a second
  digitalWrite(led, LOW);    // turn the LED off
  delay(100);               // wait for a second
}
st7789 with blackpill
https://www.stm32duino.com/viewtopic.php?t=1139&start=10
File -> Exxample -> TFT(in STM32)