Utilizing dnsmasq and netbootxyz docker container to become a PXE server to deploy various images over a local network. This setup will configure a TFTP server, a DHCP server, a DNS server and iPXE firmware boot files to utilize PXE booting for known or custom boot image resources
I'm going to assume that you already have a fresh copy of Ubuntu Server 22.04.3 LTS with no current packages installed other than SSH
ssh [email protected]
Accept the fingerprint and enter in the password for the account
sudo apt update
sudo do-release-upgrade
sudo reboot
sudo apt install -y build-essential libzma-dev isolinux git docker docker-compose dnsmasq
You may need to replace docker docker-compose with docker.io
sudo systemctl stop systemd-resolved
sudo systemctl disable systemd-resolved
sudo unlink /etc/resolv.conf
sudo nano /etc/resolv.conf
Add the following to resolv.conf:
nameserver 127.0.0.1
nameserver 1.1.1.1
nameserver 8.8.8.8
Press CTRL+X then Y to save
We're going to make our own dnsmasq.conf file, so we will be making a backup of the template config file and replacing with out own
sudo mv -v /etc/dnsmasq.conf /etc/dnsmasq.conf.backup
sudo nano /etc/dnsmasq.conf
Add the following to dnsmasq.conf:
interface=eth0 # This is your interface, if you do not know it, you can use ip -a to identify it
bind-interfaces
domain=rx-tek.local # Set this to your networks domain, or comment/remove this line

dhcp-range=eth0,10.20.30.180,10.20.30.200,255.255.255.0,8h # This line will set up your DHCP pool
dhcp-option=option:router,10.20.30.1 # This line will set up your default gateway for devices
dhcp-option=option:dns-server,1.1.1.1 # Sets DNS server 1 (CloudFlare)
dhcp-option=option:dns-server,8.8.8.8 # Sets DNS server 2 (Google)

# These are required for the netboot.xyz to work
dhcp-match=set:bios,60,PXEClient:Arch:00000
dhcp-boot=tag:bios,netboot.xyz.kpxe,,10.20.30.9 # Be sure to note and change the IP address to your netboot.xyz server
dhcp-match=set:efi32,60,PXEClient:Arch:00002
dhcp-boot=tag:efi32,netboot.xyz.efi,,10.20.30.9 # Be sure to note and change the IP address to your netboot.xyz server
dhcp-match=set:efi32-1,60,PXEClient:Arch:00006
dhcp-boot=tag:efi32-1,netboot.xyz.efi,,10.20.30.9 # Be sure to note and change the IP address to your netboot.xyz server
dhcp-match=set:efi64,60,PXEClient:Arch:00007
dhcp-boot=tag:efi64,netboot.xyz.efi,,10.20.30.9 # Be sure to note and change the IP address to your netboot.xyz server
dhcp-match=set:efi64-1,60,PXEClient:Arch:00008
dhcp-boot=tag:efi64-1,netboot.xyz.efi,,10.20.30.9 # Be sure to note and change the IP address to your netboot.xyz server
dhcp-match=set:efi64-2,60,PXEClient:Arch:00009
dhcp-boot=tag:efi64-2,netboot.xyz.efi,,10.20.30.9 # Be sure to note and change the IP address to your netboot.xyz server
Press CTRL+X then Y to save
sudo systemctl restart dnsmasq
systemctl status dnsmasq.service
If you've received no issues, you're good to continue
Utilize the following docker run to pull the latest version and run:
sudo docker run -d \
  --name=cns-pxeBoot \
  -e PUID=1000 \
  -e PGID=1000 \
  -e TZ=Etc/UTC \
  -e MENU_VERSION=1.9.9 `#optional` \
  -e PORT_RANGE=30000:30010 `#optional` \
  -e SUBFOLDER=/ `#optional` \
  -p 3000:3000 \
  -p 69:69/udp \
  -p 8080:80 `#optional` \
  -v /pxe/config:/config \
  -v /pxe/assets:/assets `#optional` \
  --restart unless-stopped \
  lscr.io/linuxserver/netbootxyz:latest
Once the container is started, the netboot.xyz web application can be accessed by the web configuration interface at http://localhost:3000 or via the specified port.
Downloaded web assets will be available at http://localhost:8080 or the specified port. If you have specified the assets volume, the assets will be available at http://localhost:8080.
If you wish to start over from scratch, you can remove the local configuration folders and upon restart of the container, it will load the default configurations.
If you want to pull the Live Images images down from your own mirror, modify the boot.cfg file and override the default live_endpoint setting from https://github.com/netbootxyz and set it to your deployment IP or domain, e.g. http://192.168.0.50:8080. It will then redirect asset download to the local location you set for assets on port 8080 and you can download the assets by using the local assets menu down to your local server. This can result in a much faster boot and load time.
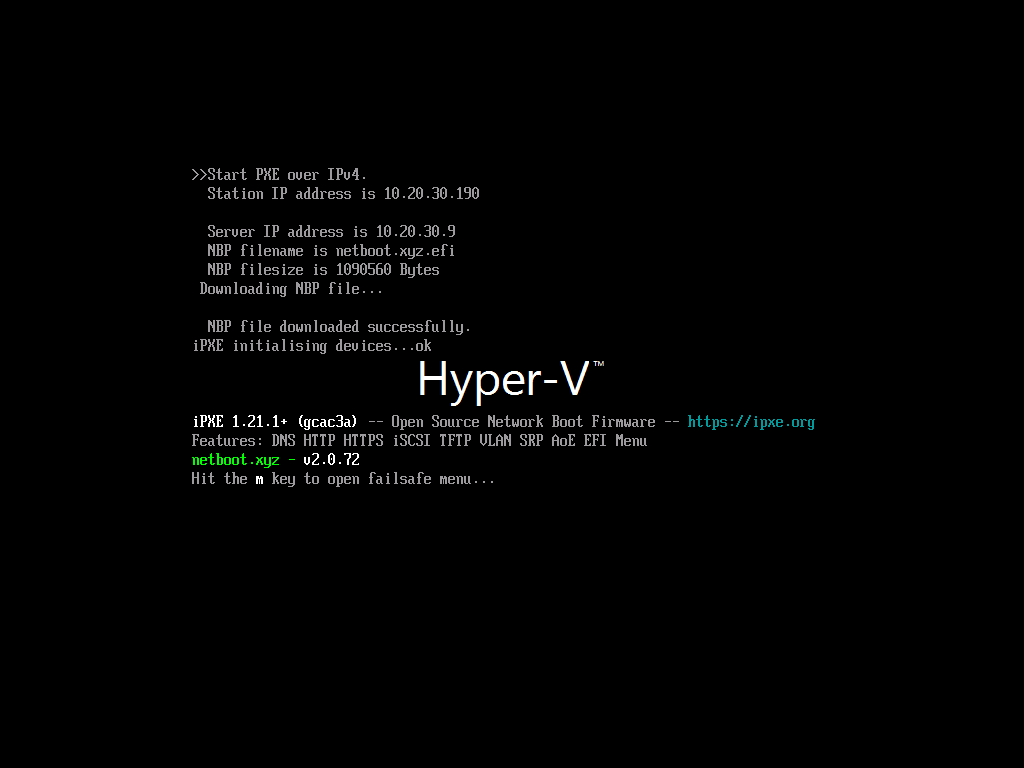
Successful load screen:
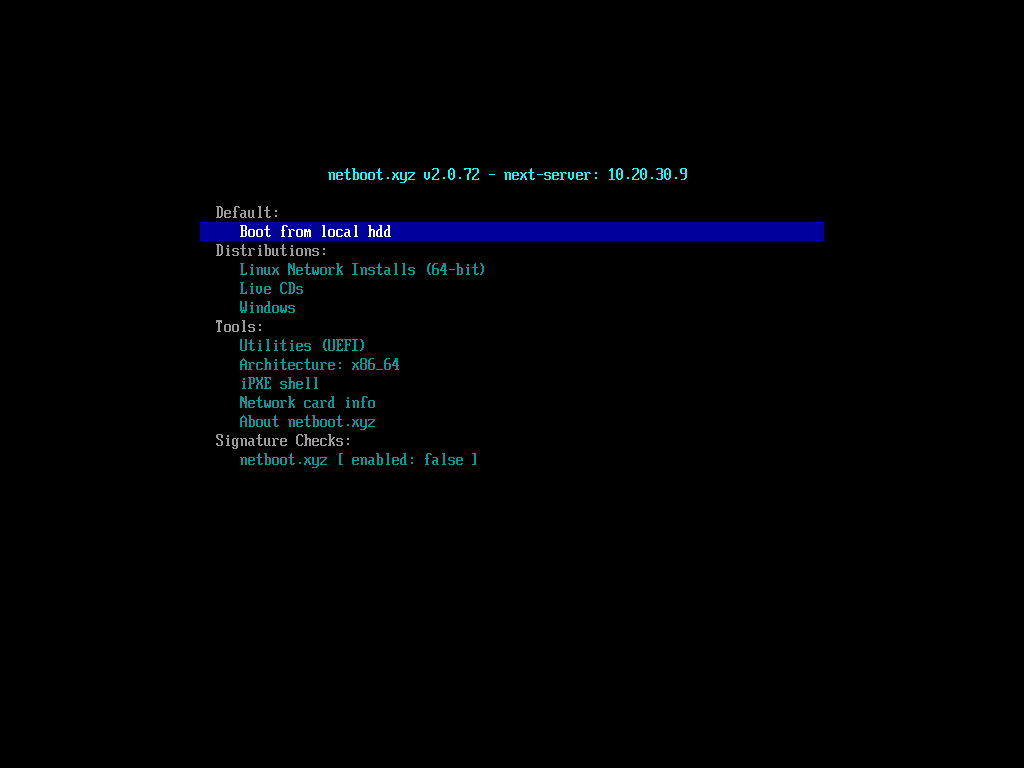
Netboot.xyz default menu: