The goal for this lesson is to bolster your confidence using git. We won't attempt a comprehensive review, but we will try to establish a more holistic understanding of what it is, what it isn't, and how you can begin to make it work for you.
This is not:
- ...a reference for commands (use the
--helpoption or look online instead) - ...a prescription for how to use git (that's up to you to ultimately decide)
- ...a high production-value way to learn git
- ...a replacement for practice and uncovering your own answers
Let's be very clear about one thing:
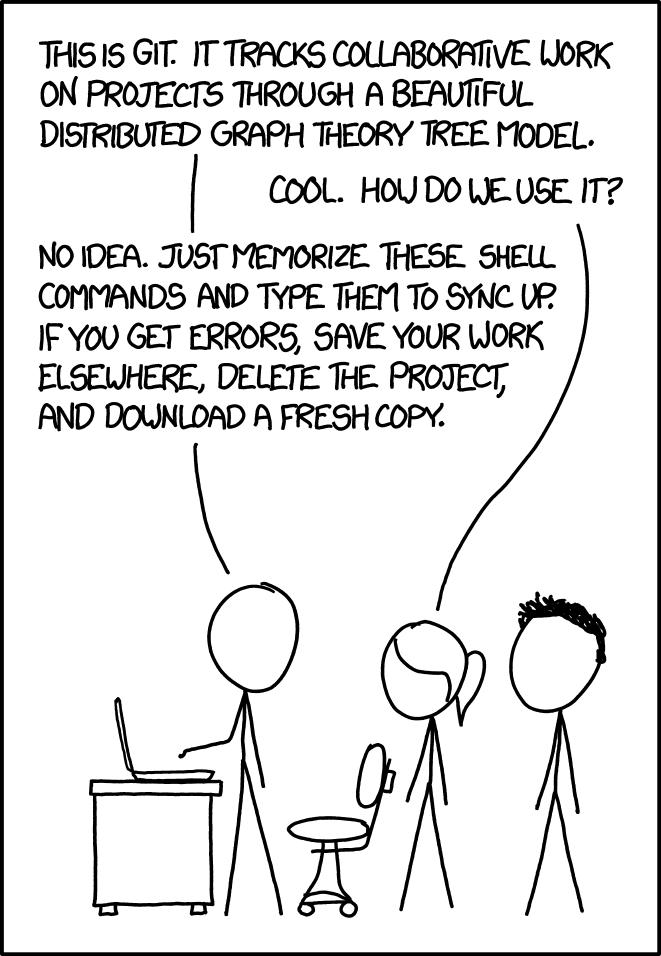
Git is not the same thing as Github.
Git is a program used to version control your software. It is open-sourced and can be called from the command line or integrated into your editor. There are other version control systems (VCS) out there (and they are all designed to do the same thing, though the way they achieve this is different), but git is by and large the most popular. Git borrows many principals from Linux (and, perhaps unsurprisingly, shares a common founder: Linus Torvalds).
Github is a service to host and manage git repositories online. There are many others: Bitbucket, GitLab, Sourceforge, etc. These are largely similar, but they compete on the margin on features like integrations, security, administration, etc. It can even be used in CI/CD (think: Buildkite, Jenkins, etc.) or more complex ways beyond the scope of this discussion. Github was acquired by Microsoft in June 2018.
Git, much like dbt or Airflow, essentially manages a directed acyclical graph (DAG). Whereas for dbt and Airflow, models and tasks are the unit of interest, respectively, for git the unit of interest is the state of a set of files and folders.
Let's look at this last sentence once more:
...unit of interest is the state of a set of files and folders.
These italicized words are concepts the humans can think about in the abstract, but for a computer, it needs this information to be encoded in a consumable way. To make these ideas into something tangible, git models these ideas as object-key pairs (think: a Python dictionary).
git object |
Description |
|---|---|
| commit | state - reference to a tree and one or more parent commits |
| blob | files - content of a file |
| tree | folders - structured collection of blobs and trees |
Git elegantly relates all of these things together by assigning keys to all of these objects. This allows git to interleave objects together without needing to copy the same data over again each time a new commit is made (unless every single file had indeed changed commit-over-commit).
The picture below is a representative example of how commits bring these pieces together under the hood:

There's probably another git entity you're familiar with: branches (and perhaps, tags, but we won't worry about those here). These may seem like substantive things, but in actuality branches (and tags) are simply pointers to commits! What this looks like on your computer is simply a file named your branch name whose contents are the SHA-1 hash of the commit being pointed to by the branch.

There are 4 types of branches and their definition depends on largely on where these branches live and how they are associated with another branch(es):
- Remote branch: located on remote; e.g., what receives changes in PRs
- Remote-tracking branch: located locally; i.e., what receives data from
git fetch - Local-tracking branch: located locally; i.e., branch corresponding to its
remote-tracking branch that receives changes from
git pull - Local branch: located locally; i.e., simply a local branch not associated with a branch in the remote
On the data team at Flexport, we tend to use the same pattern of development or
workflow. This workflow involves a "monorepo" (e.g., kimono 👘) wherein "prod"
is HEAD (pointing to master, which is itself a pointer pointing to the
latest commit). As you already know, this means that whenever you want to
contribute to a project, you create a branch from [the latest commit] on
master and name it something descriptive (e.g. test in the graphic above).
We then go about our jobs, committing as we go. But we're not working in a
vacuum! Our remote parent branch (usually master) is also having work added
to it (as people approve PRs and then incorporate their work onto remote
master). How we reconcile this divergence is what we tackle in the next
section, but for now, let's keep out attention on what's really going on as we
make changes to our copy of the codebase locally.
Reminder: We're still in the realm of git and the file system on our
local machine.
Consider Google Sheets. As soon as you enter data into a cell, that data is cached and immediately sent over the wire to be stored by whatever mechanism Google Drive uses to store data. Boom. Done. This is perfectly fine for most use cases, but imagine trying to recover a past version of a document. Google provides timestamped versions, but good luck trying to find, say days later on an active document, which wise-ass deleted your brilliant idea.
Git takes a different approach (for lots of reasons we won't get into here). What's important to know are the three "rails" involved to get the change you have mind into the repo:
- The working tree (also called the "working directory")
- The staging area (also called the "staging index", or simply, the "index")
- The [local] repo (also called the "commit tree", "HEAD", "history")
More often than not, you really care about going from #1 to #3 -- you've changed some files and now you want to commit those to the repo. This of course is easily achieve in an economy of commands (assuming you're using the command line interface):
- Change some files and save these changes to disk
git add --allto stage all changes to all filesgit commit -m "Create some files; modify others"to commit your changes
Note: git commit -a -m "[Your commit message here]" condenses the last two steps
into one command.
That's pretty easy! But let's slow down for a second and see why the staging area is valuable beyond just getting in the way of us committing directly to our repo.
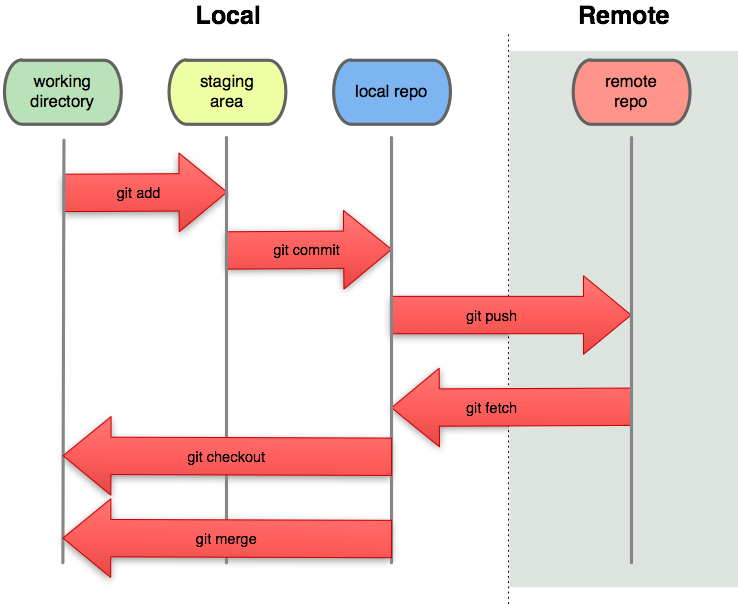
I want to emphasize that what you see in your terminal as a consequence of moving lines of code between pairs of "rails" are the diffs (or change sets) of the state of your files in the repo. Using the illustration above, the red text you'll see (read: unstaged work) is the area between the working tree and staging area rails, whereas the green text is the diff between the staging area and HEAD. This will become clearer in the demos below.
The staging area is a good place to put candidate changes as you're working. If the mantra is commit early and often, staging changes allows you to have that internal debate you're having about the changes you have to implement externally on your machine.
More importantly, I will argue that staging is super important for at least two reasons:
- Staging lets you operate on "hunks" (or "patches") which should save you time from having to open your editor -- productivity benefit
- Staging can prevent the loss of information because once something is staged, it gets tracked by git -- safety benefit
Disclaimer: I should note that this is but one way to use git effectively. Some people have completely different workflows, which speaks to how much flexibility git affords.
- Create
many_hunks.txt; fill it with contents and save to disk - Stage this file
- Make a many, many more edits; you're dissatisfied
- Use
git add -p many_hunks.txtto choose what you want to keep vs. discard
- Create
doomed.txt; give it some contents and save to disk - Stage this file as you watch what happens to the contents of
.git/ - Force delete this file (
git rm -f doomed.txt). 😱 - Recover this file to your working tree
Warning: This is merely a safety net! Git will "garbage collect" these
orphaned blobs after a while, so commit or use git stash (out of scope for
this discussion) to make more lasting changes!
The git diff command gives you insight into the differences between states of
your file(s). In it's simplest form, you can pass in any two "commit-ish"
objects as parameters to see the difference in state of your files. The
following graphic captures many of the useful applications of this command in
the contexts you'll likely care most about:

Note: git diff --cached is the same thing as git diff --staged.
git log is one of the most powerful commands for introspecting your git
database (read: repo). This is but a sampling of things this command can help
answer while you're knee deep in your work:
- Where is branch X pointing?
- Am I in line with remote
master? - Where did I add this line of code to our code base?
- When did person Y merge their PR?
- ...and much, much more!
- Show vanilla
git logvs. variations - Show all commits by a given person
- Show all potty-mouth commit messages and associated commits
- Show, roughly, how many times I made adjustments at Graham's request
- Show the "pickaxe" operation (
-S,-G) flag
Note: Aliases are your friends! They will let you abstract away the specific options and parameters so you can say focused.
Another useful introspection command is git blame, but we'll save that for
another talk or Lesson 2.
No man is an island entire of itself; every man is a piece of the continent, a part of the main... - John Donne
For better (or for worse, depending on who ask around here), your work does not exist in a silo. As such, you will need to sync what's happening around you with your body of work (vice versa, and when the time comes). For now, we will focus on only one way to achieve this synchronicity: merging (namely, pairwise fast-forward and recursive merging).
The "happy path" is straightforward, say in the context of kimono 👘:
- You make some changes to the codebase as others are merging their PRs into
master - You merge those changes into your local
feature_branch(and deal with conflicts as they arise) - When ready, you push to remote
feature_branchand open PR.
This really boils down to:
💡 Merge others' changes frequently as you work to mitigate the extent of messy merge conflicts and address any conflicts as they arise.
This will also lend itself to communicating with other people who are touching the same files you are working on! Given the surface area of our project and the structure of our team, if you follow this advice, you should be running into a merge conflicts pretty infrequently (even rarely). More on how to deal with these conflicts (should they arise), in the next section.
In short, you are coalescing your changes with the state of the repo at the time of merging. How this is accomplished really depends on the specific situation you're in.
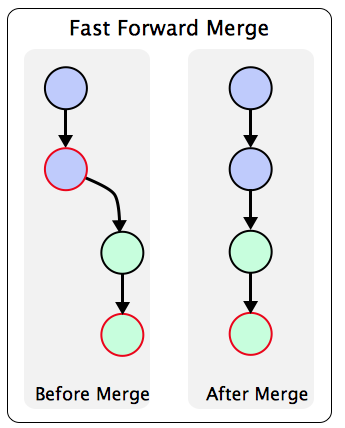
A fast-forward merge occurs when the target branch (e.g., master) can be
reached directly from your child branch. The pointer for the target branch will
"fast-forward" to the pointer of your current branch, and HEAD will point to
both of these branches (upon checkout).
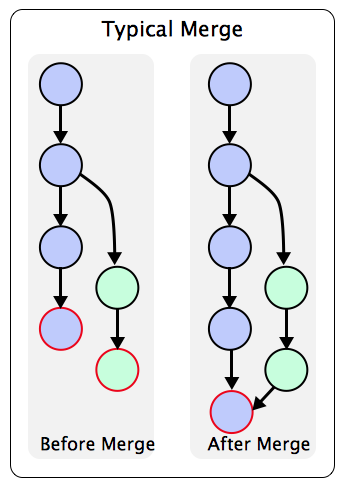
A recursive merge is needed when there is not a direct pathway between the
two (or more) branches being merged. Two branches can be coerced to a recursive
merge by passing no-ff. A merge commit is created and this commit will have
two parents.
There are a few more, but I will leave that, as book publishers are fond of saying, as an exercise for the reader. 🐙
Merge conflicts occur when competing changes are made to the same line of a file, or when one person edits a file and another person deletes the same file.
I'm not going to expound too much here (I've linked a useful guide below), but simulating and working through your own merge conflicts is, your correspondent's opinion, the best way to learn how to cope with these [infrequent] occurrences.
- Introduction to Git - Branching and Merging
- Git Merge Strategy Options and Examples
- Addressing merge conflicts
So you've been working and committing things locally on your branch periodically
until you're done and ready to merge your work into remote master. As
you've probably surmised by now, you can't simply git push origin master
directly -- and for good reason!
Instead, we employ a pretty common collaborate workflow pattern to incorporate
distributed changes into one, mainline branch (i.e., master): pull requests.
A pull request (PR) is simply a collection of bells and whistles to make collaborating much more facile, transparent, and measurable. Take a look around the next time you open a PR. What are the main features that you see?
A PR is a "pull" request because we are requesting that our changes get "pulled" into the upstream (whether that be another branch in the existing repo or in another repo altogether). There's "forum"-like conversation thread, different ways to view the proposed changes, and mechanisms to enable or disable certain actions. Hence, a PR is the real-life manifestation of the conversation and decisions made in your head if you were working alone and trying to integrate changes from a feature branch into your [own] project's mainline branch. (What's that? You don't want Graham's voice in your head?)
Often, you'll actually be presented the option of how you'd like your recently
approved PR to be integrated into prod/remote master:

First, some digging with our handy git log command shows some interesting
results. If you turn the graph option on, you can also visualize how various
changes were assimilated.
The actual reference materials used for today's talk is listed below:
- git - the simple guide
- A Visual Git Reference
- LinkedIn Learning (via Okta)
- O'Reilly (via Okta)
Each subsection has a more a targeted list of resources should you feel the desire to dive deeper.
There is a ton of material out there that is of the very highest quality. A meta-skill to develop is knowing how to ask the right question so you can get the right answer with the right level of detail at the right time -- and working with git is a great way to hone this skill!