- In your mod folder, create a new folder
Classes.
- You can open the mod folder by pressing
Browse in the modding tool.
- Create a new text file with a unique name for your skin.
- I.e.
Hat_Collectible_Skin_Oreo.uc.
- To prevent naming conflicts with other mods, you may want to go for something even more unique (I.e.
Hat_Collectible_Skin_Silver_Oreo.uc).
- It doesn't matter where you put this file, as long as it's in
Classes or a subfolder inside Classes. The vanilla skins are usually in Classes/Collectibles/Skins.
- Open the created text file in a text editor.
- Paste the following code in the file:
class CLASS_NAME extends Hat_Collectible_Skin;

defaultproperties
{
	HUDIcon = Texture2D'TEXTURE_PATH'
	ItemName = "LOCALIZATION_KEY"
	ItemQuality = class'Hat_ItemQuality_Legendary'

	SkinColor[SkinColor_Dress] = (R=0, G=0,B=0)
	SkinColor[SkinColor_Cape] = (R=0, G=0,B=0)
	SkinColor[SkinColor_Pants] = (R=0, G=0,B=0)
	SkinColor[SkinColor_Shoes] = (R=0, G=0,B=0)
	SkinColor[SkinColor_ShoesBottom] = (R=0, G=0,B=0)
	SkinColor[SkinColor_Zipper] = (R=0, G=0,B=0)
	SkinColor[SkinColor_Hair] = (R=0, G=0,B=0)
	SkinColor[SkinColor_Orange] = (R=0, G=0,B=0)
	SkinColor[SkinColor_Hat] = (R=0, G=0,B=0)
	SkinColor[SkinColor_HatAlt] = (R=0, G=0,B=0)
	SkinColor[SkinColor_HatBand] = (R=0, G=0,B=0)
}
- Replacing the following data in the code:
| Key |
Value |
CLASS_NAME |
The name of this file, but without the .uc extension.
I.e. Hat_Collectible_Skin_Oreo. |
TEXTURE_PATH |
Path to the skin icon. See Icon. |
LOCALIZATION_KEY |
A localization key that is used to later name your skin. See Localization.
I.e. OreoSkinName. |
Hat_ItemQuality_Legendary |
You can change this to give the skin a different rarity.
Known values are listed in Rarities. |
If you want to use a custom icon, please read Icon carefully now,
- Set the colors for each part of the skin by changing the
R, G and B numbers. If you don't want to set a color for a part, just remove the entire line for that part.
- Not sure which values to use? I released a mod that allows you to try out different values directly in the game using console commands! View SetColor Command on Steam.
- When using
(R=0,G=0,B=0), the color will not be applied. If you want to use this color, you should use (R=1,G=1,B=1) instead.
- Save the file.
At this point, your skin is ready. After compiling and cooking your mod, you can spend tokens in-game to obtain the item. A later section will show how to automatically unlock the skin.
For multiple skins, just repeat this step using different file and class names.
Example:
When replacing TEXTURE_PATH, you can use one of the existing textures, or add your own.
These are the brush icons available in the game:
| TEXTURE_PATH |
HatInTime_Hud_ItemIcons.PaintBrushes.paint_green_orange |
HatInTime_Hud_ItemIcons.PaintBrushes.paint_lightblue_lightred |
HatInTime_Hud_ItemIcons.PaintBrushes.paint_pink_yellow |
HatInTime_Hud_ItemIcons.PaintBrushes.paint_white_red |
HatInTime_Hud_ItemIcons.PaintBrushes.Paintbrush_black |
HatInTime_Hud_ItemIcons.PaintBrushes.Paintbrush_blue_white |
HatInTime_Hud_ItemIcons.PaintBrushes.Paintbrush_blue_yellow |
HatInTime_Hud_ItemIcons.PaintBrushes.Paintbrush_green |
HatInTime_Hud_ItemIcons.PaintBrushes.Paintbrush_Green_Cream |
HatInTime_Hud_ItemIcons.PaintBrushes.Paintbrush_pink |
HatInTime_Hud_ItemIcons.PaintBrushes.Paintbrush_purple_yellow |
HatInTime_Hud_ItemIcons.PaintBrushes.Paintbrush_red_black |
HatInTime_Hud_ItemIcons.PaintBrushes.Paintbrush_Red_Purple |
For a custom icon, use the following:
MODNAME_Content.Textures.PAINT_TEXTURE
Replace MODNAME with your mod name (I.e. OreoSkin), and PAINT_TEXTURE with your texture name (I.e. Paint_Oreo). At this point you don't have the actual asset that's used here.
Complete 2. Setting up the skin and come back to this section when you're done.
- Open the Editor and press away the warnings.
- In the Content Explorer, press Import and select your image file.
- The dimensions of your image file should be a factor of 2. 256x256 or 512x512 are recommended.

- In the
Info section, you will have to enter values matching the string TEXTURE_PATH in the skin. We do it in this order so that you don't have to restart the editor first (and it can prevent a crash).
| Key |
Value |
| Package |
MODNAME_Content, where MODNAME is what you changed (I.e. OreoSkin). |
| Grouping |
Textures |
| Name |
The value you used for PAINT_TEXTURE earlier. |

- You can check
Alpha to Opacity if your image supports transparency.
- Press OK.
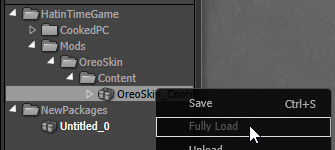
- Select your package under NewPackages.
- Right click and save the package.
- Put the package in your mod Contents folder but keep the file name the same.
- After doing this, the package will move from
NewPackages to HatinTimeGame/Mods/yourmod/Content in the Content Browser.
- If not greyed out, press Fully Load when right clicking your saved package.
- Just to be sure everything is set up correctly, right click the image in your package and press Copy Full Name to Clipboard. Paste this text somewhere and see if it matches what you entered in your skin class.
- I.e.
HUDIcon = Texture2D'OreoSkin_Content.Textures.Paint_Oreo'
| Rarity |
Code |
Preview |
| Common |
Hat_ItemQuality |
 |
| Rare* |
Hat_ItemQuality_Rare |
 |
| Epic** |
Hat_ItemQuality_Epic |
 |
| Legendary*** |
Hat_ItemQuality_Legendary |
 |
| Completionist |
Hat_ItemQuality_Completionist |
 |
| Gold |
Hat_ItemQuality_Gold |
 |
| Supporter |
Hat_ItemQuality_Supporter |
 |
Common seems to stop you from equipping the skin! Please use another quality.
Back to Top


