This gist explains how to create a simple Win32 application in Visual C++ whose graphical interface is based on a dialog box
First of all open Visual Studio and create a new project and make sure you choose the Windows Desktop Wizard project type

Once you have selected this type of application, type the name you want and click OK, then the following window will be shown which will ask us what type of Win32 application we want to create, we are interested in Desktop Application and check "Empty Project" to starting from a project completely from scratch

Finally click OK again to finish creating our project
First of all we need to create the main class of the application i.e. the code that is executed right when the application is started, before the dialog box is showed to the user
to do this, right click on Source Files and in the contextual menu that opens click on Add > Class...
And in the new window that opens, name it Main and click OK

and well now we can start programming the startup of our application
Before using the InitInstance event the event must first be declared
First of all you need to include the afxwin.h library in the Main.h header file
#include "afxwin.h"Now we need to make the following Main class a public CWinApp
class Main : public CWinApp
{
};
now we will need to add public: to inherit all members of this public class
Lastly, add the following BOOL to declare the InitInstance event in your application adding the following member under :public InitInstance();
your Main.h file should look like this:
#pragma once
#include "afxwin.h"

class Main : public CWinApp
{
public:
	BOOL InitInstance();
};
We are done with our Main.h header file now we need to go and program the event in our application from the Main.cpp file
Include the afxwin.h library in Main.cpp as well
Go to the Main.cpp file and add the InitInstance event:
Main app;

BOOL Main::InitInstance()
{

	return TRUE;
}
At this point we have finished the first part of our application, now it will be able to launch a dialog box from the InitInstance event that we have declared, from this event we can tell our application what it should do at startup
Before continuing to add a Dialog resource in our application we need to set up the use of MFC libraries
Click on Project > Projectname Properties...

and on "Use of MFC" select "Use MFC in a Static Library" Click on "Apply" and "OK" to try to launch our application
Obviously nothing will happen now, it will start and stop immediately as there is nothing on the InitInstance event
To add a new Dialog resource, right-click on Resource Files > Add > Resource...
And in the window that opens, select Dialog and New

And so we will have created our dialog box, now we should create a class to declare it from code
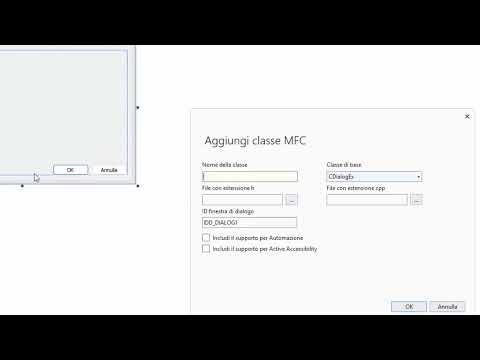
In the dialog box, right-click and click Add Class...
In the window that opens, give it a name like CMainDlg

and click OK and the class for our dialog will be created!
In the header file of the CMainDlg.h dialog box, include the following library
#include "afxdialogex.h"Now go to the CMainDlg.cpp source and delete this #include directive #include "pch.h" and include the resources header file #include "resource.h"
Go back to the Main.cpp file and include the dialog header file
#include "CMainDlg.h"and in the InitInstance event starts the dialog box with this:
BOOL Main::InitInstance()
{
	CMainDlg dlg;
	m_pMainWnd = &dlg;
	dlg.DoModal();

	return TRUE;
}
Perfect, now when you start the application the dialog box will be shown

The last optional thing you can do is set the classic Windows style on the dialog box
Right-click on the project and click Add > New Item...
And in the new window that opens, go to Web and select XML File and give it the name app.manifest and click Add

After the file is created add this:
<?xml version="1.0" encoding="UTF-8" standalone="yes"?>
<assembly xmlns="urn:schemas-microsoft-com:asm.v1" manifestVersion="1.0">
  <dependency>
    <dependentAssembly>
      <assemblyIdentity type="win32" name="Microsoft.Windows.Common-Controls" version="6.0.0.0" processorArchitecture="x86" publicKeyToken="6595b64144ccf1df" language="*"></assemblyIdentity>
    </dependentAssembly>
  </dependency>
  <trustInfo xmlns="urn:schemas-microsoft-com:asm.v3">
    <security>
      <requestedPrivileges>
        <requestedExecutionLevel level="asInvoker" uiAccess="false"></requestedExecutionLevel>
      </requestedPrivileges>
    </security>
  </trustInfo>
  <application xmlns="urn:schemas-microsoft-com:asm.v3">
    <windowsSettings>
      <dpiAware xmlns="http://schemas.microsoft.com/SMI/2005/WindowsSettings">true</dpiAware>
    </windowsSettings>
  </application>
</assembly>
Save the file and after running the application you will be able to see the change in the style of the dialog box

And this and all, now you can continue to develop your application as you wish, starting as the main graphical interface from a dialog box