An image with CentOS 7 and OpenStack pre-installed that can be imported directly from VirtualBox
This is a ready-made virtual machine with CentOS7 operating system installed with OpenStack deployed, and can be used to indulge yourself in creating instances, volumes, images, whatever you want, the performance of the instances varies by how much RAM and CPU are allocated to the VM
- The last VirtualBox 6.1.44
- A 64-bit processor with hardware assisted virtualization enabled
- 6 GB of RAM (4GB of RAM is pretty good)
- 4 Cores (2 Cores is pretty good)
- Nested Virtualization Enabled (Optional) (Increase the performance of instances running inside the VM)
For best performance it is recommended to make these settings on the VM:
- The last VirtualBox 6.1.44
- A 64-bit processor with hardware assisted virtualization enabled
- 8 GB of RAM
- 8 Cores
- Nested Virtualization Enabled
-
First go below page and download the OVA which is on the link of Google Drive
-
After download open VirtualBox and click on "File > Import Appliance..."
-
Select the OVA file you downloaded earlier
-
Then go to configure the VM to import by assigning the amount of RAM and CPU you want, above the page you can find all the requirements and choose how much to allocate
-
When you have configured everything click on "Import" and waiting for a while your VM will be imported, it is recommended to start the VM using the headless boot
The following VM with CentOS 7 installed contains two users:
The root password is openstack,
openstack account password is openstack
And the credentials to access the Horizon Dashboard are:
Username is admin and password is openstack
- Open Windows Powershell as Administrator
- Access the folder where VirtualBox is installed
cd C:\Program Files\Oracle\VirtualBox - And run this command to enable nested virtualization
.\VBoxManage modifyvm centos-openstack --nested-hw-virt on
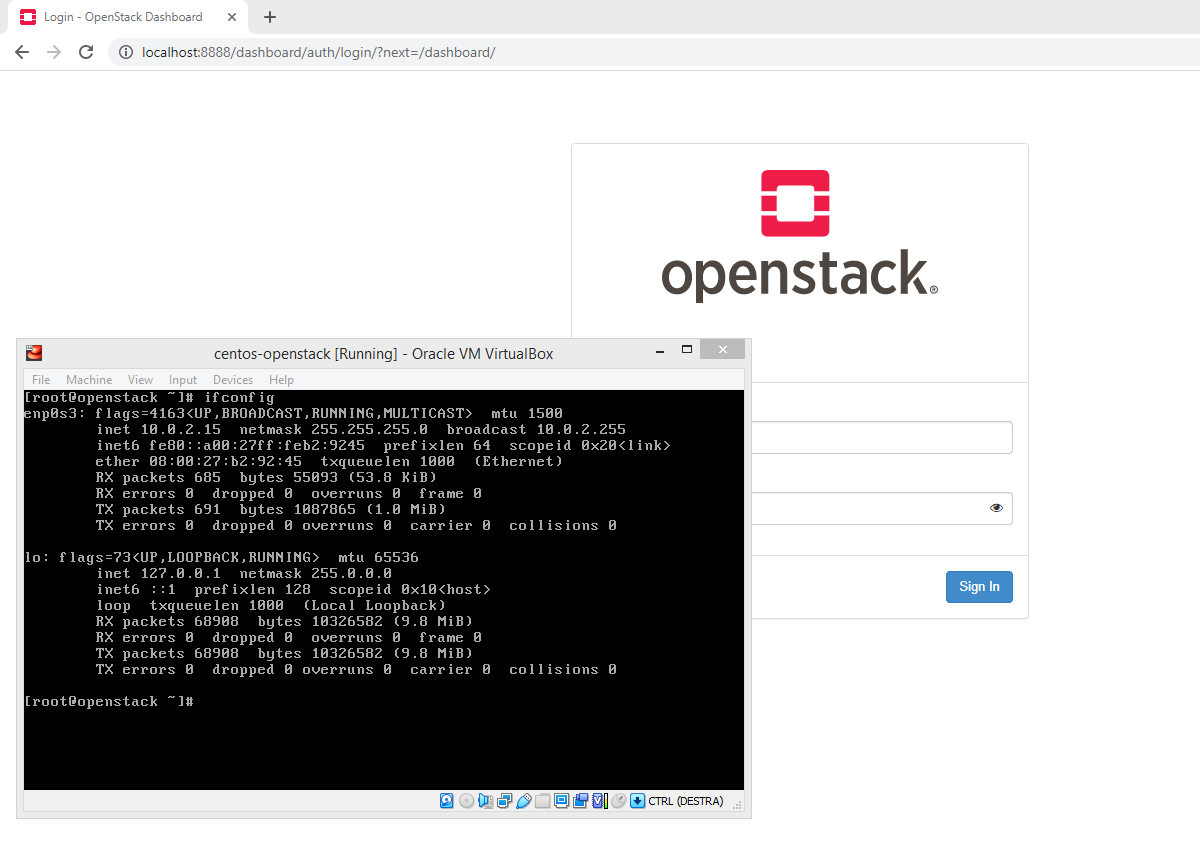
First of all check that the IP address of the machine is 10.0.2.15
Using the command ifconfig Before accessing the OpenStack Dashboard, make sure that all OpenStack services have started
To access the OpenStack dashboard, enter this link in any browser: http://localhost:8888/
And waiting a few moments if everything went well you will have to see the OpenStack login page
If the Apache2 service is started but the dashboard still does not appear, it could be port 8888 blocked by the firewall, or port forwarding is not working correctly
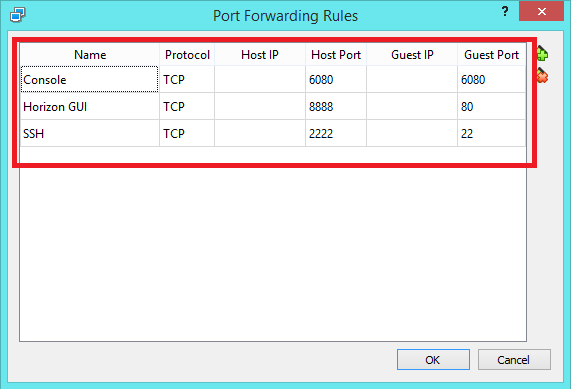
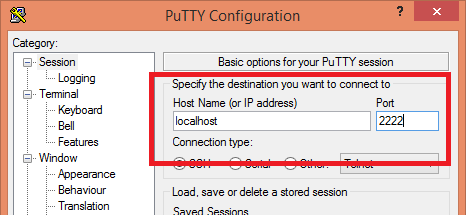
Open any SSH connection program like PuTTY, and enter on IP Address or Hostname enter localhost and as port 2222
PuTTY Example:
- OS: CentOS 7
- OpenStack Release: Train
Now you can finally download the image, If you are interested in this image you can click the link below to download it: