Skip to content

Instantly share code, notes, and snippets.

@amelieykw
Last active July 16, 2018 13:38
Show Gist options
  • Save amelieykw/48d8ece80e124fdb7a638b66df68e93d to your computer and use it in GitHub Desktop.
Save amelieykw/48d8ece80e124fdb7a638b66df68e93d to your computer and use it in GitHub Desktop.
[Python - Django and AJAX Form Submissions – Say 'Goodbye' to the Page Refresh] #Python #Django #Ajax #Form #Submission #pageRefresh
  • Use Protection
  • Handling Events
  • Adding AJAX
    • Update main.js:
    • Update forms.py:
    • Update main.js:
    • Update the views
    • Updating the DOM
    • Update the template
    • Update main.js
  • Rinse, Repeat
  • Conclusion

Background

How do we update just a portion of a webpage without having to refresh the entire page?

Enter AJAX.

AJAX is a client-side technology used for making asynchronous requests to the server-side - i.e., requesting or submitting data - where the subsequent responses do not cause an entire page refresh.

Pre-requists

  • working knowledge of Django
  • Javascript/jQuery
  • the basic HTTP methods (GET & POST)

Regardless of whether you’re using AJAX or not, forms are at risk for Cross Site Request Forgeries (CSRF) attacks.

To prevent such attacks, you must add the {% csrf_token %} template tag to the form, which adds a hidden input field containing a token that gets sent with each POST request.

However, when it comes to AJAX requests, we need to add a bit more code, because we cannot pass that token using a JavaScript object since the scripts are static.

To get around this, we need to create a custom header that includes the token to watch our back. Simply grab the code here and add it to the end of the main.js file.

Yes, it’s a lot of code. We could go through it line-by-line, but that’s not the point of this post. Just trust us that it works.

$(function() {


   // This function gets cookie with a given name
   function getCookie(name) {
       var cookieValue = null;
       if (document.cookie && document.cookie != '') {
           var cookies = document.cookie.split(';');
           for (var i = 0; i < cookies.length; i++) {
               var cookie = jQuery.trim(cookies[i]);
               // Does this cookie string begin with the name we want?
               if (cookie.substring(0, name.length + 1) == (name + '=')) {
                   cookieValue = decodeURIComponent(cookie.substring(name.length + 1));
                   break;
               }
           }
       }
       return cookieValue;
   }
   var csrftoken = getCookie('csrftoken');

   /*
   The functions below will create a header with csrftoken
   */

   function csrfSafeMethod(method) {
       // these HTTP methods do not require CSRF protection
       return (/^(GET|HEAD|OPTIONS|TRACE)$/.test(method));
   }
   function sameOrigin(url) {
       // test that a given url is a same-origin URL
       // url could be relative or scheme relative or absolute
       var host = document.location.host; // host + port
       var protocol = document.location.protocol;
       var sr_origin = '//' + host;
       var origin = protocol + sr_origin;
       // Allow absolute or scheme relative URLs to same origin
       return (url == origin || url.slice(0, origin.length + 1) == origin + '/') ||
           (url == sr_origin || url.slice(0, sr_origin.length + 1) == sr_origin + '/') ||
           // or any other URL that isn't scheme relative or absolute i.e relative.
           !(/^(\/\/|http:|https:).*/.test(url));
   }

   $.ajaxSetup({
       beforeSend: function(xhr, settings) {
           if (!csrfSafeMethod(settings.type) && sameOrigin(settings.url)) {
               // Send the token to same-origin, relative URLs only.
               // Send the token only if the method warrants CSRF protection
               // Using the CSRFToken value acquired earlier
               xhr.setRequestHeader("X-CSRFToken", csrftoken);
           }
       }
   });

});

Before we touch the AJAX code, we need to add an event handler to our JavaScript file using jQuery.

Keep in mind that jQuery is JavaScript. It’s simply a JavaScript library used to reduce the amount of code you need to write. This is a common area of confusion so just be mindful of this as you go through the remainder of this tutorial.

Which event(s) do we need to “handle”?

Since we’re just working with creating a post at this point, we just need to add one handler to main.js:

# main.js

// Submit post on submit
$('#post-form').on('submit', function(event){
    event.preventDefault();
    console.log("form submitted!")  // sanity check
    create_post();
});

Here, when a user submits the form this function fires, which-

  1. Prevents the default browser behavior for a form submission,
  2. Logs “form submitted!” to the console, and
  3. Calls a function called create_post() where the AJAX code will live.

Make sure to add an id of post-form to the form on the index.html file:

# index.html

<form action="/create_post/" method="POST" id="post-form">

And add a link to the JavaScript file to the bottom of the template:

# index.html

<script src="static/scripts/main.js"></script>

Test this out. Fire up the server, then open your JavaScript console. You should see the following when you submit the form:

form submitted!
Uncaught ReferenceError: create_post is not defined

This is exactly what we should see: The form submission is handled correctly, since “form submitted!” is displayed and the create_post function is called. Now we just need to add that function.

Update main.js:

Add the create_post function:

// AJAX for posting
function create_post() {
    console.log("create post is working!") // sanity check
    console.log($('#post-text').val())
};

Again, we ran a sanity check to ensure the function is called correctly, then we grab the input value of the form.

For this to work correctly we need to add an id to the form field:

Update forms.py:

class PostForm(forms.ModelForm):
    class Meta:
        model = Post
        # exclude = ['author', 'updated', 'created', ]
        fields = ['text']
        widgets = {
            'text': forms.TextInput(attrs={
                'id': 'post-text', 
                'required': True, 
                'placeholder': 'Say something...'
            }),
        }

Notice how we also added a placeholder to the field and made it required along with the id. We could add some error handlers to the form template or simply let HTML5 handle it. Let’s use the latter.

Test again. Submit the form with the word “test”. You should see the following in your console:

form submitted!
create post is working!
test

So, we’ve confirmed that we’re calling the create_post() function correctly as well as grabbing the value of the form input.

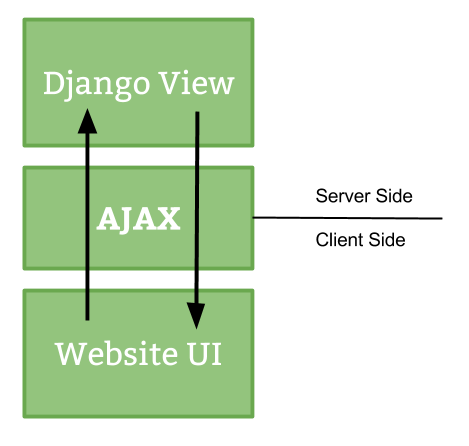
Now let’s wire in some AJAX to submit the POST request.

Update main.js:

// AJAX for posting
function create_post() {
    console.log("create post is working!") // sanity check
    $.ajax({
        url : "create_post/", // the endpoint
        type : "POST", // http method
        data : { the_post : $('#post-text').val() }, // data sent with the post request

        // handle a successful response
        success : function(json) {
            $('#post-text').val(''); // remove the value from the input
            console.log(json); // log the returned json to the console
            console.log("success"); // another sanity check
        },

        // handle a non-successful response
        error : function(xhr,errmsg,err) {
            $('#results').html("<div class='alert-box alert radius' data-alert>Oops! We have encountered an error: "+errmsg+
                " <a href='#' class='close'>&times;</a></div>"); // add the error to the dom
            console.log(xhr.status + ": " + xhr.responseText); // provide a bit more info about the error to the console
        }
    });
};

What’s happening? Well, we submit form data to the create_post/ endpoint, then wait for one of two responses - either a success or a failure.... Follow the code comments for a more detailed explanation.

Update the views

Now let’s update our views to handle the POST request correctly:

def create_post(request):
    if request.method == 'POST':
        post_text = request.POST.get('the_post')
        response_data = {}

        post = Post(text=post_text, author=request.user)
        post.save()

        response_data['result'] = 'Create post successful!'
        response_data['postpk'] = post.pk
        response_data['text'] = post.text
        response_data['created'] = post.created.strftime('%B %d, %Y %I:%M %p')
        response_data['author'] = post.author.username

        return HttpResponse(
            json.dumps(response_data),
            content_type="application/json"
        )
    else:
        return HttpResponse(
            json.dumps({"nothing to see": "this isn't happening"}),
            content_type="application/json"
        )

Here we grab the post text along with the author and update the database. Then we create a response dict, serialize it into JSON, and then send it as the response - which gets logged to the console in the success handler: console.log(json), as you saw in the create_post() function in the JavaScript file above.

Test this again.

You should see the object in the console:

form submitted!
create post is working!
Object {text: "hey!", author: "michael", postpk: 15, result: "Create post successful!", created: "August 22, 2014 10:55 PM"}
success

Updating the DOM

Update the template

Simply add an id of “talk” to the <ul>:

<ul id="talk">

Then update the form so that errors will be added:

<form method="POST" id="post-form">
    {% csrf_token %}
    <div class="fieldWrapper" id="the_post">
        {{ form.text }}
    </div>
    <div id="results"></div> <!-- errors go here -->
    <input type="submit" value="Post" class="tiny button">
</form>

Update main.js

Now we can add the JSON to the DOM where that new “talk” id is:

success : function(json) {
    $('#post-text').val(''); // remove the value from the input
    console.log(json); // log the returned json to the console
    $("#talk").prepend("<li><strong>"+json.text+"</strong> - <em> "+json.author+"</em> - <span> "+json.created+"</span></li>");
    console.log("success"); // another sanity check
},

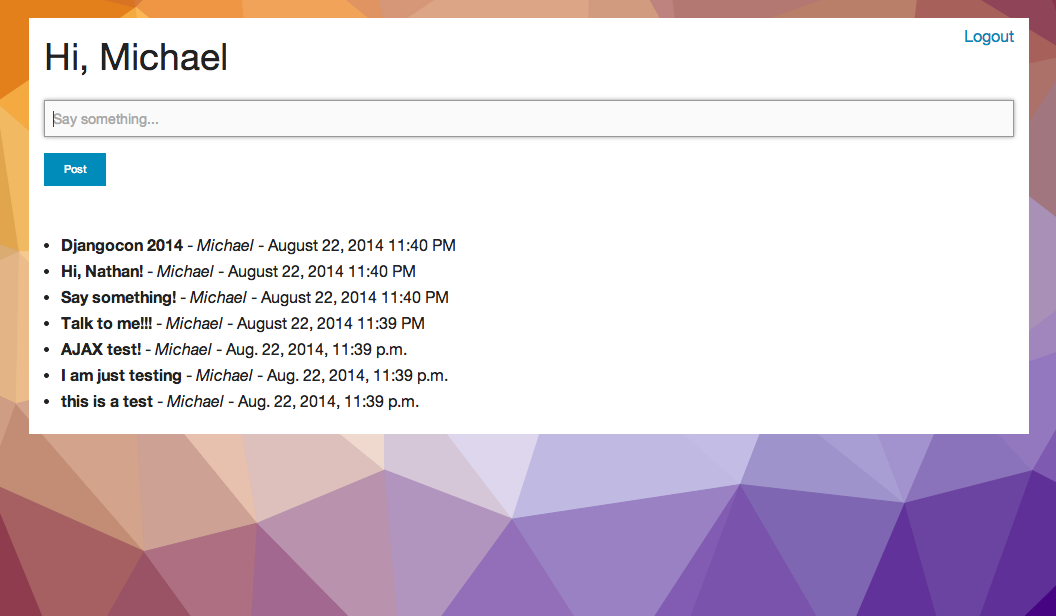
Ready to see this in action? Test it out!

Sign up for free to join this conversation on GitHub. Already have an account? Sign in to comment