/////////////////////////////////////// c%
claude zsh: command not found: claude ssh hatchery
cd infinity-topos
flox activate ╭────────────────────────────────────────────╮ │ ✻ Welcome to Claude Code research preview! │ │ │ │ /help for help │ │ │ │ cwd: /Users/barton/infinity-topos │ ╰────────────────────────────────────────────╯
✔ Found 27 MCP servers • /mcp ✔ Loaded project + user memory • /memory
/mcp ⎿ MCP Server Status ⎿ ⎿ • aider-mcp-server: connected ⎿ • anti-bullshit: connected ⎿ • apple-mcp: connected ⎿ • babashka: connected ⎿ • base-mcp: connected ⎿ • dialectical-coin: connected ⎿ • exa: connected ⎿ • firecrawl: connected ⎿ • github: connected ⎿ • github-mcp-server: failed ⎿ • kuzu: connected ⎿ • linear: connected ⎿ • manifold-markets: connected ⎿ • marginalia: connected ⎿ • mcpx: connected ⎿ • metaphor: connected ⎿ • motherduck: failed ⎿ • ngrok: connected ⎿ • omnimcp: failed ⎿ • paperproof-mcp: connected ⎿ • playwright: connected ⎿ • pulse: failed ⎿ • say: connected ⎿ • screenpipe: connected ⎿ • supabase: connected ⎿ • telegram: connected ⎿ • whatsapp: connected ⎿ ⎿ Run claude with --mcp-debug to see error logs inline, or view log files in: /Users/barton/Library/Caches/claude-cli-nodejs/-Users-barton-infinity-topos
Source: https://modelcontextprotocol.io/clients
A list of applications that support MCP integrations
This page provides an overview of applications that support the Model Context Protocol (MCP). Each client may support different MCP features, allowing for varying levels of integration with MCP servers.
| Client | Resources | Prompts | Tools | Sampling | Roots | Notes
|
| ------------------------------------ | ----------- | --------- | ------- | ---------- | ----- |
----------------------------------------------------------------------------------------------- |
| 5ire | ❌ | ❌ | ✅ | ❌ | ❌ | Supports tools.
|
| Apify MCP Tester | ❌ | ❌ | ✅ | ❌ | ❌ | Supports tools
|
| BeeAI Framework | ❌ | ❌ | ✅ | ❌ | ❌ | Supports tools in agentic workflows.
|
| Claude Code | ❌ | ✅ | ✅ | ❌ | ❌ | Supports prompts and tools
|
| Claude Desktop App | ✅ | ✅ | ✅ | ❌ | ❌ | Supports tools, prompts, and resources.
|
| Cline | ✅ | ❌ | ✅ | ❌ | ❌ | Supports tools and resources.
|
| Continue | ✅ | ✅ | ✅ | ❌ | ❌ | Supports tools, prompts, and resources.
|
| Copilot-MCP | ✅ | ❌ | ✅ | ❌ | ❌ | Supports tools and resources.
|
| Cursor | ❌ | ❌ | ✅ | ❌ | ❌ | Supports tools.
|
| Daydreams Agents | ✅ | ✅ | ✅ | ❌ | ❌ | Support for drop in Servers to Daydreams agents
|
| Emacs Mcp | ❌ | ❌ | ✅ | ❌ | ❌ | Supports tools in Emacs.
|
| fast-agent | ✅ | ✅ | ✅ | ✅ | ✅ | Full multimodal MCP support, with end-to-end tests
|
| Genkit |
|
| GenAIScript | ❌ | ❌ | ✅ | ❌ | ❌ | Supports tools.
|
| Goose | ❌ | ❌ | ✅ | ❌ | ❌ | Supports tools.
|
| LibreChat | ❌ | ❌ | ✅ | ❌ | ❌ | Supports tools for Agents
|
| mcp-agent | ❌ | ❌ | ✅ |
|
| OpenSumi | ❌ | ❌ | ✅ | ❌ | ❌ | Supports tools in OpenSumi
|
| oterm | ❌ | ✅ | ✅ | ❌ | ❌ | Supports tools and prompts.
|
| Roo Code | ✅ | ❌ | ✅ | ❌ | ❌ | Supports tools and resources.
|
| Sourcegraph Cody | ✅ | ❌ | ❌ | ❌ | ❌ | Supports resources through OpenCTX
|
| SpinAI | ❌ | ❌ | ✅ | ❌ | ❌ | Supports tools for Typescript AI Agents
|
| Superinterface | ❌ | ❌ | ✅ | ❌ | ❌ | Supports tools
|
| TheiaAI/TheiaIDE | ❌ | ❌ | ✅ | ❌ | ❌ | Supports tools for Agents in Theia AI and the AI-powered
Theia IDE |
| VS Code GitHub Copilot | ❌ | ❌ | ✅ | ❌ | ✅ | Supports dynamic tool/roots discovery, secure secret
configuration, and explicit tool prompting |
| Windsurf Editor | ❌ | ❌ | ✅ | ❌ | ❌ | Supports tools with AI Flow for collaborative
development. |
| Witsy | ❌ | ❌ | ✅ | ❌ | ❌ | Supports tools in Witsy.
|
| Zed | ❌ | ✅ | ❌ | ❌ | ❌ | Prompts appear as slash commands
|
5ire is an open source cross-platform desktop AI assistant that supports tools through MCP servers.
Key features:
- Built-in MCP servers can be quickly enabled and disabled.
- Users can add more servers by modifying the configuration file.
- It is open-source and user-friendly, suitable for beginners.
- Future support for MCP will be continuously improved.
Apify MCP Tester is an open-source client that connects to any MCP server using Server-Sent Events (SSE). It is a standalone Apify Actor designed for testing MCP servers over SSE, with support for Authorization headers. It uses plain JavaScript (old-school style) and is hosted on Apify, allowing you to run it without any setup.
Key features:
- Connects to any MCP server via SSE.
- Works with the Apify MCP Server to interact with one or more Apify Actors.
- Dynamically utilizes tools based on context and user queries (if supported by the server).
BeeAI Framework is an open-source framework for building, deploying, and serving powerful agentic workflows at scale. The framework includes the MCP Tool, a native feature that simplifies the integration of MCP servers into agentic workflows.
Key features:
- Seamlessly incorporate MCP tools into agentic workflows.
- Quickly instantiate framework-native tools from connected MCP client(s).
- Planned future support for agentic MCP capabilities.
Learn more:
Claude Code is an interactive agentic coding tool from Anthropic that helps you code faster through natural language commands. It supports MCP integration for prompts and tools, and also functions as an MCP server to integrate with other clients.
Key features:
- Tool and prompt support for MCP servers
- Offers its own tools through an MCP server for integrating with other MCP clients
The Claude desktop application provides comprehensive support for MCP, enabling deep integration with local tools and data sources.
Key features:
- Full support for resources, allowing attachment of local files and data
- Support for prompt templates
- Tool integration for executing commands and scripts
- Local server connections for enhanced privacy and security
ⓘ Note: The Claude.ai web application does not currently support MCP. MCP features are only available in the desktop application.
Cline is an autonomous coding agent in VS Code that edits files, runs commands, uses a browser, and more–with your permission at each step.
Key features:
- Create and add tools through natural language (e.g. "add a tool that searches the web")
- Share custom MCP servers Cline creates with others via the
~/Documents/Cline/MCPdirectory - Displays configured MCP servers along with their tools, resources, and any error logs
Continue is an open-source AI code assistant, with built-in support for all MCP features.
Key features
- Type "@" to mention MCP resources
- Prompt templates surface as slash commands
- Use both built-in and MCP tools directly in chat
- Supports VS Code and JetBrains IDEs, with any LLM
Copilot-MCP enables AI coding assistance via MCP.
Key features:
- Support for MCP tools and resources
- Integration with development workflows
- Extensible AI capabilities
Cursor is an AI code editor.
Key Features:
- Support for MCP tools in Cursor Composer
- Support for both STDIO and SSE
Daydreams is a generative agent framework for executing anything onchain
Key features:
- Supports MCP Servers in config
- Exposes MCP Client
Emacs Mcp is an Emacs client designed to interface with MCP servers, enabling seamless connections and interactions. It provides MCP tool invocation support for AI plugins like gptel and llm, adhering to Emacs' standard tool invocation format. This integration enhances the functionality of AI tools within the Emacs ecosystem.
Key features:
- Provides MCP tool support for Emacs.
fast-agent is a Python Agent framework, with simple declarative support for creating Agents and Workflows, with full multi-modal support for Anthropic and OpenAI models.
Key features:
- PDF and Image support, based on MCP Native types
- Interactive front-end to develop and diagnose Agent applications, including passthrough and playback simulators
- Built in support for "Building Effective Agents" workflows.
- Deploy Agents as MCP Servers
Genkit is a cross-language SDK for building and integrating GenAI features into applications. The genkitx-mcp plugin enables consuming MCP servers as a client or creating MCP servers from Genkit tools and prompts.
Key features:
- Client support for tools and prompts (resources partially supported)
- Rich discovery with support in Genkit's Dev UI playground
- Seamless interoperability with Genkit's existing tools and prompts
- Works across a wide variety of GenAI models from top providers
Programmatically assemble prompts for LLMs using GenAIScript (in JavaScript). Orchestrate LLMs, tools, and data in JavaScript.
Key features:
- JavaScript toolbox to work with prompts
- Abstraction to make it easy and productive
- Seamless Visual Studio Code integration
Goose is an open source AI agent that supercharges your software development by automating coding tasks.
Key features:
- Expose MCP functionality to Goose through tools.
- MCPs can be installed directly via the extensions directory, CLI, or UI.
- Goose allows you to extend its functionality by building your own MCP servers.
- Includes built-in tools for development, web scraping, automation, memory, and integrations with JetBrains and Google Drive.
LibreChat is an open-source, customizable AI chat UI that supports multiple AI providers, now including MCP integration.
Key features:
- Extend current tool ecosystem, including Code Interpreter and Image generation tools, through MCP servers
- Add tools to customizable Agents, using a variety of LLMs from top providers
- Open-source and self-hostable, with secure multi-user support
- Future roadmap includes expanded MCP feature support
mcp-agent is a simple, composable framework to build agents using Model Context Protocol.
Key features:
- Automatic connection management of MCP servers.
- Expose tools from multiple servers to an LLM.
- Implements every pattern defined in Building Effective Agents.
- Supports workflow pause/resume signals, such as waiting for human feedback.
Microsoft Copilot Studio is a robust SaaS platform designed for building custom AI-driven applications and intelligent agents, empowering developers to create, deploy, and manage sophisticated AI solutions.
Key features:
- Support for MCP tools
- Extend Copilot Studio agents with MCP servers
- Leveraging Microsoft unified, governed, and secure API management solutions
OpenSumi is a framework helps you quickly build AI Native IDE products.
Key features:
- Supports MCP tools in OpenSumi
- Supports built-in IDE MCP servers and custom MCP servers
oterm is a terminal client for Ollama allowing users to create chats/agents.
Key features:
- Support for multiple fully customizable chat sessions with Ollama connected with tools.
- Support for MCP tools.
Roo Code enables AI coding assistance via MCP.
Key features:
- Support for MCP tools and resources
- Integration with development workflows
- Extensible AI capabilities
Cody is Sourcegraph's AI coding assistant, which implements MCP through OpenCTX.
Key features:
- Support for MCP resources
- Integration with Sourcegraph's code intelligence
- Uses OpenCTX as an abstraction layer
- Future support planned for additional MCP features
SpinAI is an open-source TypeScript framework for building observable AI agents. The framework provides native MCP compatibility, allowing agents to seamlessly integrate with MCP servers and tools.
Key features:
- Built-in MCP compatibility for AI agents
- Open-source TypeScript framework
- Observable agent architecture
- Native support for MCP tools integration
Superinterface is AI infrastructure and a developer platform to build in-app AI assistants with support for MCP, interactive components, client-side function calling and more.
Key features:
- Use tools from MCP servers in assistants embedded via React components or script tags
- SSE transport support
- Use any AI model from any AI provider (OpenAI, Anthropic, Ollama, others)
Theia AI is a framework for building AI-enhanced tools and IDEs. The AI-powered Theia IDE is an open and flexible development environment built on Theia AI.
Key features:
- Tool Integration: Theia AI enables AI agents, including those in the Theia IDE, to utilize MCP servers for seamless tool interaction.
- Customizable Prompts: The Theia IDE allows users to define and adapt prompts, dynamically integrating MCP servers for tailored workflows.
- Custom agents: The Theia IDE supports creating custom agents that leverage MCP capabilities, enabling users to design dedicated workflows on the fly.
Theia AI and Theia IDE's MCP integration provide users with flexibility, making them powerful platforms for exploring and adapting MCP.
Learn more:
VS Code integrates MCP with GitHub Copilot through agent mode, allowing direct interaction with MCP-provided tools within your agentic coding workflow. Configure servers in Claude Desktop, workspace or user settings, with guided MCP installation and secure handling of keys in input variables to avoid leaking hard-coded keys.
Key features:
- Support for stdio and server-sent events (SSE) transport
- Per-session selection of tools per agent session for optimal performance
- Easy server debugging with restart commands and output logging
- Tool calls with editable inputs and always-allow toggle
- Integration with existing VS Code extension system to register MCP servers from extensions
Windsurf Editor is an agentic IDE that combines AI assistance with developer workflows. It features an innovative AI Flow system that enables both collaborative and independent AI interactions while maintaining developer control.
Key features:
- Revolutionary AI Flow paradigm for human-AI collaboration
- Intelligent code generation and understanding
- Rich development tools with multi-model support
Witsy is an AI desktop assistant, supoorting Anthropic models and MCP servers as LLM tools.
Key features:
- Multiple MCP servers support
- Tool integration for executing commands and scripts
- Local server connections for enhanced privacy and security
- Easy-install from Smithery.ai
- Open-source, available for macOS, Windows and Linux
Zed is a high-performance code editor with built-in MCP support, focusing on prompt templates and tool integration.
Key features:
- Prompt templates surface as slash commands in the editor
- Tool integration for enhanced coding workflows
- Tight integration with editor features and workspace context
- Does not support MCP resources
If you've added MCP support to your application, we encourage you to submit a pull request to add it to this list. MCP integration can provide your users with powerful contextual AI capabilities and make your application part of the growing MCP ecosystem.
Benefits of adding MCP support:
- Enable users to bring their own context and tools
- Join a growing ecosystem of interoperable AI applications
- Provide users with flexible integration options
- Support local-first AI workflows
To get started with implementing MCP in your application, check out our Python or TypeScript SDK Documentation
This list is maintained by the community. If you notice any inaccuracies or would like to update information about MCP support in your application, please submit a pull request or open an issue in our documentation repository.
Source: https://modelcontextprotocol.io/development/contributing
How to participate in Model Context Protocol development
We welcome contributions from the community! Please review our contributing guidelines for details on how to submit changes.
All contributors must adhere to our Code of Conduct.
For questions and discussions, please use GitHub Discussions.
Source: https://modelcontextprotocol.io/development/roadmap
Our plans for evolving Model Context Protocol
Last updated: 2025-03-27
The Model Context Protocol is rapidly evolving. This page outlines our current thinking on key priorities and direction for approximately the next six months, though these may change significantly as the project develops. To see what's changed recently, check out the specification changelog.
The ideas presented here are not commitments—we may solve these challenges differently than described, or some may not materialize at all. This is also not an exhaustive list; we may incorporate work that isn't mentioned here.
We value community participation! Each section links to relevant discussions where you can learn more and contribute your thoughts.
For a technical view of our standardization process, visit the Standards Track on GitHub, which tracks how proposals progress toward inclusion in the official MCP specification.
To foster a robust developer ecosystem, we plan to invest in:
- Reference Client Implementations: demonstrating protocol features with high-quality AI applications
- Compliance Test Suites: automated verification that clients, servers, and SDKs properly implement the specification
These tools will help developers confidently implement MCP while ensuring consistent behavior across the ecosystem.
For MCP to reach its full potential, we need streamlined ways to distribute and discover MCP servers.
We plan to develop an MCP Registry that will enable centralized server discovery and metadata. This registry will primarily function as an API layer that third-party marketplaces and discovery services can build upon.
As MCP increasingly becomes part of agentic workflows, we're exploring improvements such as:
- Agent Graphs: enabling complex agent topologies through namespacing and graph-aware communication patterns
- Interactive Workflows: improving human-in-the-loop experiences with granular permissioning, standardized interaction patterns, and ways to directly communicate with the end user
Supporting the full spectrum of AI capabilities in MCP, including:
- Additional Modalities: video and other media types
- Streaming: multipart, chunked messages, and bidirectional communication for interactive experiences
We're implementing governance structures that prioritize:
- Community-Led Development: fostering a collaborative ecosystem where community members and AI developers can all participate in MCP's evolution, ensuring it serves diverse applications and use cases
- Transparent Standardization: establishing clear processes for contributing to the specification, while exploring formal standardization via industry bodies
We welcome your contributions to MCP's future! Join our GitHub Discussions to share ideas, provide feedback, or participate in the development process.
Source: https://modelcontextprotocol.io/development/updates
The latest updates and improvements to MCP
* Version [0.9.0](https://github.com/modelcontextprotocol/java-sdk/releases/tag/v0.9.0) of the MCP Java SDK has been released. * Refactored logging system to use exchange mechanism * Custom Context Paths * Server Instructions * CallToolResult Enhancement * Fix issues and cleanup API * Added binary compatibility tracking to avoid breaking changes * Drop jdk requirements to JDK8 * Added Claude Desktop integration with sample * The full changelog can be found here: [https://github.com/modelcontextprotocol/kotlin-sdk/releases/tag/0.4.0](https://github.com/modelcontextprotocol/kotlin-sdk/releases/tag/0.4.0) * Version [0.8.1](https://github.com/modelcontextprotocol/java-sdk/releases/tag/v0.8.1) of the MCP Java SDK has been released, providing important bug fixes. * We are exited to announce the availability of the MCP [C# SDK](https://github.com/modelcontextprotocol/csharp-sdk/) developed by [Peder Holdgaard Pedersen](http://github.com/PederHP) and Microsoft. This joins our growing list of supported languages. The C# SDK is also available as [NuGet package](https://www.nuget.org/packages/ModelContextProtocol) * Python SDK 1.5.0 was released with multiple fixes and improvements. * Version [0.8.0](https://github.com/modelcontextprotocol/java-sdk/releases/tag/v0.8.0) of the MCP Java SDK has been released, delivering important session management improvements and bug fixes. * Typescript SDK 1.7.0 was released with multiple fixes and improvements. * We're excited to announce that the Java SDK developed by Spring AI at VMware Tanzu is now the official [Java SDK](https://github.com/modelcontextprotocol/java-sdk) for MCP. This joins our existing Kotlin SDK in our growing list of supported languages. The Spring AI team will maintain the SDK as an integral part of the Model Context Protocol organization. We're thrilled to welcome them to the MCP community! * Version [1.2.1](https://github.com/modelcontextprotocol/python-sdk/releases/tag/v1.2.1) of the MCP Python SDK has been released, delivering important stability improvements and bug fixes. * Simplified, express-like API in the [TypeScript SDK](https://github.com/modelcontextprotocol/typescript-sdk) * Added 8 new clients to the [clients page](https://modelcontextprotocol.io/clients) * FastMCP API in the [Python SDK](https://github.com/modelcontextprotocol/python-sdk) * Dockerized MCP servers in the [servers repo](https://github.com/modelcontextprotocol/servers) * Jetbrains released a Kotlin SDK for MCP! * For a sample MCP Kotlin server, check out [this repository](https://github.com/modelcontextprotocol/kotlin-sdk/tree/main/samples/kotlin-mcp-server)Source: https://modelcontextprotocol.io/docs/concepts/architecture
Understand how MCP connects clients, servers, and LLMs
The Model Context Protocol (MCP) is built on a flexible, extensible architecture that enables seamless communication between LLM applications and integrations. This document covers the core architectural components and concepts.
MCP follows a client-server architecture where:
- Hosts are LLM applications (like Claude Desktop or IDEs) that initiate connections
- Clients maintain 1:1 connections with servers, inside the host application
- Servers provide context, tools, and prompts to clients
flowchart LR
    subgraph "Host"
        client1[MCP Client]
        client2[MCP Client]
    end
    subgraph "Server Process"
        server1[MCP Server]
    end
    subgraph "Server Process"
        server2[MCP Server]
    end

    client1 <-->|Transport Layer| server1
    client2 <-->|Transport Layer| server2
The protocol layer handles message framing, request/response linking, and high-level communication patterns.
```typescript class Protocol { // Handle incoming requests setRequestHandler(schema: T, handler: (request: T, extra: RequestHandlerExtra) => Promise): void // Handle incoming notifications
setNotificationHandler<T>(schema: T, handler: (notification: T) => Promise<void>): void
// Send requests and await responses
request<T>(request: Request, schema: T, options?: RequestOptions): Promise<T>
// Send one-way notifications
notification(notification: Notification): Promise<void>
}
```
</Tab>
<Tab title="Python">
```python
class Session(BaseSession[RequestT, NotificationT, ResultT]):
async def send_request(
self,
request: RequestT,
result_type: type[Result]
) -> Result:
"""Send request and wait for response. Raises McpError if response contains error."""
# Request handling implementation
async def send_notification(
self,
notification: NotificationT
) -> None:
"""Send one-way notification that doesn't expect response."""
# Notification handling implementation
async def _received_request(
self,
responder: RequestResponder[ReceiveRequestT, ResultT]
) -> None:
"""Handle incoming request from other side."""
# Request handling implementation
async def _received_notification(
self,
notification: ReceiveNotificationT
) -> None:
"""Handle incoming notification from other side."""
# Notification handling implementation
```
</Tab>
Key classes include:
ProtocolClientServer
The transport layer handles the actual communication between clients and servers. MCP supports multiple transport mechanisms:
-
Stdio transport
- Uses standard input/output for communication
- Ideal for local processes
-
HTTP with SSE transport
- Uses Server-Sent Events for server-to-client messages
- HTTP POST for client-to-server messages
All transports use JSON-RPC 2.0 to exchange messages. See the specification for detailed information about the Model Context Protocol message format.
MCP has these main types of messages:
-
Requests expect a response from the other side:
interface Request {
  method: string;
  params?: { ... };
}
-
Results are successful responses to requests:
interface Result {
  [key: string]: unknown;
}
-
Errors indicate that a request failed:
interface Error {
  code: number;
  message: string;
  data?: unknown;
}
-
Notifications are one-way messages that don't expect a response:
interface Notification {
  method: string;
  params?: { ... };
}
sequenceDiagram
    participant Client
    participant Server

    Client->>Server: initialize request
    Server->>Client: initialize response
    Client->>Server: initialized notification

    Note over Client,Server: Connection ready for use
- Client sends
initializerequest with protocol version and capabilities - Server responds with its protocol version and capabilities
- Client sends
initializednotification as acknowledgment - Normal message exchange begins
After initialization, the following patterns are supported:
- Request-Response: Client or server sends requests, the other responds
- Notifications: Either party sends one-way messages
Either party can terminate the connection:
- Clean shutdown via
close() - Transport disconnection
- Error conditions
MCP defines these standard error codes:
enum ErrorCode {
  // Standard JSON-RPC error codes
  ParseError = -32700,
  InvalidRequest = -32600,
  MethodNotFound = -32601,
  InvalidParams = -32602,
  InternalError = -32603
}
SDKs and applications can define their own error codes above -32000.
Errors are propagated through:
- Error responses to requests
- Error events on transports
- Protocol-level error handlers
Here's a basic example of implementing an MCP server:
```typescript import { Server } from "@modelcontextprotocol/sdk/server/index.js"; import { StdioServerTransport } from "@modelcontextprotocol/sdk/server/stdio.js"; const server = new Server({
name: "example-server",
version: "1.0.0"
}, {
capabilities: {
resources: {}
}
});
// Handle requests
server.setRequestHandler(ListResourcesRequestSchema, async () => {
return {
resources: [
{
uri: "example://resource",
name: "Example Resource"
}
]
};
});
// Connect transport
const transport = new StdioServerTransport();
await server.connect(transport);
```
</Tab>
<Tab title="Python">
```python
import asyncio
import mcp.types as types
from mcp.server import Server
from mcp.server.stdio import stdio_server
app = Server("example-server")
@app.list_resources()
async def list_resources() -> list[types.Resource]:
return [
types.Resource(
uri="example://resource",
name="Example Resource"
)
]
async def main():
async with stdio_server() as streams:
await app.run(
streams[0],
streams[1],
app.create_initialization_options()
)
if __name__ == "__main__":
asyncio.run(main())
```
</Tab>
-
Local communication
- Use stdio transport for local processes
- Efficient for same-machine communication
- Simple process management
-
Remote communication
- Use SSE for scenarios requiring HTTP compatibility
- Consider security implications including authentication and authorization
-
Request processing
- Validate inputs thoroughly
- Use type-safe schemas
- Handle errors gracefully
- Implement timeouts
-
Progress reporting
- Use progress tokens for long operations
- Report progress incrementally
- Include total progress when known
-
Error management
- Use appropriate error codes
- Include helpful error messages
- Clean up resources on errors
-
Transport security
- Use TLS for remote connections
- Validate connection origins
- Implement authentication when needed
-
Message validation
- Validate all incoming messages
- Sanitize inputs
- Check message size limits
- Verify JSON-RPC format
-
Resource protection
- Implement access controls
- Validate resource paths
- Monitor resource usage
- Rate limit requests
-
Error handling
- Don't leak sensitive information
- Log security-relevant errors
- Implement proper cleanup
- Handle DoS scenarios
-
Logging
- Log protocol events
- Track message flow
- Monitor performance
- Record errors
-
Diagnostics
- Implement health checks
- Monitor connection state
- Track resource usage
- Profile performance
-
Testing
- Test different transports
- Verify error handling
- Check edge cases
- Load test servers
Source: https://modelcontextprotocol.io/docs/concepts/prompts
Create reusable prompt templates and workflows
Prompts enable servers to define reusable prompt templates and workflows that clients can easily surface to users and LLMs. They provide a powerful way to standardize and share common LLM interactions.
Prompts are designed to be **user-controlled**, meaning they are exposed from servers to clients with the intention of the user being able to explicitly select them for use.Prompts in MCP are predefined templates that can:
- Accept dynamic arguments
- Include context from resources
- Chain multiple interactions
- Guide specific workflows
- Surface as UI elements (like slash commands)
Each prompt is defined with:
{
  name: string;              // Unique identifier for the prompt
  description?: string;      // Human-readable description
  arguments?: [              // Optional list of arguments
    {
      name: string;          // Argument identifier
      description?: string;  // Argument description
      required?: boolean;    // Whether argument is required
    }
  ]
}Clients can discover available prompts through the prompts/list endpoint:
// Request
{
  method: "prompts/list"
}

// Response
{
  prompts: [
    {
      name: "analyze-code",
      description: "Analyze code for potential improvements",
      arguments: [
        {
          name: "language",
          description: "Programming language",
          required: true
        }
      ]
    }
  ]
}To use a prompt, clients make a prompts/get request:
// Request
{
  method: "prompts/get",
  params: {
    name: "analyze-code",
    arguments: {
      language: "python"
    }
  }
}

// Response
{
  description: "Analyze Python code for potential improvements",
  messages: [
    {
      role: "user",
      content: {
        type: "text",
        text: "Please analyze the following Python code for potential improvements:\n\n```python\ndef calculate_sum(numbers):\n    total = 0\n    for num in
numbers:\n        total = total + num\n    return total\n\nresult = calculate_sum([1, 2, 3, 4, 5])\nprint(result)\n```"
      }
    }
  ]
}Prompts can be dynamic and include:
{
  "name": "analyze-project",
  "description": "Analyze project logs and code",
  "arguments": [
    {
      "name": "timeframe",
      "description": "Time period to analyze logs",
      "required": true
    },
    {
      "name": "fileUri",
      "description": "URI of code file to review",
      "required": true
    }
  ]
}
When handling the prompts/get request:
{
  "messages": [
    {
      "role": "user",
      "content": {
        "type": "text",
        "text": "Analyze these system logs and the code file for any issues:"
      }
    },
    {
      "role": "user",
      "content": {
        "type": "resource",
        "resource": {
          "uri": "logs://recent?timeframe=1h",
          "text": "[2024-03-14 15:32:11] ERROR: Connection timeout in network.py:127\n[2024-03-14 15:32:15] WARN: Retrying connection (attempt 2/3)\n[2024-03-14
 15:32:20] ERROR: Max retries exceeded",
          "mimeType": "text/plain"
        }
      }
    },
    {
      "role": "user",
      "content": {
        "type": "resource",
        "resource": {
          "uri": "file:///path/to/code.py",
          "text": "def connect_to_service(timeout=30):\n    retries = 3\n    for attempt in range(retries):\n        try:\n            return
establish_connection(timeout)\n        except TimeoutError:\n            if attempt == retries - 1:\n                raise\n            time.sleep(5)\n\ndef
establish_connection(timeout):\n    # Connection implementation\n    pass",
          "mimeType": "text/x-python"
        }
      }
    }
  ]
}const debugWorkflow = {
name: "debug-error",
async getMessages(error: string) {
return [
{
role: "user",
content: {
type: "text",
text: `Here's an error I'm seeing: ${error}`
}
},
{
role: "assistant",
content: {
type: "text",
text: "I'll help analyze this error. What have you tried so far?"
}
},
{
role: "user",
content: {
type: "text",
text: "I've tried restarting the service, but the error persists."
}
}
];
}
};Here's a complete example of implementing prompts in an MCP server:
```typescript import { Server } from "@modelcontextprotocol/sdk/server"; import { ListPromptsRequestSchema, GetPromptRequestSchema } from "@modelcontextprotocol/sdk/types"; const PROMPTS = {
"git-commit": {
name: "git-commit",
description: "Generate a Git commit message",
arguments: [
{
name: "changes",
description: "Git diff or description of changes",
required: true
}
]
},
"explain-code": {
name: "explain-code",
description: "Explain how code works",
arguments: [
{
name: "code",
description: "Code to explain",
required: true
},
{
name: "language",
description: "Programming language",
required: false
}
]
}
};
const server = new Server({
name: "example-prompts-server",
version: "1.0.0"
}, {
capabilities: {
prompts: {}
}
});
// List available prompts
server.setRequestHandler(ListPromptsRequestSchema, async () => {
return {
prompts: Object.values(PROMPTS)
};
});
// Get specific prompt
server.setRequestHandler(GetPromptRequestSchema, async (request) => {
const prompt = PROMPTS[request.params.name];
if (!prompt) {
throw new Error(`Prompt not found: ${request.params.name}`);
}
if (request.params.name === "git-commit") {
return {
messages: [
{
role: "user",
content: {
type: "text",
text: `Generate a concise but descriptive commit message for these changes:\n\n${request.params.arguments?.changes}`
}
}
]
};
}
if (request.params.name === "explain-code") {
const language = request.params.arguments?.language || "Unknown";
return {
messages: [
{
role: "user",
content: {
type: "text",
text: `Explain how this ${language} code works:\n\n${request.params.arguments?.code}`
}
}
]
};
}
throw new Error("Prompt implementation not found");
});
```
</Tab>
<Tab title="Python">
```python
from mcp.server import Server
import mcp.types as types
# Define available prompts
PROMPTS = {
"git-commit": types.Prompt(
name="git-commit",
description="Generate a Git commit message",
arguments=[
types.PromptArgument(
name="changes",
description="Git diff or description of changes",
required=True
)
],
),
"explain-code": types.Prompt(
name="explain-code",
description="Explain how code works",
arguments=[
types.PromptArgument(
name="code",
description="Code to explain",
required=True
),
types.PromptArgument(
name="language",
description="Programming language",
required=False
)
],
)
}
# Initialize server
app = Server("example-prompts-server")
@app.list_prompts()
async def list_prompts() -> list[types.Prompt]:
return list(PROMPTS.values())
@app.get_prompt()
async def get_prompt(
name: str, arguments: dict[str, str] | None = None
) -> types.GetPromptResult:
if name not in PROMPTS:
raise ValueError(f"Prompt not found: {name}")
if name == "git-commit":
changes = arguments.get("changes") if arguments else ""
return types.GetPromptResult(
messages=[
types.PromptMessage(
role="user",
content=types.TextContent(
type="text",
text=f"Generate a concise but descriptive commit message "
f"for these changes:\n\n{changes}"
)
)
]
)
if name == "explain-code":
code = arguments.get("code") if arguments else ""
language = arguments.get("language", "Unknown") if arguments else "Unknown"
return types.GetPromptResult(
messages=[
types.PromptMessage(
role="user",
content=types.TextContent(
type="text",
text=f"Explain how this {language} code works:\n\n{code}"
)
)
]
)
raise ValueError("Prompt implementation not found")
```
</Tab>
When implementing prompts:
- Use clear, descriptive prompt names
- Provide detailed descriptions for prompts and arguments
- Validate all required arguments
- Handle missing arguments gracefully
- Consider versioning for prompt templates
- Cache dynamic content when appropriate
- Implement error handling
- Document expected argument formats
- Consider prompt composability
- Test prompts with various inputs
Prompts can be surfaced in client UIs as:
- Slash commands
- Quick actions
- Context menu items
- Command palette entries
- Guided workflows
- Interactive forms
Servers can notify clients about prompt changes:
- Server capability:
prompts.listChanged - Notification:
notifications/prompts/list_changed - Client re-fetches prompt list
When implementing prompts:
- Validate all arguments
- Sanitize user input
- Consider rate limiting
- Implement access controls
- Audit prompt usage
- Handle sensitive data appropriately
- Validate generated content
- Implement timeouts
- Consider prompt injection risks
- Document security requirements
Source: https://modelcontextprotocol.io/docs/concepts/resources
Expose data and content from your servers to LLMs
Resources are a core primitive in the Model Context Protocol (MCP) that allow servers to expose data and content that can be read by clients and used as context for LLM interactions.
Resources are designed to be **application-controlled**, meaning that the client application can decide how and when they should be used. Different MCP clients may handle resources differently. For example:* Claude Desktop currently requires users to explicitly select resources before they can be used
* Other clients might automatically select resources based on heuristics
* Some implementations may even allow the AI model itself to determine which resources to use
Server authors should be prepared to handle any of these interaction patterns when implementing resource support. In order to expose data to models
automatically, server authors should use a model-controlled primitive such as Tools.
Resources represent any kind of data that an MCP server wants to make available to clients. This can include:
- File contents
- Database records
- API responses
- Live system data
- Screenshots and images
- Log files
- And more
Each resource is identified by a unique URI and can contain either text or binary data.
Resources are identified using URIs that follow this format:
[protocol]://[host]/[path]
For example:
file:///home/user/documents/report.pdfpostgres://database/customers/schemascreen://localhost/display1
The protocol and path structure is defined by the MCP server implementation. Servers can define their own custom URI schemes.
Resources can contain two types of content:
Text resources contain UTF-8 encoded text data. These are suitable for:
- Source code
- Configuration files
- Log files
- JSON/XML data
- Plain text
Binary resources contain raw binary data encoded in base64. These are suitable for:
- Images
- PDFs
- Audio files
- Video files
- Other non-text formats
Clients can discover available resources through two main methods:
Servers expose a list of concrete resources via the resources/list endpoint. Each resource includes:
{
  uri: string;           // Unique identifier for the resource
  name: string;          // Human-readable name
  description?: string;  // Optional description
  mimeType?: string;     // Optional MIME type
}For dynamic resources, servers can expose URI templates that clients can use to construct valid resource URIs:
{
  uriTemplate: string;   // URI template following RFC 6570
  name: string;          // Human-readable name for this type
  description?: string;  // Optional description
  mimeType?: string;     // Optional MIME type for all matching resources
}To read a resource, clients make a resources/read request with the resource URI.
The server responds with a list of resource contents:
{
  contents: [
    {
      uri: string;        // The URI of the resource
      mimeType?: string;  // Optional MIME type

      // One of:
      text?: string;      // For text resources
      blob?: string;      // For binary resources (base64 encoded)
    }
  ]
}MCP supports real-time updates for resources through two mechanisms:
Servers can notify clients when their list of available resources changes via the notifications/resources/list_changed notification.
Clients can subscribe to updates for specific resources:
- Client sends
resources/subscribewith resource URI - Server sends
notifications/resources/updatedwhen the resource changes - Client can fetch latest content with
resources/read - Client can unsubscribe with
resources/unsubscribe
Here's a simple example of implementing resource support in an MCP server:
```typescript const server = new Server({ name: "example-server", version: "1.0.0" }, { capabilities: { resources: {} } }); // List available resources
server.setRequestHandler(ListResourcesRequestSchema, async () => {
return {
resources: [
{
uri: "file:///logs/app.log",
name: "Application Logs",
mimeType: "text/plain"
}
]
};
});
// Read resource contents
server.setRequestHandler(ReadResourceRequestSchema, async (request) => {
const uri = request.params.uri;
if (uri === "file:///logs/app.log") {
const logContents = await readLogFile();
return {
contents: [
{
uri,
mimeType: "text/plain",
text: logContents
}
]
};
}
throw new Error("Resource not found");
});
```
</Tab>
<Tab title="Python">
```python
app = Server("example-server")
@app.list_resources()
async def list_resources() -> list[types.Resource]:
return [
types.Resource(
uri="file:///logs/app.log",
name="Application Logs",
mimeType="text/plain"
)
]
@app.read_resource()
async def read_resource(uri: AnyUrl) -> str:
if str(uri) == "file:///logs/app.log":
log_contents = await read_log_file()
return log_contents
raise ValueError("Resource not found")
# Start server
async with stdio_server() as streams:
await app.run(
streams[0],
streams[1],
app.create_initialization_options()
)
```
</Tab>
When implementing resource support:
- Use clear, descriptive resource names and URIs
- Include helpful descriptions to guide LLM understanding
- Set appropriate MIME types when known
- Implement resource templates for dynamic content
- Use subscriptions for frequently changing resources
- Handle errors gracefully with clear error messages
- Consider pagination for large resource lists
- Cache resource contents when appropriate
- Validate URIs before processing
- Document your custom URI schemes
When exposing resources:
- Validate all resource URIs
- Implement appropriate access controls
- Sanitize file paths to prevent directory traversal
- Be cautious with binary data handling
- Consider rate limiting for resource reads
- Audit resource access
- Encrypt sensitive data in transit
- Validate MIME types
- Implement timeouts for long-running reads
- Handle resource cleanup appropriately
Source: https://modelcontextprotocol.io/docs/concepts/roots
Understanding roots in MCP
Roots are a concept in MCP that define the boundaries where servers can operate. They provide a way for clients to inform servers about relevant resources and their locations.
A root is a URI that a client suggests a server should focus on. When a client connects to a server, it declares which roots the server should work with. While primarily used for filesystem paths, roots can be any valid URI including HTTP URLs.
For example, roots could be:
file:///home/user/projects/myapp
https://api.example.com/v1
Roots serve several important purposes:
- Guidance: They inform servers about relevant resources and locations
- Clarity: Roots make it clear which resources are part of your workspace
- Organization: Multiple roots let you work with different resources simultaneously
When a client supports roots, it:
- Declares the
rootscapability during connection - Provides a list of suggested roots to the server
- Notifies the server when roots change (if supported)
While roots are informational and not strictly enforcing, servers should:
- Respect the provided roots
- Use root URIs to locate and access resources
- Prioritize operations within root boundaries
Roots are commonly used to define:
- Project directories
- Repository locations
- API endpoints
- Configuration locations
- Resource boundaries
When working with roots:
- Only suggest necessary resources
- Use clear, descriptive names for roots
- Monitor root accessibility
- Handle root changes gracefully
Here's how a typical MCP client might expose roots:
{
  "roots": [
    {
      "uri": "file:///home/user/projects/frontend",
      "name": "Frontend Repository"
    },
    {
      "uri": "https://api.example.com/v1",
      "name": "API Endpoint"
    }
  ]
}
This configuration suggests the server focus on both a local repository and an API endpoint while keeping them logically separated.
Source: https://modelcontextprotocol.io/docs/concepts/sampling
Let your servers request completions from LLMs
Sampling is a powerful MCP feature that allows servers to request LLM completions through the client, enabling sophisticated agentic behaviors while maintaining security and privacy.
This feature of MCP is not yet supported in the Claude Desktop client.The sampling flow follows these steps:
- Server sends a
sampling/createMessagerequest to the client - Client reviews the request and can modify it
- Client samples from an LLM
- Client reviews the completion
- Client returns the result to the server
This human-in-the-loop design ensures users maintain control over what the LLM sees and generates.
Sampling requests use a standardized message format:
{
  messages: [
    {
      role: "user" | "assistant",
      content: {
        type: "text" | "image",

        // For text:
        text?: string,

        // For images:
        data?: string,             // base64 encoded
        mimeType?: string
      }
    }
  ],
  modelPreferences?: {
    hints?: [{
      name?: string                // Suggested model name/family
    }],
    costPriority?: number,         // 0-1, importance of minimizing cost
    speedPriority?: number,        // 0-1, importance of low latency
    intelligencePriority?: number  // 0-1, importance of capabilities
  },
  systemPrompt?: string,
  includeContext?: "none" | "thisServer" | "allServers",
  temperature?: number,
  maxTokens: number,
  stopSequences?: string[],
  metadata?: Record<string, unknown>
}The messages array contains the conversation history to send to the LLM. Each message has:
role: Either "user" or "assistant"content: The message content, which can be:- Text content with a
textfield - Image content with
data(base64) andmimeTypefields
- Text content with a
The modelPreferences object allows servers to specify their model selection preferences:
-
hints: Array of model name suggestions that clients can use to select an appropriate model:name: String that can match full or partial model names (e.g. "claude-3", "sonnet")- Clients may map hints to equivalent models from different providers
- Multiple hints are evaluated in preference order
-
Priority values (0-1 normalized):
costPriority: Importance of minimizing costsspeedPriority: Importance of low latency responseintelligencePriority: Importance of advanced model capabilities
Clients make the final model selection based on these preferences and their available models.
An optional systemPrompt field allows servers to request a specific system prompt. The client may modify or ignore this.
The includeContext parameter specifies what MCP context to include:
"none": No additional context"thisServer": Include context from the requesting server"allServers": Include context from all connected MCP servers
The client controls what context is actually included.
Fine-tune the LLM sampling with:
temperature: Controls randomness (0.0 to 1.0)maxTokens: Maximum tokens to generatestopSequences: Array of sequences that stop generationmetadata: Additional provider-specific parameters
The client returns a completion result:
{
  model: string,  // Name of the model used
  stopReason?: "endTurn" | "stopSequence" | "maxTokens" | string,
  role: "user" | "assistant",
  content: {
    type: "text" | "image",
    text?: string,
    data?: string,
    mimeType?: string
  }
}Here's an example of requesting sampling from a client:
{
  "method": "sampling/createMessage",
  "params": {
    "messages": [
      {
        "role": "user",
        "content": {
          "type": "text",
          "text": "What files are in the current directory?"
        }
      }
    ],
    "systemPrompt": "You are a helpful file system assistant.",
    "includeContext": "thisServer",
    "maxTokens": 100
  }
}When implementing sampling:
- Always provide clear, well-structured prompts
- Handle both text and image content appropriately
- Set reasonable token limits
- Include relevant context through
includeContext - Validate responses before using them
- Handle errors gracefully
- Consider rate limiting sampling requests
- Document expected sampling behavior
- Test with various model parameters
- Monitor sampling costs
Sampling is designed with human oversight in mind:
- Clients should show users the proposed prompt
- Users should be able to modify or reject prompts
- System prompts can be filtered or modified
- Context inclusion is controlled by the client
- Clients should show users the completion
- Users should be able to modify or reject completions
- Clients can filter or modify completions
- Users control which model is used
When implementing sampling:
- Validate all message content
- Sanitize sensitive information
- Implement appropriate rate limits
- Monitor sampling usage
- Encrypt data in transit
- Handle user data privacy
- Audit sampling requests
- Control cost exposure
- Implement timeouts
- Handle model errors gracefully
Sampling enables agentic patterns like:
- Reading and analyzing resources
- Making decisions based on context
- Generating structured data
- Handling multi-step tasks
- Providing interactive assistance
Best practices for context:
- Request minimal necessary context
- Structure context clearly
- Handle context size limits
- Update context as needed
- Clean up stale context
Robust error handling should:
- Catch sampling failures
- Handle timeout errors
- Manage rate limits
- Validate responses
- Provide fallback behaviors
- Log errors appropriately
Be aware of these limitations:
- Sampling depends on client capabilities
- Users control sampling behavior
- Context size has limits
- Rate limits may apply
- Costs should be considered
- Model availability varies
- Response times vary
- Not all content types supported
Source: https://modelcontextprotocol.io/docs/concepts/tools
Enable LLMs to perform actions through your server
Tools are a powerful primitive in the Model Context Protocol (MCP) that enable servers to expose executable functionality to clients. Through tools, LLMs can interact with external systems, perform computations, and take actions in the real world.
Tools are designed to be **model-controlled**, meaning that tools are exposed from servers to clients with the intention of the AI model being able to automatically invoke them (with a human in the loop to grant approval).Tools in MCP allow servers to expose executable functions that can be invoked by clients and used by LLMs to perform actions. Key aspects of tools include:
- Discovery: Clients can list available tools through the
tools/listendpoint - Invocation: Tools are called using the
tools/callendpoint, where servers perform the requested operation and return results - Flexibility: Tools can range from simple calculations to complex API interactions
Like resources, tools are identified by unique names and can include descriptions to guide their usage. However, unlike resources, tools represent dynamic operations that can modify state or interact with external systems.
Each tool is defined with the following structure:
{
  name: string;          // Unique identifier for the tool
  description?: string;  // Human-readable description
  inputSchema: {         // JSON Schema for the tool's parameters
    type: "object",
    properties: { ... }  // Tool-specific parameters
  },
  annotations?: {        // Optional hints about tool behavior
    title?: string;      // Human-readable title for the tool
    readOnlyHint?: boolean;    // If true, the tool does not modify its environment
    destructiveHint?: boolean; // If true, the tool may perform destructive updates
    idempotentHint?: boolean;  // If true, repeated calls with same args have no additional effect
    openWorldHint?: boolean;   // If true, tool interacts with external entities
  }
}Here's an example of implementing a basic tool in an MCP server:
```typescript const server = new Server({ name: "example-server", version: "1.0.0" }, { capabilities: { tools: {} } }); // Define available tools
server.setRequestHandler(ListToolsRequestSchema, async () => {
return {
tools: [{
name: "calculate_sum",
description: "Add two numbers together",
inputSchema: {
type: "object",
properties: {
a: { type: "number" },
b: { type: "number" }
},
required: ["a", "b"]
}
}]
};
});
// Handle tool execution
server.setRequestHandler(CallToolRequestSchema, async (request) => {
if (request.params.name === "calculate_sum") {
const { a, b } = request.params.arguments;
return {
content: [
{
type: "text",
text: String(a + b)
}
]
};
}
throw new Error("Tool not found");
});
```
</Tab>
<Tab title="Python">
```python
app = Server("example-server")
@app.list_tools()
async def list_tools() -> list[types.Tool]:
return [
types.Tool(
name="calculate_sum",
description="Add two numbers together",
inputSchema={
"type": "object",
"properties": {
"a": {"type": "number"},
"b": {"type": "number"}
},
"required": ["a", "b"]
}
)
]
@app.call_tool()
async def call_tool(
name: str,
arguments: dict
) -> list[types.TextContent | types.ImageContent | types.EmbeddedResource]:
if name == "calculate_sum":
a = arguments["a"]
b = arguments["b"]
result = a + b
return [types.TextContent(type="text", text=str(result))]
raise ValueError(f"Tool not found: {name}")
```
</Tab>
Here are some examples of types of tools that a server could provide:
Tools that interact with the local system:
{
  name: "execute_command",
  description: "Run a shell command",
  inputSchema: {
    type: "object",
    properties: {
      command: { type: "string" },
      args: { type: "array", items: { type: "string" } }
    }
  }
}Tools that wrap external APIs:
{
  name: "github_create_issue",
  description: "Create a GitHub issue",
  inputSchema: {
    type: "object",
    properties: {
      title: { type: "string" },
      body: { type: "string" },
      labels: { type: "array", items: { type: "string" } }
    }
  }
}Tools that transform or analyze data:
{
  name: "analyze_csv",
  description: "Analyze a CSV file",
  inputSchema: {
    type: "object",
    properties: {
      filepath: { type: "string" },
      operations: {
        type: "array",
        items: {
          enum: ["sum", "average", "count"]
        }
      }
    }
  }
}When implementing tools:
- Provide clear, descriptive names and descriptions
- Use detailed JSON Schema definitions for parameters
- Include examples in tool descriptions to demonstrate how the model should use them
- Implement proper error handling and validation
- Use progress reporting for long operations
- Keep tool operations focused and atomic
- Document expected return value structures
- Implement proper timeouts
- Consider rate limiting for resource-intensive operations
- Log tool usage for debugging and monitoring
When exposing tools:
- Validate all parameters against the schema
- Sanitize file paths and system commands
- Validate URLs and external identifiers
- Check parameter sizes and ranges
- Prevent command injection
- Implement authentication where needed
- Use appropriate authorization checks
- Audit tool usage
- Rate limit requests
- Monitor for abuse
- Don't expose internal errors to clients
- Log security-relevant errors
- Handle timeouts appropriately
- Clean up resources after errors
- Validate return values
MCP supports dynamic tool discovery:
- Clients can list available tools at any time
- Servers can notify clients when tools change using
notifications/tools/list_changed - Tools can be added or removed during runtime
- Tool definitions can be updated (though this should be done carefully)
Tool errors should be reported within the result object, not as MCP protocol-level errors. This allows the LLM to see and potentially handle the error. When a tool encounters an error:
- Set
isErrortotruein the result - Include error details in the
contentarray
Here's an example of proper error handling for tools:
```typescript try { // Tool operation const result = performOperation(); return { content: [ { type: "text", text: `Operation successful: ${result}` } ] }; } catch (error) { return { isError: true, content: [ { type: "text", text: `Error: ${error.message}` } ] }; } ```<Tab title="Python">
```python
try:
# Tool operation
result = perform_operation()
return types.CallToolResult(
content=[
types.TextContent(
type="text",
text=f"Operation successful: {result}"
)
]
)
except Exception as error:
return types.CallToolResult(
isError=True,
content=[
types.TextContent(
type="text",
text=f"Error: {str(error)}"
)
]
)
```
</Tab>
This approach allows the LLM to see that an error occurred and potentially take corrective action or request human intervention.
Tool annotations provide additional metadata about a tool's behavior, helping clients understand how to present and manage tools. These annotations are hints that describe the nature and impact of a tool, but should not be relied upon for security decisions.
Tool annotations serve several key purposes:
- Provide UX-specific information without affecting model context
- Help clients categorize and present tools appropriately
- Convey information about a tool's potential side effects
- Assist in developing intuitive interfaces for tool approval
The MCP specification defines the following annotations for tools:
| Annotation | Type | Default | Description
|
| ----------------- | ------- | ------- |
------------------------------------------------------------------------------------------------------------------------------------ |
| title | string | - | A human-readable title for the tool, useful for UI display
|
| readOnlyHint | boolean | false | If true, indicates the tool does not modify its environment
|
| destructiveHint | boolean | true | If true, the tool may perform destructive updates (only meaningful when readOnlyHint is false)
|
| idempotentHint | boolean | false | If true, calling the tool repeatedly with the same arguments has no additional effect (only meaningful when
readOnlyHint is false) |
| openWorldHint | boolean | true | If true, the tool may interact with an "open world" of external entities
|
Here's how to define tools with annotations for different scenarios:
// A read-only search tool
{
  name: "web_search",
  description: "Search the web for information",
  inputSchema: {
    type: "object",
    properties: {
      query: { type: "string" }
    },
    required: ["query"]
  },
  annotations: {
    title: "Web Search",
    readOnlyHint: true,
    openWorldHint: true
  }
}

// A destructive file deletion tool
{
  name: "delete_file",
  description: "Delete a file from the filesystem",
  inputSchema: {
    type: "object",
    properties: {
      path: { type: "string" }
    },
    required: ["path"]
  },
  annotations: {
    title: "Delete File",
    readOnlyHint: false,
    destructiveHint: true,
    idempotentHint: true,
    openWorldHint: false
  }
}

// A non-destructive database record creation tool
{
  name: "create_record",
  description: "Create a new record in the database",
  inputSchema: {
    type: "object",
    properties: {
      table: { type: "string" },
      data: { type: "object" }
    },
    required: ["table", "data"]
  },
  annotations: {
    title: "Create Database Record",
    readOnlyHint: false,
    destructiveHint: false,
    idempotentHint: false,
    openWorldHint: false
  }
}<Tab title="Python">
```python
from mcp.server.fastmcp import FastMCP
mcp = FastMCP("example-server")
@mcp.tool(
annotations={
"title": "Calculate Sum",
"readOnlyHint": True,
"openWorldHint": False
}
)
async def calculate_sum(a: float, b: float) -> str:
"""Add two numbers together.
Args:
a: First number to add
b: Second number to add
"""
result = a + b
return str(result)
```
</Tab>
-
Be accurate about side effects: Clearly indicate whether a tool modifies its environment and whether those modifications are destructive.
-
Use descriptive titles: Provide human-friendly titles that clearly describe the tool's purpose.
-
Indicate idempotency properly: Mark tools as idempotent only if repeated calls with the same arguments truly have no additional effect.
-
Set appropriate open/closed world hints: Indicate whether a tool interacts with a closed system (like a database) or an open system (like the web).
-
Remember annotations are hints: All properties in ToolAnnotations are hints and not guaranteed to provide a faithful description of tool behavior. Clients should never make security-critical decisions based solely on annotations.
A comprehensive testing strategy for MCP tools should cover:
- Functional testing: Verify tools execute correctly with valid inputs and handle invalid inputs appropriately
- Integration testing: Test tool interaction with external systems using both real and mocked dependencies
- Security testing: Validate authentication, authorization, input sanitization, and rate limiting
- Performance testing: Check behavior under load, timeout handling, and resource cleanup
- Error handling: Ensure tools properly report errors through the MCP protocol and clean up resources
Source: https://modelcontextprotocol.io/docs/concepts/transports
Learn about MCP's communication mechanisms
Transports in the Model Context Protocol (MCP) provide the foundation for communication between clients and servers. A transport handles the underlying mechanics of how messages are sent and received.
MCP uses JSON-RPC 2.0 as its wire format. The transport layer is responsible for converting MCP protocol messages into JSON-RPC format for transmission and converting received JSON-RPC messages back into MCP protocol messages.
There are three types of JSON-RPC messages used:
{
  jsonrpc: "2.0",
  id: number | string,
  method: string,
  params?: object
}{
jsonrpc: "2.0",
id: number | string,
result?: object,
error?: {
code: number,
message: string,
data?: unknown
}
}{
jsonrpc: "2.0",
method: string,
params?: object
}MCP includes two standard transport implementations:
The stdio transport enables communication through standard input and output streams. This is particularly useful for local integrations and command-line tools.
Use stdio when:
- Building command-line tools
- Implementing local integrations
- Needing simple process communication
- Working with shell scripts
  const transport = new StdioServerTransport();
  await server.connect(transport);
  ```
</Tab>

<Tab title="TypeScript (Client)">
  ```typescript
  const client = new Client({
    name: "example-client",
    version: "1.0.0"
  }, {
    capabilities: {}
  });

  const transport = new StdioClientTransport({
    command: "./server",
    args: ["--option", "value"]
  });
  await client.connect(transport);
  ```
</Tab>

<Tab title="Python (Server)">
  ```python
  app = Server("example-server")

  async with stdio_server() as streams:
      await app.run(
          streams[0],
          streams[1],
          app.create_initialization_options()
      )
  ```
</Tab>

<Tab title="Python (Client)">
  ```python
  params = StdioServerParameters(
      command="./server",
      args=["--option", "value"]
  )

  async with stdio_client(params) as streams:
      async with ClientSession(streams[0], streams[1]) as session:
          await session.initialize()
  ```
</Tab>
SSE transport enables server-to-client streaming with HTTP POST requests for client-to-server communication.
Use SSE when:
- Only server-to-client streaming is needed
- Working with restricted networks
- Implementing simple updates
SSE transports can be vulnerable to DNS rebinding attacks if not properly secured. To prevent this:
- Always validate Origin headers on incoming SSE connections to ensure they come from expected sources
- Avoid binding servers to all network interfaces (0.0.0.0) when running locally - bind only to localhost (127.0.0.1) instead
- Implement proper authentication for all SSE connections
Without these protections, attackers could use DNS rebinding to interact with local MCP servers from remote websites.
```typescript import express from "express"; const app = express();
const server = new Server({
name: "example-server",
version: "1.0.0"
}, {
capabilities: {}
});
let transport: SSEServerTransport | null = null;
app.get("/sse", (req, res) => {
transport = new SSEServerTransport("/messages", res);
server.connect(transport);
});
app.post("/messages", (req, res) => {
if (transport) {
transport.handlePostMessage(req, res);
}
});
app.listen(3000);
```
</Tab>
<Tab title="TypeScript (Client)">
```typescript
const client = new Client({
name: "example-client",
version: "1.0.0"
}, {
capabilities: {}
});
const transport = new SSEClientTransport(
new URL("http://localhost:3000/sse")
);
await client.connect(transport);
```
</Tab>
<Tab title="Python (Server)">
```python
from mcp.server.sse import SseServerTransport
from starlette.applications import Starlette
from starlette.routing import Route
app = Server("example-server")
sse = SseServerTransport("/messages")
async def handle_sse(scope, receive, send):
async with sse.connect_sse(scope, receive, send) as streams:
await app.run(streams[0], streams[1], app.create_initialization_options())
async def handle_messages(scope, receive, send):
await sse.handle_post_message(scope, receive, send)
starlette_app = Starlette(
routes=[
Route("/sse", endpoint=handle_sse),
Route("/messages", endpoint=handle_messages, methods=["POST"]),
]
)
```
</Tab>
<Tab title="Python (Client)">
```python
async with sse_client("http://localhost:8000/sse") as streams:
async with ClientSession(streams[0], streams[1]) as session:
await session.initialize()
```
</Tab>
MCP makes it easy to implement custom transports for specific needs. Any transport implementation just needs to conform to the Transport interface:
You can implement custom transports for:
- Custom network protocols
- Specialized communication channels
- Integration with existing systems
- Performance optimization
    // Send a JSON-RPC message
    send(message: JSONRPCMessage): Promise<void>;

    // Close the connection
    close(): Promise<void>;

    // Callbacks
    onclose?: () => void;
    onerror?: (error: Error) => void;
    onmessage?: (message: JSONRPCMessage) => void;
  }
  ```
</Tab>

<Tab title="Python">
  Note that while MCP Servers are often implemented with asyncio, we recommend
  implementing low-level interfaces like transports with `anyio` for wider compatibility.

  ```python
  @contextmanager
  async def create_transport(
      read_stream: MemoryObjectReceiveStream[JSONRPCMessage | Exception],
      write_stream: MemoryObjectSendStream[JSONRPCMessage]
  ):
      """
      Transport interface for MCP.

      Args:
          read_stream: Stream to read incoming messages from
          write_stream: Stream to write outgoing messages to
      """
      async with anyio.create_task_group() as tg:
          try:
              # Start processing messages
              tg.start_soon(lambda: process_messages(read_stream))

              # Send messages
              async with write_stream:
                  yield write_stream

          except Exception as exc:
              # Handle errors
              raise exc
          finally:
              # Clean up
              tg.cancel_scope.cancel()
              await write_stream.aclose()
              await read_stream.aclose()
  ```
</Tab>
Transport implementations should handle various error scenarios:
- Connection errors
- Message parsing errors
- Protocol errors
- Network timeouts
- Resource cleanup
Example error handling:
```typescript class ExampleTransport implements Transport { async start() { try { // Connection logic } catch (error) { this.onerror?.(new Error(`Failed to connect: ${error}`)); throw error; } } async send(message: JSONRPCMessage) {
try {
// Sending logic
} catch (error) {
this.onerror?.(new Error(`Failed to send message: ${error}`));
throw error;
}
}
}
```
</Tab>
<Tab title="Python">
Note that while MCP Servers are often implemented with asyncio, we recommend
implementing low-level interfaces like transports with `anyio` for wider compatibility.
```python
@contextmanager
async def example_transport(scope: Scope, receive: Receive, send: Send):
try:
# Create streams for bidirectional communication
read_stream_writer, read_stream = anyio.create_memory_object_stream(0)
write_stream, write_stream_reader = anyio.create_memory_object_stream(0)
async def message_handler():
try:
async with read_stream_writer:
# Message handling logic
pass
except Exception as exc:
logger.error(f"Failed to handle message: {exc}")
raise exc
async with anyio.create_task_group() as tg:
tg.start_soon(message_handler)
try:
# Yield streams for communication
yield read_stream, write_stream
except Exception as exc:
logger.error(f"Transport error: {exc}")
raise exc
finally:
tg.cancel_scope.cancel()
await write_stream.aclose()
await read_stream.aclose()
except Exception as exc:
logger.error(f"Failed to initialize transport: {exc}")
raise exc
```
</Tab>
When implementing or using MCP transport:
- Handle connection lifecycle properly
- Implement proper error handling
- Clean up resources on connection close
- Use appropriate timeouts
- Validate messages before sending
- Log transport events for debugging
- Implement reconnection logic when appropriate
- Handle backpressure in message queues
- Monitor connection health
- Implement proper security measures
When implementing transport:
- Implement proper authentication mechanisms
- Validate client credentials
- Use secure token handling
- Implement authorization checks
- Use TLS for network transport
- Encrypt sensitive data
- Validate message integrity
- Implement message size limits
- Sanitize input data
- Implement rate limiting
- Use appropriate timeouts
- Handle denial of service scenarios
- Monitor for unusual patterns
- Implement proper firewall rules
- For SSE transports, validate Origin headers to prevent DNS rebinding attacks
- For local SSE servers, bind only to localhost (127.0.0.1) instead of all interfaces (0.0.0.0)
Tips for debugging transport issues:
- Enable debug logging
- Monitor message flow
- Check connection states
- Validate message formats
- Test error scenarios
- Use network analysis tools
- Implement health checks
- Monitor resource usage
- Test edge cases
- Use proper error tracking
Source: https://modelcontextprotocol.io/docs/tools/debugging
A comprehensive guide to debugging Model Context Protocol (MCP) integrations
Effective debugging is essential when developing MCP servers or integrating them with applications. This guide covers the debugging tools and approaches available in the MCP ecosystem.
This guide is for macOS. Guides for other platforms are coming soon.MCP provides several tools for debugging at different levels:
-
MCP Inspector
- Interactive debugging interface
- Direct server testing
- See the Inspector guide for details
-
Claude Desktop Developer Tools
- Integration testing
- Log collection
- Chrome DevTools integration
-
Server Logging
- Custom logging implementations
- Error tracking
- Performance monitoring
The Claude.app interface provides basic server status information:
-
Click the <img src="https://mintlify.s3.us-west-1.amazonaws.com/mcp/images/claude-desktop-mcp-plug-icon.svg" style={{display: 'inline', margin: 0, height: '1.3em'}} /> icon to view:
- Connected servers
- Available prompts and resources
-
Click the <img src="https://mintlify.s3.us-west-1.amazonaws.com/mcp/images/claude-desktop-mcp-hammer-icon.svg" style={{display: 'inline', margin: 0, height: '1.3em'}} /> icon to view:
- Tools made available to the model
Review detailed MCP logs from Claude Desktop:
# Follow logs in real-time
tail -n 20 -F ~/Library/Logs/Claude/mcp*.log
The logs capture:
- Server connection events
- Configuration issues
- Runtime errors
- Message exchanges
Access Chrome's developer tools inside Claude Desktop to investigate client-side errors:
- Create a
developer_settings.jsonfile withallowDevToolsset to true:
echo '{"allowDevTools": true}' > ~/Library/Application\ Support/Claude/developer_settings.json- Open DevTools:
Command-Option-Shift-i
Note: You'll see two DevTools windows:
- Main content window
- App title bar window
Use the Console panel to inspect client-side errors.
Use the Network panel to inspect:
- Message payloads
- Connection timing
When using MCP servers with Claude Desktop:
- The working directory for servers launched via
claude_desktop_config.jsonmay be undefined (like/on macOS) since Claude Desktop could be started from anywhere - Always use absolute paths in your configuration and
.envfiles to ensure reliable operation - For testing servers directly via command line, the working directory will be where you run the command
For example in claude_desktop_config.json, use:
{
  "command": "npx",
  "args": ["-y", "@modelcontextprotocol/server-filesystem", "/Users/username/data"]
}
Instead of relative paths like ./data
MCP servers inherit only a subset of environment variables automatically, like USER, HOME, and PATH.
To override the default variables or provide your own, you can specify an env key in claude_desktop_config.json:
{
  "myserver": {
    "command": "mcp-server-myapp",
    "env": {
      "MYAPP_API_KEY": "some_key",
    }
  }
}Common initialization problems:
-
Path Issues
- Incorrect server executable path
- Missing required files
- Permission problems
- Try using an absolute path for
command
-
Configuration Errors
- Invalid JSON syntax
- Missing required fields
- Type mismatches
-
Environment Problems
- Missing environment variables
- Incorrect variable values
- Permission restrictions
When servers fail to connect:
- Check Claude Desktop logs
- Verify server process is running
- Test standalone with Inspector
- Verify protocol compatibility
When building a server that uses the local stdio transport, all messages logged to stderr (standard error) will be captured by the host application (e.g., Claude Desktop) automatically.
Local MCP servers should not log messages to stdout (standard out), as this will interfere with protocol operation.For all transports, you can also provide logging to the client by sending a log message notification:
```python server.request_context.session.send_log_message( level="info", data="Server started successfully", ) ```<Tab title="TypeScript">
```typescript
server.sendLoggingMessage({
level: "info",
data: "Server started successfully",
});
```
</Tab>
Important events to log:
- Initialization steps
- Resource access
- Tool execution
- Error conditions
- Performance metrics
In client applications:
- Enable debug logging
- Monitor network traffic
- Track message exchanges
- Record error states
-
Initial Development
- Use Inspector for basic testing
- Implement core functionality
- Add logging points
-
Integration Testing
- Test in Claude Desktop
- Monitor logs
- Check error handling
To test changes efficiently:
- Configuration changes: Restart Claude Desktop
- Server code changes: Use Command-R to reload
- Quick iteration: Use Inspector during development
-
Structured Logging
- Use consistent formats
- Include context
- Add timestamps
- Track request IDs
-
Error Handling
- Log stack traces
- Include error context
- Track error patterns
- Monitor recovery
-
Performance Tracking
- Log operation timing
- Monitor resource usage
- Track message sizes
- Measure latency
When debugging:
-
Sensitive Data
- Sanitize logs
- Protect credentials
- Mask personal information
-
Access Control
- Verify permissions
- Check authentication
- Monitor access patterns
When encountering issues:
-
First Steps
- Check server logs
- Test with Inspector
- Review configuration
- Verify environment
-
Support Channels
- GitHub issues
- GitHub discussions
-
Providing Information
- Log excerpts
- Configuration files
- Steps to reproduce
- Environment details
Source: https://modelcontextprotocol.io/docs/tools/inspector
In-depth guide to using the MCP Inspector for testing and debugging Model Context Protocol servers
The MCP Inspector is an interactive developer tool for testing and debugging MCP servers. While the Debugging Guide covers the Inspector as part of the overall debugging toolkit, this document provides a detailed exploration of the Inspector's features and capabilities.
The Inspector runs directly through npx without requiring installation:
npx @modelcontextprotocol/inspector <command>npx @modelcontextprotocol/inspector <command> <arg1> <arg2>A common way to start server packages from NPM or PyPi.
```bash npx -y @modelcontextprotocol/inspector npx # For example npx -y @modelcontextprotocol/inspector npx server-postgres postgres://127.0.0.1/testdb ```<Tab title="PyPi package">
```bash
npx @modelcontextprotocol/inspector uvx <package-name> <args>
# For example
npx @modelcontextprotocol/inspector uvx mcp-server-git --repository ~/code/mcp/servers.git
```
</Tab>
To inspect servers locally developed or downloaded as a repository, the most common way is:
```bash npx @modelcontextprotocol/inspector node path/to/server/index.js args... ```<Tab title="Python">
```bash
npx @modelcontextprotocol/inspector \
uv \
--directory path/to/server \
run \
package-name \
args...
```
</Tab>
Please carefully read any attached README for the most accurate instructions.

The Inspector provides several features for interacting with your MCP server:
- Allows selecting the transport for connecting to the server
- For local servers, supports customizing the command-line arguments and environment
- Lists all available resources
- Shows resource metadata (MIME types, descriptions)
- Allows resource content inspection
- Supports subscription testing
- Displays available prompt templates
- Shows prompt arguments and descriptions
- Enables prompt testing with custom arguments
- Previews generated messages
- Lists available tools
- Shows tool schemas and descriptions
- Enables tool testing with custom inputs
- Displays tool execution results
- Presents all logs recorded from the server
- Shows notifications received from the server
-
Start Development
- Launch Inspector with your server
- Verify basic connectivity
- Check capability negotiation
-
Iterative testing
- Make server changes
- Rebuild the server
- Reconnect the Inspector
- Test affected features
- Monitor messages
-
Test edge cases
- Invalid inputs
- Missing prompt arguments
- Concurrent operations
- Verify error handling and error responses
<Card title="Debugging Guide" icon="bug" href="/docs/tools/debugging">
  Learn about broader debugging strategies
</Card>
Source: https://modelcontextprotocol.io/examples
A list of example servers and implementations
This page showcases various Model Context Protocol (MCP) servers that demonstrate the protocol's capabilities and versatility. These servers enable Large Language Models (LLMs) to securely access tools and data sources.
These official reference servers demonstrate core MCP features and SDK usage:
- Filesystem - Secure file operations with configurable access controls
- PostgreSQL - Read-only database access with schema inspection capabilities
- SQLite - Database interaction and business intelligence features
- Google Drive - File access and search capabilities for Google Drive
- Git - Tools to read, search, and manipulate Git repositories
- GitHub - Repository management, file operations, and GitHub API integration
- GitLab - GitLab API integration enabling project management
- Sentry - Retrieving and analyzing issues from Sentry.io
- Brave Search - Web and local search using Brave's Search API
- Fetch - Web content fetching and conversion optimized for LLM usage
- Puppeteer - Browser automation and web scraping capabilities
- Slack - Channel management and messaging capabilities
- Google Maps - Location services, directions, and place details
- Memory - Knowledge graph-based persistent memory system
- EverArt - AI image generation using various models
- Sequential Thinking - Dynamic problem-solving through thought sequences
- AWS KB Retrieval - Retrieval from AWS Knowledge Base using Bedrock Agent Runtime
These MCP servers are maintained by companies for their platforms:
- Axiom - Query and analyze logs, traces, and event data using natural language
- Browserbase - Automate browser interactions in the cloud
- Cloudflare - Deploy and manage resources on the Cloudflare developer platform
- E2B - Execute code in secure cloud sandboxes
- Neon - Interact with the Neon serverless Postgres platform
- Obsidian Markdown Notes - Read and search through Markdown notes in Obsidian vaults
- Qdrant - Implement semantic memory using the Qdrant vector search engine
- Raygun - Access crash reporting and monitoring data
- Search1API - Unified API for search, crawling, and sitemaps
- Stripe - Interact with the Stripe API
- Tinybird - Interface with the Tinybird serverless ClickHouse platform
- Weaviate - Enable Agentic RAG through your Weaviate collection(s)
A growing ecosystem of community-developed servers extends MCP's capabilities:
- Docker - Manage containers, images, volumes, and networks
- Kubernetes - Manage pods, deployments, and services
- Linear - Project management and issue tracking
- Snowflake - Interact with Snowflake databases
- Spotify - Control Spotify playback and manage playlists
- Todoist - Task management integration
Note: Community servers are untested and should be used at your own risk. They are not affiliated with or endorsed by Anthropic.
For a complete list of community servers, visit the MCP Servers Repository.
TypeScript-based servers can be used directly with npx:
npx -y @modelcontextprotocol/server-memoryPython-based servers can be used with uvx (recommended) or pip:
# Using uvx
uvx mcp-server-git

# Using pip
pip install mcp-server-git
python -m mcp_server_gitTo use an MCP server with Claude, add it to your configuration:
{
  "mcpServers": {
    "memory": {
      "command": "npx",
      "args": ["-y", "@modelcontextprotocol/server-memory"]
    },
    "filesystem": {
      "command": "npx",
      "args": ["-y", "@modelcontextprotocol/server-filesystem", "/path/to/allowed/files"]
    },
    "github": {
      "command": "npx",
      "args": ["-y", "@modelcontextprotocol/server-github"],
      "env": {
        "GITHUB_PERSONAL_ACCESS_TOKEN": "<YOUR_TOKEN>"
      }
    }
  }
}- MCP Servers Repository - Complete collection of reference implementations and community servers
- Awesome MCP Servers - Curated list of MCP servers
- MCP CLI - Command-line inspector for testing MCP servers
- MCP Get - Tool for installing and managing MCP servers
- Supergateway - Run MCP stdio servers over SSE
- Zapier MCP - MCP Server with over 7,000+ apps and 30,000+ actions
Visit our GitHub Discussions to engage with the MCP community.
Source: https://modelcontextprotocol.io/introduction
Get started with the Model Context Protocol (MCP)
C# SDK released! Check out what else is new.
MCP is an open protocol that standardizes how applications provide context to LLMs. Think of MCP like a USB-C port for AI applications. Just as USB-C provides a standardized way to connect your devices to various peripherals and accessories, MCP provides a standardized way to connect AI models to different data sources and tools.
MCP helps you build agents and complex workflows on top of LLMs. LLMs frequently need to integrate with data and tools, and MCP provides:
- A growing list of pre-built integrations that your LLM can directly plug into
- The flexibility to switch between LLM providers and vendors
- Best practices for securing your data within your infrastructure
At its core, MCP follows a client-server architecture where a host application can connect to multiple servers:
flowchart LR
    subgraph "Your Computer"
        Host["Host with MCP Client\n(Claude, IDEs, Tools)"]
        S1["MCP Server A"]
        S2["MCP Server B"]
        S3["MCP Server C"]
        Host <-->|"MCP Protocol"| S1
        Host <-->|"MCP Protocol"| S2
        Host <-->|"MCP Protocol"| S3
        S1 <--> D1[("Local\nData Source A")]
        S2 <--> D2[("Local\nData Source B")]
    end
    subgraph "Internet"
        S3 <-->|"Web APIs"| D3[("Remote\nService C")]
    end
- MCP Hosts: Programs like Claude Desktop, IDEs, or AI tools that want to access data through MCP
- MCP Clients: Protocol clients that maintain 1:1 connections with servers
- MCP Servers: Lightweight programs that each expose specific capabilities through the standardized Model Context Protocol
- Local Data Sources: Your computer's files, databases, and services that MCP servers can securely access
- Remote Services: External systems available over the internet (e.g., through APIs) that MCP servers can connect to
Choose the path that best fits your needs:
Get started building your own server to use in Claude for Desktop and other clients<Card title="For Client Developers" icon="bolt" href="/quickstart/client">
Get started building your own client that can integrate with all MCP servers
</Card>
<Card title="For Claude Desktop Users" icon="bolt" href="/quickstart/user">
Get started using pre-built servers in Claude for Desktop
</Card>
<Card title="Example Clients" icon="cubes" href="/clients">
  View the list of clients that support MCP integrations
</Card>
<Card title="Debugging Guide" icon="bug" href="/docs/tools/debugging">
  Learn how to effectively debug MCP servers and integrations
</Card>

<Card title="MCP Inspector" icon="magnifying-glass" href="/docs/tools/inspector">
  Test and inspect your MCP servers with our interactive debugging tool
</Card>

<Card title="MCP Workshop (Video, 2hr)" icon="person-chalkboard" href="https://www.youtube.com/watch?v=kQmXtrmQ5Zg">
  <iframe src="https://www.youtube.com/embed/kQmXtrmQ5Zg" />
</Card>
Dive deeper into MCP's core concepts and capabilities:
Understand how MCP connects clients, servers, and LLMs<Card title="Resources" icon="database" href="/docs/concepts/resources">
Expose data and content from your servers to LLMs
</Card>
<Card title="Prompts" icon="message" href="/docs/concepts/prompts">
Create reusable prompt templates and workflows
</Card>
<Card title="Tools" icon="wrench" href="/docs/concepts/tools">
Enable LLMs to perform actions through your server
</Card>
<Card title="Sampling" icon="robot" href="/docs/concepts/sampling">
Let your servers request completions from LLMs
</Card>
<Card title="Transports" icon="network-wired" href="/docs/concepts/transports">
Learn about MCP's communication mechanism
</Card>
Want to contribute? Check out our Contributing Guide to learn how you can help improve MCP.
Here's how to get help or provide feedback:
- For bug reports and feature requests related to the MCP specification, SDKs, or documentation (open source), please create a GitHub issue
- For discussions or Q&A about the MCP specification, use the specification discussions
- For discussions or Q&A about other MCP open source components, use the organization discussions
- For bug reports, feature requests, and questions related to Claude.app and claude.ai's MCP integration, please see Anthropic's guide on How to Get Support
Source: https://modelcontextprotocol.io/quickstart/client
Get started building your own client that can integrate with all MCP servers.
In this tutorial, you'll learn how to build a LLM-powered chatbot client that connects to MCP servers. It helps to have gone through the Server quickstart that guides you through the basic of building your first server.
[You can find the complete code for this tutorial here.](https://github.com/modelcontextprotocol/quickstart-resources/tree/main/mcp-client-python) ## System Requirements
Before starting, ensure your system meets these requirements:
* Mac or Windows computer
* Latest Python version installed
* Latest version of `uv` installed
## Setting Up Your Environment
First, create a new Python project with `uv`:
```bash
# Create project directory
uv init mcp-client
cd mcp-client
# Create virtual environment
uv venv
# Activate virtual environment
# On Windows:
.venv\Scripts\activate
# On Unix or MacOS:
source .venv/bin/activate
# Install required packages
uv add mcp anthropic python-dotenv
# Remove boilerplate files
rm main.py
# Create our main file
touch client.py
```
## Setting Up Your API Key
You'll need an Anthropic API key from the [Anthropic Console](https://console.anthropic.com/settings/keys).
Create a `.env` file to store it:
```bash
# Create .env file
touch .env
```
Add your key to the `.env` file:
```bash
ANTHROPIC_API_KEY=<your key here>
```
Add `.env` to your `.gitignore`:
```bash
echo ".env" >> .gitignore
```
<Warning>
Make sure you keep your `ANTHROPIC_API_KEY` secure!
</Warning>
## Creating the Client
### Basic Client Structure
First, let's set up our imports and create the basic client class:
```python
import asyncio
from typing import Optional
from contextlib import AsyncExitStack
from mcp import ClientSession, StdioServerParameters
from mcp.client.stdio import stdio_client
from anthropic import Anthropic
from dotenv import load_dotenv
load_dotenv() # load environment variables from .env
class MCPClient:
def __init__(self):
# Initialize session and client objects
self.session: Optional[ClientSession] = None
self.exit_stack = AsyncExitStack()
self.anthropic = Anthropic()
# methods will go here
```
### Server Connection Management
Next, we'll implement the method to connect to an MCP server:
```python
async def connect_to_server(self, server_script_path: str):
"""Connect to an MCP server
Args:
server_script_path: Path to the server script (.py or .js)
"""
is_python = server_script_path.endswith('.py')
is_js = server_script_path.endswith('.js')
if not (is_python or is_js):
raise ValueError("Server script must be a .py or .js file")
command = "python" if is_python else "node"
server_params = StdioServerParameters(
command=command,
args=[server_script_path],
env=None
)
stdio_transport = await self.exit_stack.enter_async_context(stdio_client(server_params))
self.stdio, self.write = stdio_transport
self.session = await self.exit_stack.enter_async_context(ClientSession(self.stdio, self.write))
await self.session.initialize()
# List available tools
response = await self.session.list_tools()
tools = response.tools
print("\nConnected to server with tools:", [tool.name for tool in tools])
```
### Query Processing Logic
Now let's add the core functionality for processing queries and handling tool calls:
```python
async def process_query(self, query: str) -> str:
"""Process a query using Claude and available tools"""
messages = [
{
"role": "user",
"content": query
}
]
response = await self.session.list_tools()
available_tools = [{
"name": tool.name,
"description": tool.description,
"input_schema": tool.inputSchema
} for tool in response.tools]
# Initial Claude API call
response = self.anthropic.messages.create(
model="claude-3-5-sonnet-20241022",
max_tokens=1000,
messages=messages,
tools=available_tools
)
# Process response and handle tool calls
final_text = []
assistant_message_content = []
for content in response.content:
if content.type == 'text':
final_text.append(content.text)
assistant_message_content.append(content)
elif content.type == 'tool_use':
tool_name = content.name
tool_args = content.input
# Execute tool call
result = await self.session.call_tool(tool_name, tool_args)
final_text.append(f"[Calling tool {tool_name} with args {tool_args}]")
assistant_message_content.append(content)
messages.append({
"role": "assistant",
"content": assistant_message_content
})
messages.append({
"role": "user",
"content": [
{
"type": "tool_result",
"tool_use_id": content.id,
"content": result.content
}
]
})
# Get next response from Claude
response = self.anthropic.messages.create(
model="claude-3-5-sonnet-20241022",
max_tokens=1000,
messages=messages,
tools=available_tools
)
final_text.append(response.content[0].text)
return "\n".join(final_text)
```
### Interactive Chat Interface
Now we'll add the chat loop and cleanup functionality:
```python
async def chat_loop(self):
"""Run an interactive chat loop"""
print("\nMCP Client Started!")
print("Type your queries or 'quit' to exit.")
while True:
try:
query = input("\nQuery: ").strip()
if query.lower() == 'quit':
break
response = await self.process_query(query)
print("\n" + response)
except Exception as e:
print(f"\nError: {str(e)}")
async def cleanup(self):
"""Clean up resources"""
await self.exit_stack.aclose()
```
### Main Entry Point
Finally, we'll add the main execution logic:
```python
async def main():
if len(sys.argv) < 2:
print("Usage: python client.py <path_to_server_script>")
sys.exit(1)
client = MCPClient()
try:
await client.connect_to_server(sys.argv[1])
await client.chat_loop()
finally:
await client.cleanup()
if __name__ == "__main__":
import sys
asyncio.run(main())
```
You can find the complete `client.py` file [here.](https://gist.github.com/zckly/f3f28ea731e096e53b39b47bf0a2d4b1)
## Key Components Explained
### 1. Client Initialization
* The `MCPClient` class initializes with session management and API clients
* Uses `AsyncExitStack` for proper resource management
* Configures the Anthropic client for Claude interactions
### 2. Server Connection
* Supports both Python and Node.js servers
* Validates server script type
* Sets up proper communication channels
* Initializes the session and lists available tools
### 3. Query Processing
* Maintains conversation context
* Handles Claude's responses and tool calls
* Manages the message flow between Claude and tools
* Combines results into a coherent response
### 4. Interactive Interface
* Provides a simple command-line interface
* Handles user input and displays responses
* Includes basic error handling
* Allows graceful exit
### 5. Resource Management
* Proper cleanup of resources
* Error handling for connection issues
* Graceful shutdown procedures
## Common Customization Points
1. **Tool Handling**
* Modify `process_query()` to handle specific tool types
* Add custom error handling for tool calls
* Implement tool-specific response formatting
2. **Response Processing**
* Customize how tool results are formatted
* Add response filtering or transformation
* Implement custom logging
3. **User Interface**
* Add a GUI or web interface
* Implement rich console output
* Add command history or auto-completion
## Running the Client
To run your client with any MCP server:
```bash
uv run client.py path/to/server.py # python server
uv run client.py path/to/build/index.js # node server
```
<Note>
If you're continuing the weather tutorial from the server quickstart, your command might look something like this: `python client.py
.../quickstart-resources/weather-server-python/weather.py`
  The client will:

  1. Connect to the specified server
  2. List available tools
  3. Start an interactive chat session where you can:
     * Enter queries
     * See tool executions
     * Get responses from Claude

  Here's an example of what it should look like if connected to the weather server from the server quickstart:

  <Frame>
    <img src="https://mintlify.s3.us-west-1.amazonaws.com/mcp/images/client-claude-cli-python.png" />
  </Frame>

  ## How It Works

  When you submit a query:

  1. The client gets the list of available tools from the server
  2. Your query is sent to Claude along with tool descriptions
  3. Claude decides which tools (if any) to use
  4. The client executes any requested tool calls through the server
  5. Results are sent back to Claude
  6. Claude provides a natural language response
  7. The response is displayed to you

  ## Best practices

  1. **Error Handling**
     * Always wrap tool calls in try-catch blocks
     * Provide meaningful error messages
     * Gracefully handle connection issues

  2. **Resource Management**
     * Use `AsyncExitStack` for proper cleanup
     * Close connections when done
     * Handle server disconnections

  3. **Security**
     * Store API keys securely in `.env`
     * Validate server responses
     * Be cautious with tool permissions

  ## Troubleshooting

  ### Server Path Issues

  * Double-check the path to your server script is correct
  * Use the absolute path if the relative path isn't working
  * For Windows users, make sure to use forward slashes (/) or escaped backslashes (\\) in the path
  * Verify the server file has the correct extension (.py for Python or .js for Node.js)

  Example of correct path usage:

  ```bash
  # Relative path
  uv run client.py ./server/weather.py

  # Absolute path
  uv run client.py /Users/username/projects/mcp-server/weather.py

  # Windows path (either format works)
  uv run client.py C:/projects/mcp-server/weather.py
  uv run client.py C:\\projects\\mcp-server\\weather.py
  ```

  ### Response Timing

  * The first response might take up to 30 seconds to return
  * This is normal and happens while:
    * The server initializes
    * Claude processes the query
    * Tools are being executed
  * Subsequent responses are typically faster
  * Don't interrupt the process during this initial waiting period

  ### Common Error Messages

  If you see:

  * `FileNotFoundError`: Check your server path
  * `Connection refused`: Ensure the server is running and the path is correct
  * `Tool execution failed`: Verify the tool's required environment variables are set
  * `Timeout error`: Consider increasing the timeout in your client configuration
</Tab>

<Tab title="Node">
  [You can find the complete code for this tutorial here.](https://github.com/modelcontextprotocol/quickstart-resources/tree/main/mcp-client-typescript)

  ## System Requirements

  Before starting, ensure your system meets these requirements:

  * Mac or Windows computer
  * Node.js 17 or higher installed
  * Latest version of `npm` installed
  * Anthropic API key (Claude)

  ## Setting Up Your Environment

  First, let's create and set up our project:

  <CodeGroup>
    ```bash MacOS/Linux
    # Create project directory
    mkdir mcp-client-typescript
    cd mcp-client-typescript

    # Initialize npm project
    npm init -y

    # Install dependencies
    npm install @anthropic-ai/sdk @modelcontextprotocol/sdk dotenv

    # Install dev dependencies
    npm install -D @types/node typescript

    # Create source file
    touch index.ts
    ```

    ```powershell Windows
    # Create project directory
    md mcp-client-typescript
    cd mcp-client-typescript

    # Initialize npm project
    npm init -y

    # Install dependencies
    npm install @anthropic-ai/sdk @modelcontextprotocol/sdk dotenv

    # Install dev dependencies
    npm install -D @types/node typescript

    # Create source file
    new-item index.ts
    ```
  </CodeGroup>

  Update your `package.json` to set `type: "module"` and a build script:

  ```json package.json
  {
    "type": "module",
    "scripts": {
      "build": "tsc && chmod 755 build/index.js"
    }
  }
  ```

  Create a `tsconfig.json` in the root of your project:

  ```json tsconfig.json
  {
    "compilerOptions": {
      "target": "ES2022",
      "module": "Node16",
      "moduleResolution": "Node16",
      "outDir": "./build",
      "rootDir": "./",
      "strict": true,
      "esModuleInterop": true,
      "skipLibCheck": true,
      "forceConsistentCasingInFileNames": true
    },
    "include": ["index.ts"],
    "exclude": ["node_modules"]
  }
  ```

  ## Setting Up Your API Key

  You'll need an Anthropic API key from the [Anthropic Console](https://console.anthropic.com/settings/keys).

  Create a `.env` file to store it:

  ```bash
  echo "ANTHROPIC_API_KEY=<your key here>" > .env
  ```

  Add `.env` to your `.gitignore`:

  ```bash
  echo ".env" >> .gitignore
  ```

  <Warning>
    Make sure you keep your `ANTHROPIC_API_KEY` secure!
  </Warning>

  ## Creating the Client

  ### Basic Client Structure

  First, let's set up our imports and create the basic client class in `index.ts`:

  ```typescript
  import { Anthropic } from "@anthropic-ai/sdk";
  import {
    MessageParam,
    Tool,
  } from "@anthropic-ai/sdk/resources/messages/messages.mjs";
  import { Client } from "@modelcontextprotocol/sdk/client/index.js";
  import { StdioClientTransport } from "@modelcontextprotocol/sdk/client/stdio.js";
  import readline from "readline/promises";
  import dotenv from "dotenv";

  dotenv.config();

  const ANTHROPIC_API_KEY = process.env.ANTHROPIC_API_KEY;
  if (!ANTHROPIC_API_KEY) {
    throw new Error("ANTHROPIC_API_KEY is not set");
  }

  class MCPClient {
    private mcp: Client;
    private anthropic: Anthropic;
    private transport: StdioClientTransport | null = null;
    private tools: Tool[] = [];

    constructor() {
      this.anthropic = new Anthropic({
        apiKey: ANTHROPIC_API_KEY,
      });
      this.mcp = new Client({ name: "mcp-client-cli", version: "1.0.0" });
    }
    // methods will go here
  }
  ```

  ### Server Connection Management

  Next, we'll implement the method to connect to an MCP server:

  ```typescript
  async connectToServer(serverScriptPath: string) {
    try {
      const isJs = serverScriptPath.endsWith(".js");
      const isPy = serverScriptPath.endsWith(".py");
      if (!isJs && !isPy) {
        throw new Error("Server script must be a .js or .py file");
      }
      const command = isPy
        ? process.platform === "win32"
          ? "python"
          : "python3"
        : process.execPath;

      this.transport = new StdioClientTransport({
        command,
        args: [serverScriptPath],
      });
      this.mcp.connect(this.transport);

      const toolsResult = await this.mcp.listTools();
      this.tools = toolsResult.tools.map((tool) => {
        return {
          name: tool.name,
          description: tool.description,
          input_schema: tool.inputSchema,
        };
      });
      console.log(
        "Connected to server with tools:",
        this.tools.map(({ name }) => name)
      );
    } catch (e) {
      console.log("Failed to connect to MCP server: ", e);
      throw e;
    }
  }
  ```

  ### Query Processing Logic

  Now let's add the core functionality for processing queries and handling tool calls:

  ```typescript
  async processQuery(query: string) {
    const messages: MessageParam[] = [
      {
        role: "user",
        content: query,
      },
    ];

    const response = await this.anthropic.messages.create({
      model: "claude-3-5-sonnet-20241022",
      max_tokens: 1000,
      messages,
      tools: this.tools,
    });

    const finalText = [];
    const toolResults = [];

    for (const content of response.content) {
      if (content.type === "text") {
        finalText.push(content.text);
      } else if (content.type === "tool_use") {
        const toolName = content.name;
        const toolArgs = content.input as { [x: string]: unknown } | undefined;

        const result = await this.mcp.callTool({
          name: toolName,
          arguments: toolArgs,
        });
        toolResults.push(result);
        finalText.push(
          `[Calling tool ${toolName} with args ${JSON.stringify(toolArgs)}]`
        );

        messages.push({
          role: "user",
          content: result.content as string,
        });

        const response = await this.anthropic.messages.create({
          model: "claude-3-5-sonnet-20241022",
          max_tokens: 1000,
          messages,
        });

        finalText.push(
          response.content[0].type === "text" ? response.content[0].text : ""
        );
      }
    }

    return finalText.join("\n");
  }
  ```

  ### Interactive Chat Interface

  Now we'll add the chat loop and cleanup functionality:

  ```typescript
  async chatLoop() {
    const rl = readline.createInterface({
      input: process.stdin,
      output: process.stdout,
    });

    try {
      console.log("\nMCP Client Started!");
      console.log("Type your queries or 'quit' to exit.");

      while (true) {
        const message = await rl.question("\nQuery: ");
        if (message.toLowerCase() === "quit") {
          break;
        }
        const response = await this.processQuery(message);
        console.log("\n" + response);
      }
    } finally {
      rl.close();
    }
  }

  async cleanup() {
    await this.mcp.close();
  }
  ```

  ### Main Entry Point

  Finally, we'll add the main execution logic:

  ```typescript
  async function main() {
    if (process.argv.length < 3) {
      console.log("Usage: node index.ts <path_to_server_script>");
      return;
    }
    const mcpClient = new MCPClient();
    try {
      await mcpClient.connectToServer(process.argv[2]);
      await mcpClient.chatLoop();
    } finally {
      await mcpClient.cleanup();
      process.exit(0);
    }
  }

  main();
  ```

  ## Running the Client

  To run your client with any MCP server:

  ```bash
  # Build TypeScript
  npm run build

  # Run the client
  node build/index.js path/to/server.py # python server
  node build/index.js path/to/build/index.js # node server
  ```

  <Note>
    If you're continuing the weather tutorial from the server quickstart, your command might look something like this: `node build/index.js
.../quickstart-resources/weather-server-typescript/build/index.js`
  **The client will:**

  1. Connect to the specified server
  2. List available tools
  3. Start an interactive chat session where you can:
     * Enter queries
     * See tool executions
     * Get responses from Claude

  ## How It Works

  When you submit a query:

  1. The client gets the list of available tools from the server
  2. Your query is sent to Claude along with tool descriptions
  3. Claude decides which tools (if any) to use
  4. The client executes any requested tool calls through the server
  5. Results are sent back to Claude
  6. Claude provides a natural language response
  7. The response is displayed to you

  ## Best practices

  1. **Error Handling**
     * Use TypeScript's type system for better error detection
     * Wrap tool calls in try-catch blocks
     * Provide meaningful error messages
     * Gracefully handle connection issues

  2. **Security**
     * Store API keys securely in `.env`
     * Validate server responses
     * Be cautious with tool permissions

  ## Troubleshooting

  ### Server Path Issues

  * Double-check the path to your server script is correct
  * Use the absolute path if the relative path isn't working
  * For Windows users, make sure to use forward slashes (/) or escaped backslashes (\\) in the path
  * Verify the server file has the correct extension (.js for Node.js or .py for Python)

  Example of correct path usage:

  ```bash
  # Relative path
  node build/index.js ./server/build/index.js

  # Absolute path
  node build/index.js /Users/username/projects/mcp-server/build/index.js

  # Windows path (either format works)
  node build/index.js C:/projects/mcp-server/build/index.js
  node build/index.js C:\\projects\\mcp-server\\build\\index.js
  ```

  ### Response Timing

  * The first response might take up to 30 seconds to return
  * This is normal and happens while:
    * The server initializes
    * Claude processes the query
    * Tools are being executed
  * Subsequent responses are typically faster
  * Don't interrupt the process during this initial waiting period

  ### Common Error Messages

  If you see:

  * `Error: Cannot find module`: Check your build folder and ensure TypeScript compilation succeeded
  * `Connection refused`: Ensure the server is running and the path is correct
  * `Tool execution failed`: Verify the tool's required environment variables are set
  * `ANTHROPIC_API_KEY is not set`: Check your .env file and environment variables
  * `TypeError`: Ensure you're using the correct types for tool arguments
</Tab>

<Tab title="Java">
  <Note>
    This is a quickstart demo based on Spring AI MCP auto-configuration and boot starters.
    To learn how to create sync and async MCP Clients manually, consult the [Java SDK Client](/sdk/java/mcp-client) documentation
  </Note>

  This example demonstrates how to build an interactive chatbot that combines Spring AI's Model Context Protocol (MCP) with the [Brave Search MCP
Server](https://github.com/modelcontextprotocol/servers/tree/main/src/brave-search). The application creates a conversational interface powered by Anthropic's Claude AI model that can perform internet searches through Brave Search, enabling natural language interactions with real-time web data. You can find the complete code for this tutorial here.
  ## System Requirements

  Before starting, ensure your system meets these requirements:

  * Java 17 or higher
  * Maven 3.6+
  * npx package manager
  * Anthropic API key (Claude)
  * Brave Search API key

  ## Setting Up Your Environment

  1. Install npx (Node Package eXecute):
     First, make sure to install [npm](https://docs.npmjs.com/downloading-and-installing-node-js-and-npm)
     and then run:
     ```bash
     npm install -g npx
     ```

  2. Clone the repository:
     ```bash
     git clone https://github.com/spring-projects/spring-ai-examples.git
     cd model-context-protocol/brave-chatbot
     ```

  3. Set up your API keys:
     ```bash
     export ANTHROPIC_API_KEY='your-anthropic-api-key-here'
     export BRAVE_API_KEY='your-brave-api-key-here'
     ```

  4. Build the application:
     ```bash
     ./mvnw clean install
     ```

  5. Run the application using Maven:
     ```bash
     ./mvnw spring-boot:run
     ```

  <Warning>
    Make sure you keep your `ANTHROPIC_API_KEY` and `BRAVE_API_KEY` keys secure!
  </Warning>

  ## How it Works

  The application integrates Spring AI with the Brave Search MCP server through several components:

  ### MCP Client Configuration

  1. Required dependencies in pom.xml:

  ```xml
  <dependency>
      <groupId>org.springframework.ai</groupId>
      <artifactId>spring-ai-starter-mcp-client</artifactId>
  </dependency>
  <dependency>
      <groupId>org.springframework.ai</groupId>
      <artifactId>spring-ai-starter-model-anthropic</artifactId>
  </dependency>
  ```

  2. Application properties (application.yml):

  ```yml
  spring:
    ai:
      mcp:
        client:
          enabled: true
          name: brave-search-client
          version: 1.0.0
          type: SYNC
          request-timeout: 20s
          stdio:
            root-change-notification: true
            servers-configuration: classpath:/mcp-servers-config.json
          toolcallback:
            enabled: true
      anthropic:
        api-key: ${ANTHROPIC_API_KEY}
  ```

  This activates the `spring-ai-starter-mcp-client` to create one or more `McpClient`s based on the provided server configuration.
  The `spring.ai.mcp.client.toolcallback.enabled=true` property enables the tool callback mechanism, that automatically registers all MCP tool as spring ai
tools. It is disabled by default.
  3. MCP Server Configuration (`mcp-servers-config.json`):

  ```json
  {
    "mcpServers": {
      "brave-search": {
        "command": "npx",
        "args": [
          "-y",
          "@modelcontextprotocol/server-brave-search"
        ],
        "env": {
          "BRAVE_API_KEY": "<PUT YOUR BRAVE API KEY>"
        }
      }
    }
  }
  ```

  ### Chat Implementation

  The chatbot is implemented using Spring AI's ChatClient with MCP tool integration:

  ```java
  var chatClient = chatClientBuilder
      .defaultSystem("You are useful assistant, expert in AI and Java.")
      .defaultTools((Object[]) mcpToolAdapter.toolCallbacks())
      .defaultAdvisors(new MessageChatMemoryAdvisor(new InMemoryChatMemory()))
      .build();
  ```

  Key features:

  * Uses Claude AI model for natural language understanding
  * Integrates Brave Search through MCP for real-time web search capabilities
  * Maintains conversation memory using InMemoryChatMemory
  * Runs as an interactive command-line application

  ### Build and run

  ```bash
  ./mvnw clean install
  java -jar ./target/ai-mcp-brave-chatbot-0.0.1-SNAPSHOT.jar
  ```

  or

  ```bash
  ./mvnw spring-boot:run
  ```

  The application will start an interactive chat session where you can ask questions. The chatbot will use Brave Search when it needs to find information from
the internet to answer your queries.
  The chatbot can:

  * Answer questions using its built-in knowledge
  * Perform web searches when needed using Brave Search
  * Remember context from previous messages in the conversation
  * Combine information from multiple sources to provide comprehensive answers

  ### Advanced Configuration

  The MCP client supports additional configuration options:

  * Client customization through `McpSyncClientCustomizer` or `McpAsyncClientCustomizer`
  * Multiple clients with multiple transport types: `STDIO` and `SSE` (Server-Sent Events)
  * Integration with Spring AI's tool execution framework
  * Automatic client initialization and lifecycle management

  For WebFlux-based applications, you can use the WebFlux starter instead:

  ```xml
  <dependency>
      <groupId>org.springframework.ai</groupId>
      <artifactId>spring-ai-mcp-client-webflux-spring-boot-starter</artifactId>
  </dependency>
  ```

  This provides similar functionality but uses a WebFlux-based SSE transport implementation, recommended for production deployments.
</Tab>

<Tab title="Kotlin">
  [You can find the complete code for this tutorial here.](https://github.com/modelcontextprotocol/kotlin-sdk/tree/main/samples/kotlin-mcp-client)

  ## System Requirements

  Before starting, ensure your system meets these requirements:

  * Java 17 or higher
  * Anthropic API key (Claude)

  ## Setting up your environment

  First, let's install `java` and `gradle` if you haven't already.
  You can download `java` from [official Oracle JDK website](https://www.oracle.com/java/technologies/downloads/).
  Verify your `java` installation:

  ```bash
  java --version
  ```

  Now, let's create and set up your project:

  <CodeGroup>
    ```bash MacOS/Linux
    # Create a new directory for our project
    mkdir kotlin-mcp-client
    cd kotlin-mcp-client

    # Initialize a new kotlin project
    gradle init
    ```

    ```powershell Windows
    # Create a new directory for our project
    md kotlin-mcp-client
    cd kotlin-mcp-client
    # Initialize a new kotlin project
    gradle init
    ```
  </CodeGroup>

  After running `gradle init`, you will be presented with options for creating your project.
  Select **Application** as the project type, **Kotlin** as the programming language, and **Java 17** as the Java version.

  Alternatively, you can create a Kotlin application using the [IntelliJ IDEA project wizard](https://kotlinlang.org/docs/jvm-get-started.html).

  After creating the project, add the following dependencies:

  <CodeGroup>
    ```kotlin build.gradle.kts
    val mcpVersion = "0.4.0"
    val slf4jVersion = "2.0.9"
    val anthropicVersion = "0.8.0"

    dependencies {
        implementation("io.modelcontextprotocol:kotlin-sdk:$mcpVersion")
        implementation("org.slf4j:slf4j-nop:$slf4jVersion")
        implementation("com.anthropic:anthropic-java:$anthropicVersion")
    }
    ```

    ```groovy build.gradle
    def mcpVersion = '0.3.0'
    def slf4jVersion = '2.0.9'
    def anthropicVersion = '0.8.0'
    dependencies {
        implementation "io.modelcontextprotocol:kotlin-sdk:$mcpVersion"
        implementation "org.slf4j:slf4j-nop:$slf4jVersion"
        implementation "com.anthropic:anthropic-java:$anthropicVersion"
    }
    ```
  </CodeGroup>

  Also, add the following plugins to your build script:

  <CodeGroup>
    ```kotlin build.gradle.kts
    plugins {
        id("com.github.johnrengelman.shadow") version "8.1.1"
    }
    ```

    ```groovy build.gradle
    plugins {
        id 'com.github.johnrengelman.shadow' version '8.1.1'
    }
    ```
  </CodeGroup>

  ## Setting up your API key

  You'll need an Anthropic API key from the [Anthropic Console](https://console.anthropic.com/settings/keys).

  Set up your API key:

  ```bash
  export ANTHROPIC_API_KEY='your-anthropic-api-key-here'
  ```

  <Warning>
    Make sure your keep your `ANTHROPIC_API_KEY` secure!
  </Warning>

  ## Creating the Client

  ### Basic Client Structure

  First, let's create the basic client class:

  ```kotlin
  class MCPClient : AutoCloseable {
      private val anthropic = AnthropicOkHttpClient.fromEnv()
      private val mcp: Client = Client(clientInfo = Implementation(name = "mcp-client-cli", version = "1.0.0"))
      private lateinit var tools: List<ToolUnion>

      // methods will go here

      override fun close() {
          runBlocking {
              mcp.close()
              anthropic.close()
          }
      }
  ```

  ### Server connection management

  Next, we'll implement the method to connect to an MCP server:

  ```kotlin
  suspend fun connectToServer(serverScriptPath: String) {
      try {
          val command = buildList {
              when (serverScriptPath.substringAfterLast(".")) {
                  "js" -> add("node")
                  "py" -> add(if (System.getProperty("os.name").lowercase().contains("win")) "python" else "python3")
                  "jar" -> addAll(listOf("java", "-jar"))
                  else -> throw IllegalArgumentException("Server script must be a .js, .py or .jar file")
              }
              add(serverScriptPath)
          }

          val process = ProcessBuilder(command).start()
          val transport = StdioClientTransport(
              input = process.inputStream.asSource().buffered(),
              output = process.outputStream.asSink().buffered()
          )

          mcp.connect(transport)

          val toolsResult = mcp.listTools()
          tools = toolsResult?.tools?.map { tool ->
              ToolUnion.ofTool(
                  Tool.builder()
                      .name(tool.name)
                      .description(tool.description ?: "")
                      .inputSchema(
                          Tool.InputSchema.builder()
                              .type(JsonValue.from(tool.inputSchema.type))
                              .properties(tool.inputSchema.properties.toJsonValue())
                              .putAdditionalProperty("required", JsonValue.from(tool.inputSchema.required))
                              .build()
                      )
                      .build()
              )
          } ?: emptyList()
          println("Connected to server with tools: ${tools.joinToString(", ") { it.tool().get().name() }}")
      } catch (e: Exception) {
          println("Failed to connect to MCP server: $e")
          throw e
      }
  }
  ```

  Also create a helper function to convert from `JsonObject` to `JsonValue` for Anthropic:

  ```kotlin
  private fun JsonObject.toJsonValue(): JsonValue {
      val mapper = ObjectMapper()
      val node = mapper.readTree(this.toString())
      return JsonValue.fromJsonNode(node)
  }
  ```

  ### Query processing logic

  Now let's add the core functionality for processing queries and handling tool calls:

  ```kotlin
  private val messageParamsBuilder: MessageCreateParams.Builder = MessageCreateParams.builder()
      .model(Model.CLAUDE_3_5_SONNET_20241022)
      .maxTokens(1024)

  suspend fun processQuery(query: String): String {
      val messages = mutableListOf(
          MessageParam.builder()
              .role(MessageParam.Role.USER)
              .content(query)
              .build()
      )

      val response = anthropic.messages().create(
          messageParamsBuilder
              .messages(messages)
              .tools(tools)
              .build()
      )

      val finalText = mutableListOf<String>()
      response.content().forEach { content ->
          when {
              content.isText() -> finalText.add(content.text().getOrNull()?.text() ?: "")

              content.isToolUse() -> {
                  val toolName = content.toolUse().get().name()
                  val toolArgs =
                      content.toolUse().get()._input().convert(object : TypeReference<Map<String, JsonValue>>() {})

                  val result = mcp.callTool(
                      name = toolName,
                      arguments = toolArgs ?: emptyMap()
                  )
                  finalText.add("[Calling tool $toolName with args $toolArgs]")

                  messages.add(
                      MessageParam.builder()
                          .role(MessageParam.Role.USER)
                          .content(
                              """
                                  "type": "tool_result",
                                  "tool_name": $toolName,
                                  "result": ${result?.content?.joinToString("\n") { (it as TextContent).text ?: "" }}
                              """.trimIndent()
                          )
                          .build()
                  )

                  val aiResponse = anthropic.messages().create(
                      messageParamsBuilder
                          .messages(messages)
                          .build()
                  )

                  finalText.add(aiResponse.content().first().text().getOrNull()?.text() ?: "")
              }
          }
      }

      return finalText.joinToString("\n", prefix = "", postfix = "")
  }
  ```

  ### Interactive chat

  We'll add the chat loop:

  ```kotlin
  suspend fun chatLoop() {
      println("\nMCP Client Started!")
      println("Type your queries or 'quit' to exit.")

      while (true) {
          print("\nQuery: ")
          val message = readLine() ?: break
          if (message.lowercase() == "quit") break
          val response = processQuery(message)
          println("\n$response")
      }
  }
  ```

  ### Main entry point

  Finally, we'll add the main execution function:

  ```kotlin
  fun main(args: Array<String>) = runBlocking {
      if (args.isEmpty()) throw IllegalArgumentException("Usage: java -jar <your_path>/build/libs/kotlin-mcp-client-0.1.0-all.jar <path_to_server_script>")
      val serverPath = args.first()
      val client = MCPClient()
      client.use {
          client.connectToServer(serverPath)
          client.chatLoop()
      }
  }
  ```

  ## Running the client

  To run your client with any MCP server:

  ```bash
  ./gradlew build

  # Run the client
  java -jar build/libs/<your-jar-name>.jar path/to/server.jar # jvm server
  java -jar build/libs/<your-jar-name>.jar path/to/server.py # python server
  java -jar build/libs/<your-jar-name>.jar path/to/build/index.js # node server
  ```

  <Note>
    If you're continuing the weather tutorial from the server quickstart, your command might look something like this: `java -jar
build/libs/kotlin-mcp-client-0.1.0-all.jar .../samples/weather-stdio-server/build/libs/weather-stdio-server-0.1.0-all.jar`
  **The client will:**

  1. Connect to the specified server
  2. List available tools
  3. Start an interactive chat session where you can:
     * Enter queries
     * See tool executions
     * Get responses from Claude

  ## How it works

  Here's a high-level workflow schema:

  ```mermaid
  ---
  config:
      theme: neutral
  ---
  sequenceDiagram
      actor User
      participant Client
      participant Claude
      participant MCP_Server as MCP Server
      participant Tools

      User->>Client: Send query
      Client<<->>MCP_Server: Get available tools
      Client->>Claude: Send query with tool descriptions
      Claude-->>Client: Decide tool execution
      Client->>MCP_Server: Request tool execution
      MCP_Server->>Tools: Execute chosen tools
      Tools-->>MCP_Server: Return results
      MCP_Server-->>Client: Send results
      Client->>Claude: Send tool results
      Claude-->>Client: Provide final response
      Client-->>User: Display response
  ```

  When you submit a query:

  1. The client gets the list of available tools from the server
  2. Your query is sent to Claude along with tool descriptions
  3. Claude decides which tools (if any) to use
  4. The client executes any requested tool calls through the server
  5. Results are sent back to Claude
  6. Claude provides a natural language response
  7. The response is displayed to you

  ## Best practices

  1. **Error Handling**
     * Leverage Kotlin's type system to model errors explicitly
     * Wrap external tool and API calls in `try-catch` blocks when exceptions are possible
     * Provide clear and meaningful error messages
     * Handle network timeouts and connection issues gracefully

  2. **Security**
     * Store API keys and secrets securely in `local.properties`, environment variables, or secret managers
     * Validate all external responses to avoid unexpected or unsafe data usage
     * Be cautious with permissions and trust boundaries when using tools

  ## Troubleshooting

  ### Server Path Issues

  * Double-check the path to your server script is correct
  * Use the absolute path if the relative path isn't working
  * For Windows users, make sure to use forward slashes (/) or escaped backslashes (\\) in the path
  * Make sure that the required runtime is installed (java for Java, npm for Node.js, or uv for Python)
  * Verify the server file has the correct extension (.jar for Java, .js for Node.js or .py for Python)

  Example of correct path usage:

  ```bash
  # Relative path
  java -jar build/libs/client.jar ./server/build/libs/server.jar

  # Absolute path
  java -jar build/libs/client.jar /Users/username/projects/mcp-server/build/libs/server.jar

  # Windows path (either format works)
  java -jar build/libs/client.jar C:/projects/mcp-server/build/libs/server.jar
  java -jar build/libs/client.jar C:\\projects\\mcp-server\\build\\libs\\server.jar
  ```

  ### Response Timing

  * The first response might take up to 30 seconds to return
  * This is normal and happens while:
    * The server initializes
    * Claude processes the query
    * Tools are being executed
  * Subsequent responses are typically faster
  * Don't interrupt the process during this initial waiting period

  ### Common Error Messages

  If you see:

  * `Connection refused`: Ensure the server is running and the path is correct
  * `Tool execution failed`: Verify the tool's required environment variables are set
  * `ANTHROPIC_API_KEY is not set`: Check your environment variables
</Tab>

<Tab title="C#">
  [You can find the complete code for this tutorial here.](https://github.io/modelcontextprotocol/csharp-sdk/tree/main/samples/QuickstartClient)

  ## System Requirements

  Before starting, ensure your system meets these requirements:

  * .NET 8.0 or higher
  * Anthropic API key (Claude)
  * Windows, Linux, or MacOS

  ## Setting up your environment

  First, create a new .NET project:

  ```bash
  dotnet new console -n QuickstartClient
  cd QuickstartClient
  ```

  Then, add the required dependencies to your project:

  ```bash
  dotnet add package ModelContextProtocol --prerelease
  dotnet add package Anthropic.SDK
  dotnet add package Microsoft.Extensions.Hosting
  ```

  ## Setting up your API key

  You'll need an Anthropic API key from the [Anthropic Console](https://console.anthropic.com/settings/keys).

  ```bash
  dotnet user-secrets init
  dotnet user-secrets set "ANTHROPIC_API_KEY" "<your key here>"
  ```

  ## Creating the Client

  ### Basic Client Structure

  First, let's setup the basic client class:

  ```csharp
  using Microsoft.Extensions.Configuration;
  using Microsoft.Extensions.Hosting;

  var builder = Host.CreateEmptyApplicationBuilder(settings: null);

  builder.Configuration
      .AddUserSecrets<Program>();
  ```

  This creates the beginnings of a .NET console application that can read the API key from user secrets.

  Next, we'll setup the MCP Client:

  ```csharp
  var (command, arguments) = args switch
  {
      [var script] when script.EndsWith(".py") => ("python", script),
      [var script] when script.EndsWith(".js") => ("node", script),
      [var script] when Directory.Exists(script) || (File.Exists(script) && script.EndsWith(".csproj")) => ("dotnet", $"run --project {script} --no-build"),
      _ => throw new NotSupportedException("An unsupported server script was provided. Supported scripts are .py, .js, or .csproj")
  };

  await using var mcpClient = await McpClientFactory.CreateAsync(new()
  {
      Id = "demo-server",
      Name = "Demo Server",
      TransportType = TransportTypes.StdIo,
      TransportOptions = new()
      {
          ["command"] = command,
          ["arguments"] = arguments,
      }
  });

  var tools = await mcpClient.ListToolsAsync();
  foreach (var tool in tools)
  {
      Console.WriteLine($"Connected to server with tools: {tool.Name}");
  }
  ```

  <Note>
    Be sure to add the `using` statements for the namespaces:

    ```csharp
    using ModelContextProtocol.Client;
    using ModelContextProtocol.Protocol.Transport;
    ```
  </Note>

  This configures a MCP client that will connect to a server that is provided as a command line argument. It then lists the available tools from the connected
server.
  ### Query processing logic

  Now let's add the core functionality for processing queries and handling tool calls:

  ```csharp
  using IChatClient anthropicClient = new AnthropicClient(new APIAuthentication(builder.Configuration["ANTHROPIC_API_KEY"]))
      .Messages
      .AsBuilder()
      .UseFunctionInvocation()
      .Build();

  var options = new ChatOptions
  {
      MaxOutputTokens = 1000,
      ModelId = "claude-3-5-sonnet-20241022",
      Tools = [.. tools]
  };

  while (true)
  {
      Console.WriteLine("MCP Client Started!");
      Console.WriteLine("Type your queries or 'quit' to exit.");

      string? query = Console.ReadLine();

      if (string.IsNullOrWhiteSpace(query))
      {
          continue;
      }
      if (string.Equals(query, "quit", StringComparison.OrdinalIgnoreCase))
      {
          break;
      }

      var response = anthropicClient.GetStreamingResponseAsync(query, options);

      await foreach (var message in response)
      {
          Console.Write(message.Text);
      }
      Console.WriteLine();
  }
  ```

  ## Key Components Explained

  ### 1. Client Initialization

  * The client is initialized using `McpClientFactory.CreateAsync()`, which sets up the transport type and command to run the server.

  ### 2. Server Connection

  * Supports Python, Node.js, and .NET servers.
  * The server is started using the command specified in the arguments.
  * Configures to use stdio for communication with the server.
  * Initializes the session and available tools.

  ### 3. Query Processing

  * Leverages [Microsoft.Extensions.AI](https://learn.microsoft.com/dotnet/ai/ai-extensions) for the chat client.
  * Configures the `IChatClient` to use automatic tool (function) invocation.
  * The client reads user input and sends it to the server.
  * The server processes the query and returns a response.
  * The response is displayed to the user.

  ### Running the Client

  To run your client with any MCP server:

  ```bash
  dotnet run -- path/to/server.csproj # dotnet server
  dotnet run -- path/to/server.py # python server
  dotnet run -- path/to/server.js # node server
  ```

  <Note>
    If you're continuing the weather tutorial from the server quickstart, your command might look something like this: `dotnet run --
path/to/QuickstartWeatherServer`.
  The client will:

  1. Connect to the specified server
  2. List available tools
  3. Start an interactive chat session where you can:
     * Enter queries
     * See tool executions
     * Get responses from Claude
  4. Exit the session when done

  Here's an example of what it should look like it connected to a weather server quickstart:

  <Frame>
    <img src="https://mintlify.s3.us-west-1.amazonaws.com/mcp/images/quickstart-dotnet-client.png" />
  </Frame>
</Tab>
<Card title="Clients" icon="cubes" href="/clients">
  View the list of clients that support MCP integrations
</Card>

<Card title="Building MCP with LLMs" icon="comments" href="/tutorials/building-mcp-with-llms">
  Learn how to use LLMs like Claude to speed up your MCP development
</Card>

<Card title="Core architecture" icon="sitemap" href="/docs/concepts/architecture">
  Understand how MCP connects clients, servers, and LLMs
</Card>
Source: https://modelcontextprotocol.io/quickstart/server
Get started building your own server to use in Claude for Desktop and other clients.
In this tutorial, we'll build a simple MCP weather server and connect it to a host, Claude for Desktop. We'll start with a basic setup, and then progress to more complex use cases.
Many LLMs do not currently have the ability to fetch the forecast and severe weather alerts. Let's use MCP to solve that!
We'll build a server that exposes two tools: get-alerts and get-forecast. Then we'll connect the server to an MCP host (in this case, Claude for Desktop):
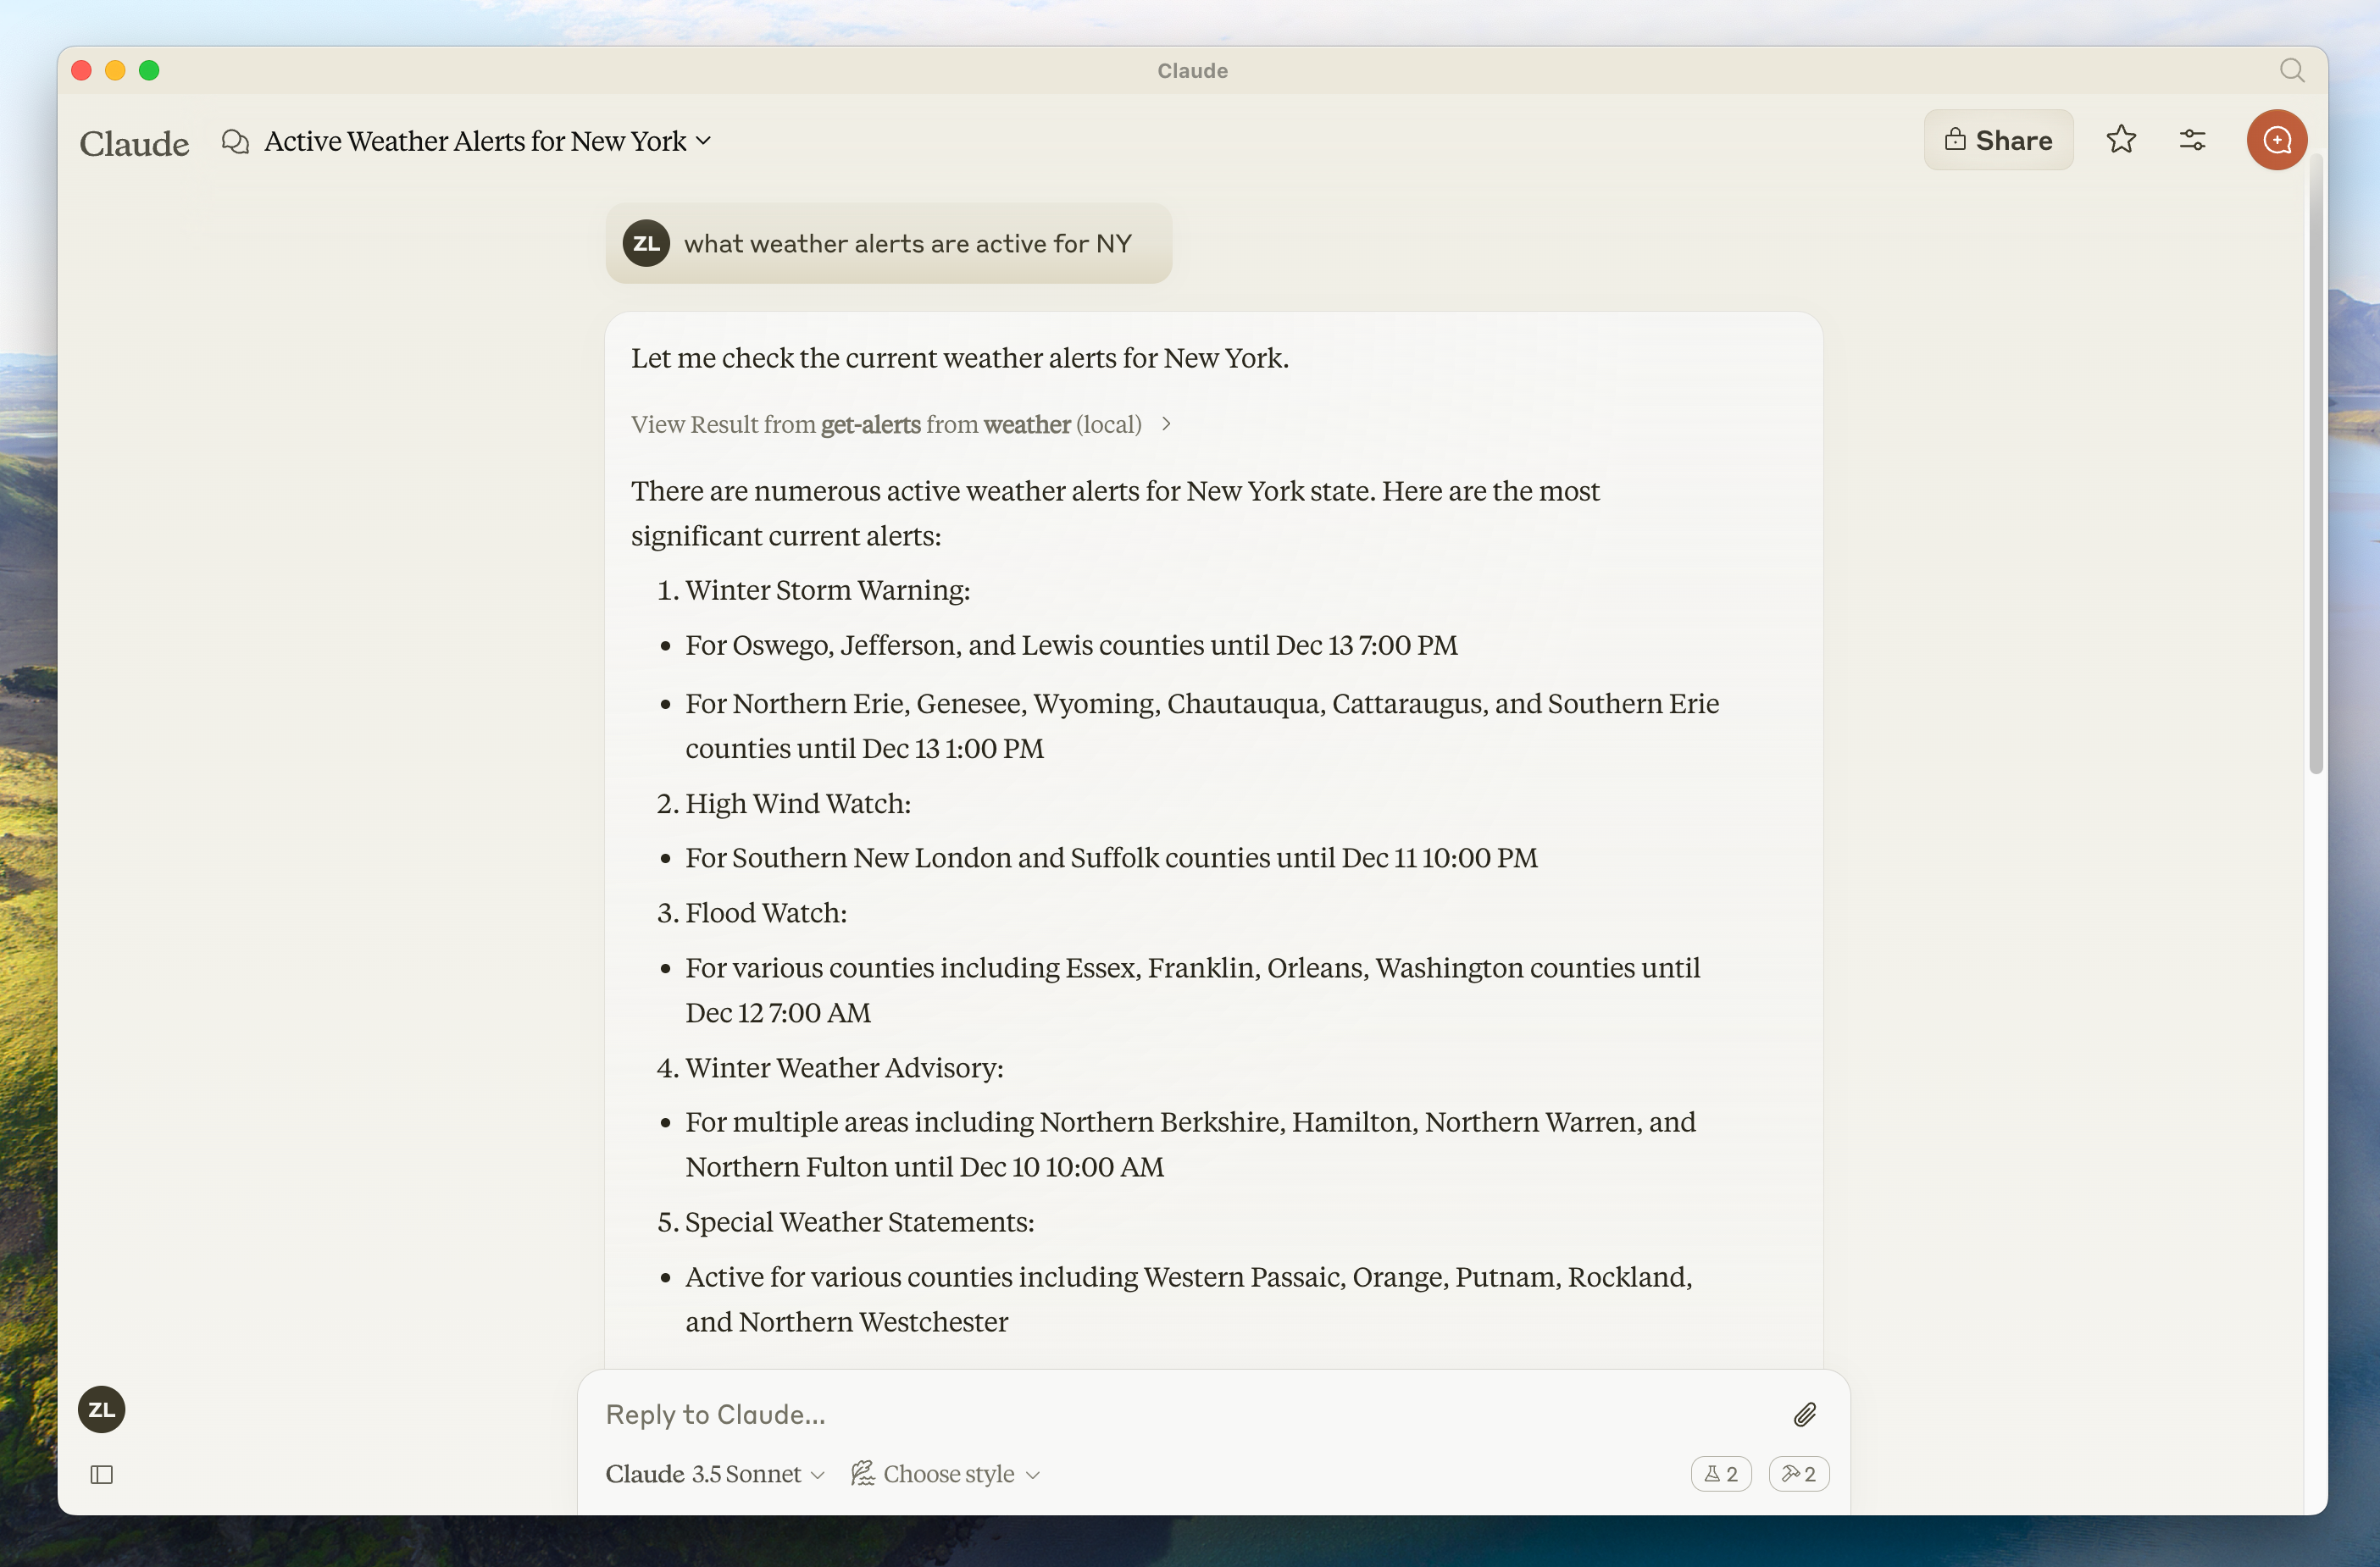
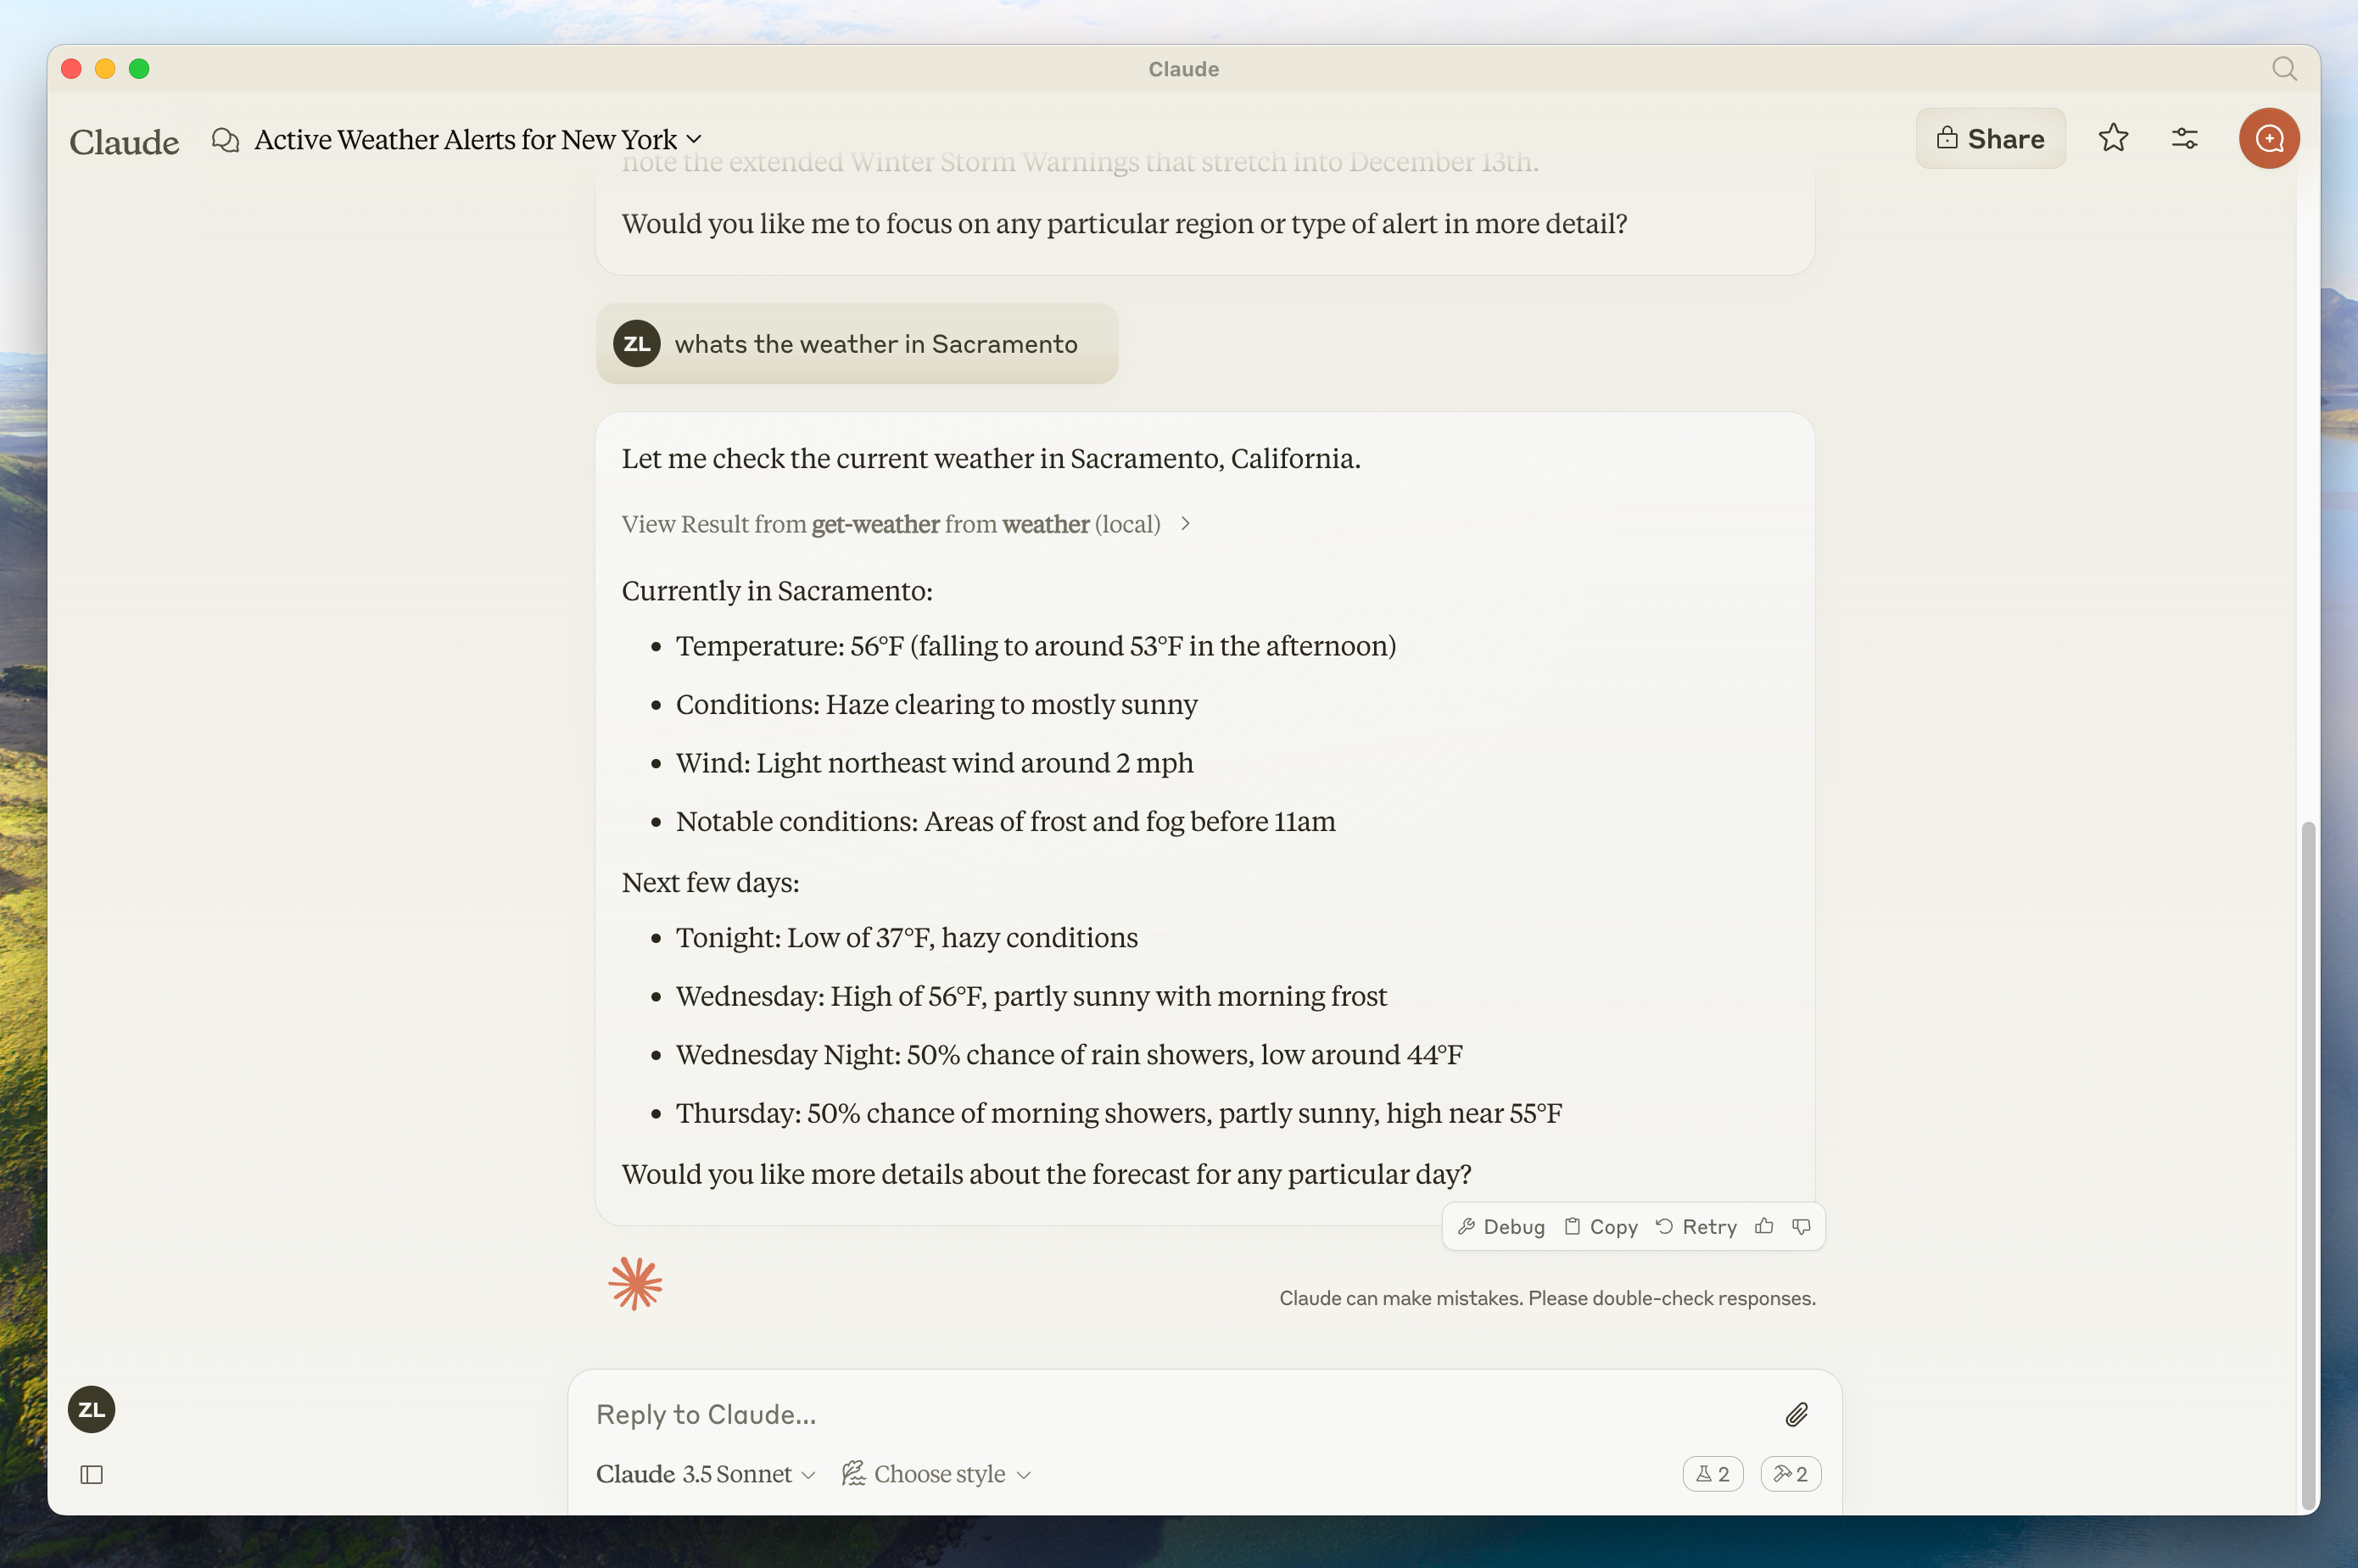
MCP servers can provide three main types of capabilities:
- Resources: File-like data that can be read by clients (like API responses or file contents)
- Tools: Functions that can be called by the LLM (with user approval)
- Prompts: Pre-written templates that help users accomplish specific tasks
This tutorial will primarily focus on tools.
Let's get started with building our weather server! [You can find the complete code for what we'll be building here.](https://github.com/modelcontextprotocol/quickstart-resources/tree/main/weather-server-python) ### Prerequisite knowledge
This quickstart assumes you have familiarity with:
* Python
* LLMs like Claude
### System requirements
* Python 3.10 or higher installed.
* You must use the Python MCP SDK 1.2.0 or higher.
### Set up your environment
First, let's install `uv` and set up our Python project and environment:
<CodeGroup>
```bash MacOS/Linux
curl -LsSf https://astral.sh/uv/install.sh | sh
```
```powershell Windows
powershell -ExecutionPolicy ByPass -c "irm https://astral.sh/uv/install.ps1 | iex"
```
</CodeGroup>
Make sure to restart your terminal afterwards to ensure that the `uv` command gets picked up.
Now, let's create and set up our project:
<CodeGroup>
```bash MacOS/Linux
# Create a new directory for our project
uv init weather
cd weather
# Create virtual environment and activate it
uv venv
source .venv/bin/activate
# Install dependencies
uv add "mcp[cli]" httpx
# Create our server file
touch weather.py
```
```powershell Windows
# Create a new directory for our project
uv init weather
cd weather
# Create virtual environment and activate it
uv venv
.venv\Scripts\activate
# Install dependencies
uv add mcp[cli] httpx
# Create our server file
new-item weather.py
```
</CodeGroup>
Now let's dive into building your server.
## Building your server
### Importing packages and setting up the instance
Add these to the top of your `weather.py`:
```python
from typing import Any
import httpx
from mcp.server.fastmcp import FastMCP
# Initialize FastMCP server
mcp = FastMCP("weather")
# Constants
NWS_API_BASE = "https://api.weather.gov"
USER_AGENT = "weather-app/1.0"
```
The FastMCP class uses Python type hints and docstrings to automatically generate tool definitions, making it easy to create and maintain MCP tools.
### Helper functions
Next, let's add our helper functions for querying and formatting the data from the National Weather Service API:
```python
async def make_nws_request(url: str) -> dict[str, Any] | None:
"""Make a request to the NWS API with proper error handling."""
headers = {
"User-Agent": USER_AGENT,
"Accept": "application/geo+json"
}
async with httpx.AsyncClient() as client:
try:
response = await client.get(url, headers=headers, timeout=30.0)
response.raise_for_status()
return response.json()
except Exception:
return None
def format_alert(feature: dict) -> str:
"""Format an alert feature into a readable string."""
props = feature["properties"]
return f"""
Event: {props.get('event', 'Unknown')}
Area: {props.get('areaDesc', 'Unknown')}
Severity: {props.get('severity', 'Unknown')}
Description: {props.get('description', 'No description available')}
Instructions: {props.get('instruction', 'No specific instructions provided')}
"""
```
### Implementing tool execution
The tool execution handler is responsible for actually executing the logic of each tool. Let's add it:
```python
@mcp.tool()
async def get_alerts(state: str) -> str:
"""Get weather alerts for a US state.
Args:
state: Two-letter US state code (e.g. CA, NY)
"""
url = f"{NWS_API_BASE}/alerts/active/area/{state}"
data = await make_nws_request(url)
if not data or "features" not in data:
return "Unable to fetch alerts or no alerts found."
if not data["features"]:
return "No active alerts for this state."
alerts = [format_alert(feature) for feature in data["features"]]
return "\n---\n".join(alerts)
@mcp.tool()
async def get_forecast(latitude: float, longitude: float) -> str:
"""Get weather forecast for a location.
Args:
latitude: Latitude of the location
longitude: Longitude of the location
"""
# First get the forecast grid endpoint
points_url = f"{NWS_API_BASE}/points/{latitude},{longitude}"
points_data = await make_nws_request(points_url)
if not points_data:
return "Unable to fetch forecast data for this location."
# Get the forecast URL from the points response
forecast_url = points_data["properties"]["forecast"]
forecast_data = await make_nws_request(forecast_url)
if not forecast_data:
return "Unable to fetch detailed forecast."
# Format the periods into a readable forecast
periods = forecast_data["properties"]["periods"]
forecasts = []
for period in periods[:5]: # Only show next 5 periods
forecast = f"""
{period['name']}:
Temperature: {period['temperature']}°{period['temperatureUnit']}
Wind: {period['windSpeed']} {period['windDirection']}
Forecast: {period['detailedForecast']}
"""
forecasts.append(forecast)
return "\n---\n".join(forecasts)
```
### Running the server
Finally, let's initialize and run the server:
```python
if __name__ == "__main__":
# Initialize and run the server
mcp.run(transport='stdio')
```
Your server is complete! Run `uv run weather.py` to confirm that everything's working.
Let's now test your server from an existing MCP host, Claude for Desktop.
## Testing your server with Claude for Desktop
<Note>
Claude for Desktop is not yet available on Linux. Linux users can proceed to the [Building a client](/quickstart/client) tutorial to build an MCP client
that connects to the server we just built.
  First, make sure you have Claude for Desktop installed. [You can install the latest version
  here.](https://claude.ai/download) If you already have Claude for Desktop, **make sure it's updated to the latest version.**

  We'll need to configure Claude for Desktop for whichever MCP servers you want to use. To do this, open your Claude for Desktop App configuration at
~/Library/Application Support/Claude/claude_desktop_config.json in a text editor. Make sure to create the file if it doesn't exist.
  For example, if you have [VS Code](https://code.visualstudio.com/) installed:

  <Tabs>
    <Tab title="MacOS/Linux">
      ```bash
      code ~/Library/Application\ Support/Claude/claude_desktop_config.json
      ```
    </Tab>

    <Tab title="Windows">
      ```powershell
      code $env:AppData\Claude\claude_desktop_config.json
      ```
    </Tab>
  </Tabs>

  You'll then add your servers in the `mcpServers` key. The MCP UI elements will only show up in Claude for Desktop if at least one server is properly
configured.
  In this case, we'll add our single weather server like so:

  <Tabs>
    <Tab title="MacOS/Linux">
      ```json Python
      {
          "mcpServers": {
              "weather": {
                  "command": "uv",
                  "args": [
                      "--directory",
                      "/ABSOLUTE/PATH/TO/PARENT/FOLDER/weather",
                      "run",
                      "weather.py"
                  ]
              }
          }
      }
      ```
    </Tab>

    <Tab title="Windows">
      ```json Python
      {
          "mcpServers": {
              "weather": {
                  "command": "uv",
                  "args": [
                      "--directory",
                      "C:\\ABSOLUTE\\PATH\\TO\\PARENT\\FOLDER\\weather",
                      "run",
                      "weather.py"
                  ]
              }
          }
      }
      ```
    </Tab>
  </Tabs>

  <Warning>
    You may need to put the full path to the `uv` executable in the `command` field. You can get this by running `which uv` on MacOS/Linux or `where uv` on
Windows.
  <Note>
    Make sure you pass in the absolute path to your server.
  </Note>

  This tells Claude for Desktop:

  1. There's an MCP server named "weather"
  2. To launch it by running `uv --directory /ABSOLUTE/PATH/TO/PARENT/FOLDER/weather run weather.py`

  Save the file, and restart **Claude for Desktop**.
</Tab>

<Tab title="Node">
  Let's get started with building our weather server! [You can find the complete code for what we'll be building
  ### Prerequisite knowledge

  This quickstart assumes you have familiarity with:

  * TypeScript
  * LLMs like Claude

  ### System requirements

  For TypeScript, make sure you have the latest version of Node installed.

  ### Set up your environment

  First, let's install Node.js and npm if you haven't already. You can download them from [nodejs.org](https://nodejs.org/).
  Verify your Node.js installation:

  ```bash
  node --version
  npm --version
  ```

  For this tutorial, you'll need Node.js version 16 or higher.

  Now, let's create and set up our project:

  <CodeGroup>
    ```bash MacOS/Linux
    # Create a new directory for our project
    mkdir weather
    cd weather

    # Initialize a new npm project
    npm init -y

    # Install dependencies
    npm install @modelcontextprotocol/sdk zod
    npm install -D @types/node typescript

    # Create our files
    mkdir src
    touch src/index.ts
    ```

    ```powershell Windows
    # Create a new directory for our project
    md weather
    cd weather

    # Initialize a new npm project
    npm init -y

    # Install dependencies
    npm install @modelcontextprotocol/sdk zod
    npm install -D @types/node typescript

    # Create our files
    md src
    new-item src\index.ts
    ```
  </CodeGroup>

  Update your package.json to add type: "module" and a build script:

  ```json package.json
  {
    "type": "module",
    "bin": {
      "weather": "./build/index.js"
    },
    "scripts": {
      "build": "tsc && chmod 755 build/index.js"
    },
    "files": [
      "build"
    ],
  }
  ```

  Create a `tsconfig.json` in the root of your project:

  ```json tsconfig.json
  {
    "compilerOptions": {
      "target": "ES2022",
      "module": "Node16",
      "moduleResolution": "Node16",
      "outDir": "./build",
      "rootDir": "./src",
      "strict": true,
      "esModuleInterop": true,
      "skipLibCheck": true,
      "forceConsistentCasingInFileNames": true
    },
    "include": ["src/**/*"],
    "exclude": ["node_modules"]
  }
  ```

  Now let's dive into building your server.

  ## Building your server

  ### Importing packages and setting up the instance

  Add these to the top of your `src/index.ts`:

  ```typescript
  import { McpServer } from "@modelcontextprotocol/sdk/server/mcp.js";
  import { StdioServerTransport } from "@modelcontextprotocol/sdk/server/stdio.js";
  import { z } from "zod";

  const NWS_API_BASE = "https://api.weather.gov";
  const USER_AGENT = "weather-app/1.0";

  // Create server instance
  const server = new McpServer({
    name: "weather",
    version: "1.0.0",
    capabilities: {
      resources: {},
      tools: {},
    },
  });
  ```

  ### Helper functions

  Next, let's add our helper functions for querying and formatting the data from the National Weather Service API:

  ```typescript
  // Helper function for making NWS API requests
  async function makeNWSRequest<T>(url: string): Promise<T | null> {
    const headers = {
      "User-Agent": USER_AGENT,
      Accept: "application/geo+json",
    };

    try {
      const response = await fetch(url, { headers });
      if (!response.ok) {
        throw new Error(`HTTP error! status: ${response.status}`);
      }
      return (await response.json()) as T;
    } catch (error) {
      console.error("Error making NWS request:", error);
      return null;
    }
  }

  interface AlertFeature {
    properties: {
      event?: string;
      areaDesc?: string;
      severity?: string;
      status?: string;
      headline?: string;
    };
  }

  // Format alert data
  function formatAlert(feature: AlertFeature): string {
    const props = feature.properties;
    return [
      `Event: ${props.event || "Unknown"}`,
      `Area: ${props.areaDesc || "Unknown"}`,
      `Severity: ${props.severity || "Unknown"}`,
      `Status: ${props.status || "Unknown"}`,
      `Headline: ${props.headline || "No headline"}`,
      "---",
    ].join("\n");
  }

  interface ForecastPeriod {
    name?: string;
    temperature?: number;
    temperatureUnit?: string;
    windSpeed?: string;
    windDirection?: string;
    shortForecast?: string;
  }

  interface AlertsResponse {
    features: AlertFeature[];
  }

  interface PointsResponse {
    properties: {
      forecast?: string;
    };
  }

  interface ForecastResponse {
    properties: {
      periods: ForecastPeriod[];
    };
  }
  ```

  ### Implementing tool execution

  The tool execution handler is responsible for actually executing the logic of each tool. Let's add it:

  ```typescript
  // Register weather tools
  server.tool(
    "get-alerts",
    "Get weather alerts for a state",
    {
      state: z.string().length(2).describe("Two-letter state code (e.g. CA, NY)"),
    },
    async ({ state }) => {
      const stateCode = state.toUpperCase();
      const alertsUrl = `${NWS_API_BASE}/alerts?area=${stateCode}`;
      const alertsData = await makeNWSRequest<AlertsResponse>(alertsUrl);

      if (!alertsData) {
        return {
          content: [
            {
              type: "text",
              text: "Failed to retrieve alerts data",
            },
          ],
        };
      }

      const features = alertsData.features || [];
      if (features.length === 0) {
        return {
          content: [
            {
              type: "text",
              text: `No active alerts for ${stateCode}`,
            },
          ],
        };
      }

      const formattedAlerts = features.map(formatAlert);
      const alertsText = `Active alerts for ${stateCode}:\n\n${formattedAlerts.join("\n")}`;

      return {
        content: [
          {
            type: "text",
            text: alertsText,
          },
        ],
      };
    },
  );

  server.tool(
    "get-forecast",
    "Get weather forecast for a location",
    {
      latitude: z.number().min(-90).max(90).describe("Latitude of the location"),
      longitude: z.number().min(-180).max(180).describe("Longitude of the location"),
    },
    async ({ latitude, longitude }) => {
      // Get grid point data
      const pointsUrl = `${NWS_API_BASE}/points/${latitude.toFixed(4)},${longitude.toFixed(4)}`;
      const pointsData = await makeNWSRequest<PointsResponse>(pointsUrl);

      if (!pointsData) {
        return {
          content: [
            {
              type: "text",
              text: `Failed to retrieve grid point data for coordinates: ${latitude}, ${longitude}. This location may not be supported by the NWS API (only US
locations are supported).`, }, ], }; }
      const forecastUrl = pointsData.properties?.forecast;
      if (!forecastUrl) {
        return {
          content: [
            {
              type: "text",
              text: "Failed to get forecast URL from grid point data",
            },
          ],
        };
      }

      // Get forecast data
      const forecastData = await makeNWSRequest<ForecastResponse>(forecastUrl);
      if (!forecastData) {
        return {
          content: [
            {
              type: "text",
              text: "Failed to retrieve forecast data",
            },
          ],
        };
      }

      const periods = forecastData.properties?.periods || [];
      if (periods.length === 0) {
        return {
          content: [
            {
              type: "text",
              text: "No forecast periods available",
            },
          ],
        };
      }

      // Format forecast periods
      const formattedForecast = periods.map((period: ForecastPeriod) =>
        [
          `${period.name || "Unknown"}:`,
          `Temperature: ${period.temperature || "Unknown"}°${period.temperatureUnit || "F"}`,
          `Wind: ${period.windSpeed || "Unknown"} ${period.windDirection || ""}`,
          `${period.shortForecast || "No forecast available"}`,
          "---",
        ].join("\n"),
      );

      const forecastText = `Forecast for ${latitude}, ${longitude}:\n\n${formattedForecast.join("\n")}`;

      return {
        content: [
          {
            type: "text",
            text: forecastText,
          },
        ],
      };
    },
  );
  ```

  ### Running the server

  Finally, implement the main function to run the server:

  ```typescript
  async function main() {
    const transport = new StdioServerTransport();
    await server.connect(transport);
    console.error("Weather MCP Server running on stdio");
  }

  main().catch((error) => {
    console.error("Fatal error in main():", error);
    process.exit(1);
  });
  ```

  Make sure to run `npm run build` to build your server! This is a very important step in getting your server to connect.

  Let's now test your server from an existing MCP host, Claude for Desktop.

  ## Testing your server with Claude for Desktop

  <Note>
    Claude for Desktop is not yet available on Linux. Linux users can proceed to the [Building a client](/quickstart/client) tutorial to build an MCP client
that connects to the server we just built.
  First, make sure you have Claude for Desktop installed. [You can install the latest version
  here.](https://claude.ai/download) If you already have Claude for Desktop, **make sure it's updated to the latest version.**

  We'll need to configure Claude for Desktop for whichever MCP servers you want to use. To do this, open your Claude for Desktop App configuration at
~/Library/Application Support/Claude/claude_desktop_config.json in a text editor. Make sure to create the file if it doesn't exist.
  For example, if you have [VS Code](https://code.visualstudio.com/) installed:

  <Tabs>
    <Tab title="MacOS/Linux">
      ```bash
      code ~/Library/Application\ Support/Claude/claude_desktop_config.json
      ```
    </Tab>

    <Tab title="Windows">
      ```powershell
      code $env:AppData\Claude\claude_desktop_config.json
      ```
    </Tab>
  </Tabs>

  You'll then add your servers in the `mcpServers` key. The MCP UI elements will only show up in Claude for Desktop if at least one server is properly
configured.
  In this case, we'll add our single weather server like so:

  <Tabs>
    <Tab title="MacOS/Linux">
      <CodeGroup>
        ```json Node
        {
            "mcpServers": {
                "weather": {
                    "command": "node",
                    "args": [
                        "/ABSOLUTE/PATH/TO/PARENT/FOLDER/weather/build/index.js"
                    ]
                }
            }
        }
        ```
      </CodeGroup>
    </Tab>

    <Tab title="Windows">
      <CodeGroup>
        ```json Node
        {
            "mcpServers": {
                "weather": {
                    "command": "node",
                    "args": [
                        "C:\\PATH\\TO\\PARENT\\FOLDER\\weather\\build\\index.js"
                    ]
                }
            }
        }
        ```
      </CodeGroup>
    </Tab>
  </Tabs>

  This tells Claude for Desktop:

  1. There's an MCP server named "weather"
  2. Launch it by running `node /ABSOLUTE/PATH/TO/PARENT/FOLDER/weather/build/index.js`

  Save the file, and restart **Claude for Desktop**.
</Tab>

<Tab title="Java">
  <Note>
    This is a quickstart demo based on Spring AI MCP auto-configuration and boot starters.
    To learn how to create sync and async MCP Servers, manually, consult the [Java SDK Server](/sdk/java/mcp-server) documentation.
  </Note>

  Let's get started with building our weather server!
  [You can find the complete code for what we'll be building
For more information, see the [MCP Server Boot Starter](https://docs.spring.io/spring-ai/reference/api/mcp/mcp-server-boot-starter-docs.html) reference
documentation. For manual MCP Server implementation, refer to the MCP Server Java SDK documentation.
  ### System requirements

  * Java 17 or higher installed.
  * [Spring Boot 3.3.x](https://docs.spring.io/spring-boot/installing.html) or higher

  ### Set up your environment

  Use the [Spring Initializer](https://start.spring.io/) to bootstrap the project.

  You will need to add the following dependencies:

  <Tabs>
    <Tab title="Maven">
      ```xml
      <dependencies>
            <dependency>
                <groupId>org.springframework.ai</groupId>
                <artifactId>spring-ai-starter-mcp-server</artifactId>
            </dependency>

            <dependency>
                <groupId>org.springframework</groupId>
                <artifactId>spring-web</artifactId>
            </dependency>
      </dependencies>
      ```
    </Tab>

    <Tab title="Gradle">
      ```groovy
      dependencies {
        implementation platform("org.springframework.ai:spring-ai-starter-mcp-server")
        implementation platform("org.springframework:spring-web")
      }
      ```
    </Tab>
  </Tabs>

  Then configure your application by setting the application properties:

  <CodeGroup>
    ```bash application.properties
    spring.main.bannerMode=off
    logging.pattern.console=
    ```

    ```yaml application.yml
    logging:
      pattern:
        console:
    spring:
      main:
        banner-mode: off
    ```
  </CodeGroup>

  The [Server Configuration Properties](https://docs.spring.io/spring-ai/reference/api/mcp/mcp-server-boot-starter-docs.html#_configuration_properties)
documents all available properties.
  Now let's dive into building your server.

  ## Building your server

  ### Weather Service

  Let's implement a [WeatherService.java](https://github.com/spring-projects/spring-ai-examples/blob/main/model-context-protocol/weather/starter-stdio-server/
src/main/java/org/springframework/ai/mcp/sample/server/WeatherService.java) that uses a REST client to query the data from the National Weather Service API:
  ```java
  @Service
  public class WeatherService {

      private final RestClient restClient;

      public WeatherService() {
          this.restClient = RestClient.builder()
              .baseUrl("https://api.weather.gov")
              .defaultHeader("Accept", "application/geo+json")
              .defaultHeader("User-Agent", "WeatherApiClient/1.0 ([email protected])")
              .build();
      }

    @Tool(description = "Get weather forecast for a specific latitude/longitude")
    public String getWeatherForecastByLocation(
        double latitude,   // Latitude coordinate
        double longitude   // Longitude coordinate
    ) {
        // Returns detailed forecast including:
        // - Temperature and unit
        // - Wind speed and direction
        // - Detailed forecast description
    }

    @Tool(description = "Get weather alerts for a US state")
    public String getAlerts(
        @ToolParam(description = "Two-letter US state code (e.g. CA, NY)" String state
    ) {
        // Returns active alerts including:
        // - Event type
        // - Affected area
        // - Severity
        // - Description
        // - Safety instructions
    }

    // ......
  }
  ```

  The `@Service` annotation with auto-register the service in your application context.
  The Spring AI `@Tool` annotation, making it easy to create and maintain MCP tools.

  The auto-configuration will automatically register these tools with the MCP server.

  ### Create your Boot Application

  ```java
  @SpringBootApplication
  public class McpServerApplication {

      public static void main(String[] args) {
          SpringApplication.run(McpServerApplication.class, args);
      }

      @Bean
      public ToolCallbackProvider weatherTools(WeatherService weatherService) {
          return  MethodToolCallbackProvider.builder().toolObjects(weatherService).build();
      }
  }
  ```

  Uses the the `MethodToolCallbackProvider` utils to convert the `@Tools` into actionable callbacks used by the MCP server.

  ### Running the server

  Finally, let's build the server:

  ```bash
  ./mvnw clean install
  ```

  This will generate a `mcp-weather-stdio-server-0.0.1-SNAPSHOT.jar` file within the `target` folder.

  Let's now test your server from an existing MCP host, Claude for Desktop.

  ## Testing your server with Claude for Desktop

  <Note>
    Claude for Desktop is not yet available on Linux.
  </Note>

  First, make sure you have Claude for Desktop installed.
  [You can install the latest version here.](https://claude.ai/download) If you already have Claude for Desktop, **make sure it's updated to the latest
version.**
  We'll need to configure Claude for Desktop for whichever MCP servers you want to use.
  To do this, open your Claude for Desktop App configuration at `~/Library/Application Support/Claude/claude_desktop_config.json` in a text editor.
  Make sure to create the file if it doesn't exist.

  For example, if you have [VS Code](https://code.visualstudio.com/) installed:

  <Tabs>
    <Tab title="MacOS/Linux">
      ```bash
      code ~/Library/Application\ Support/Claude/claude_desktop_config.json
      ```
    </Tab>

    <Tab title="Windows">
      ```powershell
      code $env:AppData\Claude\claude_desktop_config.json
      ```
    </Tab>
  </Tabs>

  You'll then add your servers in the `mcpServers` key.
  The MCP UI elements will only show up in Claude for Desktop if at least one server is properly configured.

  In this case, we'll add our single weather server like so:

  <Tabs>
    <Tab title="MacOS/Linux">
      ```json java
      {
        "mcpServers": {
          "spring-ai-mcp-weather": {
            "command": "java",
            "args": [
              "-Dspring.ai.mcp.server.stdio=true",
              "-jar",
              "/ABSOLUTE/PATH/TO/PARENT/FOLDER/mcp-weather-stdio-server-0.0.1-SNAPSHOT.jar"
            ]
          }
        }
      }
      ```
    </Tab>

    <Tab title="Windows">
      ```json java
      {
        "mcpServers": {
          "spring-ai-mcp-weather": {
            "command": "java",
            "args": [
              "-Dspring.ai.mcp.server.transport=STDIO",
              "-jar",
              "C:\\ABSOLUTE\\PATH\\TO\\PARENT\\FOLDER\\weather\\mcp-weather-stdio-server-0.0.1-SNAPSHOT.jar"
            ]
          }
        }
      }
      ```
    </Tab>
  </Tabs>

  <Note>
    Make sure you pass in the absolute path to your server.
  </Note>

  This tells Claude for Desktop:

  1. There's an MCP server named "my-weather-server"
  2. To launch it by running `java -jar /ABSOLUTE/PATH/TO/PARENT/FOLDER/mcp-weather-stdio-server-0.0.1-SNAPSHOT.jar`

  Save the file, and restart **Claude for Desktop**.

  ## Testing your server with Java client

  ### Create a MCP Client manually

  Use the `McpClient` to connect to the server:

  ```java
  var stdioParams = ServerParameters.builder("java")
    .args("-jar", "/ABSOLUTE/PATH/TO/PARENT/FOLDER/mcp-weather-stdio-server-0.0.1-SNAPSHOT.jar")
    .build();

  var stdioTransport = new StdioClientTransport(stdioParams);

  var mcpClient = McpClient.sync(stdioTransport).build();

  mcpClient.initialize();

  ListToolsResult toolsList = mcpClient.listTools();

  CallToolResult weather = mcpClient.callTool(
    new CallToolRequest("getWeatherForecastByLocation",
        Map.of("latitude", "47.6062", "longitude", "-122.3321")));

  CallToolResult alert = mcpClient.callTool(
    new CallToolRequest("getAlerts", Map.of("state", "NY")));

  mcpClient.closeGracefully();
  ```

  ### Use MCP Client Boot Starter

  Create a new boot starter application using the `spring-ai-starter-mcp-client` dependency:

  ```xml
  <dependency>
      <groupId>org.springframework.ai</groupId>
      <artifactId>spring-ai-starter-mcp-client</artifactId>
  </dependency>
  ```

  and set the `spring.ai.mcp.client.stdio.servers-configuration` property to point to your `claude_desktop_config.json`.
  You can re-use the existing Anthropic Desktop configuration:

  ```properties
  spring.ai.mcp.client.stdio.servers-configuration=file:PATH/TO/claude_desktop_config.json
  ```

  When you start your client application, the auto-configuration will create, automatically MCP clients from the claude\_desktop\_config.json.

  For more information, see the [MCP Client Boot Starters](https://docs.spring.io/spring-ai/reference/api/mcp/mcp-server-boot-client-docs.html) reference
documentation.
  ## More Java MCP Server examples

  The [starter-webflux-server](https://github.com/spring-projects/spring-ai-examples/tree/main/model-context-protocol/weather/starter-webflux-server)
demonstrates how to create a MCP server using SSE transport. It showcases how to define and register MCP Tools, Resources, and Prompts, using the Spring Boot's auto-configuration capabilities.
<Tab title="Kotlin">
  Let's get started with building our weather server! [You can find the complete code for what we'll be building
here.](https://github.com/modelcontextprotocol/kotlin-sdk/tree/main/samples/weather-stdio-server)
  ### Prerequisite knowledge

  This quickstart assumes you have familiarity with:

  * Kotlin
  * LLMs like Claude

  ### System requirements

  * Java 17 or higher installed.

  ### Set up your environment

  First, let's install `java` and `gradle` if you haven't already.
  You can download `java` from [official Oracle JDK website](https://www.oracle.com/java/technologies/downloads/).
  Verify your `java` installation:

  ```bash
  java --version
  ```

  Now, let's create and set up your project:

  <CodeGroup>
    ```bash MacOS/Linux
    # Create a new directory for our project
    mkdir weather
    cd weather

    # Initialize a new kotlin project
    gradle init
    ```

    ```powershell Windows
    # Create a new directory for our project
    md weather
    cd weather

    # Initialize a new kotlin project
    gradle init
    ```
  </CodeGroup>

  After running `gradle init`, you will be presented with options for creating your project.
  Select **Application** as the project type, **Kotlin** as the programming language, and **Java 17** as the Java version.

  Alternatively, you can create a Kotlin application using the [IntelliJ IDEA project wizard](https://kotlinlang.org/docs/jvm-get-started.html).

  After creating the project, add the following dependencies:

  <CodeGroup>
    ```kotlin build.gradle.kts
    val mcpVersion = "0.4.0"
    val slf4jVersion = "2.0.9"
    val ktorVersion = "3.1.1"

    dependencies {
        implementation("io.modelcontextprotocol:kotlin-sdk:$mcpVersion")
        implementation("org.slf4j:slf4j-nop:$slf4jVersion")
        implementation("io.ktor:ktor-client-content-negotiation:$ktorVersion")
        implementation("io.ktor:ktor-serialization-kotlinx-json:$ktorVersion")
    }
    ```

    ```groovy build.gradle
    def mcpVersion = '0.3.0'
    def slf4jVersion = '2.0.9'
    def ktorVersion = '3.1.1'

    dependencies {
        implementation "io.modelcontextprotocol:kotlin-sdk:$mcpVersion"
        implementation "org.slf4j:slf4j-nop:$slf4jVersion"
        implementation "io.ktor:ktor-client-content-negotiation:$ktorVersion"
        implementation "io.ktor:ktor-serialization-kotlinx-json:$ktorVersion"
    }
    ```
  </CodeGroup>

  Also, add the following plugins to your build script:

  <CodeGroup>
    ```kotlin build.gradle.kts
    plugins {
        kotlin("plugin.serialization") version "your_version_of_kotlin"
        id("com.github.johnrengelman.shadow") version "8.1.1"
    }
    ```

    ```groovy build.gradle
    plugins {
        id 'org.jetbrains.kotlin.plugin.serialization' version 'your_version_of_kotlin'
        id 'com.github.johnrengelman.shadow' version '8.1.1'
    }
    ```
  </CodeGroup>

  Now let’s dive into building your server.

  ## Building your server

  ### Setting up the instance

  Add a server initialization function:

  ```kotlin
  // Main function to run the MCP server
  fun `run mcp server`() {
      // Create the MCP Server instance with a basic implementation
      val server = Server(
          Implementation(
              name = "weather", // Tool name is "weather"
              version = "1.0.0" // Version of the implementation
          ),
          ServerOptions(
              capabilities = ServerCapabilities(tools = ServerCapabilities.Tools(listChanged = true))
          )
      )

      // Create a transport using standard IO for server communication
      val transport = StdioServerTransport(
          System.`in`.asInput(),
          System.out.asSink().buffered()
      )

      runBlocking {
          server.connect(transport)
          val done = Job()
          server.onClose {
              done.complete()
          }
          done.join()
      }
  }
  ```

  ### Weather API helper functions

  Next, let's add functions and data classes for querying and converting responses from the National Weather Service API:

  ```kotlin
  // Extension function to fetch forecast information for given latitude and longitude
  suspend fun HttpClient.getForecast(latitude: Double, longitude: Double): List<String> {
      val points = this.get("/points/$latitude,$longitude").body<Points>()
      val forecast = this.get(points.properties.forecast).body<Forecast>()
      return forecast.properties.periods.map { period ->
          """
              ${period.name}:
              Temperature: ${period.temperature} ${period.temperatureUnit}
              Wind: ${period.windSpeed} ${period.windDirection}
              Forecast: ${period.detailedForecast}
          """.trimIndent()
      }
  }

  // Extension function to fetch weather alerts for a given state
  suspend fun HttpClient.getAlerts(state: String): List<String> {
      val alerts = this.get("/alerts/active/area/$state").body<Alert>()
      return alerts.features.map { feature ->
          """
              Event: ${feature.properties.event}
              Area: ${feature.properties.areaDesc}
              Severity: ${feature.properties.severity}
              Description: ${feature.properties.description}
              Instruction: ${feature.properties.instruction}
          """.trimIndent()
      }
  }

  @Serializable
  data class Points(
      val properties: Properties
  ) {
      @Serializable
      data class Properties(val forecast: String)
  }

  @Serializable
  data class Forecast(
      val properties: Properties
  ) {
      @Serializable
      data class Properties(val periods: List<Period>)

      @Serializable
      data class Period(
          val number: Int, val name: String, val startTime: String, val endTime: String,
          val isDaytime: Boolean, val temperature: Int, val temperatureUnit: String,
          val temperatureTrend: String, val probabilityOfPrecipitation: JsonObject,
          val windSpeed: String, val windDirection: String,
          val shortForecast: String, val detailedForecast: String,
      )
  }

  @Serializable
  data class Alert(
      val features: List<Feature>
  ) {
      @Serializable
      data class Feature(
          val properties: Properties
      )

      @Serializable
      data class Properties(
          val event: String, val areaDesc: String, val severity: String,
          val description: String, val instruction: String?,
      )
  }
  ```

  ### Implementing tool execution

  The tool execution handler is responsible for actually executing the logic of each tool. Let's add it:

  ```kotlin
  // Create an HTTP client with a default request configuration and JSON content negotiation
  val httpClient = HttpClient {
      defaultRequest {
          url("https://api.weather.gov")
          headers {
              append("Accept", "application/geo+json")
              append("User-Agent", "WeatherApiClient/1.0")
          }
          contentType(ContentType.Application.Json)
      }
      // Install content negotiation plugin for JSON serialization/deserialization
      install(ContentNegotiation) { json(Json { ignoreUnknownKeys = true }) }
  }

  // Register a tool to fetch weather alerts by state
  server.addTool(
      name = "get_alerts",
      description = """
          Get weather alerts for a US state. Input is Two-letter US state code (e.g. CA, NY)
      """.trimIndent(),
      inputSchema = Tool.Input(
          properties = buildJsonObject {
              putJsonObject("state") {
                  put("type", "string")
                  put("description", "Two-letter US state code (e.g. CA, NY)")
              }
          },
          required = listOf("state")
      )
  ) { request ->
      val state = request.arguments["state"]?.jsonPrimitive?.content
      if (state == null) {
          return@addTool CallToolResult(
              content = listOf(TextContent("The 'state' parameter is required."))
          )
      }

      val alerts = httpClient.getAlerts(state)

      CallToolResult(content = alerts.map { TextContent(it) })
  }

  // Register a tool to fetch weather forecast by latitude and longitude
  server.addTool(
      name = "get_forecast",
      description = """
          Get weather forecast for a specific latitude/longitude
      """.trimIndent(),
      inputSchema = Tool.Input(
          properties = buildJsonObject {
              putJsonObject("latitude") { put("type", "number") }
              putJsonObject("longitude") { put("type", "number") }
          },
          required = listOf("latitude", "longitude")
      )
  ) { request ->
      val latitude = request.arguments["latitude"]?.jsonPrimitive?.doubleOrNull
      val longitude = request.arguments["longitude"]?.jsonPrimitive?.doubleOrNull
      if (latitude == null || longitude == null) {
          return@addTool CallToolResult(
              content = listOf(TextContent("The 'latitude' and 'longitude' parameters are required."))
          )
      }

      val forecast = httpClient.getForecast(latitude, longitude)

      CallToolResult(content = forecast.map { TextContent(it) })
  }
  ```

  ### Running the server

  Finally, implement the main function to run the server:

  ```kotlin
  fun main() = `run mcp server`()
  ```

  Make sure to run `./gradlew build` to build your server. This is a very important step in getting your server to connect.

  Let's now test your server from an existing MCP host, Claude for Desktop.

  ## Testing your server with Claude for Desktop

  <Note>
    Claude for Desktop is not yet available on Linux. Linux users can proceed to the [Building a client](/quickstart/client) tutorial to build an MCP client
that connects to the server we just built.
  First, make sure you have Claude for Desktop installed. [You can install the latest version
  here.](https://claude.ai/download) If you already have Claude for Desktop, **make sure it's updated to the latest version.**

  We'll need to configure Claude for Desktop for whichever MCP servers you want to use.
  To do this, open your Claude for Desktop App configuration at `~/Library/Application Support/Claude/claude_desktop_config.json` in a text editor.
  Make sure to create the file if it doesn't exist.

  For example, if you have [VS Code](https://code.visualstudio.com/) installed:

  <CodeGroup>
    ```bash MacOS/Linux
    code ~/Library/Application\ Support/Claude/claude_desktop_config.json
    ```

    ```powershell Windows
    code $env:AppData\Claude\claude_desktop_config.json
    ```
  </CodeGroup>

  You'll then add your servers in the `mcpServers` key.
  The MCP UI elements will only show up in Claude for Desktop if at least one server is properly configured.

  In this case, we'll add our single weather server like so:

  <CodeGroup>
    ```json MacOS/Linux
    {
        "mcpServers": {
            "weather": {
                "command": "java",
                "args": [
                    "-jar",
                    "/ABSOLUTE/PATH/TO/PARENT/FOLDER/weather/build/libs/weather-0.1.0-all.jar"
                ]
            }
        }
    }
    ```

    ```json Windows
    {
        "mcpServers": {
            "weather": {
                "command": "java",
                "args": [
                    "-jar",
                    "C:\\PATH\\TO\\PARENT\\FOLDER\\weather\\build\\libs\\weather-0.1.0-all.jar"
                ]
            }
        }
    }
    ```
  </CodeGroup>

  This tells Claude for Desktop:

  1. There's an MCP server named "weather"
  2. Launch it by running `java -jar /ABSOLUTE/PATH/TO/PARENT/FOLDER/weather/build/libs/weather-0.1.0-all.jar`

  Save the file, and restart **Claude for Desktop**.
</Tab>

<Tab title="C#">
  Let's get started with building our weather server! [You can find the complete code for what we'll be building
here.](https://github.com/modelcontextprotocol/csharp-sdk/tree/main/samples/QuickstartWeatherServer)
  ### Prerequisite knowledge

  This quickstart assumes you have familiarity with:

  * C#
  * LLMs like Claude
  * .NET 8 or higher

  ### System requirements

  * [.NET 8 SDK](https://dotnet.microsoft.com/download/dotnet/8.0) or higher installed.

  ### Set up your environment

  First, let's install `dotnet` if you haven't already. You can download `dotnet` from [official Microsoft .NET
website](https://dotnet.microsoft.com/download/). Verify your dotnet installation:
  ```bash
  dotnet --version
  ```

  Now, let's create and set up your project:

  <CodeGroup>
    ```bash MacOS/Linux
    # Create a new directory for our project
    mkdir weather
    cd weather
    # Initialize a new C# project
    dotnet new console
    ```

    ```powershell Windows
    # Create a new directory for our project
    mkdir weather
    cd weather
    # Initialize a new C# project
    dotnet new console
    ```
  </CodeGroup>

  After running `dotnet new console`, you will be presented with a new C# project.
  You can open the project in your favorite IDE, such as [Visual Studio](https://visualstudio.microsoft.com/) or [Rider](https://www.jetbrains.com/rider/).
  Alternatively, you can create a C# application using the [Visual Studio project
wizard](https://learn.microsoft.com/en-us/visualstudio/get-started/csharp/tutorial-console?view=vs-2022). After creating the project, add NuGet package for the Model Context Protocol SDK and hosting:
  ```bash
  # Add the Model Context Protocol SDK NuGet package
  dotnet add package ModelContextProtocol --prerelease
  # Add the .NET Hosting NuGet package
  dotnet add package Microsoft.Extensions.Hosting
  ```

  Now let’s dive into building your server.

  ## Building your server

  Open the `Program.cs` file in your project and replace its contents with the following code:

  ```csharp
  using Microsoft.Extensions.DependencyInjection;
  using Microsoft.Extensions.Hosting;
  using ModelContextProtocol;
  using System.Net.Http.Headers;

  var builder = Host.CreateEmptyApplicationBuilder(settings: null);

  builder.Services.AddMcpServer()
      .WithStdioServerTransport()
      .WithToolsFromAssembly();

  builder.Services.AddSingleton(_ =>
  {
      var client = new HttpClient() { BaseAddress = new Uri("https://api.weather.gov") };
      client.DefaultRequestHeaders.UserAgent.Add(new ProductInfoHeaderValue("weather-tool", "1.0"));
      return client;
  });

  var app = builder.Build();

  await app.RunAsync();
  ```

  <Note>
    When creating the `ApplicationHostBuilder`, ensure you use `CreateEmptyApplicationBuilder` instead of `CreateDefaultBuilder`. This ensures that the server
does not write any additional messages to the console. This is only neccessary for servers using STDIO transport.
  This code sets up a basic console application that uses the Model Context Protocol SDK to create an MCP server with standard I/O transport.

  ### Weather API helper functions

  Next, define a class with the tool execution handlers for querying and converting responses from the National Weather Service API:

  ```csharp
  using ModelContextProtocol.Server;
  using System.ComponentModel;
  using System.Net.Http.Json;
  using System.Text.Json;

  namespace QuickstartWeatherServer.Tools;

  [McpServerToolType]
  public static class WeatherTools
  {
      [McpServerTool, Description("Get weather alerts for a US state.")]
      public static async Task<string> GetAlerts(
          HttpClient client,
          [Description("The US state to get alerts for.")] string state)
      {
          var jsonElement = await client.GetFromJsonAsync<JsonElement>($"/alerts/active/area/{state}");
          var alerts = jsonElement.GetProperty("features").EnumerateArray();

          if (!alerts.Any())
          {
              return "No active alerts for this state.";
          }

          return string.Join("\n--\n", alerts.Select(alert =>
          {
              JsonElement properties = alert.GetProperty("properties");
              return $"""
                      Event: {properties.GetProperty("event").GetString()}
                      Area: {properties.GetProperty("areaDesc").GetString()}
                      Severity: {properties.GetProperty("severity").GetString()}
                      Description: {properties.GetProperty("description").GetString()}
                      Instruction: {properties.GetProperty("instruction").GetString()}
                      """;
          }));
      }

      [McpServerTool, Description("Get weather forecast for a location.")]
      public static async Task<string> GetForecast(
          HttpClient client,
          [Description("Latitude of the location.")] double latitude,
          [Description("Longitude of the location.")] double longitude)
      {
          var jsonElement = await client.GetFromJsonAsync<JsonElement>($"/points/{latitude},{longitude}");
          var periods = jsonElement.GetProperty("properties").GetProperty("periods").EnumerateArray();

          return string.Join("\n---\n", periods.Select(period => $"""
                  {period.GetProperty("name").GetString()}
                  Temperature: {period.GetProperty("temperature").GetInt32()}°F
                  Wind: {period.GetProperty("windSpeed").GetString()} {period.GetProperty("windDirection").GetString()}
                  Forecast: {period.GetProperty("detailedForecast").GetString()}
                  """));
      }
  }
  ```

  ### Running the server

  Finally, run the server using the following command:

  ```bash
  dotnet run
  ```

  This will start the server and listen for incoming requests on standard input/output.

  ## Testing your server with Claude for Desktop

  <Note>
    Claude for Desktop is not yet available on Linux. Linux users can proceed to the [Building a client](/quickstart/client) tutorial to build an MCP client
that connects to the server we just built.
  First, make sure you have Claude for Desktop installed. [You can install the latest version
  here.](https://claude.ai/download) If you already have Claude for Desktop, **make sure it's updated to the latest version.**
  We'll need to configure Claude for Desktop for whichever MCP servers you want to use. To do this, open your Claude for Desktop App configuration at
~/Library/Application Support/Claude/claude_desktop_config.json in a text editor. Make sure to create the file if it doesn't exist.
For example, if you have VS Code installed:
  <Tabs>
    <Tab title="MacOS/Linux">
      ```bash
      code ~/Library/Application\ Support/Claude/claude_desktop_config.json
      ```
    </Tab>

    <Tab title="Windows">
      ```powershell
      code $env:AppData\Claude\claude_desktop_config.json
      ```
    </Tab>
  </Tabs>

  You'll then add your servers in the `mcpServers` key. The MCP UI elements will only show up in Claude for Desktop if at least one server is properly
configured. In this case, we'll add our single weather server like so:
  <Tabs>
    <Tab title="MacOS/Linux">
      ```json
      {
          "mcpServers": {
              "weather": {
                  "command": "dotnet",
                  "args": [
                      "run",
                      "--project",
                      "/ABSOLUTE/PATH/TO/PROJECT",
                      "--no-build"
                  ]
              }
          }
      }
      ```
    </Tab>

    <Tab title="Windows">
      ```json
      {
          "mcpServers": {
              "weather": {
                  "command": "dotnet",
                  "args": [
                      "run",
                      "--project",
                      "C:\\ABSOLUTE\\PATH\\TO\\PROJECT",
                      "--no-build"
                  ]
              }
          }
      }
      ```
    </Tab>
  </Tabs>

  This tells Claude for Desktop:

  1. There's an MCP server named "weather"
  2. Launch it by running `dotnet run /ABSOLUTE/PATH/TO/PROJECT`
     Save the file, and restart **Claude for Desktop**.
</Tab>
Let's make sure Claude for Desktop is picking up the two tools we've exposed in our weather server. You can do this by looking for the hammer <img
src="https://mintlify.s3.us-west-1.amazonaws.com/mcp/images/claude-desktop-mcp-hammer-icon.svg" style={{display: 'inline', margin: 0, height: '1.3em'}} /> icon:
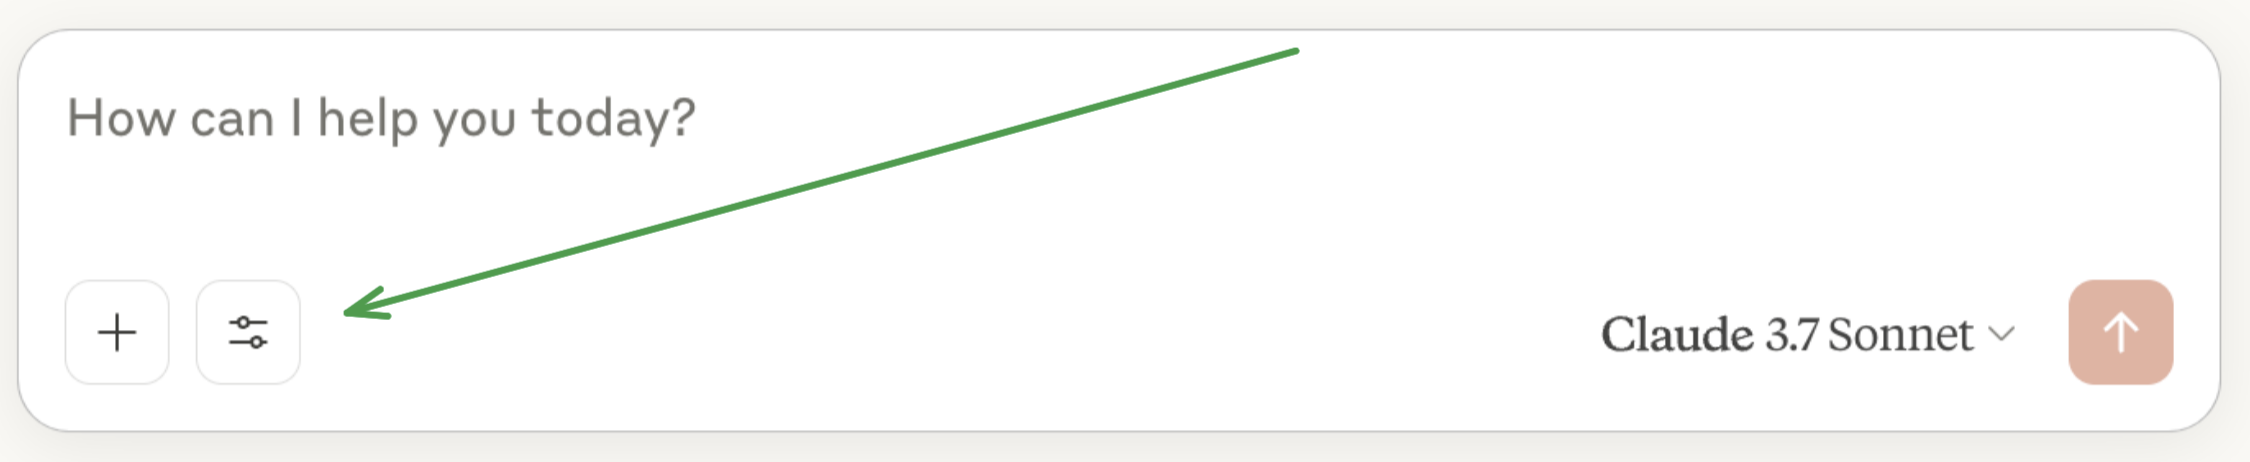
After clicking on the hammer icon, you should see two tools listed:
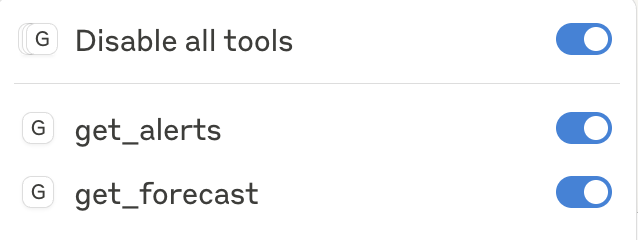
If your server isn't being picked up by Claude for Desktop, proceed to the Troubleshooting section for debugging tips.
If the hammer icon has shown up, you can now test your server by running the following commands in Claude for Desktop:
- What's the weather in Sacramento?
- What are the active weather alerts in Texas?
When you ask a question:
- The client sends your question to Claude
- Claude analyzes the available tools and decides which one(s) to use
- The client executes the chosen tool(s) through the MCP server
- The results are sent back to Claude
- Claude formulates a natural language response
- The response is displayed to you!
  Claude.app logging related to MCP is written to log files in `~/Library/Logs/Claude`:

  * `mcp.log` will contain general logging about MCP connections and connection failures.
  * Files named `mcp-server-SERVERNAME.log` will contain error (stderr) logging from the named server.

  You can run the following command to list recent logs and follow along with any new ones:

  ```bash
  # Check Claude's logs for errors
  tail -n 20 -f ~/Library/Logs/Claude/mcp*.log
  ```

  **Server not showing up in Claude**

  1. Check your `claude_desktop_config.json` file syntax
  2. Make sure the path to your project is absolute and not relative
  3. Restart Claude for Desktop completely

  **Tool calls failing silently**

  If Claude attempts to use the tools but they fail:

  1. Check Claude's logs for errors
  2. Verify your server builds and runs without errors
  3. Try restarting Claude for Desktop

  **None of this is working. What do I do?**

  Please refer to our [debugging guide](/docs/tools/debugging) for better debugging tools and more detailed guidance.
</Accordion>

<Accordion title="Weather API Issues">
  **Error: Failed to retrieve grid point data**

  This usually means either:

  1. The coordinates are outside the US
  2. The NWS API is having issues
  3. You're being rate limited

  Fix:

  * Verify you're using US coordinates
  * Add a small delay between requests
  * Check the NWS API status page

  **Error: No active alerts for \[STATE]**

  This isn't an error - it just means there are no current weather alerts for that state. Try a different state or check during severe weather.
</Accordion>
<Card title="Example servers" icon="grid" href="/examples">
  Check out our gallery of official MCP servers and implementations
</Card>

<Card title="Debugging Guide" icon="bug" href="/docs/tools/debugging">
  Learn how to effectively debug MCP servers and integrations
</Card>

<Card title="Building MCP with LLMs" icon="comments" href="/tutorials/building-mcp-with-llms">
  Learn how to use LLMs like Claude to speed up your MCP development
</Card>
Source: https://modelcontextprotocol.io/quickstart/user
Get started using pre-built servers in Claude for Desktop.
In this tutorial, you will extend Claude for Desktop so that it can read from your computer's file system, write new files, move files, and even search files.
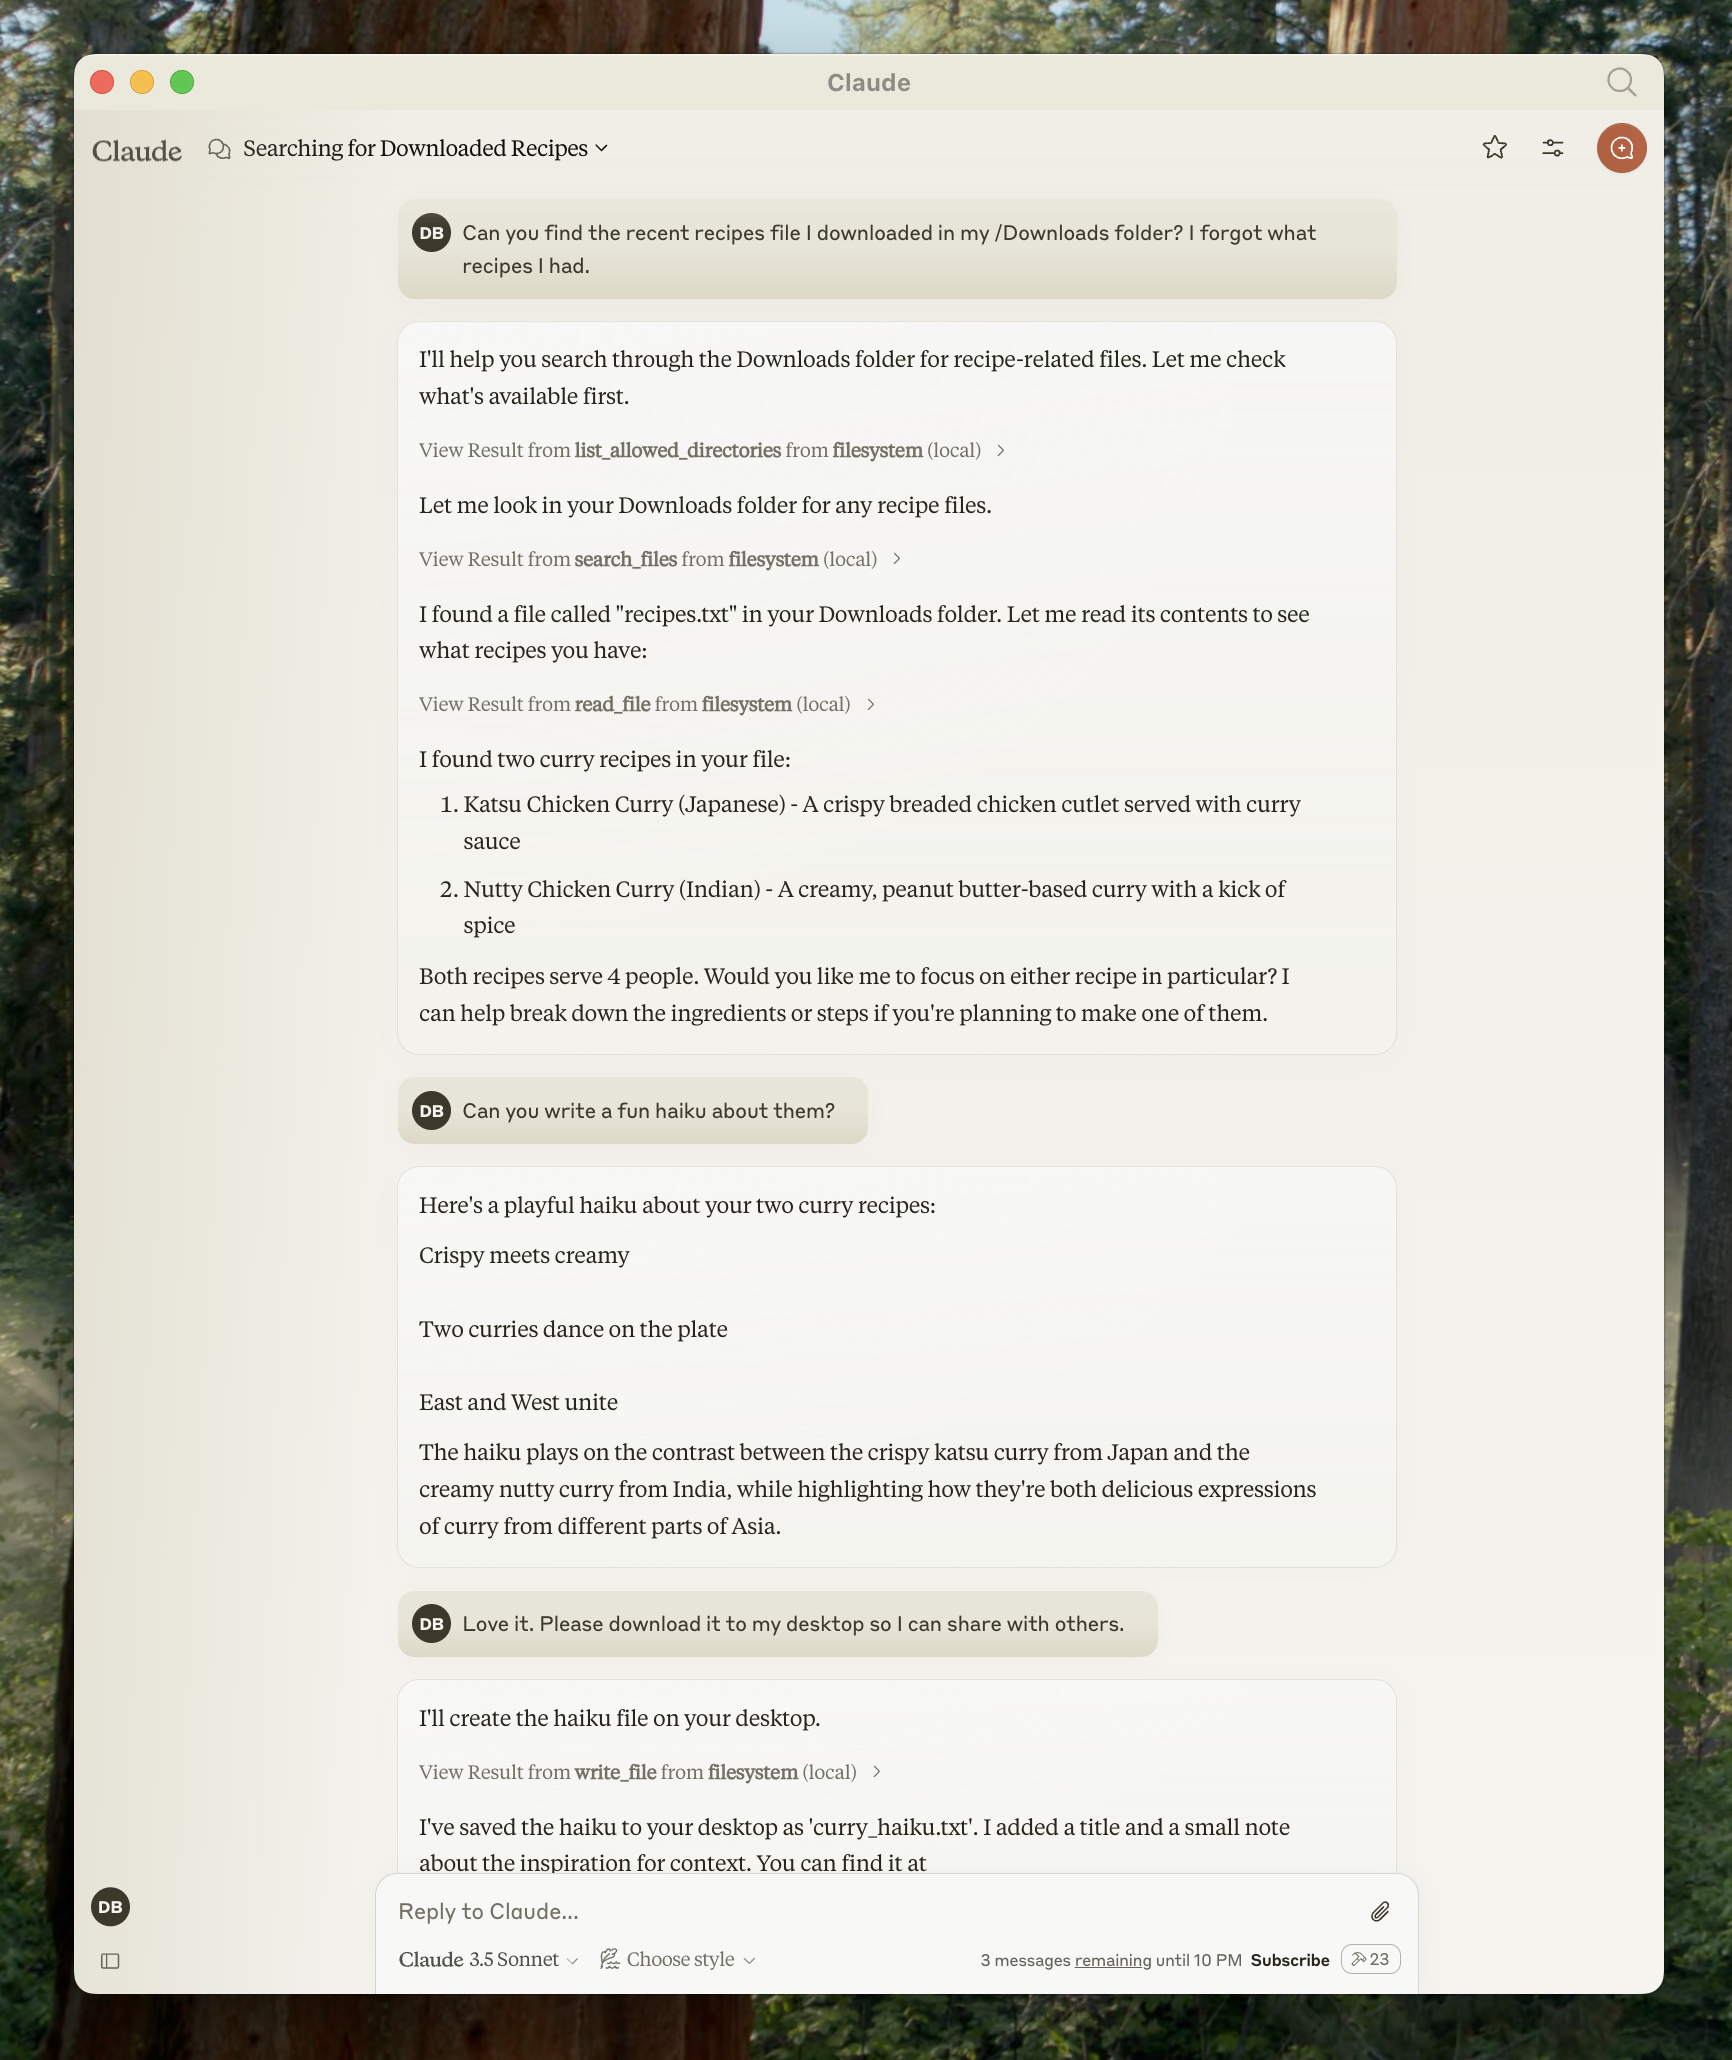
Don't worry — it will ask you for your permission before executing these actions!
Start by downloading Claude for Desktop, choosing either macOS or Windows. (Linux is not yet supported for Claude for Desktop.)
Follow the installation instructions.
If you already have Claude for Desktop, make sure it's on the latest version by clicking on the Claude menu on your computer and selecting "Check for Updates..."
Because servers are locally run, MCP currently only supports desktop hosts. Remote hosts are in active development.To add this filesystem functionality, we will be installing a pre-built Filesystem MCP Server to Claude for Desktop. This is one of dozens of servers created by Anthropic and the community.
Get started by opening up the Claude menu on your computer and select "Settings..." Please note that these are not the Claude Account Settings found in the app window itself.
This is what it should look like on a Mac:

Click on "Developer" in the left-hand bar of the Settings pane, and then click on "Edit Config":
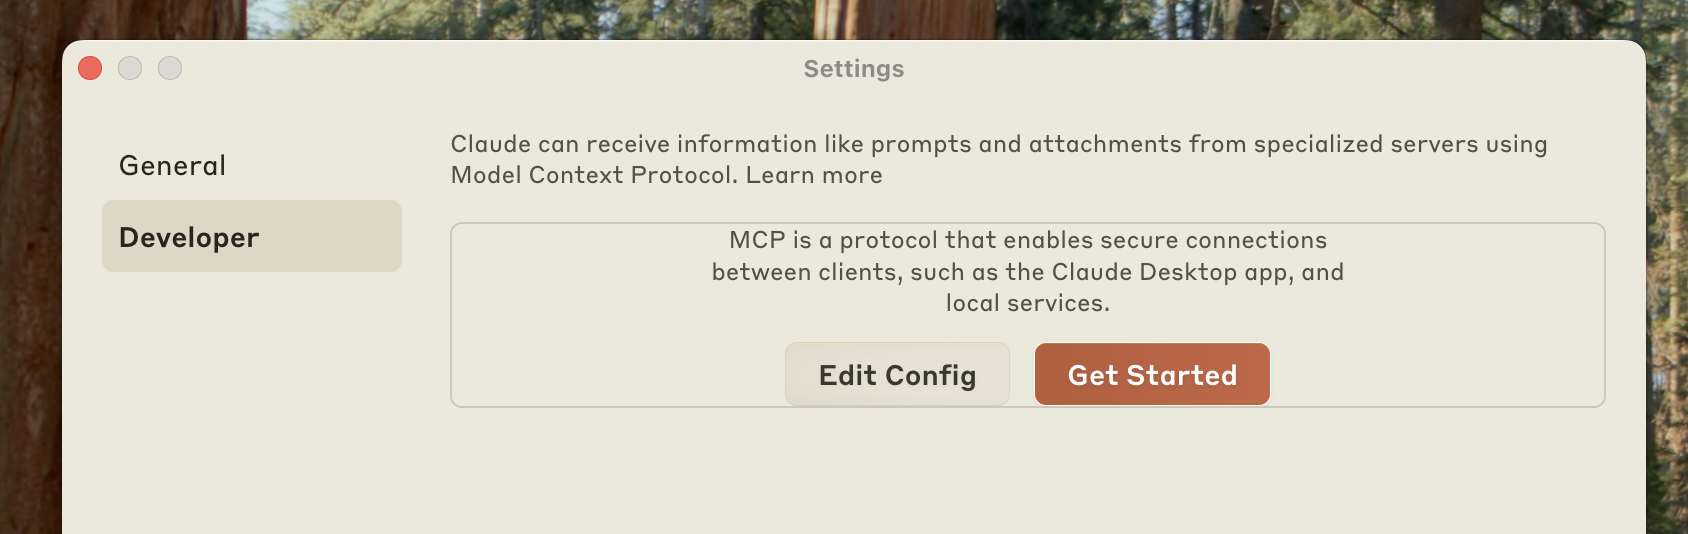
This will create a configuration file at:
- macOS:
~/Library/Application Support/Claude/claude_desktop_config.json - Windows:
%APPDATA%\Claude\claude_desktop_config.json
if you don't already have one, and will display the file in your file system.
Open up the configuration file in any text editor. Replace the file contents with this:
```json { "mcpServers": { "filesystem": { "command": "npx", "args": [ "-y", "@modelcontextprotocol/server-filesystem", "/Users/username/Desktop", "/Users/username/Downloads" ] } } } ```<Tab title="Windows">
```json
{
"mcpServers": {
"filesystem": {
"command": "npx",
"args": [
"-y",
"@modelcontextprotocol/server-filesystem",
"C:\\Users\\username\\Desktop",
"C:\\Users\\username\\Downloads"
]
}
}
}
```
</Tab>
Make sure to replace username with your computer's username. The paths should point to valid directories that you want Claude to be able to access and modify.
It's set up to work for Desktop and Downloads, but you can add more paths as well.
You will also need Node.js on your computer for this to run properly. To verify you have Node installed, open the command line on your computer.
- On macOS, open the Terminal from your Applications folder
- On Windows, press Windows + R, type "cmd", and press Enter
Once in the command line, verify you have Node installed by entering in the following command:
node --versionIf you get an error saying "command not found" or "node is not recognized", download Node from nodejs.org.
**How does the configuration file work?**This configuration file tells Claude for Desktop which MCP servers to start up every time you start the application. In this case, we have added one server
called "filesystem" that will use the Node npx command to install and run @modelcontextprotocol/server-filesystem. This server, described
here, will let you access your file system in Claude for Desktop.
Claude for Desktop will run the commands in the configuration file with the permissions of your user account, and access to your local files. Only add
commands if you understand and trust the source.
After updating your configuration file, you need to restart Claude for Desktop.
Upon restarting, you should see a hammer <img src="https://mintlify.s3.us-west-1.amazonaws.com/mcp/images/claude-desktop-mcp-hammer-icon.svg" style={{display: 'inline', margin: 0, height: '1.3em'}} /> icon in the bottom right corner of the input box:

After clicking on the hammer icon, you should see the tools that come with the Filesystem MCP Server:
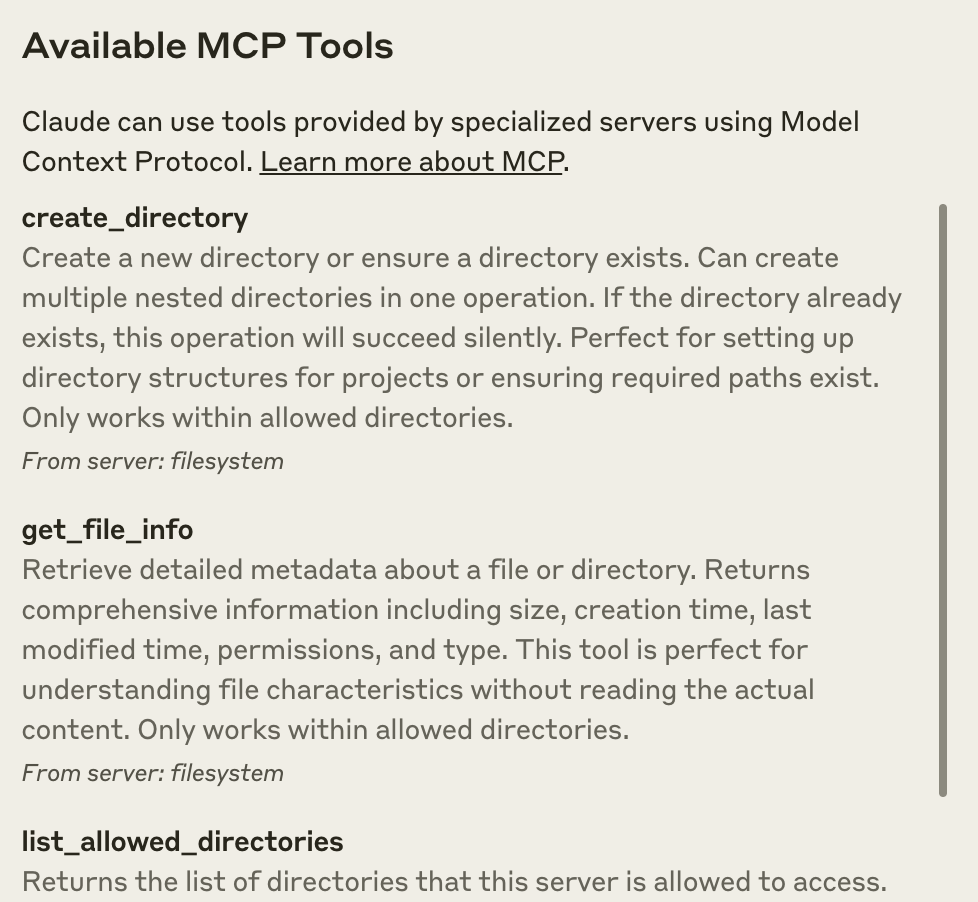
If your server isn't being picked up by Claude for Desktop, proceed to the Troubleshooting section for debugging tips.
You can now talk to Claude and ask it about your filesystem. It should know when to call the relevant tools.
Things you might try asking Claude:
- Can you write a poem and save it to my desktop?
- What are some work-related files in my downloads folder?
- Can you take all the images on my desktop and move them to a new folder called "Images"?
As needed, Claude will call the relevant tools and seek your approval before taking an action:
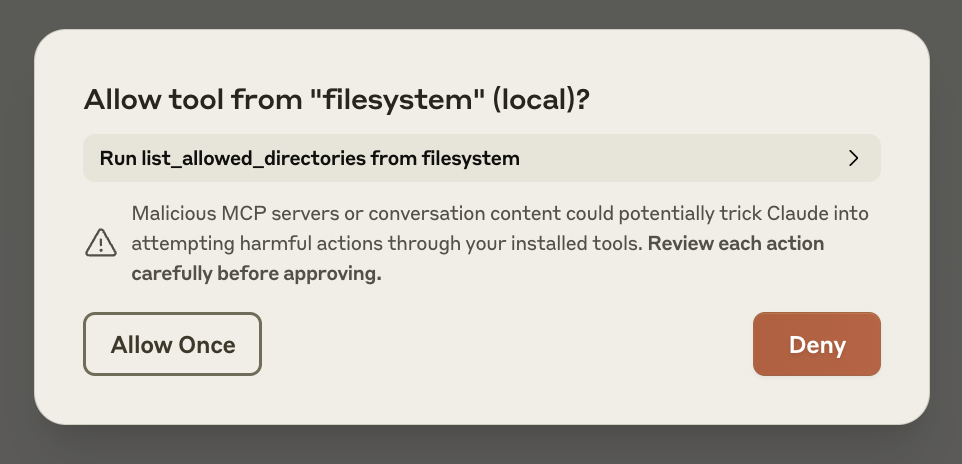
  <Tabs>
    <Tab title="MacOS/Linux">
      ```bash
      npx -y @modelcontextprotocol/server-filesystem /Users/username/Desktop /Users/username/Downloads
      ```
    </Tab>

    <Tab title="Windows">
      ```bash
      npx -y @modelcontextprotocol/server-filesystem C:\Users\username\Desktop C:\Users\username\Downloads
      ```
    </Tab>
  </Tabs>
</Accordion>

<Accordion title="Getting logs from Claude for Desktop">
  Claude.app logging related to MCP is written to log files in:

  * macOS: `~/Library/Logs/Claude`

  * Windows: `%APPDATA%\Claude\logs`

  * `mcp.log` will contain general logging about MCP connections and connection failures.

  * Files named `mcp-server-SERVERNAME.log` will contain error (stderr) logging from the named server.

  You can run the following command to list recent logs and follow along with any new ones (on Windows, it will only show recent logs):

  <Tabs>
    <Tab title="MacOS/Linux">
      ```bash
      # Check Claude's logs for errors
      tail -n 20 -f ~/Library/Logs/Claude/mcp*.log
      ```
    </Tab>

    <Tab title="Windows">
      ```bash
      type "%APPDATA%\Claude\logs\mcp*.log"
      ```
    </Tab>
  </Tabs>
</Accordion>

<Accordion title="Tool calls failing silently">
  If Claude attempts to use the tools but they fail:

  1. Check Claude's logs for errors
  2. Verify your server builds and runs without errors
  3. Try restarting Claude for Desktop
</Accordion>

<Accordion title="None of this is working. What do I do?">
  Please refer to our [debugging guide](/docs/tools/debugging) for better debugging tools and more detailed guidance.
</Accordion>

<Accordion title="ENOENT error and `${APPDATA}` in paths on Windows">
  If your configured server fails to load, and you see within its logs an error referring to `${APPDATA}` within a path, you may need to add the expanded
value of %APPDATA% to your env key in claude_desktop_config.json:
  ```json
  {
    "brave-search": {
      "command": "npx",
      "args": ["-y", "@modelcontextprotocol/server-brave-search"],
      "env": {
        "APPDATA": "C:\\Users\\user\\AppData\\Roaming\\",
        "BRAVE_API_KEY": "..."
      }
    }
  }
  ```

  With this change in place, launch Claude Desktop once again.

  <Warning>
    **NPM should be installed globally**

    The `npx` command may continue to fail if you have not installed NPM globally. If NPM is already installed globally, you will find `%APPDATA%\npm` exists
on your system. If not, you can install NPM globally by running the following command:
    ```bash
    npm install -g npm
    ```
  </Warning>
</Accordion>
<Card title="Build your own server" icon="code" href="/quickstart/server">
  Now build your own custom server to use in Claude for Desktop and other clients
</Card>
Source: https://modelcontextprotocol.io/sdk/java/mcp-client
Learn how to use the Model Context Protocol (MCP) client to interact with MCP servers
The MCP Client is a key component in the Model Context Protocol (MCP) architecture, responsible for establishing and managing connections with MCP servers. It implements the client-side of the protocol, handling:
- Protocol version negotiation to ensure compatibility with servers
- Capability negotiation to determine available features
- Message transport and JSON-RPC communication
- Tool discovery and execution
- Resource access and management
- Prompt system interactions
- Optional features like roots management and sampling support
Spring-specific transport implementations are available as an **optional** dependency `io.modelcontextprotocol.sdk:mcp-spring-webflux` for [Spring
Framework](https://docs.spring.io/spring-ai/reference/api/mcp/mcp-client-boot-starter-docs.html) users.
The client provides both synchronous and asynchronous APIs for flexibility in different application contexts.
```java // Create a sync client with custom configuration McpSyncClient client = McpClient.sync(transport) .requestTimeout(Duration.ofSeconds(10)) .capabilities(ClientCapabilities.builder() .roots(true) // Enable roots capability .sampling() // Enable sampling capability .build()) .sampling(request -> new CreateMessageResult(response)) .build(); // Initialize connection
client.initialize();
// List available tools
ListToolsResult tools = client.listTools();
// Call a tool
CallToolResult result = client.callTool(
new CallToolRequest("calculator",
Map.of("operation", "add", "a", 2, "b", 3))
);
// List and read resources
ListResourcesResult resources = client.listResources();
ReadResourceResult resource = client.readResource(
new ReadResourceRequest("resource://uri")
);
// List and use prompts
ListPromptsResult prompts = client.listPrompts();
GetPromptResult prompt = client.getPrompt(
new GetPromptRequest("greeting", Map.of("name", "Spring"))
);
// Add/remove roots
client.addRoot(new Root("file:///path", "description"));
client.removeRoot("file:///path");
// Close client
client.closeGracefully();
```
</Tab>
<Tab title="Async API">
```java
// Create an async client with custom configuration
McpAsyncClient client = McpClient.async(transport)
.requestTimeout(Duration.ofSeconds(10))
.capabilities(ClientCapabilities.builder()
.roots(true) // Enable roots capability
.sampling() // Enable sampling capability
.build())
.sampling(request -> Mono.just(new CreateMessageResult(response)))
.toolsChangeConsumer(tools -> Mono.fromRunnable(() -> {
logger.info("Tools updated: {}", tools);
}))
.resourcesChangeConsumer(resources -> Mono.fromRunnable(() -> {
logger.info("Resources updated: {}", resources);
}))
.promptsChangeConsumer(prompts -> Mono.fromRunnable(() -> {
logger.info("Prompts updated: {}", prompts);
}))
.build();
// Initialize connection and use features
client.initialize()
.flatMap(initResult -> client.listTools())
.flatMap(tools -> {
return client.callTool(new CallToolRequest(
"calculator",
Map.of("operation", "add", "a", 2, "b", 3)
));
})
.flatMap(result -> {
return client.listResources()
.flatMap(resources ->
client.readResource(new ReadResourceRequest("resource://uri"))
);
})
.flatMap(resource -> {
return client.listPrompts()
.flatMap(prompts ->
client.getPrompt(new GetPromptRequest(
"greeting",
Map.of("name", "Spring")
))
);
})
.flatMap(prompt -> {
return client.addRoot(new Root("file:///path", "description"))
.then(client.removeRoot("file:///path"));
})
.doFinally(signalType -> {
client.closeGracefully().subscribe();
})
.subscribe();
```
</Tab>
The transport layer handles the communication between MCP clients and servers, providing different implementations for various use cases. The client transport manages message serialization, connection establishment, and protocol-specific communication patterns.
Creates transport for in-process based communication ```java
ServerParameters params = ServerParameters.builder("npx")
.args("-y", "@modelcontextprotocol/server-everything", "dir")
.build();
McpTransport transport = new StdioClientTransport(params);
```
</Tab>
<Tab title="SSE (HttpClient)">
Creates a framework agnostic (pure Java API) SSE client transport. Included in the core mcp module.
```java
McpTransport transport = new HttpClientSseClientTransport("http://your-mcp-server");
```
</Tab>
<Tab title="SSE (WebFlux)">
Creates WebFlux-based SSE client transport. Requires the mcp-webflux-sse-transport dependency.
```java
WebClient.Builder webClientBuilder = WebClient.builder()
.baseUrl("http://your-mcp-server");
McpTransport transport = new WebFluxSseClientTransport(webClientBuilder);
```
</Tab>
The client can be configured with various capabilities:
var capabilities = ClientCapabilities.builder()
    .roots(true)      // Enable filesystem roots support with list changes notifications
    .sampling()       // Enable LLM sampling support
    .build();
Roots define the boundaries of where servers can operate within the filesystem:
// Add a root dynamically
client.addRoot(new Root("file:///path", "description"));

// Remove a root
client.removeRoot("file:///path");

// Notify server of roots changes
client.rootsListChangedNotification();
The roots capability allows servers to:
- Request the list of accessible filesystem roots
- Receive notifications when the roots list changes
- Understand which directories and files they have access to
Sampling enables servers to request LLM interactions ("completions" or "generations") through the client:
// Configure sampling handler
Function<CreateMessageRequest, CreateMessageResult> samplingHandler = request -> {
    // Sampling implementation that interfaces with LLM
    return new CreateMessageResult(response);
};

// Create client with sampling support
var client = McpClient.sync(transport)
    .capabilities(ClientCapabilities.builder()
        .sampling()
        .build())
    .sampling(samplingHandler)
    .build();
This capability allows:
- Servers to leverage AI capabilities without requiring API keys
- Clients to maintain control over model access and permissions
- Support for both text and image-based interactions
- Optional inclusion of MCP server context in prompts
The client can register a logging consumer to receive log messages from the server and set the minimum logging level to filter messages:
var mcpClient = McpClient.sync(transport)
        .loggingConsumer(notification -> {
            System.out.println("Received log message: " + notification.data());
        })
        .build();

mcpClient.initialize();

mcpClient.setLoggingLevel(McpSchema.LoggingLevel.INFO);

// Call the tool that can sends logging notifications
CallToolResult result = mcpClient.callTool(new McpSchema.CallToolRequest("logging-test", Map.of()));
Clients can control the minimum logging level they receive through the mcpClient.setLoggingLevel(level) request. Messages below the set level will be filtered
out.
Supported logging levels (in order of increasing severity): DEBUG (0), INFO (1), NOTICE (2), WARNING (3), ERROR (4), CRITICAL (5), ALERT (6), EMERGENCY (7)
Tools are server-side functions that clients can discover and execute. The MCP client provides methods to list available tools and execute them with specific parameters. Each tool has a unique name and accepts a map of parameters.
```java // List available tools and their names var tools = client.listTools(); tools.forEach(tool -> System.out.println(tool.getName())); // Execute a tool with parameters
var result = client.callTool("calculator", Map.of(
"operation", "add",
"a", 1,
"b", 2
));
```
</Tab>
<Tab title="Async API">
```java
// List available tools asynchronously
client.listTools()
.doOnNext(tools -> tools.forEach(tool ->
System.out.println(tool.getName())))
.subscribe();
// Execute a tool asynchronously
client.callTool("calculator", Map.of(
"operation", "add",
"a", 1,
"b", 2
))
.subscribe();
```
</Tab>
Resources represent server-side data sources that clients can access using URI templates. The MCP client provides methods to discover available resources and retrieve their contents through a standardized interface.
```java // List available resources and their names var resources = client.listResources(); resources.forEach(resource -> System.out.println(resource.getName())); // Retrieve resource content using a URI template
var content = client.getResource("file", Map.of(
"path", "/path/to/file.txt"
));
```
</Tab>
<Tab title="Async API">
```java
// List available resources asynchronously
client.listResources()
.doOnNext(resources -> resources.forEach(resource ->
System.out.println(resource.getName())))
.subscribe();
// Retrieve resource content asynchronously
client.getResource("file", Map.of(
"path", "/path/to/file.txt"
))
.subscribe();
```
</Tab>
The prompt system enables interaction with server-side prompt templates. These templates can be discovered and executed with custom parameters, allowing for dynamic text generation based on predefined patterns.
```java // List available prompt templates var prompts = client.listPrompts(); prompts.forEach(prompt -> System.out.println(prompt.getName())); // Execute a prompt template with parameters
var response = client.executePrompt("echo", Map.of(
"text", "Hello, World!"
));
```
</Tab>
<Tab title="Async API">
```java
// List available prompt templates asynchronously
client.listPrompts()
.doOnNext(prompts -> prompts.forEach(prompt ->
System.out.println(prompt.getName())))
.subscribe();
// Execute a prompt template asynchronously
client.executePrompt("echo", Map.of(
"text", "Hello, World!"
))
.subscribe();
```
</Tab>
Source: https://modelcontextprotocol.io/sdk/java/mcp-overview
Introduction to the Model Context Protocol (MCP) Java SDK
Java SDK for the Model Context Protocol enables standardized integration between AI models and tools.
### Breaking Changes in 0.8.x**Note:** Version 0.8.x introduces several breaking changes including a new session-based architecture.
If you're upgrading from 0.7.0, please refer to the [Migration Guide](https://github.com/modelcontextprotocol/java-sdk/blob/main/migration-0.8.0.md) for
detailed instructions.
- MCP Client and MCP Server implementations supporting:
- Multiple transport implementations:
- Default transports (included in core
mcpmodule, no external web frameworks required):- Stdio-based transport for process-based communication
- Java HttpClient-based SSE client transport for HTTP SSE Client-side streaming
- Servlet-based SSE server transport for HTTP SSE Server streaming
- Optional Spring-based transports (convenience if using Spring Framework):
- WebFlux SSE client and server transports for reactive HTTP streaming
- WebMVC SSE transport for servlet-based HTTP streaming
- Default transports (included in core
- Supports Synchronous and Asynchronous programming paradigms
Spring-specific transports are available as optional dependencies for convenience when using the [Spring
Framework](https://docs.spring.io/spring-ai/reference/api/mcp/mcp-client-boot-starter-docs.html).
The SDK follows a layered architecture with clear separation of concerns:

- Client/Server Layer (McpClient/McpServer): Both use McpSession for sync/async operations, with McpClient handling client-side protocol operations and McpServer managing server-side protocol operations.
- Session Layer (McpSession): Manages communication patterns and state using DefaultMcpSession implementation.
- Transport Layer (McpTransport): Handles JSON-RPC message serialization/deserialization via:
- StdioTransport (stdin/stdout) in the core module
- HTTP SSE transports in dedicated transport modules (Java HttpClient, Spring WebFlux, Spring WebMVC)
The MCP Client is a key component in the Model Context Protocol (MCP) architecture, responsible for establishing and managing connections with MCP servers. It implements the client-side of the protocol.

The MCP Server is a foundational component in the Model Context Protocol (MCP) architecture that provides tools, resources, and capabilities to clients. It implements the server-side of the protocol.

Key Interactions:
- Client/Server Initialization: Transport setup, protocol compatibility check, capability negotiation, and implementation details exchange.
- Message Flow: JSON-RPC message handling with validation, type-safe response processing, and error handling.
- Resource Management: Resource discovery, URI template-based access, subscription system, and content retrieval.
Add the following Maven dependency to your project:
The core MCP functionality: ```xml
<dependency>
<groupId>io.modelcontextprotocol.sdk</groupId>
<artifactId>mcp</artifactId>
</dependency>
```
The core `mcp` module already includes default STDIO and SSE transport implementations and doesn't require external web frameworks.
If you're using the Spring Framework and want to use Spring-specific transport implementations, add one of the following optional dependencies:
```xml
<!-- Optional: Spring WebFlux-based SSE client and server transport -->
<dependency>
<groupId>io.modelcontextprotocol.sdk</groupId>
<artifactId>mcp-spring-webflux</artifactId>
</dependency>
<!-- Optional: Spring WebMVC-based SSE server transport -->
<dependency>
<groupId>io.modelcontextprotocol.sdk</groupId>
<artifactId>mcp-spring-webmvc</artifactId>
</dependency>
```
</Tab>
<Tab title="Gradle">
The core MCP functionality:
```groovy
dependencies {
implementation platform("io.modelcontextprotocol.sdk:mcp")
//...
}
```
The core `mcp` module already includes default STDIO and SSE transport implementations and doesn't require external web frameworks.
If you're using the Spring Framework and want to use Spring-specific transport implementations, add one of the following optional dependencies:
```groovy
// Optional: Spring WebFlux-based SSE client and server transport
dependencies {
implementation platform("io.modelcontextprotocol.sdk:mcp-spring-webflux")
}
// Optional: Spring WebMVC-based SSE server transport
dependencies {
implementation platform("io.modelcontextprotocol.sdk:mcp-spring-webmvc")
}
```
</Tab>
The Bill of Materials (BOM) declares the recommended versions of all the dependencies used by a given release. Using the BOM from your application's build script avoids the need for you to specify and maintain the dependency versions yourself. Instead, the version of the BOM you're using determines the utilized dependency versions. It also ensures that you're using supported and tested versions of the dependencies by default, unless you choose to override them.
Add the BOM to your project:
```xml io.modelcontextprotocol.sdk mcp-bom 0.9.0 pom import ```<Tab title="Gradle">
```groovy
dependencies {
implementation platform("io.modelcontextprotocol.sdk:mcp-bom:0.9.0")
//...
}
```
Gradle users can also use the Spring AI MCP BOM by leveraging Gradle (5.0+) native support for declaring dependency constraints using a Maven BOM.
This is implemented by adding a 'platform' dependency handler method to the dependencies section of your Gradle build script.
As shown in the snippet above this can then be followed by version-less declarations of the Starter Dependencies for the one or more spring-ai modules you
wish to use, e.g. spring-ai-openai.
Replace the version number with the version of the BOM you want to use.
The following dependencies are available and managed by the BOM:
- Core Dependencies
io.modelcontextprotocol.sdk:mcp- Core MCP library providing the base functionality and APIs for Model Context Protocol implementation, including default STDIO and SSE client and server transport implementations. No external web frameworks required.
- Optional Transport Dependencies (convenience if using Spring Framework)
io.modelcontextprotocol.sdk:mcp-spring-webflux- WebFlux-based Server-Sent Events (SSE) transport implementation for reactive applications.io.modelcontextprotocol.sdk:mcp-spring-webmvc- WebMVC-based Server-Sent Events (SSE) transport implementation for servlet-based applications.
- Testing Dependencies
io.modelcontextprotocol.sdk:mcp-test- Testing utilities and support for MCP-based applications.
Source: https://modelcontextprotocol.io/sdk/java/mcp-server
Learn how to implement and configure a Model Context Protocol (MCP) server
### Breaking Changes in 0.8.x**Note:** Version 0.8.x introduces several breaking changes including a new session-based architecture.
If you're upgrading from 0.7.0, please refer to the [Migration Guide](https://github.com/modelcontextprotocol/java-sdk/blob/main/migration-0.8.0.md) for
detailed instructions.
The MCP Server is a foundational component in the Model Context Protocol (MCP) architecture that provides tools, resources, and capabilities to clients. It implements the server-side of the protocol, responsible for:
- Exposing tools that clients can discover and execute
- Managing resources with URI-based access patterns
- Providing prompt templates and handling prompt requests
- Supporting capability negotiation with clients
- Implementing server-side protocol operations
- Managing concurrent client connections
- Providing structured logging and notifications
Spring-specific transport implementations are available as an **optional** dependencies `io.modelcontextprotocol.sdk:mcp-spring-webflux`,
io.modelcontextprotocol.sdk:mcp-spring-webmvc for Spring Framework
users.
The server supports both synchronous and asynchronous APIs, allowing for flexible integration in different application contexts.
```java // Create a server with custom configuration McpSyncServer syncServer = McpServer.sync(transportProvider) .serverInfo("my-server", "1.0.0") .capabilities(ServerCapabilities.builder() .resources(true) // Enable resource support .tools(true) // Enable tool support .prompts(true) // Enable prompt support .logging() // Enable logging support .build()) .build(); // Register tools, resources, and prompts
syncServer.addTool(syncToolSpecification);
syncServer.addResource(syncResourceSpecification);
syncServer.addPrompt(syncPromptSpecification);
// Close the server when done
syncServer.close();
```
</Tab>
<Tab title="Async API">
```java
// Create an async server with custom configuration
McpAsyncServer asyncServer = McpServer.async(transportProvider)
.serverInfo("my-server", "1.0.0")
.capabilities(ServerCapabilities.builder()
.resources(true) // Enable resource support
.tools(true) // Enable tool support
.prompts(true) // Enable prompt support
.logging() // Enable logging support
.build())
.build();
// Register tools, resources, and prompts
asyncServer.addTool(asyncToolSpecification)
.doOnSuccess(v -> logger.info("Tool registered"))
.subscribe();
asyncServer.addResource(asyncResourceSpecification)
.doOnSuccess(v -> logger.info("Resource registered"))
.subscribe();
asyncServer.addPrompt(asyncPromptSpecification)
.doOnSuccess(v -> logger.info("Prompt registered"))
.subscribe();
// Close the server when done
asyncServer.close()
.doOnSuccess(v -> logger.info("Server closed"))
.subscribe();
```
</Tab>
The transport layer in the MCP SDK is responsible for handling the communication between clients and servers. It provides different implementations to support various communication protocols and patterns. The SDK includes several built-in transport provider implementations:
<> Create in-process based transport: ```java
StdioServerTransportProvider transportProvider = new StdioServerTransportProvider(new ObjectMapper());
```
Provides bidirectional JSON-RPC message handling over standard input/output streams with non-blocking message processing, serialization/deserialization,
and graceful shutdown support.
    Key features:

    <ul>
      <li>Bidirectional communication through stdin/stdout</li>
      <li>Process-based integration support</li>
      <li>Simple setup and configuration</li>
      <li>Lightweight implementation</li>
    </ul>
  </>
</Tab>

<Tab title="SSE (WebFlux)">
  <>
    <p>Creates WebFlux-based SSE server transport.<br />Requires the <code>mcp-spring-webflux</code> dependency.</p>

    ```java
    @Configuration
    class McpConfig {
        @Bean
        WebFluxSseServerTransportProvider webFluxSseServerTransportProvider(ObjectMapper mapper) {
            return new WebFluxSseServerTransportProvider(mapper, "/mcp/message");
        }

        @Bean
        RouterFunction<?> mcpRouterFunction(WebFluxSseServerTransportProvider transportProvider) {
            return transportProvider.getRouterFunction();
        }
    }
    ```

    <p>Implements the MCP HTTP with SSE transport specification, providing:</p>

    <ul>
      <li>Reactive HTTP streaming with WebFlux</li>
      <li>Concurrent client connections through SSE endpoints</li>
      <li>Message routing and session management</li>
      <li>Graceful shutdown capabilities</li>
    </ul>
  </>
</Tab>

<Tab title="SSE (WebMvc)">
  <>
    <p>Creates WebMvc-based SSE server transport.<br />Requires the <code>mcp-spring-webmvc</code> dependency.</p>

    ```java
    @Configuration
    @EnableWebMvc
    class McpConfig {
        @Bean
        WebMvcSseServerTransportProvider webMvcSseServerTransportProvider(ObjectMapper mapper) {
            return new WebMvcSseServerTransportProvider(mapper, "/mcp/message");
        }

        @Bean
        RouterFunction<ServerResponse> mcpRouterFunction(WebMvcSseServerTransportProvider transportProvider) {
            return transportProvider.getRouterFunction();
        }
    }
    ```

    <p>Implements the MCP HTTP with SSE transport specification, providing:</p>

    <ul>
      <li>Server-side event streaming</li>
      <li>Integration with Spring WebMVC</li>
      <li>Support for traditional web applications</li>
      <li>Synchronous operation handling</li>
    </ul>
  </>
</Tab>

<Tab title="SSE (Servlet)">
  <>
    <p>
      Creates a Servlet-based SSE server transport. It is included in the core <code>mcp</code> module.<br />
      The <code>HttpServletSseServerTransport</code> can be used with any Servlet container.<br />
      To use it with a Spring Web application, you can register it as a Servlet bean:
    </p>

    ```java
    @Configuration
    @EnableWebMvc
    public class McpServerConfig implements WebMvcConfigurer {

        @Bean
        public HttpServletSseServerTransportProvider servletSseServerTransportProvider() {
            return new HttpServletSseServerTransportProvider(new ObjectMapper(), "/mcp/message");
        }

        @Bean
        public ServletRegistrationBean customServletBean(HttpServletSseServerTransportProvider transportProvider) {
            return new ServletRegistrationBean(transportProvider);
        }
    }
    ```

    <p>
      Implements the MCP HTTP with SSE transport specification using the traditional Servlet API, providing:
    </p>

    <ul>
      <li>Asynchronous message handling using Servlet 6.0 async support</li>
      <li>Session management for multiple client connections</li>

      <li>
        Two types of endpoints:

        <ul>
          <li>SSE endpoint (<code>/sse</code>) for server-to-client events</li>
          <li>Message endpoint (configurable) for client-to-server requests</li>
        </ul>
      </li>

      <li>Error handling and response formatting</li>
      <li>Graceful shutdown support</li>
    </ul>
  </>
</Tab>
The server can be configured with various capabilities:
var capabilities = ServerCapabilities.builder()
    .resources(false, true)  // Resource support with list changes notifications
    .tools(true)            // Tool support with list changes notifications
    .prompts(true)          // Prompt support with list changes notifications
    .logging()              // Enable logging support (enabled by default with logging level INFO)
.build();The server provides structured logging capabilities that allow sending log messages to clients with different severity levels:
// Send a log message to clients
server.loggingNotification(LoggingMessageNotification.builder()
    .level(LoggingLevel.INFO)
    .logger("custom-logger")
    .data("Custom log message")
    .build());
Clients can control the minimum logging level they receive through the mcpClient.setLoggingLevel(level) request. Messages below the set level will be filtered
out.
Supported logging levels (in order of increasing severity): DEBUG (0), INFO (1), NOTICE (2), WARNING (3), ERROR (4), CRITICAL (5), ALERT (6), EMERGENCY (7)
The Model Context Protocol allows servers to expose tools that can be invoked by language models. The Java SDK allows implementing a Tool Specifications with their handler functions. Tools enable AI models to perform calculations, access external APIs, query databases, and manipulate files:
```java // Sync tool specification var schema = """ { "type" : "object", "id" : "urn:jsonschema:Operation", "properties" : { "operation" : { "type" : "string" }, "a" : { "type" : "number" }, "b" : { "type" : "number" } } } """; var syncToolSpecification = new McpServerFeatures.SyncToolSpecification( new Tool("calculator", "Basic calculator", schema), (exchange, arguments) -> { // Tool implementation return new CallToolResult(result, false); } ); ```<Tab title="Async">
```java
// Async tool specification
var schema = """
{
"type" : "object",
"id" : "urn:jsonschema:Operation",
"properties" : {
"operation" : {
"type" : "string"
},
"a" : {
"type" : "number"
},
"b" : {
"type" : "number"
}
}
}
""";
var asyncToolSpecification = new McpServerFeatures.AsyncToolSpecification(
new Tool("calculator", "Basic calculator", schema),
(exchange, arguments) -> {
// Tool implementation
return Mono.just(new CallToolResult(result, false));
}
);
```
</Tab>
The Tool specification includes a Tool definition with name, description, and parameter schema followed by a call handler that implements the tool's
logic.
The function's first argument is McpAsyncServerExchange for client interaction, and the second is a map of tool arguments.
Specification of a resource with its handler function. Resources provide context to AI models by exposing data such as: File contents, Database records, API responses, System information, Application state. Example resource specification:
```java // Sync resource specification var syncResourceSpecification = new McpServerFeatures.syncResourceSpecification( new Resource("custom://resource", "name", "description", "mime-type", null), (exchange, request) -> { // Resource read implementation return new ReadResourceResult(contents); } ); ```<Tab title="Async">
```java
// Async resource specification
var asyncResourceSpecification = new McpServerFeatures.asyncResourceSpecification(
new Resource("custom://resource", "name", "description", "mime-type", null),
(exchange, request) -> {
// Resource read implementation
return Mono.just(new ReadResourceResult(contents));
}
);
```
</Tab>
The resource specification comprised of resource definitions and resource read handler.
The resource definition including name, description, and MIME type.
The first argument of the function that handles resource read requests is an McpAsyncServerExchange upon which the server can
interact with the connected client.
The second arguments is a McpSchema.ReadResourceRequest.
As part of the Prompting capabilities, MCP provides a standardized way for servers to expose prompt templates to clients. The Prompt Specification is a structured template for AI model interactions that enables consistent message formatting, parameter substitution, context injection, response formatting, and instruction templating.
```java // Sync prompt specification var syncPromptSpecification = new McpServerFeatures.syncPromptSpecification( new Prompt("greeting", "description", List.of( new PromptArgument("name", "description", true) )), (exchange, request) -> { // Prompt implementation return new GetPromptResult(description, messages); } ); ```<Tab title="Async">
```java
// Async prompt specification
var asyncPromptSpecification = new McpServerFeatures.asyncPromptSpecification(
new Prompt("greeting", "description", List.of(
new PromptArgument("name", "description", true)
)),
(exchange, request) -> {
// Prompt implementation
return Mono.just(new GetPromptResult(description, messages));
}
);
```
</Tab>
The prompt definition includes name (identifier for the prompt), description (purpose of the prompt), and list of arguments (parameters for templating).
The handler function processes requests and returns formatted templates.
The first argument is McpAsyncServerExchange for client interaction, and the second argument is a GetPromptRequest instance.
To use Sampling capabilities, connect to a client that supports sampling. No special server configuration is needed, but verify client sampling support before making requests. Learn about client sampling support.
Once connected to a compatible client, the server can request language model generations:
```java // Create a server McpSyncServer server = McpServer.sync(transportProvider) .serverInfo("my-server", "1.0.0") .build(); // Define a tool that uses sampling
var calculatorTool = new McpServerFeatures.SyncToolSpecification(
new Tool("ai-calculator", "Performs calculations using AI", schema),
(exchange, arguments) -> {
// Check if client supports sampling
if (exchange.getClientCapabilities().sampling() == null) {
return new CallToolResult("Client does not support AI capabilities", false);
}
// Create a sampling request
McpSchema.CreateMessageRequest request = McpSchema.CreateMessageRequest.builder()
.messages(List.of(new McpSchema.SamplingMessage(McpSchema.Role.USER,
new McpSchema.TextContent("Calculate: " + arguments.get("expression")))
.modelPreferences(McpSchema.ModelPreferences.builder()
.hints(List.of(
McpSchema.ModelHint.of("claude-3-sonnet"),
McpSchema.ModelHint.of("claude")
))
.intelligencePriority(0.8) // Prioritize intelligence
.speedPriority(0.5) // Moderate speed importance
.build())
.systemPrompt("You are a helpful calculator assistant. Provide only the numerical answer.")
.maxTokens(100)
.build();
// Request sampling from the client
McpSchema.CreateMessageResult result = exchange.createMessage(request);
// Process the result
String answer = result.content().text();
return new CallToolResult(answer, false);
}
);
// Add the tool to the server
server.addTool(calculatorTool);
```
</Tab>
<Tab title="Async API">
```java
// Create a server
McpAsyncServer server = McpServer.async(transportProvider)
.serverInfo("my-server", "1.0.0")
.build();
// Define a tool that uses sampling
var calculatorTool = new McpServerFeatures.AsyncToolSpecification(
new Tool("ai-calculator", "Performs calculations using AI", schema),
(exchange, arguments) -> {
// Check if client supports sampling
if (exchange.getClientCapabilities().sampling() == null) {
return Mono.just(new CallToolResult("Client does not support AI capabilities", false));
}
// Create a sampling request
McpSchema.CreateMessageRequest request = McpSchema.CreateMessageRequest.builder()
.content(new McpSchema.TextContent("Calculate: " + arguments.get("expression")))
.modelPreferences(McpSchema.ModelPreferences.builder()
.hints(List.of(
McpSchema.ModelHint.of("claude-3-sonnet"),
McpSchema.ModelHint.of("claude")
))
.intelligencePriority(0.8) // Prioritize intelligence
.speedPriority(0.5) // Moderate speed importance
.build())
.systemPrompt("You are a helpful calculator assistant. Provide only the numerical answer.")
.maxTokens(100)
.build();
// Request sampling from the client
return exchange.createMessage(request)
.map(result -> {
// Process the result
String answer = result.content().text();
return new CallToolResult(answer, false);
});
}
);
// Add the tool to the server
server.addTool(calculatorTool)
.subscribe();
```
</Tab>
The CreateMessageRequest object allows you to specify: Content - the input text or image for the model,
Model Preferences - hints and priorities for model selection, System Prompt - instructions for the model's behavior and
Max Tokens - maximum length of the generated response.
The server provides structured logging capabilities that allow sending log messages to clients with different severity levels. The log notifications can only be sent from within an existing client session, such as tools, resources, and prompts calls.
For example, we can send a log message from within a tool handler function. On the client side, you can register a logging consumer to receive log messages from the server and set the minimum logging level to filter messages.
var mcpClient = McpClient.sync(transport)
        .loggingConsumer(notification -> {
            System.out.println("Received log message: " + notification.data());
        })
        .build();

mcpClient.initialize();

mcpClient.setLoggingLevel(McpSchema.LoggingLevel.INFO);

// Call the tool that sends logging notifications
CallToolResult result = mcpClient.callTool(new McpSchema.CallToolRequest("logging-test", Map.of()));
The server can send log messages using the McpAsyncServerExchange/McpSyncServerExchange object in the tool/resource/prompt handler function:
var tool = new McpServerFeatures.AsyncToolSpecification(
    new McpSchema.Tool("logging-test", "Test logging notifications", emptyJsonSchema),
    (exchange, request) -> {

      exchange.loggingNotification( // Use the exchange to send log messages
          McpSchema.LoggingMessageNotification.builder()
            .level(McpSchema.LoggingLevel.DEBUG)
            .logger("test-logger")
            .data("Debug message")
            .build())
        .block();

      return Mono.just(new CallToolResult("Logging test completed", false));
    });

var mcpServer = McpServer.async(mcpServerTransportProvider)
  .serverInfo("test-server", "1.0.0")
  .capabilities(
    ServerCapabilities.builder()
      .logging() // Enable logging support
      .tools(true)
      .build())
  .tools(tool)
  .build();
Clients can control the minimum logging level they receive through the mcpClient.setLoggingLevel(level) request. Messages below the set level will be filtered
out.
Supported logging levels (in order of increasing severity): DEBUG (0), INFO (1), NOTICE (2), WARNING (3), ERROR (4), CRITICAL (5), ALERT (6), EMERGENCY (7)
The SDK provides comprehensive error handling through the McpError class, covering protocol compatibility, transport communication, JSON-RPC messaging, tool execution, resource management, prompt handling, timeouts, and connection issues. This unified error handling approach ensures consistent and reliable error management across both synchronous and asynchronous operations.
Source: https://modelcontextprotocol.io/specification/2024-11-05/architecture/index
The Model Context Protocol (MCP) follows a client-host-server architecture where each host can run multiple client instances. This architecture enables users to integrate AI capabilities across applications while maintaining clear security boundaries and isolating concerns. Built on JSON-RPC, MCP provides a stateful session protocol focused on context exchange and sampling coordination between clients and servers.
graph LR
    subgraph "Application Host Process"
        H[Host]
        C1[Client 1]
        C2[Client 2]
        C3[Client 3]
        H --> C1
        H --> C2
        H --> C3
    end

    subgraph "Local machine"
        S1[Server 1<br>Files & Git]
        S2[Server 2<br>Database]
        R1[("Local<br>Resource A")]
        R2[("Local<br>Resource B")]

        C1 --> S1
        C2 --> S2
        S1 <--> R1
        S2 <--> R2
    end

    subgraph "Internet"
        S3[Server 3<br>External APIs]
        R3[("Remote<br>Resource C")]

        C3 --> S3
        S3 <--> R3
    end
The host process acts as the container and coordinator:
- Creates and manages multiple client instances
- Controls client connection permissions and lifecycle
- Enforces security policies and consent requirements
- Handles user authorization decisions
- Coordinates AI/LLM integration and sampling
- Manages context aggregation across clients
Each client is created by the host and maintains an isolated server connection:
- Establishes one stateful session per server
- Handles protocol negotiation and capability exchange
- Routes protocol messages bidirectionally
- Manages subscriptions and notifications
- Maintains security boundaries between servers
A host application creates and manages multiple clients, with each client having a 1:1 relationship with a particular server.
Servers provide specialized context and capabilities:
- Expose resources, tools and prompts via MCP primitives
- Operate independently with focused responsibilities
- Request sampling through client interfaces
- Must respect security constraints
- Can be local processes or remote services
MCP is built on several key design principles that inform its architecture and implementation:
-
Servers should be extremely easy to build
- Host applications handle complex orchestration responsibilities
- Servers focus on specific, well-defined capabilities
- Simple interfaces minimize implementation overhead
- Clear separation enables maintainable code
-
Servers should be highly composable
- Each server provides focused functionality in isolation
- Multiple servers can be combined seamlessly
- Shared protocol enables interoperability
- Modular design supports extensibility
-
Servers should not be able to read the whole conversation, nor "see into" other servers
- Servers receive only necessary contextual information
- Full conversation history stays with the host
- Each server connection maintains isolation
- Cross-server interactions are controlled by the host
- Host process enforces security boundaries
-
Features can be added to servers and clients progressively
- Core protocol provides minimal required functionality
- Additional capabilities can be negotiated as needed
- Servers and clients evolve independently
- Protocol designed for future extensibility
- Backwards compatibility is maintained
MCP defines three core message types based on JSON-RPC 2.0:
- Requests: Bidirectional messages with method and parameters expecting a response
- Responses: Successful results or errors matching specific request IDs
- Notifications: One-way messages requiring no response
Each message type follows the JSON-RPC 2.0 specification for structure and delivery semantics.
The Model Context Protocol uses a capability-based negotiation system where clients and servers explicitly declare their supported features during initialization. Capabilities determine which protocol features and primitives are available during a session.
- Servers declare capabilities like resource subscriptions, tool support, and prompt templates
- Clients declare capabilities like sampling support and notification handling
- Both parties must respect declared capabilities throughout the session
- Additional capabilities can be negotiated through extensions to the protocol
sequenceDiagram
    participant Host
    participant Client
    participant Server

    Host->>+Client: Initialize client
    Client->>+Server: Initialize session with capabilities
    Server-->>Client: Respond with supported capabilities

    Note over Host,Server: Active Session with Negotiated Features

    loop Client Requests
        Host->>Client: User- or model-initiated action
        Client->>Server: Request (tools/resources)
        Server-->>Client: Response
        Client-->>Host: Update UI or respond to model
    end

    loop Server Requests
        Server->>Client: Request (sampling)
        Client->>Host: Forward to AI
        Host-->>Client: AI response
        Client-->>Server: Response
    end

    loop Notifications
        Server--)Client: Resource updates
        Client--)Server: Status changes
    end

    Host->>Client: Terminate
    Client->>-Server: End session
    deactivate Server
Each capability unlocks specific protocol features for use during the session. For example:
- Implemented server features must be advertised in the server's capabilities
- Emitting resource subscription notifications requires the server to declare subscription support
- Tool invocation requires the server to declare tool capabilities
- Sampling requires the client to declare support in its capabilities
This capability negotiation ensures clients and servers have a clear understanding of supported functionality while maintaining protocol extensibility.
Source: https://modelcontextprotocol.io/specification/2024-11-05/basic/index
Protocol Revision: 2024-11-05
All messages between MCP clients and servers MUST follow the JSON-RPC 2.0 specification. The protocol defines three fundamental types of messages:
| Type | Description | Requirements |
|---|---|---|
Requests |
Messages sent to initiate an operation | Must include unique ID and method name |
Responses |
Messages sent in reply to requests | Must include same ID as request |
Notifications |
One-way messages with no reply | Must not include an ID |
Responses are further sub-categorized as either successful results or errors. Results can follow any JSON object structure, while errors must include an error code and message at minimum.
The Model Context Protocol consists of several key components that work together:
- Base Protocol: Core JSON-RPC message types
- Lifecycle Management: Connection initialization, capability negotiation, and session control
- Server Features: Resources, prompts, and tools exposed by servers
- Client Features: Sampling and root directory lists provided by clients
- Utilities: Cross-cutting concerns like logging and argument completion
All implementations MUST support the base protocol and lifecycle management components. Other components MAY be implemented based on the specific needs of the application.
These protocol layers establish clear separation of concerns while enabling rich interactions between clients and servers. The modular design allows implementations to support exactly the features they need.
See the following pages for more details on the different components:
<Card title="Resources" icon="file-lines" href="/specification/2024-11-05/server/resources" />

<Card title="Prompts" icon="message" href="/specification/2024-11-05/server/prompts" />

<Card title="Tools" icon="wrench" href="/specification/2024-11-05/server/tools" />

<Card title="Logging" icon="rectangle-list" href="/specification/2024-11-05/server/utilities/logging" />

<Card title="Sampling" icon="code" href="/specification/2024-11-05/client/sampling" />
Authentication and authorization are not currently part of the core MCP specification, but we are considering ways to introduce them in future. Join us in GitHub Discussions to help shape the future of the protocol!
Clients and servers MAY negotiate their own custom authentication and authorization strategies.
The full specification of the protocol is defined as a TypeScript schema. This is the source of truth for all protocol messages and structures.
There is also a JSON Schema, which is automatically generated from the TypeScript source of truth, for use with various automated tooling.
Source: https://modelcontextprotocol.io/specification/2024-11-05/basic/lifecycle
Protocol Revision: 2024-11-05
The Model Context Protocol (MCP) defines a rigorous lifecycle for client-server connections that ensures proper capability negotiation and state management.
- Initialization: Capability negotiation and protocol version agreement
- Operation: Normal protocol communication
- Shutdown: Graceful termination of the connection
sequenceDiagram
    participant Client
    participant Server

    Note over Client,Server: Initialization Phase
    activate Client
    Client->>+Server: initialize request
    Server-->>Client: initialize response
    Client--)Server: initialized notification

    Note over Client,Server: Operation Phase
    rect rgb(200, 220, 250)
        note over Client,Server: Normal protocol operations
    end

    Note over Client,Server: Shutdown
    Client--)-Server: Disconnect
    deactivate Server
    Note over Client,Server: Connection closed
The initialization phase MUST be the first interaction between client and server. During this phase, the client and server:
- Establish protocol version compatibility
- Exchange and negotiate capabilities
- Share implementation details
The client MUST initiate this phase by sending an initialize request containing:
- Protocol version supported
- Client capabilities
- Client implementation information
{
  "jsonrpc": "2.0",
  "id": 1,
  "method": "initialize",
  "params": {
    "protocolVersion": "2024-11-05",
    "capabilities": {
      "roots": {
        "listChanged": true
      },
      "sampling": {}
    },
    "clientInfo": {
      "name": "ExampleClient",
      "version": "1.0.0"
    }
  }
}
The server MUST respond with its own capabilities and information:
{
  "jsonrpc": "2.0",
  "id": 1,
  "result": {
    "protocolVersion": "2024-11-05",
    "capabilities": {
      "logging": {},
      "prompts": {
        "listChanged": true
      },
      "resources": {
        "subscribe": true,
        "listChanged": true
      },
      "tools": {
        "listChanged": true
      }
    },
    "serverInfo": {
      "name": "ExampleServer",
      "version": "1.0.0"
    }
  }
}
After successful initialization, the client MUST send an initialized notification
to indicate it is ready to begin normal operations:
{
  "jsonrpc": "2.0",
  "method": "notifications/initialized"
}- The client SHOULD NOT send requests other than
pings before the server
has responded to the
initializerequest. - The server SHOULD NOT send requests other than
pings and
logging before
receiving the
initializednotification.
In the initialize request, the client MUST send a protocol version it supports.
This SHOULD be the latest version supported by the client.
If the server supports the requested protocol version, it MUST respond with the same version. Otherwise, the server MUST respond with another protocol version it supports. This SHOULD be the latest version supported by the server.
If the client does not support the version in the server's response, it SHOULD disconnect.
Client and server capabilities establish which optional protocol features will be available during the session.
Key capabilities include:
| Category | Capability | Description |
|---|---|---|
| Client | roots |
Ability to provide filesystem roots |
| Client | sampling |
Support for LLM sampling requests |
| Client | experimental |
Describes support for non-standard experimental features |
| Server | prompts |
Offers prompt templates |
| Server | resources |
Provides readable resources |
| Server | tools |
Exposes callable tools |
| Server | logging |
Emits structured log messages |
| Server | experimental |
Describes support for non-standard experimental features |
Capability objects can describe sub-capabilities like:
listChanged: Support for list change notifications (for prompts, resources, and tools)subscribe: Support for subscribing to individual items' changes (resources only)
During the operation phase, the client and server exchange messages according to the negotiated capabilities.
Both parties SHOULD:
- Respect the negotiated protocol version
- Only use capabilities that were successfully negotiated
During the shutdown phase, one side (usually the client) cleanly terminates the protocol connection. No specific shutdown messages are defined—instead, the underlying transport mechanism should be used to signal connection termination:
For the stdio transport, the client SHOULD initiate shutdown by:
- First, closing the input stream to the child process (the server)
- Waiting for the server to exit, or sending
SIGTERMif the server does not exit within a reasonable time - Sending
SIGKILLif the server does not exit within a reasonable time afterSIGTERM
The server MAY initiate shutdown by closing its output stream to the client and exiting.
For HTTP transports, shutdown is indicated by closing the associated HTTP connection(s).
Implementations SHOULD be prepared to handle these error cases:
- Protocol version mismatch
- Failure to negotiate required capabilities
- Initialize request timeout
- Shutdown timeout
Implementations SHOULD implement appropriate timeouts for all requests, to prevent hung connections and resource exhaustion.
Example initialization error:
{
  "jsonrpc": "2.0",
  "id": 1,
  "error": {
    "code": -32602,
    "message": "Unsupported protocol version",
    "data": {
      "supported": ["2024-11-05"],
      "requested": "1.0.0"
    }
  }
}Source: https://modelcontextprotocol.io/specification/2024-11-05/basic/messages
Protocol Revision: 2024-11-05
All messages in MCP MUST follow the JSON-RPC 2.0 specification. The protocol defines three types of messages:
Requests are sent from the client to the server or vice versa.
{
  jsonrpc: "2.0";
  id: string | number;
  method: string;
  params?: {
    [key: string]: unknown;
  };
}- Requests MUST include a string or integer ID.
- Unlike base JSON-RPC, the ID MUST NOT be
null. - The request ID MUST NOT have been previously used by the requestor within the same session.
Responses are sent in reply to requests.
{
  jsonrpc: "2.0";
  id: string | number;
  result?: {
    [key: string]: unknown;
  }
  error?: {
    code: number;
    message: string;
    data?: unknown;
  }
}- Responses MUST include the same ID as the request they correspond to.
- Either a
resultor anerrorMUST be set. A response MUST NOT set both. - Error codes MUST be integers.
Notifications are sent from the client to the server or vice versa. They do not expect a response.
{
  jsonrpc: "2.0";
  method: string;
  params?: {
    [key: string]: unknown;
  };
}- Notifications MUST NOT include an ID.
Source: https://modelcontextprotocol.io/specification/2024-11-05/basic/transports
Protocol Revision: 2024-11-05
MCP currently defines two standard transport mechanisms for client-server communication:
- stdio, communication over standard in and standard out
- HTTP with Server-Sent Events (SSE)
Clients SHOULD support stdio whenever possible.
It is also possible for clients and servers to implement custom transports in a pluggable fashion.
In the stdio transport:
- The client launches the MCP server as a subprocess.
- The server receives JSON-RPC messages on its standard input (
stdin) and writes responses to its standard output (stdout). - Messages are delimited by newlines, and MUST NOT contain embedded newlines.
- The server MAY write UTF-8 strings to its standard error (
stderr) for logging purposes. Clients MAY capture, forward, or ignore this logging. - The server MUST NOT write anything to its
stdoutthat is not a valid MCP message. - The client MUST NOT write anything to the server's
stdinthat is not a valid MCP message.
sequenceDiagram
    participant Client
    participant Server Process

    Client->>+Server Process: Launch subprocess
    loop Message Exchange
        Client->>Server Process: Write to stdin
        Server Process->>Client: Write to stdout
        Server Process--)Client: Optional logs on stderr
    end
    Client->>Server Process: Close stdin, terminate subprocess
    deactivate Server Process
In the SSE transport, the server operates as an independent process that can handle multiple client connections.
When implementing HTTP with SSE transport:
- Servers MUST validate the
Originheader on all incoming connections to prevent DNS rebinding attacks - When running locally, servers SHOULD bind only to localhost (127.0.0.1) rather than all network interfaces (0.0.0.0)
- Servers SHOULD implement proper authentication for all connections
Without these protections, attackers could use DNS rebinding to interact with local MCP servers from remote websites.
The server MUST provide two endpoints:
- An SSE endpoint, for clients to establish a connection and receive messages from the server
- A regular HTTP POST endpoint for clients to send messages to the server
When a client connects, the server MUST send an endpoint event containing a URI for
the client to use for sending messages. All subsequent client messages MUST be sent
as HTTP POST requests to this endpoint.
Server messages are sent as SSE message events, with the message content encoded as
JSON in the event data.
sequenceDiagram
    participant Client
    participant Server

    Client->>Server: Open SSE connection
    Server->>Client: endpoint event
    loop Message Exchange
        Client->>Server: HTTP POST messages
        Server->>Client: SSE message events
    end
    Client->>Server: Close SSE connection
Clients and servers MAY implement additional custom transport mechanisms to suit their specific needs. The protocol is transport-agnostic and can be implemented over any communication channel that supports bidirectional message exchange.
Implementers who choose to support custom transports MUST ensure they preserve the JSON-RPC message format and lifecycle requirements defined by MCP. Custom transports SHOULD document their specific connection establishment and message exchange patterns to aid interoperability.
Source: https://modelcontextprotocol.io/specification/2024-11-05/basic/utilities/cancellation
Protocol Revision: 2024-11-05
The Model Context Protocol (MCP) supports optional cancellation of in-progress requests through notification messages. Either side can send a cancellation notification to indicate that a previously-issued request should be terminated.
When a party wants to cancel an in-progress request, it sends a notifications/cancelled
notification containing:
- The ID of the request to cancel
- An optional reason string that can be logged or displayed
{
  "jsonrpc": "2.0",
  "method": "notifications/cancelled",
  "params": {
    "requestId": "123",
    "reason": "User requested cancellation"
  }
}- Cancellation notifications MUST only reference requests that:
- Were previously issued in the same direction
- Are believed to still be in-progress
- The
initializerequest MUST NOT be cancelled by clients - Receivers of cancellation notifications SHOULD:
- Stop processing the cancelled request
- Free associated resources
- Not send a response for the cancelled request
- Receivers MAY ignore cancellation notifications if:
- The referenced request is unknown
- Processing has already completed
- The request cannot be cancelled
- The sender of the cancellation notification SHOULD ignore any response to the request that arrives afterward
Due to network latency, cancellation notifications may arrive after request processing has completed, and potentially after a response has already been sent.
Both parties MUST handle these race conditions gracefully:
sequenceDiagram
   participant Client
   participant Server

   Client->>Server: Request (ID: 123)
   Note over Server: Processing starts
   Client--)Server: notifications/cancelled (ID: 123)
   alt
      Note over Server: Processing may have<br/>completed before<br/>cancellation arrives
   else If not completed
      Note over Server: Stop processing
   end
- Both parties SHOULD log cancellation reasons for debugging
- Application UIs SHOULD indicate when cancellation is requested
Invalid cancellation notifications SHOULD be ignored:
- Unknown request IDs
- Already completed requests
- Malformed notifications
This maintains the "fire and forget" nature of notifications while allowing for race conditions in asynchronous communication.
Source: https://modelcontextprotocol.io/specification/2024-11-05/basic/utilities/ping
Protocol Revision: 2024-11-05
The Model Context Protocol includes an optional ping mechanism that allows either party to verify that their counterpart is still responsive and the connection is alive.
The ping functionality is implemented through a simple request/response pattern. Either
the client or server can initiate a ping by sending a ping request.
A ping request is a standard JSON-RPC request with no parameters:
{
  "jsonrpc": "2.0",
  "id": "123",
  "method": "ping"
}- The receiver MUST respond promptly with an empty response:
{
  "jsonrpc": "2.0",
  "id": "123",
  "result": {}
}- If no response is received within a reasonable timeout period, the sender MAY:
- Consider the connection stale
- Terminate the connection
- Attempt reconnection procedures
sequenceDiagram
    participant Sender
    participant Receiver

    Sender->>Receiver: ping request
    Receiver->>Sender: empty response
- Implementations SHOULD periodically issue pings to detect connection health
- The frequency of pings SHOULD be configurable
- Timeouts SHOULD be appropriate for the network environment
- Excessive pinging SHOULD be avoided to reduce network overhead
- Timeouts SHOULD be treated as connection failures
- Multiple failed pings MAY trigger connection reset
- Implementations SHOULD log ping failures for diagnostics
Source: https://modelcontextprotocol.io/specification/2024-11-05/basic/utilities/progress
Protocol Revision: 2024-11-05
The Model Context Protocol (MCP) supports optional progress tracking for long-running operations through notification messages. Either side can send progress notifications to provide updates about operation status.
When a party wants to receive progress updates for a request, it includes a
progressToken in the request metadata.
- Progress tokens MUST be a string or integer value
- Progress tokens can be chosen by the sender using any means, but MUST be unique across all active requests.
{
  "jsonrpc": "2.0",
  "id": 1,
  "method": "some_method",
  "params": {
    "_meta": {
      "progressToken": "abc123"
    }
  }
}
The receiver MAY then send progress notifications containing:
- The original progress token
- The current progress value so far
- An optional "total" value
{
  "jsonrpc": "2.0",
  "method": "notifications/progress",
  "params": {
    "progressToken": "abc123",
    "progress": 50,
    "total": 100
  }
}- The
progressvalue MUST increase with each notification, even if the total is unknown. - The
progressand thetotalvalues MAY be floating point.
-
Progress notifications MUST only reference tokens that:
- Were provided in an active request
- Are associated with an in-progress operation
-
Receivers of progress requests MAY:
- Choose not to send any progress notifications
- Send notifications at whatever frequency they deem appropriate
- Omit the total value if unknown
sequenceDiagram
    participant Sender
    participant Receiver

    Note over Sender,Receiver: Request with progress token
    Sender->>Receiver: Method request with progressToken

    Note over Sender,Receiver: Progress updates
    loop Progress Updates
        Receiver-->>Sender: Progress notification (0.2/1.0)
        Receiver-->>Sender: Progress notification (0.6/1.0)
        Receiver-->>Sender: Progress notification (1.0/1.0)
    end

    Note over Sender,Receiver: Operation complete
    Receiver->>Sender: Method response
- Senders and receivers SHOULD track active progress tokens
- Both parties SHOULD implement rate limiting to prevent flooding
- Progress notifications MUST stop after completion
Source: https://modelcontextprotocol.io/specification/2024-11-05/client/roots
Protocol Revision: 2024-11-05
The Model Context Protocol (MCP) provides a standardized way for clients to expose filesystem "roots" to servers. Roots define the boundaries of where servers can operate within the filesystem, allowing them to understand which directories and files they have access to. Servers can request the list of roots from supporting clients and receive notifications when that list changes.
Roots in MCP are typically exposed through workspace or project configuration interfaces.
For example, implementations could offer a workspace/project picker that allows users to select directories and files the server should have access to. This can be combined with automatic workspace detection from version control systems or project files.
However, implementations are free to expose roots through any interface pattern that suits their needs—the protocol itself does not mandate any specific user interaction model.
Clients that support roots MUST declare the roots capability during
initialization:
{
  "capabilities": {
    "roots": {
      "listChanged": true
    }
  }
}
listChanged indicates whether the client will emit notifications when the list of roots
changes.
To retrieve roots, servers send a roots/list request:
Request:
{
  "jsonrpc": "2.0",
  "id": 1,
  "method": "roots/list"
}
Response:
{
  "jsonrpc": "2.0",
  "id": 1,
  "result": {
    "roots": [
      {
        "uri": "file:///home/user/projects/myproject",
        "name": "My Project"
      }
    ]
  }
}When roots change, clients that support listChanged MUST send a notification:
{
  "jsonrpc": "2.0",
  "method": "notifications/roots/list_changed"
}sequenceDiagram
participant Server
participant Client
Note over Server,Client: Discovery
Server->>Client: roots/list
Client-->>Server: Available roots
Note over Server,Client: Changes
Client--)Server: notifications/roots/list_changed
Server->>Client: roots/list
Client-->>Server: Updated roots
A root definition includes:
uri: Unique identifier for the root. This MUST be afile://URI in the current specification.name: Optional human-readable name for display purposes.
Example roots for different use cases:
{
  "uri": "file:///home/user/projects/myproject",
  "name": "My Project"
}[
{
"uri": "file:///home/user/repos/frontend",
"name": "Frontend Repository"
},
{
"uri": "file:///home/user/repos/backend",
"name": "Backend Repository"
}
]Clients SHOULD return standard JSON-RPC errors for common failure cases:
- Client does not support roots:
-32601(Method not found) - Internal errors:
-32603
Example error:
{
  "jsonrpc": "2.0",
  "id": 1,
  "error": {
    "code": -32601,
    "message": "Roots not supported",
    "data": {
      "reason": "Client does not have roots capability"
    }
  }
}-
Clients MUST:
- Only expose roots with appropriate permissions
- Validate all root URIs to prevent path traversal
- Implement proper access controls
- Monitor root accessibility
-
Servers SHOULD:
- Handle cases where roots become unavailable
- Respect root boundaries during operations
- Validate all paths against provided roots
-
Clients SHOULD:
- Prompt users for consent before exposing roots to servers
- Provide clear user interfaces for root management
- Validate root accessibility before exposing
- Monitor for root changes
-
Servers SHOULD:
- Check for roots capability before usage
- Handle root list changes gracefully
- Respect root boundaries in operations
- Cache root information appropriately
Source: https://modelcontextprotocol.io/specification/2024-11-05/client/sampling
Protocol Revision: 2024-11-05
The Model Context Protocol (MCP) provides a standardized way for servers to request LLM sampling ("completions" or "generations") from language models via clients. This flow allows clients to maintain control over model access, selection, and permissions while enabling servers to leverage AI capabilities—with no server API keys necessary. Servers can request text or image-based interactions and optionally include context from MCP servers in their prompts.
Sampling in MCP allows servers to implement agentic behaviors, by enabling LLM calls to occur nested inside other MCP server features.
Implementations are free to expose sampling through any interface pattern that suits their needs—the protocol itself does not mandate any specific user interaction model.
For trust & safety and security, there **SHOULD** always be a human in the loop with the ability to deny sampling requests.Applications **SHOULD**:
* Provide UI that makes it easy and intuitive to review sampling requests
* Allow users to view and edit prompts before sending
* Present generated responses for review before delivery
Clients that support sampling MUST declare the sampling capability during
initialization:
{
  "capabilities": {
    "sampling": {}
  }
}To request a language model generation, servers send a sampling/createMessage request:
Request:
{
  "jsonrpc": "2.0",
  "id": 1,
  "method": "sampling/createMessage",
  "params": {
    "messages": [
      {
        "role": "user",
        "content": {
          "type": "text",
          "text": "What is the capital of France?"
        }
      }
    ],
    "modelPreferences": {
      "hints": [
        {
          "name": "claude-3-sonnet"
        }
      ],
      "intelligencePriority": 0.8,
      "speedPriority": 0.5
    },
    "systemPrompt": "You are a helpful assistant.",
    "maxTokens": 100
  }
}
Response:
{
  "jsonrpc": "2.0",
  "id": 1,
  "result": {
    "role": "assistant",
    "content": {
      "type": "text",
      "text": "The capital of France is Paris."
    },
    "model": "claude-3-sonnet-20240307",
    "stopReason": "endTurn"
  }
}sequenceDiagram
participant Server
participant Client
participant User
participant LLM
Note over Server,Client: Server initiates sampling
Server->>Client: sampling/createMessage
Note over Client,User: Human-in-the-loop review
Client->>User: Present request for approval
User-->>Client: Review and approve/modify
Note over Client,LLM: Model interaction
Client->>LLM: Forward approved request
LLM-->>Client: Return generation
Note over Client,User: Response review
Client->>User: Present response for approval
User-->>Client: Review and approve/modify
Note over Server,Client: Complete request
Client-->>Server: Return approved response
Sampling messages can contain:
{
  "type": "text",
  "text": "The message content"
}{
"type": "image",
"data": "base64-encoded-image-data",
"mimeType": "image/jpeg"
}Model selection in MCP requires careful abstraction since servers and clients may use different AI providers with distinct model offerings. A server cannot simply request a specific model by name since the client may not have access to that exact model or may prefer to use a different provider's equivalent model.
To solve this, MCP implements a preference system that combines abstract capability priorities with optional model hints:
Servers express their needs through three normalized priority values (0-1):
costPriority: How important is minimizing costs? Higher values prefer cheaper models.speedPriority: How important is low latency? Higher values prefer faster models.intelligencePriority: How important are advanced capabilities? Higher values prefer more capable models.
While priorities help select models based on characteristics, hints allow servers to
suggest specific models or model families:
- Hints are treated as substrings that can match model names flexibly
- Multiple hints are evaluated in order of preference
- Clients MAY map hints to equivalent models from different providers
- Hints are advisory—clients make final model selection
For example:
{
  "hints": [
    { "name": "claude-3-sonnet" }, // Prefer Sonnet-class models
    { "name": "claude" } // Fall back to any Claude model
  ],
  "costPriority": 0.3, // Cost is less important
  "speedPriority": 0.8, // Speed is very important
  "intelligencePriority": 0.5 // Moderate capability needs
}
The client processes these preferences to select an appropriate model from its available
options. For instance, if the client doesn't have access to Claude models but has Gemini,
it might map the sonnet hint to gemini-1.5-pro based on similar capabilities.
Clients SHOULD return errors for common failure cases:
Example error:
{
  "jsonrpc": "2.0",
  "id": 1,
  "error": {
    "code": -1,
    "message": "User rejected sampling request"
  }
}- Clients SHOULD implement user approval controls
- Both parties SHOULD validate message content
- Clients SHOULD respect model preference hints
- Clients SHOULD implement rate limiting
- Both parties MUST handle sensitive data appropriately
Source: https://modelcontextprotocol.io/specification/2024-11-05/index
Model Context Protocol (MCP) is an open protocol that enables seamless integration between LLM applications and external data sources and tools. Whether you're building an AI-powered IDE, enhancing a chat interface, or creating custom AI workflows, MCP provides a standardized way to connect LLMs with the context they need.
This specification defines the authoritative protocol requirements, based on the TypeScript schema in schema.ts.
For implementation guides and examples, visit modelcontextprotocol.io.
The key words "MUST", "MUST NOT", "REQUIRED", "SHALL", "SHALL NOT", "SHOULD", "SHOULD NOT", "RECOMMENDED", "NOT RECOMMENDED", "MAY", and "OPTIONAL" in this document are to be interpreted as described in BCP 14 [RFC2119] [RFC8174] when, and only when, they appear in all capitals, as shown here.
MCP provides a standardized way for applications to:
- Share contextual information with language models
- Expose tools and capabilities to AI systems
- Build composable integrations and workflows
The protocol uses JSON-RPC 2.0 messages to establish communication between:
- Hosts: LLM applications that initiate connections
- Clients: Connectors within the host application
- Servers: Services that provide context and capabilities
MCP takes some inspiration from the Language Server Protocol, which standardizes how to add support for programming languages across a whole ecosystem of development tools. In a similar way, MCP standardizes how to integrate additional context and tools into the ecosystem of AI applications.
- JSON-RPC message format
- Stateful connections
- Server and client capability negotiation
Servers offer any of the following features to clients:
- Resources: Context and data, for the user or the AI model to use
- Prompts: Templated messages and workflows for users
- Tools: Functions for the AI model to execute
Clients may offer the following feature to servers:
- Sampling: Server-initiated agentic behaviors and recursive LLM interactions
- Configuration
- Progress tracking
- Cancellation
- Error reporting
- Logging
The Model Context Protocol enables powerful capabilities through arbitrary data access and code execution paths. With this power comes important security and trust considerations that all implementors must carefully address.
-
User Consent and Control
- Users must explicitly consent to and understand all data access and operations
- Users must retain control over what data is shared and what actions are taken
- Implementors should provide clear UIs for reviewing and authorizing activities
-
Data Privacy
- Hosts must obtain explicit user consent before exposing user data to servers
- Hosts must not transmit resource data elsewhere without user consent
- User data should be protected with appropriate access controls
-
Tool Safety
- Tools represent arbitrary code execution and must be treated with appropriate caution
- Hosts must obtain explicit user consent before invoking any tool
- Users should understand what each tool does before authorizing its use
-
LLM Sampling Controls
- Users must explicitly approve any LLM sampling requests
- Users should control:
- Whether sampling occurs at all
- The actual prompt that will be sent
- What results the server can see
- The protocol intentionally limits server visibility into prompts
While MCP itself cannot enforce these security principles at the protocol level, implementors SHOULD:
- Build robust consent and authorization flows into their applications
- Provide clear documentation of security implications
- Implement appropriate access controls and data protections
- Follow security best practices in their integrations
- Consider privacy implications in their feature designs
Explore the detailed specification for each protocol component:
<Card title="Base Protocol" icon="code" href="basic" />

<Card title="Server Features" icon="server" href="server" />

<Card title="Client Features" icon="user" href="client" />

<Card title="Contributing" icon="pencil" href="contributing" />
Source: https://modelcontextprotocol.io/specification/2024-11-05/server/index
Protocol Revision: 2024-11-05
Servers provide the fundamental building blocks for adding context to language models via MCP. These primitives enable rich interactions between clients, servers, and language models:
- Prompts: Pre-defined templates or instructions that guide language model interactions
- Resources: Structured data or content that provides additional context to the model
- Tools: Executable functions that allow models to perform actions or retrieve information
Each primitive can be summarized in the following control hierarchy:
| Primitive | Control | Description | Example |
|---|---|---|---|
| Prompts | User-controlled | Interactive templates invoked by user choice | Slash commands, menu options |
| Resources | Application-controlled | Contextual data attached and managed by the client | File contents, git history |
| Tools | Model-controlled | Functions exposed to the LLM to take actions | API POST requests, file writing |
Explore these key primitives in more detail below:
<Card title="Resources" icon="file-lines" href="resources" />

<Card title="Tools" icon="wrench" href="tools" />
Source: https://modelcontextprotocol.io/specification/2024-11-05/server/prompts
Protocol Revision: 2024-11-05
The Model Context Protocol (MCP) provides a standardized way for servers to expose prompt templates to clients. Prompts allow servers to provide structured messages and instructions for interacting with language models. Clients can discover available prompts, retrieve their contents, and provide arguments to customize them.
Prompts are designed to be user-controlled, meaning they are exposed from servers to clients with the intention of the user being able to explicitly select them for use.
Typically, prompts would be triggered through user-initiated commands in the user interface, which allows users to naturally discover and invoke available prompts.
For example, as slash commands:

However, implementors are free to expose prompts through any interface pattern that suits their needs—the protocol itself does not mandate any specific user interaction model.
Servers that support prompts MUST declare the prompts capability during
initialization:
{
  "capabilities": {
    "prompts": {
      "listChanged": true
    }
  }
}
listChanged indicates whether the server will emit notifications when the list of
available prompts changes.
To retrieve available prompts, clients send a prompts/list request. This operation
supports
pagination.
Request:
{
  "jsonrpc": "2.0",
  "id": 1,
  "method": "prompts/list",
  "params": {
    "cursor": "optional-cursor-value"
  }
}
Response:
{
  "jsonrpc": "2.0",
  "id": 1,
  "result": {
    "prompts": [
      {
        "name": "code_review",
        "description": "Asks the LLM to analyze code quality and suggest improvements",
        "arguments": [
          {
            "name": "code",
            "description": "The code to review",
            "required": true
          }
        ]
      }
    ],
    "nextCursor": "next-page-cursor"
  }
}To retrieve a specific prompt, clients send a prompts/get request. Arguments may be
auto-completed through the completion API.
Request:
{
  "jsonrpc": "2.0",
  "id": 2,
  "method": "prompts/get",
  "params": {
    "name": "code_review",
    "arguments": {
      "code": "def hello():\n    print('world')"
    }
  }
}
Response:
{
  "jsonrpc": "2.0",
  "id": 2,
  "result": {
    "description": "Code review prompt",
    "messages": [
      {
        "role": "user",
        "content": {
          "type": "text",
          "text": "Please review this Python code:\ndef hello():\n    print('world')"
        }
      }
    ]
  }
}When the list of available prompts changes, servers that declared the listChanged
capability SHOULD send a notification:
{
  "jsonrpc": "2.0",
  "method": "notifications/prompts/list_changed"
}sequenceDiagram
participant Client
participant Server
Note over Client,Server: Discovery
Client->>Server: prompts/list
Server-->>Client: List of prompts
Note over Client,Server: Usage
Client->>Server: prompts/get
Server-->>Client: Prompt content
opt listChanged
Note over Client,Server: Changes
Server--)Client: prompts/list_changed
Client->>Server: prompts/list
Server-->>Client: Updated prompts
end
A prompt definition includes:
name: Unique identifier for the promptdescription: Optional human-readable descriptionarguments: Optional list of arguments for customization
Messages in a prompt can contain:
role: Either "user" or "assistant" to indicate the speakercontent: One of the following content types:
Text content represents plain text messages:
{
  "type": "text",
  "text": "The text content of the message"
}
This is the most common content type used for natural language interactions.
Image content allows including visual information in messages:
{
  "type": "image",
  "data": "base64-encoded-image-data",
  "mimeType": "image/png"
}
The image data MUST be base64-encoded and include a valid MIME type. This enables multi-modal interactions where visual context is important.
Embedded resources allow referencing server-side resources directly in messages:
{
  "type": "resource",
  "resource": {
    "uri": "resource://example",
    "mimeType": "text/plain",
    "text": "Resource content"
  }
}
Resources can contain either text or binary (blob) data and MUST include:
- A valid resource URI
- The appropriate MIME type
- Either text content or base64-encoded blob data
Embedded resources enable prompts to seamlessly incorporate server-managed content like documentation, code samples, or other reference materials directly into the conversation flow.
Servers SHOULD return standard JSON-RPC errors for common failure cases:
- Invalid prompt name:
-32602(Invalid params) - Missing required arguments:
-32602(Invalid params) - Internal errors:
-32603(Internal error)
- Servers SHOULD validate prompt arguments before processing
- Clients SHOULD handle pagination for large prompt lists
- Both parties SHOULD respect capability negotiation
Implementations MUST carefully validate all prompt inputs and outputs to prevent injection attacks or unauthorized access to resources.
Source: https://modelcontextprotocol.io/specification/2024-11-05/server/resources
Protocol Revision: 2024-11-05
The Model Context Protocol (MCP) provides a standardized way for servers to expose resources to clients. Resources allow servers to share data that provides context to language models, such as files, database schemas, or application-specific information. Each resource is uniquely identified by a URI.
Resources in MCP are designed to be application-driven, with host applications determining how to incorporate context based on their needs.
For example, applications could:
- Expose resources through UI elements for explicit selection, in a tree or list view
- Allow the user to search through and filter available resources
- Implement automatic context inclusion, based on heuristics or the AI model's selection

However, implementations are free to expose resources through any interface pattern that suits their needs—the protocol itself does not mandate any specific user interaction model.
Servers that support resources MUST declare the resources capability:
{
  "capabilities": {
    "resources": {
      "subscribe": true,
      "listChanged": true
    }
  }
}
The capability supports two optional features:
subscribe: whether the client can subscribe to be notified of changes to individual resources.listChanged: whether the server will emit notifications when the list of available resources changes.
Both subscribe and listChanged are optional—servers can support neither,
either, or both:
{
  "capabilities": {
    "resources": {} // Neither feature supported
  }
}
{
"capabilities": {
"resources": {
"subscribe": true // Only subscriptions supported
}
}
}{
"capabilities": {
"resources": {
"listChanged": true // Only list change notifications supported
}
}
}To discover available resources, clients send a resources/list request. This operation
supports
pagination.
Request:
{
  "jsonrpc": "2.0",
  "id": 1,
  "method": "resources/list",
  "params": {
    "cursor": "optional-cursor-value"
  }
}
Response:
{
  "jsonrpc": "2.0",
  "id": 1,
  "result": {
    "resources": [
      {
        "uri": "file:///project/src/main.rs",
        "name": "main.rs",
        "description": "Primary application entry point",
        "mimeType": "text/x-rust"
      }
    ],
    "nextCursor": "next-page-cursor"
  }
}To retrieve resource contents, clients send a resources/read request:
Request:
{
  "jsonrpc": "2.0",
  "id": 2,
  "method": "resources/read",
  "params": {
    "uri": "file:///project/src/main.rs"
  }
}
Response:
{
  "jsonrpc": "2.0",
  "id": 2,
  "result": {
    "contents": [
      {
        "uri": "file:///project/src/main.rs",
        "mimeType": "text/x-rust",
        "text": "fn main() {\n    println!(\"Hello world!\");\n}"
      }
    ]
  }
}
Resource templates allow servers to expose parameterized resources using URI templates. Arguments may be auto-completed through the completion API.
Request:
{
  "jsonrpc": "2.0",
  "id": 3,
  "method": "resources/templates/list"
}
Response:
{
  "jsonrpc": "2.0",
  "id": 3,
  "result": {
    "resourceTemplates": [
      {
        "uriTemplate": "file:///{path}",
        "name": "Project Files",
        "description": "Access files in the project directory",
        "mimeType": "application/octet-stream"
      }
    ]
  }
}When the list of available resources changes, servers that declared the listChanged
capability SHOULD send a notification:
{
  "jsonrpc": "2.0",
  "method": "notifications/resources/list_changed"
}The protocol supports optional subscriptions to resource changes. Clients can subscribe to specific resources and receive notifications when they change:
Subscribe Request:
{
  "jsonrpc": "2.0",
  "id": 4,
  "method": "resources/subscribe",
  "params": {
    "uri": "file:///project/src/main.rs"
  }
}
Update Notification:
{
  "jsonrpc": "2.0",
  "method": "notifications/resources/updated",
  "params": {
    "uri": "file:///project/src/main.rs"
  }
}sequenceDiagram
participant Client
participant Server
Note over Client,Server: Resource Discovery
Client->>Server: resources/list
Server-->>Client: List of resources
Note over Client,Server: Resource Access
Client->>Server: resources/read
Server-->>Client: Resource contents
Note over Client,Server: Subscriptions
Client->>Server: resources/subscribe
Server-->>Client: Subscription confirmed
Note over Client,Server: Updates
Server--)Client: notifications/resources/updated
Client->>Server: resources/read
Server-->>Client: Updated contents
A resource definition includes:
uri: Unique identifier for the resourcename: Human-readable namedescription: Optional descriptionmimeType: Optional MIME type
Resources can contain either text or binary data:
{
  "uri": "file:///example.txt",
  "mimeType": "text/plain",
  "text": "Resource content"
}{
"uri": "file:///example.png",
"mimeType": "image/png",
"blob": "base64-encoded-data"
}The protocol defines several standard URI schemes. This list not exhaustive—implementations are always free to use additional, custom URI schemes.
Used to represent a resource available on the web.
Servers SHOULD use this scheme only when the client is able to fetch and load the resource directly from the web on its own—that is, it doesn’t need to read the resource via the MCP server.
For other use cases, servers SHOULD prefer to use another URI scheme, or define a custom one, even if the server will itself be downloading resource contents over the internet.
Used to identify resources that behave like a filesystem. However, the resources do not need to map to an actual physical filesystem.
MCP servers MAY identify file:// resources with an
XDG MIME type,
like inode/directory, to represent non-regular files (such as directories) that don’t
otherwise have a standard MIME type.
Git version control integration.
Servers SHOULD return standard JSON-RPC errors for common failure cases:
- Resource not found:
-32002 - Internal errors:
-32603
Example error:
{
  "jsonrpc": "2.0",
  "id": 5,
  "error": {
    "code": -32002,
    "message": "Resource not found",
    "data": {
      "uri": "file:///nonexistent.txt"
    }
  }
}- Servers MUST validate all resource URIs
- Access controls SHOULD be implemented for sensitive resources
- Binary data MUST be properly encoded
- Resource permissions SHOULD be checked before operations
Source: https://modelcontextprotocol.io/specification/2024-11-05/server/tools
Protocol Revision: 2024-11-05
The Model Context Protocol (MCP) allows servers to expose tools that can be invoked by language models. Tools enable models to interact with external systems, such as querying databases, calling APIs, or performing computations. Each tool is uniquely identified by a name and includes metadata describing its schema.
Tools in MCP are designed to be model-controlled, meaning that the language model can discover and invoke tools automatically based on its contextual understanding and the user's prompts.
However, implementations are free to expose tools through any interface pattern that suits their needs—the protocol itself does not mandate any specific user interaction model.
For trust & safety and security, there **SHOULD** always be a human in the loop with the ability to deny tool invocations.Applications **SHOULD**:
* Provide UI that makes clear which tools are being exposed to the AI model
* Insert clear visual indicators when tools are invoked
* Present confirmation prompts to the user for operations, to ensure a human is in the
loop
Servers that support tools MUST declare the tools capability:
{
  "capabilities": {
    "tools": {
      "listChanged": true
    }
  }
}
listChanged indicates whether the server will emit notifications when the list of
available tools changes.
To discover available tools, clients send a tools/list request. This operation supports
pagination.
Request:
{
  "jsonrpc": "2.0",
  "id": 1,
  "method": "tools/list",
  "params": {
    "cursor": "optional-cursor-value"
  }
}
Response:
{
  "jsonrpc": "2.0",
  "id": 1,
  "result": {
    "tools": [
      {
        "name": "get_weather",
        "description": "Get current weather information for a location",
        "inputSchema": {
          "type": "object",
          "properties": {
            "location": {
              "type": "string",
              "description": "City name or zip code"
            }
          },
          "required": ["location"]
        }
      }
    ],
    "nextCursor": "next-page-cursor"
  }
}To invoke a tool, clients send a tools/call request:
Request:
{
  "jsonrpc": "2.0",
  "id": 2,
  "method": "tools/call",
  "params": {
    "name": "get_weather",
    "arguments": {
      "location": "New York"
    }
  }
}
Response:
{
  "jsonrpc": "2.0",
  "id": 2,
  "result": {
    "content": [
      {
        "type": "text",
        "text": "Current weather in New York:\nTemperature: 72°F\nConditions: Partly cloudy"
      }
    ],
    "isError": false
  }
}When the list of available tools changes, servers that declared the listChanged
capability SHOULD send a notification:
{
  "jsonrpc": "2.0",
  "method": "notifications/tools/list_changed"
}sequenceDiagram
participant LLM
participant Client
participant Server
Note over Client,Server: Discovery
Client->>Server: tools/list
Server-->>Client: List of tools
Note over Client,LLM: Tool Selection
LLM->>Client: Select tool to use
Note over Client,Server: Invocation
Client->>Server: tools/call
Server-->>Client: Tool result
Client->>LLM: Process result
Note over Client,Server: Updates
Server--)Client: tools/list_changed
Client->>Server: tools/list
Server-->>Client: Updated tools
A tool definition includes:
name: Unique identifier for the tooldescription: Human-readable description of functionalityinputSchema: JSON Schema defining expected parameters
Tool results can contain multiple content items of different types:
{
  "type": "text",
  "text": "Tool result text"
}{
"type": "image",
"data": "base64-encoded-data",
"mimeType": "image/png"
}Resources MAY be embedded, to provide additional context or data, behind a URI that can be subscribed to or fetched again by the client later:
{
  "type": "resource",
  "resource": {
    "uri": "resource://example",
    "mimeType": "text/plain",
    "text": "Resource content"
  }
}Tools use two error reporting mechanisms:
-
Protocol Errors: Standard JSON-RPC errors for issues like:
- Unknown tools
- Invalid arguments
- Server errors
-
Tool Execution Errors: Reported in tool results with
isError: true:- API failures
- Invalid input data
- Business logic errors
Example protocol error:
{
  "jsonrpc": "2.0",
  "id": 3,
  "error": {
    "code": -32602,
    "message": "Unknown tool: invalid_tool_name"
  }
}
Example tool execution error:
{
"jsonrpc": "2.0",
"id": 4,
"result": {
"content": [
{
"type": "text",
"text": "Failed to fetch weather data: API rate limit exceeded"
}
],
"isError": true
}
}-
Servers MUST:
- Validate all tool inputs
- Implement proper access controls
- Rate limit tool invocations
- Sanitize tool outputs
-
Clients SHOULD:
- Prompt for user confirmation on sensitive operations
- Show tool inputs to the user before calling the server, to avoid malicious or accidental data exfiltration
- Validate tool results before passing to LLM
- Implement timeouts for tool calls
- Log tool usage for audit purposes
Source: https://modelcontextprotocol.io/specification/2024-11-05/server/utilities/completion
Protocol Revision: 2024-11-05
The Model Context Protocol (MCP) provides a standardized way for servers to offer argument autocompletion suggestions for prompts and resource URIs. This enables rich, IDE-like experiences where users receive contextual suggestions while entering argument values.
Completion in MCP is designed to support interactive user experiences similar to IDE code completion.
For example, applications may show completion suggestions in a dropdown or popup menu as users type, with the ability to filter and select from available options.
However, implementations are free to expose completion through any interface pattern that suits their needs—the protocol itself does not mandate any specific user interaction model.
To get completion suggestions, clients send a completion/complete request specifying
what is being completed through a reference type:
Request:
{
"jsonrpc": "2.0",
"id": 1,
"method": "completion/complete",
"params": {
"ref": {
"type": "ref/prompt",
"name": "code_review"
},
"argument": {
"name": "language",
"value": "py"
}
}
}Response:
{
"jsonrpc": "2.0",
"id": 1,
"result": {
"completion": {
"values": ["python", "pytorch", "pyside"],
"total": 10,
"hasMore": true
}
}
}The protocol supports two types of completion references:
| Type | Description | Example |
|---|---|---|
ref/prompt |
References a prompt by name | {"type": "ref/prompt", "name": "code_review"} |
ref/resource |
References a resource URI | {"type": "ref/resource", "uri": "file:///{path}"} |
Servers return an array of completion values ranked by relevance, with:
- Maximum 100 items per response
- Optional total number of available matches
- Boolean indicating if additional results exist
sequenceDiagram
participant Client
participant Server
Note over Client: User types argument
Client->>Server: completion/complete
Server-->>Client: Completion suggestions
Note over Client: User continues typing
Client->>Server: completion/complete
Server-->>Client: Refined suggestions
ref: APromptReferenceorResourceReferenceargument: Object containing:name: Argument namevalue: Current value
completion: Object containing:values: Array of suggestions (max 100)total: Optional total matcheshasMore: Additional results flag
-
Servers SHOULD:
- Return suggestions sorted by relevance
- Implement fuzzy matching where appropriate
- Rate limit completion requests
- Validate all inputs
-
Clients SHOULD:
- Debounce rapid completion requests
- Cache completion results where appropriate
- Handle missing or partial results gracefully
Implementations MUST:
- Validate all completion inputs
- Implement appropriate rate limiting
- Control access to sensitive suggestions
- Prevent completion-based information disclosure
Source: https://modelcontextprotocol.io/specification/2024-11-05/server/utilities/logging
Protocol Revision: 2024-11-05
The Model Context Protocol (MCP) provides a standardized way for servers to send structured log messages to clients. Clients can control logging verbosity by setting minimum log levels, with servers sending notifications containing severity levels, optional logger names, and arbitrary JSON-serializable data.
Implementations are free to expose logging through any interface pattern that suits their needs—the protocol itself does not mandate any specific user interaction model.
Servers that emit log message notifications MUST declare the logging capability:
{
"capabilities": {
"logging": {}
}
}The protocol follows the standard syslog severity levels specified in RFC 5424:
| Level | Description | Example Use Case |
|---|---|---|
| debug | Detailed debugging information | Function entry/exit points |
| info | General informational messages | Operation progress updates |
| notice | Normal but significant events | Configuration changes |
| warning | Warning conditions | Deprecated feature usage |
| error | Error conditions | Operation failures |
| critical | Critical conditions | System component failures |
| alert | Action must be taken immediately | Data corruption detected |
| emergency | System is unusable | Complete system failure |
To configure the minimum log level, clients MAY send a logging/setLevel request:
Request:
{
"jsonrpc": "2.0",
"id": 1,
"method": "logging/setLevel",
"params": {
"level": "info"
}
}Servers send log messages using notifications/message notifications:
{
"jsonrpc": "2.0",
"method": "notifications/message",
"params": {
"level": "error",
"logger": "database",
"data": {
"error": "Connection failed",
"details": {
"host": "localhost",
"port": 5432
}
}
}
}sequenceDiagram
participant Client
participant Server
Note over Client,Server: Configure Logging
Client->>Server: logging/setLevel (info)
Server-->>Client: Empty Result
Note over Client,Server: Server Activity
Server--)Client: notifications/message (info)
Server--)Client: notifications/message (warning)
Server--)Client: notifications/message (error)
Note over Client,Server: Level Change
Client->>Server: logging/setLevel (error)
Server-->>Client: Empty Result
Note over Server: Only sends error level<br/>and above
Servers SHOULD return standard JSON-RPC errors for common failure cases:
- Invalid log level:
-32602(Invalid params) - Configuration errors:
-32603(Internal error)
-
Servers SHOULD:
- Rate limit log messages
- Include relevant context in data field
- Use consistent logger names
- Remove sensitive information
-
Clients MAY:
- Present log messages in the UI
- Implement log filtering/search
- Display severity visually
- Persist log messages
-
Log messages MUST NOT contain:
- Credentials or secrets
- Personal identifying information
- Internal system details that could aid attacks
-
Implementations SHOULD:
- Rate limit messages
- Validate all data fields
- Control log access
- Monitor for sensitive content
Source: https://modelcontextprotocol.io/specification/2024-11-05/server/utilities/pagination
Protocol Revision: 2024-11-05
The Model Context Protocol (MCP) supports paginating list operations that may return large result sets. Pagination allows servers to yield results in smaller chunks rather than all at once.
Pagination is especially important when connecting to external services over the internet, but also useful for local integrations to avoid performance issues with large data sets.
Pagination in MCP uses an opaque cursor-based approach, instead of numbered pages.
- The cursor is an opaque string token, representing a position in the result set
- Page size is determined by the server, and clients MUST NOT assume a fixed page size
Pagination starts when the server sends a response that includes:
- The current page of results
- An optional
nextCursorfield if more results exist
{
"jsonrpc": "2.0",
"id": "123",
"result": {
"resources": [...],
"nextCursor": "eyJwYWdlIjogM30="
}
}After receiving a cursor, the client can continue paginating by issuing a request including that cursor:
{
"jsonrpc": "2.0",
"method": "resources/list",
"params": {
"cursor": "eyJwYWdlIjogMn0="
}
}sequenceDiagram
participant Client
participant Server
Client->>Server: List Request (no cursor)
loop Pagination Loop
Server-->>Client: Page of results + nextCursor
Client->>Server: List Request (with cursor)
end
The following MCP operations support pagination:
resources/list- List available resourcesresources/templates/list- List resource templatesprompts/list- List available promptstools/list- List available tools
-
Servers SHOULD:
- Provide stable cursors
- Handle invalid cursors gracefully
-
Clients SHOULD:
- Treat a missing
nextCursoras the end of results - Support both paginated and non-paginated flows
- Treat a missing
-
Clients MUST treat cursors as opaque tokens:
- Don't make assumptions about cursor format
- Don't attempt to parse or modify cursors
- Don't persist cursors across sessions
Invalid cursors SHOULD result in an error with code -32602 (Invalid params).
Source: https://modelcontextprotocol.io/specification/2025-03-26/architecture/index
The Model Context Protocol (MCP) follows a client-host-server architecture where each host can run multiple client instances. This architecture enables users to integrate AI capabilities across applications while maintaining clear security boundaries and isolating concerns. Built on JSON-RPC, MCP provides a stateful session protocol focused on context exchange and sampling coordination between clients and servers.
graph LR
subgraph "Application Host Process"
H[Host]
C1[Client 1]
C2[Client 2]
C3[Client 3]
H --> C1
H --> C2
H --> C3
end
subgraph "Local machine"
S1[Server 1<br>Files & Git]
S2[Server 2<br>Database]
R1[("Local<br>Resource A")]
R2[("Local<br>Resource B")]
C1 --> S1
C2 --> S2
S1 <--> R1
S2 <--> R2
end
subgraph "Internet"
S3[Server 3<br>External APIs]
R3[("Remote<br>Resource C")]
C3 --> S3
S3 <--> R3
end
The host process acts as the container and coordinator:
- Creates and manages multiple client instances
- Controls client connection permissions and lifecycle
- Enforces security policies and consent requirements
- Handles user authorization decisions
- Coordinates AI/LLM integration and sampling
- Manages context aggregation across clients
Each client is created by the host and maintains an isolated server connection:
- Establishes one stateful session per server
- Handles protocol negotiation and capability exchange
- Routes protocol messages bidirectionally
- Manages subscriptions and notifications
- Maintains security boundaries between servers
A host application creates and manages multiple clients, with each client having a 1:1 relationship with a particular server.
Servers provide specialized context and capabilities:
- Expose resources, tools and prompts via MCP primitives
- Operate independently with focused responsibilities
- Request sampling through client interfaces
- Must respect security constraints
- Can be local processes or remote services
MCP is built on several key design principles that inform its architecture and implementation:
-
Servers should be extremely easy to build
- Host applications handle complex orchestration responsibilities
- Servers focus on specific, well-defined capabilities
- Simple interfaces minimize implementation overhead
- Clear separation enables maintainable code
-
Servers should be highly composable
- Each server provides focused functionality in isolation
- Multiple servers can be combined seamlessly
- Shared protocol enables interoperability
- Modular design supports extensibility
-
Servers should not be able to read the whole conversation, nor "see into" other servers
- Servers receive only necessary contextual information
- Full conversation history stays with the host
- Each server connection maintains isolation
- Cross-server interactions are controlled by the host
- Host process enforces security boundaries
-
Features can be added to servers and clients progressively
- Core protocol provides minimal required functionality
- Additional capabilities can be negotiated as needed
- Servers and clients evolve independently
- Protocol designed for future extensibility
- Backwards compatibility is maintained
The Model Context Protocol uses a capability-based negotiation system where clients and servers explicitly declare their supported features during initialization. Capabilities determine which protocol features and primitives are available during a session.
- Servers declare capabilities like resource subscriptions, tool support, and prompt templates
- Clients declare capabilities like sampling support and notification handling
- Both parties must respect declared capabilities throughout the session
- Additional capabilities can be negotiated through extensions to the protocol
sequenceDiagram
participant Host
participant Client
participant Server
Host->>+Client: Initialize client
Client->>+Server: Initialize session with capabilities
Server-->>Client: Respond with supported capabilities
Note over Host,Server: Active Session with Negotiated Features
loop Client Requests
Host->>Client: User- or model-initiated action
Client->>Server: Request (tools/resources)
Server-->>Client: Response
Client-->>Host: Update UI or respond to model
end
loop Server Requests
Server->>Client: Request (sampling)
Client->>Host: Forward to AI
Host-->>Client: AI response
Client-->>Server: Response
end
loop Notifications
Server--)Client: Resource updates
Client--)Server: Status changes
end
Host->>Client: Terminate
Client->>-Server: End session
deactivate Server
Each capability unlocks specific protocol features for use during the session. For example:
- Implemented server features must be advertised in the server's capabilities
- Emitting resource subscription notifications requires the server to declare subscription support
- Tool invocation requires the server to declare tool capabilities
- Sampling requires the client to declare support in its capabilities
This capability negotiation ensures clients and servers have a clear understanding of supported functionality while maintaining protocol extensibility.
Source: https://modelcontextprotocol.io/specification/2025-03-26/basic/authorization
Protocol Revision: 2025-03-26
The Model Context Protocol provides authorization capabilities at the transport level, enabling MCP clients to make requests to restricted MCP servers on behalf of resource owners. This specification defines the authorization flow for HTTP-based transports.
Authorization is OPTIONAL for MCP implementations. When supported:
- Implementations using an HTTP-based transport SHOULD conform to this specification.
- Implementations using an STDIO transport SHOULD NOT follow this specification, and instead retrieve credentials from the environment.
- Implementations using alternative transports MUST follow established security best practices for their protocol.
This authorization mechanism is based on established specifications listed below, but implements a selected subset of their features to ensure security and interoperability while maintaining simplicity:
- OAuth 2.1 IETF DRAFT
- OAuth 2.0 Authorization Server Metadata (RFC8414)
- OAuth 2.0 Dynamic Client Registration Protocol (RFC7591)
-
MCP auth implementations MUST implement OAuth 2.1 with appropriate security measures for both confidential and public clients.
-
MCP auth implementations SHOULD support the OAuth 2.0 Dynamic Client Registration Protocol (RFC7591).
-
MCP servers SHOULD and MCP clients MUST implement OAuth 2.0 Authorization Server Metadata (RFC8414). Servers that do not support Authorization Server Metadata MUST follow the default URI schema.
OAuth specifies different flows or grant types, which are different ways of obtaining an access token. Each of these targets different use cases and scenarios.
MCP servers SHOULD support the OAuth grant types that best align with the intended audience. For instance:
- Authorization Code: useful when the client is acting on behalf of a (human) end user.
- For instance, an agent calls an MCP tool implemented by a SaaS system.
- Client Credentials: the client is another application (not a human)
- For instance, an agent calls a secure MCP tool to check inventory at a specific store. No need to impersonate the end user.
This demonstrates the OAuth 2.1 flow for the authorization code grant type, used for user auth.
NOTE: The following example assumes the MCP server is also functioning as the authorization server. However, the authorization server may be deployed as its own distinct service.
A human user completes the OAuth flow through a web browser, obtaining an access token that identifies them personally and allows the client to act on their behalf.
When authorization is required and not yet proven by the client, servers MUST respond with HTTP 401 Unauthorized.
Clients initiate the OAuth 2.1 IETF DRAFT authorization flow after receiving the HTTP 401 Unauthorized.
The following demonstrates the basic OAuth 2.1 for public clients using PKCE.
sequenceDiagram
participant B as User-Agent (Browser)
participant C as Client
participant M as MCP Server
C->>M: MCP Request
M->>C: HTTP 401 Unauthorized
Note over C: Generate code_verifier and code_challenge
C->>B: Open browser with authorization URL + code_challenge
B->>M: GET /authorize
Note over M: User logs in and authorizes
M->>B: Redirect to callback URL with auth code
B->>C: Callback with authorization code
C->>M: Token Request with code + code_verifier
M->>C: Access Token (+ Refresh Token)
C->>M: MCP Request with Access Token
Note over C,M: Begin standard MCP message exchange
For server capability discovery:
- MCP clients MUST follow the OAuth 2.0 Authorization Server Metadata protocol defined in RFC8414.
- MCP server SHOULD follow the OAuth 2.0 Authorization Server Metadata protocol.
- MCP servers that do not support the OAuth 2.0 Authorization Server Metadata protocol, MUST support fallback URLs.
The discovery flow is illustrated below:
sequenceDiagram
participant C as Client
participant S as Server
C->>S: GET /.well-known/oauth-authorization-server
alt Discovery Success
S->>C: 200 OK + Metadata Document
Note over C: Use endpoints from metadata
else Discovery Failed
S->>C: 404 Not Found
Note over C: Fall back to default endpoints
end
Note over C: Continue with authorization flow
MCP clients SHOULD include the header MCP-Protocol-Version: <protocol-version> during
Server Metadata Discovery to allow the MCP server to respond based on the MCP protocol
version.
For example: MCP-Protocol-Version: 2024-11-05
The authorization base URL MUST be determined from the MCP server URL by discarding
any existing path component. For example:
If the MCP server URL is https://api.example.com/v1/mcp, then:
- The authorization base URL is
https://api.example.com - The metadata endpoint MUST be at
https://api.example.com/.well-known/oauth-authorization-server
This ensures authorization endpoints are consistently located at the root level of the domain hosting the MCP server, regardless of any path components in the MCP server URL.
For servers that do not implement OAuth 2.0 Authorization Server Metadata, clients MUST use the following default endpoint paths relative to the authorization base URL (as defined in Section 2.3.2):
| Endpoint | Default Path | Description |
|---|---|---|
| Authorization Endpoint | /authorize | Used for authorization requests |
| Token Endpoint | /token | Used for token exchange & refresh |
| Registration Endpoint | /register | Used for dynamic client registration |
For example, with an MCP server hosted at https://api.example.com/v1/mcp, the default
endpoints would be:
https://api.example.com/authorizehttps://api.example.com/tokenhttps://api.example.com/register
Clients MUST first attempt to discover endpoints via the metadata document before falling back to default paths. When using default paths, all other protocol requirements remain unchanged.
MCP clients and servers SHOULD support the OAuth 2.0 Dynamic Client Registration Protocol to allow MCP clients to obtain OAuth client IDs without user interaction. This provides a standardized way for clients to automatically register with new servers, which is crucial for MCP because:
- Clients cannot know all possible servers in advance
- Manual registration would create friction for users
- It enables seamless connection to new servers
- Servers can implement their own registration policies
Any MCP servers that do not support Dynamic Client Registration need to provide alternative ways to obtain a client ID (and, if applicable, client secret). For one of these servers, MCP clients will have to either:
- Hardcode a client ID (and, if applicable, client secret) specifically for that MCP server, or
- Present a UI to users that allows them to enter these details, after registering an OAuth client themselves (e.g., through a configuration interface hosted by the server).
The complete Authorization flow proceeds as follows:
sequenceDiagram
participant B as User-Agent (Browser)
participant C as Client
participant M as MCP Server
C->>M: GET /.well-known/oauth-authorization-server
alt Server Supports Discovery
M->>C: Authorization Server Metadata
else No Discovery
M->>C: 404 (Use default endpoints)
end
alt Dynamic Client Registration
C->>M: POST /register
M->>C: Client Credentials
end
Note over C: Generate PKCE Parameters
C->>B: Open browser with authorization URL + code_challenge
B->>M: Authorization Request
Note over M: User /authorizes
M->>B: Redirect to callback with authorization code
B->>C: Authorization code callback
C->>M: Token Request + code_verifier
M->>C: Access Token (+ Refresh Token)
C->>M: API Requests with Access Token
flowchart TD
A[Start Auth Flow] --> B{Check Metadata Discovery}
B -->|Available| C[Use Metadata Endpoints]
B -->|Not Available| D[Use Default Endpoints]
C --> G{Check Registration Endpoint}
D --> G
G -->|Available| H[Perform Dynamic Registration]
G -->|Not Available| I[Alternative Registration Required]
H --> J[Start OAuth Flow]
I --> J
J --> K[Generate PKCE Parameters]
K --> L[Request Authorization]
L --> M[User Authorization]
M --> N[Exchange Code for Tokens]
N --> O[Use Access Token]
Access token handling MUST conform to OAuth 2.1 Section 5 requirements for resource requests. Specifically:
- MCP client MUST use the Authorization request header field Section 5.1.1:
Authorization: Bearer <access-token>
Note that authorization MUST be included in every HTTP request from client to server, even if they are part of the same logical session.
- Access tokens MUST NOT be included in the URI query string
Example request:
GET /v1/contexts HTTP/1.1
Host: mcp.example.com
Authorization: Bearer eyJhbGciOiJIUzI1NiIs...Resource servers MUST validate access tokens as described in Section 5.2. If validation fails, servers MUST respond according to Section 5.3 error handling requirements. Invalid or expired tokens MUST receive a HTTP 401 response.
The following security requirements MUST be implemented:
- Clients MUST securely store tokens following OAuth 2.0 best practices
- Servers SHOULD enforce token expiration and rotation
- All authorization endpoints MUST be served over HTTPS
- Servers MUST validate redirect URIs to prevent open redirect vulnerabilities
- Redirect URIs MUST be either localhost URLs or HTTPS URLs
Servers MUST return appropriate HTTP status codes for authorization errors:
| Status Code | Description | Usage |
|---|---|---|
| 401 | Unauthorized | Authorization required or token invalid |
| 403 | Forbidden | Invalid scopes or insufficient permissions |
| 400 | Bad Request | Malformed authorization request |
- Implementations MUST follow OAuth 2.1 security best practices
- PKCE is REQUIRED for all clients
- Token rotation SHOULD be implemented for enhanced security
- Token lifetimes SHOULD be limited based on security requirements
MCP servers MAY support delegated authorization through third-party authorization servers. In this flow, the MCP server acts as both an OAuth client (to the third-party auth server) and an OAuth authorization server (to the MCP client).
The third-party authorization flow comprises these steps:
- MCP client initiates standard OAuth flow with MCP server
- MCP server redirects user to third-party authorization server
- User authorizes with third-party server
- Third-party server redirects back to MCP server with authorization code
- MCP server exchanges code for third-party access token
- MCP server generates its own access token bound to the third-party session
- MCP server completes original OAuth flow with MCP client
sequenceDiagram
participant B as User-Agent (Browser)
participant C as MCP Client
participant M as MCP Server
participant T as Third-Party Auth Server
C->>M: Initial OAuth Request
M->>B: Redirect to Third-Party /authorize
B->>T: Authorization Request
Note over T: User authorizes
T->>B: Redirect to MCP Server callback
B->>M: Authorization code
M->>T: Exchange code for token
T->>M: Third-party access token
Note over M: Generate bound MCP token
M->>B: Redirect to MCP Client callback
B->>C: MCP authorization code
C->>M: Exchange code for token
M->>C: MCP access token
MCP servers implementing third-party authorization MUST:
- Maintain secure mapping between third-party tokens and issued MCP tokens
- Validate third-party token status before honoring MCP tokens
- Implement appropriate token lifecycle management
- Handle third-party token expiration and renewal
When implementing third-party authorization, servers MUST:
- Validate all redirect URIs
- Securely store third-party credentials
- Implement appropriate session timeout handling
- Consider security implications of token chaining
- Implement proper error handling for third-party auth failures
We strongly recommend that local clients implement OAuth 2.1 as a public client:
- Utilizing code challenges (PKCE) for authorization requests to prevent interception attacks
- Implementing secure token storage appropriate for the local system
- Following token refresh best practices to maintain sessions
- Properly handling token expiration and renewal
We strongly recommend that all clients implement metadata discovery. This reduces the need for users to provide endpoints manually or clients to fallback to the defined defaults.
Since clients do not know the set of MCP servers in advance, we strongly recommend the implementation of dynamic client registration. This allows applications to automatically register with the MCP server, and removes the need for users to obtain client ids manually.
Source: https://modelcontextprotocol.io/specification/2025-03-26/basic/index
Protocol Revision: 2025-03-26
The Model Context Protocol consists of several key components that work together:
- Base Protocol: Core JSON-RPC message types
- Lifecycle Management: Connection initialization, capability negotiation, and session control
- Server Features: Resources, prompts, and tools exposed by servers
- Client Features: Sampling and root directory lists provided by clients
- Utilities: Cross-cutting concerns like logging and argument completion
All implementations MUST support the base protocol and lifecycle management components. Other components MAY be implemented based on the specific needs of the application.
These protocol layers establish clear separation of concerns while enabling rich interactions between clients and servers. The modular design allows implementations to support exactly the features they need.
All messages between MCP clients and servers MUST follow the JSON-RPC 2.0 specification. The protocol defines these types of messages:
Requests are sent from the client to the server or vice versa, to initiate an operation.
{
jsonrpc: "2.0";
id: string | number;
method: string;
params?: {
[key: string]: unknown;
};
}- Requests MUST include a string or integer ID.
- Unlike base JSON-RPC, the ID MUST NOT be
null. - The request ID MUST NOT have been previously used by the requestor within the same session.
Responses are sent in reply to requests, containing the result or error of the operation.
{
jsonrpc: "2.0";
id: string | number;
result?: {
[key: string]: unknown;
}
error?: {
code: number;
message: string;
data?: unknown;
}
}- Responses MUST include the same ID as the request they correspond to.
- Responses are further sub-categorized as either successful results or
errors. Either a
resultor anerrorMUST be set. A response MUST NOT set both. - Results MAY follow any JSON object structure, while errors MUST include an error code and message at minimum.
- Error codes MUST be integers.
Notifications are sent from the client to the server or vice versa, as a one-way message. The receiver MUST NOT send a response.
{
jsonrpc: "2.0";
method: string;
params?: {
[key: string]: unknown;
};
}- Notifications MUST NOT include an ID.
JSON-RPC also defines a means to batch multiple requests and notifications, by sending them in an array. MCP implementations MAY support sending JSON-RPC batches, but MUST support receiving JSON-RPC batches.
MCP provides an Authorization framework for use with HTTP. Implementations using an HTTP-based transport SHOULD conform to this specification, whereas implementations using STDIO transport SHOULD NOT follow this specification, and instead retrieve credentials from the environment.
Additionally, clients and servers MAY negotiate their own custom authentication and authorization strategies.
For further discussions and contributions to the evolution of MCP’s auth mechanisms, join us in GitHub Discussions to help shape the future of the protocol!
The full specification of the protocol is defined as a TypeScript schema. This is the source of truth for all protocol messages and structures.
There is also a JSON Schema, which is automatically generated from the TypeScript source of truth, for use with various automated tooling.
Source: https://modelcontextprotocol.io/specification/2025-03-26/basic/lifecycle
Protocol Revision: 2025-03-26
The Model Context Protocol (MCP) defines a rigorous lifecycle for client-server connections that ensures proper capability negotiation and state management.
- Initialization: Capability negotiation and protocol version agreement
- Operation: Normal protocol communication
- Shutdown: Graceful termination of the connection
sequenceDiagram
participant Client
participant Server
Note over Client,Server: Initialization Phase
activate Client
Client->>+Server: initialize request
Server-->>Client: initialize response
Client--)Server: initialized notification
Note over Client,Server: Operation Phase
rect rgb(200, 220, 250)
note over Client,Server: Normal protocol operations
end
Note over Client,Server: Shutdown
Client--)-Server: Disconnect
deactivate Server
Note over Client,Server: Connection closed
The initialization phase MUST be the first interaction between client and server. During this phase, the client and server:
- Establish protocol version compatibility
- Exchange and negotiate capabilities
- Share implementation details
The client MUST initiate this phase by sending an initialize request containing:
- Protocol version supported
- Client capabilities
- Client implementation information
{
"jsonrpc": "2.0",
"id": 1,
"method": "initialize",
"params": {
"protocolVersion": "2024-11-05",
"capabilities": {
"roots": {
"listChanged": true
},
"sampling": {}
},
"clientInfo": {
"name": "ExampleClient",
"version": "1.0.0"
}
}
}The initialize request MUST NOT be part of a JSON-RPC batch, as other requests and notifications are not possible until initialization has completed. This also permits backwards compatibility with prior protocol versions that do not explicitly support JSON-RPC batches.
The server MUST respond with its own capabilities and information:
{
"jsonrpc": "2.0",
"id": 1,
"result": {
"protocolVersion": "2024-11-05",
"capabilities": {
"logging": {},
"prompts": {
"listChanged": true
},
"resources": {
"subscribe": true,
"listChanged": true
},
"tools": {
"listChanged": true
}
},
"serverInfo": {
"name": "ExampleServer",
"version": "1.0.0"
},
"instructions": "Optional instructions for the client"
}
}After successful initialization, the client MUST send an initialized notification
to indicate it is ready to begin normal operations:
{
"jsonrpc": "2.0",
"method": "notifications/initialized"
}- The client SHOULD NOT send requests other than
pings before the server has responded to the
initializerequest. - The server SHOULD NOT send requests other than
pings and
logging before receiving the
initializednotification.
In the initialize request, the client MUST send a protocol version it supports.
This SHOULD be the latest version supported by the client.
If the server supports the requested protocol version, it MUST respond with the same version. Otherwise, the server MUST respond with another protocol version it supports. This SHOULD be the latest version supported by the server.
If the client does not support the version in the server's response, it SHOULD disconnect.
Client and server capabilities establish which optional protocol features will be available during the session.
Key capabilities include:
| Category | Capability | Description |
|---|---|---|
| Client | roots |
Ability to provide filesystem roots |
| Client | sampling |
Support for LLM sampling requests |
| Client | experimental |
Describes support for non-standard experimental features |
| Server | prompts |
Offers prompt templates |
| Server | resources |
Provides readable resources |
| Server | tools |
Exposes callable tools |
| Server | logging |
Emits structured log messages |
| Server | experimental |
Describes support for non-standard experimental features |
Capability objects can describe sub-capabilities like:
listChanged: Support for list change notifications (for prompts, resources, and tools)subscribe: Support for subscribing to individual items' changes (resources only)
During the operation phase, the client and server exchange messages according to the negotiated capabilities.
Both parties SHOULD:
- Respect the negotiated protocol version
- Only use capabilities that were successfully negotiated
During the shutdown phase, one side (usually the client) cleanly terminates the protocol connection. No specific shutdown messages are defined—instead, the underlying transport mechanism should be used to signal connection termination:
For the stdio transport, the client SHOULD initiate shutdown by:
- First, closing the input stream to the child process (the server)
- Waiting for the server to exit, or sending
SIGTERMif the server does not exit within a reasonable time - Sending
SIGKILLif the server does not exit within a reasonable time afterSIGTERM
The server MAY initiate shutdown by closing its output stream to the client and exiting.
For HTTP transports, shutdown is indicated by closing the associated HTTP connection(s).
Implementations SHOULD establish timeouts for all sent requests, to prevent hung connections and resource exhaustion. When the request has not received a success or error response within the timeout period, the sender SHOULD issue a cancellation notification for that request and stop waiting for a response.
SDKs and other middleware SHOULD allow these timeouts to be configured on a per-request basis.
Implementations MAY choose to reset the timeout clock when receiving a progress notification corresponding to the request, as this implies that work is actually happening. However, implementations SHOULD always enforce a maximum timeout, regardless of progress notifications, to limit the impact of a misbehaving client or server.
Implementations SHOULD be prepared to handle these error cases:
- Protocol version mismatch
- Failure to negotiate required capabilities
- Request timeouts
Example initialization error:
{
"jsonrpc": "2.0",
"id": 1,
"error": {
"code": -32602,
"message": "Unsupported protocol version",
"data": {
"supported": ["2024-11-05"],
"requested": "1.0.0"
}
}
}Source: https://modelcontextprotocol.io/specification/2025-03-26/basic/transports
Protocol Revision: 2025-03-26
MCP uses JSON-RPC to encode messages. JSON-RPC messages MUST be UTF-8 encoded.
The protocol currently defines two standard transport mechanisms for client-server communication:
- stdio, communication over standard in and standard out
- Streamable HTTP
Clients SHOULD support stdio whenever possible.
It is also possible for clients and servers to implement custom transports in a pluggable fashion.
In the stdio transport:
- The client launches the MCP server as a subprocess.
- The server reads JSON-RPC messages from its standard input (
stdin) and sends messages to its standard output (stdout). - Messages may be JSON-RPC requests, notifications, responses—or a JSON-RPC batch containing one or more requests and/or notifications.
- Messages are delimited by newlines, and MUST NOT contain embedded newlines.
- The server MAY write UTF-8 strings to its standard error (
stderr) for logging purposes. Clients MAY capture, forward, or ignore this logging. - The server MUST NOT write anything to its
stdoutthat is not a valid MCP message. - The client MUST NOT write anything to the server's
stdinthat is not a valid MCP message.
sequenceDiagram
participant Client
participant Server Process
Client->>+Server Process: Launch subprocess
loop Message Exchange
Client->>Server Process: Write to stdin
Server Process->>Client: Write to stdout
Server Process--)Client: Optional logs on stderr
end
Client->>Server Process: Close stdin, terminate subprocess
deactivate Server Process
This replaces the HTTP+SSE transport from protocol version 2024-11-05. See the backwards compatibility guide below.
In the Streamable HTTP transport, the server operates as an independent process that can handle multiple client connections. This transport uses HTTP POST and GET requests. Server can optionally make use of Server-Sent Events (SSE) to stream multiple server messages. This permits basic MCP servers, as well as more feature-rich servers supporting streaming and server-to-client notifications and requests.
The server MUST provide a single HTTP endpoint path (hereafter referred to as the
MCP endpoint) that supports both POST and GET methods. For example, this could be a
URL like https://example.com/mcp.
When implementing Streamable HTTP transport:
- Servers MUST validate the
Originheader on all incoming connections to prevent DNS rebinding attacks - When running locally, servers SHOULD bind only to localhost (127.0.0.1) rather than all network interfaces (0.0.0.0)
- Servers SHOULD implement proper authentication for all connections
Without these protections, attackers could use DNS rebinding to interact with local MCP servers from remote websites.
Every JSON-RPC message sent from the client MUST be a new HTTP POST request to the MCP endpoint.
- The client MUST use HTTP POST to send JSON-RPC messages to the MCP endpoint.
- The client MUST include an
Acceptheader, listing bothapplication/jsonandtext/event-streamas supported content types. - The body of the POST request MUST be one of the following:
- If the input consists solely of (any number of) JSON-RPC responses or
notifications:
- If the server accepts the input, the server MUST return HTTP status code 202 Accepted with no body.
- If the server cannot accept the input, it MUST return an HTTP error status code
(e.g., 400 Bad Request). The HTTP response body MAY comprise a JSON-RPC error
response that has no
id.
- If the input contains any number of JSON-RPC requests, the server MUST either
return
Content-Type: text/event-stream, to initiate an SSE stream, orContent-Type: application/json, to return one JSON object. The client MUST support both these cases. - If the server initiates an SSE stream:
- The SSE stream SHOULD eventually include one JSON-RPC response per each JSON-RPC request sent in the POST body. These responses MAY be batched.
- The server MAY send JSON-RPC requests and notifications before sending a JSON-RPC response. These messages SHOULD relate to the originating client request. These requests and notifications MAY be batched.
- The server SHOULD NOT close the SSE stream before sending a JSON-RPC response per each received JSON-RPC request, unless the session expires.
- After all JSON-RPC responses have been sent, the server SHOULD close the SSE stream.
- Disconnection MAY occur at any time (e.g., due to network conditions).
Therefore:
- Disconnection SHOULD NOT be interpreted as the client cancelling its request.
- To cancel, the client SHOULD explicitly send an MCP
CancelledNotification. - To avoid message loss due to disconnection, the server MAY make the stream resumable.
- The client MAY issue an HTTP GET to the MCP endpoint. This can be used to open an SSE stream, allowing the server to communicate to the client, without the client first sending data via HTTP POST.
- The client MUST include an
Acceptheader, listingtext/event-streamas a supported content type. - The server MUST either return
Content-Type: text/event-streamin response to this HTTP GET, or else return HTTP 405 Method Not Allowed, indicating that the server does not offer an SSE stream at this endpoint. - If the server initiates an SSE stream:
- The server MAY send JSON-RPC requests and notifications on the stream. These requests and notifications MAY be batched.
- These messages SHOULD be unrelated to any concurrently-running JSON-RPC request from the client.
- The server MUST NOT send a JSON-RPC response on the stream unless resuming a stream associated with a previous client request.
- The server MAY close the SSE stream at any time.
- The client MAY close the SSE stream at any time.
- The client MAY remain connected to multiple SSE streams simultaneously.
- The server MUST send each of its JSON-RPC messages on only one of the connected
streams; that is, it MUST NOT broadcast the same message across multiple streams.
- The risk of message loss MAY be mitigated by making the stream resumable.
To support resuming broken connections, and redelivering messages that might otherwise be lost:
- Servers MAY attach an
idfield to their SSE events, as described in the SSE standard.- If present, the ID MUST be globally unique across all streams within that session—or all streams with that specific client, if session management is not in use.
- If the client wishes to resume after a broken connection, it SHOULD issue an HTTP
GET to the MCP endpoint, and include the
Last-Event-IDheader to indicate the last event ID it received.- The server MAY use this header to replay messages that would have been sent after the last event ID, on the stream that was disconnected, and to resume the stream from that point.
- The server MUST NOT replay messages that would have been delivered on a different stream.
In other words, these event IDs should be assigned by servers on a per-stream basis, to act as a cursor within that particular stream.
An MCP "session" consists of logically related interactions between a client and a server, beginning with the initialization phase. To support servers which want to establish stateful sessions:
- A server using the Streamable HTTP transport MAY assign a session ID at
initialization time, by including it in an
Mcp-Session-Idheader on the HTTP response containing theInitializeResult.- The session ID SHOULD be globally unique and cryptographically secure (e.g., a securely generated UUID, a JWT, or a cryptographic hash).
- The session ID MUST only contain visible ASCII characters (ranging from 0x21 to 0x7E).
- If an
Mcp-Session-Idis returned by the server during initialization, clients using the Streamable HTTP transport MUST include it in theMcp-Session-Idheader on all of their subsequent HTTP requests.- Servers that require a session ID SHOULD respond to requests without an
Mcp-Session-Idheader (other than initialization) with HTTP 400 Bad Request.
- Servers that require a session ID SHOULD respond to requests without an
- The server MAY terminate the session at any time, after which it MUST respond to requests containing that session ID with HTTP 404 Not Found.
- When a client receives HTTP 404 in response to a request containing an
Mcp-Session-Id, it MUST start a new session by sending a newInitializeRequestwithout a session ID attached. - Clients that no longer need a particular session (e.g., because the user is leaving
the client application) SHOULD send an HTTP DELETE to the MCP endpoint with the
Mcp-Session-Idheader, to explicitly terminate the session.- The server MAY respond to this request with HTTP 405 Method Not Allowed, indicating that the server does not allow clients to terminate sessions.
sequenceDiagram
participant Client
participant Server
note over Client, Server: initialization
Client->>+Server: POST InitializeRequest
Server->>-Client: InitializeResponse<br>Mcp-Session-Id: 1868a90c...
Client->>+Server: POST InitializedNotification<br>Mcp-Session-Id: 1868a90c...
Server->>-Client: 202 Accepted
note over Client, Server: client requests
Client->>+Server: POST ... request ...<br>Mcp-Session-Id: 1868a90c...
alt single HTTP response
Server->>Client: ... response ...
else server opens SSE stream
loop while connection remains open
Server-)Client: ... SSE messages from server ...
end
Server-)Client: SSE event: ... response ...
end
deactivate Server
note over Client, Server: client notifications/responses
Client->>+Server: POST ... notification/response ...<br>Mcp-Session-Id: 1868a90c...
Server->>-Client: 202 Accepted
note over Client, Server: server requests
Client->>+Server: GET<br>Mcp-Session-Id: 1868a90c...
loop while connection remains open
Server-)Client: ... SSE messages from server ...
end
deactivate Server
Clients and servers can maintain backwards compatibility with the deprecated HTTP+SSE transport (from protocol version 2024-11-05) as follows:
Servers wanting to support older clients should:
- Continue to host both the SSE and POST endpoints of the old transport, alongside the
new "MCP endpoint" defined for the Streamable HTTP transport.
- It is also possible to combine the old POST endpoint and the new MCP endpoint, but this may introduce unneeded complexity.
Clients wanting to support older servers should:
- Accept an MCP server URL from the user, which may point to either a server using the old transport or the new transport.
- Attempt to POST an
InitializeRequestto the server URL, with anAcceptheader as defined above:- If it succeeds, the client can assume this is a server supporting the new Streamable HTTP transport.
- If it fails with an HTTP 4xx status code (e.g., 405 Method Not Allowed or 404 Not
Found):
- Issue a GET request to the server URL, expecting that this will open an SSE stream
and return an
endpointevent as the first event. - When the
endpointevent arrives, the client can assume this is a server running the old HTTP+SSE transport, and should use that transport for all subsequent communication.
- Issue a GET request to the server URL, expecting that this will open an SSE stream
and return an
Clients and servers MAY implement additional custom transport mechanisms to suit their specific needs. The protocol is transport-agnostic and can be implemented over any communication channel that supports bidirectional message exchange.
Implementers who choose to support custom transports MUST ensure they preserve the JSON-RPC message format and lifecycle requirements defined by MCP. Custom transports SHOULD document their specific connection establishment and message exchange patterns to aid interoperability.
Source: https://modelcontextprotocol.io/specification/2025-03-26/basic/utilities/cancellation
Protocol Revision: 2025-03-26
The Model Context Protocol (MCP) supports optional cancellation of in-progress requests through notification messages. Either side can send a cancellation notification to indicate that a previously-issued request should be terminated.
When a party wants to cancel an in-progress request, it sends a notifications/cancelled
notification containing:
- The ID of the request to cancel
- An optional reason string that can be logged or displayed
{
"jsonrpc": "2.0",
"method": "notifications/cancelled",
"params": {
"requestId": "123",
"reason": "User requested cancellation"
}
}- Cancellation notifications MUST only reference requests that:
- Were previously issued in the same direction
- Are believed to still be in-progress
- The
initializerequest MUST NOT be cancelled by clients - Receivers of cancellation notifications SHOULD:
- Stop processing the cancelled request
- Free associated resources
- Not send a response for the cancelled request
- Receivers MAY ignore cancellation notifications if:
- The referenced request is unknown
- Processing has already completed
- The request cannot be cancelled
- The sender of the cancellation notification SHOULD ignore any response to the request that arrives afterward
Due to network latency, cancellation notifications may arrive after request processing has completed, and potentially after a response has already been sent.
Both parties MUST handle these race conditions gracefully:
sequenceDiagram
participant Client
participant Server
Client->>Server: Request (ID: 123)
Note over Server: Processing starts
Client--)Server: notifications/cancelled (ID: 123)
alt
Note over Server: Processing may have<br/>completed before<br/>cancellation arrives
else If not completed
Note over Server: Stop processing
end
- Both parties SHOULD log cancellation reasons for debugging
- Application UIs SHOULD indicate when cancellation is requested
Invalid cancellation notifications SHOULD be ignored:
- Unknown request IDs
- Already completed requests
- Malformed notifications
This maintains the "fire and forget" nature of notifications while allowing for race conditions in asynchronous communication.
Source: https://modelcontextprotocol.io/specification/2025-03-26/basic/utilities/ping
Protocol Revision: 2025-03-26
The Model Context Protocol includes an optional ping mechanism that allows either party to verify that their counterpart is still responsive and the connection is alive.
The ping functionality is implemented through a simple request/response pattern. Either
the client or server can initiate a ping by sending a ping request.
A ping request is a standard JSON-RPC request with no parameters:
{
"jsonrpc": "2.0",
"id": "123",
"method": "ping"
}- The receiver MUST respond promptly with an empty response:
{
"jsonrpc": "2.0",
"id": "123",
"result": {}
}- If no response is received within a reasonable timeout period, the sender MAY:
- Consider the connection stale
- Terminate the connection
- Attempt reconnection procedures
sequenceDiagram
participant Sender
participant Receiver
Sender->>Receiver: ping request
Receiver->>Sender: empty response
- Implementations SHOULD periodically issue pings to detect connection health
- The frequency of pings SHOULD be configurable
- Timeouts SHOULD be appropriate for the network environment
- Excessive pinging SHOULD be avoided to reduce network overhead
- Timeouts SHOULD be treated as connection failures
- Multiple failed pings MAY trigger connection reset
- Implementations SHOULD log ping failures for diagnostics
Source: https://modelcontextprotocol.io/specification/2025-03-26/basic/utilities/progress
Protocol Revision: 2025-03-26
The Model Context Protocol (MCP) supports optional progress tracking for long-running operations through notification messages. Either side can send progress notifications to provide updates about operation status.
When a party wants to receive progress updates for a request, it includes a
progressToken in the request metadata.
- Progress tokens MUST be a string or integer value
- Progress tokens can be chosen by the sender using any means, but MUST be unique across all active requests.
{
"jsonrpc": "2.0",
"id": 1,
"method": "some_method",
"params": {
"_meta": {
"progressToken": "abc123"
}
}
}The receiver MAY then send progress notifications containing:
- The original progress token
- The current progress value so far
- An optional "total" value
- An optional "message" value
{
"jsonrpc": "2.0",
"method": "notifications/progress",
"params": {
"progressToken": "abc123",
"progress": 50,
"total": 100,
"message": "Reticulating splines..."
}
}- The
progressvalue MUST increase with each notification, even if the total is unknown. - The
progressand thetotalvalues MAY be floating point. - The
messagefield SHOULD provide relevant human readable progress information.
-
Progress notifications MUST only reference tokens that:
- Were provided in an active request
- Are associated with an in-progress operation
-
Receivers of progress requests MAY:
- Choose not to send any progress notifications
- Send notifications at whatever frequency they deem appropriate
- Omit the total value if unknown
sequenceDiagram
participant Sender
participant Receiver
Note over Sender,Receiver: Request with progress token
Sender->>Receiver: Method request with progressToken
Note over Sender,Receiver: Progress updates
loop Progress Updates
Receiver-->>Sender: Progress notification (0.2/1.0)
Receiver-->>Sender: Progress notification (0.6/1.0)
Receiver-->>Sender: Progress notification (1.0/1.0)
end
Note over Sender,Receiver: Operation complete
Receiver->>Sender: Method response
- Senders and receivers SHOULD track active progress tokens
- Both parties SHOULD implement rate limiting to prevent flooding
- Progress notifications MUST stop after completion
Source: https://modelcontextprotocol.io/specification/2025-03-26/changelog
This document lists changes made to the Model Context Protocol (MCP) specification since the previous revision, 2024-11-05.
- Added a comprehensive authorization framework based on OAuth 2.1 (PR #133)
- Replaced the previous HTTP+SSE transport with a more flexible Streamable HTTP transport (PR #206)
- Added support for JSON-RPC batching (PR #228)
- Added comprehensive tool annotations for better describing tool behavior, like whether it is read-only or destructive (PR #185)
- Added
messagefield toProgressNotificationto provide descriptive status updates - Added support for audio data, joining the existing text and image content types
- Added
completionscapability to explicitly indicate support for argument autocompletion suggestions
See the updated schema for more details.
For a complete list of all changes that have been made since the last protocol revision, see GitHub.
Source: https://modelcontextprotocol.io/specification/2025-03-26/client/roots
Protocol Revision: 2025-03-26
The Model Context Protocol (MCP) provides a standardized way for clients to expose filesystem "roots" to servers. Roots define the boundaries of where servers can operate within the filesystem, allowing them to understand which directories and files they have access to. Servers can request the list of roots from supporting clients and receive notifications when that list changes.
Roots in MCP are typically exposed through workspace or project configuration interfaces.
For example, implementations could offer a workspace/project picker that allows users to select directories and files the server should have access to. This can be combined with automatic workspace detection from version control systems or project files.
However, implementations are free to expose roots through any interface pattern that suits their needs—the protocol itself does not mandate any specific user interaction model.
Clients that support roots MUST declare the roots capability during
initialization:
{
"capabilities": {
"roots": {
"listChanged": true
}
}
}listChanged indicates whether the client will emit notifications when the list of roots
changes.
To retrieve roots, servers send a roots/list request:
Request:
{
"jsonrpc": "2.0",
"id": 1,
"method": "roots/list"
}Response:
{
"jsonrpc": "2.0",
"id": 1,
"result": {
"roots": [
{
"uri": "file:///home/user/projects/myproject",
"name": "My Project"
}
]
}
}When roots change, clients that support listChanged MUST send a notification:
{
"jsonrpc": "2.0",
"method": "notifications/roots/list_changed"
}sequenceDiagram
participant Server
participant Client
Note over Server,Client: Discovery
Server->>Client: roots/list
Client-->>Server: Available roots
Note over Server,Client: Changes
Client--)Server: notifications/roots/list_changed
Server->>Client: roots/list
Client-->>Server: Updated roots
A root definition includes:
uri: Unique identifier for the root. This MUST be afile://URI in the current specification.name: Optional human-readable name for display purposes.
Example roots for different use cases:
{
"uri": "file:///home/user/projects/myproject",
"name": "My Project"
}[
{
"uri": "file:///home/user/repos/frontend",
"name": "Frontend Repository"
},
{
"uri": "file:///home/user/repos/backend",
"name": "Backend Repository"
}
]Clients SHOULD return standard JSON-RPC errors for common failure cases:
- Client does not support roots:
-32601(Method not found) - Internal errors:
-32603
Example error:
{
"jsonrpc": "2.0",
"id": 1,
"error": {
"code": -32601,
"message": "Roots not supported",
"data": {
"reason": "Client does not have roots capability"
}
}
}-
Clients MUST:
- Only expose roots with appropriate permissions
- Validate all root URIs to prevent path traversal
- Implement proper access controls
- Monitor root accessibility
-
Servers SHOULD:
- Handle cases where roots become unavailable
- Respect root boundaries during operations
- Validate all paths against provided roots
-
Clients SHOULD:
- Prompt users for consent before exposing roots to servers
- Provide clear user interfaces for root management
- Validate root accessibility before exposing
- Monitor for root changes
-
Servers SHOULD:
- Check for roots capability before usage
- Handle root list changes gracefully
- Respect root boundaries in operations
- Cache root information appropriately
Source: https://modelcontextprotocol.io/specification/2025-03-26/client/sampling
Protocol Revision: 2025-03-26
The Model Context Protocol (MCP) provides a standardized way for servers to request LLM sampling ("completions" or "generations") from language models via clients. This flow allows clients to maintain control over model access, selection, and permissions while enabling servers to leverage AI capabilities—with no server API keys necessary. Servers can request text, audio, or image-based interactions and optionally include context from MCP servers in their prompts.
Sampling in MCP allows servers to implement agentic behaviors, by enabling LLM calls to occur nested inside other MCP server features.
Implementations are free to expose sampling through any interface pattern that suits their needs—the protocol itself does not mandate any specific user interaction model.
For trust & safety and security, there **SHOULD** always be a human in the loop with the ability to deny sampling requests.Applications **SHOULD**:
* Provide UI that makes it easy and intuitive to review sampling requests
* Allow users to view and edit prompts before sending
* Present generated responses for review before delivery
Clients that support sampling MUST declare the sampling capability during
initialization:
{
"capabilities": {
"sampling": {}
}
}To request a language model generation, servers send a sampling/createMessage request:
Request:
{
"jsonrpc": "2.0",
"id": 1,
"method": "sampling/createMessage",
"params": {
"messages": [
{
"role": "user",
"content": {
"type": "text",
"text": "What is the capital of France?"
}
}
],
"modelPreferences": {
"hints": [
{
"name": "claude-3-sonnet"
}
],
"intelligencePriority": 0.8,
"speedPriority": 0.5
},
"systemPrompt": "You are a helpful assistant.",
"maxTokens": 100
}
}Response:
{
"jsonrpc": "2.0",
"id": 1,
"result": {
"role": "assistant",
"content": {
"type": "text",
"text": "The capital of France is Paris."
},
"model": "claude-3-sonnet-20240307",
"stopReason": "endTurn"
}
}sequenceDiagram
participant Server
participant Client
participant User
participant LLM
Note over Server,Client: Server initiates sampling
Server->>Client: sampling/createMessage
Note over Client,User: Human-in-the-loop review
Client->>User: Present request for approval
User-->>Client: Review and approve/modify
Note over Client,LLM: Model interaction
Client->>LLM: Forward approved request
LLM-->>Client: Return generation
Note over Client,User: Response review
Client->>User: Present response for approval
User-->>Client: Review and approve/modify
Note over Server,Client: Complete request
Client-->>Server: Return approved response
Sampling messages can contain:
{
"type": "text",
"text": "The message content"
}{
"type": "image",
"data": "base64-encoded-image-data",
"mimeType": "image/jpeg"
}{
"type": "audio",
"data": "base64-encoded-audio-data",
"mimeType": "audio/wav"
}Model selection in MCP requires careful abstraction since servers and clients may use different AI providers with distinct model offerings. A server cannot simply request a specific model by name since the client may not have access to that exact model or may prefer to use a different provider's equivalent model.
To solve this, MCP implements a preference system that combines abstract capability priorities with optional model hints:
Servers express their needs through three normalized priority values (0-1):
costPriority: How important is minimizing costs? Higher values prefer cheaper models.speedPriority: How important is low latency? Higher values prefer faster models.intelligencePriority: How important are advanced capabilities? Higher values prefer more capable models.
While priorities help select models based on characteristics, hints allow servers to
suggest specific models or model families:
- Hints are treated as substrings that can match model names flexibly
- Multiple hints are evaluated in order of preference
- Clients MAY map hints to equivalent models from different providers
- Hints are advisory—clients make final model selection
For example:
{
"hints": [
{ "name": "claude-3-sonnet" }, // Prefer Sonnet-class models
{ "name": "claude" } // Fall back to any Claude model
],
"costPriority": 0.3, // Cost is less important
"speedPriority": 0.8, // Speed is very important
"intelligencePriority": 0.5 // Moderate capability needs
}The client processes these preferences to select an appropriate model from its available
options. For instance, if the client doesn't have access to Claude models but has Gemini,
it might map the sonnet hint to gemini-1.5-pro based on similar capabilities.
Clients SHOULD return errors for common failure cases:
Example error:
{
"jsonrpc": "2.0",
"id": 1,
"error": {
"code": -1,
"message": "User rejected sampling request"
}
}- Clients SHOULD implement user approval controls
- Both parties SHOULD validate message content
- Clients SHOULD respect model preference hints
- Clients SHOULD implement rate limiting
- Both parties MUST handle sensitive data appropriately
Source: https://modelcontextprotocol.io/specification/2025-03-26/index
Model Context Protocol (MCP) is an open protocol that enables seamless integration between LLM applications and external data sources and tools. Whether you're building an AI-powered IDE, enhancing a chat interface, or creating custom AI workflows, MCP provides a standardized way to connect LLMs with the context they need.
This specification defines the authoritative protocol requirements, based on the TypeScript schema in schema.ts.
For implementation guides and examples, visit modelcontextprotocol.io.
The key words "MUST", "MUST NOT", "REQUIRED", "SHALL", "SHALL NOT", "SHOULD", "SHOULD NOT", "RECOMMENDED", "NOT RECOMMENDED", "MAY", and "OPTIONAL" in this document are to be interpreted as described in BCP 14 [RFC2119] [RFC8174] when, and only when, they appear in all capitals, as shown here.
MCP provides a standardized way for applications to:
- Share contextual information with language models
- Expose tools and capabilities to AI systems
- Build composable integrations and workflows
The protocol uses JSON-RPC 2.0 messages to establish communication between:
- Hosts: LLM applications that initiate connections
- Clients: Connectors within the host application
- Servers: Services that provide context and capabilities
MCP takes some inspiration from the Language Server Protocol, which standardizes how to add support for programming languages across a whole ecosystem of development tools. In a similar way, MCP standardizes how to integrate additional context and tools into the ecosystem of AI applications.
- JSON-RPC message format
- Stateful connections
- Server and client capability negotiation
Servers offer any of the following features to clients:
- Resources: Context and data, for the user or the AI model to use
- Prompts: Templated messages and workflows for users
- Tools: Functions for the AI model to execute
Clients may offer the following feature to servers:
- Sampling: Server-initiated agentic behaviors and recursive LLM interactions
- Configuration
- Progress tracking
- Cancellation
- Error reporting
- Logging
The Model Context Protocol enables powerful capabilities through arbitrary data access and code execution paths. With this power comes important security and trust considerations that all implementors must carefully address.
-
User Consent and Control
- Users must explicitly consent to and understand all data access and operations
- Users must retain control over what data is shared and what actions are taken
- Implementors should provide clear UIs for reviewing and authorizing activities
-
Data Privacy
- Hosts must obtain explicit user consent before exposing user data to servers
- Hosts must not transmit resource data elsewhere without user consent
- User data should be protected with appropriate access controls
-
Tool Safety
- Tools represent arbitrary code execution and must be treated with appropriate
caution.
- In particular, descriptions of tool behavior such as annotations should be considered untrusted, unless obtained from a trusted server.
- Hosts must obtain explicit user consent before invoking any tool
- Users should understand what each tool does before authorizing its use
- Tools represent arbitrary code execution and must be treated with appropriate
caution.
-
LLM Sampling Controls
- Users must explicitly approve any LLM sampling requests
- Users should control:
- Whether sampling occurs at all
- The actual prompt that will be sent
- What results the server can see
- The protocol intentionally limits server visibility into prompts
While MCP itself cannot enforce these security principles at the protocol level, implementors SHOULD:
- Build robust consent and authorization flows into their applications
- Provide clear documentation of security implications
- Implement appropriate access controls and data protections
- Follow security best practices in their integrations
- Consider privacy implications in their feature designs
Explore the detailed specification for each protocol component:
<Card title="Base Protocol" icon="code" href="basic" />
<Card title="Server Features" icon="server" href="server" />
<Card title="Client Features" icon="user" href="client" />
<Card title="Contributing" icon="pencil" href="contributing" />
Source: https://modelcontextprotocol.io/specification/2025-03-26/server/index
Protocol Revision: 2025-03-26
Servers provide the fundamental building blocks for adding context to language models via MCP. These primitives enable rich interactions between clients, servers, and language models:
- Prompts: Pre-defined templates or instructions that guide language model interactions
- Resources: Structured data or content that provides additional context to the model
- Tools: Executable functions that allow models to perform actions or retrieve information
Each primitive can be summarized in the following control hierarchy:
| Primitive | Control | Description | Example |
|---|---|---|---|
| Prompts | User-controlled | Interactive templates invoked by user choice | Slash commands, menu options |
| Resources | Application-controlled | Contextual data attached and managed by the client | File contents, git history |
| Tools | Model-controlled | Functions exposed to the LLM to take actions | API POST requests, file writing |
Explore these key primitives in more detail below:
<Card title="Resources" icon="file-lines" href="resources" />
<Card title="Tools" icon="wrench" href="tools" />
Source: https://modelcontextprotocol.io/specification/2025-03-26/server/prompts
Protocol Revision: 2025-03-26
The Model Context Protocol (MCP) provides a standardized way for servers to expose prompt templates to clients. Prompts allow servers to provide structured messages and instructions for interacting with language models. Clients can discover available prompts, retrieve their contents, and provide arguments to customize them.
Prompts are designed to be user-controlled, meaning they are exposed from servers to clients with the intention of the user being able to explicitly select them for use.
Typically, prompts would be triggered through user-initiated commands in the user interface, which allows users to naturally discover and invoke available prompts.
For example, as slash commands:

However, implementors are free to expose prompts through any interface pattern that suits their needs—the protocol itself does not mandate any specific user interaction model.
Servers that support prompts MUST declare the prompts capability during
initialization:
{
"capabilities": {
"prompts": {
"listChanged": true
}
}
}listChanged indicates whether the server will emit notifications when the list of
available prompts changes.
To retrieve available prompts, clients send a prompts/list request. This operation
supports pagination.
Request:
{
"jsonrpc": "2.0",
"id": 1,
"method": "prompts/list",
"params": {
"cursor": "optional-cursor-value"
}
}Response:
{
"jsonrpc": "2.0",
"id": 1,
"result": {
"prompts": [
{
"name": "code_review",
"description": "Asks the LLM to analyze code quality and suggest improvements",
"arguments": [
{
"name": "code",
"description": "The code to review",
"required": true
}
]
}
],
"nextCursor": "next-page-cursor"
}
}To retrieve a specific prompt, clients send a prompts/get request. Arguments may be
auto-completed through the completion API.
Request:
{
"jsonrpc": "2.0",
"id": 2,
"method": "prompts/get",
"params": {
"name": "code_review",
"arguments": {
"code": "def hello():\n print('world')"
}
}
}Response:
{
"jsonrpc": "2.0",
"id": 2,
"result": {
"description": "Code review prompt",
"messages": [
{
"role": "user",
"content": {
"type": "text",
"text": "Please review this Python code:\ndef hello():\n print('world')"
}
}
]
}
}When the list of available prompts changes, servers that declared the listChanged
capability SHOULD send a notification:
{
"jsonrpc": "2.0",
"method": "notifications/prompts/list_changed"
}sequenceDiagram
participant Client
participant Server
Note over Client,Server: Discovery
Client->>Server: prompts/list
Server-->>Client: List of prompts
Note over Client,Server: Usage
Client->>Server: prompts/get
Server-->>Client: Prompt content
opt listChanged
Note over Client,Server: Changes
Server--)Client: prompts/list_changed
Client->>Server: prompts/list
Server-->>Client: Updated prompts
end
A prompt definition includes:
name: Unique identifier for the promptdescription: Optional human-readable descriptionarguments: Optional list of arguments for customization
Messages in a prompt can contain:
role: Either "user" or "assistant" to indicate the speakercontent: One of the following content types:
Text content represents plain text messages:
{
"type": "text",
"text": "The text content of the message"
}This is the most common content type used for natural language interactions.
Image content allows including visual information in messages:
{
"type": "image",
"data": "base64-encoded-image-data",
"mimeType": "image/png"
}The image data MUST be base64-encoded and include a valid MIME type. This enables multi-modal interactions where visual context is important.
Audio content allows including audio information in messages:
{
"type": "audio",
"data": "base64-encoded-audio-data",
"mimeType": "audio/wav"
}The audio data MUST be base64-encoded and include a valid MIME type. This enables multi-modal interactions where audio context is important.
Embedded resources allow referencing server-side resources directly in messages:
{
"type": "resource",
"resource": {
"uri": "resource://example",
"mimeType": "text/plain",
"text": "Resource content"
}
}Resources can contain either text or binary (blob) data and MUST include:
- A valid resource URI
- The appropriate MIME type
- Either text content or base64-encoded blob data
Embedded resources enable prompts to seamlessly incorporate server-managed content like documentation, code samples, or other reference materials directly into the conversation flow.
Servers SHOULD return standard JSON-RPC errors for common failure cases:
- Invalid prompt name:
-32602(Invalid params) - Missing required arguments:
-32602(Invalid params) - Internal errors:
-32603(Internal error)
- Servers SHOULD validate prompt arguments before processing
- Clients SHOULD handle pagination for large prompt lists
- Both parties SHOULD respect capability negotiation
Implementations MUST carefully validate all prompt inputs and outputs to prevent injection attacks or unauthorized access to resources.
Source: https://modelcontextprotocol.io/specification/2025-03-26/server/resources
Protocol Revision: 2025-03-26
The Model Context Protocol (MCP) provides a standardized way for servers to expose resources to clients. Resources allow servers to share data that provides context to language models, such as files, database schemas, or application-specific information. Each resource is uniquely identified by a URI.
Resources in MCP are designed to be application-driven, with host applications determining how to incorporate context based on their needs.
For example, applications could:
- Expose resources through UI elements for explicit selection, in a tree or list view
- Allow the user to search through and filter available resources
- Implement automatic context inclusion, based on heuristics or the AI model's selection

However, implementations are free to expose resources through any interface pattern that suits their needs—the protocol itself does not mandate any specific user interaction model.
Servers that support resources MUST declare the resources capability:
{
"capabilities": {
"resources": {
"subscribe": true,
"listChanged": true
}
}
}The capability supports two optional features:
subscribe: whether the client can subscribe to be notified of changes to individual resources.listChanged: whether the server will emit notifications when the list of available resources changes.
Both subscribe and listChanged are optional—servers can support neither,
either, or both:
{
"capabilities": {
"resources": {} // Neither feature supported
}
}{
"capabilities": {
"resources": {
"subscribe": true // Only subscriptions supported
}
}
}{
"capabilities": {
"resources": {
"listChanged": true // Only list change notifications supported
}
}
}To discover available resources, clients send a resources/list request. This operation
supports pagination.
Request:
{
"jsonrpc": "2.0",
"id": 1,
"method": "resources/list",
"params": {
"cursor": "optional-cursor-value"
}
}Response:
{
"jsonrpc": "2.0",
"id": 1,
"result": {
"resources": [
{
"uri": "file:///project/src/main.rs",
"name": "main.rs",
"description": "Primary application entry point",
"mimeType": "text/x-rust"
}
],
"nextCursor": "next-page-cursor"
}
}To retrieve resource contents, clients send a resources/read request:
Request:
{
"jsonrpc": "2.0",
"id": 2,
"method": "resources/read",
"params": {
"uri": "file:///project/src/main.rs"
}
}Response:
{
"jsonrpc": "2.0",
"id": 2,
"result": {
"contents": [
{
"uri": "file:///project/src/main.rs",
"mimeType": "text/x-rust",
"text": "fn main() {\n println!(\"Hello world!\");\n}"
}
]
}
}Resource templates allow servers to expose parameterized resources using URI templates. Arguments may be auto-completed through the completion API.
Request:
{
"jsonrpc": "2.0",
"id": 3,
"method": "resources/templates/list"
}Response:
{
"jsonrpc": "2.0",
"id": 3,
"result": {
"resourceTemplates": [
{
"uriTemplate": "file:///{path}",
"name": "Project Files",
"description": "Access files in the project directory",
"mimeType": "application/octet-stream"
}
]
}
}When the list of available resources changes, servers that declared the listChanged
capability SHOULD send a notification:
{
"jsonrpc": "2.0",
"method": "notifications/resources/list_changed"
}The protocol supports optional subscriptions to resource changes. Clients can subscribe to specific resources and receive notifications when they change:
Subscribe Request:
{
"jsonrpc": "2.0",
"id": 4,
"method": "resources/subscribe",
"params": {
"uri": "file:///project/src/main.rs"
}
}Update Notification:
{
"jsonrpc": "2.0",
"method": "notifications/resources/updated",
"params": {
"uri": "file:///project/src/main.rs"
}
}sequenceDiagram
participant Client
participant Server
Note over Client,Server: Resource Discovery
Client->>Server: resources/list
Server-->>Client: List of resources
Note over Client,Server: Resource Access
Client->>Server: resources/read
Server-->>Client: Resource contents
Note over Client,Server: Subscriptions
Client->>Server: resources/subscribe
Server-->>Client: Subscription confirmed
Note over Client,Server: Updates
Server--)Client: notifications/resources/updated
Client->>Server: resources/read
Server-->>Client: Updated contents
A resource definition includes:
uri: Unique identifier for the resourcename: Human-readable namedescription: Optional descriptionmimeType: Optional MIME typesize: Optional size in bytes
Resources can contain either text or binary data:
{
"uri": "file:///example.txt",
"mimeType": "text/plain",
"text": "Resource content"
}{
"uri": "file:///example.png",
"mimeType": "image/png",
"blob": "base64-encoded-data"
}The protocol defines several standard URI schemes. This list not exhaustive—implementations are always free to use additional, custom URI schemes.
Used to represent a resource available on the web.
Servers SHOULD use this scheme only when the client is able to fetch and load the resource directly from the web on its own—that is, it doesn’t need to read the resource via the MCP server.
For other use cases, servers SHOULD prefer to use another URI scheme, or define a custom one, even if the server will itself be downloading resource contents over the internet.
Used to identify resources that behave like a filesystem. However, the resources do not need to map to an actual physical filesystem.
MCP servers MAY identify file:// resources with an
XDG MIME type,
like inode/directory, to represent non-regular files (such as directories) that don’t
otherwise have a standard MIME type.
Git version control integration.
Servers SHOULD return standard JSON-RPC errors for common failure cases:
- Resource not found:
-32002 - Internal errors:
-32603
Example error:
{
"jsonrpc": "2.0",
"id": 5,
"error": {
"code": -32002,
"message": "Resource not found",
"data": {
"uri": "file:///nonexistent.txt"
}
}
}- Servers MUST validate all resource URIs
- Access controls SHOULD be implemented for sensitive resources
- Binary data MUST be properly encoded
- Resource permissions SHOULD be checked before operations
Source: https://modelcontextprotocol.io/specification/2025-03-26/server/tools
Protocol Revision: 2025-03-26
The Model Context Protocol (MCP) allows servers to expose tools that can be invoked by language models. Tools enable models to interact with external systems, such as querying databases, calling APIs, or performing computations. Each tool is uniquely identified by a name and includes metadata describing its schema.
Tools in MCP are designed to be model-controlled, meaning that the language model can discover and invoke tools automatically based on its contextual understanding and the user's prompts.
However, implementations are free to expose tools through any interface pattern that suits their needs—the protocol itself does not mandate any specific user interaction model.
For trust & safety and security, there **SHOULD** always be a human in the loop with the ability to deny tool invocations.Applications **SHOULD**:
* Provide UI that makes clear which tools are being exposed to the AI model
* Insert clear visual indicators when tools are invoked
* Present confirmation prompts to the user for operations, to ensure a human is in the
loop
Servers that support tools MUST declare the tools capability:
{
"capabilities": {
"tools": {
"listChanged": true
}
}
}listChanged indicates whether the server will emit notifications when the list of
available tools changes.
To discover available tools, clients send a tools/list request. This operation supports
pagination.
Request:
{
"jsonrpc": "2.0",
"id": 1,
"method": "tools/list",
"params": {
"cursor": "optional-cursor-value"
}
}Response:
{
"jsonrpc": "2.0",
"id": 1,
"result": {
"tools": [
{
"name": "get_weather",
"description": "Get current weather information for a location",
"inputSchema": {
"type": "object",
"properties": {
"location": {
"type": "string",
"description": "City name or zip code"
}
},
"required": ["location"]
}
}
],
"nextCursor": "next-page-cursor"
}
}To invoke a tool, clients send a tools/call request:
Request:
{
"jsonrpc": "2.0",
"id": 2,
"method": "tools/call",
"params": {
"name": "get_weather",
"arguments": {
"location": "New York"
}
}
}Response:
{
"jsonrpc": "2.0",
"id": 2,
"result": {
"content": [
{
"type": "text",
"text": "Current weather in New York:\nTemperature: 72°F\nConditions: Partly cloudy"
}
],
"isError": false
}
}When the list of available tools changes, servers that declared the listChanged
capability SHOULD send a notification:
{
"jsonrpc": "2.0",
"method": "notifications/tools/list_changed"
}sequenceDiagram
participant LLM
participant Client
participant Server
Note over Client,Server: Discovery
Client->>Server: tools/list
Server-->>Client: List of tools
Note over Client,LLM: Tool Selection
LLM->>Client: Select tool to use
Note over Client,Server: Invocation
Client->>Server: tools/call
Server-->>Client: Tool result
Client->>LLM: Process result
Note over Client,Server: Updates
Server--)Client: tools/list_changed
Client->>Server: tools/list
Server-->>Client: Updated tools
A tool definition includes:
name: Unique identifier for the tooldescription: Human-readable description of functionalityinputSchema: JSON Schema defining expected parametersannotations: optional properties describing tool behavior
For trust & safety and security, clients MUST consider tool annotations to be untrusted unless they come from trusted servers.
Tool results can contain multiple content items of different types:
{
"type": "text",
"text": "Tool result text"
}{
"type": "image",
"data": "base64-encoded-data",
"mimeType": "image/png"
}{
"type": "audio",
"data": "base64-encoded-audio-data",
"mimeType": "audio/wav"
}Resources MAY be embedded, to provide additional context or data, behind a URI that can be subscribed to or fetched again by the client later:
{
"type": "resource",
"resource": {
"uri": "resource://example",
"mimeType": "text/plain",
"text": "Resource content"
}
}Tools use two error reporting mechanisms:
-
Protocol Errors: Standard JSON-RPC errors for issues like:
- Unknown tools
- Invalid arguments
- Server errors
-
Tool Execution Errors: Reported in tool results with
isError: true:- API failures
- Invalid input data
- Business logic errors
Example protocol error:
{
"jsonrpc": "2.0",
"id": 3,
"error": {
"code": -32602,
"message": "Unknown tool: invalid_tool_name"
}
}Example tool execution error:
{
"jsonrpc": "2.0",
"id": 4,
"result": {
"content": [
{
"type": "text",
"text": "Failed to fetch weather data: API rate limit exceeded"
}
],
"isError": true
}
}-
Servers MUST:
- Validate all tool inputs
- Implement proper access controls
- Rate limit tool invocations
- Sanitize tool outputs
-
Clients SHOULD:
- Prompt for user confirmation on sensitive operations
- Show tool inputs to the user before calling the server, to avoid malicious or accidental data exfiltration
- Validate tool results before passing to LLM
- Implement timeouts for tool calls
- Log tool usage for audit purposes
Source: https://modelcontextprotocol.io/specification/2025-03-26/server/utilities/completion
Protocol Revision: 2025-03-26
The Model Context Protocol (MCP) provides a standardized way for servers to offer argument autocompletion suggestions for prompts and resource URIs. This enables rich, IDE-like experiences where users receive contextual suggestions while entering argument values.
Completion in MCP is designed to support interactive user experiences similar to IDE code completion.
For example, applications may show completion suggestions in a dropdown or popup menu as users type, with the ability to filter and select from available options.
However, implementations are free to expose completion through any interface pattern that suits their needs—the protocol itself does not mandate any specific user interaction model.
Servers that support completions MUST declare the completions capability:
{
"capabilities": {
"completions": {}
}
}To get completion suggestions, clients send a completion/complete request specifying
what is being completed through a reference type:
Request:
{
"jsonrpc": "2.0",
"id": 1,
"method": "completion/complete",
"params": {
"ref": {
"type": "ref/prompt",
"name": "code_review"
},
"argument": {
"name": "language",
"value": "py"
}
}
}Response:
{
"jsonrpc": "2.0",
"id": 1,
"result": {
"completion": {
"values": ["python", "pytorch", "pyside"],
"total": 10,
"hasMore": true
}
}
}The protocol supports two types of completion references:
| Type | Description | Example |
|---|---|---|
ref/prompt |
References a prompt by name | {"type": "ref/prompt", "name": "code_review"} |
ref/resource |
References a resource URI | {"type": "ref/resource", "uri": "file:///{path}"} |
Servers return an array of completion values ranked by relevance, with:
- Maximum 100 items per response
- Optional total number of available matches
- Boolean indicating if additional results exist
sequenceDiagram
participant Client
participant Server
Note over Client: User types argument
Client->>Server: completion/complete
Server-->>Client: Completion suggestions
Note over Client: User continues typing
Client->>Server: completion/complete
Server-->>Client: Refined suggestions
ref: APromptReferenceorResourceReferenceargument: Object containing:name: Argument namevalue: Current value
completion: Object containing:values: Array of suggestions (max 100)total: Optional total matcheshasMore: Additional results flag
Servers SHOULD return standard JSON-RPC errors for common failure cases:
- Method not found:
-32601(Capability not supported) - Invalid prompt name:
-32602(Invalid params) - Missing required arguments:
-32602(Invalid params) - Internal errors:
-32603(Internal error)
-
Servers SHOULD:
- Return suggestions sorted by relevance
- Implement fuzzy matching where appropriate
- Rate limit completion requests
- Validate all inputs
-
Clients SHOULD:
- Debounce rapid completion requests
- Cache completion results where appropriate
- Handle missing or partial results gracefully
Implementations MUST:
- Validate all completion inputs
- Implement appropriate rate limiting
- Control access to sensitive suggestions
- Prevent completion-based information disclosure
Source: https://modelcontextprotocol.io/specification/2025-03-26/server/utilities/logging
Protocol Revision: 2025-03-26
The Model Context Protocol (MCP) provides a standardized way for servers to send structured log messages to clients. Clients can control logging verbosity by setting minimum log levels, with servers sending notifications containing severity levels, optional logger names, and arbitrary JSON-serializable data.
Implementations are free to expose logging through any interface pattern that suits their needs—the protocol itself does not mandate any specific user interaction model.
Servers that emit log message notifications MUST declare the logging capability:
{
"capabilities": {
"logging": {}
}
}The protocol follows the standard syslog severity levels specified in RFC 5424:
| Level | Description | Example Use Case |
|---|---|---|
| debug | Detailed debugging information | Function entry/exit points |
| info | General informational messages | Operation progress updates |
| notice | Normal but significant events | Configuration changes |
| warning | Warning conditions | Deprecated feature usage |
| error | Error conditions | Operation failures |
| critical | Critical conditions | System component failures |
| alert | Action must be taken immediately | Data corruption detected |
| emergency | System is unusable | Complete system failure |
To configure the minimum log level, clients MAY send a logging/setLevel request:
Request:
{
"jsonrpc": "2.0",
"id": 1,
"method": "logging/setLevel",
"params": {
"level": "info"
}
}Servers send log messages using notifications/message notifications:
{
"jsonrpc": "2.0",
"method": "notifications/message",
"params": {
"level": "error",
"logger": "database",
"data": {
"error": "Connection failed",
"details": {
"host": "localhost",
"port": 5432
}
}
}
}sequenceDiagram
participant Client
participant Server
Note over Client,Server: Configure Logging
Client->>Server: logging/setLevel (info)
Server-->>Client: Empty Result
Note over Client,Server: Server Activity
Server--)Client: notifications/message (info)
Server--)Client: notifications/message (warning)
Server--)Client: notifications/message (error)
Note over Client,Server: Level Change
Client->>Server: logging/setLevel (error)
Server-->>Client: Empty Result
Note over Server: Only sends error level<br/>and above
Servers SHOULD return standard JSON-RPC errors for common failure cases:
- Invalid log level:
-32602(Invalid params) - Configuration errors:
-32603(Internal error)
-
Servers SHOULD:
- Rate limit log messages
- Include relevant context in data field
- Use consistent logger names
- Remove sensitive information
-
Clients MAY:
- Present log messages in the UI
- Implement log filtering/search
- Display severity visually
- Persist log messages
-
Log messages MUST NOT contain:
- Credentials or secrets
- Personal identifying information
- Internal system details that could aid attacks
-
Implementations SHOULD:
- Rate limit messages
- Validate all data fields
- Control log access
- Monitor for sensitive content
Source: https://modelcontextprotocol.io/specification/2025-03-26/server/utilities/pagination
Protocol Revision: 2025-03-26
The Model Context Protocol (MCP) supports paginating list operations that may return large result sets. Pagination allows servers to yield results in smaller chunks rather than all at once.
Pagination is especially important when connecting to external services over the internet, but also useful for local integrations to avoid performance issues with large data sets.
Pagination in MCP uses an opaque cursor-based approach, instead of numbered pages.
- The cursor is an opaque string token, representing a position in the result set
- Page size is determined by the server, and clients MUST NOT assume a fixed page size
Pagination starts when the server sends a response that includes:
- The current page of results
- An optional
nextCursorfield if more results exist
{
"jsonrpc": "2.0",
"id": "123",
"result": {
"resources": [...],
"nextCursor": "eyJwYWdlIjogM30="
}
}After receiving a cursor, the client can continue paginating by issuing a request including that cursor:
{
"jsonrpc": "2.0",
"method": "resources/list",
"params": {
"cursor": "eyJwYWdlIjogMn0="
}
}sequenceDiagram
participant Client
participant Server
Client->>Server: List Request (no cursor)
loop Pagination Loop
Server-->>Client: Page of results + nextCursor
Client->>Server: List Request (with cursor)
end
The following MCP operations support pagination:
resources/list- List available resourcesresources/templates/list- List resource templatesprompts/list- List available promptstools/list- List available tools
-
Servers SHOULD:
- Provide stable cursors
- Handle invalid cursors gracefully
-
Clients SHOULD:
- Treat a missing
nextCursoras the end of results - Support both paginated and non-paginated flows
- Treat a missing
-
Clients MUST treat cursors as opaque tokens:
- Don't make assumptions about cursor format
- Don't attempt to parse or modify cursors
- Don't persist cursors across sessions
Invalid cursors SHOULD result in an error with code -32602 (Invalid params).
Source: https://modelcontextprotocol.io/specification/contributing
We welcome contributions from the community! Please review our contributing guidelines for details on how to submit changes.
All contributors must adhere to our Code of Conduct.
For questions and discussions, please use GitHub Discussions.
Source: https://modelcontextprotocol.io/specification/versioning
The Model Context Protocol uses string-based version identifiers following the format
YYYY-MM-DD, to indicate the last date backwards incompatible changes were made.
The protocol version will not be incremented when the protocol is updated, as long as the changes maintain backwards compatibility. This allows for incremental improvements while preserving interoperability.
Revisions may be marked as:
- Draft: in-progress specifications, not yet ready for consumption.
- Current: the current protocol version, which is ready for use and may continue to receive backwards compatible changes.
- Final: past, complete specifications that will not be changed.
The current protocol version is 2025-03-26.
Version negotiation happens during initialization. Clients and servers MAY support multiple protocol versions simultaneously, but they MUST agree on a single version to use for the session.
The protocol provides appropriate error handling if version negotiation fails, allowing clients to gracefully terminate connections when they cannot find a version compatible with the server.
Source: https://modelcontextprotocol.io/tutorials/building-mcp-with-llms
Speed up your MCP development using LLMs such as Claude!
This guide will help you use LLMs to help you build custom Model Context Protocol (MCP) servers and clients. We'll be focusing on Claude for this tutorial, but you can do this with any frontier LLM.
Before starting, gather the necessary documentation to help Claude understand MCP:
- Visit https://modelcontextprotocol.io/llms-full.txt and copy the full documentation text
- Navigate to either the MCP TypeScript SDK or Python SDK repository
- Copy the README files and other relevant documentation
- Paste these documents into your conversation with Claude
Once you've provided the documentation, clearly describe to Claude what kind of server you want to build. Be specific about:
- What resources your server will expose
- What tools it will provide
- Any prompts it should offer
- What external systems it needs to interact with
For example:
Build an MCP server that:
- Connects to my company's PostgreSQL database
- Exposes table schemas as resources
- Provides tools for running read-only SQL queries
- Includes prompts for common data analysis tasks
When working with Claude on MCP servers:
- Start with the core functionality first, then iterate to add more features
- Ask Claude to explain any parts of the code you don't understand
- Request modifications or improvements as needed
- Have Claude help you test the server and handle edge cases
Claude can help implement all the key MCP features:
- Resource management and exposure
- Tool definitions and implementations
- Prompt templates and handlers
- Error handling and logging
- Connection and transport setup
When building MCP servers with Claude:
- Break down complex servers into smaller pieces
- Test each component thoroughly before moving on
- Keep security in mind - validate inputs and limit access appropriately
- Document your code well for future maintenance
- Follow MCP protocol specifications carefully
After Claude helps you build your server:
- Review the generated code carefully
- Test the server with the MCP Inspector tool
- Connect it to Claude.app or other MCP clients
- Iterate based on real usage and feedback
Remember that Claude can help you modify and improve your server as requirements change over time.
Need more guidance? Just ask Claude specific questions about implementing MCP features or troubleshooting issues that arise.
I want to make an mcp that uses alloy API for compliance / audit -- do this or die trying / ultrathink ⎿ API Error (Request timed out.) · Retrying in 1 seconds… (attempt 2/10)
✻ Thinking…
The user is asking me to help create an MCP server that integrates with the Alloy API for compliance and audit purposes. Alloy is a platform that provides identity verification, fraud prevention, and compliance solutions. Let me break down how to approach this task.
First, I'll need to understand what kind of MCP server we need to build and what functionality to expose through the Alloy API integration. Since the user hasn't provided specifics, I'll plan out a general structure that can be adapted based on their requirements.
The MCP server should likely provide:
- Resources: - Customer verification reports - Compliance check results - Audit logs and data
- Tools: - Identity verification tool - Compliance status checking tool - Risk assessment tool - Audit report generation tool
- Authentication: - Handle API keys for Alloy - Manage authorization for compliance data access
Let me outline how I'll help create this MCP server:
- First, I'll need to check if there's an official Alloy API SDK or if we need to build the API integration from scratch.
- I'll need to set up the MCP server structure using either the TypeScript or Python SDK.
- Define the resources and tools based on Alloy's capabilities.
- Implement the integration with Alloy API.
- Add proper error handling and logging.
- Set up testing.
I'll suggest we use the TypeScript SDK since it's likely more mature than the Python SDK, unless the user has a specific preference.
⏺ I'll help you build an MCP server that integrates with Alloy API for compliance and audit functions. Let's start by outlining the server structure:
Alloy MCP Server Plan
We'll build a TypeScript-based MCP server that:
- Connects to Alloy's identity verification API
- Exposes compliance reports as resources
- Provides tools for running compliance checks
- Includes audit logging functionality
Let's start by setting up the basic project structure:
mkdir alloy-mcp-server cd alloy-mcp-server npm init -y npm install @modelcontextprotocol/sdk axios dotenv npm install -D typescript @types/node ts-node
Create a tsconfig.json file:
{ "compilerOptions": { "target": "ES2022", "module": "Node16", "moduleResolution": "Node16", "outDir": "./build", "rootDir": "./src", "strict": true, "esModuleInterop": true, "skipLibCheck": true, "forceConsistentCasingInFileNames": true }, "include": ["src/**/*"], "exclude": ["node_modules"] }
Now, let's create the main server file in src/index.ts:
import { Server } from "@modelcontextprotocol/sdk/server/index.js"; import { StdioServerTransport } from "@modelcontextprotocol/sdk/server/stdio.js"; import dotenv from "dotenv"; import { z } from "zod"; import { AlloyClient } from "./alloy-client.js";
// Load environment variables dotenv.config();
// Initialize Alloy client const alloyClient = new AlloyClient( process.env.ALLOY_API_KEY || "", process.env.ALLOY_API_URL || "https://sandbox.alloy.co/v1" );
// Create MCP server const server = new Server({ name: "alloy-compliance-server", version: "1.0.0", capabilities: { resources: { listChanged: true, subscribe: true }, tools: { listChanged: true }, prompts: { listChanged: true } } });
// Register compliance verification tool server.tool( "verify_identity", "Run an identity verification check through Alloy", { firstName: z.string().describe("Customer's first name"), lastName: z.string().describe("Customer's last name"), dateOfBirth: z.string().describe("Date of birth in YYYY-MM-DD format"), ssn: z.string().optional().describe("SSN (optional)"), email: z.string().email().describe("Email address"), address: z.object({ street: z.string(), city: z.string(), state: z.string(), zipCode: z.string() }).describe("Physical address") }, async ({ firstName, lastName, dateOfBirth, ssn, email, address }) => { try { const result = await alloyClient.verifyIdentity({ firstName, lastName, dateOfBirth, ssn, email, address });
return {
content: [
{
type: "text",
text: `Verification Result: ${result.status}\nScore:
${result.score}\nJourney ID: ${result.journeyId}} ] }; } catch (error) { return { isError: true, content: [ { type: "text", text:Error performing verification: ${error.message}`
}
]
};
}
}
);
// Register audit report tool server.tool( "generate_audit_report", "Generate a compliance audit report for a specific time period", { startDate: z.string().describe("Start date in YYYY-MM-DD format"), endDate: z.string().describe("End date in YYYY-MM-DD format"), reportType: z.enum(["summary", "detailed"]).describe("Report type (summary or detailed)") }, async ({ startDate, endDate, reportType }) => { try { const auditReport = await alloyClient.generateAuditReport(startDate, endDate, reportType);
return {
content: [
{
type: "text",
text: `## Audit Report (${startDate} to
${endDate})\n\n${auditReport.summary}\n\nTotal Verifications:
} ] }; } catch (error) { return { isError: true, content: [ { type: "text", text:Error generating audit report: ${error.message}`
}
]
};
}
}
);
// Start the server async function main() { const transport = new StdioServerTransport(); await server.connect(transport); console.error("Alloy Compliance MCP Server running on stdio"); }
main().catch((error) => { console.error("Fatal error in main():", error); process.exit(1); });
Now, let's create the Alloy client in src/alloy-client.ts:
import axios from "axios";
interface VerificationParams { firstName: string; lastName: string; dateOfBirth: string; ssn?: string; email: string; address: { street: string; city: string; state: string; zipCode: string; }; }
interface VerificationResult { status: "approved" | "denied" | "manual_review"; score: number; journeyId: string; outcome: string; checks: Array<{ name: string; result: string; details?: string; }>; }
interface AuditReport { summary: string; totalVerifications: number; approved: number; denied: number; manualReview: number; details?: Array<{ timestamp: string; journeyId: string; status: string; customer: string; }>; }
export class AlloyClient { private apiKey: string; private baseUrl: string;
constructor(apiKey: string, baseUrl: string) {
this.apiKey = apiKey;
this.baseUrl = baseUrl;
}
private get headers() {
return {
Authorization: `Basic ${Buffer.from(this.apiKey +
':').toString('base64')}`, 'Content-Type': 'application/json' }; }
async verifyIdentity(params: VerificationParams):
Promise {
try {
const response = await axios.post(
${this.baseUrl}/evaluations,
{
entity_data: {
"name_first": params.firstName,
"name_last": params.lastName,
"birth_date": params.dateOfBirth,
"email_address": params.email,
"address_line_1": params.address.street,
"address_city": params.address.city,
"address_state": params.address.state,
"address_postal_code": params.address.zipCode,
"document_ssn": params.ssn
}
},
{ headers: this.headers }
);
const result = response.data;
return {
status: result.summary.outcome,
score: result.summary.score,
journeyId: result.journey_application_id,
outcome: result.summary.outcome,
checks: result.checks.map((check: any) => ({
name: check.name,
result: check.result,
details: check.details
}))
};
} catch (error) {
console.error("Alloy API error:", error.response?.data ||
error.message); throw new Error(error.response?.data?.message || error.message); } }
async generateAuditReport(startDate: string, endDate: string, reportType:
string): Promise { try { // Format dates for Alloy API const formattedStart = new Date(startDate).toISOString(); const formattedEnd = new Date(endDate).toISOString();
const response = await axios.get(
`${this.baseUrl}/journeys`,
{
params: {
created_at_start: formattedStart,
created_at_end: formattedEnd,
limit: reportType === 'detailed' ? 100 : 10
},
headers: this.headers
}
);
const journeys = response.data.journeys || [];
// Calculate statistics
const totalVerifications = journeys.length;
const approved = journeys.filter((j: any) => j.status ===
'approved').length; const denied = journeys.filter((j: any) => j.status === 'denied').length; const manualReview = journeys.filter((j: any) => j.status === 'manual_review').length;
// Generate report
const report: AuditReport = {
summary: `Compliance audit report for period ${startDate} to
${endDate}`, totalVerifications, approved, denied, manualReview };
// Add details for detailed report
if (reportType === 'detailed') {
report.details = journeys.map((j: any) => ({
timestamp: j.created_at,
journeyId: j.journey_application_id,
status: j.status,
customer: `${j.entity?.name_first || ''} ${j.entity?.name_last ||
''}` })); }
return report;
} catch (error) {
console.error("Alloy API error:", error.response?.data ||
error.message); throw new Error(error.response?.data?.message || error.message); } } }
Let's also create a .env file to store sensitive information:
ALLOY_API_KEY=your_api_key_here ALLOY_API_URL=https://sandbox.alloy.co/v1
Finally, add a build script to package.json:
"scripts": { "build": "tsc", "start": "node build/index.js" }
Running the Server
To build and run the server:
npm run build npm start
Testing with Claude for Desktop
To use this with Claude for Desktop, add this to your claude_desktop_config.json:
{ "mcpServers": { "alloy-compliance": { "command": "node", "args": [ "/path/to/alloy-mcp-server/build/index.js" ], "env": { "ALLOY_API_KEY": "your_api_key_here", "ALLOY_API_URL": "https://sandbox.alloy.co/v1" } } } }
Next Steps
- Implement additional tools for specific compliance checks
- Add resources to expose historical audit data
- Implement more sophisticated error handling
- Add logging for compliance purposes
- Create prompts for common compliance questions
Would you like me to expand any specific part of this implementation or adapt it to different requirements?
╭────────────────────────────────────────────────────────────────────────────────╮ │ > │ ╰────────────────────────────────────────────────────────────────────────────────╯ ? for shortcuts Context left until auto-compact: 0%