Last active
August 29, 2015 14:27
-
-
Save clamytoe/51343bfafc7eb2580acd to your computer and use it in GitHub Desktop.
HKUSTx: COMP107x Introduction to Mobile Application Development using Android
This file contains hidden or bidirectional Unicode text that may be interpreted or compiled differently than what appears below. To review, open the file in an editor that reveals hidden Unicode characters.
Learn more about bidirectional Unicode characters
| { | |
| "cells": [ | |
| { | |
| "cell_type": "markdown", | |
| "metadata": {}, | |
| "source": [ | |
| "# App Development Process\n", | |
| "---\n", | |
| "## Create an Android Virtual Device (AVD)\n", | |
| "\n", | |
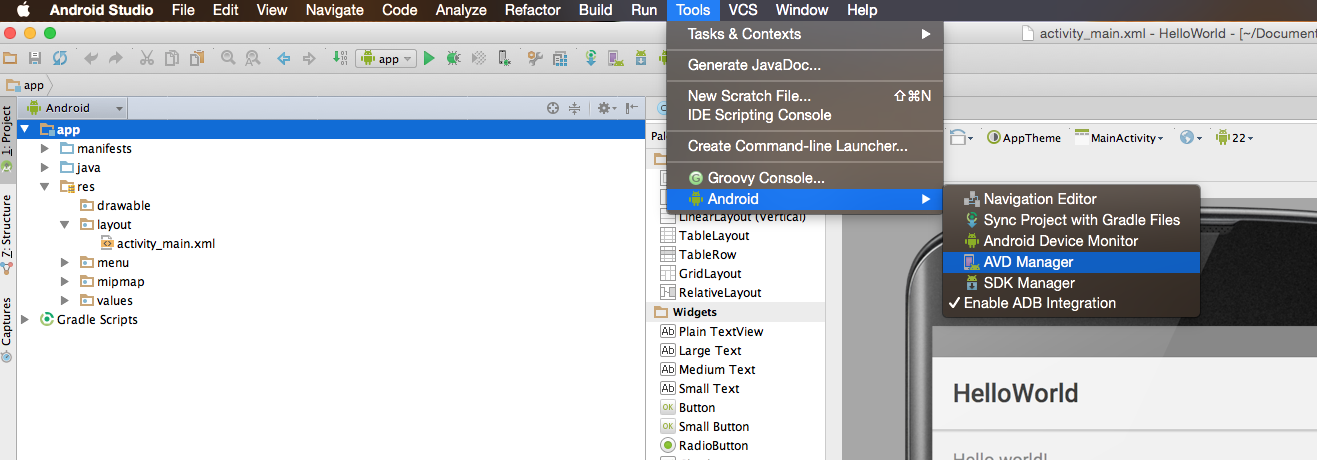
| "1. In Android Studio, select **Tools->Android -> AVD Manager**, or click on the \"**AVD Manager**\" **icon on the toolbar**.\n", | |
| "\n", | |
| " \n", | |
| " \n", | |
| " <br/>\n", | |
| " \n", | |
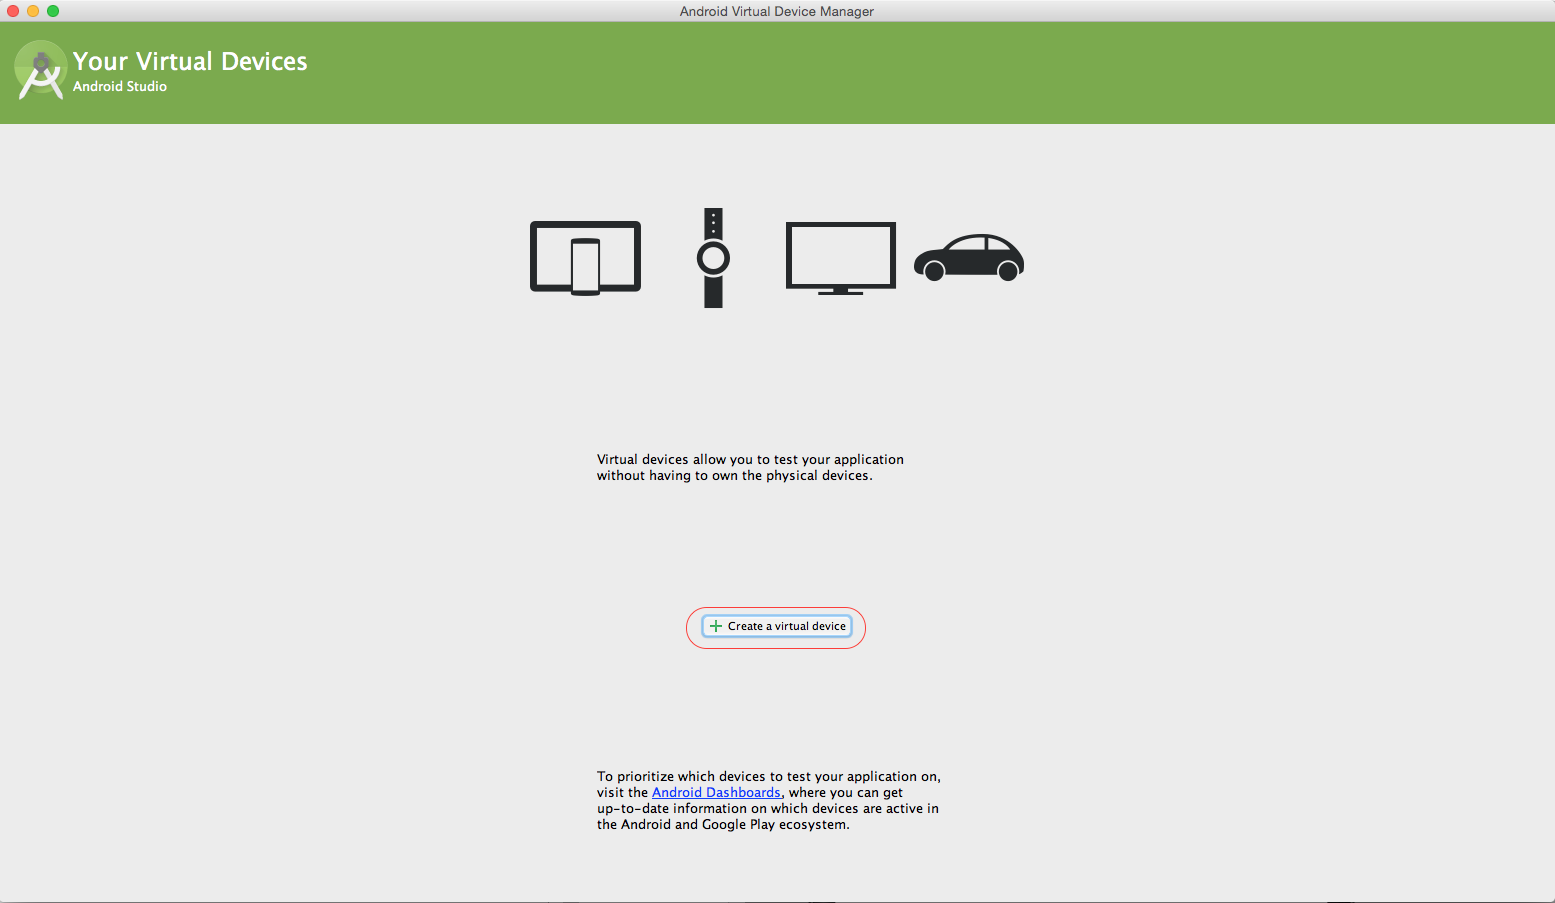
| "2. When the AVD Manager window opens, click on **Create a virtual device** button.\n", | |
| " \n", | |
| " <br/>\n", | |
| " \n", | |
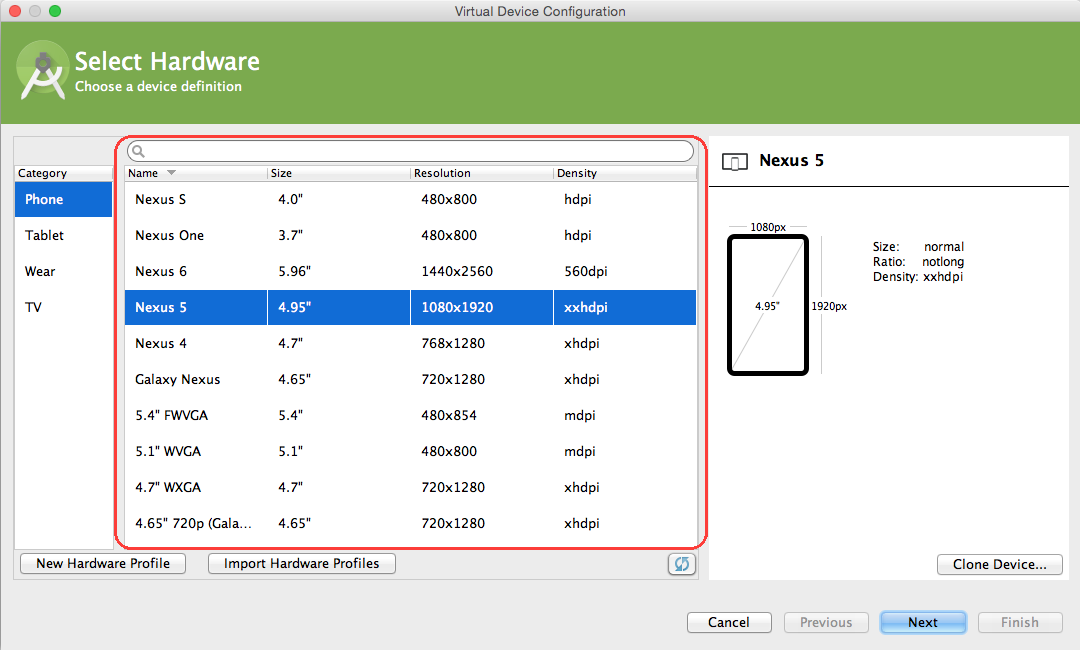
| "3. Select the device category from the left column (i.e TV, Phone, Wear, Tablet). In our case, we need to select **Phone**.\n", | |
| " * Select the device (e.g. Galaxy Nexus, 4.65\", 720x1280, xhdpi) in the middle area of the window, as shown below. Note that if your machine runs out of memory and gets into all kind of strange situations, you are advised to select **Nexus One, 3.7\", 480x800, hdpi**. \n", | |
| " \n", | |
| " * Then, click on the \"**Next**\" button at the lower right corner.\n", | |
| " \n", | |
| " <br/>\n", | |
| " \n", | |
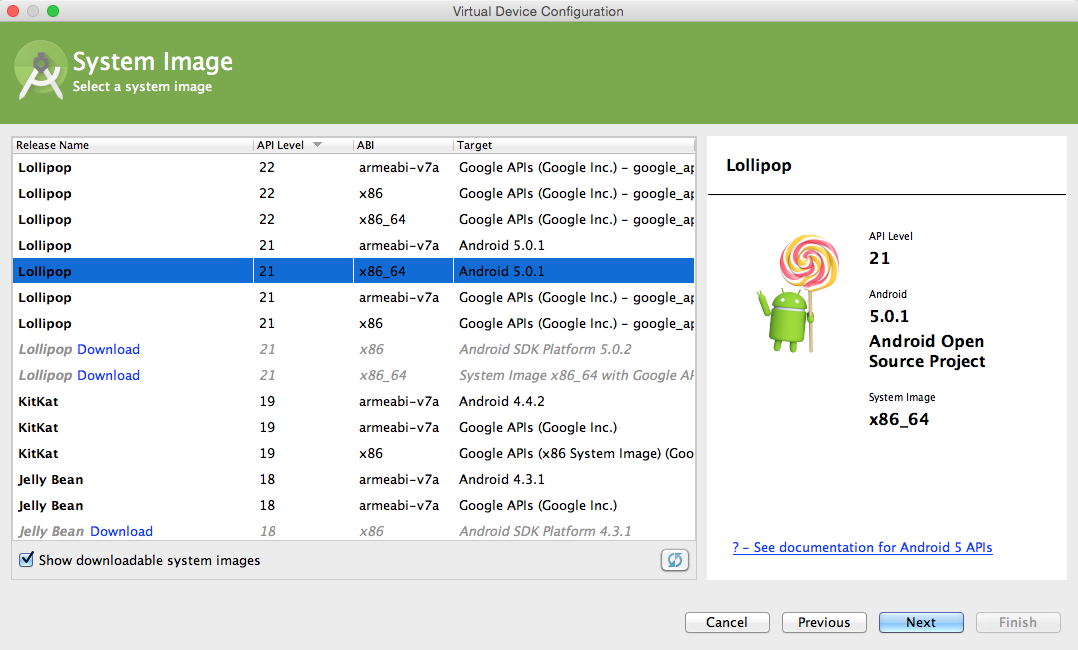
| "4. Select a version of system image. In our case, we select \"Lollipop\", \"21\", \"x86_64\", \"Android 5.0.1\". Note that, if you wish to select x86, x86_64 as the ABI, you need to install the corresponding Intel HAXM driver first. See the instructions for [downloading Android Studio](https://courses.edx.org/courses/course-v1:HKUSTx+COMP107x+2016_T1/jump_to_id/f3b6c26995ef45248dbc13722f8de7c9). \n", | |
| " \n", | |
| " * Then click on the \"**Next**\" button at the lower right corner.\n", | |
| " \n", | |
| " <br/>\n", | |
| " \n", | |
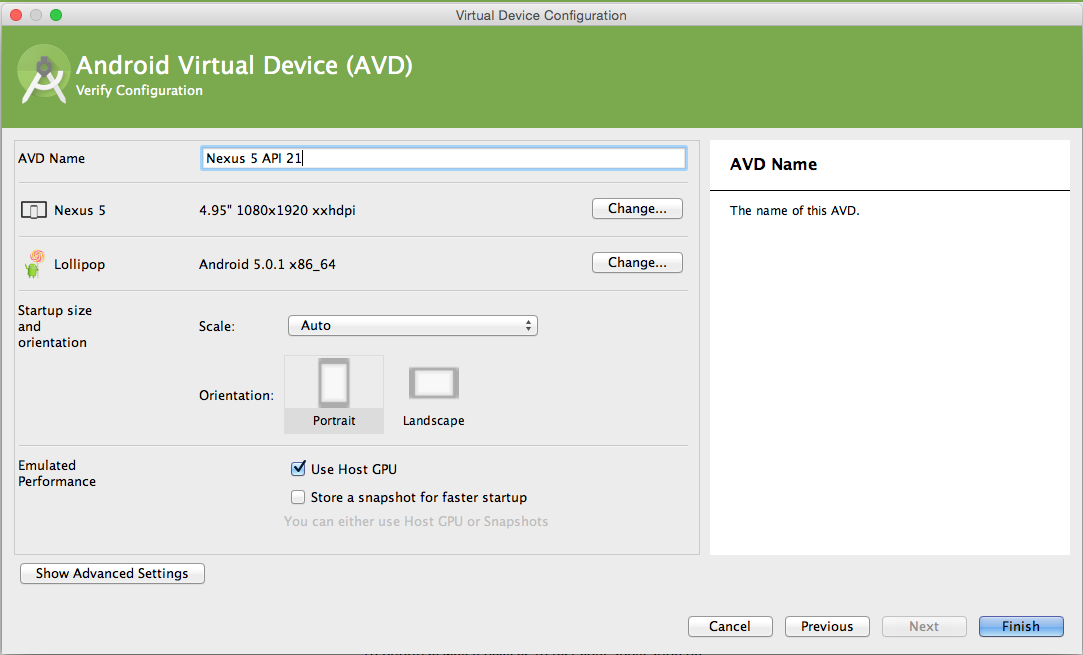
| "5. You can provide any name for the virtual device (or use the default name if you like). If you have already installed the proper GPU driver, you can check \"**Use Host GPU**\". Otherwise leave it unchecked. If you have a slow computer with limited memory, then click on the \"**Show Advanced Settings**\" button. Scroll down to change the RAM from 1 GB to 256MB, and click on the \"**Finish**\" button at the lower right corner.\n", | |
| " \n", | |
| " <br/>\n", | |
| " \n", | |
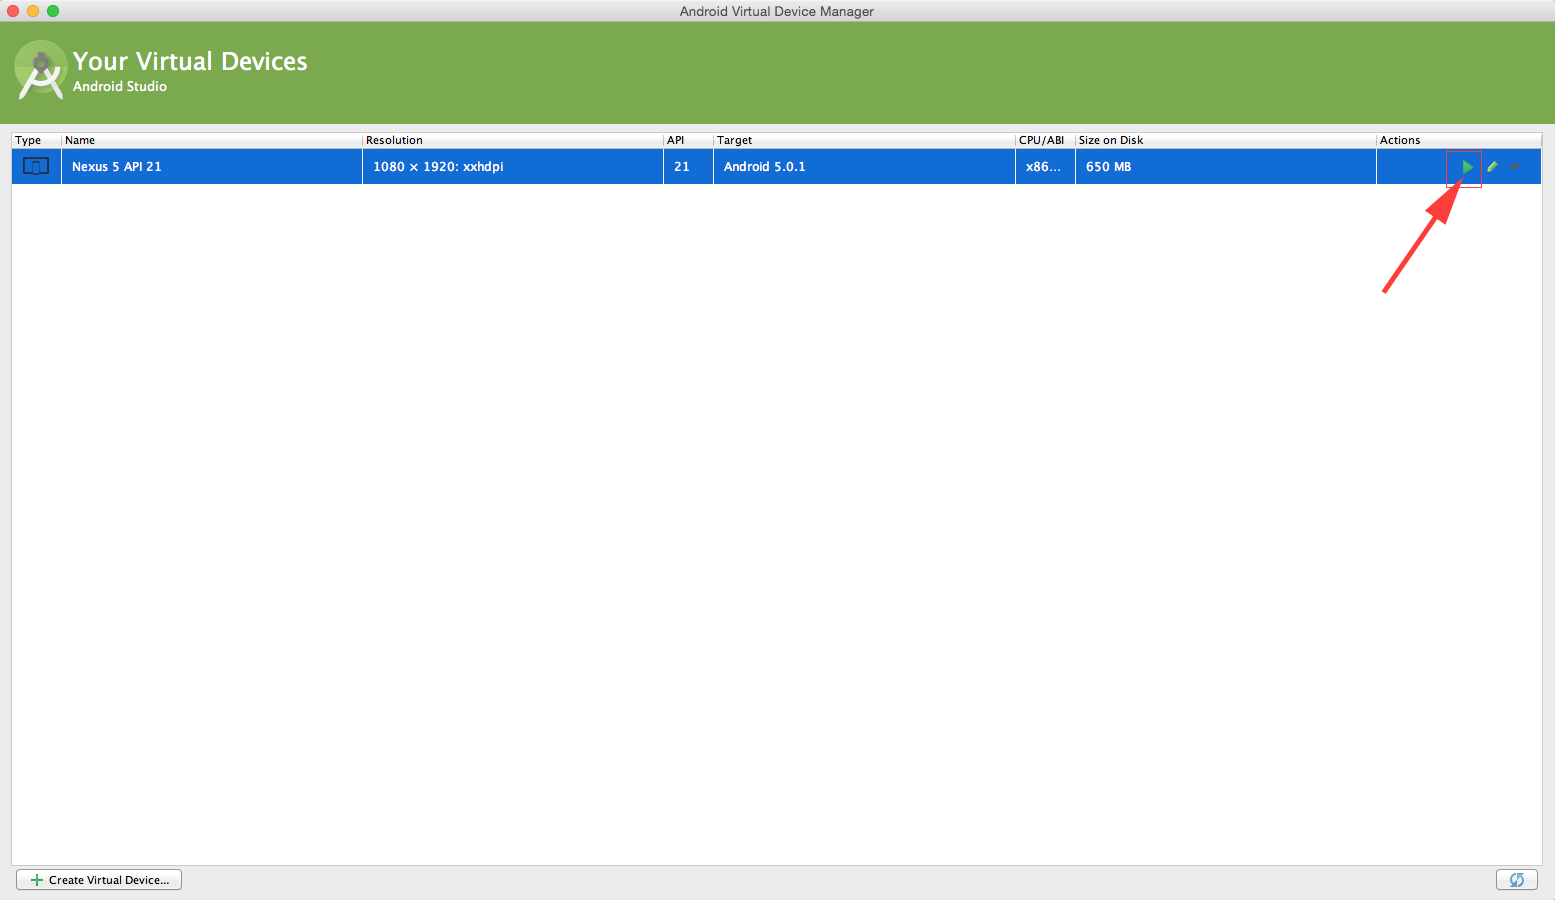
| "6. You will see the following screen. You can click on the green triangle button to start the AVD, if you wish. Alternately, you will be given the option to start the AVD when you try to deploy an app to the emulator.\n", | |
| " \n", | |
| " <br/>\n", | |
| " \n", | |
| "This AVD is the virtual device (emulator) that we use to test our program. An AVD defines the system image and device settings used by the emulator." | |
| ] | |
| }, | |
| { | |
| "cell_type": "markdown", | |
| "metadata": {}, | |
| "source": [ | |
| "## Deploying the App to a Device\n", | |
| "\n", | |
| "Deploying the app to a mobile device is another way to test the application. Depending on your computer and the mobile device, this may require you to install a device-specific device driver on your computer.\n", | |
| "\n", | |
| "1. Make sure you enable USB debugging mode on your device (e.g. If you are using Samsung phone, go to settings. Navigate towards “about device” tab, and click on the \"Build number\" tab multiple times to enable the Developer options tab. In this tab, you can enable the USB debugging mode.).\n", | |
| "2. Connect your device to the computer using the USB cable supplied for your mobile device.\n", | |
| "3. The device should show up as one of the options in Android Studio to deploy your application.\n", | |
| "\n", | |
| "All the examples in this course can be deployed and tested using the AVD. If you are not comfortable using your own device for deploying and testing the applications, or if you do not have access to an Android device, you can use the AVD instead." | |
| ] | |
| }, | |
| { | |
| "cell_type": "markdown", | |
| "metadata": {}, | |
| "source": [ | |
| "## Run the App\n", | |
| "\n", | |
| "In this section, you will see the steps to deploy and run your application on the emulator or a device.\n", | |
| "\n", | |
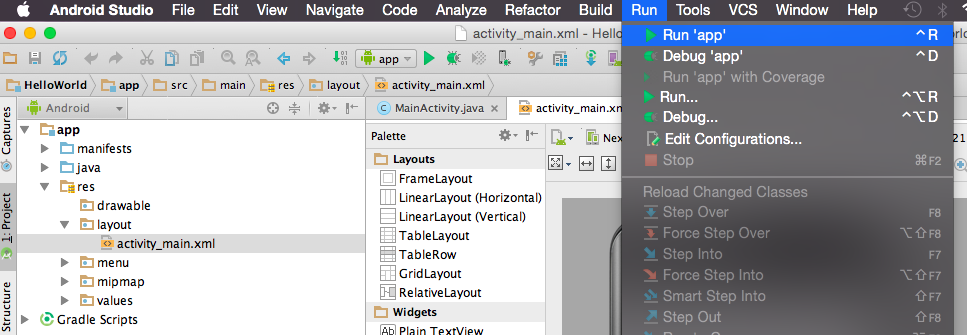
| "1. To deploy your app to an AVD or a device, select **Run->Run 'app'** from the menu or click on the **Run 'app'** icon on the toolbar.\n", | |
| " \n", | |
| " <br/>\n", | |
| " \n", | |
| " <br/>\n", | |
| "\n", | |
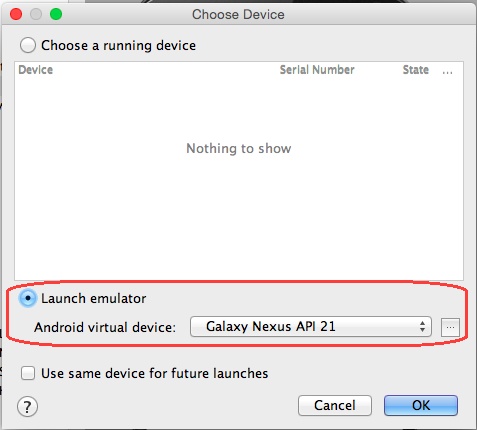
| "2. Gradle build will start. When it is completed, if your AVD is not running or your device is not connected to the computer, then the following window will pop up.\n", | |
| " \n", | |
| " * This window enables you to select the emulator on which your app should be deployed and run.\n", | |
| " \n", | |
| " <br/>\n", | |
| " \n", | |
| "3. If the AVD is already running, then the following window will pop up letting you choose (one of the) AVD to deploy and run the app.\n", | |
| " \n", | |
| " 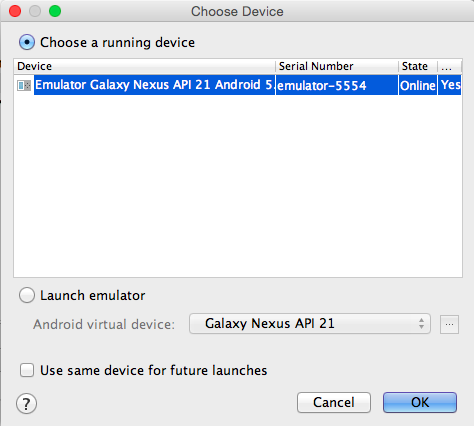<br/>\n", | |
| " \n", | |
| "4. After a few minutes (be patient!), the AVD will be ready and you will see the following screen.\n", | |
| " \n", | |
| " 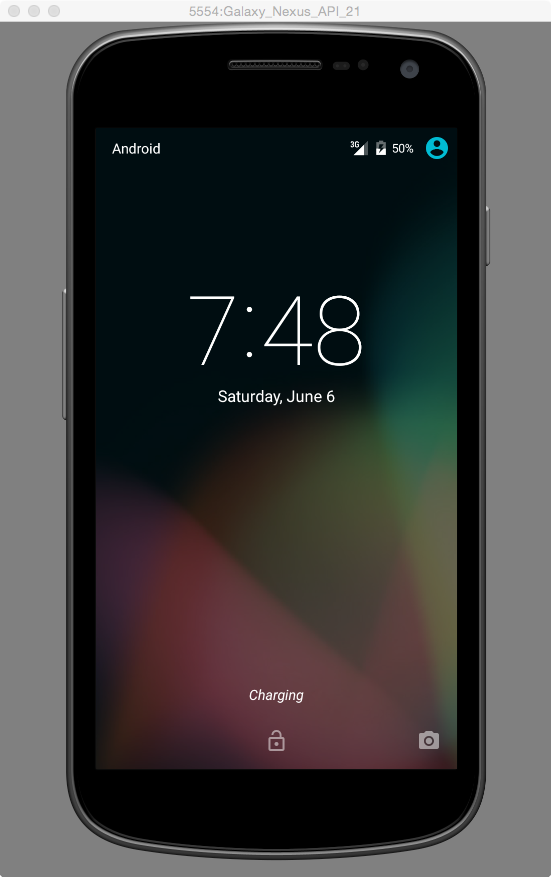<br/>\n", | |
| "\n", | |
| "5. You can unlock the screen by dragging on the lock to see the HelloWorld app running on the screen as shown below.\n", | |
| " \n", | |
| " 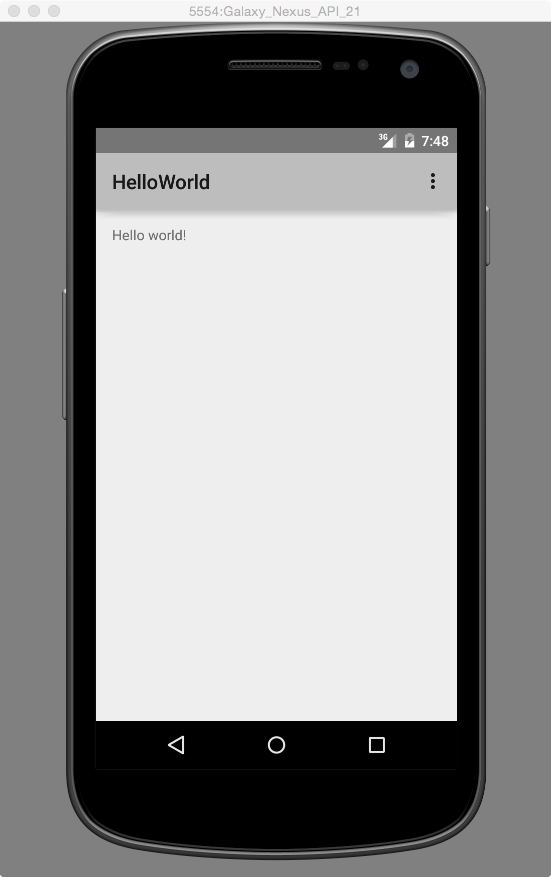" | |
| ] | |
| } | |
| ], | |
| "metadata": { | |
| "kernelspec": { | |
| "display_name": "Python 2", | |
| "language": "python", | |
| "name": "python2" | |
| }, | |
| "language_info": { | |
| "codemirror_mode": { | |
| "name": "ipython", | |
| "version": 2 | |
| }, | |
| "file_extension": ".py", | |
| "mimetype": "text/x-python", | |
| "name": "python", | |
| "nbconvert_exporter": "python", | |
| "pygments_lexer": "ipython2", | |
| "version": "2.7.6" | |
| } | |
| }, | |
| "nbformat": 4, | |
| "nbformat_minor": 0 | |
| } |
Sign up for free
to join this conversation on GitHub.
Already have an account?
Sign in to comment