Skip to content

Instantly share code, notes, and snippets.

@dannguyen
Last active June 30, 2024 18:52
Show Gist options
  • Save dannguyen/f056d05bb7fec408bb7c14ea1552c349 to your computer and use it in GitHub Desktop.
Save dannguyen/f056d05bb7fec408bb7c14ea1552c349 to your computer and use it in GitHub Desktop.
How to use schemacrawler to generate schema diagrams for SQLite from the commandline (Mac OS)

Installing and using schemacrawler for MacOS

A recipe for generating cool SQLite database diagrams with schemacrawler on MacOS

This was tested on MacOS 10.14.5 on 2019-07-16

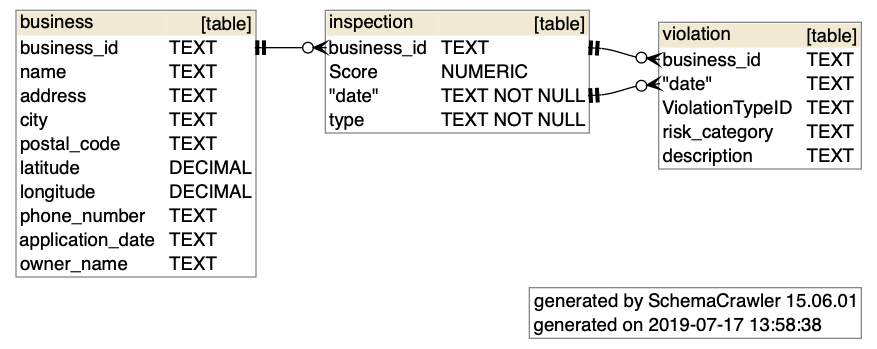
schemacrawler is a free and open-source database schema discovery and comprehension tool. It can be invoked from the command-line to produce, using GraphViz, images/pdfs from a SQLite (or other database type) file. It can be used from the command-line to generate schema diagrams like these:

image

To see more examples of commands and diagrams, visit scheacrawler's docs: http://www.schemacrawler.com/diagramming.html

Install graphviz dependency

For schema drawing, schemacrawler uses graphviz, which can be installed via the Homebrew package manager:

brew install graphviz

Installing schemacrawler as a command-line tool

This section gives an example of how to install schemacrawler so that you can invoke it with your shell. There isn't a Homebrew recipe, so the shell commands basically:

  • Download a release zip from schemacrawler/releases
  • Copies the relevant subdir from the release into a local directory, e.g. /usr/local/opt/schemacrawler
  • Creates a simple shell script that saves you from having to run schemacrawler via the java executable
  • symlinks this shell script into an executable path, e.g. /usr/local/bin

Downloading and installing schemacrawler

The latest releases can be found on the Github page:

https://github.com/schemacrawler/SchemaCrawler/releases/

Setting up schemacrawler to run on your system via $ schemacrawler

In this gist, I've attached a shell script script-schemacrawler-on-macos.sh that automates the downloading of the schemacrawler ZIP file from its Github repo, installs it, creates a helper script, and creates a symlink to that helper script so you can invoke it via:

$ schemacrawler ...

You can copy the script into a file and invoke it, or copy-paste it directly into Bash. Obviously, as with anything you copy-paste, read it for yourself to make sure I'm not attempting to do something malicious.

(An older version of this script can be found here)

A couple of notes about

The script script-schemacrawler-on-macos.sh has a few defaults – e.g. /usr/local/opt/ and /usr/local/bin/ – which are assumed to be writeable, but you can change those default vars for yourself.

One of the effects of is that it creates a Bash script named something like

Its contents are:

This script is a derivation of schemacrawler's schemacrawler-distrib/src/assembly/schemacrawler.sh, the contents of which are:

General usage

Now that schemacrawler is installed as an executable shell command, here's an example of how to invoke it – change DBNAME.sqlite and OUTPUT_IMAGE_FILE.png to something appropriate for your usecase:

  schemacrawler -server sqlite \
    -database DBNAME.sqlite \
    -user -password \
    -infolevel standard \
    -command schema \
    -outputformat png \
    -outputfile OUTPUT_IMAGE_FILE.png

Bootload a sample SQLite database and test out schemacrawler

Just in case you don't have a database to play around with, you can copy paste this sequence of SQLite commands into your Bash shell, which will create the following empty database file at /tmp/tmpdb.sqlite

echo '''
DROP TABLE IF EXISTS business;
DROP TABLE IF EXISTS inspection;
DROP TABLE IF EXISTS violation;

CREATE TABLE business (
    business_id TEXT,
    name TEXT,
    address TEXT,
    city TEXT,
    postal_code TEXT,
    latitude DECIMAL,
    longitude DECIMAL,
    phone_number TEXT,
    application_date TEXT,
    owner_name TEXT
);

CREATE TABLE inspection (
    business_id TEXT,
    "Score" NUMERIC,
    date TEXT NOT NULL,
    type TEXT NOT NULL,
    FOREIGN KEY(business_id) REFERENCES business(business_id)
);

CREATE TABLE violation (
    business_id TEXT,
    date TEXT,
    "ViolationTypeID" TEXT,
    risk_category TEXT,
    description TEXT,
    FOREIGN KEY(business_id, date) REFERENCES inspection(business_id, date)
);''' \
  | sqlite3 /tmp/tmpdb.sqlite

Invoke schemacrawler like so:

schemacrawler -server sqlite \
  -database /tmp/tmpdb.sqlite \
  -user -password \
  -infolevel standard \
  -command schema \
  -outputformat png \
  -outputfile /tmp/mytmpdb.png

The output of that Bash command will be a file /tmp/tmpdb.sqlite, which looks like this:

/tmp/tmpdb.sqlite

GraphViz visual properties

You can edit schemacrawler.config.properties, which is found wherever you installed the schemacrawler distribution – e.g. if you ran my installer script, it would be in /usr/local/opt/schemacrawler/config/schemacrawler.config.properties

Some example settings:

schemacrawler.format.no_schemacrawler_info=true
schemacrawler.format.show_database_info=true
schemacrawler.format.show_row_counts=true
schemacrawler.format.identifier_quoting_strategy=quote_if_special_characters

schemacrawler.graph.graphviz.nodes.ranksep=circo
schemacrawler.graph.graphviz.graph.layout=circo
schemacrawler.graph.graphviz.graph.splines=ortho


schemacrawler.graph.graphviz.node.shape=folder
schemacrawler.graph.graphviz.node.style=rounded,filled
schemacrawler.graph.graphviz.node.fillcolor=#fcfdfc
#schemacrawler.graph.graphviz.node.color=red

schemacrawler.graph.graphviz.graph.fontname=Helvetica Neue
schemacrawler.graph.graphviz.node.fontname=Consolas
schemacrawler.graph.graphviz.edge.fontname=Consolas
schemacrawler.graph.graphviz.edge.arrowsize=1.5

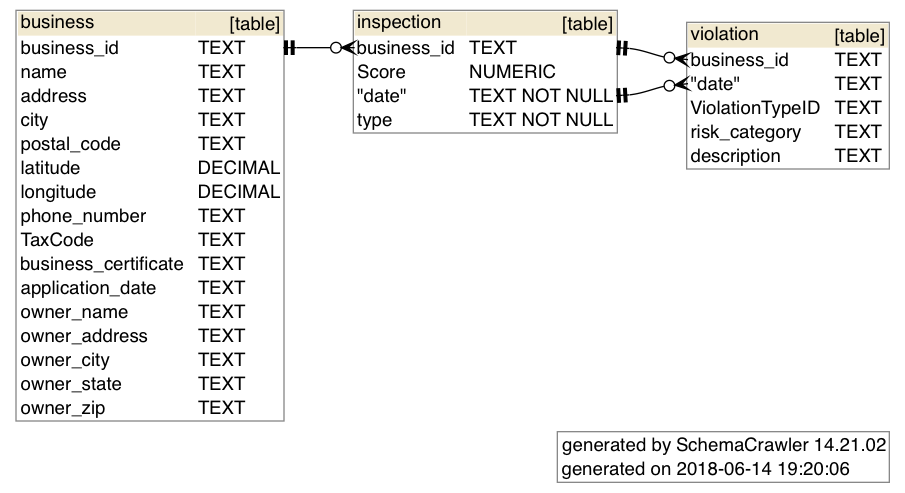
If you append the previous snippet to the default schemacrawler.config.properties, you'll get output that looks like this:

image

More info about GraphViz in this StackOverflow Q:
How to influence layout of graph items?

#!/bin/sh
## Tested on MacOS 10.14.5
## Gist URL: https://gist.github.com/dannguyen/f056d05bb7fec408bb7c14ea1552c349
########################
# Variables and defaults
########################
# Modify this for whatever version you're trying to download
_SCH_VERSION='15.06.01'
# Pick your own temp dir
# Note that the zip archive by default creates and unzips into a subdir,
# e.g. `schemacrawler-15.06.01-distribution`
_TEMPDIR=/tmp
# Pick the path to store the app and the shell script
# NOTE: The parent dir – e.g. /usr/local/opt – must be writable
_INSTALL_DIR=/usr/local/opt/schemacrawler
# Pick the symlink for the path; ideally, it's a path that is in your system's executable PATH
# NOTE: The executable PATH – e.g. /usr/local/bin – must be writable
_SCH_SYMLINK=/usr/local/bin/schemacrawler
#####
# These defaults are derived from above
# The filename stem for the downloadable zip, as it exists on the Github filesystem,
# and the subdir it creates when unzipped
_SCH_FNAME="schemacrawler-${_SCH_VERSION}-distribution"
_SCH_URL="https://github.com/schemacrawler/SchemaCrawler/releases/download/v${_SCH_VERSION}/${_SCH_FNAME}.zip"
_SCH_ZNAME="${_TEMPDIR}/${_SCH_FNAME}.zip"
# `schema-macos-opt.sh` is just the arbitrary name from which the symlink will be based
_SCH_SCRIPT_NAME="${_INSTALL_DIR}/schemacrawler-macos-opt.sh"
#########
# Actions
#########
# Download and unzip into $_TEMPDIR
mkdir -p ${_TEMPDIR}
printf "\nDownloading\n\t ${_SCH_URL} \n\tinto temporary directory: ${_TEMPDIR}\n\n"
curl -Lo ${_SCH_ZNAME} ${_SCH_URL}
unzip ${_SCH_ZNAME} -d ${_TEMPDIR}
printf "\n\n"
# Move subdir from release package into /usr/local/opt
printf "\nMoving contents of /tmp/${_SCH_FNAME}/_schemacrawler/ \n\tinto ${_INSTALL_DIR}"
mkdir -p ${_INSTALL_DIR}
cp -r /tmp/${_SCH_FNAME}/_schemacrawler/ ${_INSTALL_DIR}
# create the shell script manually
# https://stackoverflow.com/questions/2953081/how-can-i-write-a-heredoc-to-a-file-in-bash-script
printf "\n\nCreating ${_SCH_SCRIPT_NAME}"
# The shell code below is a variation of what's found at:
# https://github.com/schemacrawler/SchemaCrawler/blob/a3fea8be74ae28d6e8318c14f2c3f4be314efe2a/schemacrawler-distrib/src/assembly/schemacrawler.sh
cat << SCSCRIPT > ${_SCH_SCRIPT_NAME}
#!/usr/bin/env bash
SCHEMACRAWL_DIR=${_INSTALL_DIR}
java -cp \$(echo \${SCHEMACRAWL_DIR}/lib/*.jar | tr ' ' ':'):\${SCHEMACRAWL_DIR}/config schemacrawler.Main "\$@"
SCSCRIPT
# make the shell script executable and symlink it
printf "\n\nSymlinking ${_SCH_SCRIPT_NAME} \n\tto ${_SCH_SYMLINK}\n\n"
chmod +x ${_SCH_SCRIPT_NAME}
ln -sf ${_SCH_SCRIPT_NAME} ${_SCH_SYMLINK}
# This was tested on MacOS 10.13
# set up some variables to reduce redundancy
_SCH_VERSION='14.21.02'
_SCH_BNAME="schemacrawler-${_SCH_VERSION}-distribution"
_SCH_TNAME="/tmp/${SCH_BNAME}.zip"
_SCH_URL="https://github.com/schemacrawler/SchemaCrawler/releases/download/v${_SCH_VERSION}/${_SCH_BNAME}.zip"
_SCH_DIR='/usr/local/opt/schemacrawler'
_SCH_SH="${_SCH_DIR}/schemacrawler-macos-opt.sh"
# Download and unzip into /tmp
curl -Lo ${_SCH_TNAME} ${_SCH_URL}
unzip ${_SCH_TNAME}
# Move subdir from release package into /usr/local/opt
mkdir -p ${_SCH_DIR}
cp -r /tmp/${_SCH_BNAME}/_schemacrawler/ ${_SCH_DIR}
# create the shell script manually
echo '#!/usr/bin/env bash' > ${_SCH_SH}
echo "SC_DIR=${_SCH_DIR}" >> ${_SCH_SH}
echo "java -cp \$(echo \$SC_DIR/lib/*.jar | tr ' ' ':'):\$SC_DIR/config schemacrawler.Main \"\$@\"" \
>> ${_SCH_SH}
# make it executable and symlink it
chmod +x ${_SCH_SH}
ln -sf ${_SCH_SH} /usr/local/bin/schemacrawler
@Samox
Copy link

Samox commented Jun 13, 2019

<3

@PavelPolyakov
Copy link

PavelPolyakov commented Jul 17, 2019

Nice guide, thank you!

(part of the comment is removed, since is not actual anymore)

@dannguyen
Copy link
Author

@PavelPolyakov thanks! Looks like I also needed to run unzip with the -d ${TEMPDIR} flag so that it wouldn't install to wherever you were running the commands. Created an updated version of the script to reflect this.

@PavelPolyakov
Copy link

@dannguyen cool, I suggest we remove the old ones to not confuse people

@jdraths
Copy link

jdraths commented Aug 18, 2020

👍 I forgot to chmod 744 the script file at first and was banging my head for a minute.

@benabbes-slimane-takiedine

is there a way to use this on windows 10 ?

Sign up for free to join this conversation on GitHub. Already have an account? Sign in to comment