Today we're going to demonstrate how a Python application can interact with CockroachDB using jwt tokens. We are going to go over requesting and renewing authentication tokens.
In my previous article I demonstrated how jwt tokens can replace passwords for a safer and more secure cloud native future.
Check out my previous articles covering SSO for DB Console using Google OAuth, Microsoft Identity Platform and Okta.
- Provision a CockroachDB cluster
- Configure Okta
- Write code
- Verify
SSO for SQL can be set up for CockroachDB Self-Hosted and our hosted offerings. Follow this tutorial to set up a Dedicated cluster. I'm using a Docker environment with the latest 22.2 beta image where this capability is available.
I am using an Okta developer account, you can get one by signing up here.
Assuming the steps from the following tutorial are finished, you may go ahead and follow this tutorial to get jwt authN working with your Python application.
The application we're going to use as an example is our Python psycopg3 tutorial. We are going to demonstrate how we can request an id_token for the initial authentication and in case of a long running Python application, demonstrate how we can request a refresh_token to swap id_token with a new one.
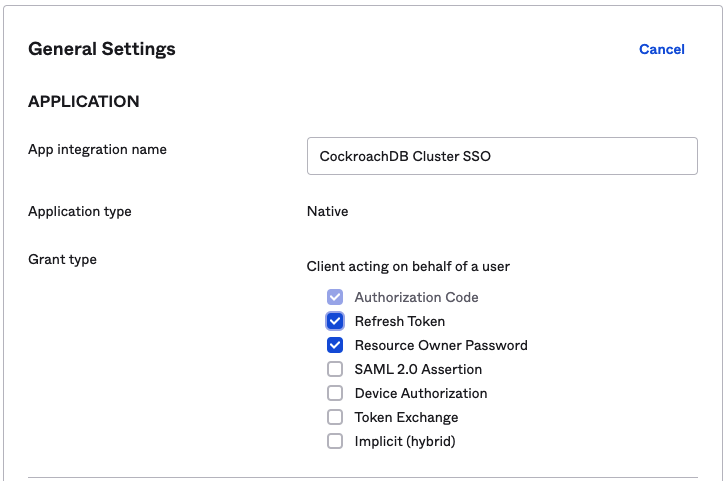
The first order of business is adding ability to refresh tokens in our Okta console.
At this point, we're going to pull down the application code and attempt to run it.
We need to set up a few environment variables to keep sensitive information out of the code base.
export OKTAURL=https://dev-number.okta.com/oauth2/v1/token
export CLIENT_ID=<okta-client-id>
export CLIENT_SECRET=<okta-client-secret>
export OKTAUSERNAME=<Okta user>
export OKTAPASSWORD=<Okta password>
Refer to the previous article for where to find the properties.
The very first change I want to tackle is changing the application's dependence on $DATABASE_URL variable. I'm using the psycopg3 practice of setting up a connection, i.e.:
with psycopg.connect("host=lb dbname=defaultdb user=roach password={} port=26257 sslmode=verify-full sslrootcert=/certs/ca.crt options=--crdb:jwt_auth_enabled=true".format(id_token), application_name="$ using_jwt_token_psycopg3", row_factory=namedtuple_row) as connI am adding the options parameter, options=--crdb:jwt_auth_enabled=true and also passing the jwt token as an argument, i.e. password={} and .format(id_token).
The goal here is to codify the following curl command:
curl --request POST \
  --url $OKTAURL \
  --header 'accept: application/json' \
  -u "$CLIENT_ID:$CLIENT_SECRET" \
  --header 'content-type: application/x-www-form-urlencoded' \
  --data "grant_type=password&username=$OKTAUSERNAME&password=$OKTAPASSWORD&scope=openid"
I am using the requests module to implement this logic. Since we're going to also refresh our tokens, we have to add a slight change to the command, i.e. offline_access as per the Otka documentation
--data "grant_type=password&username=$OKTAUSERNAME&password=$OKTAPASSWORD&scope=openid offline_accessIf you compare my code with the original version, you can see I have a call for a token
    json_response = get_id_token(url, data, headers, client_id, client_secret)
    id_token = json_response["id_token"]
    refresh_token = json_response["refresh_token"]
The result of the function is sent back as a json object, I extract the id_token and refresh_token for the consecutive call.
def get_id_token(url, data, headers, client_id, client_secret):
    r = requests.post(url, data, headers=headers, auth=(client_id, client_secret))
    return json.loads(r.text)
If you have a short lived application, you can stop here and perhaps discard the refresh token but in case your application runs as a service, the next call will include the refresh_token as part of the payload to generate a new id_token. We are trying to codify the following curl example:
curl --request POST \
  --url $OKTAURL \
  --header 'accept: application/json' \
  -u "$CLIENT_ID:$CLIENT_SECRET" \
  --header 'content-type: application/x-www-form-urlencoded' \
  --data "grant_type=refresh_token&scope=openid offline_access&refresh_token=<refresh-token-goes-here>"
I concatenate the refresh token in the data field
    data = "grant_type=refresh_token&scope=openid offline_access&refresh_token=" + refresh_token
    json_refresh_response = get_id_token(url, data, headers, client_id, client_secret)
    new_id_token = json_refresh_response["id_token"]
I am going to stop here but if in your long running application you will continue this loop by passing each consecutive refresh token to a new request and renew your tokens.
If we were to execute the application as is, the output will be:
Initiate authentication with a new id_token:
Balances at Thu Oct 27 19:59:38 2022:
account id: 12df8892-1800-4f91-afde-2f0742e9757e  balance: $250
account id: a6f5618e-5301-466c-ba9b-1bb67cedb39c  balance: $1000
Balances at Thu Oct 27 19:59:38 2022:
account id: 12df8892-1800-4f91-afde-2f0742e9757e  balance: $350
account id: a6f5618e-5301-466c-ba9b-1bb67cedb39c  balance: $900
The following output is generated by the refreshed id_token
Initiate authentication with a refreshed id_token:
Balances at Thu Oct 27 19:59:38 2022:
account id: 11f31444-5271-4ad2-9dcd-3d1245d4faf5  balance: $1000
account id: 3c52d759-8790-45fc-9a3a-f31027b64398  balance: $250
Balances at Thu Oct 27 19:59:38 2022:
account id: 11f31444-5271-4ad2-9dcd-3d1245d4faf5  balance: $900
account id: 3c52d759-8790-45fc-9a3a-f31027b64398  balance: $350
Finally, I am passing a fake token to demonstrate that the cluster will reject it.
Initiate authentication with a bogus id_token:
CRITICAL:root:database connection failed
CRITICAL:root:connection failed: ERROR:  JWT authentication: invalid token
We can also run this workflow manually by accessing Cockroach without a password:
cockroach sql --url "postgresql://roach@lb:26257/defaultdb?sslmode=verify-full&sslrootcert=%2Fcerts%2Fca.crt&options=--crdb:jwt_auth_enabled=true"If you enter an invalid token:
Connecting to server "lb:26257" as user "roach".
Enter password:
ERROR: JWT authentication: invalid token
SQLSTATE: 28000
Failed running "sql"
Hopefully you were able to follow along, if you have any questions, feel free to leave a comment below.