I've seen several posts on Reddit and other forums that say "oh you can use a grandstream phone with UniFi Talk and it's flawless". Unfortunately, I am not a VoIP engineer so it was not intuitive to me, but I got it to work. Here's how.
For this writeup, I'm using a Grandstream DP750 DECT base with a DP720 DECT wireless handset. I really wanted a wireless phone for general use in my house, but Ubiquiti doesn't make one, so I wanted to find a way. My goal is to setup UniFi Talk for my home phone solution and share a single phone number with a UniFi wired phone that sits on my office desk. As far as I know, you have to get a UniFi phone to do the initial Talk setup (though, in my tinkering, I noticed it's using a PostgreSQL database, you could probably bypass the initial setup if you knew what you were doing). I'm also using a UDM-Pro for my gateway.
Assuming your UDM-Pro management interface is on 192.168.1.1, your base station should be assigned an IP on a VLAN that can access that endpoint. UniFi Talk (which is running FreeSWITCH) is listening only on that IP on TCP and UDP port 5060. There's also an external port for communicating with UniFi's VoIP provider of choice.
root@ubnt:/# netstat -plantu | grep freeswitch | grep -v ESTAB
tcp        0      0 192.168.1.1:5060        0.0.0.0:*               LISTEN      8212/freeswitch
tcp        0      0 192.168.1.1:5066        0.0.0.0:*               LISTEN      8212/freeswitch
tcp        0      0 X.X.X.X:59411           0.0.0.0:*               LISTEN      8212/freeswitch
tcp        0      0 127.0.0.1:8021          0.0.0.0:*               LISTEN      8212/freeswitch
tcp        0      0 192.168.1.1:7448        0.0.0.0:*               LISTEN      8212/freeswitch
udp        0      0 192.168.1.1:5060        0.0.0.0:*                           8212/freeswitch
udp 0 0 X.X.X.X:59411 0.0.0.0:* 8212/freeswitchDepending on how you want to manage your devices, you need to make sure you have a user for each device. This creates an extension. In my setup, I want my devices to have unique extensions, but share an external phone number. To do this, I assigned my Talk service number to a group, then put my UniFi phone extension and my new "Cordless Phone" user extension into the same group.
Last thing in the Talk web UI, we need to know which extension is assigned to the "Cordless Phone" account. Go to the account overview, and you'll see it shown there.
Several posts suggested that the SIP password for this account was actually listed on the "Manage" page of the account, but Ubiquiti must have removed that, as it is no longer there when I looked. To get the password, you'll have to SSH into the UDM-Pro. You can get that info from the main UDM-Pro settings page. Enable "SSH" and set a password using the button below the toggle.
You'll SSH in as root, using the password you just configured. Then we'll enter the UniFi-OS shell. Lastly, we'll enter a command to retrieve the SIP password for the phone account. Where I've entered 0003, you'll enter the extension for your account.
>_ ssh [email protected]
Welcome to UbiOS

By logging in, accessing, or using the Ubiquiti product, you
acknowledge that you have read and understood the Ubiquiti
License Agreement and agree to be bound by its terms.

[email protected]'s password:
  ___ ___      .__________.__
 |   |   |____ |__\_  ____/__|
 |   |   /    \|  ||  __) |  |   (c) 2010-2021
 |   |  |   |  \  ||  \   |  |   Ubiquiti Inc.
 |______|___|  /__||__/   |__|
            |_/                  http://www.ui.com

      Welcome to UniFi Dream Machine!
# unifi-os shell
root@ubnt:/# fs_cli -x "user_data [email protected] param password"
wM2B46sacGb4
Don't worry, that's not my actual password. Now we have all the info we need to configure the Grandstream device.
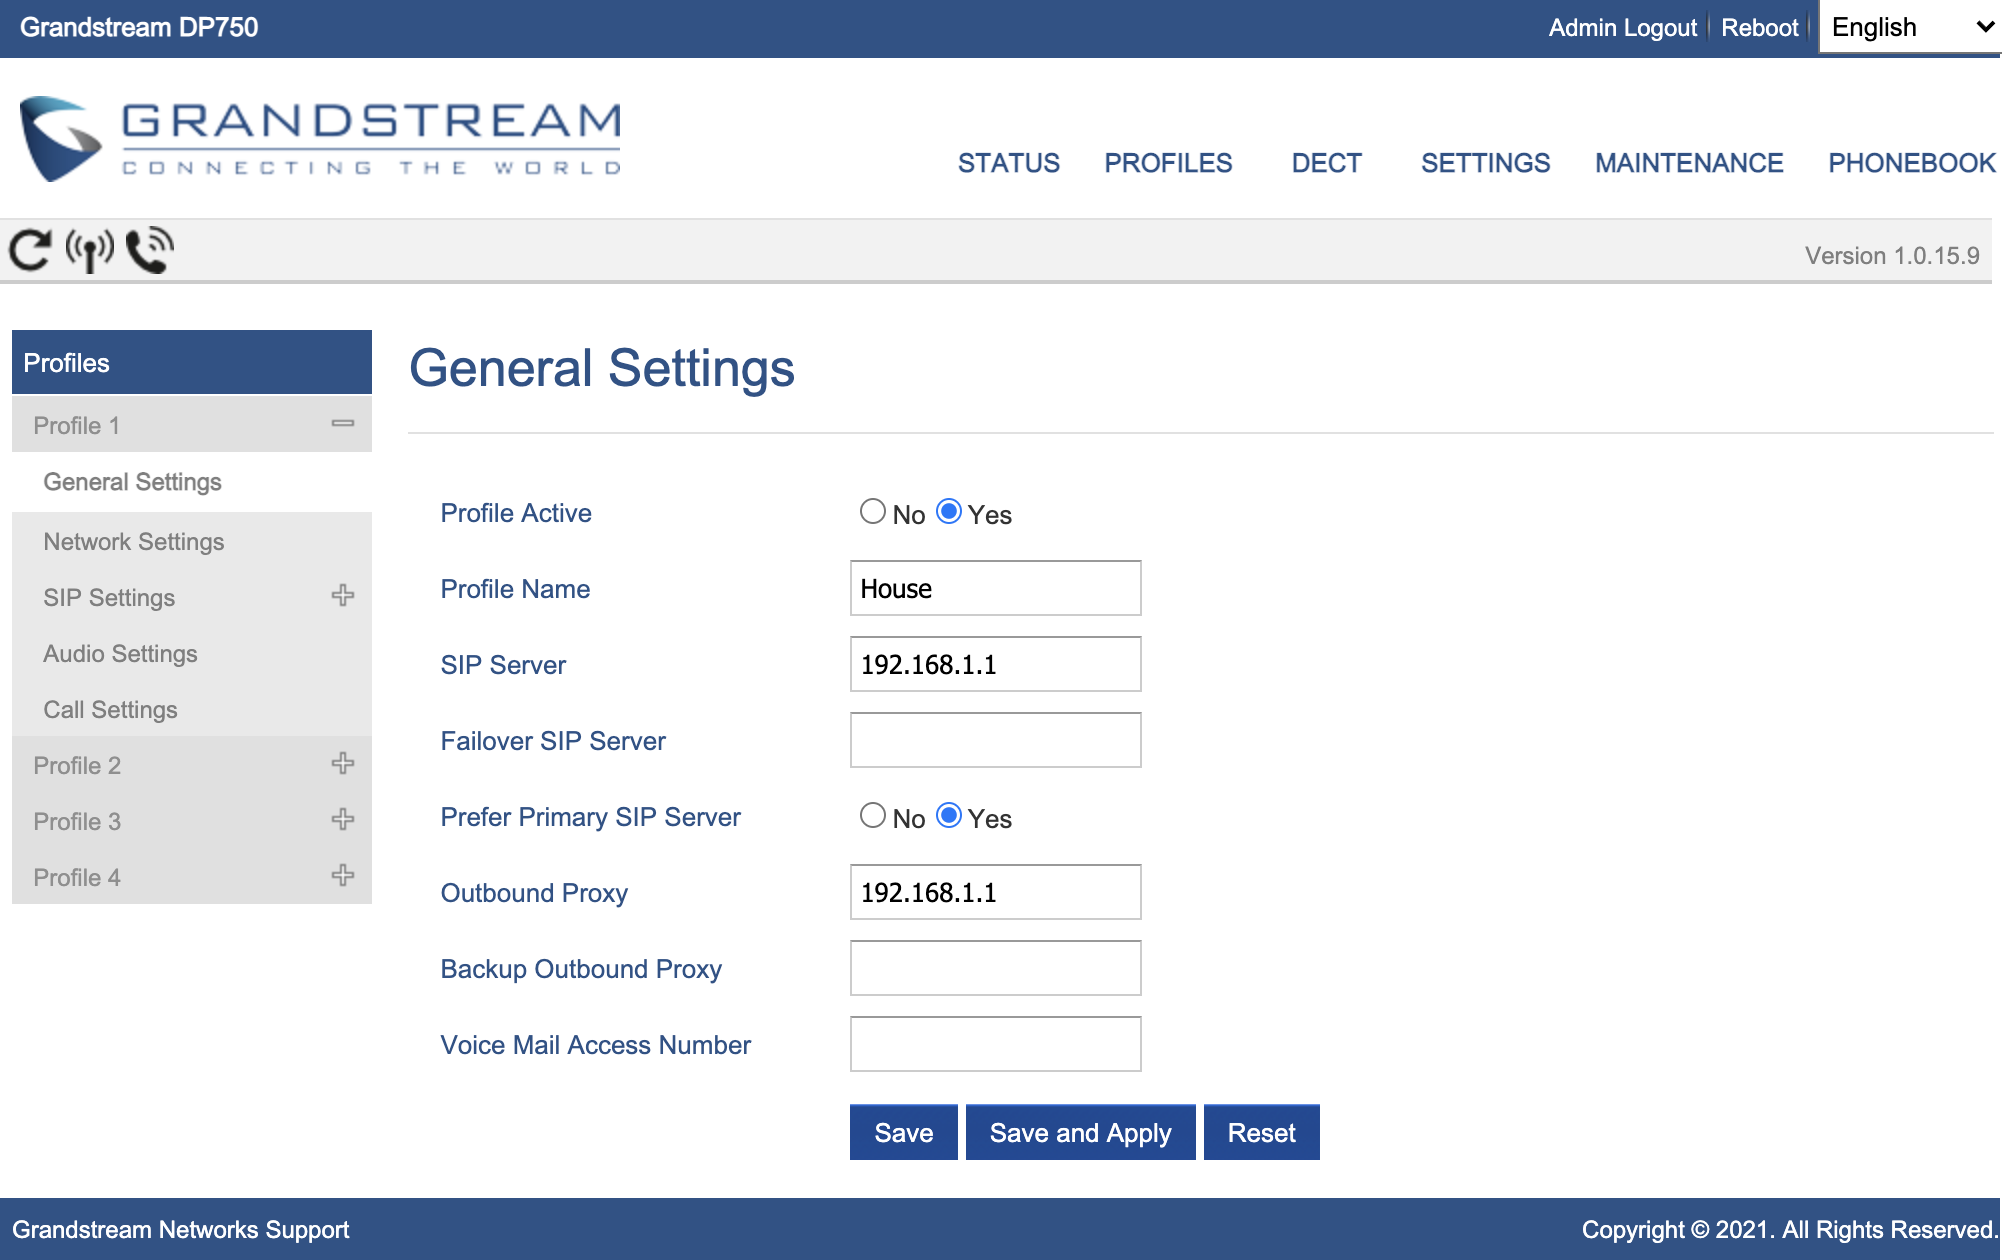
You'll log into the Grandstream device by browsing to the IP and logging in with the your credentials (default are admin/, where is a password on the bottom of the device). Across the top, go to "Profiles" -> "Profile 1" -> "General Settings". Here we'll configure a name for this profile and configure where the SIP server is. This will be your UDM-Pro management IP. I'm assuming the default of 192.168.1.1 here.
One last step, is to configure the SIP authentication. Go to "DECT" -> "SIP Account Settings" and configure "Account 1" with the numeric extension as the User ID and the password you retrieved earlier. You can give it a friendly name here that will show up on the screen of your phone. Once you've done that, click "Save and Apply".
If everything worked correctly (and I didn't skip a step in this documentation), after a few seconds you'll get green status indicators on the main "Status" page.


Hhh I missed this. They took a very nice step :) Now it's the turn of the softphone for international use.
Thank you.