Updated 4/11/2018
Here's my experience of installing the NVIDIA CUDA kit 9.0 on a fresh install of Ubuntu Desktop 16.04.4 LTS.
Table of contents generated with markdown-toc
Do not use the CUDA run file to install your driver. Use apt-get instead. This way you do not need to worry about the Nouveau stuff you read about on StackOverflow.
As of 04/11/2018, the latest version of NVIDIA driver for Ubuntu 16.04.4 LTS is 384. To install the driver, excute
sudo apt-get nvidia-384 nvidia-modprobe
, and then you will be prompted to disable Secure Boot. Select Disable.
Reboot the machine but enter BIOS to disable Secure Boot. Typically you can enter BIOS by hitting F12 rapidly as soon as the system restarts.
Afterwards, you can check the Installation with the nvidia-smi command, which will report all your CUDA-capable devices in the system.
ERROR: Unable to load the 'nvidia-drm' kernel module.
- One probable reason is that the system is boot from UEFI but Secure Boot option is turned on in the BIOS setting. Turn it off and the problem will be solved.
nvidia-smi -pm 1 can enable the persistent mode, which will save some time from loading the driver. It will have significant effect on machines with more than 4 GPUs.
nvidia-smi -e 0 can disable ECC on TESLA products, which will provide about 1/15 more video memory. Reboot is reqired for taking effect. nvidia-smi -e 1 can be used to enable ECC again.
nvidia-smi -pl <some power value> can be used for increasing or decrasing the TDP limit of the GPU. Increasing will encourage higher GPU Boost frequency, but is somehow DANGEROUS and HARMFUL to the GPU. Decreasing will help to same some power, which is useful for machines that does not have enough power supply and will shutdown unintendedly when pull all GPU to their maximum load.
-i <GPUID> can be added after above commands to specify individual GPU.
These commands can be added to /etc/rc.local for excuting at system boot.
Installing CUDA from runfile is much simpler and smoother than installing the NVIDIA driver. It just involves copying files to system directories and has nothing to do with the system kernel or online compilation. Removing CUDA is simply removing the installation directory. So I personally does not recommend adding NVIDIA's repositories and install CUDA via apt-get or other package managers as it will not reduce the complexity of installation or uninstallation but increase the risk of messing up the configurations for repositories.
The CUDA runfile installer can be downloaded from NVIDIA's websie, or using wget in case you can't find it easily on NVIDIA:
cd
wget https://developer.nvidia.com/compute/cuda/9.0/Prod/local_installers/cuda_9.0.176_384.81_linux-run
What you download is a package the following three components:
- an NVIDIA driver installer, but usually of stale version;
- the actual CUDA installer;
- the CUDA samples installer;
I suggest extracting the above three components and executing 2 and 3 separately (remember we installed the driver ourselves already). To extract them, execute the runfile installer with --extract option:
cd
chmod +x cuda_9.0.176_384.81_linux-run
./cuda_9.0.176_384.81_linux-run --extract=$HOME
You should have unpacked three components:
NVIDIA-Linux-x86_64-384.81.run (1. NVIDIA driver that we ignore),
cuda-linux.9.0.176-22781540.run (2. CUDA 9.0 installer), and
cuda-samples.9.0.176-22781540-linux.run (3. CUDA 9.0 Samples).
Execute the second one to install the CUDA Toolkit 9.0:
sudo ./cuda-linux.9.0.176-22781540.run
You now have to accept the license by scrolling down to the bottom (hit the "d" key on your keyboard) and enter "accept". Next accept the defaults.
To verify our CUDA installation, install the sample tests by
sudo ./cuda-samples.9.0.176-22781540-linux.run
After the installation finishes, configure the runtime library.
sudo bash -c "echo /usr/local/cuda/lib64/ > /etc/ld.so.conf.d/cuda.conf"
sudo ldconfig
It is also recommended for Ubuntu users to append string /usr/local/cuda/bin to system file /etc/environments so that nvcc will be included in $PATH. This will take effect after reboot. To do that, you just have to
sudo vim /etc/environments
and then add :/usr/local/cuda/bin (including the ":") at the end of the PATH="/blah:/blah/blah" string (inside the quotes).
After a reboot, let's test our installation by making and invoking our tests:
cd /usr/local/cuda-9.0/samples
sudo make
It's a long process with many irrelevant warnings about deprecated architectures (sm_20 and such ancient GPUs). After it completes, run deviceQuery and p2pBandwidthLatencyTest:
cd /usr/local/cuda/samples/bin/x86_64/linux/release
./deviceQuery
The result of running deviceQuery should look something like this:
./deviceQuery Starting...

 CUDA Device Query (Runtime API) version (CUDART static linking)

Detected 1 CUDA Capable device(s)

Device 0: "GeForce GTX 1060"
  CUDA Driver Version / Runtime Version          9.0 / 9.0
  CUDA Capability Major/Minor version number:    6.1
  Total amount of global memory:                 6073 MBytes (6367739904 bytes)
  (10) Multiprocessors, (128) CUDA Cores/MP:     1280 CUDA Cores
  GPU Max Clock rate:                            1671 MHz (1.67 GHz)
  Memory Clock rate:                             4004 Mhz
  Memory Bus Width:                              192-bit
  L2 Cache Size:                                 1572864 bytes
  Maximum Texture Dimension Size (x,y,z)         1D=(131072), 2D=(131072, 65536), 3D=(16384, 16384, 16384)
  Maximum Layered 1D Texture Size, (num) layers  1D=(32768), 2048 layers
  Maximum Layered 2D Texture Size, (num) layers  2D=(32768, 32768), 2048 layers
  Total amount of constant memory:               65536 bytes
  Total amount of shared memory per block:       49152 bytes
  Total number of registers available per block: 65536
  Warp size:                                     32
  Maximum number of threads per multiprocessor:  2048
  Maximum number of threads per block:           1024
  Max dimension size of a thread block (x,y,z): (1024, 1024, 64)
  Max dimension size of a grid size    (x,y,z): (2147483647, 65535, 65535)
  Maximum memory pitch:                          2147483647 bytes
  Texture alignment:                             512 bytes
  Concurrent copy and kernel execution:          Yes with 2 copy engine(s)
  Run time limit on kernels:                     Yes
  Integrated GPU sharing Host Memory:            No
  Support host page-locked memory mapping:       Yes
  Alignment requirement for Surfaces:            Yes
  Device has ECC support:                        Disabled
  Device supports Unified Addressing (UVA):      Yes
  Supports Cooperative Kernel Launch:            Yes
  Supports MultiDevice Co-op Kernel Launch:      Yes
  Device PCI Domain ID / Bus ID / location ID:   0 / 1 / 0
  Compute Mode:
     < Default (multiple host threads can use ::cudaSetDevice() with device simultaneously) >

deviceQuery, CUDA Driver = CUDART, CUDA Driver Version = 9.0, CUDA Runtime Version = 9.0, NumDevs = 1
Result = PASS
Cleanup: if ./deviceQuery works, remember to rm the 4 files (1 downloaded and 3 extracted).
The recommended way for installing cuDNN is to
-
Download the "cuDNN v7.0.5 Library for Linux"
tgzfile (need to register for an Nvidia account). -
sudo mvthe downloaded archive to/usr/local. This might seem silly at first, but when you unzip it next you will see that the contents end up going to various folders under/usr/local/cudaand would be messy to move otherwise. -
Then
cd /usr/localand extract thetgzby
sudo tar -xvzf cudnn-9.0-linux-x64-v7.tgz
-
Finally, execute
sudo ldconfigto update the shared library cache. -
Clean up now or later by
sudo rm cudnn-9.0-linux-x64-v7.tgz
OpenGL Troubleshooting
Long story
The explanation below could contain inaccurate information.
There are three OpenGL rendering backends;
GLFW,EGL,OSMesa. The main problem isGLFWsince it does not support the headless rendering. The most elegant solution supportEGL, but the most commonly used OpenGL library in Python, namelypygletonly supportGLFW, so it becomes painful. There has been a discussion, but it is unsure when the update will be made. (Luckily,mujoco_pyanddm_controllibraries supportEGLorOSMesaso I have not noticed this problem for now.)One way to workaround is by using a virtual framebuffer, such as
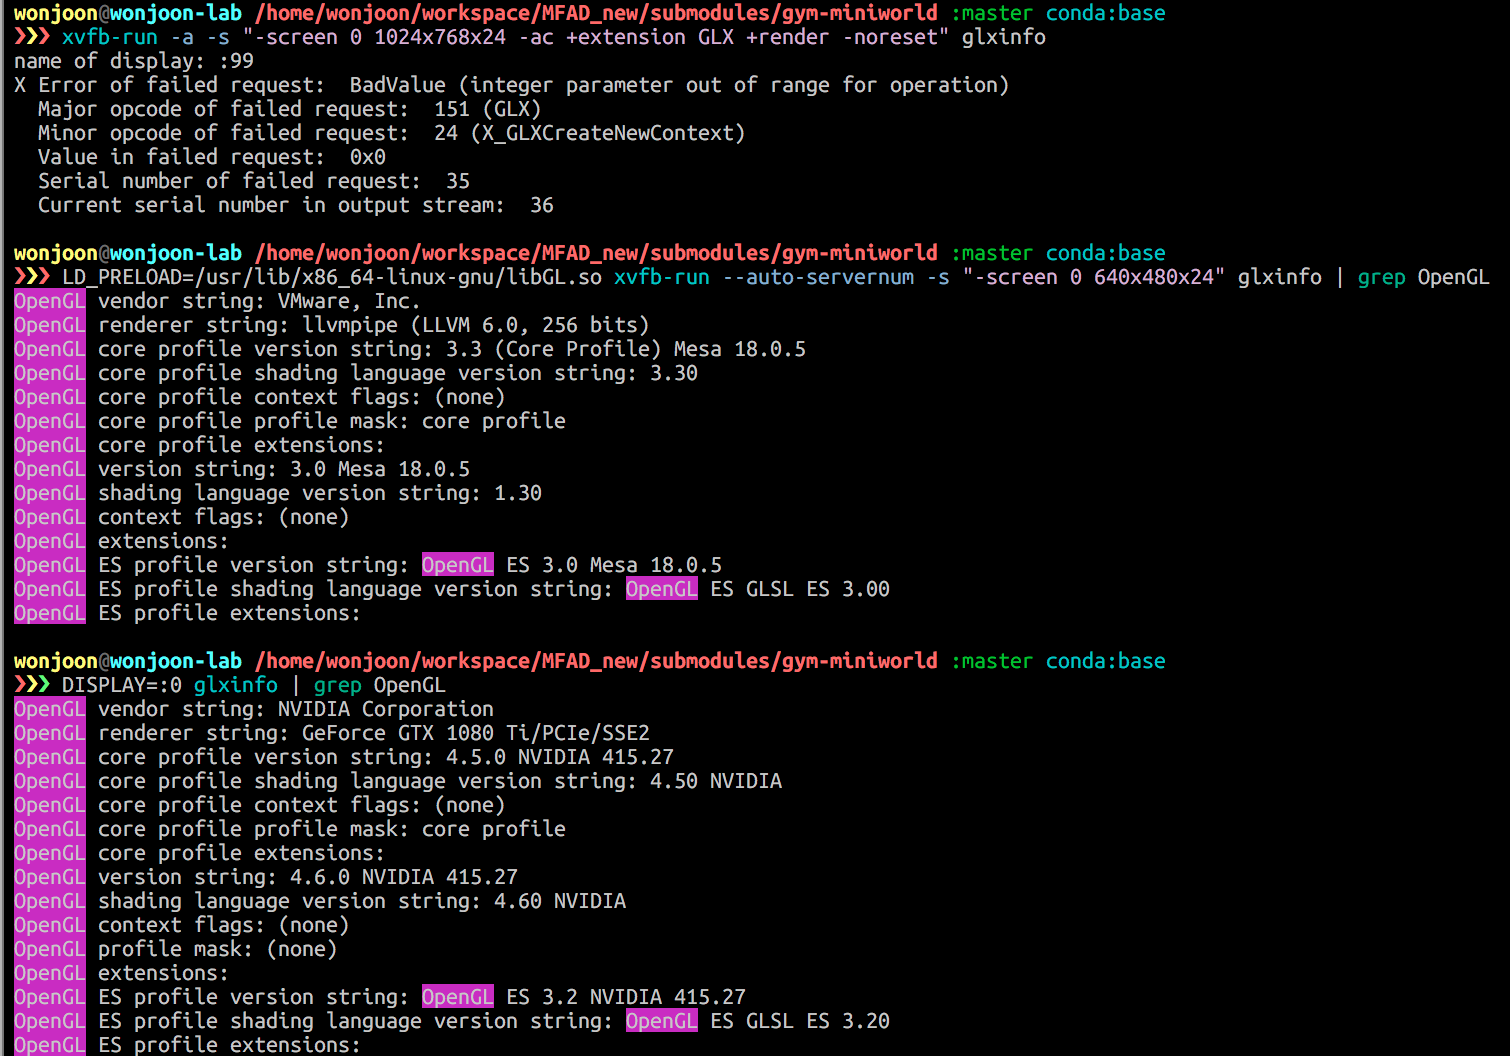
xvfb, as it is noted in many places like this and this.However, there are known problem between nVidia driver and
xvfbsincexvfbis totally cpu-based ref1, ref2. It does not know how to interact with GPU based OpenGL implementation supported by the driver. Therefore, people suggest installing drivers and CUDA library without OpenGL library with--no-opengl-libsoptions ref1, ref2. It could be one solution, but it is not satisfactory since it abandons hardware-accelerated rendering.If you can run X-server, (possibly more elegant?) solution is simply running an X-server to generate a virtual monitor. It can be done easily by
and specifying the virtual display in front of a command by, for instance,
DISPLAY=:1. You can get busid with the commandnvidia-xconfig --query-gpu-info.Tips if you have a trouble in running nvidia-xconfig
Actually, you don't need to run
nvidia-xconfig. All you need is a properly set xorg.conf file and PCI bus ID.First, you can just generate a default
xorg.conffile by running the following command (note that there is no options at all).Then, change a few sections related to a screen and serverflags. Copy
/etc/X11/xorg.confto your home directory or whatever directory you want, then change the sections.You can grab a PCI id with different command. (actually, nvidia-smi includes this info, too)
You will get a result like below.
Then, your PCI ID is
PCI:2:0:0,PCI:3:0:0,PCI:129:0:0,PCI:130:0:0. (note that 81, 82 is hexadecimal, so 8*16+1=129).Finally, you can run X-server, by running a command:
Don't forget the last
&, because it is a daemon process.You can check your x-server by monitoring
nvidia-smiwhile runningglxgearscommand, or withglxinfo.Solutions
If you can connect a monitor directly to a machine
Just connect it; then run app with
DISPLAY=:0option.Connecting a monitor is impossible, but you have a
sudoaccess.Run X-server; generate a virtual monitor Ref.
You don't have a monitor, and you don't have a
sudoaccess.You can workaround OpenGL problem with library preloading trick:
LD_PRELOADFirst, install OSMesa OpenGL library. (Or, all you need is
mesa/libGL.sofile. You can just copy from your local computer to a server.)It will be usually installed under
/usr/lib/x86_64-linux-gnu/. Check whethermesa/libGL.soexists of which we will preload.Note that, installed OSMesa library is not included in the
ldconfigcache, so it won't be loaded (unsure..) unless we specify it withLD_PRELOAD.Anyway, now you can easily prevent
/usr/lib32/nvidia-415/libGL.sofrom loading by specifying OSMesa OpenGL library.Here are some illustrative runs. The loaded library for OpenGL is now different.
Some useful commands & links
nvidia-xconfig --query-gpu-infoglxinfoorDISPLAY=:0 glxinfo | grep OpenGLlsof -p <process_id>; observe shared libraries in used from the processdpkg-query -L <package-name>; check included file from the packageldd <binary>; list libraries the binary linked againstldconfig -p; check library cacheopenai/gym#366
https://bitbucket.org/pyglet/pyglet/issues/219/egl-support-headless-rendering