
| chapter I | General Markdown reference |
|---|
Markdown is created by Daring Fireball; the original guideline is here. Its syntax, however, varies between different parsers or editors. Typora editor, in example, try follow GitHub Flavored Markdown, but may still have small incompatibilities.
A paragraph is simply one or more consecutive lines of text. In markdown source code, paragraphs are separated by two or more blank lines. In Typora, you only need one blank line (press Return once) to create a new paragraph.
Press Shift + Return to create a single line break. Most other markdown parsers will ignore single line breaks, so in order to make other markdown parsers recognize your line break, you can leave two spaces at the end of the line, or insert <br/>.
Headers use 1-6 hash (#) characters at the start of the line, corresponding to header levels 1-6. For example:
# This is an H1

## This is an H2

###### This is an H6
In Typora, input ‘#’s followed by title content, and press Return key will create a header. Or type ⌘1 to ⌘6 as a shortcut.
Markdown uses email-style > characters for block quoting. They are presented as:
> This is a blockquote with two paragraphs. This is first paragraph.
>
> This is second pragraph. Vestibulum enim wisi, viverra nec, fringilla in, laoreet vitae, risus.


> This is another blockquote with one paragraph. There is three empty line to seperate two blockquote.
In Typora, typing ‘>’ followed by your quote contents will generate a quote block. Typora will insert a proper ‘>’ or line break for you. Nested block quotes (a block quote inside another block quote) by adding additional levels of ‘>’.
Typing * list item 1 will create an unordered list. (The * symbol can be replace with + or -.)
Typing 1. list item 1 will create an ordered list.
For example:
## un-ordered list
*   Red
*   Green
*   Blue

## ordered list
1.  Red
2. 	Green
3.	Blue
Task lists are lists with items marked as either [ ] or [x] (incomplete or complete). For example:
- [ ] a task list item
- [ ] list syntax required
- [ ] normal **formatting**, @mentions, #1234 refs
- [ ] incomplete
- [x] completed
You can change the complete/incomplete state by clicking on the checkbox before the item.
Typora only supports fences in GitHub Flavored Markdown, not the original code block style.
Using fences is easy: type ``` and press return. Add an optional language identifier after ``` and Typora runs it through syntax highlighting:
Here's a basic example with ```:
function test() {
  console.log("notice the blank line before this function?");
}
syntax highlighting:
```ruby
and close block as usually
```
gives:
require 'redcarpet'
markdown = Redcarpet.new("Hello World!")
puts markdown.to_htmlYou can render LaTeX mathematical expressions using MathJax.
To add a mathematical expression, enter $$ and press the 'Return' key. This will trigger an input field which accepts Tex/LaTex source. For example:
In the markdown source file, the math block is a LaTeX expression wrapped by a pair of ‘$$’ marks:
$$
\mathbf{V}_1 \times \mathbf{V}_2 =  \begin{vmatrix}
\mathbf{i} & \mathbf{j} & \mathbf{k} \\
\frac{\partial X}{\partial u} &  \frac{\partial Y}{\partial u} & 0 \\
\frac{\partial X}{\partial v} &  \frac{\partial Y}{\partial v} & 0 \\
\end{vmatrix}
$$
You can find more details here.
Standard Markdown has been extended in several ways to add table support., including by GFM. Typora supports this with a graphical interface, or writing the source code directly.
Enter | First Header | Second Header | and press the return key. This will create a table with two columns.
After a table is created, placing the focus on that table will open up a toolbar for the table where you can resize, align, or delete the table. You can also use the context menu to copy and add/delete individual columns/rows.
The full syntax for tables is described below, but it is not necessary to know the full syntax in detail as the markdown source code for tables is generated automatically by Typora.
In markdown source code, they look like:
| First Header  | Second Header |
| ------------- | ------------- |
| Content Cell  | Content Cell  |
| Content Cell  | Content Cell  |
You can also include inline Markdown such as links, bold, italics, or strikethrough in the table.
By including colons (:) within the header row, you can set text in that column to be left-aligned, right-aligned, or center-aligned:
| Left-Aligned  | Center Aligned  | Right Aligned |
| :------------ |:---------------:| -----:|
| col 3 is      | some wordy text | $1600 |
| col 2 is      | centered        |   $12 |
| zebra stripes | are neat        |    $1 |
A colon on the left-most side indicates a left-aligned column; a colon on the right-most side indicates a right-aligned column; a colon on both sides indicates a center-aligned column.
MultiMarkdown extends standard Markdown to provide two ways to add footnotes.
You can create reference footnotes like this1 and this2.
will produce:
You can create footnotes like this[^fn1] and this[^fn2].

[^fn1]: Here is the *text* of the first **footnote**.
[^fn2]: Here is the *text* of the second **footnote**.
Hover over the ‘fn1’ or 'fn2' superscript to see content of the footnote. You can use whatever unique identified you like as the footnote marker (e.g. "fn1").
Hover over the footnote superscripts to see content of the footnote.
Entering *** or --- on a blank line and pressing return will draw a horizontal line.
Typora now supports YAML Front Matter. Enter --- at the top of the article and then press Return to introduce a metadata block. Alternatively, you can insert a metadata block from the top menu of Typora.
Enter [toc] and press the Return key to create a “Table of Contents” section. The TOC extracts all headers from the document, and its contents are updated automatically as you add to the document.
Span elements will be parsed and rendered right after typing. Moving the cursor in middle of those span elements will expand those elements into markdown source. Below is an explanation of the syntax for each span element.
Markdown supports two styles of links: inline and reference.
In both styles, the link text is delimited by [square brackets].
To create an inline link, use a set of regular parentheses immediately after the link text’s closing square bracket. Inside the parentheses, put the URL where you want the link to point, along with an optional title for the link, surrounded in quotes. For example:
This is [an example](http://example.com/ "Title") inline link.

[This link](http://example.net/) has no title attribute.
will produce:
This is an example inline link. (<p>This is <a href="http://example.com/" title="Title">)
This link has no title attribute. (<p><a href="http://example.net/">This link</a> has no)
To create an internal link that creates a 'bookmark' that allow you to jump to that section after clicking on it, use the name of the header element as the href. For example:
Hold down Cmd (on Windows: Ctrl) and click on this link to jump to header Block Elements.
Hold down Cmd (on Windows: Ctrl) and click on [this link](#block-elements) to jump to header `Block Elements`. Reference-style links use a second set of square brackets, inside which you place a label of your choosing to identify the link:
This is [an example][id] reference-style link.

Then, anywhere in the document, you define your link label on a line by itself like this:

[id]: http://example.com/  "Optional Title Here"
In Typora, they will be rendered like so:
This is an example reference-style link.
The implicit link name shortcut allows you to omit the name of the link, in which case the link text itself is used as the name. Just use an empty set of square brackets — for example, to link the word “Google” to the google.com web site, you could simply write:
[Google][]
And then define the link:

[Google]: http://google.com/
In Typora, clicking the link will expand it for editing, and command+click will open the hyperlink in your web browser.
Typora allows you to insert URLs as links, wrapped by <brackets>. For example <i@typora.io> becomes i@typora.io.
Typora will also automatically link standard URLs (for example: www.google.com) without these brackets.
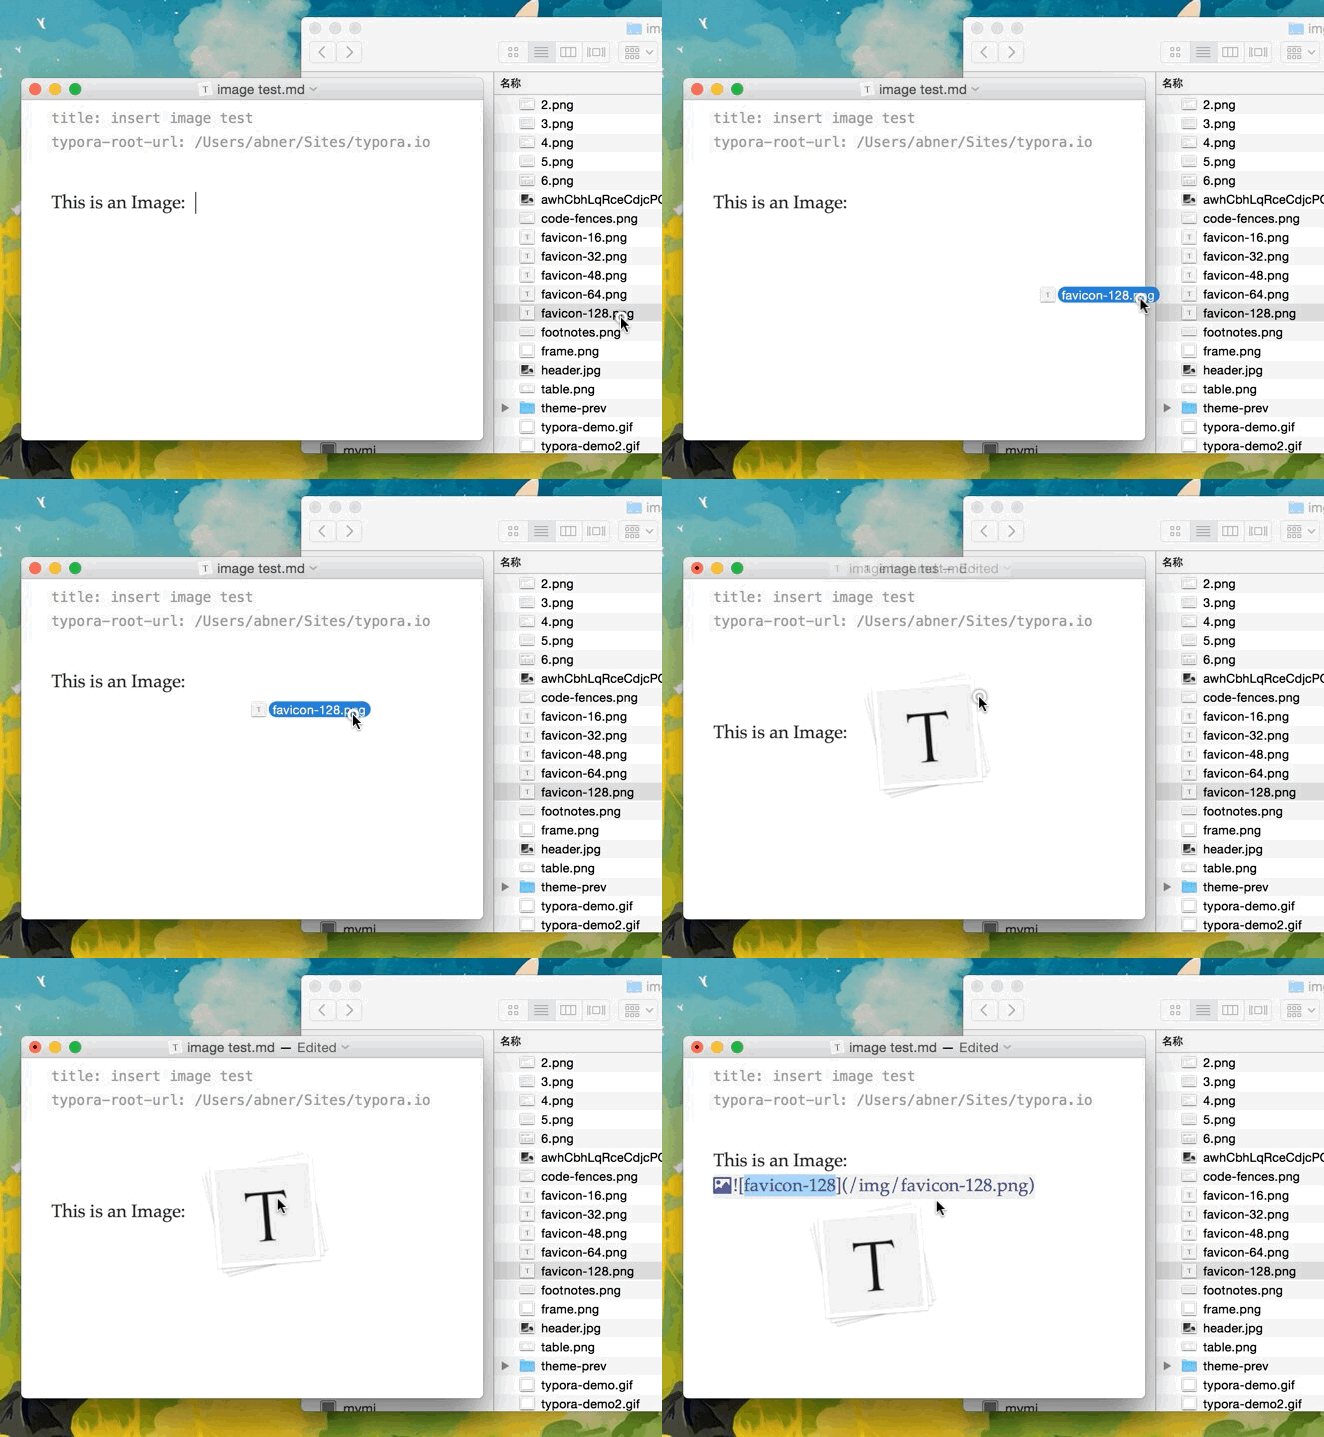
Images have similar syntax as links, but they require an additional ! char before the start of the link. The syntax for inserting an image looks like this:

You are able to use drag and drop to insert an image from an image file or your web browser. You can modify the markdown source code by clicking on the image. A relative path will be used if the image that is added using drag and drop is in same directory or sub-directory as the document you're currently editing.
If you’re using markdown for building websites, you may specify a URL prefix for the image preview on your local computer with property typora-root-url in YAML Front Matter.
Markdown treats asterisks (*) and underscores (_) as indicators of emphasis. Text wrapped with one * or _ will be wrapped with an HTML <em> tag. For example:
*single asterisks*

_single underscores_
produces:
single asterisks
single underscores
GFM will ignore underscores in words, which is commonly used in code and names, like this:
wow_great_stuff
do_this_and_do_that_and_another_thing.
To produce a literal asterisk or underscore at a position where it would otherwise be used as an emphasis delimiter, you can backslash escape it with a backslash character:
\*this text is surrounded by literal asterisks\*Typora recommends using the * symbol.
A double * or _ will cause its enclosed contents to be wrapped with an HTML <strong> tag, e.g:
**double asterisks**

__double underscores__
produces:
double asterisks
double underscores
Typora recommends using the ** symbol.
To indicate an inline span of code, wrap it with backtick quotes (`). Unlike a pre-formatted code block, a code span indicates code within a normal paragraph. For example:
Use the `printf()` function.will produce:
Use the printf() function.
GFM adds syntax to create strikethrough text, which is missing from standard Markdown.
~~Mistaken text.~~ becomes Mistaken text.
Enter emoji with syntax :smile:. To make it easier, an auto-complete helper will pop up after typing : and the start of an emoji name.
Entering UTF-8 emoji characters directly is also supported by going to Edit -> Emoji & Symbols in the menu bar.
To use this feature, please enable it first in the Markdown tab of the preference panel. Then, use $ to wrap a LaTeX command. For example: $\lim_{x \to \infty} \exp(-x) = 0$.
To trigger inline preview for inline math: input “$”, then press the ESC key, then input a TeX command.
You can find more details here.
To use this feature, please enable it first in the Markdown tab of the preference panel. Then, use ~ to wrap subscript content. For example: H~2~O, X~long\ text~/
To use this feature, please enable it first in the Markdown tab of the preference panel. Then, use ^ to wrap superscript content. For example: X^2^.
To use this feature, please enable it first in the Markdown tab of the preference panel. Then, use == to wrap highlight content. For example: ==highlight==.
You can use HTML to style content what pure Markdown does not support. For example, use <span style="color:red">this text is red</span> to add text with red color.
Underline isn't specified in Markdown of GFM, but can be produced by using underline HTML tags:
<u>Underline</u> becomes Underline.
Some websites provide iframe-based embed code which you can also paste into Typora. For example:
<iframe height='265' scrolling='no' title='Fancy Animated SVG Menu' src='http://codepen.io/jeangontijo/embed/OxVywj/?height=265&theme-id=0&default-tab=css,result&embed-version=2' frameborder='no' allowtransparency='true' allowfullscreen='true' style='width: 100%;'></iframe>You can use the <video> HTML tag to embed videos. For example:
<video src="xxx.mp4" />You can find more details here.