
-
Create a basic Node.js app using the Express framework
-
Use the Mongoose ORM to define a model
-
Use the Mongoose ORM to access MongoDB
-
Create Express routes to access our API
-
Setting up the Basics of the App
-
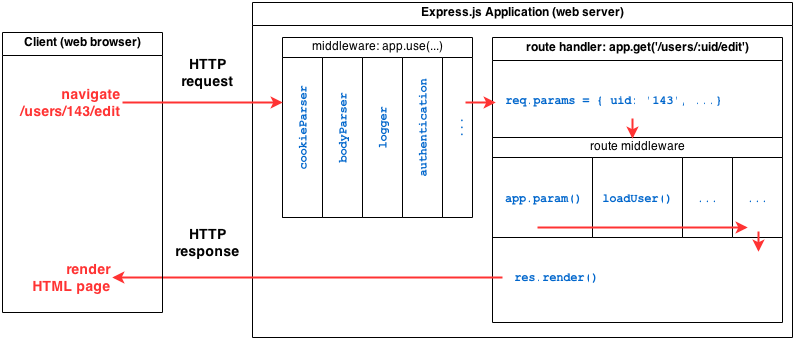
Request/Response Cycle & Middleware
-
Routing
-
Mongoose - An ORM for MongoDB
-
Connecting the AngularJS App
-
Several weeks ago we created an app that displayed hippos for sale - Big Hippo Depot.
-
That app was already a SPA developed with AngularJS, which is perfect. Why?
-
However, instead of it being served by a Rails server, we will create a server using Node.js with the Express framework.
-
Lastly, instead of PostgreSQL, we will use MongoDB.
-
express-generatoris a command line tool that quickly generates a skeleton node.js app that incorporates the Express framework.? npm install express-generator -g -
By using the global
-gflag, we only need to install it once on our machine.
Let's take a look at the options available to us:
? express -h
  Usage: express [options] [dir]

  Options:

    -h, --help          output usage information
    -V, --version       output the version number
    -e, --ejs           add ejs engine support (defaults to jade)
        --hbs           add handlebars engine support
    -H, --hogan         add hogan.js engine support
    -c, --css <engine>  add stylesheet <engine> support (less|stylus|compass) (defaults to plain css)
    -f, --force         force on non-empty directory
-
We will use the
-eoption to use the ejs template engine instead of jade. -
jadeis a template language that leverages indentation to create HTML with a "shorthand" syntax. -
jade is the default because it is written by the same fine people that brought us the Express framework.
-
ejs(embedded JavaScript) templates look and work very much like erb templates - much nicer (IMHO)!
From your new app's parent directory (just like rails new...)
? express -e node-hippo
Our scaffolded folder structure will look like this:
├── app.js
├── bin
│   └── www
├── package.json
├── public
│   ├── images
│   ├── javascripts
│   └── stylesheets
│       └── style.css
├── routes
│   ├── index.js
│   └── users.js
└── views
    ├── error.js
    └── index.js
-
A quick look at the
package.jsonfile reveals the default modules Express has set up. -
? npm installwill copy these modules into our app's node_modules folder.
-
Starting an Express app properly is not as straight forward as it should be.
-
The most basic way is to simply type
npm start. This will execute the start script specified in package.json. -
Tutorials will often show an alternative command such as this:
DEBUG=node-hippos ./bin/www. This method creates a debug log file. -
To properly debug Node apps, use node-inspector.
-
Type
npm startand browse tolocalhost:3000.
-
Middleware is a stack of processes that run on each request made to the server.
-
You can have any number of middleware that will process the request one by one in the order they were mounted.
-
Middleware can be used to, log info, compile css, do authentication, etc.
-
Once a piece of middleware has done its job, it either calls
next()to pass control to the next middleware in the stack or renders the response back to the browser.
-
morgan: Logger
-
body-parser: Parses the body so you can access parameters in requests in the request.body, for example,
request.body.name. -
cookie-parser: Populates the
cookiesobject on therequestso that you can access data in cookies. For example,req.cookies.name. cookie-parser is middleware which deals with the request. To set a cookie, you would use thecookieobject on the response object. -
serve-favicon: Serves the favicon from route /favicon.ico.
-
Middleware is added to the Express middleware stack using the Express app's
use()method or one of the methods representing one of the HTTP verbs (check app.js). -
Let's add our own piece of middleware that logs out the requestor's IP address:
app.use(express.static(path.join(__dirname, 'public')));

// above is existing code / below is new code
app.use(function (req, res, next) {
  var ip = req.headers['x-forwarded-for'] || req.connection.remoteAddress;
  console.log('Client IP:', ip);
  next();
});
Be sure to restart your server, then browse...
-
Unfortunately, every change in the source code requires a restart. This is because Node loads the entire application into memory once - at startup.
-
Fortunately, there's a Node module,
nodemon, that will watch for saved changes and restart the server for us.? npm install nodemon -g
Now we start the server by typing:? nodemon
-
There are several ways to set up routing in an Express app. In fact, we've already seen how middleware is plugged into the routing system with the
.use()method. -
Examine the two sample routes in app.js:
  app.use('/', routes);
  app.use('/users', users);
-
Note how their code is organized inside the routes folder, required, then plugged into the request middleware stack.
-
The Express'
Routerobject is the most powerful and flexible way to set up routes in Express.
-
As we've seen, the default route (
/) is already configured to render the index.ejs view. Soon, we'll change the code in index.ejs to load our AngularJS front-end. -
We also need an API for hippos. Let's modify the sample users route:
- Rename users.js to hippos.js
- Change users to hippos in
var users = require('./routes/users') - Lets also namespace our API by changing:
app.use('/users', users);
toapp.use('/api/hippos', hippos);
Verify the new API route by browsing to localhost:3000/api/hippos
-
Let's stub up a route that would send back a single hippo.
-
What would the RESTful route be?
-
Add this code to hippos.js:
 router.get('/:id', function(req, res, next) {
 	res.json({id: req.params.id});
 });
-
Note that the path defined in the router is appended to the path specified when the router was mounted with
app.use('api/hippos', hippos);. -
Check the route in the browser!
-
Install Mongoose:
? npm install mongoose --save -
In app.js after
var hippos = require('./routes/hippos');var mongoose = require('mongoose'); mongoose.connect(process.env.MONGOLAB_URI, function(err) { if(err) { console.log('MongoDB connection error', err); } else { console.log('Successfully connected to MongoDB'); } });
-
We will receive an error because we are "hiding" our connection string. Let's fix this...
-
We need another module to automatically load environment variables from a .env file (that we would include in our .gitignore):
? npm install dotenv --save -
Require it early in app.js (after bodyParser works):
require('dotenv').load();
-
Then create a .env file in our app's root folder and create our variable for our connection string in it like this:
 // .env
 MONGOLAB_URI=mongodb://<user>:<pw>@ds047692.mongolab.com:47692/hippos
-
Update with the correct user & pw, and voila!
-
Mongoose models make it easier to implement CRUD in Node apps. Mongoose is to MEAN, what ActiveRecord is to Rails.
-
Mongoose models map to a collection in MongoDB. For example our Hippo model will be saved in a MongoDB collection named hippos.
-
In an Express app, we need to self-organize our code. Create a models folder to keep our model files in. In the folder, create Hippo.js:
 var mongoose = require('mongoose');

 var hippoSchema = new mongoose.Schema({
 	name: String,
 	weight: Number,
 	price: Number,
 	sold: Boolean,
 	created_at: { type: Date, default: Date.now }
 });

 module.exports = mongoose.model('Hippo', hippoSchema);
-
It's also possible to create a model by passing in an object instead of a schema, however, creating a Mongoose schema allows you to add virtual fields, pre & post middleware, etc.
-
To create new documents for our models we can use either of these two techniques:
 var hippo = new Hippo({name: 'Henry', weight: 4300});
 hippo.save(function(err) {
 	// callback code
 });
OR
```js
Hippo.create({name: 'Henry', weight: 4300}, function(err, hippo) {
	// callback code
});
```
- Does this look familiar?
-
Let's write the code in our
hippos.jsroute file to return all hippos for the/api/hipposAPI route:var Hippo = require('../models/Hippo'); router.get('/', function(req, res) { Hippo.find(function (err, hippos) { if (err) res.send(err); res.json(hippos); }); });
-
Wherever we want to access our Hippo model, we will need to
requireit. Don't worry about a performance hit, each module is actually loaded by Node one time, no matter how many times it is required in other modules. -
Test the API at
localhost:3000/api/hippos
-
We used the
json()method of the res object to return JSON to the client. -
Here is a list of common methods that can be used to terminate the request/response cycle:
res.json()- Send a JSON responseres.jsonp()- Send a JSON response with JSONP supportres.redirect()- Redirect a requestres.render()- Render a view templateres.send()- Send a response of various typesres.sendFile- Send a file as an octet stream
-
We need to update our index.ejs so that it loads the HTML, the required AngularJS libraries, and the JavaScript for our app.
-
Copy the index.html section from this Gist and paste it into index.ejs - overwriting its current contents.
-
Browse to
localhost:3000. A quick check of the console will inform us that we're missing our hippo_app.js...
-
The public folder holds all of our static files. This was configured in app.js with this code:
app.use(express.static(path.join(__dirname, 'public'))); -
In the javascripts folder, create a file named hippo_app.js, and copy the script from the Gist.
-
Refresh!
-
Earlier we stubbed up a route in our hippo API to return a single hippo, but simply returned the id parameter.
-
Modify the code to return the JSON of the requested hippo.
-
Note: Unlike PostgreSQL, the _id field in MongoDB is a unique string. To test the API, you will need to access the _id's by browsing to
localhost:3000/api/hippos. -
Mongoose has a nice method for this -
findById().
-
Write the code for the addHippo function in the HomeController:
- There are a few hints in the existing code.
-
Add a
postroute to the hippos router:- Use the json in the
req.body.yourObjectNameto create a new Hippo in the db using the Hippo model. - Be sure to return the newly created hippo from your server to the browser - it's a standard to do this in REST.
- Use the json in the
_Note: When searching for info on the Express framework, be sure that you search for the info for version 4 only - there were significant changes made from earlier versions._