
In this lesson we'll cover branching, merging, and working with teams
- Review the basic commands for Git
- Explain what a branch is and why we would use one
- Create and switch between branches
- Destroy a branch
- Explain what a merge is and why we need them
- Describe what a merge conflict is and how to resolve one
- Explain the difference b/w cloning and forking a repo
- Submit a pull request on GitHub for a branch
- Explain the workflow for developing a project with other developers
- What does it mean when we say Git is a distributed version control system vs centralized?
- Why do we need Git?
- Revert files back to a previous state
- Revert the entire project back to a previous state
- See who introduced an issue and when
- Automation, deployment
- Benefits of working locally
- Speed
- Don't need to be connected to the internet to save progress
- Free to experiment without impacting others
- Working with Git
- Working directory
- Staging area
- .git repository
- States
- Untracked
- Unmodified
- Modified
- Staged
- Commands
git initgit addgit statusgit commitgit loggit branchgit checkoutgit merge
- work in teams
- backup our data in case our machine crashes
- resume
- social
A clone is a copy of an existing repository. We can create as many clones as we want, wherever we want.
Forking creates a copy of someone else's GitHub repo to your GitHub account. The forked repo is not perfectly identical - but it includes all the same source files, issues, and commit history.
- Used for open source contributions so that not everyone has to have write access to the code in order to contribute
- Propose bug fixes
We Do
git clone git@github.com:ga-students/wdi-atx-7-class.git
Search for any popular repository and show how easy it is to fork into our own repository
NOTE: Students will be using a variation of the following link to submit homework:
https://www.atlassian.com/git/tutorials/comparing-workflows/forking-workflow
- Fork the homework repo
- Clone your version of the repo
- Add a remote
upstream - To get the latest updates, they will run
git pull upstream master - They will then submit a pull request
Initialize the repo with a README or there won't be a master branch
You Do
Clone the repository you just created on GitHub
git push / git push origin master
git fetch- Obtains the latest updates from the remote repositorygit merge- Merges the new updates with your existing working copygit pull- A combination of both fetch and merge
Update the class repo with the Git Haiku class exercise. Have the students do a git pull to get the updates
20 min
https://gist.github.com/mdang/e6b45f9554a64c8d44fd
Why create pull requests? What are they used for?
Branching allows you to diverge from the main line of development and continue to do work and experiment without messing up the main line.
Git stores data as a series of snapshots, with pointers to versions of files. A branch is a lightweight pointer that refers to a particular commit.
Whiteboard the main "branch", and show development branches coming out of it
The default branch name in Git is master. It's not special in any way other then it's automatically created when you use git commit. Most people don't bother to change it.
Because a branch in Git is in actuality a simple file that contains the 40 character SHA-1 checksum of the commit it points to, branches are cheap to create and destroy. Creating a new branch is as quick and simple as writing 41 bytes to a file (40 characters and a newline).
This is in sharp contrast to the way most older VCS tools branch, which involves copying all of the project’s files into a second directory. This can take several seconds or even minutes, depending on the size of the project, whereas in Git the process is always instantaneous.
Creating a branch creates a new pointer to the same series of commits as master
HEAD is a special pointer to the local branch that you're currently on. In this case it's still master because we haven't switched to our new branch yet.
# This creates the branch but doesn't switch to it
git branch testing
# This creates the branch and switches to it
git checkout -b testing
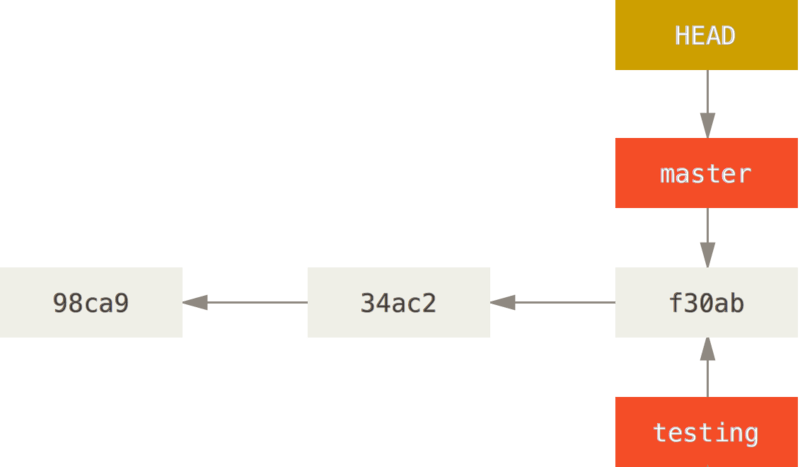
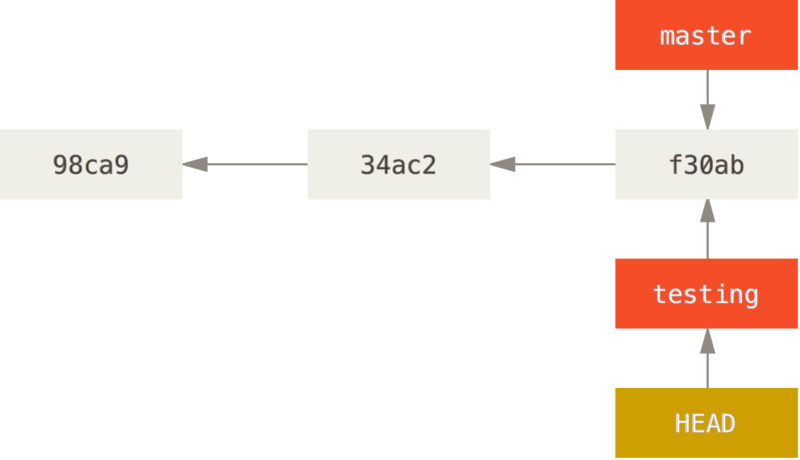
HEAD now points to our testing branch.
Switching branches changes the files in your working directory
git checkout testing
Check out the branch you wish to merge into and then run the git merge command
git checkout master
git merge testing
To update the current branch with changes from master, merge master into the branch
git checkout testing
git merge origin/master
git push origin master
Alternatively, you can rebase:
git fetch
git rebase origin/master
git branch -d testing
While running git merge, if you edited part of a file that would be further altered by the merge, you'll get a merge conflict. It looks like this:
$ git merge testing
Auto-merging index.html
CONFLICT (content): Merge conflict in index.html
Automatic merge failed; fix conflicts and then commit the result.
To resolve:
Run git status to verify all the files that could not be merged
Open up the file(s) with a conflict
<<<<<<< HEAD:index.html
<div id="footer">contact : email.support@github.com</div>
=======
<div id="footer">
 please contact us at support@github.com
</div>
>>>>>>> iss53:index.html
Resolve the conflict and remove any markers added by Git
Run git add on any files you updates
Run git status to verify all conflicts have been resolved
$ git status
On branch master
All conflicts fixed but you are still merging.
  (use "git commit" to conclude merge)

Changes to be committed:

    modified:   index.html
Run git commit -m "Message"
2 min
- Describe the most important thing you learned about Git today
- What is most confusing?
origin is not special, it's the default name given when you clone a git repo
To view remote branches, use:
git remote -v
git push origin testing
git push origin --delete serverfix
20 min
https://gist.github.com/mdang/9ef6df246e23a795936b