Skip to content

Instantly share code, notes, and snippets.

@mdvorak
Last active March 2, 2025 23:10
Show Gist options
  • Save mdvorak/2fccca3fa9f76f5a2e11e567797c76d6 to your computer and use it in GitHub Desktop.
Save mdvorak/2fccca3fa9f76f5a2e11e567797c76d6 to your computer and use it in GitHub Desktop.
DS18B20 on BigTreeTech Pi

DS18B20 on BigTreeTech Pi v1.2

BTT Pi uses AllWinner H616 CPU, and on https://github.com/bigtreetech/CB1 system, w1-gpio kernel module does not work.

However, there is an excellent custom module https://github.com/pstolarz/w1-gpio-cl

The following steps were tested on CB1 v2.3.3.

Wiring

DS18B20 Pinout
BTT Pi GPIO

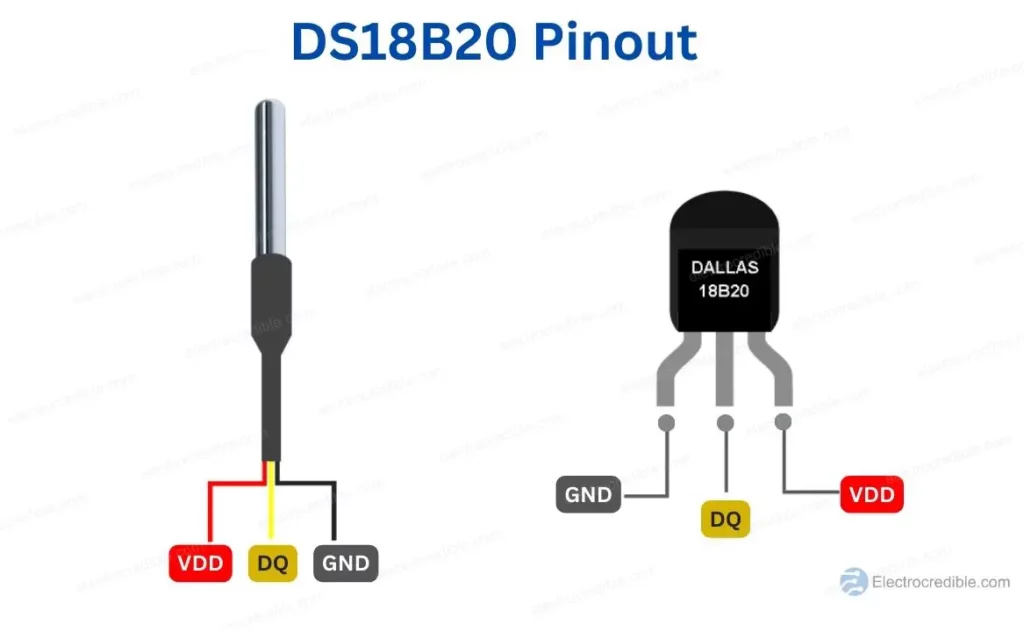
Connect sensor VCC pin to 3.3V, GND to GND (obviously), and signal pin to selected GPIO. I used PC7, since it corresponds to the default w1 pin location on the Raspberry Pi header.
Don't forget to add a pull-up resistor between 3.3V and the signal pin. A 4.7 kOhm resistor is the recommended value.

NEVER connect anything while the printer is powered on!

I did not try parasitic power mode, and I don't recommend it. Klipper will shut down on subsequent read errors, and it might ruin your prints randomly. I did not have any problems with the standard 3-wire connection yet.

Compilation on CB1 system

The easiest way is to compile it directly on the device. The official guide needed to be modified slightly.

  1. sudo apt-get install build-essential bc bison flex libssl-dev
  2. sudo apt-get install linux-headers-current-sun50iw9
  3. git clone https://github.com/pstolarz/w1-gpio-cl.git
  4. cd w1-gpio-cl
  5. ln -s /lib/modules/`uname -r`/build/include/linux w1
  6. make
  7. sudo make install

DKMS

Optionally, you can install it using DKMS

sudo dkms add .
sudo dkms install w1-gpio-cl/1.2.2

where 1.2.1 is the latest w1-gpio-cl release version.

Installation

For details, read the original README.

Pin Selection

The w1-gpio-cl module does not accept pin names; instead, it needs pin index. To list all available pins, run

sudo cat /sys/kernel/debug/pinctrl/300b000.pinctrl/pinmux-pins

Find your preferred pin (note that some pins might not work). I used PC7

pin 71 (PC7): UNCLAIMED

Now you can configure module options

echo 'options w1-gpio-cl m1="gdt:71"' | sudo tee /etc/modprobe.d/w1-gpio-cl.conf

Test Config

Try loading the module manually

sudo modprobe w1-gpio-cl

Verify that the module is loaded

lsmod | grep w1

You should see something like

w1_therm               28672  0
w1_gpio_cl             16384  0

You can verify the output of the dmesg for errors.

Automatic Loading

To load the module during boot, run

echo 'w1-gpio-cl' | sudo tee /etc/modules-load.d/w1-gpio-cl.conf

Reboot and verify that the module is properly loaded and working.

Configuration

See https://www.klipper3d.org/Config_Reference.html#ds18b20-temperature-sensor

Find out connected sensor addresses

sudo ls /sys/bus/w1/devices/

You will see output like

28-011319f769fe  w1_bus_master1

With that address, add a Klipper config section like this

[temperature_sensor my_sensor]
sensor_type: DS18B20
serial_no: 28-011319f769fe
sensor_mcu: CB1

Note that sensor_mcu must be set to the host, which is CB1 by default.

After restarting Klipper, your new temperature sensor should appear in the Mainsail/Fluidd UI automatically.

@mdvorak
Copy link
Author

mdvorak commented Apr 29, 2024

Hm, according to dmesg, module is loaded without error:

[    8.045259] w1_gpio_cl: loading out-of-tree module taints kernel.
[    8.051683] w1_gpio_cl: module verification failed: signature and/or required key missing - tainting kernel

Check again output of lsmod | grep w1 and then sudo ls /sys/bus/w1/devices/. If everything is OK but no devices are found, I would revisit wiring again. Also, try only one (or better, different) sensor. Cheap china clones are not always 100% functional.

@jonathjon
Copy link

sudo ls /sys/bus/w1/devices/

Here is the output I get from what you asked. Going to wire up a single sensor and give that a try. Im wondering if its because the CB1 EMMC has different GPIO numbers than the regular CB1 or BTT Pi

biqu@BTT-CB1:~$ lsmod | grep w1
w1_gpio_cl             16384  0
biqu@BTT-CB1:~$ sudo ls /sys/bus/w1/devices/
w1_bus_master1
biqu@BTT-CB1:~$

@mdvorak
Copy link
Author

mdvorak commented Apr 30, 2024

It does not seem like sw issue, so check the hw.

@jonathjon
Copy link

Just tried another single sensor. Same thing, not getting anything. Took that same sensor and hooked it up to a D1 Mini with ESP Home and I get an address from it and temp readings. Sensor is good. So its a SW issue.

@math-milan
Copy link

Hi mdvorak. I have trouble loading the kernel headers for the new build with the Kernel version 6.6.66. Do i have to build the headers form source?

@mdvorak
Copy link
Author

mdvorak commented Jan 3, 2025

Sorry, I did not try it yet with 6.x kernel, I'm still on previous version:

Welcome to BTT-CB1 2.3.4 Bullseye with Linux 5.16.17-sun50iw9

But I'll try it soon with latest version running on 6.6 kernel.

@math-milan
Copy link

math-milan commented Jan 3, 2025

Thanks for the response. I found a solution and thought I’d share it—maybe somebody else wants to try this.
How to Compile the Kernel Headers and w1-gpio-cl

You should be able to use these commands to cross-compile the driver and then install it on the BTT Pi.

  1. Install Build Tools
sudo apt-get install build-essential bc bison flex libssl-dev
sudo apt-get install gcc-aarch64-linux-gnu
  1. Download the Kernel
    Use the branch for your build. You can find it in the release for the BTT image you used. This is for the current latest version V3.0.0 of the OS image.
git clone --branch bpi-6.6.y --single-branch --depth 1 https://github.com/bigtreetech/linux.git
  1. Update the Kernel Makefile
    In the Makefile, update the EXTRAVERSION line:
EXTRAVERSION =-vendor-sunxi64 # this in the first paragrh. 

This must be done because this is the name of the kernel in the os image and it only worked for me if they matched

  1. Get the Kernel Configuration from Your BTT Pi
cp /proc/config.gz ~/.config
gzip -d ~/.config.gz
# Copy this configuration file to the downloaded Git repo on your PC
  1. Add the W1 too the build in feathers
    Edit the kernel configuration to enable W1 (1-Wire) support:
make menuconfig ARCH=arm64 CROSS_COMPILE=aarch64-linux-gnu-
  • Navigate to Device Drivers -> Dallas's 1-Wire support.
  • Change it to {*} to build it into the kernel.
  • Save the configuration.
  1. Make the Kernel
make ARCH=arm64 CROSS_COMPILE=aarch64-linux-gnu- LOCALVERSION=

I got a Error 2 at the end of the build process. When you see this at the end
it might still work. Your milage might vary.

  LD      vmlinux
  NM      System.map
  SORTTAB vmlinux
  1. Build the 1-wire driver
git clone https://github.com/pstolarz/w1-gpio-cl.git
cd w1-gpio-cl
ln -s /to the kernel repo/include/linux w1 # Creat Sim Link to the w1 file in the build kernel headers

make ARCH=arm64 CROSS_COMPILE=aarch64-linux-gnu- KERNEL_SRC=/to the kernel repo/linux/

Check the compiled module for compatibility:

modinfo w1-gpio-cl.ko

Ensure the vermagic matches uname -r on the BTT Pi.
7. Install the Driver on the BTT Pi
Transfer the compiled w1-gpio-cl.ko to your BTT Pi, then:

sudo cp w1-gpio-cl.ko /lib/modules/KERNEL_RELEASE/kernel/drivers/w1/masters
sudo depmod

Now 1w shoude work.

Sign up for free to join this conversation on GitHub. Already have an account? Sign in to comment