A brief guide to
- Rancher Kubernetes Engine (RKE)
- Installing Rancher With Kubernetes
- Deploying Kubernetes With Rancher
- Managing Kubernetes With Rancher
- Running Kubernetes Workloads
brew install rke
rke --version
If you are using a test server in Virtual Machine consider to setup a DNS masquerade tool to configure DNS forwarder like
brew install dnsmasq
brew info dnsmasq

# Create config directory
mkdir -pv $(brew --prefix)/etc/

# Setup *.test
echo 'address=/.test/<IP_ADDRESS>' >> $(brew --prefix)/etc/dnsmasq.conf

# Change port for High Sierra
echo 'port=53' >> $(brew --prefix)/etc/dnsmasq.conf

# Create resolver directory
sudo mkdir -v /etc/resolver

# Add your nameserver to resolvers
sudo bash -c 'echo "nameserver 127.0.0.1" > /etc/resolver/test'

# Verify that all .test requests are using 127.0.0.1
scutil --dns

# Modify macOS network configuration
sudo vi /etc/resolv.conf
nameserver 127.0.0.1 # Add localhost ip

# Verify your changes using the dig command by querying your local Dnsmasq instance.
dig rancher.mydomain.test
nslookup rancher.mydomain.test
dig -x <IP-ADDRESS> # Reverse IP lookup
dig rancher.mydomain.test @127.0.0.1

# Restart dnsmasq
sudo brew services stop dnsmasq
sudo brew services start dnsmasq
# Install sudo
su -
apt-get update
apt-get install sudo

# Add user to sudo groups
sudo usermod -a -G sudo user

# Exit from remote server
exit

# Login to remote server and check if user is in sudo group
ssh user@remote_server
groups
References: https://rancher.com/docs/rke/latest/en/os/#ports
# Open TCP/6443 for all
sudo iptables -A INPUT -p tcp --dport 6443 -j ACCEPT

# Open TCP/6443 for ONE SPECIFIC IP
sudo iptables -A INPUT -p tcp -s your_ip_here --dport 6443 -j ACCEPT
# Open TCP/6443 for all
firewall-cmd --zone=public --add-port=6443/tcp --permanent
firewall-cmd --reload

# Open TCP/6443 for one specific IP
firewall-cmd --permanent --zone=public --add-rich-rule='
  rule family="ipv4"
  source address="your_ip_here/32"
  port protocol="tcp" port="6443" accept'
firewall-cmd --reload
# Check for open ports
sudo apt-get install nmap
nmap –sT –O localhost
....
PORT     STATE SERVICE
22/tcp   open  ssh
80/tcp   open  http
....

# Use netcat to check if port is open
sudo apt-get install netcat
sudo nc -vz localhost <PORT>

# Check for a specific port such as 6443 with lsof
sudo apt-get install lsof
sudo lsof -i:6443

# List of all LISTEN port
sudo lsof -i -P -n | grep LISTEN

# List all iptables rules
sudo iptables --list
Check for Opening Ports with firewalld advanced configuration
References: https://rancher.com/docs/rancher/v2.x/en/installation/resources/installing-docker/
Check installer script version
ssh username@remote_server

# Check if certificates are installed on your server
ls /etc/ssl/certs

# If ssl/certificates folder is empty remove and re-install ca-certificates
suodo apt-get remove ca-certificates
sudo apt-get install ca-certificates
ls /etc/ssl/certs

# Installing Docker (Check installer script version before)
curl https://releases.rancher.com/install-docker/19.03.sh | sh
docker --version
sudo usermod -aG docker yourusername
References:
- https://rancher.com/blog/2018/2018-09-26-setup-basic-kubernetes-cluster-with-ease-using-rke#creating-the-linux-user-account
- https://rancher.com/docs/rke/latest/en/os/
Set AllowAgentForwarding yes in remote server
sudo vi /etc/ssh/sshd_config
...
# Uncomment line
AllowAgentForwarding yes
....

sudo systemctl restart sshd
sudo systemctl status sshd
# Login to remote server / node
ssh username@remote_server

# Create .ssh folder in remote server user home folder
mkdir $HOME/.ssh
chmod 700 $HOME/.ssh

# Login to your client
# Check if SSH key already exists
ls $HOME/.ssh/
less $HOME/.ssh/id_rsa

# If necessary create new SSH key pair
ssh-keygen

# Copy the SSH public key to the remote server / node
cat $HOME/.ssh/id_rsa.pub | ssh remote_server "tee -a /home/<yourusername>/.ssh/authorized_keys"

# Test SSH connectivity
ssh -i $HOME/.ssh/id_rsa username@remote_server docker version
mkdir /opt/rke
cd /opt/rke
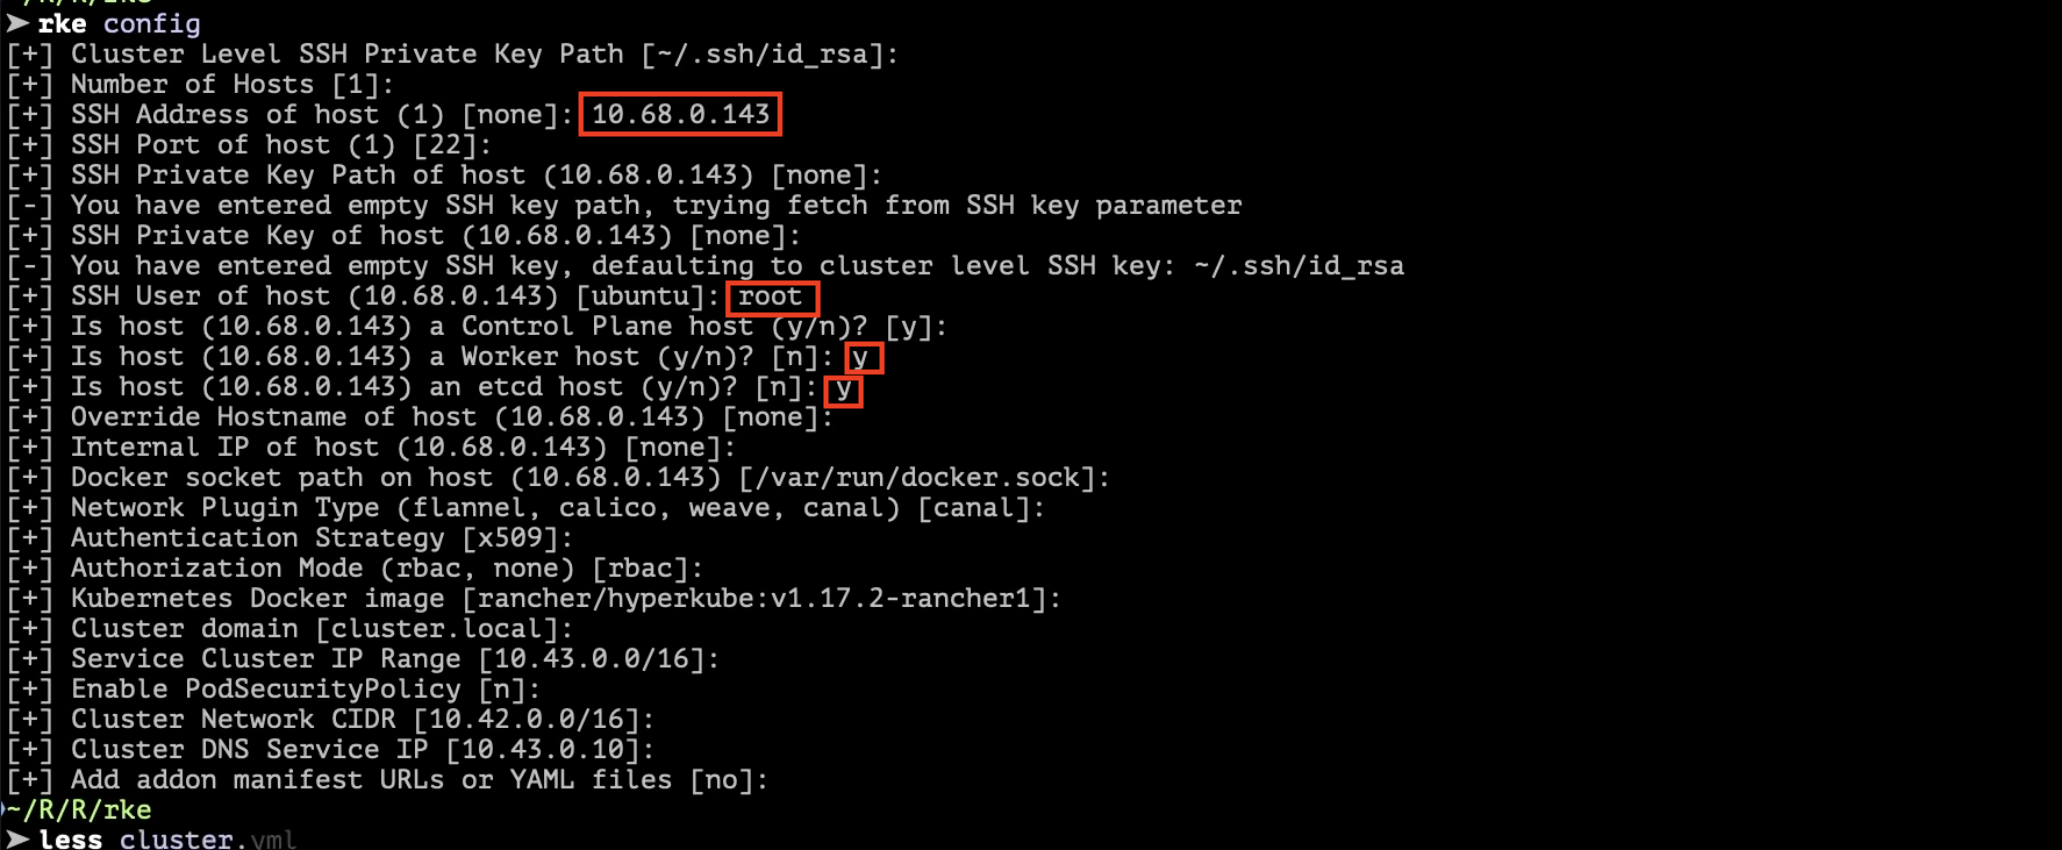
rke config
...

Compile all asked questions

Change SSH User of host 'root' with your remote server username

Reference: https://rancher.com/docs/rancher/v2.x/en/cluster-provisioning/production/#cluster-architecture
- Nodes should have one of the following role configurations:
etcdcontrolplaneetcd and controlplaneworker(the worker role should not be used or added on nodes with the etcd or controlplane role)
- Have at least three nodes with the role
etcdto survive losing one node. Increase this count for higher node fault toleration, and spread them across (availability) zones to provide even better fault tolerance. - Assign two or more nodes the
controlplanerole for master component high availability. - Assign two or more nodes the
workerrole for workload rescheduling upon node failure.
rke up
Save a copy of the following files in a secure location:
cluster.yml: The RKE cluster configuration file.kube_config_cluster.yml: The Kubeconfig file for the cluster, this file contains credentials for full access to the cluster.cluster.rkestate: The Kubernetes Cluster State file, this file contains credentials for full access to the cluster.
References: https://rancher.com/docs/rancher/v2.x/en/cluster-admin/cluster-access/kubectl/
Workstation global configuration
cp kube_config_cluster.yml ~/.kube/config
chmod go-r ~/.kube/config
You can use any directory and specify it using the --kubeconfig flag, as in this command: kubectl --kubeconfig /custom/path/kube.config get pods
From your workstation, launch kubectl. Use it to interact with your kubernetes cluster
cp kube_config_cluster.yml kube.config
chmod go-r kube.config

kubectl --kubeconfig kube.config get nodes
kubectl get nodes
kubectl get nodes -o wide
kubectl describe nodes
Set kubernetes_version:"" with last available Kubernetes version (e.g. kubernetes_version: "v1.19.4-rancher1-1")
rke config --list-version --all
vi cluster.yml
...
rke up --config cluster.yml
You can update Kubernetes version one node at the time
- Navigate to cluster you want edit (e.g. Global > Cluster_name)
- Navigate to Node > Take a snapshot (option on the right > Snapshot now)
- Edit the Cluster > Scroll down to Kubernetes options
- From the Kubernetes Version drop-down, choose the version of Kubernetes that you want to use for the cluster.
- Save new configuration and wait few minutes it will rebuilt
- Check if version has changed
kubectl get nodes
- If the upgrade fails, revert the cluster to the pre-upgrade Kubernetes version. This is achieved by selecting the Restore etcd and Kubernetes version option. This will return your cluster to the pre-upgrade kubernetes version before restoring the etcd snapshot.
References: https://rancher.com/docs/rke/latest/en/cert-mgmt/#certificate-rotation
References: https://rancher.com/docs/rke/latest/en/managing-clusters/#adding-removing-nodes
You can edit cluster.yml file to add / remove nodes
vi cluster.yml

rke up
References: https://helm.sh/
brew install helm
Rancher provides three repositories for Helm charts:
Latest: Recommended for trying out the newest features. Not recommended for production.Stable: Recommended for production environmentsAlpha: Experimental previews of upcoming releases. Definitely not recommended for production.
helm repo add rancher-stable https://releases.rancher.com/server-charts/stable
helm repo update
If namespace cattle-system doesn't exists create it
kubectl get namespaces
kubectl create namespace cattle-system
List all deployments
kubectl get deployments --all-namespaces
Rancher will always be protected by TLS, and you have three options for how to provision this component:
Rancher-generatedself-signed certificates- Real certificates from
Let's Encrypt - Certificates that you provide (
real or self-signed)
The first two options require a Kubernetes package called cert-manager https://cert-manager.io/docs/
Check jetstack/cert-manager latest stable release
# Kubernetes 1.16+
kubectl apply -f https://github.com/jetstack/cert-manager/releases/download/v1.1.0/cert-manager.yaml

# Kubernetes <1.16
kubectl apply --validate=false -f https://github.com/jetstack/cert-manager/releases/download/v1.1.0/cert-manager-legacy.yaml
kubectl get deployments --namespace cert-manager
kubectl get pods -n cert-manager
kubectl rollout status deployment -n cert-manager cert-manager
kubectl rollout status deployment -n cert-manager cert-manager-cainjector
kubectl rollout status deployment -n cert-manager cert-manager-webhook
References: https://rancher.com/docs/rancher/v2.x/en/installation/install-rancher-on-k8s/
helm search repo --versions
Three available options
- Option 1: Rancher-Generated Self-Signed Certificates
- Option 2: Real Certificates From Let's Encrypt
- Option 3: Certificates That You Provide
This is the default option when installing Rancher and requires no additional configuration. You only need to specify the namespace and the hostname when installing.
This installation option requires two parameters:
--set hostname=rancher.mydomain.com--namespace cattle-system
helm install rancher rancher-stable/rancher \
  --version v2.5.5 \
  --namespace cattle-system \
  --set hostname=rancher.mydomain.com
Check if Rancher is Running
kubectl -n cattle-system get deploy rancher
kubectl -n cattle-system get pods
kubectl get all -n cattle-system
Wait for Rancher to be rolled out
kubectl rollout status deployment -n cattle-system rancher
If the state is not Running, run a describe on the pod and check the Events
kubectl -n cattle-system describe pod
Open https://rancher.mydomain.com on your browser
To request a certificate from Let's Encrypt you must have the load balancer and hostname properly configured. Let's Encrypt will issue an http-01 challenge that cert-manager will process. Certificates issued by Let's Encrypt will be automatically renewed before their expiration date.
In addition to the parameters listed in Option 1, this installation option requires two additional parameters:
--set ingress.tls.source=letsEncrypt--set [email protected]
Let's Encrypt uses the email to communicate with you about any issues with the certificate, such as its upcoming expiration. Please use a real email address for this parameter.
helm search repo --versions
helm install rancher rancher-stable/rancher \
  --version v2.5.5 \
  --namespace cattle-system \
  --set hostname=rancher.mydomain.com \
  --set ingress.tls.source=letsEncrypt \
  --set [email protected]
Check if Rancher is Running
kubectl -n cattle-system get deploy rancher
kubectl -n cattle-system get pods
kubectl get all -n cattle-system
Wait for Rancher to be rolled out
kubectl rollout status deployment -n cattle-system rancher
Open https://rancher.mydomain.com on your browser
References:
If you have your own certificates, either from a public or private CA, you will load these into a Kubernetes Secret and tell Rancher and the Ingress Controller to use that secret to provision TLS.
In addition to the parameters listed in Option 1, this option requires the following additional parameter:
--set ingress.tls.source=secret
If you want a little more realism in your development self-signed certificates, you can use minica to generate your own local root certificate, and issue end-entity (aka leaf) certificates signed by it.
helm search repo --versions
helm install rancher rancher-stable/rancher \
  --version v2.5.5 \
  --namespace cattle-system \
  --set hostname=rancher.mydomain.com \
  --set ingress.tls.source=secret
If your certificates are signed by a private CA (or self-signed), you will also need to provide:
--set privateCA=true
helm install rancher rancher-stable/rancher \
  --version v2.5.5 \
  --namespace cattle-system \
  --set hostname=rancher.mydomain.com \
  --set ingress.tls.source=secret \
  --set privateCA=true
After initiating the install, you’ll need to create the secrets for the TLS certificates before the install will complete.
- Create a file called
tls.crtwith the certificate - Create a file called
tls.keywith the private key - Create a secret called
tls-rancher-ingressfrom those files. - This secret is of type tls
mkdir certs
cd certs

# Create certificates
minica --ca-cert cacerts.pem -ca-key cacerts-key.pem -domains rancher.mydomain.com

# For Mac users - Trust certificate
sudo security add-trusted-cert -d -r trustAsRoot -k /Library/Keychains/System.keychain rancher.mydomain.com/cert.pem

# Create a secret called tls-rancher-ingress from those files
kubectl -n cattle-system create secret tls tls-rancher-ingress \
  --cert=rancher.mydomain.com/cert.pem --key=rancher.mydomain.com/key.pem

# Create a secret called tls-ca
kubectl -n cattle-system create secret generic tls-ca \
  --from-file=cacerts.pem=./cacerts.pem
Wait for Rancher to be rolled out
kubectl rollout status deployment -n cattle-system rancher
Check if Rancher is Running
kubectl -n cattle-system get deploy rancher
kubectl -n cattle-system get pods
kubectl get all -n cattle-system
Open https://rancher.mydomain.com on your browser
If you see the following error: error: deployment "rancher" exceeded its progress deadline, you can check the status of the deployment by running the following command:
kubectl -n cattle-system get deploy rancher
And get logs from the pod
kubectl -n cattle-system get pods
kubectl -n cattle-system logs rancher-6868c8454-vrtvn -f
Check for a more exhaustive list of possible Troubleshooting
List all deployments
kubectl get deployments --all-namespaces
Then to delete the deployment
Where NAMESPACE is the namespace it's in, and DEPLOYMENT is the name of the deployment
kubectl delete -n NAMESPACE deployment DEPLOYMENT
helm ls --all-namespaces
kubectl delete namespace cattle-system
kubectl create namespace cattle-system
There are two methods for backing up an RKE cluster:
rke etcd snapshot-save --config cluster.yml --name snapshot-name
ssh username@remote_server 'sudo ls /opt/rke/etcd-snapshots'
- Review the options you desire for the setup of the snapshot service
- Configure the interval hours and retention settings, in the etcd service settings of your rke config file. Here’s a very simple single node cluster example
nodes:
- address: 1.2.3.4
 port: "22"
 role:
 - controlplane
 - worker
 - etcd
 user: root
 docker_socket: /var/run/docker.sock
 ssh_key_path: ~/.ssh/id_rsa
services:
 etcd:
 backup_config:
 interval_hours: 3
 retention: 3
- Save the file run
rke up. You’ll notice the etc-rolling-snapshots service gets modified
rke up

...
INFO[0011] [etcd] Successfully started [etcd-rolling-snapshots] container on host [104.43.162.0]
- A snapshot will be saved in
/opt/rke/snapshotson a node running etcd
ssh username@remote_server sudo ls /opt/rke/etcd-snapshots
[TODO]
Like Backup, restoring RKE, has a method for locally saved snapshots and a method for s3 based snapshots
- The restoration routine will assume that the backup is in
/opt/rke/etcd-snapshots - Modify the cluster.yml file for the new node
nodes:
    - address: 10.0.0.1
      hostname_override: node1
      user: ubuntu
      role:
        - controlplane
        - worker
#    - address: 10.0.0.2
#      hostname_override: node2
#      user: ubuntu
#      role:
#       - etcd
- Run rke etcd snapshot-restore to restore etcd to its previous state
rke etcd snapshot-restore --config cluster.yml --name mysnapshot
rke up
kubectl get pod
- Verify the cluster is operating as expected
kubectl get pods
[TODO]
To bakcup an RKE Cluster with more than one node
- Prepare the same numbers of new nodes of existing Rancher server nodes for the new cluster. These can be the same size or larger than the existing Rancher server nodes.
- Choose one of these nodes to be the initial "target node" for the restore. We will bring this node up first and then add the other two once the cluster is online.
- Make a backup copy of the RKE files you used to build the original cluster. Store these in a safe place until the new cluster is online.
- Edit
cluster.ymland make the following changes:- Remove or comment out the entire
addons section. The information about the Rancher deployment is already in etcd. - Change the nodes section to
point to the new nodes - Comment out all but the chosen target node.
- Remove or comment out the entire
nodes:
    - address: 10.0.0.1
      hostname_override: node1
      user: ubuntu
      role:
        - controlplane
        - worker
        - etcd
#    - address: 10.0.0.2
#      hostname_override: node2
#      user: ubuntu
#      role:
#       - controlplane
#       - worker
#       - etcd
#    - address: 10.0.0.3
#      hostname_override: node3
#      user: ubuntu
#      role:
#       - controlplane
#       - worker
#       - etcd

# addons:
#    apiVersion: v1
#    Kind: Pod
#    metadata:
#    ....
How you perform the initial restore of the database depends on if the data is stored locally or available on S3.
- Place the snapshot into
/opt/rke/etcd-snapshotson the target node - Restore the snapshot with
rke etcd snapshot-restore, passing it the name of the snapshot and pointing to thecluster.ymlfile
rke etcd snapshot-restore --config cluster.yml --name mysnapshot
- Restore the snapshot with
rke etcd snapshot-restore, passing it the parameters needed to access S3
Bring up the cluster on the target node by running rke up, pointing to the cluster config file. When the cluster is ready, RKE will write a credentials file to the local directory. Configure kubectl to use this file and then check on the status of the cluster. Wait for the target node to change to Ready. The three old nodes will be in a NotReady state.
- When the target node is Ready, remove the old nodes with
kubectl delete node. - Reboot the target node to ensure cluster networking and services are in a clean state
ssh username@server_1 sudo reboot
- Wait until all pods in
kube-system,ingress-nginx, and the rancher pod incattle-systemreturn to a Running state- The
cattle-cluster-agentandcattle-node-agent podswill be in anErrororCrashLoopBackOffstate until the Rancher server is up and DNS has been pointed to the new cluster.
- The
kubectl get deployments -A
kubectl get daemonsets -A
- Edit
cluster.ymland uncomment the additional nodes
nodes:
    - address: 10.0.0.1
      hostname_override: node1
      user: ubuntu
      role:
        - controlplane
        - worker
        - etcd
    - address: 10.0.0.2
      hostname_override: node2
      user: ubuntu
      role:
       - controlplane
       - worker
       - etcd
    - address: 10.0.0.3
      hostname_override: node3
      user: ubuntu
      role:
       - controlplane
       - worker
       - etcd
- Run
rke upto add the new nodes to the cluster
kubectl get nodes
rke up
- Wait for all nodes to show Ready in the output of
kubectl get nodes
kubectl get nodes
- Reboot all target nodes to ensure cluster networking and services are in a clean state
ssh username@server_1 sudo reboot
ssh username@server_2 sudo reboot
ssh username@server_n sudo reboot
Once the cluster is up and all three nodes are Ready, complete any final DNS or load balancer change necessary to point the external URL to the new cluster. This might be a DNS change to point to a new load balancer, or it might mean that you need to configure the existing load balancer to point to the new nodes.
After making this change the agents on the downstream clusters will automatically reconnect. Because of backoff timers on the clusters, they may take up to 15 minutes to reconnect.
- Securely store the new
cluster.yml,kube_config_cluster.ymlandcluster.rkestatefiles for future use. - Delete the archived configuration files from the old cluster.
- Delete the nodes from the old cluster or clean them of all Kubernetes and Rancher configuration
https://rancher.com/docs/rancher/v2.x/en/installation/install-rancher-on-k8s/upgrades/
Make a one-time snapshot of Rancher before continuing
rke etcd snapshot-save --config cluster.yml --name rke-etcd-snapshot-cert

ssh username@remote_server 'sudo ls /opt/rke/etcd-snapshots'

# Copy snapshot somewhere outside the cluster in case of failure
ssh -t remote_server 'sudo cat /opt/rke/etcd-snapshots/rke-etcd-snapshot-cert.zip' > ./rke-etcd-snapshot-cert.zip
Update the Helm repo
helm repo update
Get the values, which were passed with --set, from the current Rancher Helm chart that is installed
helm list --all-namespaces -f rancher -o yaml

helm get values -n cattle-system rancher -o yaml > values.yaml
Upgrading Rancher
helm upgrade rancher rancher-latest/rancher \
  --namespace cattle-system \
  -f values.yaml \
  --version=2.5.5
kubectl rollout status deployment -n cattle-system rancher
When upgrade is healty go to rancher.mydomain.com and new vesion is shown in the bottom left
If the upgrade fails, the process for rolling back is to restore from the snapshot taken just prior to the upgrade.
- Hosted / Infrastructure Provider: Rancher can deploy clusters into a hosted provider's solution, such as Amazon’s Elastic Kubernetes Service (EKS), Microsoft’s Azure Kubernetes Service (AKS), Google’s Kubernetes Engine (GKE)
- Custom Provider: If you do your provisioning with Terraform, Ansible, Puppet, Chef, Cloud Init, Shell scripts, autoscaling groups, or anything else, you can use the Custom driver to build those nodes into a Kubernetes cluster.
- Imported Clusters: if you already have Kubernetes clusters running out there, or if you're using something like K3s, you can import those clusters into Rancher
It's recommended that control plane, data plane, and worker roles reside on different node pools. This allows you to configure and scale them without affecting other roles.
Check logfiles and test that nodes in each role are able to communicate with nodes in other roles according to the charts in the documentation.
Also verify that cross-host networking is available from with Kubernetes by testing that Pods on one host are able to communicate with Pods on other hosts.
Cluster Ownershave full control over everything in the cluster, including user access.Cluster Memberscan view most cluster-level resources and create new projects.- Selecting
Custompresents a list of roles that you can assign to the user.
References
References: https://rancher.com/docs/rancher/v2.x/en/cluster-provisioning/rke-clusters/options/
Reference: https://rancher.com/docs/rancher/v2.x/en/cluster-provisioning/rke-clusters/custom-nodes/
- Add cluster > From existing node
- Give the Cluster Name
- Check kubernetes Option section
- You can choose Kubernetes Version
- Network Provider
- You can enable Windows Support (Network Provider > Fannel | Windows Support > Enabled)
- Project Network Isolation
- Cloud Provider
- Check Private Registry section
- Check Advance Option section
- Nginx Ingress
- Pod Security Policy Support
etcdSnapshot Backup Target (local / s3)
- Check Authorized Endpoint
- CA Certificate
RKE Templates allow teams to standardize and simplify the creation of their Kubernetes clusters. With the proper permissions, an administrator or user can create and share RKE templates with other users. Templates, like applications have their own lifecycle. Administrators can even force user to use a template to create new clusters. Along with node templates and infrastructure-ascode tools like Terraform, organizations can go a long way to standardizing and systematizing the provisioning of all of the substrate serving their applications.
References: https://rancher.com/docs/rancher/v2.x/en/admin-settings/rke-templates/
- Navigate to Tools > RKE Templates
- Click Add Template
- Give the template a name
- You can skip Share Template as you don’t have any users, yet
- Review the other options in the template. Any that you adjust will be applied to clusters created with this template, unless users are allowed to override them. You can do this by toggling the override for that setting
- For example, you may want users to be able to override the FQDN and CA certificate for a cluster they create with your template
- You can require that a user fill in the settings when creating a cluster, by clicking the required argument for each parameter
- Uncheck those settings for now, as we don’t want to require them when we use this template in a future lab.
- Do allow the users to override the Kubernetes version, in a future lab we’ll create a cluster using this template, and we’ll use the cluster we create to demonstrate upgrades as well. Also, select an older version of Kubernetes.
- Click Create
In the RKE Templates section of Rancher, you should see the RKE Template you just created. In a future lab we’ll use the template you created.
They make it easier to reuse an existing configuration instead of creating it again for every node or every cluster that you launch.
You can create node templates from the cluster launch screen or from your profile avatar in the top right.
Cloud credentials define how to communicate with a cloud provider. They allow you to configure multiple accounts for use with different providers or in different provider regions. When creating a node template, you select the cloud credentials to use.
- Creating a Cloud Credential
- Create a Node Template
- Click on your User Avatar in the upper-right corner, and select Node Templates
- Click Add Template
- Choose your cloud of choice. You’ll be creating a new Cloud Credential, that allow Docker Machine to automate the provisioning of your infrastructure.
- Setup the node template based upon your cloud of choice.
- Give it a name and click Create
- Create a New Cluster and set your newly saved node template on
Templatefield
Check documentation to configure correctly a cloud provider
General References:
Troubleshooting Index:
- Rancher’s API Server
- Container Runtime
- Node Conditions
- Kubelet on the Worker Nodes
- etcd
- Controlplane
- nginx-proxy
- Container Network Interface (CNI) and Networking
References: https://rancher.com/docs/rancher/v2.x/en/troubleshooting/rancherha/
Check Rancher pods
kubectl -n cattle-system get pods -l app=rancher -o wide

# Pod container logs
kubectl -n cattle-system logs -l app=rancher
ssh username@remote_server

sudo systemctl status docker.service | head -n 14

sudo journalctl -u docker.service | less
Report on network availability, disk pressure, memory pressure, PID pressure, and a general "ready" state for the node.
References: https://rancher.com/docs/rancher/v2.x/en/troubleshooting/kubernetes-resources/#get-node-conditions
kubectl describe node ip-172.31.42.12 | less
Run the command below to list nodes with Node Conditions that are active that could prevent normal operation
kubectl get nodes -o go-template='{{range .items}}{{$node := .}}{{range .status.conditions}}{{if ne .type "Ready"}}{{if eq .status "True"}}{{$node.metadata.name}}{{": "}}{{.type}}{{":"}}{{.status}}{{"\n"}}{{end}}{{else}}{{if ne .status "True"}}{{$node.metadata.name}}{{": "}}{{.type}}{{": "}}{{.status}}{{"\n"}}{{end}}{{end}}{{end}}{{end}}'
Example output:
worker-0: DiskPressure:True
References: https://rancher.com/docs/rancher/v2.x/en/troubleshooting/kubernetes-components/worker-and-generic/
ssh username@remote_server

# Check if the Containers are Running
docker ps -a -f=name='kubelet|kube-proxy'

# Check Container Logs
docker logs kubelet
docker logs kube-proxy
It stores the state for Kubernetes and the Rancher application.
References: https://rancher.com/docs/rancher/v2.x/en/troubleshooting/kubernetes-components/etcd/
kubectl get nodes
ssh username@remote_server

# Checking if the etcd Container is Running
docker ps -a -f=name=etcd$

# etcd Container Logging
docker logs etcd

# Check etcd Members on all Nodes
docker exec etcd etcdctl member list
The control plane is where the cluster-wide API and logic engines run.
References: https://rancher.com/docs/rancher/v2.x/en/troubleshooting/kubernetes-components/controlplane/
First need to determine which is the leader
kube-controller-manager
kubectl get endpoints -n kube-system kube-controller-manager \
  -o jsonpath='{.metadata.annotations.control-plane\.alpha\.kubernetes\.io/leader}{"\n"}'

ssh username@remote_server 'echo $HOSTNAME'

# Container Logging
ssh username@remote_server
docker logs kube-controller-manager
kube-scheduler
kubectl get endpoints -n kube-system kube-scheduler \
  -o jsonpath='{.metadata.annotations.control-plane\.alpha\.kubernetes\.io/leader}{"\n"}'

# Container Logging
ssh username@remote_server
docker logs kube-scheduler
kube-apiserver
If apiserver run in multiple active service replicas using tmux to allow viewing logs on the same time and check whick server logs contains errors
# tmux
ssh username@remote_server1
ssh username@remote_server2
ssh username@remote_server3

<prefix> :setw synchronize-panes

# Container Logging
docker logs --follow kube-apiserver
The nginx proxy exists so that non-controlplane nodes can reach the services in the controlplane without knowing which node they’re on or what IP they have.
References: https://rancher.com/docs/rancher/v2.x/en/troubleshooting/kubernetes-components/nginx-proxy/
ssh username@remote_server

# Check if the Container is Running
docker ps -a -f=name=nginx-proxy

# Check Generated NGINX Configuration
# The generated configuration should include the IP addresses of the nodes with the controlplane role
docker exec nginx-proxy cat /etc/nginx/nginx.conf

# Container Logging
docker logs nginx-proxy
If any firewalls or proxies are blocking those connections, the CNI will fail
References: https://rancher.com/docs/rancher/v2.x/en/troubleshooting/networking/
- Make sure all of your ports are configured properly.
- Next you can test the overlay network.
- Create a Daemonset component using the busybox image. Save the following file as
overlaytest.yml
apiVersion: apps/v1
kind: DaemonSet
metadata:
  name: overlaytest
spec:
  selector:
      matchLabels:
        name: overlaytest
  template:
    metadata:
      labels:
        name: overlaytest
    spec:
      tolerations:
      - operator: Exists
      containers:
      - image: leodotcloud/swiss-army-knife
        imagePullPolicy: Always
        name: overlaytest
        command: ["sh", "-c", "tail -f /dev/null"]
        terminationMessagePath: /dev/termination-log
- Launch it using
kubectl create -f overlaytest.yml - Once the daemonset has rolled out, run this command. It will let each container ping the others. Wait until
kubectl rollout status ds/overlaytest -wreturns:daemon set "overlaytest" successfully rolled out. - Run the following script, from the same location. It will have each
overlaytestcontainer on every host ping each other:
#!/bin/bash
echo "=> Start network overlay test"
  kubectl get pods -l name=overlaytest -o jsonpath='{range .items[*]}{@.metadata.name}{" "}{@.spec.nodeName}{"\n"}{end}' |
  while read spod shost
    do kubectl get pods -l name=overlaytest -o jsonpath='{range .items[*]}{@.status.podIP}{" "}{@.spec.nodeName}{"\n"}{end}' |
    while read tip thost
      do kubectl --request-timeout='10s' exec $spod -c overlaytest -- /bin/sh -c "ping -c2 $tip > /dev/null 2>&1"
        RC=$?
        if [ $RC -ne 0 ]
          then echo FAIL: $spod on $shost cannot reach pod IP $tip on $thost
          else echo $shost can reach $thost
        fi
    done
  done
echo "=> End network overlay test"
- When this command has finished running, it will output the state of each route:
=> Start network overlay test
Error from server (NotFound): pods "wk2" not found
FAIL: overlaytest-5bglp on wk2 cannot reach pod IP 10.42.7.3 on wk2
Error from server (NotFound): pods "wk2" not found
FAIL: overlaytest-5bglp on wk2 cannot reach pod IP 10.42.0.5 on cp1
Error from server (NotFound): pods "wk2" not found
FAIL: overlaytest-5bglp on wk2 cannot reach pod IP 10.42.2.12 on wk1
command terminated with exit code 1
FAIL: overlaytest-v4qkl on cp1 cannot reach pod IP 10.42.7.3 on wk2
cp1 can reach cp1
cp1 can reach wk1
command terminated with exit code 1
FAIL: overlaytest-xpxwp on wk1 cannot reach pod IP 10.42.7.3 on wk2
wk1 can reach cp1
wk1 can reach wk1
=> End network overlay test
If you see error in the output, there is some issue with the route between the pods on the two hosts. In the above output the node wk2 has no connectivity over the overlay network. This could be because the required ports for overlay networking are not opened for wk2.
- You can now clean up the DaemonSet by running
kubectl delete ds/overlaytest - Some clouds, and CNI plugins have issues with MTU autodetection, make sure your MTU settings are correct as well.
Example
cat ./overlaytest.yml
kubectl create -f overlaytest.yml
kubectl rollout status ds/overlaytest -w

echo "=> Start network overlay test"; \
  kubectl get pods -l name=overlaytest \
  -o jsonpath='{range .items[*]}{@.metadata.name}{" "}{@.spec.nodeName}{"\n"}{end}' \
    | while read spod shost; \
      do kubectl get pods -l name=overlaytest \
        -o jsonpath='{range .items[*]}{@.status.podIP}{" "}{@.spec.nodeName}{"\n"}{end}' \
          | while read tip thost; \
            do kubectl --request-timeout='10s' exec $spod \
              -c overlaytest -- /bin/sh -c "ping -c2 $tip > /dev/null 2>&1"; \
              RC=$?; if [ $RC -ne 0 ] then echo FAIL: $spod on $shost cannot reach pod IP $tip on $thost else echo $shost can reach $thost; fi; \
            done; \
        done; \
echo "=> End network overlay test"
References: https://rancher.com/docs/rancher/v2.x/en/cluster-admin/editing-clusters/
- Navigate to cluster you want edit (e.g. Global > Cluster_name)
- Navigate to Node option (Menu bar) > and click on Edit Cluster
- Add Node Pole > add one or more (use
Countoption in the field)WorkerorPrimay(with onlyetc,Control Planechecked options) nodes - Save new configuration and wait few minutes it will rebuilt
if you create one or more Worker node and you want remove worker role in existing node, because no longer needed, you can:
# Get node NAME and check ROLES in each node
kubectl get nodes

# Drain the node
kubectl drain <NAME> --ignore-daemonsets=true
Navigate to cluster you are editing > Remove Worker role from the Primay nodes > Save new configuration and wait few minutes it will rebuilt
Check section Upgrade Kubernetes Downstream RKE Clusters
Each Kubernetes cluster within Rancher will have its own kubectl config file
References: https://rancher.com/docs/rancher/v2.x/en/cluster-admin/cluster-access/kubectl/
-
Accessing Clusters with kubectl Shell in the Rancher UI
- From the Global view, open the cluster that you want to access with kubectl.
- Click Launch kubectl. Use the window that opens to interact with your Kubernetes cluster.
-
Accessing Clusters with kubectl from Your Workstation
- Log into Rancher. From the Global view, open the cluster that you want to access with kubectl.
- Click Kubeconfig File.
- Copy the contents displayed to your clipboard.
- Paste the contents into a new file on your local computer. Move the file to
~/.kube/config. Note: The default location that kubectl uses for the kubeconfig file is~/.kube/config, but you can use any directory and specify it using the--kubeconfig flag, as in this command: kubectl --kubeconfig /custom/path/kube.config get pods
pbpaste > kubeconfig set -x KUBECONFIG (pwd)/kubeconfig- From your workstation, launch
kubectl. Use it to interact with your kubernetes cluster.
kubectl get ns
ns <NAME>
kubectl get deploy
Everything that you can do with Kubernetes you can do with Rancher
References: https://rancher.com/docs/rancher/v2.x/en/cli/
Install Rancher and get barrer token
- On the bottom right of your screen, there is the Download CLI option
- Select the version for your operating system.
- Install this and add it to your path. This will vary for your operating system.
# Mac
mv rancher /usr/local/bin
rancher --version

rancher --help
rancher app --help
rancher app ls --help
- Now we’ll need an API Token. Click on your Avatar icon > select API & Keys > Select Add Key
- Save these items to a file as this is the last time you will see them. Keep them safe, anyone who has access to this token has access to your credentials and RBAC for the scope of this API token.
Login with Rancher CLI
# Replace <BEARER_TOKEN> and <SERVER_URL> with your information
rancher login https://<SERVER_URL> --token <BEARER_TOKEN>
Project Selection
# List of available projects displays
rancher context switch
...

Select a project: <NUMBER>
App installation throught Rancher CLI
rancher app install --set persistentVolume.enable=false --set [email protected] pgadmin4 pgadmin4

rancher app ls
watch -n 5 rancher app ls

rancher app show-notes pgadmin4

kcc do
...
Switched to context do
...

kubectl get pods --namespace pgadmin4-vzber \
  -l "app.kubernetes.io/name=pgadmin4,app.kubernetes.io/instance=pgadmin4" \
  -o jsonpath="{.items[0].metadata.name}"
...
pgadmin4-5c98347506c-zftzd
...

kubectl port-forward -n pgadmin4-vzber pgadmin4-5c98347506c-zftzd 8080:80

# Connect to localhost:8080 to PgAdmin4
SSH proxy to cluster node
# Get information about nodes
rancher nodes

# SSH login in node
rancher ssh <NAME>
Get namespaces with Rancher CLI
rancher namespace ls
Replace Kube controlor whit Rancher CLI kubectl can be available also without kubeconfig file after rancher login
rancher kubectl get nodes
FATA[0020] Get https://rancher.mydomain.com: dial tcp: lookup rancher.local.com on 10.0.0.1:53: read udp 10.0.0.2:60759->10.0.0.1:53: i/o timeout
# Check DNS config
ssh username@remote_server
cat /etc/resolv.conf

# Check coredns service
kubectl get svc -n kube-system

# Check code DNS pod endpoints
kubectl get ep -n kube-system

# Check CoreDNS pod logs
kubectl get po -n kube-system
kubectl logs -n kube-system pod/coredns-<NAME/NUMBER>

....
[INFO] plugin/reload: Running configuration MD5 = 7b85fbe9b4156cf64b768261d4ea6e3b
CoreDNS-1.7.0
linux/amd64, go1.14.4, f59c03d
[ERROR] plugin/errors: 2 2248327252308706239.6961694972959355173. HINFO: read udp 10.42.0.178:60278->10.0.0.1:53: i/o timeout
[ERROR] plugin/errors: 2 2248327252308706239.6961694972959355173. HINFO: read udp 10.42.0.178:57472->10.0.0.1:53: i/o timeout
[ERROR] plugin/errors: 2 2248327252308706239.6961694972959355173. HINFO: read udp 10.42.0.178:47228->10.0.0.1:53: i/o timeout
...

# Run busybox pod, then exec nslookup <ADDRESS> in busybox pod
kubectl run -it --rm --restart=Never busybox --image=busybox sh
cat /etc/resolv.conf
nslookup google.com
Advanced monitoring deploys Prometheus and Grafana, and the worker nodes will need to have enough resources to accommodate the extra load. Recommended CPU and memory sizes are available in the Rancher documentation.
References: https://rancher.com/docs/rancher/v2.x/en/monitoring-alerting/v2.5/
In addition to the standard memory and CPU reservation and limits, consider the following options for your cluster
- Data retention period - How long to keep data
- Persistent Storage - Required for long-term retention
- Node Exporter configuration - Enables host monitoring
- Selectors and Tolerations - Controls workloads scheduling
- Make sure that you are allowing traffic on
port 9796for each of your nodes because Prometheus will scrape metrics from here. - The cluster should have at least
1950Mi memory available,2700m CPU, and50Gi storage. A breakdown of the resource limits and requests is here.
References: https://rancher.com/docs/rancher/v2.x/en/monitoring-alerting/v2.5/#enable-monitoring
- Navigate to cluster > Click 'Cluster' on top menu bar
- Click on
Enable Monitoring to see live metrics - Configure Monitoring. Example of long-term retention:
- Data Retention = 72
- Enable Persistent Storage for Prometheus = True
- Prometheus Persistent Volume Size = 50Gi
- Default StorageClass for Prometheus = ebs
- Let's do the same for Grafana
- Grafana Persistent Volume Size = 3Gi
- Default StorageClass for Grafana = ebs
- Navigate to System > Click Your Cluster Name on top menu bar > System
- Check for
cluster-monitoringpod deploy - When deployment is finished > Navigate to Resources > Workloads
- Navigate to cluster > Check section 'Cluster Metrics' to see if Grafana is enabled
- Navigate to Your Cluster Name > Your app (e.g. simple-app) in the cluster > Click Tools on top menu bar > Monitoring
- Change monitoring options if necessary and enable it
- Navigate to Resources > Workloads
- When finished to build Navigate to Namespace: <your_app> and click on it
- Check Workloads Metrics section to see Datail of Monitoring activity
References: https://rancher.com/docs/rancher/v2.x/en/monitoring-alerting/v2.0.x-v2.4.x/notifiers/
References: https://rancher.com/docs/rancher/v2.x/en/monitoring-alerting/v2.0.x-v2.4.x/cluster-alerts/
Rancher collects stdout and stderr output from each container, along with any logs written to /var/log/containers on the hosts and sends it to the configured endpoint.
Rancher can write logs to Elasticsearch, Splunk, Fluentd, Kafka, or syslog.
References: https://rancher.com/docs/rancher/v2.x/en/logging/v2.0.x-v2.4.x/cluster-logging/
In Kubernetes, a namespace is a logical seperation of resources. It helps keep resources organized, and it allows resources of the same type with the same name to coexist on the same cluster.
Rancher uses Projects to group namespaces and apply a common configuration for RBAC to all of them.
The following resources can be assigned to a Project:
- ConfigMaps
- Secrets
- Certificates
- Registry Credentials
The following resources can only be assigned to a namespace within the project:
- Workloads
- Load Balancers / Ingress
- Service Discovery records
- Persistent Volume Claims
Rancher automatically creates two projects when you launch a cluster:
- Default - User Workloads
- System - System Workloads
Create a namespace via kubectl and move it in a specific cluster later via Rancher UI
kubectl create namespace ra-demo
- Adding Users to Projects
- Cluster and Project Roles
- Pod Security Policies
- Assigning Pod Security Policies
- Role-Based Access Control (RBAC)
References: https://rancher.com/docs/rancher/v2.x/en/project-admin/resource-quotas/
Many users forget to set these limits on their workloads, so having a reasonable default set on the project will help keep the cluster secure.
Be careful not to set a threshold that is too low, or else the cluster will regularly restart workloads that use more resources as part of their normal operation.