Created
February 6, 2025 20:12
-
-
Save rodrigobarona/83de3f6a787456acd9466f756f4baa79 to your computer and use it in GitHub Desktop.
MEDUSA.js: If you're using Cursor or similar LLM editors, try adding https://docs.medusajs.com/llms-full.txt to your Docs index and benefit from improved suggestions!
This file has been truncated, but you can view the full file.
This file contains hidden or bidirectional Unicode text that may be interpreted or compiled differently than what appears below. To review, open the file in an editor that reveals hidden Unicode characters.
Learn more about bidirectional Unicode characters
| # Introduction | |
| Medusa is a digital commerce platform with a built-in framework for customization. | |
| Medusa ships with three main tools: | |
| 1. A suite of [commerce modules](https://docs.medusajs.com/resources/commerce-modules/index.html.md) with core commerce functionalities, such as tracking inventory, calculating cart totals, accepting payments, managing orders, and much more. | |
| 2. A framework for building custom functionalities specific to your business, product, or industry. This includes tools for introducing custom API endpoints, business logic, and data models; building workflows and automations; and integrating with third-party services. | |
| 3. A customizable admin dashboard for merchants to configure and operate their store. | |
| When you install Medusa, you get a fully fledged commerce platform with all the features you need to get off the ground. However, unlike other platforms, Medusa is built with customization in mind. You don't need to build hacky workarounds that are difficult to maintain and scale. Your efforts go into building features that brings your business's vision to life. | |
| *** | |
| ## Who should use Medusa | |
| Medusa is for businesses and teams looking for a digital commerce platform with the tools to implement unique requirements that other platforms aren't built to support. | |
| Businesses of all sizes can use Medusa, from small start ups to large enterprises. Also, technical teams of all sizes can build with Medusa; all it takes is a developer to manage and deploy Medusa projects. | |
| Below are some stories from companies that use Medusa: | |
| - [Use Case: D2C](https://medusajs.com/blog/matt-sleeps/): How Matt Sleeps built a unique D2C experience with Medusa | |
| - [Use Case: OMS](https://medusajs.com/blog/makro-pro/): How Makro Pro Built an OMS with Medusa | |
| - [Use Case: Marketplace](https://medusajs.com/blog/foraged/): How Foraged built a custom marketplace with Medusa | |
| - [Use Case: POS](https://medusajs.com/blog/tekla-pos/): How Tekla built a global webshop and a POS system with Medusa | |
| - [Use Case: B2B](https://medusajs.com/blog/visionary/): How Visionary built B2B commerce with Medusa | |
| - [Use Case: Platform](https://medusajs.com/blog/catalog/): How Catalog built a B2B platform for SMBs with Medusa | |
| *** | |
| ## Who is this documentation for | |
| This documentation introduces you to Medusa's concepts and how they help you build your business use case. The documentation is structured to gradually introduce Medusa's concepts, with easy-to-follow examples along the way. | |
| By following this documentation, you'll be able to create custom commerce experiences that would otherwise take large engineering teams months to build. | |
| ### How to use the documentation | |
| This documentation is split into the following sections: | |
| 1. The main documentation, which is the one you're currently reading. It's recommended to follow the chapters in this documentation to understand the core concepts of Medusa and how to use them. | |
| 2. The [Development Resources documentation](https://docs.medusajs.com/resources/index.html.md) provides guides and resources useful during your development, such as tools, API references, recipes, step-by-step guides and examples, and more. | |
| 3. The [Store](https://docs.medusajs.com/api/store/index.html.md) and [Admin](https://docs.medusajs.com/api/admin/index.html.md) API references provide a reference to the Medusa application's endpoints and instructions related to authentication, parameter types in requests, and more. | |
| To get started, check out the [Installation chapter](https://docs.medusajs.com/learn/installation/index.html.md). | |
| ### Using with LLM Editors | |
| This documentation provides an [llms-full.txt](https://docs.medusajs.com/llms-full.txt/index.html.md) file to support LLM editors. To access the documentation directly from your editor and benefit from code generation, add [https://docs.medusajs.com/llms-full.txt](https://docs.medusajs.com/llms-full.txt/index.html.md) as a custom documentation source in your LLM editor, such as [Cursor](https://docs.cursor.com/context/@-symbols/@-docs). | |
| *** | |
| ## Useful Links | |
| - Need Help? Refer to our [GitHub repository](https://github.com/medusajs/medusa) for [issues](https://github.com/medusajs/medusa/issues) and [discussions](https://github.com/medusajs/medusa/discussions). | |
| - [Join the community on Discord](https://discord.gg/medusajs). | |
| - Have questions or need more support? Contact our [sales team](https://medusajs.com/contact/). | |
| - Facing issues in your development? Refer to our [troubleshooting guides](https://docs.medusajs.com/resources/troubleshooting/index.html.md). | |
| # Build Medusa Application | |
| In this chapter, you'll learn how to create a production build of your Medusa application to be deployed to a hosting provider. | |
| Next chapters explain how to deploy the Medusa application. | |
| ## build Command | |
| The Medusa CLI tool has a [build](https://docs.medusajs.com/resources/medusa-cli/commands/build/index.html.md) command which creates a standalone build of the Medusa application that: | |
| - Doesn't rely on the source TypeScript files. | |
| - Can be copied to a production server reliably. | |
| So, to create the production build, run the following command in the root of your Medusa application: | |
| ```bash | |
| npx medusa build | |
| ``` | |
| *** | |
| ## Build Output | |
| The `build` command outputs the production build in the `.medusa/server` directory, and the admin dashboard build in the `.medusa/server/public/admin`. | |
| ### Separate Admin Build | |
| The `build` command accepts a `--admin-only` option that outputs the admin to the `.medusa/admin` directory. This is useful when deploying the admin dashboard separately, such as on Vercel: | |
| ```bash | |
| npx medusa build --admin-only | |
| ``` | |
| *** | |
| ## Start Built Medusa Application | |
| To start the Medusa application after running the `build` command: | |
| - Change to the `.medusa/server` directory and install the dependencies: | |
| ```bash npm2yarn | |
| cd .medusa/server && npm install | |
| ``` | |
| - When running the application locally, make sure to copy the `.env` file from the root project's directory. In production, use system environment variables instead. | |
| ```bash title=".medusa/server" | |
| cp ../../.env .env.production | |
| ``` | |
| When `NODE_ENV=production`, the Medusa application loads the environment variables from `.env.production`. Learn more about environment variables in [this guide](https://docs.medusajs.com/learn/fundamentals/environment-variables/index.html.md). | |
| - Set `NODE_ENV` to `production` in the system environment variable, then start the Medusa application from `.medusa/server`: | |
| ```bash npm2yarn title=".medusa/server" | |
| export NODE_ENV=production | |
| npm run start | |
| ``` | |
| *** | |
| ## Deploying Production Build | |
| The next chapter covers how you generally deploy the production build. | |
| You can also refer to the [deployment how-to guides](https://docs.medusajs.com/resources/deployment/index.html.md) for platform-specific how-to guides. | |
| # Debugging and Testing | |
| In the next chapters, you’ll learn about the tools Medusa provides for testing and debugging your Medusa application. | |
| By the end of this chapter, you’ll learn: | |
| - How to use Medusa's `@medusajs/test-utils` test to write integration tests. | |
| - How to use Medusa’s `Logger` utility to log messages. | |
| # Medusa Deployment Overview | |
| In this chapter, you’ll learn the general approach to deploying the Medusa application. | |
| ## Medusa Project Components | |
| A standard Medusa project is made up of: | |
| - Medusa application: The Medusa server and the Medusa Admin. | |
| - One or more storefronts | |
| 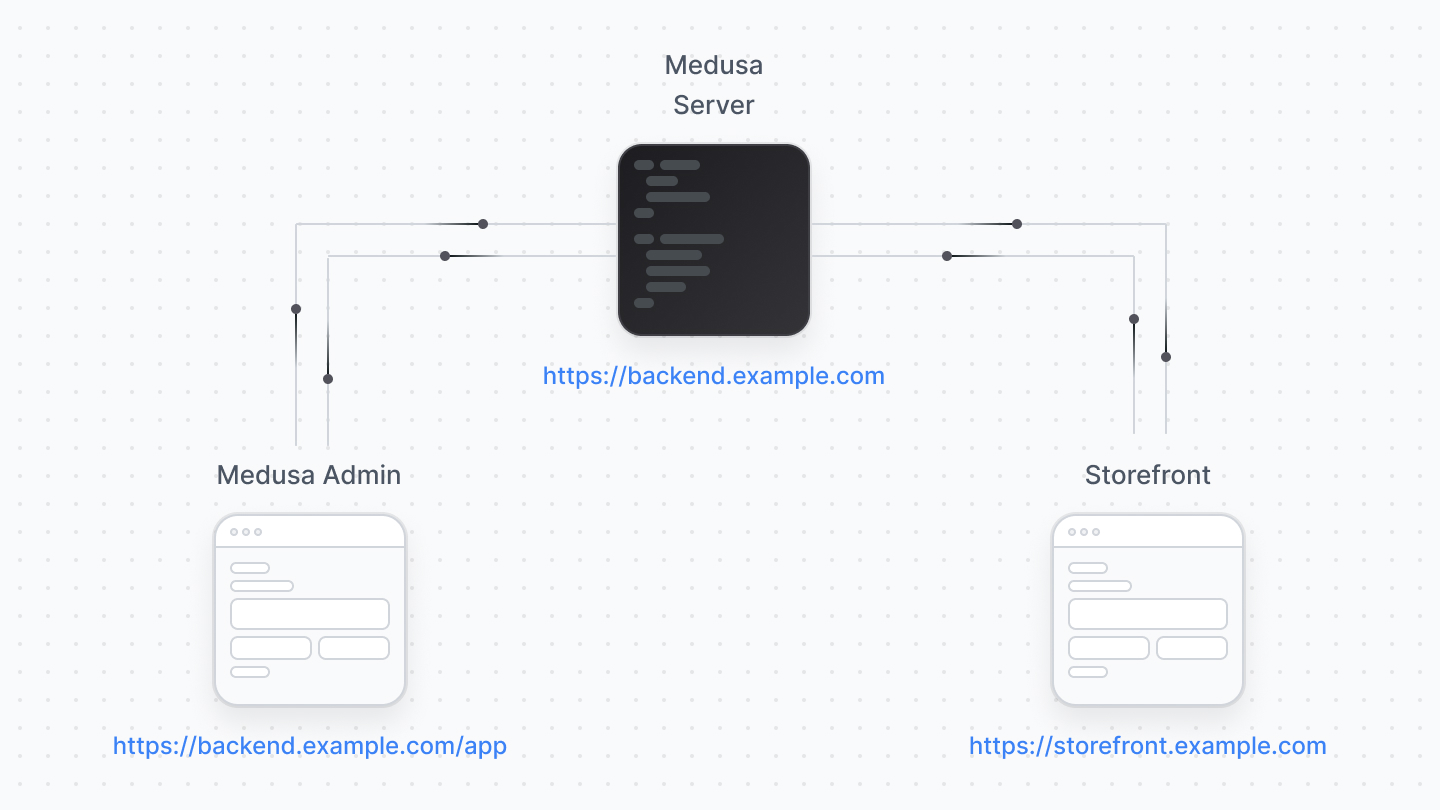 | |
| You deploy the Medusa application, with the server and admin, separately from the storefront. | |
| *** | |
| ## Deploying the Medusa Application | |
| You must deploy the Medusa application before the storefront, as it connects to the server and won’t work without a deployed Medusa server URL. | |
| The Medusa application must be deployed to a hosting provider supporting Node.js server deployments, such as Railway, DigitalOcean, AWS, Heroku, etc… | |
| 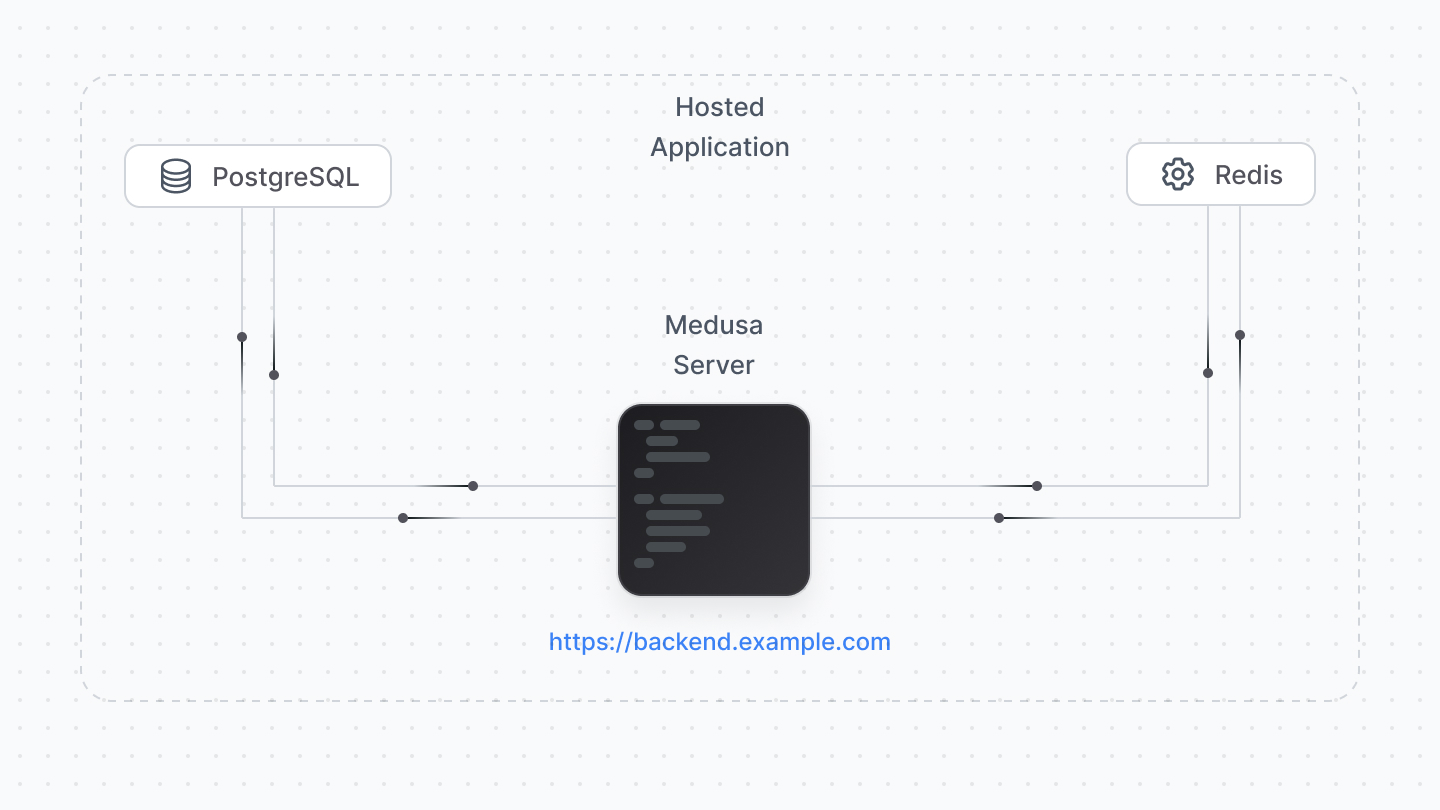 | |
| Your server connects to a PostgreSQL database, Redis, and other services relevant for your setup. Most hosting providers support deploying and managing these databases along with your Medusa server (such as Railway and DigitalOcean). | |
| When you deploy your Medusa application, you also deploy the Medusa Admin. For optimal experience, your hosting provider and plan must offer at least 2GB of RAM. | |
| ### How to Deploy Medusa? | |
| Medusa Cloud is our managed services offering that makes deploying and operating Medusa applications possible without having to worry about configuring, scaling, and maintaining infrastructure. Medusa Cloud hosts your server, Admin dashboard, database, and Redis instance. | |
| With Medusa Cloud, you maintain full customization control as you deploy your own modules and customizations directly from GitHub: | |
| - Push to deploy. | |
| - Multiple testing environments. | |
| - Preview environments for new PRs. | |
| - Test on production-like data. | |
| [Sign up and learn more about Medusa Cloud](https://medusajs.com/contact) | |
| To self-host Medusa, the [next chapter](https://docs.medusajs.com/learn/deployment/general/index.html.md) explains the general steps to deploy your Medusa application. Refer to [this reference](https://docs.medusajs.com/resources/deployment/index.html.md) to find how-to deployment guides for general and specific hosting providers. | |
| *** | |
| ## Deploying the Storefront | |
| The storefront is deployed separately from the Medusa application, and the hosting options depend on the tools and frameworks you use to create the storefront. | |
| If you’re using the Next.js Starter storefront, you may deploy the storefront to any hosting provider that supports frontend frameworks, such as Vercel. | |
| Per Vercel’s [license and plans](https://vercel.com/pricing), their free plan can only be used for personal, non-commercial projects. So, you can deploy the storefront on the free plan for development purposes, but for commercial projects, you must update your Vercel plan. | |
| Refer to [this reference](https://docs.medusajs.com/resources/deployment/index.html.md) to find how-to deployment guides for specific hosting providers. | |
| # Install Medusa | |
| In this chapter, you'll learn how to install and run a Medusa application. | |
| ## Create Medusa Application | |
| A Medusa application is made up of a Node.js server and an admin dashboard. You can optionally install a separate [Next.js storefront](https://docs.medusajs.com/learn/storefront-development/nextjs-starter/index.html.md) either while installing the Medusa application or at a later point. | |
| ### Prerequisites | |
| - [Node.js v20+](https://nodejs.org/en/download) | |
| - [Git CLI tool](https://git-scm.com/downloads) | |
| - [PostgreSQL](https://www.postgresql.org/download/) | |
| To create a Medusa application, use the `create-medusa-app` command: | |
| ```bash | |
| npx create-medusa-app@latest my-medusa-store | |
| ``` | |
| Where `my-medusa-store` is the name of the project's directory and PostgreSQL database created for the project. When you run the command, you'll be asked whether you want to install the Next.js storefront. | |
| After answering the prompts, the command installs the Medusa application in a directory with your project name, and sets up a PostgreSQL database that the application connects to. | |
| If you chose to install the storefront with the Medusa application, the storefront is installed in a separate directory named `{project-name}-storefront`. | |
| ### Successful Installation Result | |
| Once the installation finishes successfully, the Medusa application will run at `http://localhost:9000`. | |
| The Medusa Admin dashboard also runs at `http://localhost:9000/app`. The installation process opens the Medusa Admin dashboard in your default browser to create a user. You can later log in with that user. | |
| If you also installed the Next.js storefront, it'll be running at `http://localhost:8000`. | |
| You can stop the servers for the Medusa application and Next.js storefront by exiting the installation command. To run the server for the Medusa application again, refer to [this section](#run-medusa-application-in-development). | |
| ### Troubleshooting Installation Errors | |
| If you ran into an error during your installation, refer to the following troubleshooting guides for help: | |
| 1. [create-medusa-app troubleshooting guides](https://docs.medusajs.com/resources/troubleshooting/create-medusa-app-errors/index.html.md). | |
| 2. [CORS errors](https://docs.medusajs.com/resources/troubleshooting/cors-errors/index.html.md). | |
| 3. [All troubleshooting guides](https://docs.medusajs.com/resources/troubleshooting/index.html.md). | |
| If you can't find your error reported anywhere, please open a [GitHub issue](https://github.com/medusajs/medusa/issues/new/choose). | |
| *** | |
| ## Run Medusa Application in Development | |
| To run the Medusa application in development, change to your application's directory and run the following command: | |
| ```bash npm2yarn | |
| npm run dev | |
| ``` | |
| This runs your Medusa application at `http://localhost:9000`, and the Medusa Admin dashboard `http://localhost:9000/app`. | |
| For details on starting and configuring the Next.js storefront, refer to [this documentation](https://docs.medusajs.com/learn/storefront-development/nextjs-starter/index.html.md). | |
| The application will restart if you make any changes to code under the `src` directory, except for admin customizations which are hot reloaded, providing you with a seamless developer experience without having to refresh your browser to see the changes. | |
| *** | |
| ## Create Medusa Admin User | |
| Aside from creating an admin user in the admin dashboard, you can create a user with Medusa's CLI tool. | |
| Run the following command in your Medusa application's directory to create a new admin user: | |
| ```bash | |
| npx medusa user -e [email protected] -p supersecret | |
| ``` | |
| Replace `[email protected]` and `supersecret` with the user's email and password respectively. | |
| You can then use the user's credentials to log into the Medusa Admin application. | |
| *** | |
| ## Project Files | |
| Your Medusa application's project will have the following files and directories: | |
| 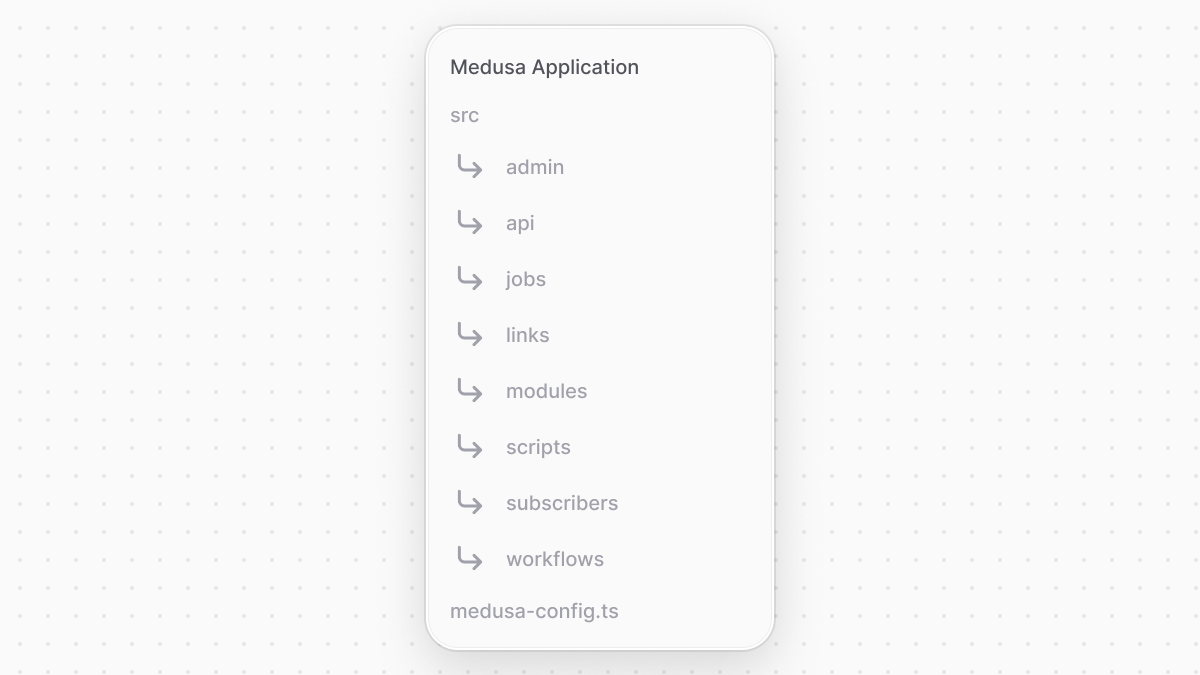 | |
| ### src | |
| This directory is the central place for your custom development. It includes the following sub-directories: | |
| - `admin`: Holds your admin dashboard's custom [widgets](https://docs.medusajs.com/learn/fundamentals/admin/widgets/index.html.md) and [UI routes](https://docs.medusajs.com/learn/fundamentals/admin/ui-routes/index.html.md). | |
| - `api`: Holds your custom [API routes](https://docs.medusajs.com/learn/fundamentals/api-routes/index.html.md) that are added as endpoints in your Medusa application. | |
| - `jobs`: Holds your [scheduled jobs](https://docs.medusajs.com/learn/fundamentals/scheduled-jobs/index.html.md) that run at a specified interval during your Medusa application's runtime. | |
| - `links`: Holds you [module links](https://docs.medusajs.com/learn/fundamentals/module-links/index.html.md) that build associations between data models of different modules. | |
| - `modules`: Holds your custom [modules](https://docs.medusajs.com/learn/fundamentals/modules/index.html.md) that implement custom business logic. | |
| - `scripts`: Holds your custom [scripts](https://docs.medusajs.com/learn/fundamentals/custom-cli-scripts/index.html.md) to be executed using Medusa's CLI tool. | |
| - `subscribers`: Holds your [event listeners](https://docs.medusajs.com/learn/fundamentals/events-and-subscribers/index.html.md) that are executed asynchronously whenever an event is emitted. | |
| - `workflows`: Holds your custom [flows](https://docs.medusajs.com/learn/fundamentals/workflows/index.html.md) that can be executed from anywhere in your application. | |
| ### medusa-config.ts | |
| This file holds your [Medusa configurations](https://docs.medusajs.com/resources/references/medusa-config/index.html.md), such as your PostgreSQL database configurations. | |
| *** | |
| ## Configure Medusa Application | |
| By default, your Medusa application is equipped with the basic configuration to start your development. | |
| If you run into issues with configurations, such as CORS configurations, or need to make changes to the default configuration, refer to [this guide on all available configurations](https://docs.medusajs.com/resources/references/medusa-config/index.html.md). | |
| *** | |
| ## Update Medusa Application | |
| Refer to [this documentation](https://docs.medusajs.com/learn/update/index.html.md) to learn how to update your Medusa project. | |
| *** | |
| ## Next Steps | |
| In the next chapters, you'll learn about the architecture of your Medusa application, then learn how to customize your application to build custom features. | |
| # More Resources | |
| The Development Resources documentation provides guides and references that are useful for your development. This documentation included links to parts of the Development Resources documentation where necessary. | |
| Check out the Development Resources documentation [here](https://docs.medusajs.com/resources/index.html.md). | |
| # Storefront Development | |
| The Medusa application is made up of a Node.js server and an admin dashboard. Storefronts are installed, built, and hosted separately from the Medusa application, giving you the flexibility to choose the frontend tech stack that you and your team are proficient in, and implement unique design systems and user experience. | |
| You can build your storefront from scratch with your preferred tech stack, or start with our Next.js Starter storefront. The Next.js Starter storefront provides rich commerce features and a sleek design. Developers and businesses can use it as-is or build on top of it to tailor it for the business's unique use case, design, and customer experience. | |
| - [Install Next.js Starter Storefront](https://docs.medusajs.com/resources/nextjs-starter/index.html.md) | |
| - [Build Custom Storefront](https://docs.medusajs.com/resources/storefront-development/index.html.md) | |
| *** | |
| ## Passing a Publishable API Key in Storefront Requests | |
| When sending a request to an API route starting with `/store`, you must include a publishable API key in the header of your request. | |
| A publishable API key sets the scope of your request to one or more sales channels. | |
| Then, when you retrieve products, only products of those sales channels are retrieved. This also ensures you retrieve correct inventory data, and associate created orders with the scoped sales channel. | |
| Learn more about passing the publishable API key in [this storefront development guide](https://docs.medusajs.com/resources/storefront-development/publishable-api-keys/index.html.md). | |
| # Updating Medusa | |
| In this chapter, you'll learn about updating your Medusa application and packages. | |
| Medusa's current version is v{config.version.number}. {releaseNoteText} | |
| ## Medusa Versioning | |
| When Medusa puts out a new release, all packages are updated to the same version. This ensures that all packages are compatible with each other, and makes it easier for you to switch between versions. | |
| This doesn't apply to the design-system packages, including `@medusajs/ui`, `@medusajs/ui-presets`, and `@medusajs/ui-icons`. These packages are versioned independently. However, you don't need to install and manage them separately in your Medusa application, as they are included in the `@medusajs/admin-sdk`. If you're using them in a standalone project, such as a storefront or custom admin dashboard, refer to [this section in the Medusa UI documentation](https://docs.medusajs.com/ui/installation/standalone-project#updating-ui-packages/index.html.md) for update instructions. | |
| Medusa updates the version number `major.minor.patch` according to the following rules: | |
| - **patch**: A patch release includes bug fixes and minor improvements. It doesn't include breaking changes. For example, if the current version is `2.0.0`, the next patch release will be `2.0.1`. | |
| - **minor**: A minor release includes new features, fixes, improvements, and breaking changes. For example, if the current version is `2.0.0`, the next minor release will be `2.1.0`. | |
| - **major**: A major release includes significant changes to the entire codebase and architecture. For those, the update process will be more elaborate. For example, if the current version is `2.0.0`, the next major release would be `3.0.0`. | |
| *** | |
| ## Check Installed Version | |
| To check the currently installed version of Medusa in your project, run the following command in your Medusa application: | |
| ```bash | |
| npx medusa -v | |
| ``` | |
| This will show you the installed version of Medusa and the [Medusa CLI tool](https://docs.medusajs.com/resources/medusa-cli/index.html.md), which should be the same. | |
| *** | |
| ## Check Latest Version | |
| The documentation shows the current version at the top right of the navigation bar. When a new version is released, you'll find a blue dot on the version number. Clicking it will take you to the [release notes on GitHub](https://github.com/medusajs/medusa/releases). | |
| You can also star the [Medusa repository on GitHub](https://github.com/medusajs/medusa) to receive updates about new releases on your GitHub dashboard. Our team also shares updates on new releases on our social media channels. | |
| *** | |
| ## Update Medusa Application | |
| Before updating a Medusa application, make sure to check the [release notes](https://github.com/medusajs/medusa/releases) for any breaking changes that require actions from your side. | |
| Then, to update your Medusa application, bump the version of all `@medusajs/*` dependencies in your `package.json`. Then, re-install dependencies: | |
| ```bash npm2yarn | |
| npm run install | |
| ``` | |
| This will update all Medusa packages to the latest version. | |
| ### Running Migrations | |
| Releases may include changes to the database, such as new tables, updates to existing tables, updates after adding links, or data migration scripts. | |
| So, after updating Medusa, run the following command to migrate the latest changes to your database: | |
| ```bash | |
| npx medusa db:migrate | |
| ``` | |
| This will run all pending migrations, sync links, and run data migration scripts. | |
| ### Reverting an Update | |
| Before reverting an update, if you already ran the migrations, you have to first identify the modules who had migrations. Then, before reverting, run the `db:rollback` command for each of those modules. | |
| For example, if the version you updated to had migrations for the Cart and Product Modules, run the following command: | |
| ```bash | |
| npx medusa db:rollback cart product | |
| ``` | |
| Then, revert the update by changing the version of all `@medusajs/*` dependencies in your `package.json` to the previous version and re-installing dependencies: | |
| ```bash npm2yarn | |
| npm run install | |
| ``` | |
| Finally, run the migrations to sync link changes: | |
| ```bash | |
| npx medusa db:migrate | |
| ``` | |
| *** | |
| ## Understanding Codebase Changes | |
| In the Medusa codebase, our team uses the following [TSDoc](https://tsdoc.org/) tags to indicate changes made in the latest version for a specific piece of code: | |
| - `@deprecated`: Indicates that a piece of code is deprecated and will be removed in a future version. The tag's message will include details on what to use instead. However, our updates are always backward-compatible, allowing you to update your codebase at your own pace. | |
| - `@version`: Indicates the version when a piece of code was available from. A piece of code that has this tag will only be available starting from the specified version. | |
| *** | |
| ## Update Plugin Project | |
| If you have a Medusa plugin project, you only need to update its `@medusajs/*` dependencies in the `package.json` file to the latest version. Then, re-install dependencies: | |
| ```bash npm2yarn | |
| npm run install | |
| ``` | |
| # Using TypeScript Aliases | |
| By default, Medusa doesn't support TypeScript aliases in production. | |
| If you prefer using TypeScript aliases, install following development dependencies: | |
| ```bash npm2yarn | |
| npm install --save-dev tsc-alias rimraf | |
| ``` | |
| Where `tsc-alias` is a package that resolves TypeScript aliases, and `rimraf` is a package that removes files and directories. | |
| Then, add a new `resolve:aliases` script to your `package.json` and update the `build` script: | |
| ```json title="package.json" | |
| { | |
| "scripts": { | |
| // other scripts... | |
| "resolve:aliases": "tsc --showConfig -p tsconfig.json > tsconfig.resolved.json && tsc-alias -p tsconfig.resolved.json && rimraf tsconfig.resolved.json", | |
| "build": "npm run resolve:aliases && medusa build" | |
| } | |
| } | |
| ``` | |
| You can now use TypeScript aliases in your Medusa application. For example, add the following in `tsconfig.json`: | |
| ```json title="tsconfig.json" | |
| { | |
| "compilerOptions": { | |
| // ... | |
| "paths": { | |
| "@/*": ["./src/*"] | |
| } | |
| } | |
| } | |
| ``` | |
| Now, you can import modules, for example, using TypeScript aliases: | |
| ```ts | |
| import { BrandModuleService } from "@/modules/brand/service" | |
| ``` | |
| # Configure Instrumentation | |
| In this chapter, you'll learn about observability in Medusa and how to configure instrumentation with OpenTelemetry. | |
| ## Observability with OpenTelemtry | |
| Medusa uses [OpenTelemetry](https://opentelemetry.io/) for instrumentation and reporting. When configured, it reports traces for: | |
| - HTTP requests | |
| - Workflow executions | |
| - Query usages | |
| - Database queries and operations | |
| *** | |
| ## How to Configure Instrumentation in Medusa? | |
| ### Prerequisites | |
| - [An exporter to visualize your application's traces, such as Zipkin.](https://zipkin.io/pages/quickstart.html) | |
| ### Install Dependencies | |
| Start by installing the following OpenTelemetry dependencies in your Medusa project: | |
| ```bash npm2yarn | |
| npm install @opentelemetry/sdk-node @opentelemetry/resources @opentelemetry/sdk-trace-node @opentelemetry/instrumentation-pg | |
| ``` | |
| Also, install the dependencies relevant for the exporter you use. If you're using Zipkin, install the following dependencies: | |
| ```bash npm2yarn | |
| npm install @opentelemetry/exporter-zipkin | |
| ``` | |
| ### Add instrumentation.ts | |
| Next, create the file `instrumentation.ts` with the following content: | |
| ```ts title="instrumentation.ts" | |
| import { registerOtel } from "@medusajs/medusa" | |
| import { ZipkinExporter } from "@opentelemetry/exporter-zipkin" | |
| // If using an exporter other than Zipkin, initialize it here. | |
| const exporter = new ZipkinExporter({ | |
| serviceName: "my-medusa-project", | |
| }) | |
| export function register() { | |
| registerOtel({ | |
| serviceName: "medusajs", | |
| // pass exporter | |
| exporter, | |
| instrument: { | |
| http: true, | |
| workflows: true, | |
| query: true, | |
| }, | |
| }) | |
| } | |
| ``` | |
| In the `instrumentation.ts` file, you export a `register` function that uses Medusa's `registerOtel` utility function. | |
| You also initialize an instance of the exporter, such as Zipkin, and pass it to the `registerOtel` function. | |
| `registerOtel` accepts an object having the following properties: | |
| - serviceName: (\`string\`) The name of the service traced. | |
| - exporter: (\[SpanExporter]\(https://open-telemetry.github.io/opentelemetry-js/interfaces/\_opentelemetry\_sdk\_trace\_base.SpanExporter.html)) An instance of an exporter, such as Zipkin. | |
| - instrument: (\`object\`) Options specifying what to trace. | |
| - http: (\`boolean\`) Whether to trace HTTP requests. | |
| - query: (\`boolean\`) Whether to trace Query usages. | |
| - workflows: (\`boolean\`) Whether to trace Workflow executions. | |
| - db: (\`boolean\`) Whether to trace database queries and operations. | |
| - instrumentations: (\[Instrumentation\[]]\(https://open-telemetry.github.io/opentelemetry-js/interfaces/\_opentelemetry\_instrumentation.Instrumentation.html)) Additional instrumentation options that OpenTelemetry accepts. | |
| *** | |
| ## Test it Out | |
| To test it out, start your exporter, such as Zipkin. | |
| Then, start your Medusa application: | |
| ```bash npm2yarn | |
| npm run dev | |
| ``` | |
| Try to open the Medusa Admin or send a request to an API route. | |
| If you check traces in your exporter, you'll find new traces reported. | |
| ### Trace Span Names | |
| Trace span names start with the following keywords based on what it's reporting: | |
| - `{methodName} {URL}` when reporting HTTP requests, where `{methodName}` is the HTTP method, and `{URL}` is the URL the request is sent to. | |
| - `route:` when reporting route handlers running on an HTTP request. | |
| - `middleware:` when reporting a middleware running on an HTTP request. | |
| - `workflow:` when reporting a workflow execution. | |
| - `step:` when reporting a step in a workflow execution. | |
| - `query.graph:` when reporting Query usages. | |
| - `pg.query:` when reporting database queries and operations. | |
| # Medusa Testing Tools | |
| In this chapter, you'll learn about Medusa's testing tools and how to install and configure them. | |
| ## @medusajs/test-utils Package | |
| Medusa provides a Testing Framework to create integration tests for your custom API routes, modules, or other Medusa customizations. | |
| To use the Testing Framework, install `@medusajs/test-utils` as a `devDependency`: | |
| ```bash npm2yarn | |
| npm install --save-dev @medusajs/test-utils@latest | |
| ``` | |
| *** | |
| ## Install and Configure Jest | |
| Writing tests with `@medusajs/test-utils`'s tools requires installing and configuring Jest in your project. | |
| Run the following command to install the required Jest dependencies: | |
| ```bash npm2yarn | |
| npm install --save-dev jest @types/jest @swc/jest | |
| ``` | |
| Then, create the file `jest.config.js` with the following content: | |
| ```js title="jest.config.js" | |
| const { loadEnv } = require("@medusajs/framework/utils") | |
| loadEnv("test", process.cwd()) | |
| module.exports = { | |
| transform: { | |
| "^.+\\.[jt]s$": [ | |
| "@swc/jest", | |
| { | |
| jsc: { | |
| parser: { syntax: "typescript", decorators: true }, | |
| }, | |
| }, | |
| ], | |
| }, | |
| testEnvironment: "node", | |
| moduleFileExtensions: ["js", "ts", "json"], | |
| modulePathIgnorePatterns: ["dist/"], | |
| setupFiles: ["./integration-tests/setup.js"], | |
| } | |
| if (process.env.TEST_TYPE === "integration:http") { | |
| module.exports.testMatch = ["**/integration-tests/http/*.spec.[jt]s"] | |
| } else if (process.env.TEST_TYPE === "integration:modules") { | |
| module.exports.testMatch = ["**/src/modules/*/__tests__/**/*.[jt]s"] | |
| } else if (process.env.TEST_TYPE === "unit") { | |
| module.exports.testMatch = ["**/src/**/__tests__/**/*.unit.spec.[jt]s"] | |
| } | |
| ``` | |
| Next, create the `integration-tests/setup.js` file with the following content: | |
| ```js title="integration-tests/setup.js" | |
| const { MetadataStorage } = require("@mikro-orm/core") | |
| MetadataStorage.clear() | |
| ``` | |
| *** | |
| ## Add Test Commands | |
| Finally, add the following scripts to `package.json`: | |
| ```json title="package.json" | |
| "scripts": { | |
| // ... | |
| "test:integration:http": "TEST_TYPE=integration:http NODE_OPTIONS=--experimental-vm-modules jest --silent=false --runInBand --forceExit", | |
| "test:integration:modules": "TEST_TYPE=integration:modules NODE_OPTIONS=--experimental-vm-modules jest --silent --runInBand --forceExit", | |
| "test:unit": "TEST_TYPE=unit NODE_OPTIONS=--experimental-vm-modules jest --silent --runInBand --forceExit" | |
| }, | |
| ``` | |
| You now have two commands: | |
| - `test:integration:http` to run integration tests (for example, for API routes and workflows) available under the `integration-tests/http` directory. | |
| - `test:integration:modules` to run integration tests for modules available in any `__tests__` directory under `src/modules`. | |
| - `test:unit` to run unit tests in any `__tests__` directory under the `src` directory. | |
| Medusa's Testing Framework works for integration tests only. You can write unit tests using Jest. | |
| *** | |
| ## Test Tools and Writing Tests | |
| The next chapters explain how to use the testing tools provided by `@medusajs/test-utils` to write tests. | |
| # General Medusa Application Deployment Guide | |
| In this document, you'll learn the general steps to deploy your Medusa application. How you apply these steps depend on your chosen hosting provider or platform. | |
| Find how-to guides for specific platforms in [this documentation](https://docs.medusajs.com/resources/deployment/index.html.md). | |
| Want Medusa to manage and maintain your infrastructure? [Sign up and learn more about Medusa Cloud](https://medusajs.com/contact) | |
| Medusa Cloud is our managed services offering that makes deploying and operating Medusa applications possible without having to worry about configuring, scaling, and maintaining infrastructure. Medusa Cloud hosts your server, Admin dashboard, database, and Redis instance. | |
| With Medusa Cloud, you maintain full customization control as you deploy your own modules and customizations directly from GitHub: | |
| - Push to deploy. | |
| - Multiple testing environments. | |
| - Preview environments for new PRs. | |
| - Test on production-like data. | |
| ### Prerequisites | |
| - [Medusa application’s codebase hosted on GitHub repository.](https://docs.medusajs.com/learn/index.html.md) | |
| ## Hosting Provider Requirements | |
| When you deploy your Medusa application, make sure your chosen hosting provider supports deploying the following resources: | |
| 1. PostgreSQL database: If your hosting provider doesn't support database hosting, you must find another hosting provider for the PostgreSQL database. | |
| 2. Redis database: If your hosting provider doesn't support database hosting, you must find another hosting provider for the Redis database. | |
| 3. Medusa application in server and worker mode. This means your hosting provider should support deploying two applications or instances from the same codebase. | |
| 4. For optimal experience, the hosting provider and plan must offer at least 2GB of RAM. | |
| *** | |
| ## 1. Configure Medusa Application | |
| ### Worker Mode | |
| The `workerMode` configuration determines which mode the Medusa application runs in. | |
| When you deploy the Medusa application, you deploy two instances: one in server mode, and one in worker mode. | |
| Learn more about the `workerMode` configuration in [this document](https://docs.medusajs.com/resources/references/medusa-config#workermode/index.html.md). | |
| So, add the following configuration in `medusa-config.ts`: | |
| ```ts title="medusa-config.ts" | |
| module.exports = defineConfig({ | |
| projectConfig: { | |
| // ... | |
| workerMode: process.env.MEDUSA_WORKER_MODE as "shared" | "worker" | "server", | |
| }, | |
| }) | |
| ``` | |
| Later, you’ll set different values of the `MEDUSA_WORKER_MODE` environment variable for each Medusa application deployment or instance. | |
| ### Configure Medusa Admin | |
| You need to disable the Medusa Admin in the worker Medusa application, while keeping it enabled in the server Medusa application. So, add the following configuration in `medusa-config.ts`: | |
| ```ts title="medusa-config.ts" | |
| module.exports = defineConfig({ | |
| // ... | |
| admin: { | |
| disable: process.env.DISABLE_MEDUSA_ADMIN === "true", | |
| }, | |
| }) | |
| ``` | |
| Later, you’ll set different values of the `DISABLE_MEDUSA_ADMIN` environment variable. | |
| ### Configure Redis URL | |
| The `redisUrl` configuration specifies the connection URL to Redis to store the Medusa server's session. | |
| Learn more in the [Medusa Configuration documentation](https://docs.medusajs.com/resources/references/medusa-config#redisurl/index.html.md). | |
| So, add the following configuration in `medusa-config.ts` : | |
| ```ts title="medusa-config.ts" | |
| module.exports = defineConfig({ | |
| projectConfig: { | |
| // ... | |
| redisUrl: process.env.REDIS_URL, | |
| }, | |
| }) | |
| ``` | |
| *** | |
| ## 2. Add predeploy Script | |
| Before you start the Medusa application in production, you should always run migrations and sync links. | |
| So, add the following script in `package.json`: | |
| ```json | |
| "scripts": { | |
| // ... | |
| "predeploy": "medusa db:migrate" | |
| }, | |
| ``` | |
| *** | |
| ## 3. Install Production Modules and Providers | |
| By default, your Medusa application uses modules and providers useful for development, such as the In-Memory Cache Module or the Local File Module Provider. | |
| It’s highly recommended to instead use modules and providers suitable for production, including: | |
| - [Redis Cache Module](https://docs.medusajs.com/resources/architectural-modules/cache/redis/index.html.md) | |
| - [Redis Event Bus Module](https://docs.medusajs.com/resources/architectural-modules/event/redis/index.html.md) | |
| - [Workflow Engine Redis Module](https://docs.medusajs.com/resources/architectural-modules/workflow-engine/redis/index.html.md) | |
| - [S3 File Module Provider](https://docs.medusajs.com/resources/architectural-modules/file/s3/index.html.md) (or other file module providers production-ready). | |
| - [SendGrid Notification Module Provider](https://docs.medusajs.com/resources/architectural-modules/notification/sendgrid/index.html.md) (or other notification module providers production-ready). | |
| Then, add these modules in `medusa-config.ts`: | |
| ```ts title="medusa-config.ts" | |
| import { Modules } from "@medusajs/framework/utils" | |
| module.exports = defineConfig({ | |
| // ... | |
| modules: [ | |
| { | |
| resolve: "@medusajs/medusa/cache-redis", | |
| options: { | |
| redisUrl: process.env.REDIS_URL, | |
| }, | |
| }, | |
| { | |
| resolve: "@medusajs/medusa/event-bus-redis", | |
| options: { | |
| redisUrl: process.env.REDIS_URL, | |
| }, | |
| }, | |
| { | |
| resolve: "@medusajs/medusa/workflow-engine-redis", | |
| options: { | |
| redis: { | |
| url: process.env.REDIS_URL, | |
| }, | |
| }, | |
| }, | |
| ], | |
| }) | |
| ``` | |
| Check out the [Integrations](https://docs.medusajs.com/resources/integrations/index.html.md) and [Architectural Modules](https://docs.medusajs.com/resources/architectural-modules/index.html.md) documentation for other modules and providers to use. | |
| *** | |
| ## 4. Create PostgreSQL and Redis Databases | |
| Your Medusa application must connect to PostgreSQL and Redis databases. So, before you deploy it, create production PostgreSQL and Redis databases. | |
| If your hosting provider doesn't support databases, you can use [Neon for PostgreSQL database hosting](https://neon.tech/), and [Redis Cloud for the Redis database hosting](https://redis.io/cloud/). | |
| After hosting both databases, keep their connection URLs for the next steps. | |
| *** | |
| ## 5. Deploy Medusa Application in Server Mode | |
| As mentioned earlier, you'll deploy two instances or create two deployments of your Medusa application: one in server mode, and the other in worker mode. | |
| The deployment steps depend on your hosting provider. This section provides the general steps to perform during the deployment. | |
| ### Set Environment Variables | |
| When setting the environment variables of the Medusa application, set the following variables: | |
| ```bash | |
| COOKIE_SECRET=supersecret # TODO GENERATE SECURE SECRET | |
| JWT_SECRET=supersecret # TODO GENERATE SECURE SECRET | |
| STORE_CORS= # STOREFRONT URL | |
| ADMIN_CORS= # ADMIN URL | |
| AUTH_CORS= # STOREFRONT AND ADMIN URLS, SEPARATED BY COMMAS | |
| DISABLE_MEDUSA_ADMIN=false | |
| MEDUSA_WORKER_MODE=server | |
| PORT=9000 | |
| DATABASE_URL # POSTGRES DATABASE URL | |
| REDIS_URL= # REDIS DATABASE URL | |
| ``` | |
| Where: | |
| - The value of `COOKIE_SECRET` and `JWT_SECRET` must be a randomly generated secret. | |
| - `STORE_CORS`'s value is the URL of your storefront. If you don’t have it yet, you can skip adding it for now. | |
| - `ADMIN_CORS`'s value is the URL of the admin dashboard, which is the same as the server Medusa application. You can add it later if you don't currently have it. | |
| - `AUTH_CORS`'s value is the URLs of any application authenticating users, customers, or other actor types, such as the storefront and admin URLs. The URLs are separated by commas. If you don’t have the URLs yet, you can set its value later. | |
| - Set `DISABLE_MEDUSA_ADMIN`'s value to `false` so that the admin is built with the server application. | |
| - Set the PostgreSQL database's connection URL as the value of `DATABASE_URL` | |
| - Set the Redis database's connection URL as the value of `REDIS_URL`. | |
| Feel free to add any other relevant environment variables, such as for integrations and architectural modules. | |
| ### Set Start Command | |
| The Medusa application's production build, which is created using the `build` command, outputs the Medusa application to `.medusa/server`. | |
| So, you must run the `start` command from the `.medusa/server` directory. | |
| If your hosting provider doesn't support setting a current-working directory, set the start command to the following: | |
| ```bash npm2yarn | |
| cd .medusa/server && npm run predeploy && npm run start | |
| ``` | |
| ### Set Backend URL in Admin Configuration | |
| After you’ve obtained the Medusa application’s URL, add the following configuration to `medusa-config.ts`: | |
| ```ts title="medusa-config.ts" | |
| module.exports = defineConfig({ | |
| // ... | |
| admin: { | |
| // ... | |
| backendUrl: process.env.MEDUSA_BACKEND_URL, | |
| }, | |
| }) | |
| ``` | |
| Then, push the changes to the GitHub repository or deployed application. | |
| In your hosting provider, add or modify the following environment variables for the Medusa application in server mode: | |
| ```bash | |
| ADMIN_CORS= # MEDUSA APPLICATION URL | |
| AUTH_CORS= # ADD MEDUSA APPLICATION URL | |
| MEDUSA_BACKEND_URL= # URL TO DEPLOYED MEDUSA APPLICATION | |
| ``` | |
| Where you set the value of `ADMIN_CORS` and `MEDUSA_BACKEND_URL` to the Medusa application’s URL, and you add the URL to `AUTH_CORS`. | |
| Remember to separate URLs in `AUTH_CORS` by commas. | |
| *** | |
| ## 6. Deploy Medusa Application in Worker Mode | |
| Next, you'll deploy the Medusa application in worker mode. | |
| As explained in the previous section, the deployment steps depend on your hosting provider. This section provides the general steps to perform during the deployment. | |
| ### Set Environment Variables | |
| When setting the environment variables of the Medusa application, set the following variables: | |
| ```bash | |
| COOKIE_SECRET=supersecret # TODO GENERATE SECURE SECRET | |
| JWT_SECRET=supersecret # TODO GENERATE SECURE SECRET | |
| DISABLE_MEDUSA_ADMIN=true | |
| MEDUSA_WORKER_MODE=worker | |
| PORT=9000 | |
| DATABASE_URL # POSTGRES DATABASE URL | |
| REDIS_URL= # REDIS DATABASE URL | |
| ``` | |
| Where: | |
| - The value of `COOKIE_SECRET` and `JWT_SECRET` must be a randomly generated secret. | |
| - Set `DISABLE_MEDUSA_ADMIN`'s value to `true` so that the admin isn't built with the worker application. | |
| - Set the PostgreSQL database's connection URL as the value of `DATABASE_URL` | |
| - Set the Redis database's connection URL as the value of `REDIS_URL`. | |
| Feel free to add any other relevant environment variables, such as for integrations and architectural modules. | |
| ### Set Start Command | |
| The Medusa application's production build, which is created using the `build` command, outputs the Medusa application to `.medusa/server`. | |
| So, you must run the `start` command from the `.medusa/server` directory. | |
| If your hosting provider doesn't support setting a current-working directory, set the start command to the following: | |
| ```bash npm2yarn | |
| cd .medusa/server && npm run predeploy && npm run start | |
| ``` | |
| *** | |
| ## 7. Test Deployed Application | |
| Once the application is deployed and live, go to `<APP_URL>/health`, where `<APP_URL>` is the URL of the Medusa application in server mode. If the deployment was successful, you’ll see the `OK` response. | |
| The Medusa Admin is also available at `<APP_URL>/app`. | |
| *** | |
| ## Create Admin User | |
| If your hosting provider supports running commands in your Medusa application's directory, run the following command to create an admin user: | |
| ```bash | |
| npx medusa user -e [email protected] -p supersecret | |
| ``` | |
| Replace the email `[email protected]` and password `supersecret` with the credentials you want. | |
| You can use these credentials to log into the Medusa Admin dashboard. | |
| # Logging | |
| In this chapter, you’ll learn how to use Medusa’s logging utility. | |
| ## Logger Class | |
| Medusa provides a `Logger` class with advanced logging functionalities. This includes configuring logging levels or saving logs to a file. | |
| The Medusa application registers the `Logger` class in the Medusa container and each module's container as `logger`. | |
| *** | |
| ## How to Log a Message | |
| Resolve the `logger` using the Medusa container to log a message in your resource. | |
| For example, create the file `src/jobs/log-message.ts` with the following content: | |
| ```ts title="src/jobs/log-message.ts" highlights={highlights} | |
| import { MedusaContainer } from "@medusajs/framework/types" | |
| import { ContainerRegistrationKeys } from "@medusajs/framework/utils" | |
| export default async function myCustomJob( | |
| container: MedusaContainer | |
| ) { | |
| const logger = container.resolve(ContainerRegistrationKeys.LOGGER) | |
| logger.info("I'm using the logger!") | |
| } | |
| export const config = { | |
| name: "test-logger", | |
| // execute every minute | |
| schedule: "* * * * *", | |
| } | |
| ``` | |
| This creates a scheduled job that resolves the `logger` from the Medusa container and uses it to log a message. | |
| ### Test the Scheduled Job | |
| To test out the above scheduled job, start the Medusa application: | |
| ```bash npm2yarn | |
| npm run dev | |
| ``` | |
| After a minute, you'll see the following message as part of the logged messages: | |
| ```text | |
| info: I'm using the logger! | |
| ``` | |
| *** | |
| ## Log Levels | |
| The `Logger` class has the following methods: | |
| - `info`: The message is logged with level `info`. | |
| - `warn`: The message is logged with level `warn`. | |
| - `error`: The message is logged with level `error`. | |
| - `debug`: The message is logged with level `debug`. | |
| Each of these methods accepts a string parameter to log in the terminal with the associated level. | |
| *** | |
| ## Logging Configurations | |
| ### Log Level | |
| The available log levels, from lowest to highest levels, are: | |
| 1. `silly` (default, meaning messages of all levels are logged) | |
| 2. `debug` | |
| 3. `info` | |
| 4. `warn` | |
| 5. `error` | |
| You can change that by setting the `LOG_LEVEL` environment variable to the minimum level you want to be logged. | |
| For example: | |
| ```bash | |
| LOG_LEVEL=error | |
| ``` | |
| This logs `error` messages only. | |
| The environment variable must be set as a system environment variable and not in `.env`. | |
| ### Save Logs in a File | |
| Aside from showing the logs in the terminal, you can save the logs in a file by setting the `LOG_FILE` environment variable to the path of the file relative to the Medusa server’s root directory. | |
| For example: | |
| ```bash | |
| LOG_FILE=all.log | |
| ``` | |
| Your logs are now saved in the `all.log` file at the root of your Medusa application. | |
| The environment variable must be set as a system environment variable and not in `.env`. | |
| *** | |
| ## Show Log with Progress | |
| The `Logger` class has an `activity` method used to log a message of level `info`. If the Medusa application is running in a development environment, a spinner starts to show the activity's progress. | |
| For example: | |
| ```ts title="src/jobs/log-message.ts" | |
| import { MedusaContainer } from "@medusajs/framework/types" | |
| import { ContainerRegistrationKeys } from "@medusajs/framework/utils" | |
| export default async function myCustomJob( | |
| container: MedusaContainer | |
| ) { | |
| const logger = container.resolve(ContainerRegistrationKeys.LOGGER) | |
| const activityId = logger.activity("First log message") | |
| logger.progress(activityId, `Second log message`) | |
| logger.success(activityId, "Last log message") | |
| } | |
| ``` | |
| The `activity` method returns the ID of the started activity. This ID can then be passed to one of the following methods of the `Logger` class: | |
| - `progress`: Log a message of level `info` that indicates progress within that same activity. | |
| - `success`: Log a message of level `info` that indicates that the activity has succeeded. This also ends the associated activity. | |
| - `failure`: Log a message of level `error` that indicates that the activity has failed. This also ends the associated activity. | |
| If you configured the `LOG_LEVEL` environment variable to a level higher than those associated with the above methods, their messages won’t be logged. | |
| # Next.js Starter Storefront | |
| The Medusa application is made up of a Node.js server and an admin dashboard. The storefront is installed and hosted separately from the Medusa application, giving you the flexibility to choose the frontend tech stack that you and your team are proficient in, and implement unique design systems and user experience. | |
| The Next.js Starter storefront provides rich commerce features and a sleek design. Developers and businesses can use it as-is or build on top of it to tailor it for the business's unique use case, design, and customer experience. | |
| In this chapter, you’ll learn how to install the Next.js Starter storefront separately from the Medusa application. You can also install it while installing the Medusa application as explained in [the installation chapter](https://docs.medusajs.com/learn/installation/index.html.md). | |
| ## Install Next.js Starter | |
| ### Prerequisites | |
| - [Node.js v20+](https://nodejs.org/en/download) | |
| - [Git CLI tool](https://git-scm.com/downloads) | |
| If you already have a Medusa application installed with at least one region, you can install the Next.js Starter storefront with the following steps: | |
| 1. Clone the [Next.js Starter](https://github.com/medusajs/nextjs-starter-medusa): | |
| ```bash | |
| git clone https://github.com/medusajs/nextjs-starter-medusa my-medusa-storefront | |
| ``` | |
| 2. Change to the `my-medusa-storefront` directory, install the dependencies, and rename the template environment variable file: | |
| ```bash npm2yarn | |
| cd my-medusa-storefront | |
| npm install | |
| mv .env.template .env.local | |
| ``` | |
| 3. Set the Medusa application's publishable API key in the `NEXT_PUBLIC_MEDUSA_PUBLISHABLE_KEY` environment variable. You can retrieve the publishable API key in on the Medusa Admin dashboard by going to Settings -> Publishable API Keys | |
| ```bash | |
| NEXT_PUBLIC_MEDUSA_PUBLISHABLE_KEY=pk_123... | |
| ``` | |
| 4. While the Medusa application is running, start the Next.js Starter storefront: | |
| ```bash npm2yarn | |
| npm run dev | |
| ``` | |
| Your Next.js Starter storefront is now running at `http://localhost:8000`. | |
| *** | |
| ## Customize Storefront | |
| To customize the storefront, refer to the following directories: | |
| - `src/app`: The storefront’s pages. | |
| - `src/modules`: The storefront’s components. | |
| - `src/styles`: The storefront’s styles. | |
| You can learn more about development with Next.js through [their documentation](https://nextjs.org/docs/getting-started). | |
| *** | |
| ## Configurations and Integrations | |
| The Next.js Starter is compatible with some Medusa integrations out-of-the-box, such as the Stripe provider module. You can also change some of its configurations if necessary. | |
| Refer to the [Next.js Starter reference](https://docs.medusajs.com/resources/nextjs-starter/index.html.md) for more details. | |
| # Build Custom Features | |
| In the upcoming chapters, you'll follow step-by-step guides to build custom features in Medusa. These guides gradually introduce Medusa's concepts to help you understand what they are and how to use them. | |
| By following these guides, you'll add brands to the Medusa application that you can associate with products. | |
| To build a custom feature in Medusa, you need three main tools: | |
| - [Module](https://docs.medusajs.com/learn/fundamentals/modules/index.html.md): a package with commerce logic for a single domain. It defines new tables to add to the database, and a class of methods to manage these tables. | |
| - [Workflow](https://docs.medusajs.com/learn/fundamentals/workflows/index.html.md): a tool to perform an operation comprising multiple steps with built-in rollback and retry mechanisms. | |
| - [API route](https://docs.medusajs.com/learn/fundamentals/api-routes/index.html.md): a REST endpoint that exposes commerce features to clients, such as the admin dashboard or a storefront. The API route executes a workflow that implements the commerce feature using modules. | |
| 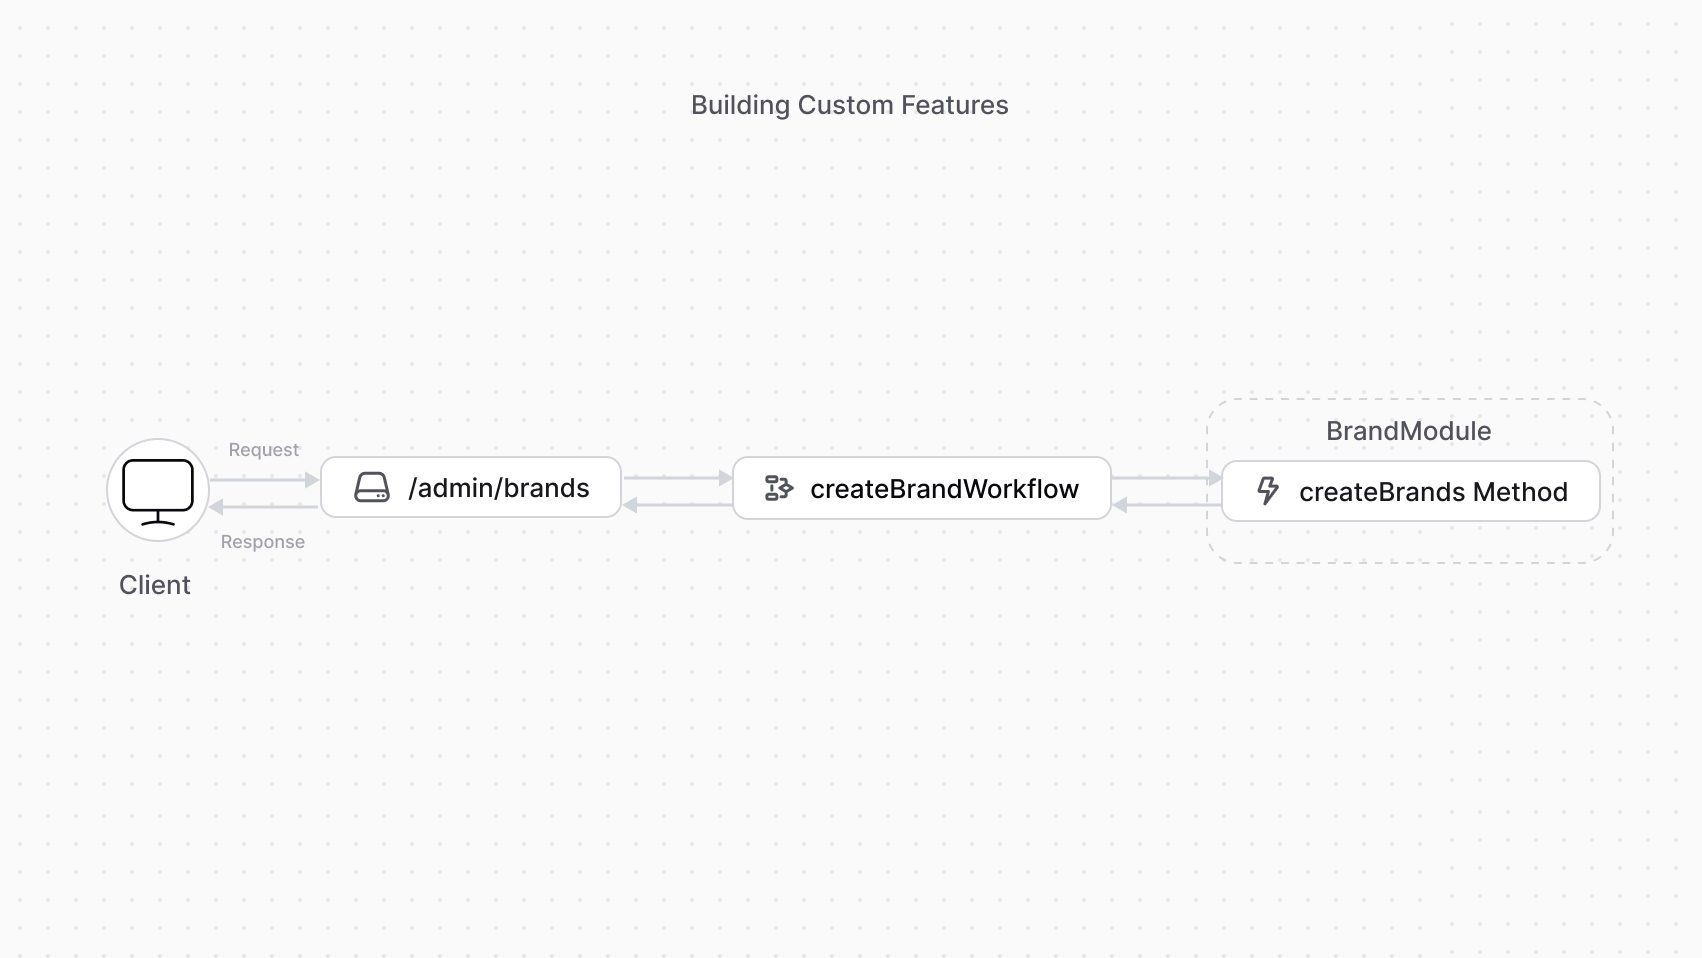 | |
| *** | |
| ## Next Chapters: Brand Module Example | |
| The next chapters will guide you to: | |
| 1. Build a Brand Module that creates a `Brand` data model and provides data-management features. | |
| 2. Add a workflow to create a brand. | |
| 3. Expose an API route that allows admin users to create a brand using the workflow. | |
| # Customize Medusa Admin Dashboard | |
| In the previous chapters, you've customized your Medusa application to [add brands](https://docs.medusajs.com/learn/customization/custom-features/module/index.html.md), [expose an API route to create brands](https://docs.medusajs.com/learn/customization/custom-features/api-route/index.html.md), and [linked brands to products](https://docs.medusajs.com/learn/customization/extend-features/define-link/index.html.md). | |
| After customizing and extending your application with new features, you may need to provide an interface for admin users to utilize these features. The Medusa Admin dashboard is extendable, allowing you to: | |
| - Insert components, called [widgets](https://docs.medusajs.com/learn/fundamentals/admin/widgets/index.html.md), on existing pages. | |
| - Add new pages, called [UI Routes](https://docs.medusajs.com/learn/fundamentals/admin/ui-routes/index.html.md). | |
| From these customizations, you can send requests to custom API routes, allowing admin users to manage custom resources on the dashboard | |
| *** | |
| ## Next Chapters: View Brands in Dashboard | |
| In the next chapters, you'll continue with the brands example to: | |
| - Add a new section to the product details page that shows the product's brand. | |
| - Add a new page in the dashboard that shows all brands in the store. | |
| # Customizations Next Steps: Learn the Fundamentals | |
| The previous guides introduced Medusa's different concepts and how you can use them to customize Medusa for a realistic use case, You added brands to your application, linked them to products, customized the admin dashboard, and integrated a third-party CMS. | |
| The next chapters will cover each of these concepts in depth, with the different ways you can use them, their options or configurations, and more advanced features that weren't covered in the previous guides. While you can start building with Medusa, it's highly recommended to follow the next chapters for a better understanding of Medusa's fundamentals. | |
| ## Helpful Resources Guides | |
| The [Development Resources](https://docs.medusajs.com/resources/index.html.md) documentation provides more helpful guides and references for your development journey. Some of these guides and references include: | |
| 3. [Commerce Modules](https://docs.medusajs.com/resources/commerce-modules/index.html.md): Browse the list of commerce modules in Medusa and their references to learn how to use them. | |
| 4. [Service Factory Reference](https://docs.medusajs.com/resources/service-factory-reference/index.html.md): Learn about the methods generated by `MedusaService` with examples. | |
| 5. [Workflows Reference](https://docs.medusajs.com/resources/medusa-workflows-reference/index.html.md): Browse the list of core workflows and their hooks that are useful for your customizations. | |
| 6. [Admin Injection Zones](https://docs.medusajs.com/resources/admin-widget-injection-zones/index.html.md): Browse the injection zones in the Medusa Admin to learn where you can inject widgets. | |
| *** | |
| ## More Examples in Recipes | |
| In the Development Resources documentation, you'll also find step-by-step guides for different use cases, such as building a marketplace, digital products, and more. | |
| Refer to the [Recipes](https://docs.medusajs.com/resources/recipes/index.html.md) documentation to learn more. | |
| # Re-Use Customizations with Plugins | |
| In the previous chapters, you've learned important concepts related to creating modules, implementing commerce features in workflows, exposing those features in API routes, customizing the Medusa Admin dashboard with Admin Extensions, and integrating third-party systems. | |
| You've implemented the brands example within a single Medusa application. However, this approach is not scalable when you want to reuse your customizations across multiple projects. | |
| To reuse your customizations across multiple Medusa applications, such as implementing brands in different projects, you can create a plugin. A plugin is an NPM package that encapsulates your customizations and can be installed in any Medusa application. Plugins can include modules, workflows, API routes, Admin Extensions, and more. | |
| 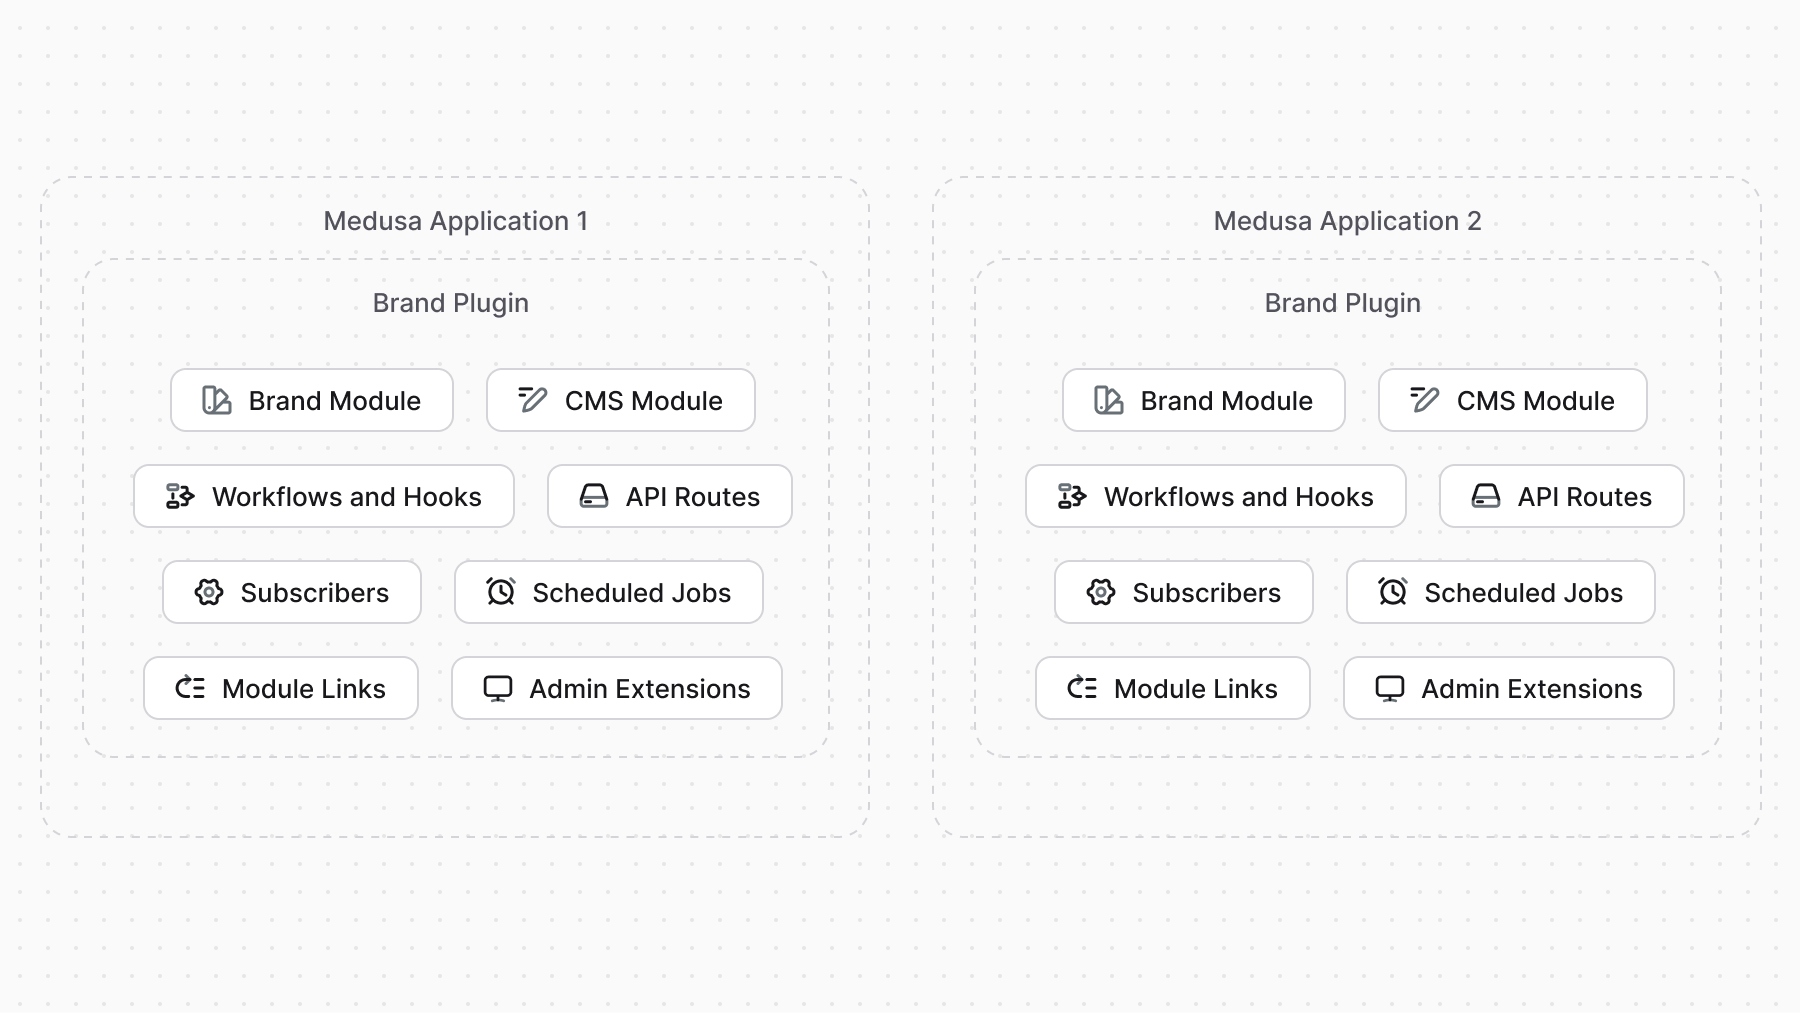 | |
| Medusa provides the tooling to create a plugin package, test it in a local Medusa application, and publish it to NPM. | |
| To learn more about plugins and how to create them, refer to [this chapter](https://docs.medusajs.com/learn/fundamentals/plugins/index.html.md). | |
| # Admin Development | |
| In the next chapters, you'll learn more about possible admin customizations. | |
| You can customize the admin dashboard by: | |
| - Adding new sections to existing pages using Widgets. | |
| - Adding new pages using UI Routes. | |
| *** | |
| ## Medusa UI Package | |
| Medusa provides a Medusa UI package to facilitate your admin development through ready-made components and ensure a consistent design between your customizations and the dashboard’s design. | |
| Refer to the [Medusa UI documentation](https://docs.medusajs.com/ui/index.html.md) to learn how to install it and use its components. | |
| *** | |
| ## Admin Components List | |
| To build admin customizations that match the Medusa Admin's designs and layouts, refer to [this guide](https://docs.medusajs.com/resources/admin-components/index.html.md) to find common components. | |
| # API Routes | |
| In this chapter, you’ll learn what API Routes are and how to create them. | |
| ## What is an API Route? | |
| An API Route is an endpoint. It exposes commerce features to external applications, such as storefronts, the admin dashboard, or third-party systems. | |
| The Medusa core application provides a set of admin and store API routes out-of-the-box. You can also create custom API routes to expose your custom functionalities. | |
| *** | |
| ## How to Create an API Route? | |
| An API Route is created in a TypeScript or JavaScript file under the `src/api` directory of your Medusa application. The file’s name must be `route.ts` or `route.js`. | |
| 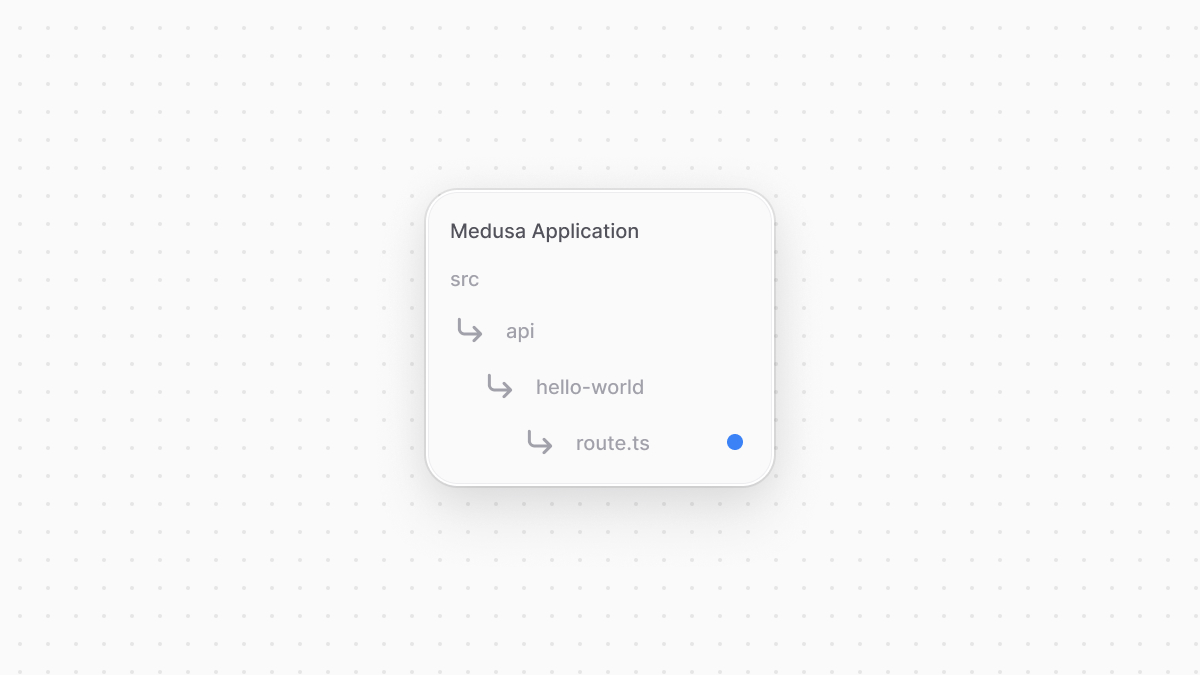 | |
| Each file exports API Route handler functions for at least one HTTP method (`GET`, `POST`, `DELETE`, etc…). | |
| For example, to create a `GET` API Route at `/hello-world`, create the file `src/api/hello-world/route.ts` with the following content: | |
| ```ts title="src/api/hello-world/route.ts" | |
| import type { | |
| MedusaRequest, | |
| MedusaResponse, | |
| } from "@medusajs/framework/http" | |
| export const GET = ( | |
| req: MedusaRequest, | |
| res: MedusaResponse | |
| ) => { | |
| res.json({ | |
| message: "[GET] Hello world!", | |
| }) | |
| } | |
| ``` | |
| ### Test API Route | |
| To test the API route above, start the Medusa application: | |
| ```bash npm2yarn | |
| npm run dev | |
| ``` | |
| Then, send a `GET` request to the `/hello-world` API Route: | |
| ```bash | |
| curl http://localhost:9000/hello-world | |
| ``` | |
| *** | |
| ## When to Use API Routes | |
| You're exposing custom functionality to be used by a storefront, admin dashboard, or any external application. | |
| # Custom CLI Scripts | |
| In this chapter, you'll learn how to create and execute custom scripts from Medusa's CLI tool. | |
| ## What is a Custom CLI Script? | |
| A custom CLI script is a function to execute through Medusa's CLI tool. This is useful when creating custom Medusa tooling to run through the CLI. | |
| *** | |
| ## How to Create a Custom CLI Script? | |
| To create a custom CLI script, create a TypeScript or JavaScript file under the `src/scripts` directory. The file must default export a function. | |
| For example, create the file `src/scripts/my-script.ts` with the following content: | |
| ```ts title="src/scripts/my-script.ts" | |
| import { | |
| ExecArgs, | |
| IProductModuleService, | |
| } from "@medusajs/framework/types" | |
| import { Modules } from "@medusajs/framework/utils" | |
| export default async function myScript({ container }: ExecArgs) { | |
| const productModuleService: IProductModuleService = container.resolve( | |
| Modules.PRODUCT | |
| ) | |
| const [, count] = await productModuleService | |
| .listAndCountProducts() | |
| console.log(`You have ${count} product(s)`) | |
| } | |
| ``` | |
| The function receives as a parameter an object having a `container` property, which is an instance of the Medusa Container. Use it to resolve resources in your Medusa application. | |
| *** | |
| ## How to Run Custom CLI Script? | |
| To run the custom CLI script, run the Medusa CLI's `exec` command: | |
| ```bash | |
| npx medusa exec ./src/scripts/my-script.ts | |
| ``` | |
| *** | |
| ## Custom CLI Script Arguments | |
| Your script can accept arguments from the command line. Arguments are passed to the function's object parameter in the `args` property. | |
| For example: | |
| ```ts | |
| import { ExecArgs } from "@medusajs/framework/types" | |
| export default async function myScript({ args }: ExecArgs) { | |
| console.log(`The arguments you passed: ${args}`) | |
| } | |
| ``` | |
| Then, pass the arguments in the `exec` command after the file path: | |
| ```bash | |
| npx medusa exec ./src/scripts/my-script.ts arg1 arg2 | |
| ``` | |
| # Environment Variables | |
| In this chapter, you'll learn how environment variables are loaded in Medusa. | |
| ## System Environment Variables | |
| The Medusa application loads and uses system environment variables. | |
| For example, if you set the `PORT` environment variable to `8000`, the Medusa application runs on that port instead of `9000`. | |
| In production, you should always use system environment variables that you set through your hosting provider. | |
| *** | |
| ## Environment Variables in .env Files | |
| During development, it's easier to set environment variables in a `.env` file in your repository. | |
| Based on your `NODE_ENV` system environment variable, which is considered as `development` if not set, Medusa will try to load environment variables from the following `.env` files: | |
| |\`.env\`| | |
| |---|---| | |
| |\`NODE\_ENV\`|\`.env\`| | |
| |\`NODE\_ENV\`|\`.env.production\`| | |
| |\`NODE\_ENV\`|\`.env.staging\`| | |
| |\`NODE\_ENV\`|\`.env.test\`| | |
| ### Set Environment in `loadEnv` | |
| In the `medusa-config.ts` file of your Medusa application, you'll find a `loadEnv` function used that accepts `process.env.NODE_ENV` as a first parameter. | |
| This function is responsible for loading the correct `.env` file based on the value of `process.env.NODE_ENV`. | |
| To ensure that the correct `.env` file is loaded as shown in the table above, only specify `development`, `production`, `staging` or `test` as the value of `process.env.NODE_ENV` or as the parameter of `loadEnv`. | |
| *** | |
| ## Environment Variables for Admin Customizations | |
| Since the Medusa Admin is built on top of [Vite](https://vite.dev/), you prefix the environment variables you want to use in a widget or UI route with `VITE_`. Then, you can access or use them with the `import.meta.env` object. | |
| Learn more in [this documentation](https://docs.medusajs.com/learn/fundamentals/admin/environment-variables/index.html.md). | |
| # Data Models Advanced Guides | |
| Data models are created and managed in a module. To learn how to create a data model in a custom module, refer to the [Modules chapter](https://docs.medusajs.com/learn/fundamentals/modules/index.html.md). | |
| In the next chapters, you'll learn about defining data models in more details. You'll learn about: | |
| - The different property types available. | |
| - How to set a property as a primary key. | |
| - How to create and manage relationships. | |
| - How to configure properties, such as making them nullable or searchable. | |
| - How to manually write migrations. | |
| # Events and Subscribers | |
| In this chapter, you’ll learn about Medusa's event system, and how to handle events with subscribers. | |
| ## Handle Core Commerce Flows with Events | |
| When building commerce digital applications, you'll often need to perform an action after a commerce operation is performed. For example, sending an order confirmation email when the customer places an order, or syncing data that's updated in Medusa to a third-party system. | |
| Medusa emits events when core commerce features are performed, and you can listen to and handle these events in asynchronous functions. You can think of Medusa's events like you'd think about webhooks in other commerce platforms, but instead of having to setup separate applications to handle webhooks, your efforts only go into writing the logic right in your Medusa codebase. | |
| You listen to an event in a subscriber, which is an asynchronous function that's executed when its associated event is emitted. | |
| 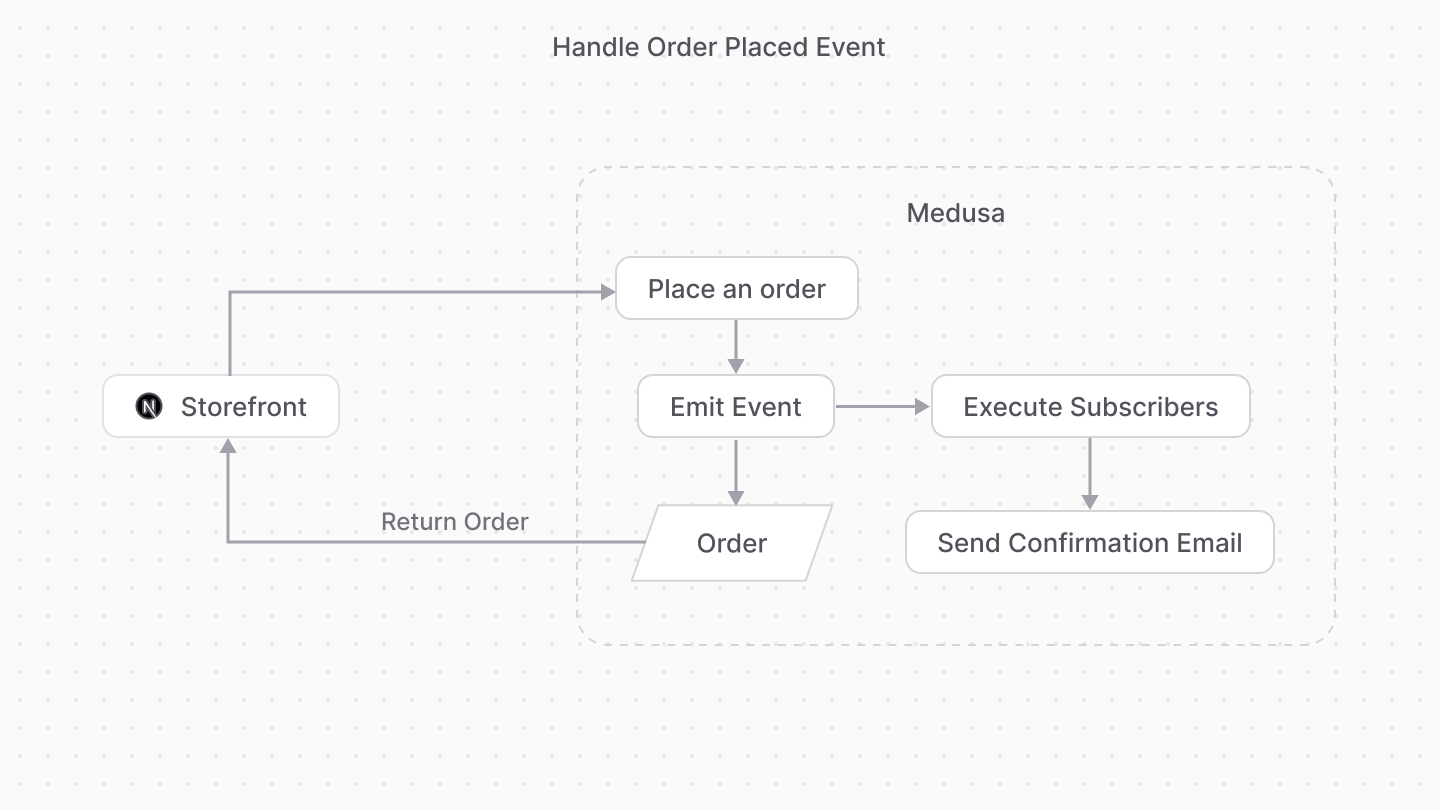 | |
| Subscribers are useful to perform actions that aren't integral to the original flow. For example, you can handle the `order.placed` event in a subscriber that sends a confirmation email to the customer. The subscriber has no impact on the original order-placement flow, as it's executed outside of it. | |
| If the action you're performing is integral to the main flow of the core commerce feature, use [workflow hooks](https://docs.medusajs.com/learn/fundamentals/workflows/workflow-hooks/index.html.md) instead. | |
| ### List of Emitted Events | |
| Find a list of all emitted events in [this reference](https://docs.medusajs.com/resources/events-reference/index.html.md). | |
| *** | |
| ## How to Create a Subscriber? | |
| You create a subscriber in a TypeScript or JavaScript file under the `src/subscribers` directory. The file exports the function to execute and the subscriber's configuration that indicate what event(s) it listens to. | |
| For example, create the file `src/subscribers/order-placed.ts` with the following content: | |
| 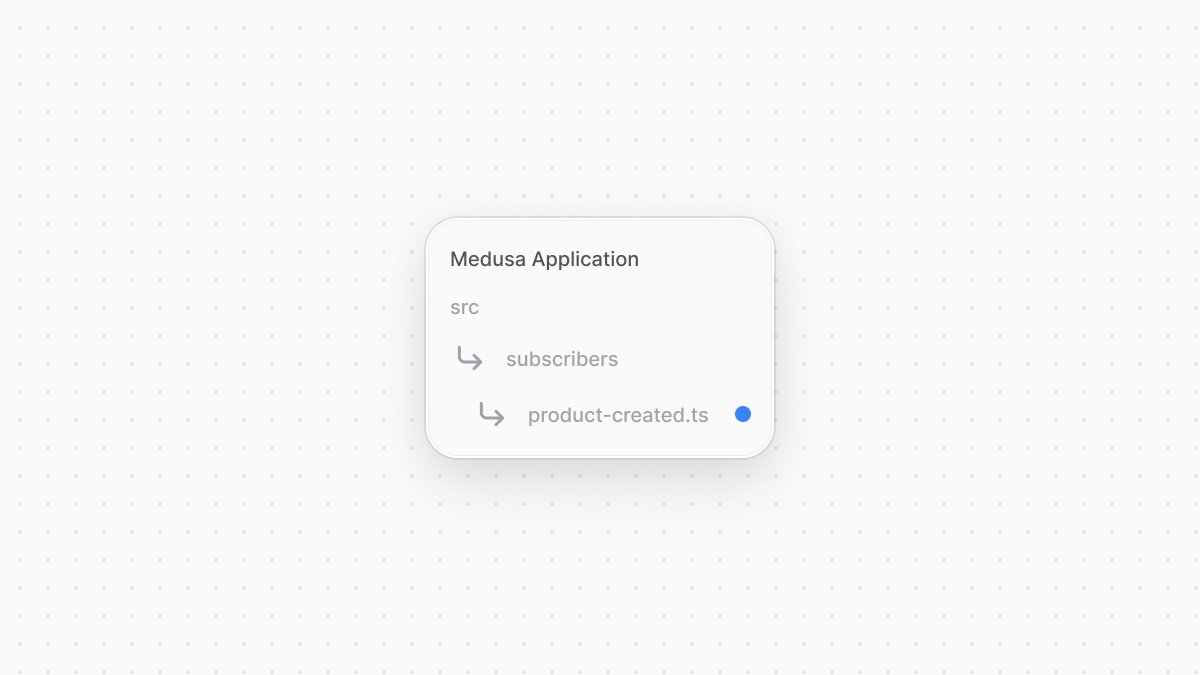 | |
| ```ts title="src/subscribers/product-created.ts" | |
| import { SubscriberArgs, type SubscriberConfig } from "@medusajs/framework" | |
| import { sendOrderConfirmationWorkflow } from "../workflows/send-order-confirmation" | |
| export default async function orderPlacedHandler({ | |
| event: { data }, | |
| container, | |
| }: SubscriberArgs<{ id: string }>) { | |
| const logger = container.resolve("logger") | |
| logger.info("Sending confirmation email...") | |
| await sendOrderConfirmationWorkflow(container) | |
| .run({ | |
| input: { | |
| id: data.id, | |
| }, | |
| }) | |
| } | |
| export const config: SubscriberConfig = { | |
| event: `order.placed`, | |
| } | |
| ``` | |
| This subscriber file exports: | |
| - An asynchronous subscriber function that's executed whenever the associated event, which is `order.placed` is triggered. | |
| - A configuration object with an `event` property whose value is the event the subscriber is listening to. You can also pass an array of event names to listen to multiple events in the same subscriber. | |
| The subscriber function receives an object as a parameter that has the following properties: | |
| - `event`: An object with the event's details. The `data` property contains the data payload of the event emitted, which is the order's ID in this case. | |
| - `container`: The [Medusa container](https://docs.medusajs.com/learn/fundamentals/medusa-container/index.html.md) that you can use to resolve registered resources. | |
| In the subscriber function, you use the container to resolve the Logger utility and log a message in the console. Also, assuming you have a [workflow](https://docs.medusajs.com/learn/fundamentals/workflows/index.html.md) that sends an order confirmation email, you execute it in the subscriber. | |
| *** | |
| ## Test the Subscriber | |
| To test the subscriber, start the Medusa application: | |
| ```bash npm2yarn | |
| npm run dev | |
| ``` | |
| Then, try placing an order either using Medusa's API routes or the [Next.js Storefront](https://docs.medusajs.com/learn/storefront-development/nextjs-starter/index.html.md). You'll see the following message in the terminal: | |
| ```bash | |
| info: Processing order.placed which has 1 subscribers | |
| Sending confirmation email... | |
| ``` | |
| The first message indicates that the `order.placed` event was emitted, and the second one is the message logged from the subscriber. | |
| *** | |
| ## Event Module | |
| The subscription and emitting of events is handled by an Event Module, an architectural module that implements the pub/sub functionalities of Medusa's event system. | |
| Medusa provides two Event Modules out of the box: | |
| - [Local Event Module](https://docs.medusajs.com/resources/architectural-modules/event/local/index.html.md), used by default. It's useful for development, as you don't need additional setup to use it. | |
| - [Redis Event Module](https://docs.medusajs.com/resources/architectural-modules/event/redis/index.html.md), which is useful in production. It uses [Redis](https://redis.io/) to implement Medusa's pub/sub events system. | |
| Medusa's [architecture](https://docs.medusajs.com/learn/introduction/architecture/index.html.md) also allows you to build a custom Event Module that uses a different service or logic to implement the pub/sub system. Learn how to build an Event Module in [this guide](https://docs.medusajs.com/resources/architectural-modules/event/create/index.html.md). | |
| # Medusa Container | |
| In this chapter, you’ll learn about the Medusa container and how to use it. | |
| ## What is the Medusa Container? | |
| The Medusa container is a registry of framework and commerce tools that's accessible across your application. Medusa automatically registers these tools in the container, including custom ones that you've built, so that you can use them in your customizations. | |
| In other platforms, if you have a resource A (for example, a class) that depends on a resource B, you have to manually add resource B to the container or specify it beforehand as A's dependency, which is often done in a file separate from A's code. This becomes difficult to manage as you maintain larger applications with many changing dependencies. | |
| Medusa simplifies this process by giving you access to the container, with the tools or resources already registered, at all times in your customizations. When you reach a point in your code where you need a tool, you resolve it from the container and use it. | |
| For example, consider you're creating an API route that retrieves products based on filters using [Query](https://docs.medusajs.com/learn/fundamentals/module-links/query/index.html.md), a tool that fetches data across the application. In the API route's function, you can resolve Query from the container passed to the API route and use it: | |
| ```ts highlights={highlights} | |
| import { MedusaRequest, MedusaResponse } from "@medusajs/framework" | |
| import { ContainerRegistrationKeys } from "@medusajs/framework/utils" | |
| export async function GET( | |
| req: MedusaRequest, | |
| res: MedusaResponse | |
| ) { | |
| const query = req.scope.resolve("query") | |
| const { data: products } = await query.graph({ | |
| entity: "product", | |
| fields: ["*"], | |
| filters: { | |
| id: "prod_123", | |
| }, | |
| }) | |
| res.json({ | |
| products, | |
| }) | |
| } | |
| ``` | |
| The API route accepts as a first parameter a request object that has a `scope` property, which is the Medusa container. It has a `resolve` method that resolves a resource from the container by the key it's registered with. | |
| You can learn more about how Query works in [this chapter](https://docs.medusajs.com/learn/fundamentals/module-links/query/index.html.md). | |
| *** | |
| ## List of Resources Registered in the Medusa Container | |
| Find a full list of the registered resources and their registration key in [this reference](https://docs.medusajs.com/resources/medusa-container-resources/index.html.md) | |
| *** | |
| ## How to Resolve From the Medusa Container | |
| This section gives quick examples of how to resolve resources from the Medusa container in customizations other than an API route, which is covered in the section above. | |
| ### Subscriber | |
| A [subscriber](https://docs.medusajs.com/learn/fundamentals/events-and-subscribers/index.html.md) function, which is executed when an event is emitted, accepts as a parameter an object with a `container` property, whose value is the Medusa container. Use its `resolve` method to resolve a resource by its registration key: | |
| ```ts highlights={subscriberHighlights} | |
| import { SubscriberArgs, type SubscriberConfig } from "@medusajs/framework" | |
| import { ContainerRegistrationKeys } from "@medusajs/framework/utils" | |
| export default async function productCreateHandler({ | |
| event: { data }, | |
| container, | |
| }: SubscriberArgs<{ id: string }>) { | |
| const query = container.resolve(ContainerRegistrationKeys.QUERY) | |
| const { data: products } = await query.graph({ | |
| entity: "product", | |
| fields: ["*"], | |
| filters: { | |
| id: data.id, | |
| }, | |
| }) | |
| console.log(`You created a product with the title ${products[0].title}`) | |
| } | |
| export const config: SubscriberConfig = { | |
| event: `product.created`, | |
| } | |
| ``` | |
| ### Scheduled Job | |
| A [scheduled job](https://docs.medusajs.com/learn/fundamentals/scheduled-jobs/index.html.md) function, which is executed at a specified interval, accepts the Medusa container as a parameter. Use its `resolve` method to resolve a resource by its registration key: | |
| ```ts highlights={scheduledJobHighlights} | |
| import { MedusaContainer } from "@medusajs/framework/types" | |
| import { ContainerRegistrationKeys } from "@medusajs/framework/utils" | |
| export default async function myCustomJob( | |
| container: MedusaContainer | |
| ) { | |
| const query = container.resolve(ContainerRegistrationKeys.QUERY) | |
| const { data: products } = await query.graph({ | |
| entity: "product", | |
| fields: ["*"], | |
| filters: { | |
| id: "prod_123", | |
| }, | |
| }) | |
| console.log( | |
| `You have ${products.length} matching your filters.` | |
| ) | |
| } | |
| export const config = { | |
| name: "every-minute-message", | |
| // execute every minute | |
| schedule: "* * * * *", | |
| } | |
| ``` | |
| ### Workflow Step | |
| A [step in a workflow](https://docs.medusajs.com/learn/fundamentals/workflows/index.html.md), which is a special function where you build durable execution logic across multiple modules, accepts in its second parameter a `container` property, whose value is the Medusa container. Use its `resolve` method to resolve a resource by its registration key: | |
| ```ts highlights={workflowStepsHighlight} | |
| import { | |
| createStep, | |
| StepResponse, | |
| } from "@medusajs/framework/workflows-sdk" | |
| import { ContainerRegistrationKeys } from "@medusajs/framework/utils" | |
| const step1 = createStep("step-1", async (_, { container }) => { | |
| const query = container.resolve(ContainerRegistrationKeys.QUERY) | |
| const { data: products } = await query.graph({ | |
| entity: "product", | |
| fields: ["*"], | |
| filters: { | |
| id: "prod_123", | |
| }, | |
| }) | |
| return new StepResponse(products) | |
| }) | |
| ``` | |
| ### Module Services and Loaders | |
| A [module](https://docs.medusajs.com/learn/fundamentals/modules/index.html.md), which is a package of functionalities for a single feature or domain, has its own container, so it can't resolve resources from the Medusa container. | |
| Learn more about the module's container in [this chapter](https://docs.medusajs.com/learn/fundamentals/modules/container/index.html.md). | |
| # Integrate Third-Party Systems | |
| Commerce applications often connect to third-party systems that provide additional or specialized features. For example, you may integrate a Content-Management System (CMS) for rich content features, a payment provider to process credit-card payments, and a notification service to send emails. | |
| Medusa's framework facilitates integrating these systems and orchestrating operations across them, saving you the effort of managing them yourself. You won't find those capabilities in other commerce platforms that in these scenarios become a bottleneck to building customizations and iterating quickly. | |
| In Medusa, you integrate a third-party system by: | |
| 1. Creating a module whose service provides the methods to connect to and perform operations in the third-party system. | |
| 2. Building workflows that complete tasks spanning across systems. You use the module that integrates a third-party system in the workflow's steps. | |
| 3. Executing the workflows you built in an [API route](https://docs.medusajs.com/learn/fundamentals/api-routes/index.html.md), at a scheduled time, or when an event is emitted. | |
| *** | |
| ## Next Chapters: Sync Brands Example | |
| In the previous chapters, you've [added brands](https://docs.medusajs.com/learn/customization/custom-features/module/index.html.md) to your Medusa application. In the next chapters, you will: | |
| 1. Integrate a dummy third-party CMS in the Brand Module. | |
| 2. Sync brands to the CMS when a brand is created. | |
| 3. Sync brands from the CMS at a daily schedule. | |
| # Module Link | |
| In this chapter, you’ll learn what a module link is. | |
| ## What is a Module Link? | |
| Since modules are isolated, you can't access another module's data models to add a relation to it or extend it. | |
| Instead, you use a module link. A module link forms an association between two data models of different modules, while maintaining module isolation. | |
| *** | |
| ## How to Define a Module Link? | |
| ### 1. Create Link File | |
| Links are defined in a TypeScript or JavaScript file under the `src/links` directory. The file defines the link using `defineLink` from the Modules SDK and exports it. | |
| For example: | |
| ```ts title="src/links/hello-product.ts" highlights={highlights} | |
| import HelloModule from "../modules/hello" | |
| import ProductModule from "@medusajs/medusa/product" | |
| import { defineLink } from "@medusajs/framework/utils" | |
| export default defineLink( | |
| ProductModule.linkable.product, | |
| HelloModule.linkable.myCustom | |
| ) | |
| ``` | |
| The `defineLink` function accepts as parameters the link configurations of each module's data model. A module has a special `linkable` property that holds these configurations for its data models. | |
| In this example, you define a module link between the `hello` module's `MyCustom` data model and the Product Module's `Product` data model. | |
| ### 2. Sync Links | |
| After defining the link, run the `db:sync-links` command: | |
| ```bash | |
| npx medusa db:sync-links | |
| ``` | |
| The Medusa application creates a new table for your link to store the IDs of linked records. | |
| Use this command whenever you make changes to your links. For example, run this command if you remove your link definition file. | |
| You can also use the `db:migrate` command, which both runs the migrations and syncs the links. | |
| *** | |
| ## How Module Links Work? | |
| When you define a module link, the Medusa application creates a table in the database for that link. | |
| Then, when you create links between records of the data models, the IDs of these data models are stored as a new record in the link's table. | |
| 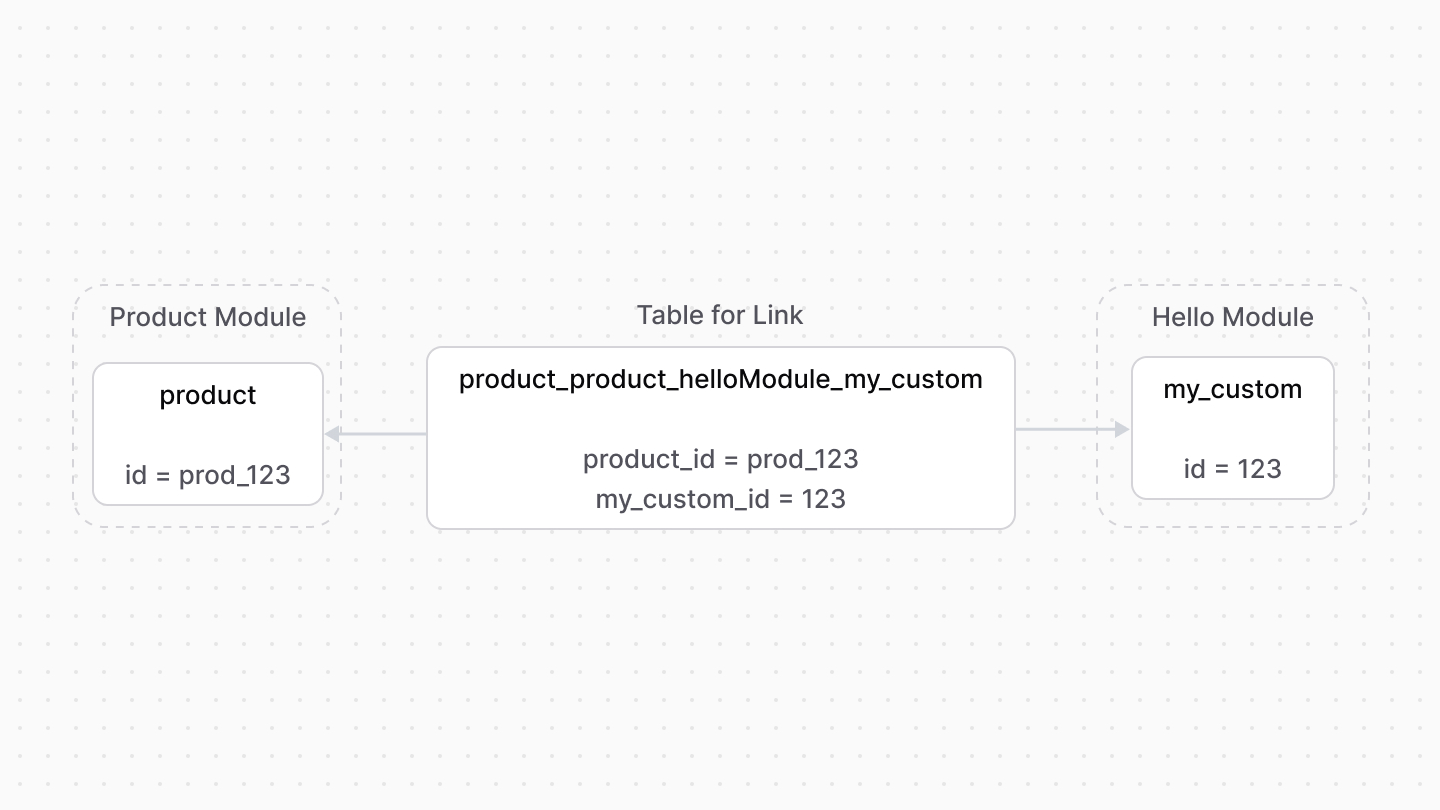 | |
| *** | |
| ## When to Use Module Links | |
| - You want to create a relation between data models from different modules. | |
| - You want to extend the data model of another module. | |
| You want to create a relationship between data models in the same module. Use data model relationships instead. | |
| *** | |
| ## Define a List Link | |
| By default, the defined link establishes a one-to-one relation: a record of a data model is linked to one record of the other data model. | |
| To specify that a data model can have multiple of its records linked to the other data model's record, use the `isList` option. | |
| For example: | |
| ```ts | |
| import HelloModule from "../modules/hello" | |
| import ProductModule from "@medusajs/medusa/product" | |
| import { defineLink } from "@medusajs/framework/utils" | |
| export default defineLink( | |
| ProductModule.linkable.product, | |
| { | |
| linkable: HelloModule.linkable.myCustom, | |
| isList: true, | |
| } | |
| ) | |
| ``` | |
| In this case, you pass an object of configuration as a parameter instead. The object accepts the following properties: | |
| - `linkable`: The data model's link configuration. | |
| - `isList`: Whether multiple records can be linked to one record of the other data model. | |
| In this example, a record of `product` can be linked to more than one record of `myCustom`. | |
| *** | |
| ## Set Delete Cascades on Link | |
| To enable delete cascade on a link so that when a record is deleted, its linked records are also deleted, pass the `deleteCascade` property in the object passed to `defineLink`. | |
| For example: | |
| ```ts | |
| import HelloModule from "../modules/hello" | |
| import ProductModule from "@medusajs/medusa/product" | |
| import { defineLink } from "@medusajs/framework/utils" | |
| export default defineLink( | |
| ProductModule.linkable.product, | |
| { | |
| linkable: HelloModule.linkable.myCustom, | |
| deleteCascade: true, | |
| } | |
| ) | |
| ``` | |
| In this example, when a product is deleted, its linked `myCustom` record is also deleted. | |
| # Modules | |
| In this chapter, you’ll learn about modules and how to create them. | |
| ## What is a Module? | |
| A module is a reusable package of functionalities related to a single domain or integration. Medusa comes with multiple pre-built modules for core commerce needs, such as the [Cart Module](https://docs.medusajs.com/resources/commerce-modules/cart/index.html.md) that holds the data models and business logic for cart operations. | |
| When building a commerce application, you often need to introduce custom behavior specific to your products, tech stack, or your general ways of working. In other commerce platforms, introducing custom business logic and data models requires setting up separate applications to manage these customizations. | |
| Medusa removes this overhead by allowing you to easily write custom modules that integrate into the Medusa application without implications on the existing setup. You can also re-use your modules across Medusa projects. | |
| As you learn more about Medusa, you will see that modules are central to customizations and integrations. With modules, your Medusa application can turn into a middleware solution for your commerce ecosystem. | |
| - You want to build a custom feature related to a single domain or integrate a third-party service. | |
| - You want to create a reusable package of customizations that include not only modules, but also API routes, workflows, and other customizations. Instead, use a [plugin](https://docs.medusajs.com/learn/fundamentals/plugins/index.html.md). | |
| *** | |
| ## How to Create a Module? | |
| In a module, you define data models that represent new tables in the database, and you manage these models in a class called a service. Then, the Medusa application registers the module's service in the [Medusa container](https://docs.medusajs.com/learn/fundamentals/medusa-container/index.html.md) so that you can build commerce flows and features around the functionalities provided by the module. | |
| In this section, you'll build a Blog Module that has a `Post` data model and a service to manage that data model, you'll expose an API endpoint to create a blog post. | |
| Modules are created in a sub-directory of `src/modules`. So, start by creating the directory `src/modules/blog`. | |
| ### 1. Create Data Model | |
| A data model represents a table in the database. You create data models using Medusa's data modeling language (DML). It simplifies defining a table's columns, relations, and indexes with straightforward methods and configurations. | |
| You create a data model in a TypeScript or JavaScript file under the `models` directory of a module. So, to create a `Post` data model in the Blog Module, create the file `src/modules/blog/models/post.ts` with the following content: | |
|  | |
| ```ts title="src/modules/blog/models/post.ts" | |
| import { model } from "@medusajs/framework/utils" | |
| const Post = model.define("post", { | |
| id: model.id().primaryKey(), | |
| title: model.text(), | |
| }) | |
| export default Post | |
| ``` | |
| You define the data model using the `define` method of the DML. It accepts two parameters: | |
| 1. The first one is the name of the data model's table in the database. Use snake-case names. | |
| 2. The second is an object, which is the data model's schema. The schema's properties are defined using the `model`'s methods, such as `text` and `id`. | |
| - Data models automatically have the date properties `created_at`, `updated_at`, and `deleted_at`, so you don't need to add them manually. | |
| Learn about other property types in [this chapter](https://docs.medusajs.com/learn/fundamentals/data-models/property-types/index.html.md). | |
| The code snippet above defines a `Post` data model with `id` and `title` properties. | |
| ### 2. Create Service | |
| You perform database operations on your data models in a service, which is a class exported by the module and acts like an interface to its functionalities. Medusa registers the service in its [container](https://docs.medusajs.com/learn/fundamentals/medusa-container/index.html.md), allowing you to resolve and use it when building custom commerce flows. | |
| You define a service in a `service.ts` or `service.js` file at the root of your module's directory. So, to create the Blog Module's service, create the file `src/modules/blog/service.ts` with the following content: | |
| 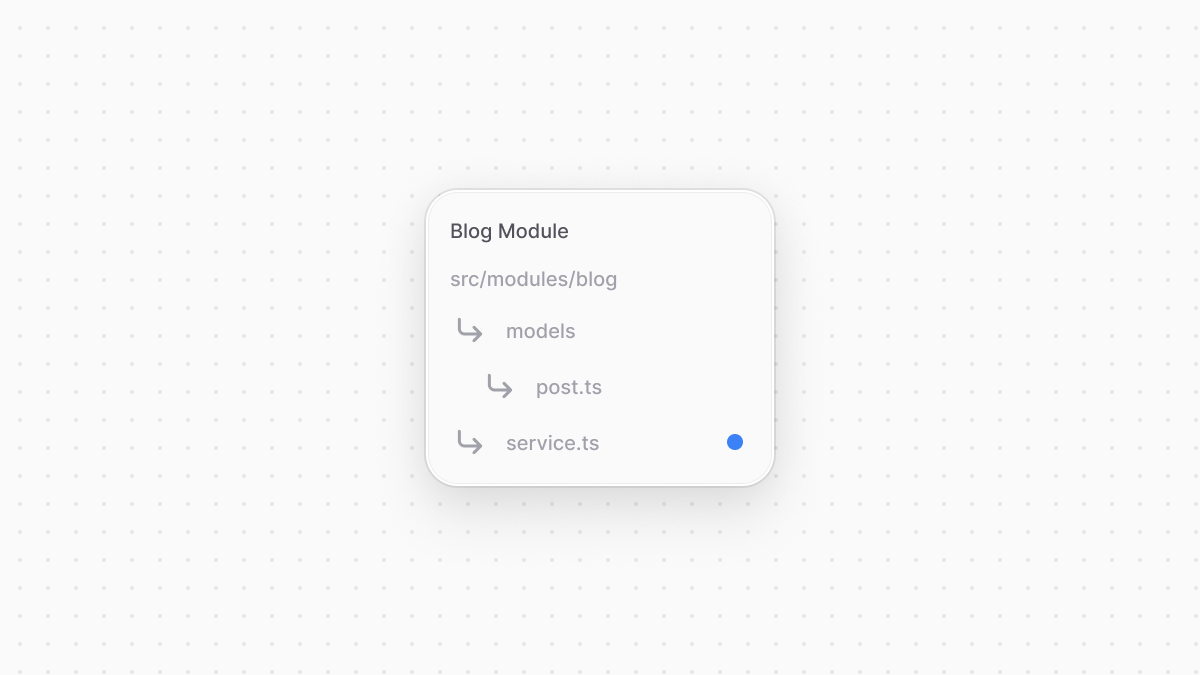 | |
| ```ts title="src/modules/blog/service.ts" highlights={highlights} | |
| import { MedusaService } from "@medusajs/framework/utils" | |
| import Post from "./models/post" | |
| class BlogModuleService extends MedusaService({ | |
| Post, | |
| }){ | |
| } | |
| export default BlogModuleService | |
| ``` | |
| Your module's service extends a class generated by `MedusaService` from the Modules SDK. This class comes with generated methods for data-management Create, Read, Update, and Delete (CRUD) operations on each of your modules, saving your time that can be spent on building custom business logic. | |
| The `MedusaService` function accepts an object of data models to generate methods for. You can pass all data models in your module in this object. | |
| For example, the `BlogModuleService` now has a `createPosts` method to create post records, and a `retrievePost` method to retrieve a post record. The suffix of each method (except for `retrieve`) is the pluralized name of the data model. | |
| Find all methods generated by the `MedusaService` in [this reference](https://docs.medusajs.com/resources/service-factory-reference/index.html.md) | |
| If a module doesn't have data models, such as when it's integrating a third-party service, it doesn't need to extend `MedusaService`. | |
| ### 3. Export Module Definition | |
| The final piece to a module is its definition, which is exported in an `index.ts` file at its root directory. This definition tells Medusa the name of the module and its main service. Medusa will then register the main service in the container under the module's name. | |
| So, to export the definition of the Blog Module, create the file `src/modules/blog/index.ts` with the following content: | |
| 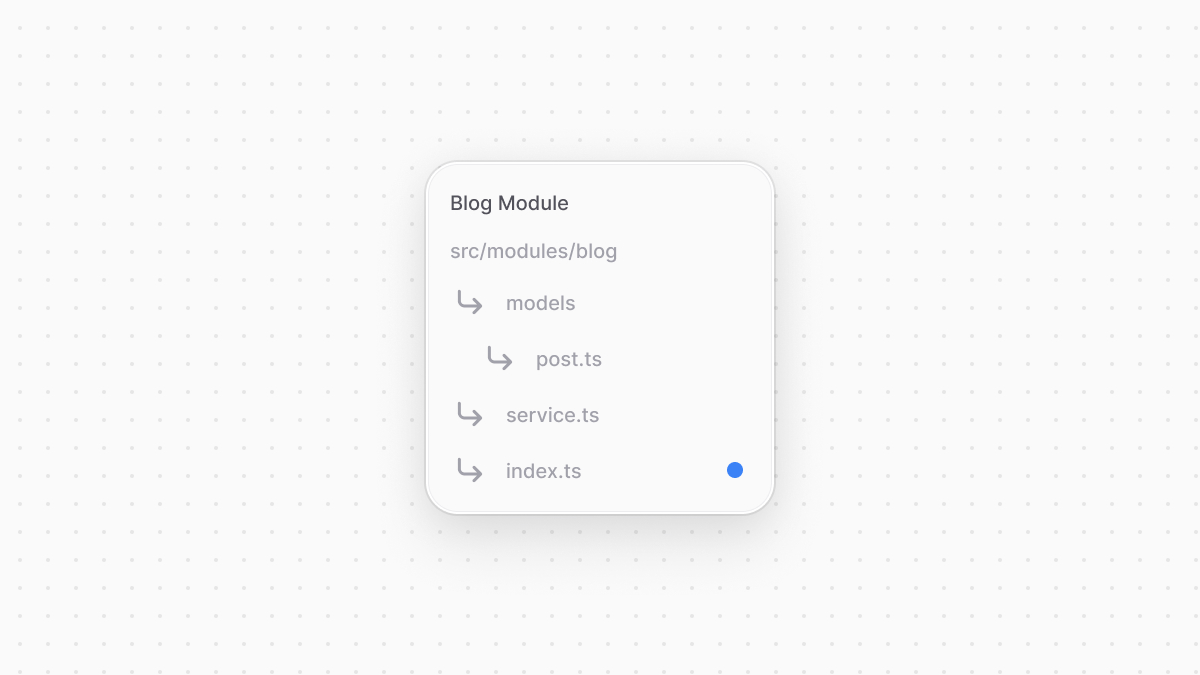 | |
| ```ts title="src/modules/blog/index.ts" highlights={moduleDefinitionHighlights} | |
| import BlogModuleService from "./service" | |
| import { Module } from "@medusajs/framework/utils" | |
| export const BLOG_MODULE = "blog" | |
| export default Module(BLOG_MODULE, { | |
| service: BlogModuleService, | |
| }) | |
| ``` | |
| You use `Module` from the Modules SDK to create the module's definition. It accepts two parameters: | |
| 1. The name that the module's main service is registered under (`blog`). | |
| 2. An object with a required property `service` indicating the module's main service. | |
| You export `BLOG_MODULE` to reference the module's name more reliably when resolving its service in other customizations. | |
| ### 4. Add Module to Medusa's Configurations | |
| If you're creating the module in a plugin, this step isn't required as the module is registered when the plugin is registered. Learn more about plugins in [this documentation](https://docs.medusajs.com/learn/fundamentals/plugins/index.html.md). | |
| Once you finish building the module, add it to Medusa's configurations to start using it. Medusa will then register the module's main service in the Medusa container, allowing you to resolve and use it in other customizations. | |
| In `medusa-config.ts`, add a `modules` property and pass an array with your custom module: | |
| ```ts title="medusa-config.ts" highlights={[["7"]]} | |
| module.exports = defineConfig({ | |
| projectConfig: { | |
| // ... | |
| }, | |
| modules: [ | |
| { | |
| resolve: "./src/modules/blog", | |
| }, | |
| ], | |
| }) | |
| ``` | |
| Each object in the `modules` array has a `resolve` property, whose value is either a path to the module's directory, or an `npm` package’s name. | |
| ### 5. Generate Migrations | |
| Since data models represent tables in the database, you define how they're created in the database with migrations. A migration is a TypeScript or JavaScript file that defines database changes made by a module. | |
| Migrations are useful when you re-use a module or you're working in a team, so that when one member of a team makes a database change, everyone else can reflect it on their side by running the migrations. | |
| You don't have to write migrations yourself. Medusa's CLI tool has a command that generates the migrations for you. You can also use this command again when you make changes to the module at a later point, and it will generate new migrations for that change. | |
| To generate a migration for the Blog Module, run the following command in your Medusa application's directory: | |
| If you're creating the module in a plugin, use the [plugin:db:generate command](https://docs.medusajs.com/resources/medusa-cli/commands/plugin#plugindbgenerate/index.html.md) instead. | |
| ```bash | |
| npx medusa db:generate blog | |
| ``` | |
| The `db:generate` command of the Medusa CLI accepts one or more module names to generate the migration for. It will create a migration file for the Blog Module in the directory `src/modules/blog/migrations` similar to the following: | |
| ```ts | |
| import { Migration } from "@mikro-orm/migrations" | |
| export class Migration20241121103722 extends Migration { | |
| async up(): Promise<void> { | |
| this.addSql("create table if not exists \"post\" (\"id\" text not null, \"title\" text not null, \"created_at\" timestamptz not null default now(), \"updated_at\" timestamptz not null default now(), \"deleted_at\" timestamptz null, constraint \"post_pkey\" primary key (\"id\"));") | |
| } | |
| async down(): Promise<void> { | |
| this.addSql("drop table if exists \"post\" cascade;") | |
| } | |
| } | |
| ``` | |
| In the migration class, the `up` method creates the table `post` and defines its columns using PostgreSQL syntax. The `down` method drops the table. | |
| ### 6. Run Migrations | |
| To reflect the changes in the generated migration file on the database, run the `db:migrate` command: | |
| If you're creating the module in a plugin, run this command on the Medusa application that the plugin is installed in. | |
| ```bash | |
| npx medusa db:migrate | |
| ``` | |
| This creates the `post` table in the database. | |
| *** | |
| ## Test the Module | |
| Since the module's main service is registered in the Medusa container, you can resolve it in other customizations to use its methods. | |
| To test out the Blog Module, you'll add the functionality to create a post in a [workflow](https://docs.medusajs.com/learn/fundamentals/workflows/index.html.md), which is a special function that performs a task in a series of steps with rollback logic. Then, you'll expose an [API route](https://docs.medusajs.com/learn/fundamentals/api-routes/index.html.md) that creates a blog post by executing the workflow. | |
| By building a commerce feature in a workflow, you can execute it in other customizations while ensuring data consistency across systems. If an error occurs during execution, every step has its own rollback logic to undo its actions. Workflows have other special features which you can learn about in [this chapter](https://docs.medusajs.com/learn/fundamentals/workflows/index.html.md). | |
| To create the workflow, create the file `src/workflows/create-post.ts` with the following content: | |
| ```ts title="src/workflows/create-post.ts" highlights={workflowHighlights} | |
| import { | |
| createStep, | |
| createWorkflow, | |
| StepResponse, | |
| WorkflowResponse, | |
| } from "@medusajs/framework/workflows-sdk" | |
| import { BLOG_MODULE } from "../modules/blog" | |
| import BlogModuleService from "../modules/blog/service" | |
| type CreatePostWorkflowInput = { | |
| title: string | |
| } | |
| const createPostStep = createStep( | |
| "create-post", | |
| async ({ title }: CreatePostWorkflowInput, { container }) => { | |
| const blogModuleService: BlogModuleService = container.resolve(BLOG_MODULE) | |
| const post = await blogModuleService.createPosts({ | |
| title, | |
| }) | |
| return new StepResponse(post, post) | |
| }, | |
| async (post, { container }) => { | |
| const blogModuleService: BlogModuleService = container.resolve(BLOG_MODULE) | |
| await blogModuleService.deletePosts(post.id) | |
| } | |
| ) | |
| export const createPostWorkflow = createWorkflow( | |
| "create-post", | |
| (postInput: CreatePostWorkflowInput) => { | |
| const post = createPostStep(postInput) | |
| return new WorkflowResponse(post) | |
| } | |
| ) | |
| ``` | |
| The workflow has a single step `createPostStep` that creates a post. In the step, you resolve the Blog Module's service from the Medusa container, which the step receives as a parameter. Then, you create the post using the method `createPosts` of the service, which was generated by `MedusaService`. | |
| The step also has a compensation function, which is a function passed as a third-parameter to `createStep` that implements the logic to rollback the change made by a step in case an error occurs during the workflow's execution. | |
| You'll now execute that workflow in an API route to expose the feature of creating blog posts to clients. To create an API route, create the file `src/api/blog/posts/route.ts` with the following content: | |
| ```ts | |
| import type { | |
| MedusaRequest, | |
| MedusaResponse, | |
| } from "@medusajs/framework/http" | |
| import { | |
| createPostWorkflow, | |
| } from "../../../workflows/create-post" | |
| export async function POST( | |
| req: MedusaRequest, | |
| res: MedusaResponse | |
| ) { | |
| const { result: post } = await createPostWorkflow(req.scope) | |
| .run({ | |
| input: { | |
| title: "My Post", | |
| }, | |
| }) | |
| res.json({ | |
| post, | |
| }) | |
| } | |
| ``` | |
| This adds a `POST` API route at `/blog/posts`. In the API route, you execute the `createPostWorkflow` by invoking it, passing it the Medusa container in `req.scope`, then invoking the `run` method. In the `run` method, you pass the workflow's input in the `input` property. | |
| To test this out, start the Medusa application: | |
| ```bash npm2yarn | |
| npm run dev | |
| ``` | |
| Then, send a `POST` request to `/blog/posts`: | |
| ```bash | |
| curl -X POST http://localhost:9000/blog/posts | |
| ``` | |
| This will create a post and return it in the response: | |
| ```json | |
| { | |
| "post": { | |
| "id": "123...", | |
| "title": "My Post", | |
| "created_at": "...", | |
| "updated_at": "..." | |
| } | |
| } | |
| ``` | |
| You can also execute the workflow from a [subscriber](https://docs.medusajs.com/learn/fundamentals/events-and-subscribers/index.html.md) when an event occurs, or from a [scheduled job](https://docs.medusajs.com/learn/fundamentals/scheduled-jobs/index.html.md) to run it at a specified interval. | |
| # Extend Core Commerce Features | |
| In the upcoming chapters, you'll learn about the concepts and tools to extend Medusa's core commerce features. | |
| In other commerce platforms, you extend core features and models through hacky workarounds that can introduce unexpected issues and side effects across the platform. It also makes your application difficult to maintain and upgrade in the long run. | |
| Medusa's framework and orchestration tools mitigate these issues while supporting all your customization needs: | |
| - [Module Links](https://docs.medusajs.com/learn/fundamentals/module-links/index.html.md): Link data models of different modules without building direct dependencies, ensuring that the Medusa application integrates your modules without side effects. | |
| - [Workflow Hooks](https://docs.medusajs.com/learn/fundamentals/workflows/workflow-hooks/index.html.md): inject custom functionalities into a workflow at predefined points, called hooks. This allows you to perform custom actions as a part of a core workflow without hacky workarounds. | |
| - [Additional Data in API Routes](https://docs.medusajs.com/learn/fundamentals/api-routes/additional-data/index.html.md): Configure core API routes to accept request parameters relevant to your customizations. These parameters are passed to the underlying workflow's hooks, where you can manage your custom data as part of an existing flow. | |
| *** | |
| ## Next Chapters: Link Brands to Products Example | |
| The next chapters explain how to use the tools mentioned above with step-by-step guides. You'll continue with the [brands example from the previous chapters](https://docs.medusajs.com/learn/customization/custom-features/index.html.md) to: | |
| - Link brands from the custom [Brand Module](https://docs.medusajs.com/learn/customization/custom-features/module/index.html.md) to products from Medusa's [Product Module](https://docs.medusajs.com/resources/commerce-modules/product/index.html.md). | |
| - Extend the core product-creation workflow and the API route that uses it to allow setting the brand of a newly created product. | |
| - Retrieve a product's associated brand's details. | |
| # Scheduled Jobs | |
| In this chapter, you’ll learn about scheduled jobs and how to use them. | |
| ## What is a Scheduled Job? | |
| When building your commerce application, you may need to automate tasks and run them repeatedly at a specific schedule. For example, you need to automatically sync products to a third-party service once a day. | |
| In other commerce platforms, this feature isn't natively supported. Instead, you have to setup a separate application to execute cron jobs, which adds complexity as to how you expose this task to be executed in a cron job, or how do you debug it when it's not running within the platform's tooling. | |
| Medusa removes this overhead by supporting this feature natively with scheduled jobs. A scheduled job is an asynchronous function that the Medusa application runs at the interval you specify during the Medusa application's runtime. Your efforts are only spent on implementing the functionality performed by the job, such as syncing products to an ERP. | |
| - You want the action to execute at a specified schedule while the Medusa application **isn't** running. Instead, use the operating system's equivalent of a cron job. | |
| - You want to execute the action once when the application loads. Use [loaders](https://docs.medusajs.com/learn/fundamentals/modules/loaders/index.html.md) instead. | |
| - You want to execute the action if an event occurs. Use [subscribers](https://docs.medusajs.com/learn/fundamentals/events-and-subscribers/index.html.md) instead. | |
| *** | |
| ## How to Create a Scheduled Job? | |
| You create a scheduled job in a TypeScript or JavaScript file under the `src/jobs` directory. The file exports the asynchronous function to run, and the configurations indicating the schedule to run the function. | |
| For example, create the file `src/jobs/hello-world.ts` with the following content: | |
| 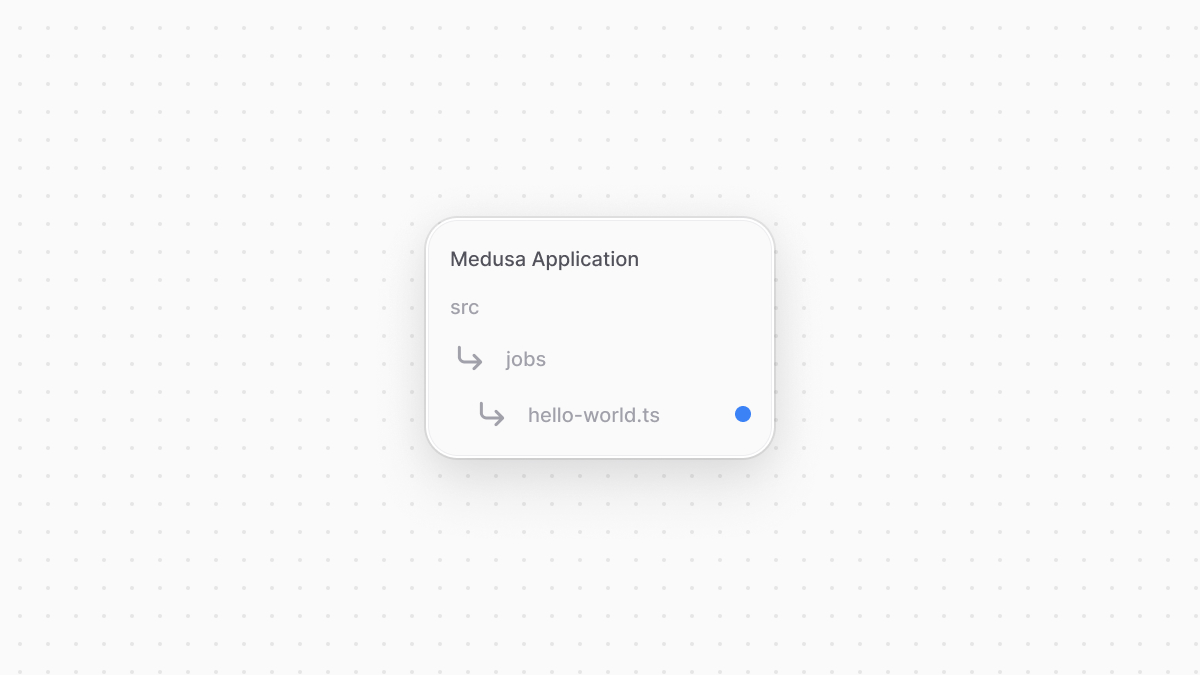 | |
| ```ts title="src/jobs/hello-world.ts" highlights={highlights} | |
| import { MedusaContainer } from "@medusajs/framework/types" | |
| export default async function greetingJob(container: MedusaContainer) { | |
| const logger = container.resolve("logger") | |
| logger.info("Greeting!") | |
| } | |
| export const config = { | |
| name: "greeting-every-minute", | |
| schedule: "* * * * *", | |
| } | |
| ``` | |
| You export an asynchronous function that receives the [Medusa container](https://docs.medusajs.com/learn/fundamentals/medusa-container/index.html.md) as a parameter. In the function, you resolve the [Logger utility](https://docs.medusajs.com/learn/debugging-and-testing/logging/index.html.md) from the Medusa container and log a message. | |
| You also export a `config` object that has the following properties: | |
| - `name`: A unique name for the job. | |
| - `schedule`: A string that holds a [cron expression](https://crontab.guru/) indicating the schedule to run the job. | |
| This scheduled job executes every minute and logs into the terminal `Greeting!`. | |
| ### Test the Scheduled Job | |
| To test out your scheduled job, start the Medusa application: | |
| ```bash npm2yarn | |
| npm run dev | |
| ``` | |
| After a minute, the following message will be logged to the terminal: | |
| ```bash | |
| info: Greeting! | |
| ``` | |
| *** | |
| ## Example: Sync Products Once a Day | |
| In this section, you'll find a brief example of how you use a scheduled job to sync products to a third-party service. | |
| When implementing flows spanning across systems or [modules](https://docs.medusajs.com/learn/fundamentals/modules/index.html.md), you use [workflows](https://docs.medusajs.com/learn/fundamentals/workflows/index.html.md). A workflow is a task made up of a series of steps, and you construct it like you would a regular function, but it's a special function that supports rollback mechanism in case of errors, background execution, and more. | |
| You can learn how to create a workflow in [this chapter](https://docs.medusajs.com/learn/fundamentals/workflows/index.html.md), but this example assumes you already have a `syncProductToErpWorkflow` implemented. To execute this workflow once a day, create a scheduled job at `src/jobs/sync-products.ts` with the following content: | |
| ```ts title="src/jobs/sync-products.ts" | |
| import { MedusaContainer } from "@medusajs/framework/types" | |
| import { syncProductToErpWorkflow } from "../workflows/sync-products-to-erp" | |
| export default async function syncProductsJob(container: MedusaContainer) { | |
| await syncProductToErpWorkflow(container) | |
| .run() | |
| } | |
| export const config = { | |
| name: "sync-products-job", | |
| schedule: "0 0 * * *", | |
| } | |
| ``` | |
| In the scheduled job function, you execute the `syncProductToErpWorkflow` by invoking it and passing it the container, then invoking the `run` method. You also specify in the exported configurations the schedule `0 0 * * *` which indicates midnight time of every day. | |
| The next time you start the Medusa application, it will run this job every day at midnight. | |
| # Write Integration Tests | |
| In this chapter, you'll learn about `medusaIntegrationTestRunner` from Medusa's Testing Framework and how to use it to write integration tests. | |
| ### Prerequisites | |
| - [Testing Tools Setup](https://docs.medusajs.com/learn/debugging-and-testing/testing-tools/index.html.md) | |
| ## medusaIntegrationTestRunner Utility | |
| The `medusaIntegrationTestRunner` is from Medusa's Testing Framework and it's used to create integration tests in your Medusa project. It runs a full Medusa application, allowing you test API routes, workflows, or other customizations. | |
| For example: | |
| ```ts title="integration-tests/http/test.spec.ts" highlights={highlights} | |
| import { medusaIntegrationTestRunner } from "@medusajs/test-utils" | |
| medusaIntegrationTestRunner({ | |
| testSuite: ({ api, getContainer }) => { | |
| // TODO write tests... | |
| }, | |
| }) | |
| jest.setTimeout(60 * 1000) | |
| ``` | |
| The `medusaIntegrationTestRunner` function accepts an object as a parameter. The object has a required property `testSuite`. | |
| `testSuite`'s value is a function that defines the tests to run. The function accepts as a parameter an object that has the following properties: | |
| - `api`: a set of utility methods used to send requests to the Medusa application. It has the following methods: | |
| - `get`: Send a `GET` request to an API route. | |
| - `post`: Send a `POST` request to an API route. | |
| - `delete`: Send a `DELETE` request to an API route. | |
| - `getContainer`: a function that retrieves the Medusa Container. Use the `getContainer().resolve` method to resolve resources from the Medusa Container. | |
| The tests in the `testSuite` function are written using [Jest](https://jestjs.io/). | |
| ### Jest Timeout | |
| Since your tests connect to the database and perform actions that require more time than the typical tests, make sure to increase the timeout in your test: | |
| ```ts title="integration-tests/http/test.spec.ts" | |
| // in your test's file | |
| jest.setTimeout(60 * 1000) | |
| ``` | |
| *** | |
| ### Run Tests | |
| Run the following command to run your tests: | |
| ```bash npm2yarn | |
| npm run test:integration | |
| ``` | |
| If you don't have a `test:integration` script in `package.json`, refer to the [Medusa Testing Tools chapter](https://docs.medusajs.com/learn/debugging-and-testing/testing-tools#add-test-commands/index.html.md). | |
| This runs your Medusa application and runs the tests available under the `src/integrations/http` directory. | |
| *** | |
| ## Other Options and Inputs | |
| Refer to [this reference in the Development Resources documentation](https://docs.medusajs.com/resources/test-tools-reference/medusaIntegrationTestRunner/index.html.md) for other available parameter options and inputs of the `testSuite` function. | |
| *** | |
| ## Database Used in Tests | |
| The `medusaIntegrationTestRunner` function creates a database with a random name before running the tests. Then, it drops that database after all the tests end. | |
| To manage that database, such as changing its name or perform operations on it in your tests, refer to the [references in the Development Resources documentation](https://docs.medusajs.com/resources/test-tools-reference/medusaIntegrationTestRunner/index.html.md). | |
| *** | |
| ## Example Integration Tests | |
| The next chapters provide examples of writing integration tests for API routes and workflows. | |
| # Workflows | |
| In this chapter, you’ll learn about workflows and how to define and execute them. | |
| ## What is a Workflow? | |
| In digital commerce you typically have many systems involved in your operations. For example, you may have an ERP system that holds product master data and accounting reports, a CMS system for content, a CRM system for managing customer campaigns, a payment service to process credit cards, and so on. Sometimes you may even have custom built applications that need to participate in the commerce stack. One of the biggest challenges when operating a stack like this is ensuring consistency in the data spread across systems. | |
| Medusa has a built-in durable execution engine to help complete tasks that span multiple systems. You orchestrate your operations across systems in Medusa instead of having to manage it yourself. Other commerce platforms don't have this capability, which makes them a bottleneck to building customizations and iterating quickly. | |
| A workflow is a series of queries and actions, called steps, that complete a task. You construct a workflow similar to how you create a JavaScript function. | |
| However, unlike regular functions, workflows: | |
| - Create an internal representation of your steps, allowing you to track them and their progress. | |
| - Support defining roll-back logic for each step, so that you can handle errors gracefully and your data remain consistent across systems. | |
| - Perform long actions asynchronously, giving you control over when a step starts and finishes. | |
| You implement all custom flows within workflows, then execute them from [API routes](https://docs.medusajs.com/learn/fundamentals/api-routes/index.html.md), [subscribers](https://docs.medusajs.com/learn/fundamentals/events-and-subscribers/index.html.md), and [scheduled jobs](https://docs.medusajs.com/learn/fundamentals/scheduled-jobs/index.html.md). | |
| *** | |
| ## How to Create and Execute a Workflow? | |
| ### 1. Create the Steps | |
| A workflow is made of a series of steps. A step is created using `createStep` from the Workflows SDK. | |
| Create the file `src/workflows/hello-world.ts` with the following content: | |
| 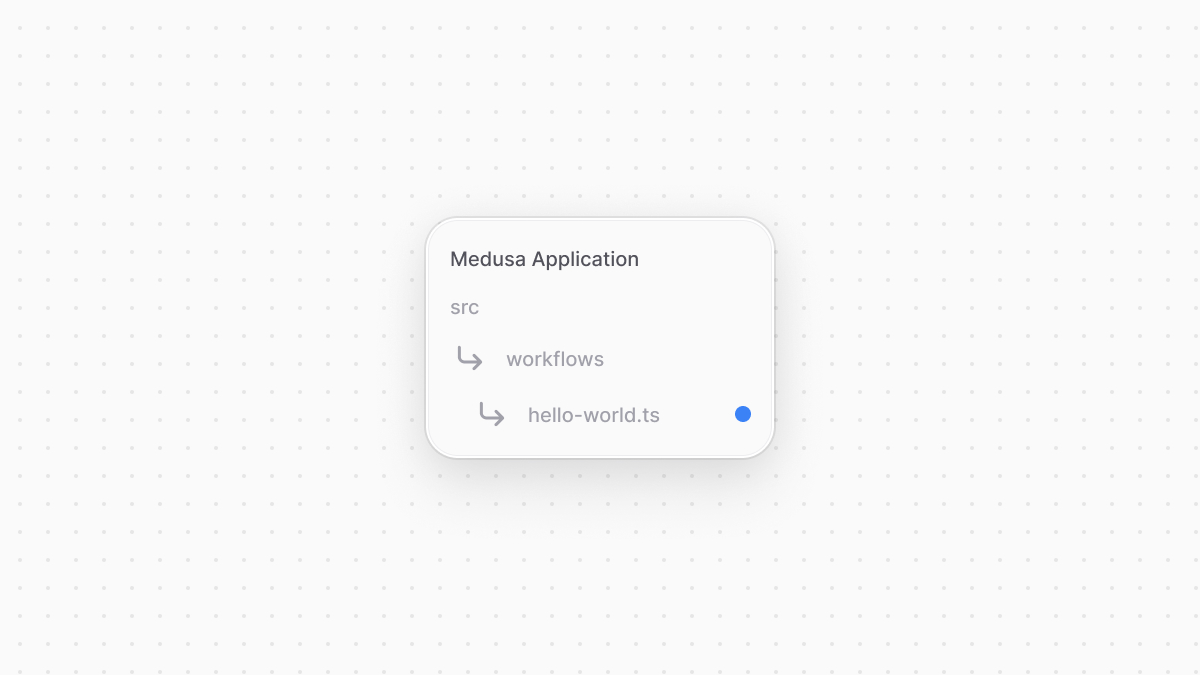 | |
| ```ts title="src/workflows/hello-world.ts" highlights={step1Highlights} | |
| import { createStep, StepResponse } from "@medusajs/framework/workflows-sdk" | |
| const step1 = createStep( | |
| "step-1", | |
| async () => { | |
| return new StepResponse(`Hello from step one!`) | |
| } | |
| ) | |
| ``` | |
| The `createStep` function accepts the step's unique name as a first parameter, and the step's function as a second parameter. | |
| Steps must return an instance of `StepResponse`, whose parameter is the data to return to the workflow executing the step. | |
| Steps can accept input parameters. For example, add the following to `src/workflows/hello-world.ts`: | |
| ```ts title="src/workflows/hello-world.ts" highlights={step2Highlights} | |
| type WorkflowInput = { | |
| name: string | |
| } | |
| const step2 = createStep( | |
| "step-2", | |
| async ({ name }: WorkflowInput) => { | |
| return new StepResponse(`Hello ${name} from step two!`) | |
| } | |
| ) | |
| ``` | |
| This adds another step whose function accepts as a parameter an object with a `name` property. | |
| ### 2. Create a Workflow | |
| Next, add the following to the same file to create the workflow using the `createWorkflow` function: | |
| ```ts title="src/workflows/hello-world.ts" highlights={workflowHighlights} | |
| import { | |
| // other imports... | |
| createWorkflow, | |
| WorkflowResponse, | |
| } from "@medusajs/framework/workflows-sdk" | |
| // ... | |
| const myWorkflow = createWorkflow( | |
| "hello-world", | |
| function (input: WorkflowInput) { | |
| const str1 = step1() | |
| // to pass input | |
| const str2 = step2(input) | |
| return new WorkflowResponse({ | |
| message: str2, | |
| }) | |
| } | |
| ) | |
| export default myWorkflow | |
| ``` | |
| The `createWorkflow` function accepts the workflow's unique name as a first parameter, and the workflow's function as a second parameter. The workflow can accept input which is passed as a parameter to the function. | |
| The workflow must return an instance of `WorkflowResponse`, whose parameter is returned to workflow executors. | |
| ### 3. Execute the Workflow | |
| You can execute a workflow from different customizations: | |
| - Execute in an API route to expose the workflow's functionalities to clients. | |
| - Execute in a subscriber to use the workflow's functionalities when a commerce operation is performed. | |
| - Execute in a scheduled job to run the workflow's functionalities automatically at a specified repeated interval. | |
| To execute the workflow, invoke it passing the [Medusa container](https://docs.medusajs.com/learn/fundamentals/medusa-container/index.html.md) as a parameter. Then, use its `run` method: | |
| ### API Route | |
| ```ts title="src/api/workflow/route.ts" highlights={[["11"], ["12"], ["13"], ["14"], ["15"], ["16"]]} collapsibleLines="1-6" expandButtonLabel="Show Imports" | |
| import type { | |
| MedusaRequest, | |
| MedusaResponse, | |
| } from "@medusajs/framework/http" | |
| import myWorkflow from "../../workflows/hello-world" | |
| export async function GET( | |
| req: MedusaRequest, | |
| res: MedusaResponse | |
| ) { | |
| const { result } = await myWorkflow(req.scope) | |
| .run({ | |
| input: { | |
| name: "John", | |
| }, | |
| }) | |
| res.send(result) | |
| } | |
| ``` | |
| ### Subscriber | |
| ```ts title="src/subscribers/order-placed.ts" highlights={[["11"], ["12"], ["13"], ["14"], ["15"], ["16"]]} collapsibleLines="1-6" expandButtonLabel="Show Imports" | |
| import { | |
| type SubscriberConfig, | |
| type SubscriberArgs, | |
| } from "@medusajs/framework" | |
| import myWorkflow from "../workflows/hello-world" | |
| export default async function handleOrderPlaced({ | |
| event: { data }, | |
| container, | |
| }: SubscriberArgs<{ id: string }>) { | |
| const { result } = await myWorkflow(container) | |
| .run({ | |
| input: { | |
| name: "John", | |
| }, | |
| }) | |
| console.log(result) | |
| } | |
| export const config: SubscriberConfig = { | |
| event: "order.placed", | |
| } | |
| ``` | |
| ### Scheduled Job | |
| ```ts title="src/jobs/message-daily.ts" highlights={[["7"], ["8"], ["9"], ["10"], ["11"], ["12"]]} | |
| import { MedusaContainer } from "@medusajs/framework/types" | |
| import myWorkflow from "../workflows/hello-world" | |
| export default async function myCustomJob( | |
| container: MedusaContainer | |
| ) { | |
| const { result } = await myWorkflow(container) | |
| .run({ | |
| input: { | |
| name: "John", | |
| }, | |
| }) | |
| console.log(result.message) | |
| } | |
| export const config = { | |
| name: "run-once-a-day", | |
| schedule: `0 0 * * *`, | |
| }; | |
| ``` | |
| ### 4. Test Workflow | |
| To test out your workflow, start your Medusa application: | |
| ```bash npm2yarn | |
| npm run dev | |
| ``` | |
| Then, if you added the API route above, send a `GET` request to `/workflow`: | |
| ```bash | |
| curl http://localhost:9000/workflow | |
| ``` | |
| You’ll receive the following response: | |
| ```json title="Example Response" | |
| { | |
| "message": "Hello John from step two!" | |
| } | |
| ``` | |
| *** | |
| ## Access Medusa Container in Workflow Steps | |
| A step receives an object as a second parameter with configurations and context-related properties. One of these properties is the `container` property, which is the [Medusa container](https://docs.medusajs.com/learn/fundamentals/medusa-container/index.html.md) to allow you to resolve framework and commerce tools in your application. | |
| For example, consider you want to implement a workflow that returns the total products in your application. Create the file `src/workflows/product-count.ts` with the following content: | |
| ```ts title="src/workflows/product-count.ts" highlights={highlights} collapsibleLines="1-7" expandButtonLabel="Show Imports" | |
| import { | |
| createStep, | |
| StepResponse, | |
| createWorkflow, | |
| WorkflowResponse, | |
| } from "@medusajs/framework/workflows-sdk" | |
| const getProductCountStep = createStep( | |
| "get-product-count", | |
| async (_, { container }) => { | |
| const productModuleService = container.resolve("product") | |
| const [, count] = await productModuleService.listAndCountProducts() | |
| return new StepResponse(count) | |
| } | |
| ) | |
| const productCountWorkflow = createWorkflow( | |
| "product-count", | |
| function () { | |
| const count = getProductCountStep() | |
| return new WorkflowResponse({ | |
| count, | |
| }) | |
| } | |
| ) | |
| export default productCountWorkflow | |
| ``` | |
| In `getProductCountStep`, you use the `container` to resolve the Product Module's main service. Then, you use its `listAndCountProducts` method to retrieve the total count of products and return it in the step's response. You then execute this step in the `productCountWorkflow`. | |
| You can now execute this workflow in a custom API route, scheduled job, or subscriber to get the total count of products. | |
| Find a full list of the registered resources in the Medusa container and their registration key in [this reference](https://docs.medusajs.com/resources/medusa-container-resources/index.html.md). You can use these resources in your custom workflows. | |
| # Medusa's Architecture | |
| In this chapter, you'll learn about the architectural layers in Medusa. | |
| ## HTTP, Workflow, and Module Layers | |
| Medusa is a headless commerce platform. So, storefronts, admin dashboards, and other clients consume Medusa's functionalities through its API routes. | |
| In a common Medusa application, requests go through four layers in the stack. In order of entry, those are: | |
| 1. API Routes (HTTP): Our API Routes are the typical entry point. | |
| 2. Workflows: API Routes consume workflows that hold the opinionated business logic of your application. | |
| 3. Modules: Workflows use domain-specific modules for resource management. | |
| 4. Data store: Modules query the underlying datastore, which is a PostgreSQL database in common cases. | |
| These layers of stack can be implemented within [plugins](https://docs.medusajs.com/learn/fundamentals/plugins/index.html.md). | |
| 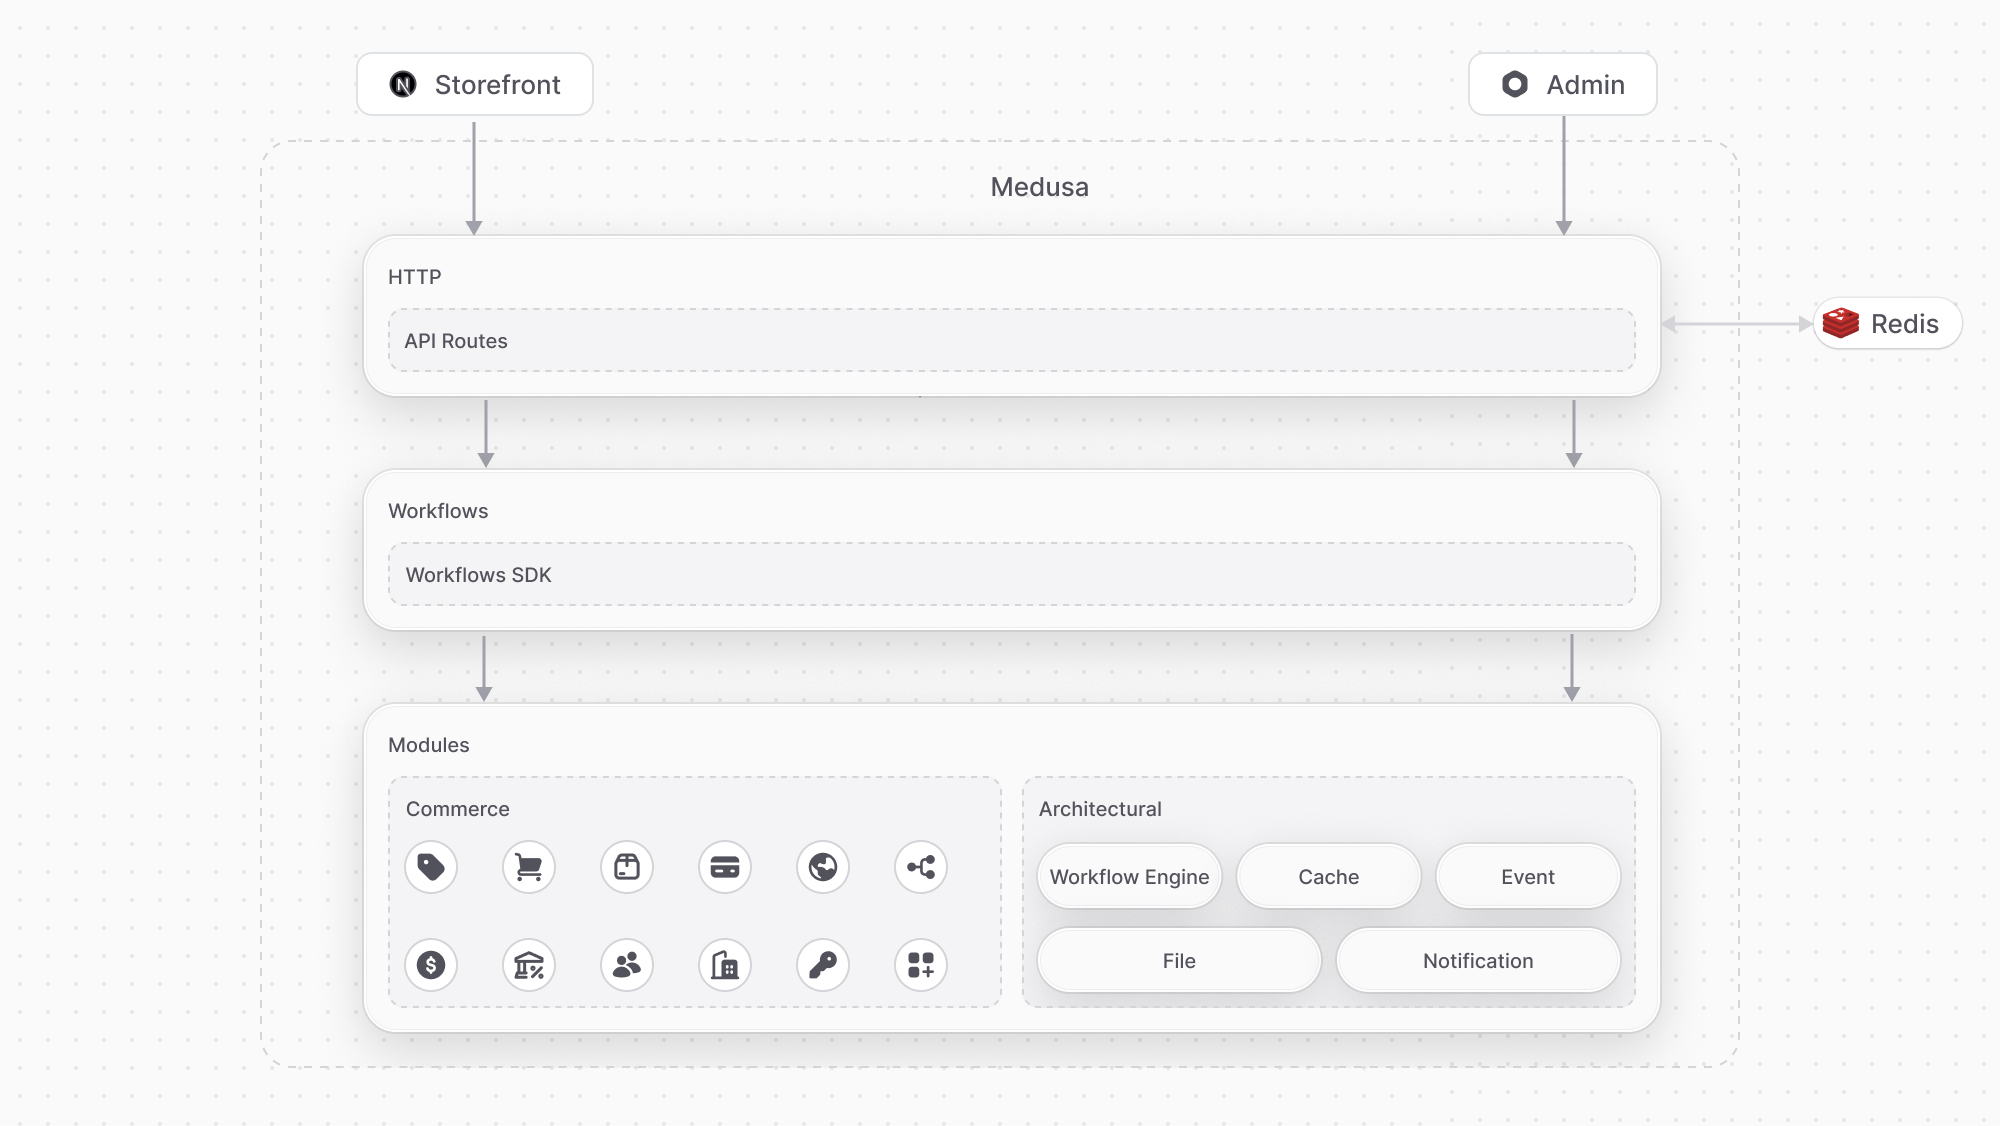 | |
| *** | |
| ## Database Layer | |
| The Medusa application injects into each module a connection to the configured PostgreSQL database. Modules use that connection to read and write data to the database. | |
| Modules can be implemented within [plugins](https://docs.medusajs.com/learn/fundamentals/plugins/index.html.md). | |
| 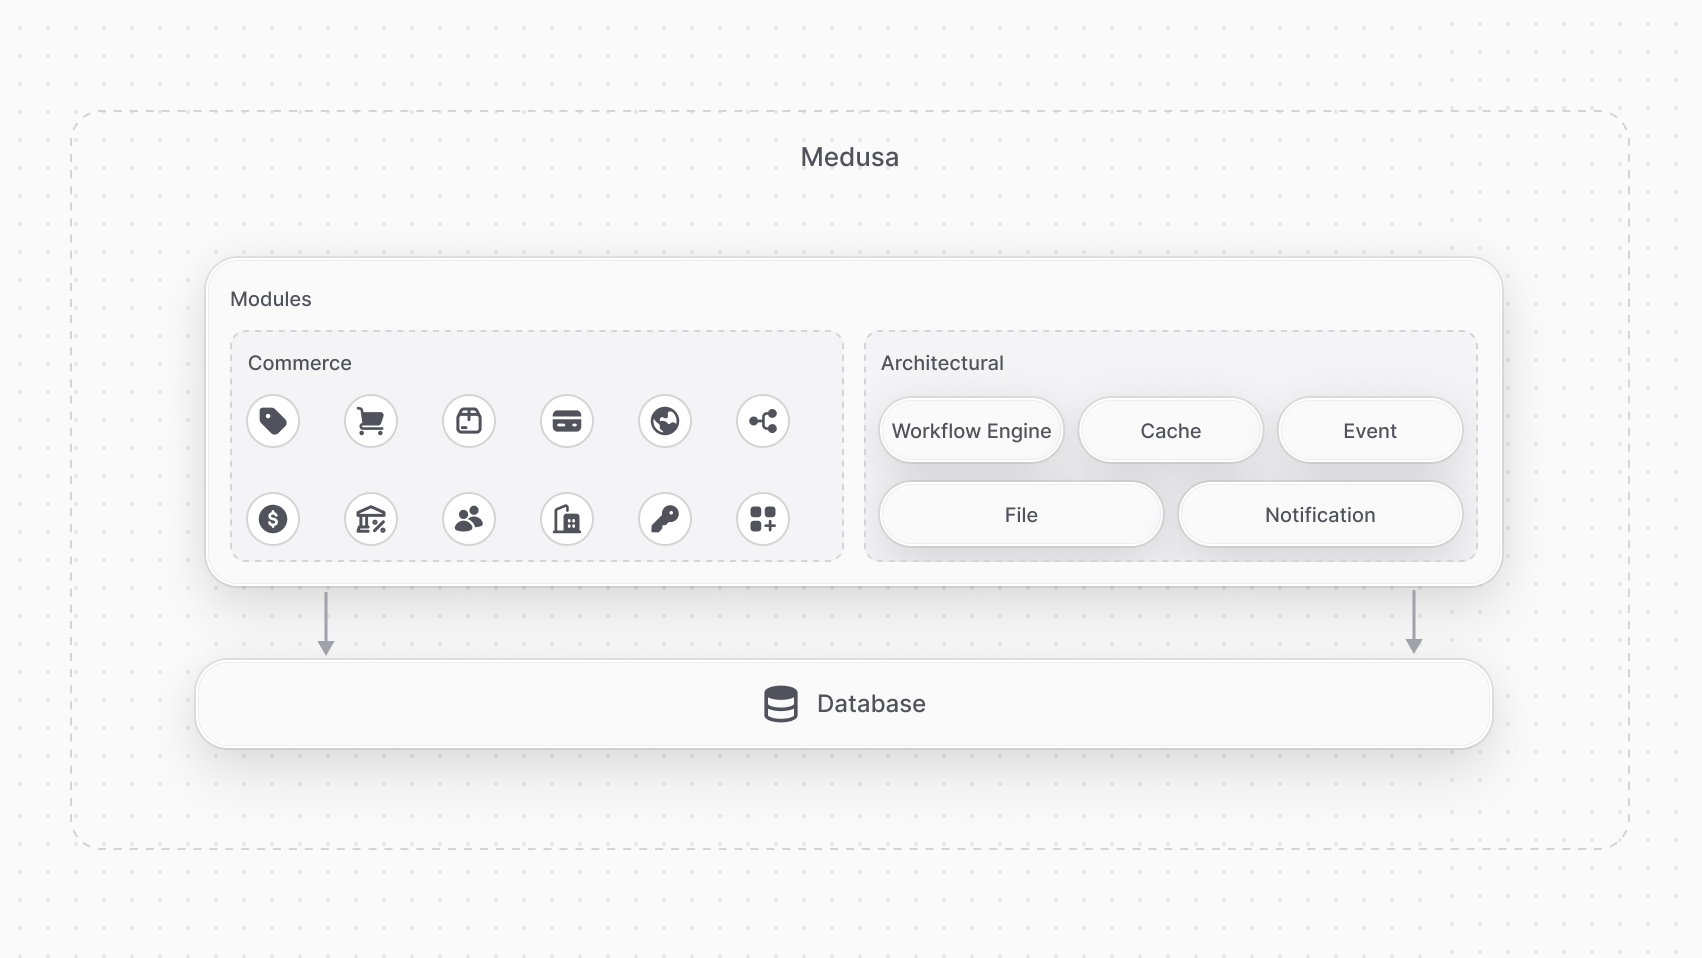 | |
| *** | |
| ## Service Integrations | |
| Third-party services are integrated through commerce and architectural modules. You also create custom third-party integrations through a custom module. | |
| Modules can be implemented within [plugins](https://docs.medusajs.com/learn/fundamentals/plugins/index.html.md). | |
| ### Commerce Modules | |
| [Commerce modules](https://docs.medusajs.com/resources/commerce-modules/index.html.md) integrate third-party services relevant for commerce or user-facing features. For example, you integrate Stripe through a payment module provider. | |
| 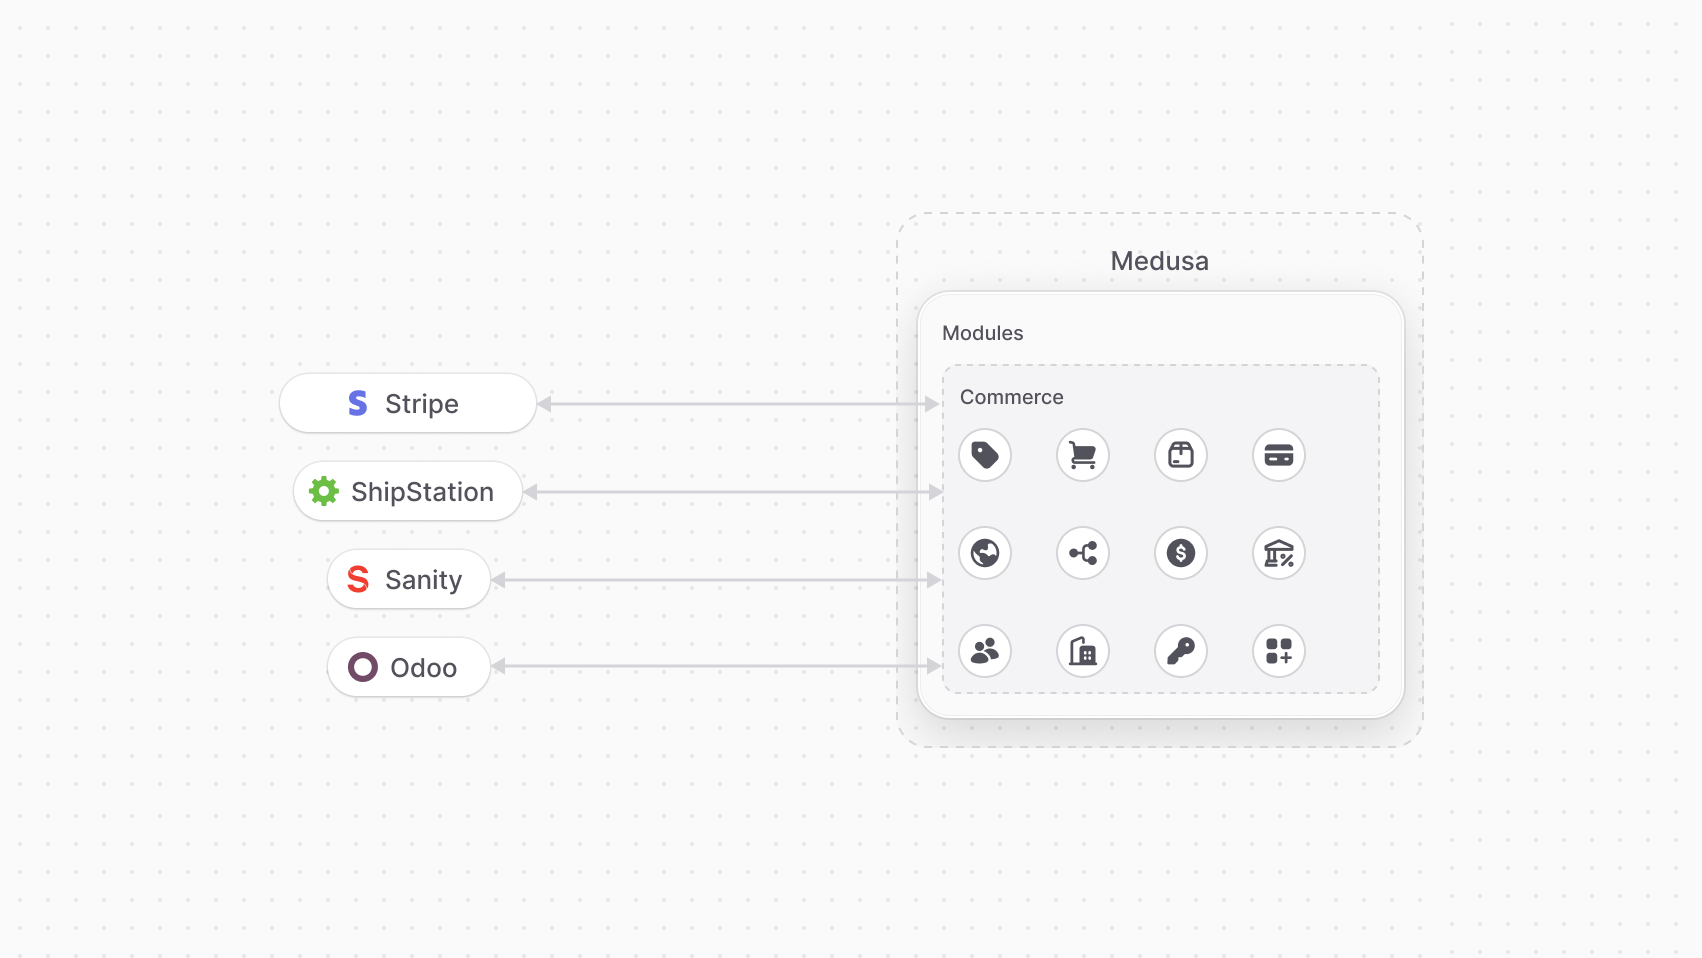 | |
| ### Architectural Modules | |
| [Architectural modules](https://docs.medusajs.com/resources/architectural-modules/index.html.md) integrate third-party services and systems for architectural features. For example, you integrate Redis as a pub/sub service to send events, or SendGrid to send notifications. | |
| 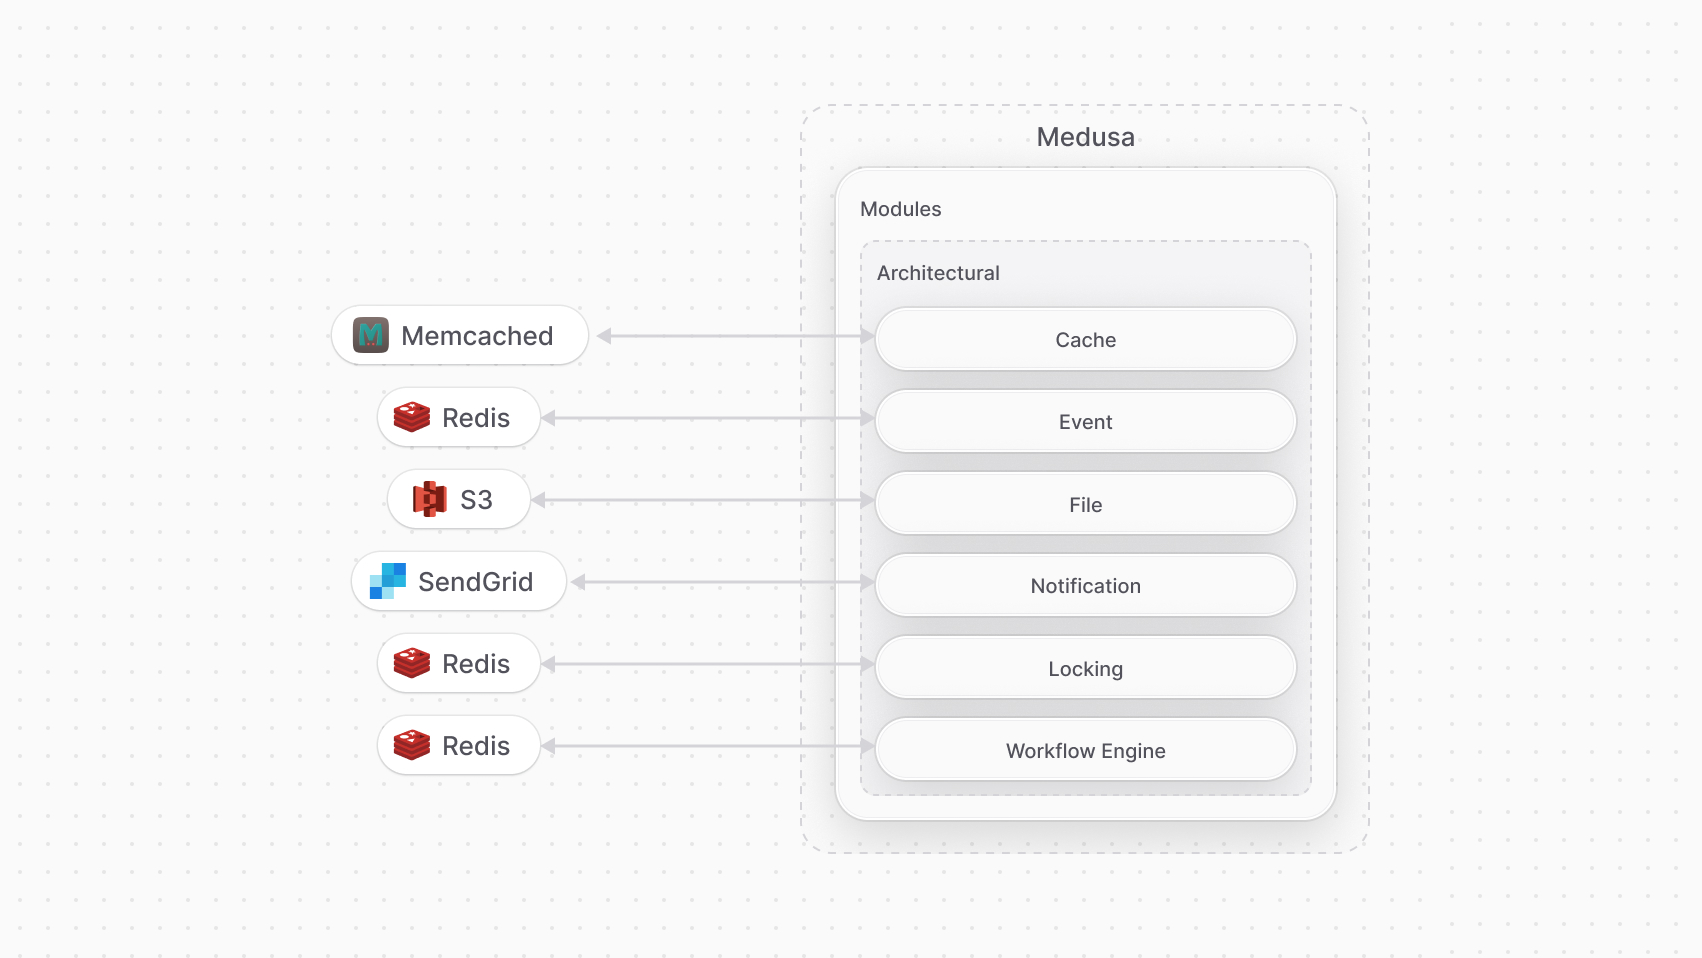 | |
| *** | |
| ## Full Diagram of Medusa's Architecture | |
| The following diagram illustrates Medusa's architecture over the three layers. | |
| 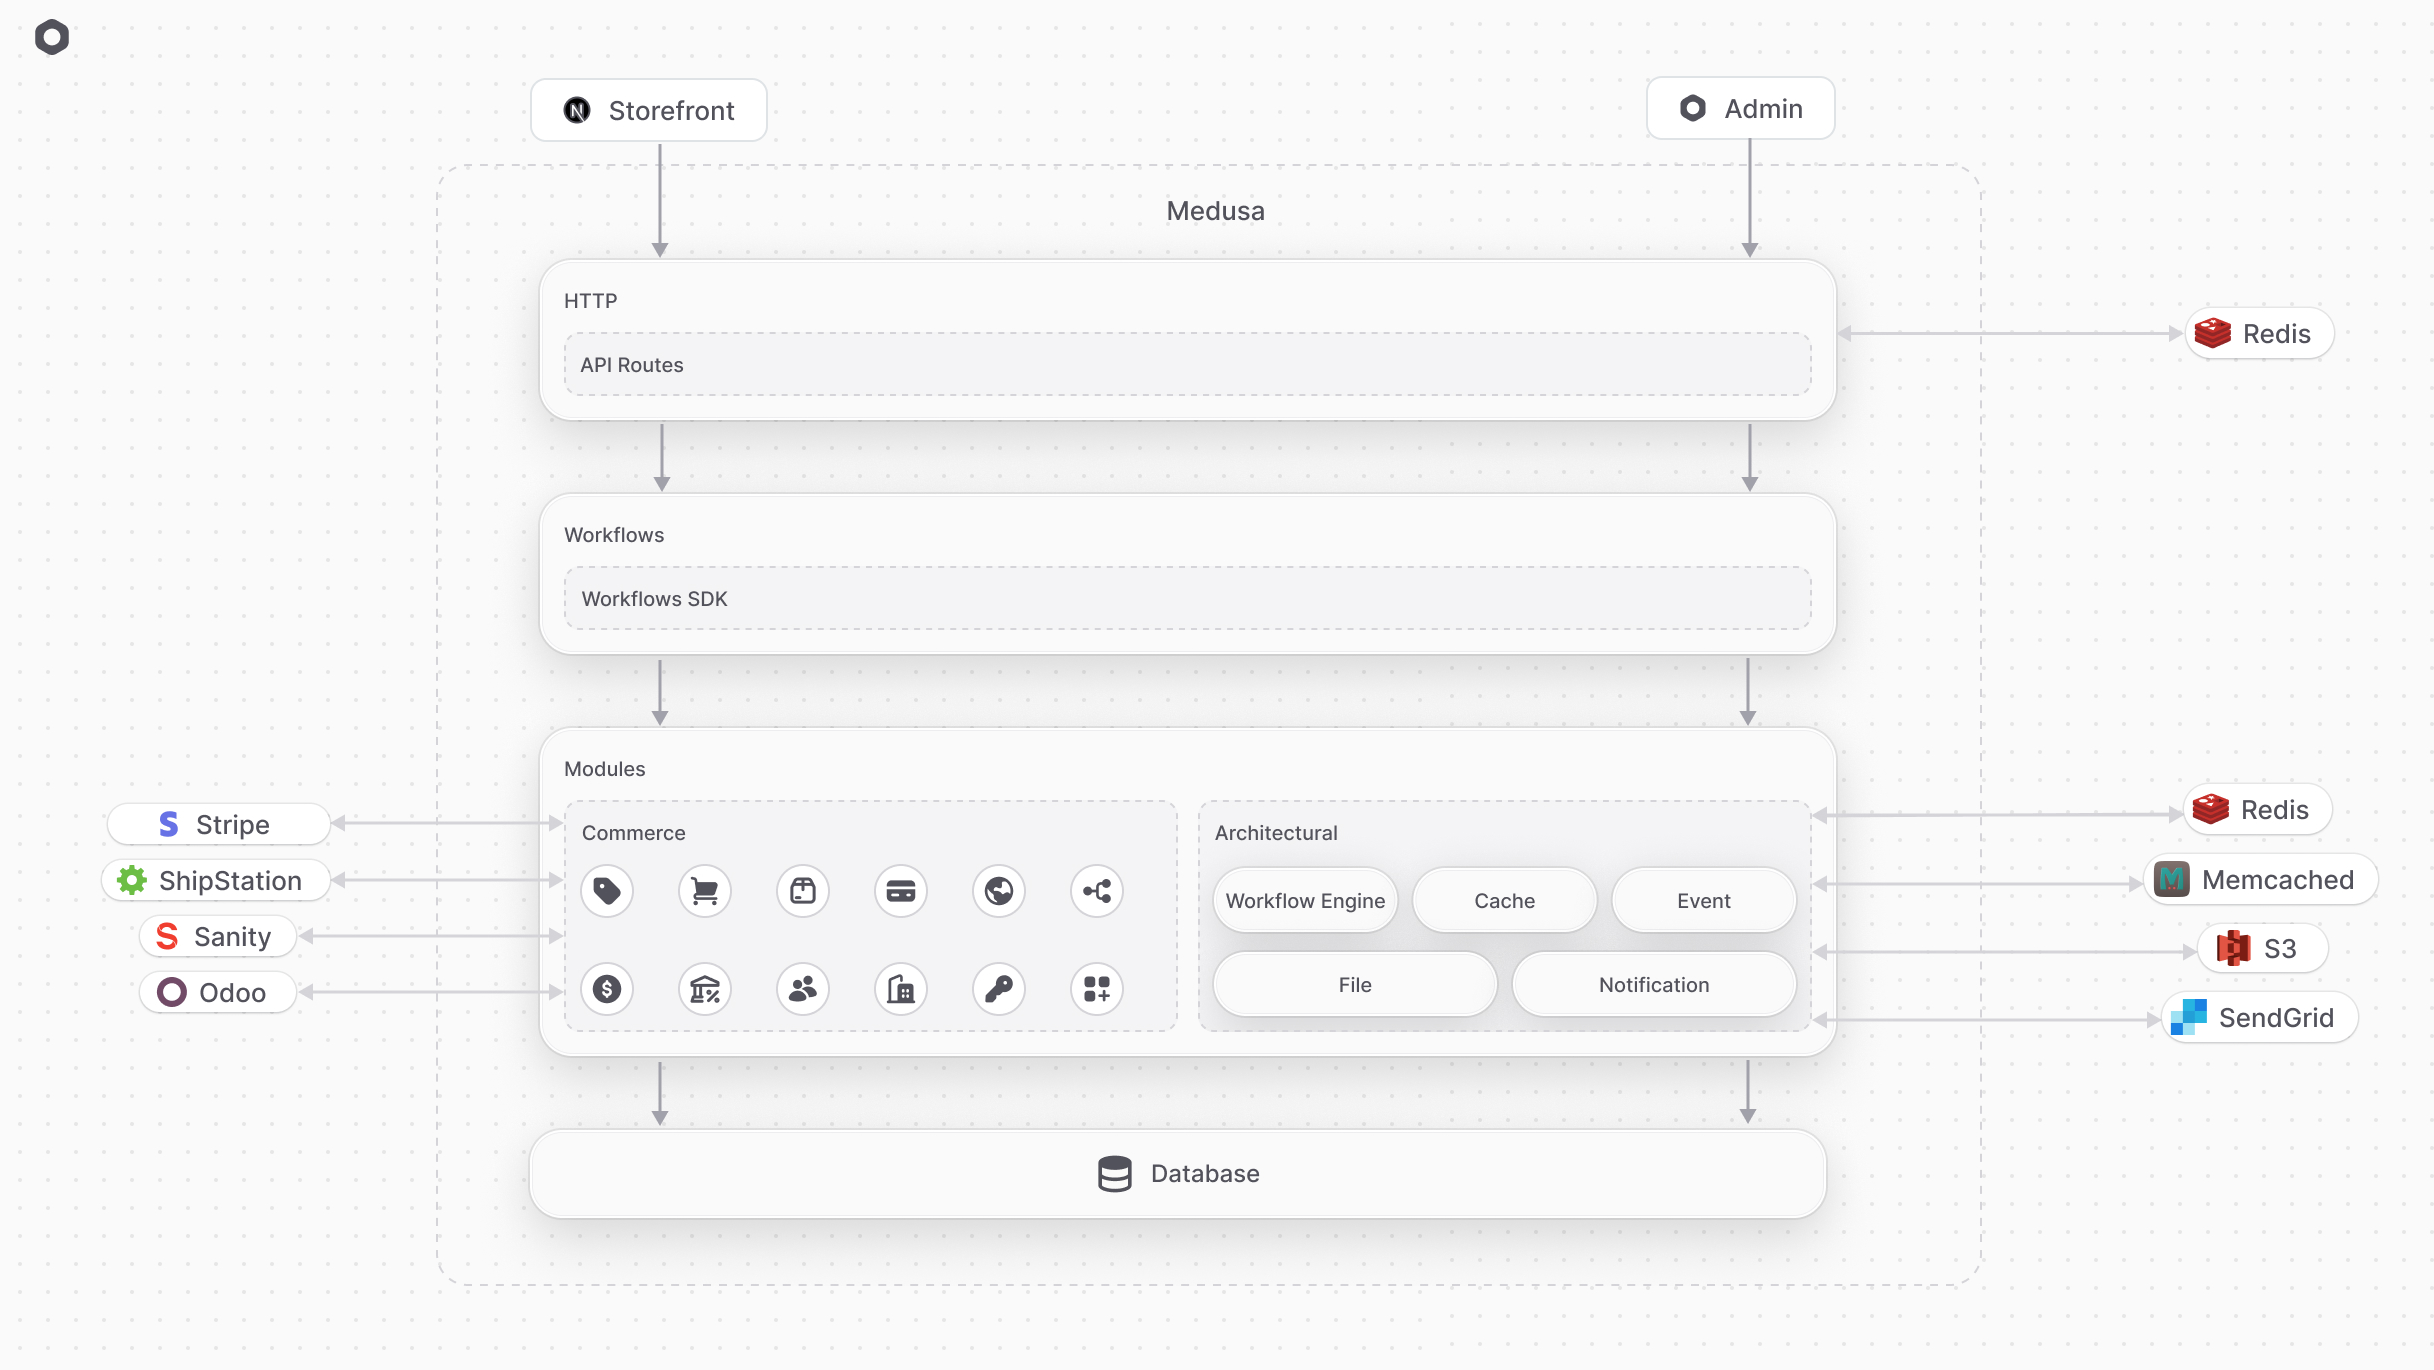 | |
| # Plugins | |
| In this chapter, you'll learn what a plugin is in Medusa. | |
| Plugins are available starting from [Medusa v2.3.0](https://github.com/medusajs/medusa/releases/tag/v2.3.0). | |
| ## What is a Plugin? | |
| A plugin is a package of reusable Medusa customizations that you can install in any Medusa application. The supported customizations are [Modules](https://docs.medusajs.com/learn/fundamentals/modules/index.html.md), [API Routes](https://docs.medusajs.com/learn/fundamentals/api-routes/index.html.md), [Workflows](https://docs.medusajs.com/learn/fundamentals/workflows/index.html.md), [Workflow Hooks](https://docs.medusajs.com/learn/fundamentals/workflows/workflow-hooks/index.html.md), [Links](https://docs.medusajs.com/learn/fundamentals/module-links/index.html.md), [Subscribers](https://docs.medusajs.com/learn/fundamentals/events-and-subscribers/index.html.md), [Scheduled Jobs](https://docs.medusajs.com/learn/fundamentals/scheduled-jobs/index.html.md), and [Admin Extensions](https://docs.medusajs.com/learn/fundamentals/admin/index.html.md). | |
| Plugins allow you to reuse your Medusa customizations across multiple projects or share them with the community. They can be published to npm and installed in any Medusa project. | |
| 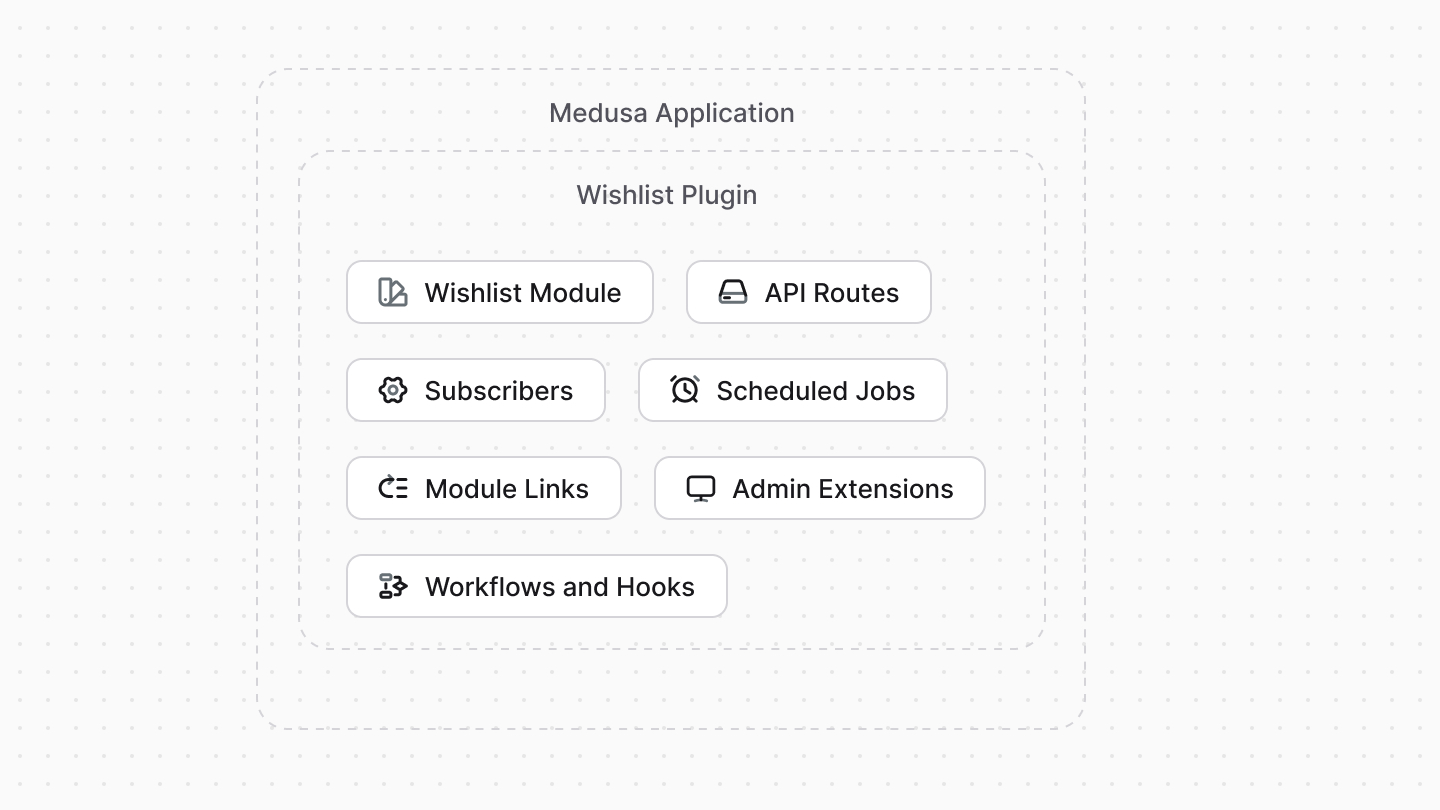 | |
| Learn how to create a wishlist plugin in [this guide](https://docs.medusajs.com/resources/plugins/guides/wishlist/index.html.md). | |
| *** | |
| ## Plugin vs Module | |
| A [module](https://docs.medusajs.com/learn/fundamentals/modules/index.html.md) is an isolated package related to a single domain or functionality, such as product reviews or integrating a Content Management System. A module can't access any resources in the Medusa application that are outside its codebase. | |
| A plugin, on the other hand, can contain multiple Medusa customizations, including modules. Your plugin can define a module, then build flows around it. | |
| For example, in a plugin, you can define a module that integrates a third-party service, then add a workflow that uses the module when a certain event occurs to sync data to that service. | |
| - You want to reuse your Medusa customizations across multiple projects. | |
| - You want to share your Medusa customizations with the community. | |
| - You want to build a custom feature related to a single domain or integrate a third-party service. Instead, use a [module](https://docs.medusajs.com/learn/fundamentals/modules/index.html.md). You can wrap that module in a plugin if it's used in other customizations, such as if it has a module link or it's used in a workflow. | |
| *** | |
| ## How to Create a Plugin? | |
| The next chapter explains how you can create and publish a plugin. | |
| *** | |
| ## Plugin Guides and Resources | |
| For more resources and guides related to plugins, refer to the [Resources documentation](https://docs.medusajs.com/resources/plugins/index.html.md). | |
| # Guide: Create Brand API Route | |
| In the previous two chapters, you created a [Brand Module](https://docs.medusajs.com/learn/customization/custom-features/module/index.html.md) that added the concepts of brands to your application, then created a [workflow to create a brand](https://docs.medusajs.com/learn/customization/custom-features/workflow/index.html.md). In this chapter, you'll expose an API route that allows admin users to create a brand using the workflow from the previous chapter. | |
| An API Route is an endpoint that acts as an entry point for other clients to interact with your Medusa customizations, such as the admin dashboard, storefronts, or third-party systems. | |
| The Medusa core application provides a set of [admin](https://docs.medusajs.com/api/admin/index.html.md) and [store](https://docs.medusajs.com/api/store/index.html.md) API routes out-of-the-box. You can also create custom API routes to expose your custom functionalities. | |
| ### Prerequisites | |
| - [createBrandWorkflow](https://docs.medusajs.com/learn/customization/custom-features/workflow/index.html.md) | |
| ## 1. Create the API Route | |
| You create an API route in a `route.{ts,js}` file under a sub-directory of the `src/api` directory. The file exports API Route handler functions for at least one HTTP method (`GET`, `POST`, `DELETE`, etc…). | |
| Learn more about API routes [in this guide](https://docs.medusajs.com/learn/fundamentals/api-routes/index.html.md). | |
| The route's path is the path of `route.{ts,js}` relative to `src/api`. So, to create the API route at `/admin/brands`, create the file `src/api/admin/brands/route.ts` with the following content: | |
| 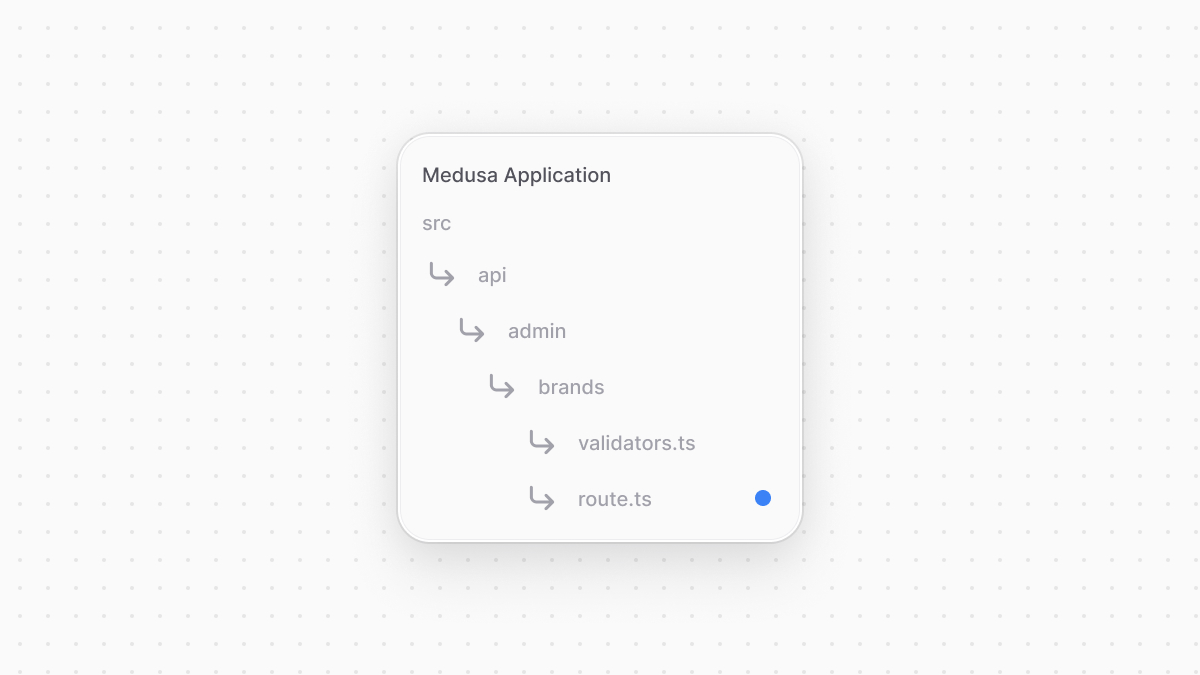 | |
| ```ts title="src/api/admin/brands/route.ts" | |
| import { | |
| MedusaRequest, | |
| MedusaResponse, | |
| } from "@medusajs/framework/http" | |
| import { | |
| createBrandWorkflow, | |
| } from "../../../workflows/create-brand" | |
| type PostAdminCreateBrandType = { | |
| name: string | |
| } | |
| export const POST = async ( | |
| req: MedusaRequest<PostAdminCreateBrandType>, | |
| res: MedusaResponse | |
| ) => { | |
| const { result } = await createBrandWorkflow(req.scope) | |
| .run({ | |
| input: req.validatedBody, | |
| }) | |
| res.json({ brand: result }) | |
| } | |
| ``` | |
| You export a route handler function with its name (`POST`) being the HTTP method of the API route you're exposing. | |
| The function receives two parameters: a `MedusaRequest` object to access request details, and `MedusaResponse` object to return or manipulate the response. The `MedusaRequest` object's `scope` property is the [Medusa container](https://docs.medusajs.com/learn/fundamentals/medusa-container/index.html.md) that holds framework tools and custom and core modules' services. | |
| `MedusaRequest` accepts the request body's type as a type argument. | |
| In the API route's handler, you execute the `createBrandWorkflow` by invoking it and passing the Medusa container `req.scope` as a parameter, then invoking its `run` method. You pass the workflow's input in the `input` property of the `run` method's parameter. You pass the request body's parameters using the `validatedBody` property of `MedusaRequest`. | |
| You return a JSON response with the created brand using the `res.json` method. | |
| *** | |
| ## 2. Create Validation Schema | |
| The API route you created accepts the brand's name in the request body. So, you'll create a schema used to validate incoming request body parameters. | |
| Medusa uses [Zod](https://zod.dev/) to create validation schemas. These schemas are then used to validate incoming request bodies or query parameters. | |
| Learn more about API route validation in [this chapter](https://docs.medusajs.com/learn/fundamentals/api-routes/validation/index.html.md). | |
| You create a validation schema in a TypeScript or JavaScript file under a sub-directory of the `src/api` directory. So, create the file `src/api/admin/brands/validators.ts` with the following content: | |
| 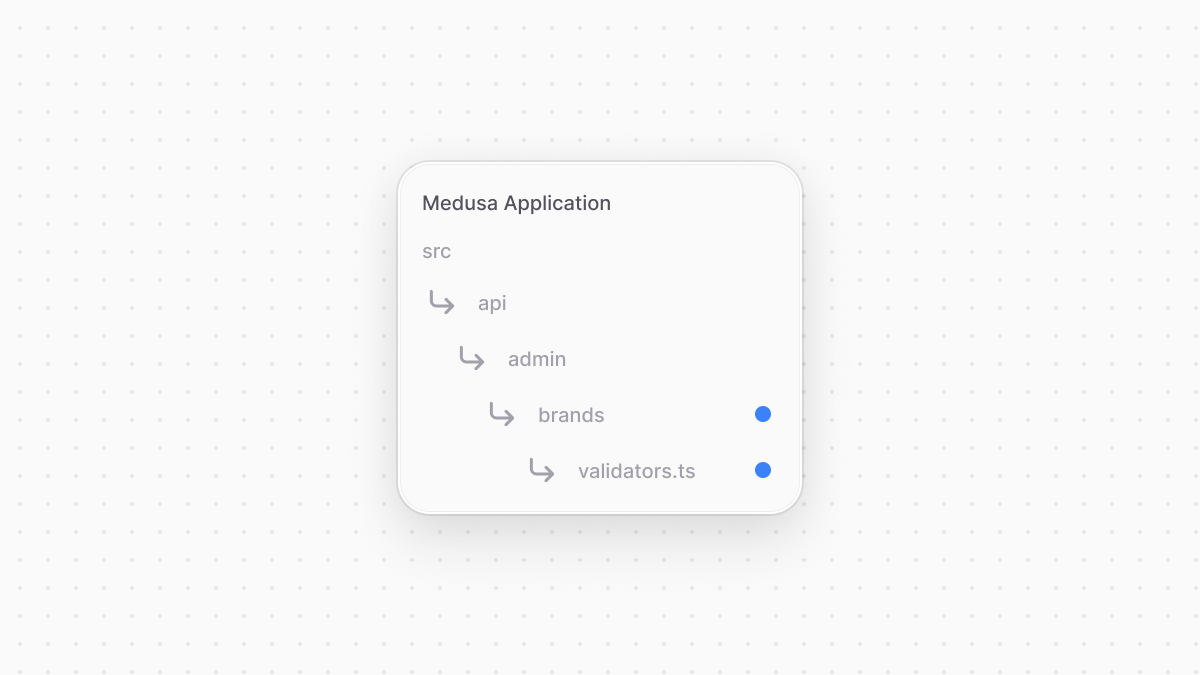 | |
| ```ts title="src/api/admin/brands/validators.ts" | |
| import { z } from "zod" | |
| export const PostAdminCreateBrand = z.object({ | |
| name: z.string(), | |
| }) | |
| ``` | |
| You export a validation schema that expects in the request body an object having a `name` property whose value is a string. | |
| You can then replace `PostAdminCreateBrandType` in `src/api/admin/brands/route.ts` with the following: | |
| ```ts title="src/api/admin/brands/route.ts" | |
| // ... | |
| import { z } from "zod" | |
| import { PostAdminCreateBrand } from "./validators" | |
| type PostAdminCreateBrandType = z.infer<typeof PostAdminCreateBrand> | |
| // ... | |
| ``` | |
| *** | |
| ## 3. Add Validation Middleware | |
| A middleware is a function executed before the route handler when a request is sent to an API Route. It's useful to guard API routes, parse custom request body types, and apply validation on an API route. | |
| Learn more about middlewares in [this chapter](https://docs.medusajs.com/learn/fundamentals/api-routes/middlewares/index.html.md). | |
| Medusa provides a `validateAndTransformBody` middleware that accepts a Zod validation schema and returns a response error if a request is sent with body parameters that don't satisfy the validation schema. | |
| Middlewares are defined in the special file `src/api/middlewares.ts`. So, to add the validation middleware on the API route you created in the previous step, create the file `src/api/middlewares.ts` with the following content: | |
| 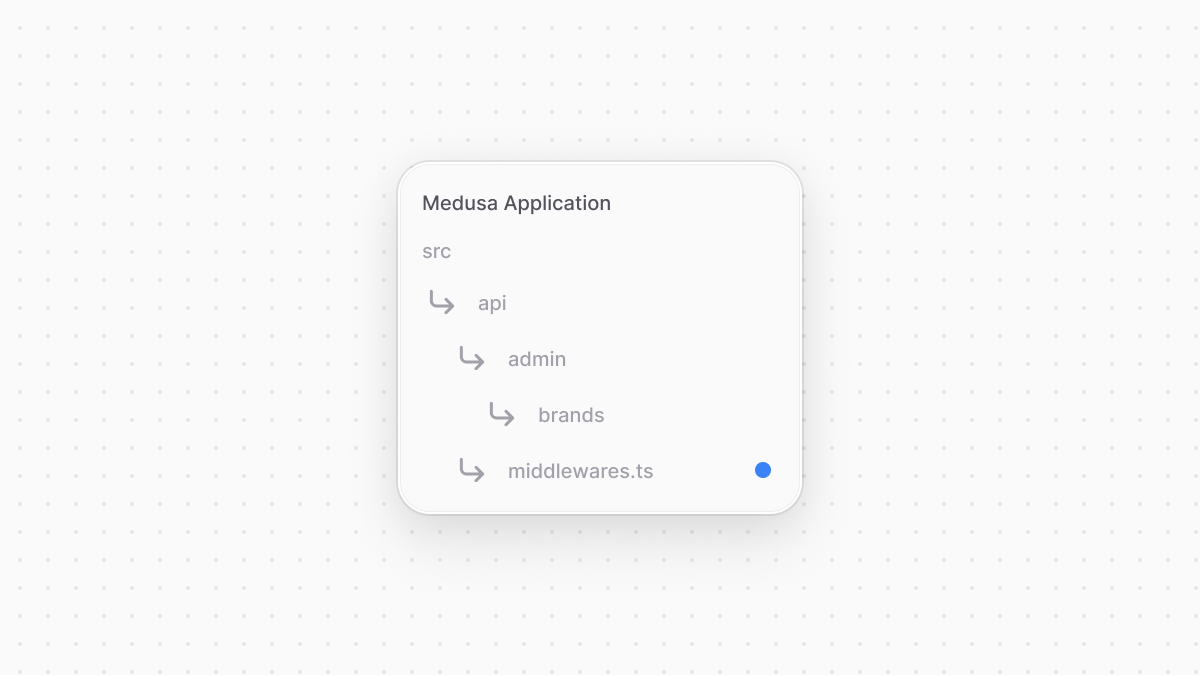 | |
| ```ts title="src/api/middlewares.ts" | |
| import { | |
| defineMiddlewares, | |
| validateAndTransformBody, | |
| } from "@medusajs/framework/http" | |
| import { PostAdminCreateBrand } from "./admin/brands/validators" | |
| export default defineMiddlewares({ | |
| routes: [ | |
| { | |
| matcher: "/admin/brands", | |
| method: "POST", | |
| middlewares: [ | |
| validateAndTransformBody(PostAdminCreateBrand), | |
| ], | |
| }, | |
| ], | |
| }) | |
| ``` | |
| You define the middlewares using the `defineMiddlewares` function and export its returned value. The function accepts an object having a `routes` property, which is an array of middleware objects. | |
| In the middleware object, you define three properties: | |
| - `matcher`: a string or regular expression indicating the API route path to apply the middleware on. You pass the create brand's route `/admin/brand`. | |
| - `method`: The HTTP method to restrict the middleware to, which is `POST`. | |
| - `middlewares`: An array of middlewares to apply on the route. You pass the `validateAndTransformBody` middleware, passing it the Zod schema you created earlier. | |
| The Medusa application will now validate the body parameters of `POST` requests sent to `/admin/brands` to ensure they match the Zod validation schema. If not, an error is returned in the response specifying the issues to fix in the request body. | |
| *** | |
| ## Test API Route | |
| To test out the API route, start the Medusa application with the following command: | |
| ```bash npm2yarn | |
| npm run dev | |
| ``` | |
| Since the `/admin/brands` API route has a `/admin` prefix, it's only accessible by authenticated admin users. | |
| So, to retrieve an authenticated token of your admin user, send a `POST` request to the `/auth/user/emailpass` API Route: | |
| ```bash | |
| curl -X POST 'http://localhost:9000/auth/user/emailpass' \ | |
| -H 'Content-Type: application/json' \ | |
| --data-raw '{ | |
| "email": "[email protected]", | |
| "password": "supersecret" | |
| }' | |
| ``` | |
| Make sure to replace the email and password with your admin user's credentials. | |
| Don't have an admin user? Refer to [this guide](https://docs.medusajs.com/learn/installation#create-medusa-admin-user/index.html.md). | |
| Then, send a `POST` request to `/admin/brands`, passing the token received from the previous request in the `Authorization` header: | |
| ```bash | |
| curl -X POST 'http://localhost:9000/admin/brands' \ | |
| -H 'Content-Type: application/json' \ | |
| -H 'Authorization: Bearer {token}' \ | |
| --data '{ | |
| "name": "Acme" | |
| }' | |
| ``` | |
| This returns the created brand in the response: | |
| ```json title="Example Response" | |
| { | |
| "brand": { | |
| "id": "01J7AX9ES4X113HKY6C681KDZJ", | |
| "name": "Acme", | |
| "created_at": "2024-09-09T08:09:34.244Z", | |
| "updated_at": "2024-09-09T08:09:34.244Z" | |
| } | |
| } | |
| ``` | |
| *** | |
| ## Summary | |
| By following the previous example chapters, you implemented a custom feature that allows admin users to create a brand. You did that by: | |
| 1. Creating a module that defines and manages a `brand` table in the database. | |
| 2. Creating a workflow that uses the module's service to create a brand record, and implements the compensation logic to delete that brand in case an error occurs. | |
| 3. Creating an API route that allows admin users to create a brand. | |
| *** | |
| ## Next Steps: Associate Brand with Product | |
| Now that you have brands in your Medusa application, you want to associate a brand with a product, which is defined in the [Product Module](https://docs.medusajs.com/resources/commerce-modules/product/index.html.md). | |
| In the next chapters, you'll learn how to build associations between data models defined in different modules. | |
| # Write Tests for Modules | |
| In this chapter, you'll learn about `moduleIntegrationTestRunner` from Medusa's Testing Framework and how to use it to write integration tests for a module's main service. | |
| ### Prerequisites | |
| - [Testing Tools Setup](https://docs.medusajs.com/learn/debugging-and-testing/testing-tools/index.html.md) | |
| ## moduleIntegrationTestRunner Utility | |
| `moduleIntegrationTestRunner` creates integration tests for a module. The integration tests run on a test Medusa application with only the specified module enabled. | |
| For example, assuming you have a `hello` module, create a test file at `src/modules/hello/__tests__/service.spec.ts`: | |
| ```ts title="src/modules/hello/__tests__/service.spec.ts" | |
| import { moduleIntegrationTestRunner } from "@medusajs/test-utils" | |
| import { HELLO_MODULE } from ".." | |
| import HelloModuleService from "../service" | |
| import MyCustom from "../models/my-custom" | |
| moduleIntegrationTestRunner<HelloModuleService>({ | |
| moduleName: HELLO_MODULE, | |
| moduleModels: [MyCustom], | |
| resolve: "./src/modules/hello", | |
| testSuite: ({ service }) => { | |
| // TODO write tests | |
| }, | |
| }) | |
| jest.setTimeout(60 * 1000) | |
| ``` | |
| The `moduleIntegrationTestRunner` function accepts as a parameter an object with the following properties: | |
| - `moduleName`: The name of the module. | |
| - `moduleModels`: An array of models in the module. Refer to [this section](#write-tests-for-modules-without-data-models) if your module doesn't have data models. | |
| - `resolve`: The path to the model. | |
| - `testSuite`: A function that defines the tests to run. | |
| The `testSuite` function accepts as a parameter an object having the `service` property, which is an instance of the module's main service. | |
| The type argument provided to the `moduleIntegrationTestRunner` function is used as the type of the `service` property. | |
| The tests in the `testSuite` function are written using [Jest](https://jestjs.io/). | |
| *** | |
| ## Run Tests | |
| Run the following command to run your module integration tests: | |
| ```bash npm2yarn | |
| npm run test:integration:modules | |
| ``` | |
| If you don't have a `test:integration:modules` script in `package.json`, refer to the [Medusa Testing Tools chapter](https://docs.medusajs.com/learn/debugging-and-testing/testing-tools#add-test-commands/index.html.md). | |
| This runs your Medusa application and runs the tests available in any `__tests__` directory under the `src/modules` directory. | |
| *** | |
| ## Pass Module Options | |
| If your module accepts options, you can set them using the `moduleOptions` property of the `moduleIntegrationTestRunner`'s parameter. | |
| For example: | |
| ```ts | |
| import { moduleIntegrationTestRunner } from "@medusajs/test-utils" | |
| import HelloModuleService from "../service" | |
| moduleIntegrationTestRunner<HelloModuleService>({ | |
| moduleOptions: { | |
| apiKey: "123", | |
| }, | |
| // ... | |
| }) | |
| ``` | |
| *** | |
| ## Write Tests for Modules without Data Models | |
| If your module doesn't have a data model, pass a dummy model in the `moduleModels` property. | |
| For example: | |
| ```ts | |
| import { moduleIntegrationTestRunner } from "@medusajs/test-utils" | |
| import HelloModuleService from "../service" | |
| import { model } from "@medusajs/framework/utils" | |
| const DummyModel = model.define("dummy_model", { | |
| id: model.id().primaryKey(), | |
| }) | |
| moduleIntegrationTestRunner<HelloModuleService>({ | |
| moduleModels: [DummyModel], | |
| // ... | |
| }) | |
| jest.setTimeout(60 * 1000) | |
| ``` | |
| *** | |
| ### Other Options and Inputs | |
| Refer to [this reference in the Development Resources documentation](https://docs.medusajs.com/resources/test-tools-reference/moduleIntegrationTestRunner/index.html.md) for other available parameter options and inputs of the `testSuite` function. | |
| *** | |
| ## Database Used in Tests | |
| The `moduleIntegrationTestRunner` function creates a database with a random name before running the tests. Then, it drops that database after all the tests end. | |
| To manage that database, such as changing its name or perform operations on it in your tests, refer to the [references in the Development Resources documentation](https://docs.medusajs.com/resources/test-tools-reference/moduleIntegrationTestRunner/index.html.md). | |
| # Create Brands UI Route in Admin | |
| In this chapter, you'll add a UI route to the admin dashboard that shows all [brands](https://docs.medusajs.com/learn/customization/custom-features/module/index.html.md) in a new page. You'll retrieve the brands from the server and display them in a table with pagination. | |
| ### Prerequisites | |
| - [Brands Module](https://docs.medusajs.com/learn/customization/custom-features/modules/index.html.md) | |
| ## 1. Get Brands API Route | |
| In a [previous chapter](https://docs.medusajs.com/learn/customization/extend-features/query-linked-records/index.html.md), you learned how to add an API route that retrieves brands and their products using [Query](https://docs.medusajs.com/learn/fundamentals/module-links/query/index.html.md). You'll expand that API route to support pagination, so that on the admin dashboard you can show the brands in a paginated table. | |
| Replace or create the `GET` API route at `src/api/admin/brands/route.ts` with the following: | |
| ```ts title="src/api/admin/brands/route.ts" highlights={apiRouteHighlights} | |
| // other imports... | |
| import { | |
| MedusaRequest, | |
| MedusaResponse, | |
| } from "@medusajs/framework/http" | |
| export const GET = async ( | |
| req: MedusaRequest, | |
| res: MedusaResponse | |
| ) => { | |
| const query = req.scope.resolve("query") | |
| const { | |
| data: brands, | |
| metadata: { count, take, skip } = {}, | |
| } = await query.graph({ | |
| entity: "brand", | |
| ...req.queryConfig, | |
| }) | |
| res.json({ | |
| brands, | |
| count, | |
| limit: take, | |
| offset: skip, | |
| }) | |
| } | |
| ``` | |
| In the API route, you use Query's `graph` method to retrieve the brands. In the method's object parameter, you spread the `queryConfig` property of the request object. This property holds configurations for pagination and retrieved fields. | |
| The query configurations are combined from default configurations, which you'll add next, and the request's query parameters: | |
| - `fields`: The fields to retrieve in the brands. | |
| - `limit`: The maximum number of items to retrieve. | |
| - `offset`: The number of items to skip before retrieving the returned items. | |
| When you pass pagination configurations to the `graph` method, the returned object has the pagination's details in a `metadata` property, whose value is an object having the following properties: | |
| - `count`: The total count of items. | |
| - `take`: The maximum number of items returned in the `data` array. | |
| - `skip`: The number of items skipped before retrieving the returned items. | |
| You return in the response the retrieved brands and the pagination configurations. | |
| Learn more about pagination with Query in [this chapter](https://docs.medusajs.com/learn/fundamentals/module-links/query#apply-pagination/index.html.md). | |
| *** | |
| ## 2. Add Default Query Configurations | |
| Next, you'll set the default query configurations of the above API route and allow passing query parameters to change the configurations. | |
| Medusa provides a `validateAndTransformQuery` middleware that validates the accepted query parameters for a request and sets the default Query configuration. So, in `src/api/middlewares.ts`, add a new middleware configuration object: | |
| ```ts title="src/api/middlewares.ts" | |
| import { | |
| defineMiddlewares, | |
| validateAndTransformQuery, | |
| } from "@medusajs/framework/http" | |
| import { createFindParams } from "@medusajs/medusa/api/utils/validators" | |
| // other imports... | |
| export const GetBrandsSchema = createFindParams() | |
| export default defineMiddlewares({ | |
| routes: [ | |
| // ... | |
| { | |
| matcher: "/admin/brands", | |
| method: "GET", | |
| middlewares: [ | |
| validateAndTransformQuery( | |
| GetBrandsSchema, | |
| { | |
| defaults: [ | |
| "id", | |
| "name", | |
| "products.*", | |
| ], | |
| isList: true, | |
| } | |
| ), | |
| ], | |
| }, | |
| ], | |
| }) | |
| ``` | |
| You apply the `validateAndTransformQuery` middleware on the `GET /admin/brands` API route. The middleware accepts two parameters: | |
| - A [Zod](https://zod.dev/) schema that a request's query parameters must satisfy. Medusa provides `createFindParams` that generates a Zod schema with the following properties: | |
| - `fields`: A comma-separated string indicating the fields to retrieve. | |
| - `limit`: The maximum number of items to retrieve. | |
| - `offset`: The number of items to skip before retrieving the returned items. | |
| - `order`: The name of the field to sort the items by. Learn more about sorting in [the API reference](https://docs.medusajs.com/api/admin#sort-order/index.html.md) | |
| - An object of Query configurations having the following properties: | |
| - `defaults`: An array of default fields and relations to retrieve. | |
| - `isList`: Whether the API route returns a list of items. | |
| By applying the above middleware, you can pass pagination configurations to `GET /admin/brands`, which will return a paginated list of brands. You'll see how it works when you create the UI route. | |
| Learn more about using the `validateAndTransformQuery` middleware to configure Query in [this chapter](https://docs.medusajs.com/learn/fundamentals/module-links/query#request-query-configurations/index.html.md). | |
| *** | |
| ## 3. Initialize JS SDK | |
| In your custom UI route, you'll retrieve the brands by sending a request to the Medusa server. Medusa has a [JS SDK](https://docs.medusajs.com/resources/js-sdk/index.html.md) that simplifies sending requests to the core API route. | |
| If you didn't follow the [previous chapter](https://docs.medusajs.com/learn/customization/customize-admin/widget/index.html.md), create the file `src/admin/lib/sdk.ts` with the following content: | |
|  | |
| ```ts title="src/admin/lib/sdk.ts" | |
| import Medusa from "@medusajs/js-sdk" | |
| export const sdk = new Medusa({ | |
| baseUrl: import.meta.env.VITE_BACKEND_URL || "/", | |
| debug: import.meta.env.DEV, | |
| auth: { | |
| type: "session", | |
| }, | |
| }) | |
| ``` | |
| You initialize the SDK passing it the following options: | |
| - `baseUrl`: The URL to the Medusa server. | |
| - `debug`: Whether to enable logging debug messages. This should only be enabled in development. | |
| - `auth.type`: The authentication method used in the client application, which is `session` in the Medusa Admin dashboard. | |
| Notice that you use `import.meta.env` to access environment variables in your customizations because the Medusa Admin is built on top of Vite. Learn more in [this chapter](https://docs.medusajs.com/learn/fundamentals/admin/environment-variables/index.html.md). | |
| You can now use the SDK to send requests to the Medusa server. | |
| Learn more about the JS SDK and its options in [this reference](https://docs.medusajs.com/resources/js-sdk/index.html.md). | |
| *** | |
| ## 4. Add a UI Route to Show Brands | |
| You'll now add the UI route that shows the paginated list of brands. A UI route is a React component created in a `page.tsx` file under a sub-directory of `src/admin/routes`. The file's path relative to src/admin/routes determines its path in the dashboard. | |
| Learn more about UI routes in [this chapter](https://docs.medusajs.com/learn/fundamentals/admin/ui-routes/index.html.md). | |
| So, to add the UI route at the `localhost:9000/app/brands` path, create the file `src/admin/routes/brands/page.tsx` with the following content: | |
| 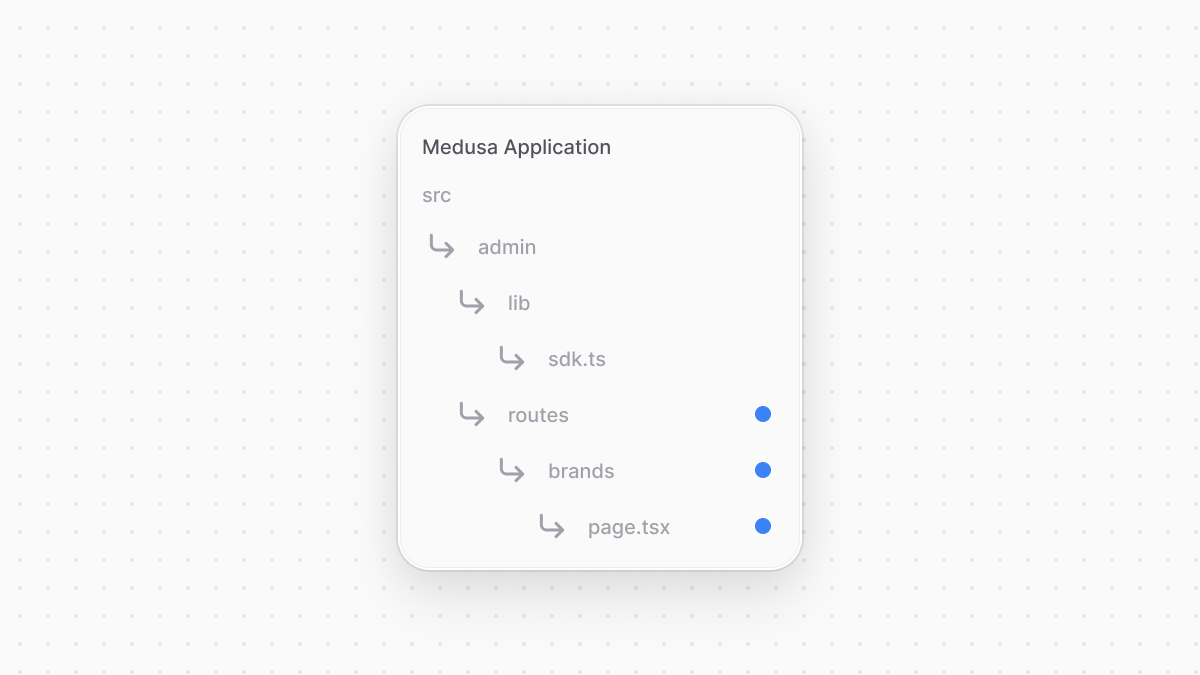 | |
| ```tsx title="src/admin/routes/brands/page.tsx" highlights={uiRouteHighlights} | |
| import { defineRouteConfig } from "@medusajs/admin-sdk" | |
| import { TagSolid } from "@medusajs/icons" | |
| import { | |
| Container, | |
| } from "@medusajs/ui" | |
| import { useQuery } from "@tanstack/react-query" | |
| import { sdk } from "../../lib/sdk" | |
| import { useMemo, useState } from "react" | |
| const BrandsPage = () => { | |
| // TODO retrieve brands | |
| return ( | |
| <Container className="divide-y p-0"> | |
| {/* TODO show brands */} | |
| </Container> | |
| ) | |
| } | |
| export const config = defineRouteConfig({ | |
| label: "Brands", | |
| icon: TagSolid, | |
| }) | |
| export default BrandsPage | |
| ``` | |
| A route's file must export the React component that will be rendered in the new page. It must be the default export of the file. You can also export configurations that add a link in the sidebar for the UI route. You create these configurations using `defineRouteConfig` from the Admin Extension SDK. | |
| So far, you only show a container. In admin customizations, use components from the [Medusa UI package](https://docs.medusajs.com/ui/index.html.md) to maintain a consistent user interface and design in the dashboard. | |
| ### Retrieve Brands From API Route | |
| You'll now update the UI route to retrieve the brands from the API route you added earlier. | |
| First, add the following type in `src/admin/routes/brands/page.tsx`: | |
| ```tsx title="src/admin/routes/brands/page.tsx" | |
| type Brand = { | |
| id: string | |
| name: string | |
| } | |
| type BrandsResponse = { | |
| brands: Brand[] | |
| count: number | |
| limit: number | |
| offset: number | |
| } | |
| ``` | |
| You define the type for a brand, and the type of expected response from the `GET /admin/brands` API route. | |
| To display the brands, you'll use Medusa UI's [DataTable](https://docs.medusajs.com/ui/components/data-table/index.html.md) component. So, add the following imports in `src/admin/routes/brands/page.tsx`: | |
| ```tsx title="src/admin/routes/brands/page.tsx" | |
| import { | |
| // ... | |
| Heading, | |
| createDataTableColumnHelper, | |
| DataTable, | |
| DataTablePaginationState, | |
| useDataTable, | |
| } from "@medusajs/ui" | |
| ``` | |
| You import the `DataTable` component and the following utilities: | |
| - `createDataTableColumnHelper`: A utility to create columns for the data table. | |
| - `DataTablePaginationState`: A type that holds the pagination state of the data table. | |
| - `useDataTable`: A hook to initialize and configure the data table. | |
| You also import the `Heading` component to show a heading above the data table. | |
| Next, you'll define the table's columns. Add the following before the `BrandsPage` component: | |
| ```tsx title="src/admin/routes/brands/page.tsx" | |
| const columnHelper = createDataTableColumnHelper<Brand>() | |
| const columns = [ | |
| columnHelper.accessor("id", { | |
| header: "ID", | |
| }), | |
| columnHelper.accessor("name", { | |
| header: "Name", | |
| }) | |
| ] | |
| ``` | |
| You use the `createDataTableColumnHelper` utility to create columns for the data table. You define two columns for the ID and name of the brands. | |
| Then, replace the `// TODO retrieve brands` in the component with the following: | |
| ```tsx title="src/admin/routes/brands/page.tsx" highlights={queryHighlights} | |
| const limit = 15 | |
| const [pagination, setPagination] = useState<DataTablePaginationState>({ | |
| pageSize: limit, | |
| pageIndex: 0, | |
| }) | |
| const offset = useMemo(() => { | |
| return pagination.pageIndex * limit | |
| }, [pagination]) | |
| const { data, isLoading } = useQuery<BrandsResponse>({ | |
| queryFn: () => sdk.client.fetch(`/admin/brands`, { | |
| query: { | |
| limit, | |
| offset, | |
| }, | |
| }), | |
| queryKey: [["brands", limit, offset]], | |
| }) | |
| // TODO configure data table | |
| ``` | |
| To enable pagination in the `DataTable` component, you need to define a state variable of type `DataTablePaginationState`. It's an object having the following properties: | |
| - `pageSize`: The maximum number of items per page. You set it to `15`. | |
| - `pageIndex`: A zero-based index of the current page of items. | |
| You also define a memoized `offset` value that indicates the number of items to skip before retrieving the current page's items. | |
| Then, you use `useQuery` from [Tanstack (React) Query](https://tanstack.com/query/latest) to query the Medusa server. Tanstack Query provides features like asynchronous state management and optimized caching. | |
| Do not install Tanstack Query as that will cause unexpected errors in your development. If you prefer installing it for better auto-completion in your code editor, make sure to install `v5.64.2` as a development dependency. | |
| In the `queryFn` function that executes the query, you use the JS SDK's `client.fetch` method to send a request to your custom API route. The first parameter is the route's path, and the second is an object of request configuration and data. You pass the query parameters in the `query` property. | |
| This sends a request to the [Get Brands API route](#1-get-brands-api-route), passing the pagination query parameters. Whenever `currentPage` is updated, the `offset` is also updated, which will send a new request to retrieve the brands for the current page. | |
| ### Display Brands Table | |
| Finally, you'll display the brands in a data table. Replace the `// TODO configure data table` in the component with the following: | |
| ```tsx title="src/admin/routes/brands/page.tsx" | |
| const table = useDataTable({ | |
| columns, | |
| data: data?.brands || [], | |
| getRowId: (row) => row.id, | |
| rowCount: data?.count || 0, | |
| isLoading, | |
| pagination: { | |
| state: pagination, | |
| onPaginationChange: setPagination, | |
| }, | |
| }) | |
| ``` | |
| You use the `useDataTable` hook to initialize and configure the data table. It accepts an object with the following properties: | |
| - `columns`: The columns of the data table. You created them using the `createDataTableColumnHelper` utility. | |
| - `data`: The brands to display in the table. | |
| - `getRowId`: A function that returns a unique identifier for a row. | |
| - `rowCount`: The total count of items. This is used to determine the number of pages. | |
| - `isLoading`: A boolean indicating whether the data is loading. | |
| - `pagination`: An object to configure pagination. It accepts the following properties: | |
| - `state`: The pagination state of the data table. | |
| - `onPaginationChange`: A function to update the pagination state. | |
| Then, replace the `{/* TODO show brands */}` in the return statement with the following: | |
| ```tsx title="src/admin/routes/brands/page.tsx" | |
| <DataTable instance={table}> | |
| <DataTable.Toolbar className="flex flex-col items-start justify-between gap-2 md:flex-row md:items-center"> | |
| <Heading>Brands</Heading> | |
| </DataTable.Toolbar> | |
| <DataTable.Table /> | |
| <DataTable.Pagination /> | |
| </DataTable> | |
| ``` | |
| This renders the data table that shows the brands with pagination. The `DataTable` component accepts the `instance` prop, which is the object returned by the `useDataTable` hook. | |
| *** | |
| ## Test it Out | |
| To test out the UI route, start the Medusa application: | |
| ```bash npm2yarn | |
| npm run dev | |
| ``` | |
| Then, open the admin dashboard at `http://localhost:9000/app`. After you log in, you'll find a new "Brands" sidebar item. Click on it to see the brands in your store. You can also go to `http://localhost:9000/app/brands` to see the page. | |
| 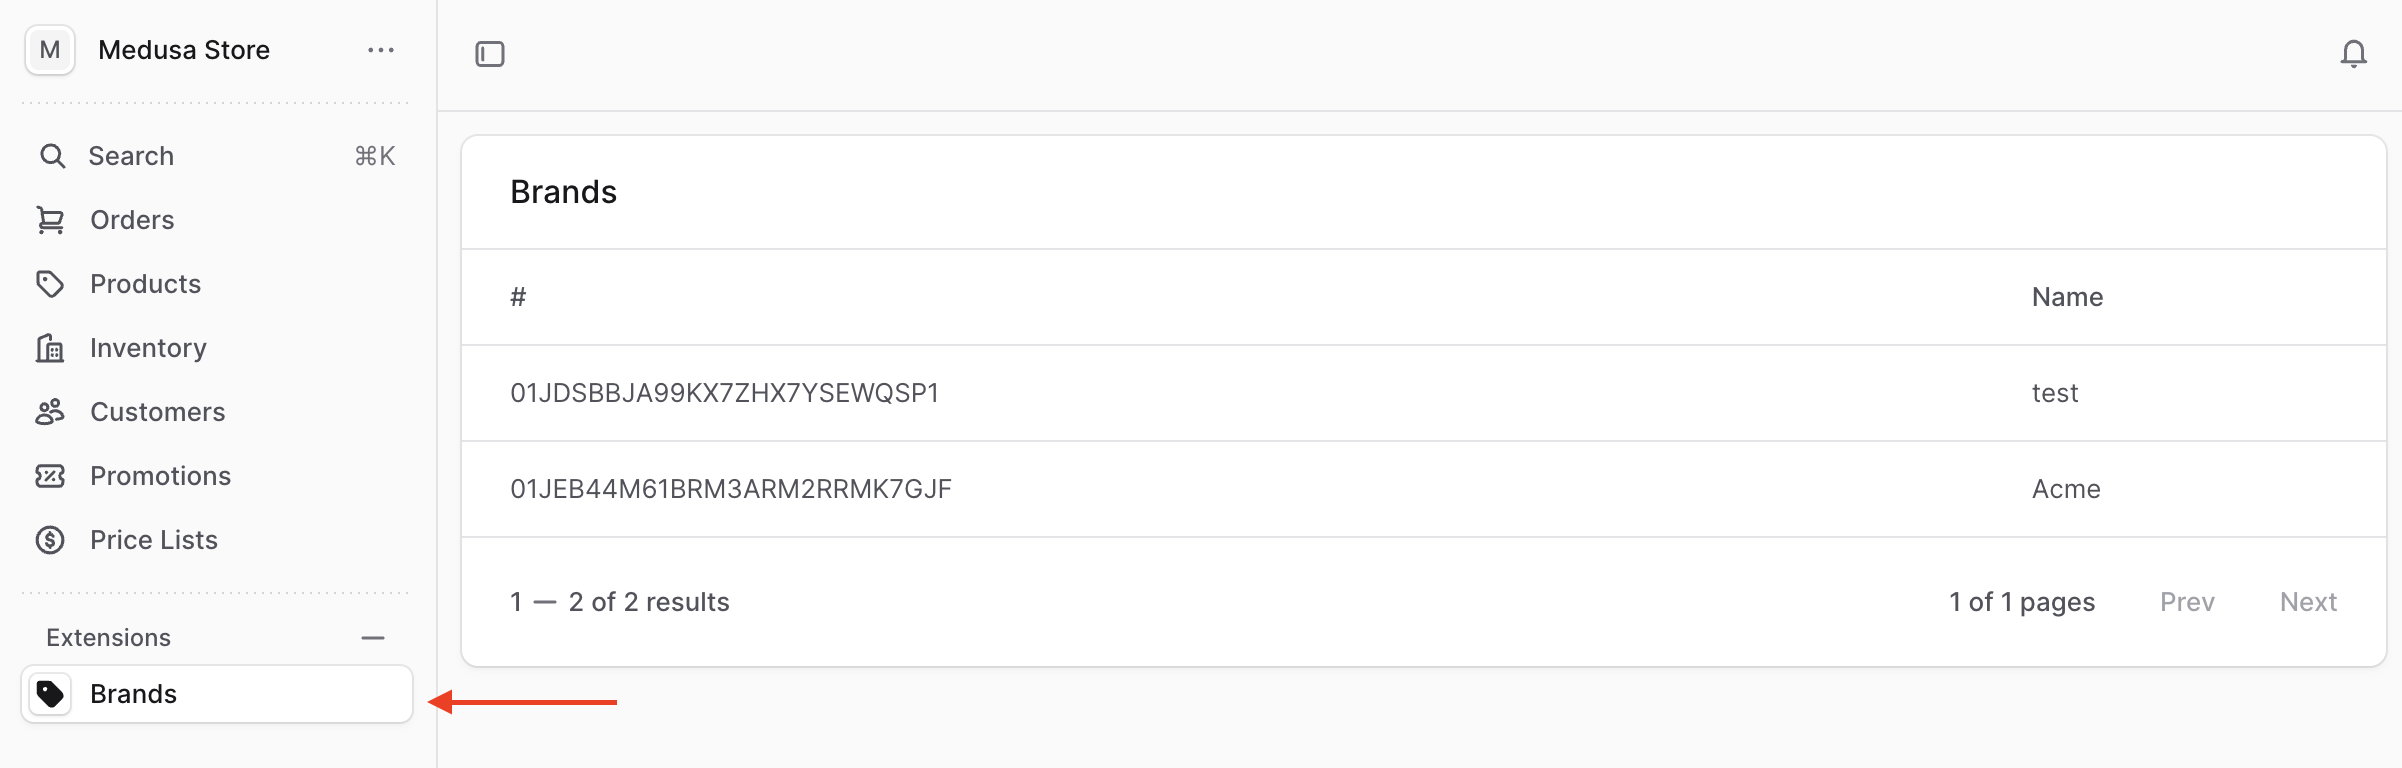 | |
| *** | |
| ## Summary | |
| By following the previous chapters, you: | |
| - Injected a widget into the product details page to show the product's brand. | |
| - Created a UI route in the Medusa Admin that shows the list of brands. | |
| *** | |
| ## Next Steps: Integrate Third-Party Systems | |
| Your customizations often span across systems, where you need to retrieve data or perform operations in a third-party system. | |
| In the next chapters, you'll learn about the concepts that facilitate integrating third-party systems in your application. You'll integrate a dummy third-party system and sync the brands between it and the Medusa application. | |
| # Guide: Add Product's Brand Widget in Admin | |
| In this chapter, you'll customize the product details page of the Medusa Admin dashboard to show the product's [brand](https://docs.medusajs.com/learn/customization/custom-features/module/index.html.md). You'll create a widget that is injected into a pre-defined zone in the page, and in the widget you'll retrieve the product's brand from the server and display it. | |
| ### Prerequisites | |
| - [Brands linked to products](https://docs.medusajs.com/learn/customization/extend-features/define-link/index.html.md) | |
| ## 1. Initialize JS SDK | |
| In your custom widget, you'll retrieve the product's brand by sending a request to the Medusa server. Medusa has a [JS SDK](https://docs.medusajs.com/resources/js-sdk/index.html.md) that simplifies sending requests to the server's API routes. | |
| So, you'll start by configuring the JS SDK. Create the file `src/admin/lib/sdk.ts` with the following content: | |
|  | |
| ```ts title="src/admin/lib/sdk.ts" | |
| import Medusa from "@medusajs/js-sdk" | |
| export const sdk = new Medusa({ | |
| baseUrl: import.meta.env.VITE_BACKEND_URL || "/", | |
| debug: import.meta.env.DEV, | |
| auth: { | |
| type: "session", | |
| }, | |
| }) | |
| ``` | |
| You initialize the SDK passing it the following options: | |
| - `baseUrl`: The URL to the Medusa server. | |
| - `debug`: Whether to enable logging debug messages. This should only be enabled in development. | |
| - `auth.type`: The authentication method used in the client application, which is `session` in the Medusa Admin dashboard. | |
| Notice that you use `import.meta.env` to access environment variables in your customizations because the Medusa Admin is built on top of Vite. Learn more in [this chapter](https://docs.medusajs.com/learn/fundamentals/admin/environment-variables/index.html.md). | |
| You can now use the SDK to send requests to the Medusa server. | |
| Learn more about the JS SDK and its options in [this reference](https://docs.medusajs.com/resources/js-sdk/index.html.md). | |
| *** | |
| ## 2. Add Widget to Product Details Page | |
| You'll now add a widget to the product-details page. A widget is a React component that's injected into pre-defined zones in the Medusa Admin dashboard. It's created in a `.tsx` file under the `src/admin/widgets` directory. | |
| Learn more about widgets in [this documentation](https://docs.medusajs.com/learn/fundamentals/admin/widgets/index.html.md). | |
| To create a widget that shows a product's brand in its details page, create the file `src/admin/widgets/product-brand.tsx` with the following content: | |
| 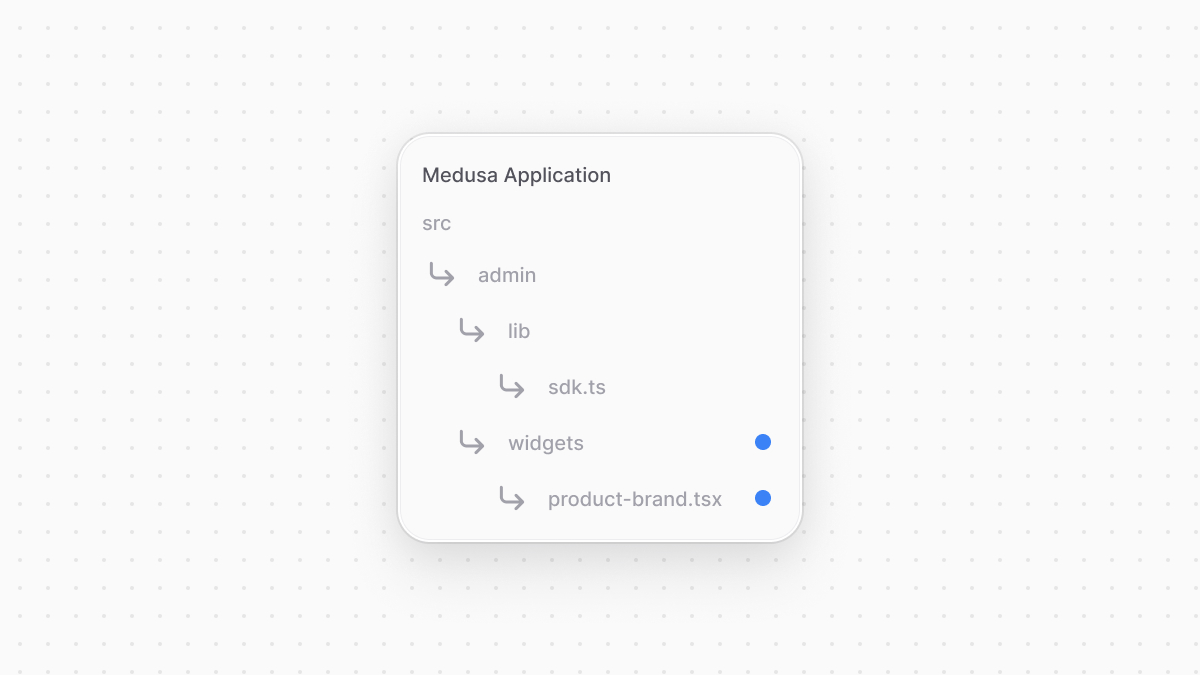 | |
| ```tsx title="src/admin/widgets/product-brand.tsx" highlights={highlights} | |
| import { defineWidgetConfig } from "@medusajs/admin-sdk" | |
| import { DetailWidgetProps, AdminProduct } from "@medusajs/framework/types" | |
| import { clx, Container, Heading, Text } from "@medusajs/ui" | |
| import { useQuery } from "@tanstack/react-query" | |
| import { sdk } from "../lib/sdk" | |
| type AdminProductBrand = AdminProduct & { | |
| brand?: { | |
| id: string | |
| name: string | |
| } | |
| } | |
| const ProductBrandWidget = ({ | |
| data: product, | |
| }: DetailWidgetProps<AdminProduct>) => { | |
| const { data: queryResult } = useQuery({ | |
| queryFn: () => sdk.admin.product.retrieve(product.id, { | |
| fields: "+brand.*", | |
| }), | |
| queryKey: [["product", product.id]], | |
| }) | |
| const brandName = (queryResult?.product as AdminProductBrand)?.brand?.name | |
| return ( | |
| <Container className="divide-y p-0"> | |
| <div className="flex items-center justify-between px-6 py-4"> | |
| <div> | |
| <Heading level="h2">Brand</Heading> | |
| </div> | |
| </div> | |
| <div | |
| className={clx( | |
| `text-ui-fg-subtle grid grid-cols-2 items-center px-6 py-4` | |
| )} | |
| > | |
| <Text size="small" weight="plus" leading="compact"> | |
| Name | |
| </Text> | |
| <Text | |
| size="small" | |
| leading="compact" | |
| className="whitespace-pre-line text-pretty" | |
| > | |
| {brandName || "-"} | |
| </Text> | |
| </div> | |
| </Container> | |
| ) | |
| } | |
| export const config = defineWidgetConfig({ | |
| zone: "product.details.before", | |
| }) | |
| export default ProductBrandWidget | |
| ``` | |
| A widget's file must export: | |
| - A React component to be rendered in the specified injection zone. The component must be the file's default export. | |
| - A configuration object created with `defineWidgetConfig` from the Admin Extension SDK. The function receives an object as a parameter that has a `zone` property, whose value is the zone to inject the widget to. | |
| Since the widget is injected at the top of the product details page, the widget receives the product's details as a parameter. | |
| In the widget, you use [Tanstack (React) Query](https://tanstack.com/query/latest) to query the Medusa server. Tanstack Query provides features like asynchronous state management and optimized caching. In the `queryFn` function that executes the query, you use the JS SDK to send a request to the [Get Product API Route](https://docs.medusajs.com/api/admin#products_getproductsid/index.html.md), passing `+brand.*` in the `fields` query parameter to retrieve the product's brand. | |
| Do not install Tanstack Query as that will cause unexpected errors in your development. If you prefer installing it for better auto-completion in your code editor, make sure to install `v5.64.2` as a development dependency. | |
| You then render a section that shows the brand's name. In admin customizations, use components from the [Medusa UI package](https://docs.medusajs.com/ui/index.html.md) to maintain a consistent user interface and design in the dashboard. | |
| *** | |
| ## Test it Out | |
| To test out your widget, start the Medusa application: | |
| ```bash npm2yarn | |
| npm run dev | |
| ``` | |
| Then, open the admin dashboard at `http://localhost:9000/app`. After you log in, open the page of a product that has a brand. You'll see a new section at the top showing the brand's name. | |
| 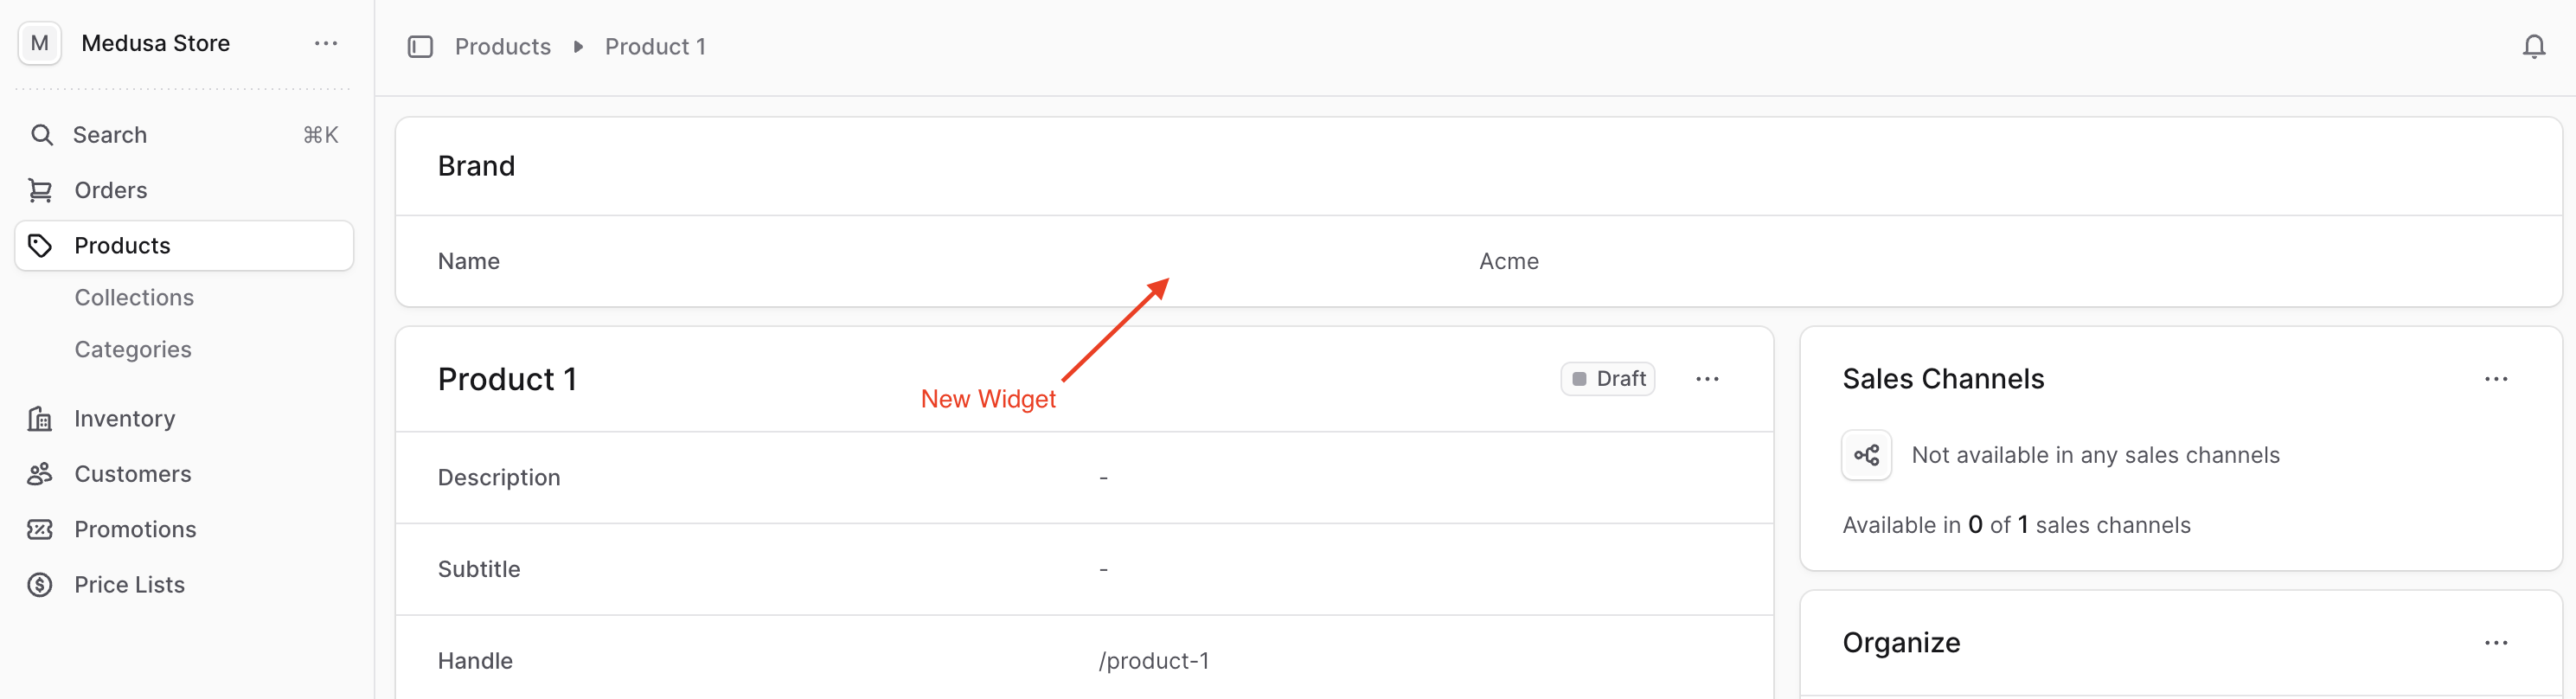 | |
| *** | |
| ## Admin Components Guides | |
| When building your widget, you may need more complicated components. For example, you may add a form to the above widget to set the product's brand. | |
| The [Admin Components guides](https://docs.medusajs.com/resources/admin-components/index.html.md) show you how to build and use common components in the Medusa Admin, such as forms, tables, JSON data viewer, and more. The components in the guides also follow the Medusa Admin's design convention. | |
| *** | |
| ## Next Chapter: Add UI Route for Brands | |
| In the next chapter, you'll add a UI route that displays the list of brands in your application and allows admin users. | |
| # Admin Development Constraints | |
| This chapter lists some constraints of admin widgets and UI routes. | |
| ## Arrow Functions | |
| Widget and UI route components must be created as arrow functions. | |
| ```ts highlights={arrowHighlights} | |
| // Don't | |
| function ProductWidget() { | |
| // ... | |
| } | |
| // Do | |
| const ProductWidget = () => { | |
| // ... | |
| } | |
| ``` | |
| *** | |
| ## Widget Zone | |
| A widget zone's value must be wrapped in double or single quotes. It can't be a template literal or a variable. | |
| ```ts highlights={zoneHighlights} | |
| // Don't | |
| export const config = defineWidgetConfig({ | |
| zone: `product.details.before`, | |
| }) | |
| // Don't | |
| const ZONE = "product.details.after" | |
| export const config = defineWidgetConfig({ | |
| zone: ZONE, | |
| }) | |
| // Do | |
| export const config = defineWidgetConfig({ | |
| zone: "product.details.before", | |
| }) | |
| ``` | |
| # Guide: Create Brand Workflow | |
| This chapter builds on the work from the [previous chapter](https://docs.medusajs.com/learn/customization/custom-features/module/index.html.md) where you created a Brand Module. | |
| After adding custom modules to your application, you build commerce features around them using workflows. A workflow is a series of queries and actions, called steps, that complete a task spanning across modules. You construct a workflow similar to a regular function, but it's a special function that allows you to define roll-back logic, retry configurations, and more advanced features. | |
| The workflow you'll create in this chapter will use the Brand Module's service to implement the feature of creating a brand. In the [next chapter](https://docs.medusajs.com/learn/customization/custom-features/api-route/index.html.md), you'll expose an API route that allows admin users to create a brand, and you'll use this workflow in the route's implementation. | |
| Learn more about workflows in [this chapter](https://docs.medusajs.com/learn/fundamentals/workflows/index.html.md). | |
| ### Prerequisites | |
| - [Brand Module](https://docs.medusajs.com/learn/customization/custom-features/module/index.html.md) | |
| *** | |
| ## 1. Create createBrandStep | |
| A workflow consists of a series of steps, each step created in a TypeScript or JavaScript file under the `src/workflows` directory. A step is defined using `createStep` from the Workflows SDK | |
| The workflow you're creating in this guide has one step to create the brand. So, create the file `src/workflows/create-brand.ts` with the following content: | |
|  | |
| ```ts title="src/workflows/create-brand.ts" | |
| import { | |
| createStep, | |
| StepResponse, | |
| } from "@medusajs/framework/workflows-sdk" | |
| import { BRAND_MODULE } from "../modules/brand" | |
| import BrandModuleService from "../modules/brand/service" | |
| export type CreateBrandStepInput = { | |
| name: string | |
| } | |
| export const createBrandStep = createStep( | |
| "create-brand-step", | |
| async (input: CreateBrandStepInput, { container }) => { | |
| const brandModuleService: BrandModuleService = container.resolve( | |
| BRAND_MODULE | |
| ) | |
| const brand = await brandModuleService.createBrands(input) | |
| return new StepResponse(brand, brand.id) | |
| } | |
| ) | |
| ``` | |
| You create a `createBrandStep` using the `createStep` function. It accepts the step's unique name as a first parameter, and the step's function as a second parameter. | |
| The step function receives two parameters: input passed to the step when it's invoked, and an object of general context and configurations. This object has a `container` property, which is the Medusa container. | |
| The [Medusa container](https://docs.medusajs.com/learn/fundamentals/medusa-container/index.html.md) is a registry of framework and commerce tools accessible in your customizations, such as a workflow's step. The Medusa application registers the services of core and custom modules in the container, allowing you to resolve and use them. | |
| So, In the step function, you use the Medusa container to resolve the Brand Module's service and use its generated `createBrands` method, which accepts an object of brands to create. | |
| Learn more about the generated `create` method's usage in [this reference](https://docs.medusajs.com/resources/service-factory-reference/methods/create/index.html.md). | |
| A step must return an instance of `StepResponse`. Its first parameter is the data returned by the step, and the second is the data passed to the compensation function, which you'll learn about next. | |
| ### Add Compensation Function to Step | |
| You define for each step a compensation function that's executed when an error occurs in the workflow. The compensation function defines the logic to roll-back the changes made by the step. This ensures your data remains consistent if an error occurs, which is especially useful when you integrate third-party services. | |
| Learn more about the compensation function in [this chapter](https://docs.medusajs.com/learn/fundamentals/workflows/compensation-function/index.html.md). | |
| To add a compensation function to the `createBrandStep`, pass it as a third parameter to `createStep`: | |
| ```ts title="src/workflows/create-brand.ts" | |
| export const createBrandStep = createStep( | |
| // ... | |
| async (id: string, { container }) => { | |
| const brandModuleService: BrandModuleService = container.resolve( | |
| BRAND_MODULE | |
| ) | |
| await brandModuleService.deleteBrands(id) | |
| } | |
| ) | |
| ``` | |
| The compensation function's first parameter is the brand's ID which you passed as a second parameter to the step function's returned `StepResponse`. It also accepts a context object with a `container` property as a second parameter, similar to the step function. | |
| In the compensation function, you resolve the Brand Module's service from the Medusa container, then use its generated `deleteBrands` method to delete the brand created by the step. This method accepts the ID of the brand to delete. | |
| Learn more about the generated `delete` method's usage in [this reference](https://docs.medusajs.com/resources/service-factory-reference/methods/delete/index.html.md). | |
| So, if an error occurs during the workflow's execution, the brand that was created by the step is deleted to maintain data consistency. | |
| *** | |
| ## 2. Create createBrandWorkflow | |
| You can now create the workflow that runs the `createBrandStep`. A workflow is created in a TypeScript or JavaScript file under the `src/workflows` directory. In the file, you use `createWorkflow` from the Workflows SDK to create the workflow. | |
| Add the following content in the same `src/workflows/create-brand.ts` file: | |
| ```ts title="src/workflows/create-brand.ts" | |
| // other imports... | |
| import { | |
| // ... | |
| createWorkflow, | |
| WorkflowResponse, | |
| } from "@medusajs/framework/workflows-sdk" | |
| // ... | |
| type CreateBrandWorkflowInput = { | |
| name: string | |
| } | |
| export const createBrandWorkflow = createWorkflow( | |
| "create-brand", | |
| (input: CreateBrandWorkflowInput) => { | |
| const brand = createBrandStep(input) | |
| return new WorkflowResponse(brand) | |
| } | |
| ) | |
| ``` | |
| You create the `createBrandWorkflow` using the `createWorkflow` function. This function accepts two parameters: the workflow's unique name, and the workflow's constructor function holding the workflow's implementation. | |
| The constructor function accepts the workflow's input as a parameter. In the function, you invoke the `createBrandStep` you created in the previous step to create a brand. | |
| A workflow must return an instance of `WorkflowResponse`. It accepts as a parameter the data to return to the workflow's executor. | |
| *** | |
| ## Next Steps: Expose Create Brand API Route | |
| You now have a `createBrandWorkflow` that you can execute to create a brand. | |
| In the next chapter, you'll add an API route that allows admin users to create a brand. You'll learn how to create the API route, and execute in it the workflow you implemented in this chapter. | |
| # Environment Variables in Admin Customizations | |
| In this chapter, you'll learn how to use environment variables in your admin customizations. | |
| To learn how envirnment variables are generally loaded in Medusa based on your application's environment, check out [this chapter](https://docs.medusajs.com/learn/fundamentals/environment-variables/index.html.md). | |
| ## How to Set Environment Variables | |
| The Medusa Admin is built on top of [Vite](https://vite.dev/). To set an environment variable that you want to use in a widget or UI route, prefix the environment variable with `VITE_`. | |
| For example: | |
| ```plain | |
| VITE_MY_API_KEY=sk_123 | |
| ``` | |
| *** | |
| ## How to Use Environment Variables | |
| To access or use an environment variable starting with `VITE_`, use the `import.meta.env` object. | |
| For example: | |
| ```tsx highlights={[["8"]]} | |
| import { defineWidgetConfig } from "@medusajs/admin-sdk" | |
| import { Container, Heading } from "@medusajs/ui" | |
| const ProductWidget = () => { | |
| return ( | |
| <Container className="divide-y p-0"> | |
| <div className="flex items-center justify-between px-6 py-4"> | |
| <Heading level="h2">API Key: {import.meta.env.VITE_MY_API_KEY}</Heading> | |
| </div> | |
| </Container> | |
| ) | |
| } | |
| export const config = defineWidgetConfig({ | |
| zone: "product.details.before", | |
| }) | |
| export default ProductWidget | |
| ``` | |
| In this example, you display the API key in a widget using `import.meta.env.VITE_MY_API_KEY`. | |
| ### Type Error on import.meta.env | |
| If you receive a type error on `import.meta.env`, create the file `src/admin/vite-env.d.ts` with the following content: | |
| ```ts title="src/admin/vite-env.d.ts" | |
| /// <reference types="vite/client" /> | |
| ``` | |
| This file tells TypeScript to recognize the `import.meta.env` object and enhances the types of your custom environment variables. | |
| *** | |
| ## Check Node Environment in Admin Customizations | |
| To check the current environment, Vite exposes two variables: | |
| - `import.meta.env.DEV`: Returns `true` if the current environment is development. | |
| - `import.meta.env.PROD`: Returns `true` if the current environment is production. | |
| Learn more about other Vite environment variables in the [Vite documentation](https://vite.dev/guide/env-and-mode). | |
| # Guide: Implement Brand Module | |
| In this chapter, you'll build a Brand Module that adds a `brand` table to the database and provides data-management features for it. | |
| A module is a reusable package of functionalities related to a single domain or integration. Medusa comes with multiple pre-built modules for core commerce needs, such as the [Cart Module](https://docs.medusajs.com/resources/commerce-modules/cart/index.html.md) that holds the data models and business logic for cart operations. | |
| In a module, you create data models and business logic to manage them. In the next chapters, you'll see how you use the module to build commerce features. | |
| Learn more about modules in [this chapter](https://docs.medusajs.com/learn/fundamentals/modules/index.html.md). | |
| ## 1. Create Module Directory | |
| Modules are created in a sub-directory of `src/modules`. So, start by creating the directory `src/modules/brand` that will hold the Brand Module's files. | |
| 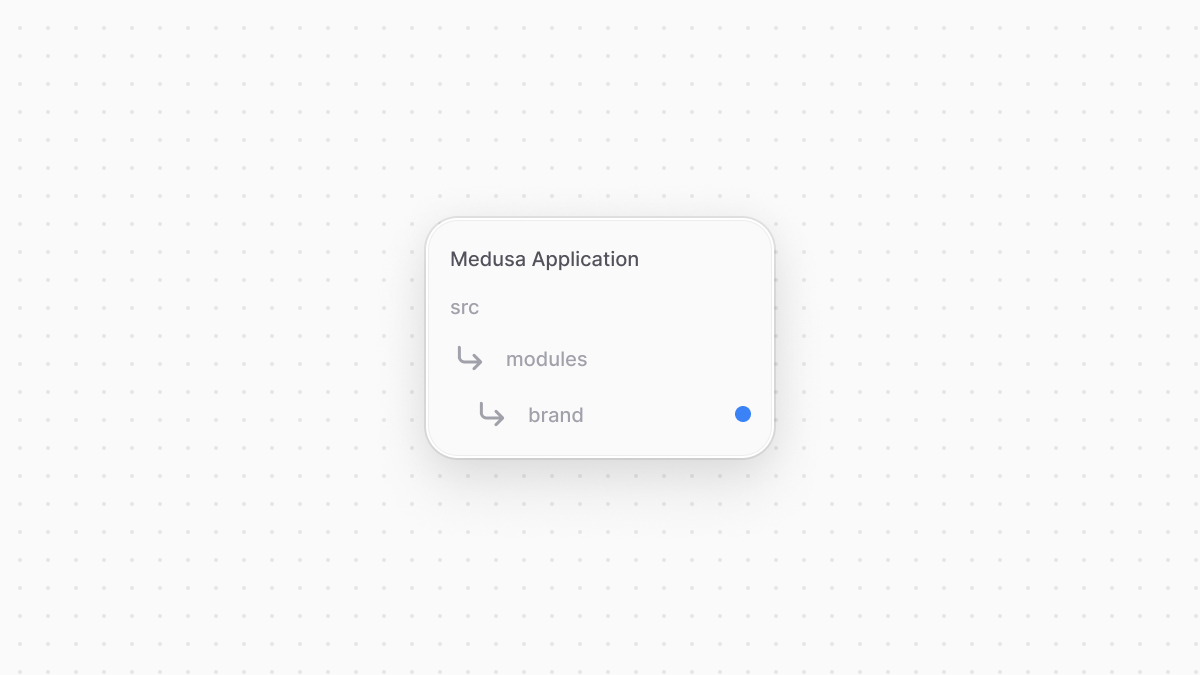 | |
| *** | |
| ## 2. Create Data Model | |
| A data model represents a table in the database. You create data models using Medusa's Data Model Language (DML). It simplifies defining a table's columns, relations, and indexes with straightforward methods and configurations. | |
| Learn more about data models in [this chapter](https://docs.medusajs.com/learn/fundamentals/modules#1-create-data-model/index.html.md). | |
| You create a data model in a TypeScript or JavaScript file under the `models` directory of a module. So, to create a data model that represents a new `brand` table in the database, create the file `src/modules/brand/models/brand.ts` with the following content: | |
| 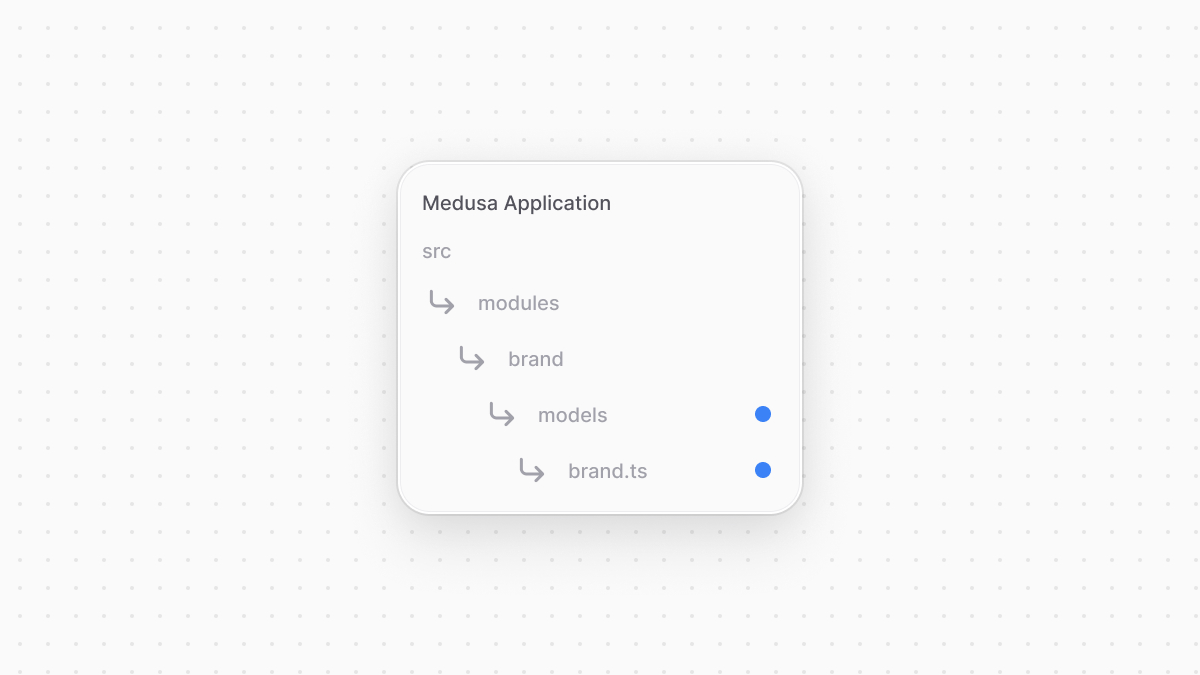 | |
| ```ts title="src/modules/brand/models/brand.ts" | |
| import { model } from "@medusajs/framework/utils" | |
| export const Brand = model.define("brand", { | |
| id: model.id().primaryKey(), | |
| name: model.text(), | |
| }) | |
| ``` | |
| You create a `Brand` data model which has an `id` primary key property, and a `name` text property. | |
| You define the data model using the `define` method of the DML. It accepts two parameters: | |
| 1. The first one is the name of the data model's table in the database. Use snake-case names. | |
| 2. The second is an object, which is the data model's schema. | |
| Learn about other property types in [this chapter](https://docs.medusajs.com/learn/fundamentals/data-models/property-types/index.html.md). | |
| *** | |
| ## 3. Create Module Service | |
| You perform database operations on your data models in a service, which is a class exported by the module and acts like an interface to its functionalities. | |
| In this step, you'll create the Brand Module's service that provides methods to manage the `Brand` data model. In the next chapters, you'll use this service when exposing custom features that involve managing brands. | |
| Learn more about services in [this chapter](https://docs.medusajs.com/learn/fundamentals/modules#2-create-service/index.html.md). | |
| You define a service in a `service.ts` or `service.js` file at the root of your module's directory. So, create the file `src/modules/brand/service.ts` with the following content: | |
| 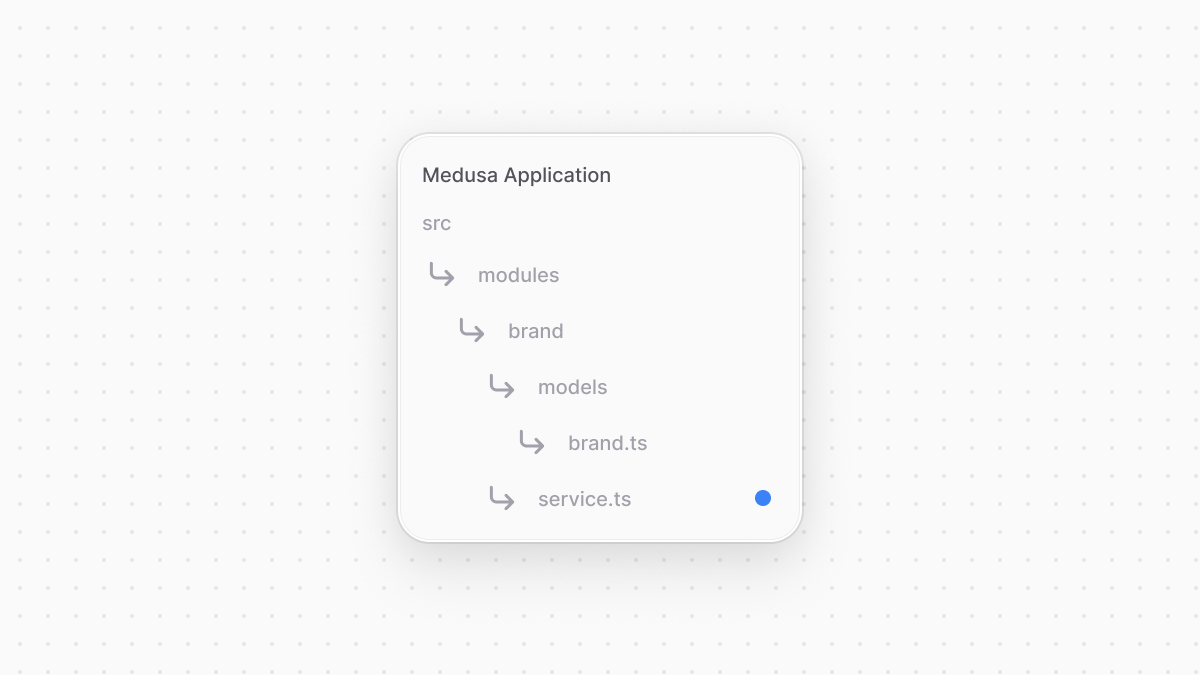 | |
| ```ts title="src/modules/brand/service.ts" highlights={serviceHighlights} | |
| import { MedusaService } from "@medusajs/framework/utils" | |
| import { Brand } from "./models/brand" | |
| class BrandModuleService extends MedusaService({ | |
| Brand, | |
| }) { | |
| } | |
| export default BrandModuleService | |
| ``` | |
| The `BrandModuleService` extends a class returned by `MedusaService` from the Modules SDK. This function generates a class with data-management methods for your module's data models. | |
| The `MedusaService` function receives an object of the module's data models as a parameter, and generates methods to manage those data models. So, the `BrandModuleService` now has methods like `createBrands` and `retrieveBrand` to manage the `Brand` data model. | |
| You'll use these methods in the [next chapter](https://docs.medusajs.com/learn/customization/custom-features/workflow/index.html.md). | |
| Find a reference of all generated methods in [this guide](https://docs.medusajs.com/resources/service-factory-reference/index.html.md). | |
| *** | |
| ## 4. Export Module Definition | |
| A module must export a definition that tells Medusa the name of the module and its main service. This definition is exported in an `index.ts` file at the module's root directory. | |
| So, to export the Brand Module's definition, create the file `src/modules/brand/index.ts` with the following content: | |
| 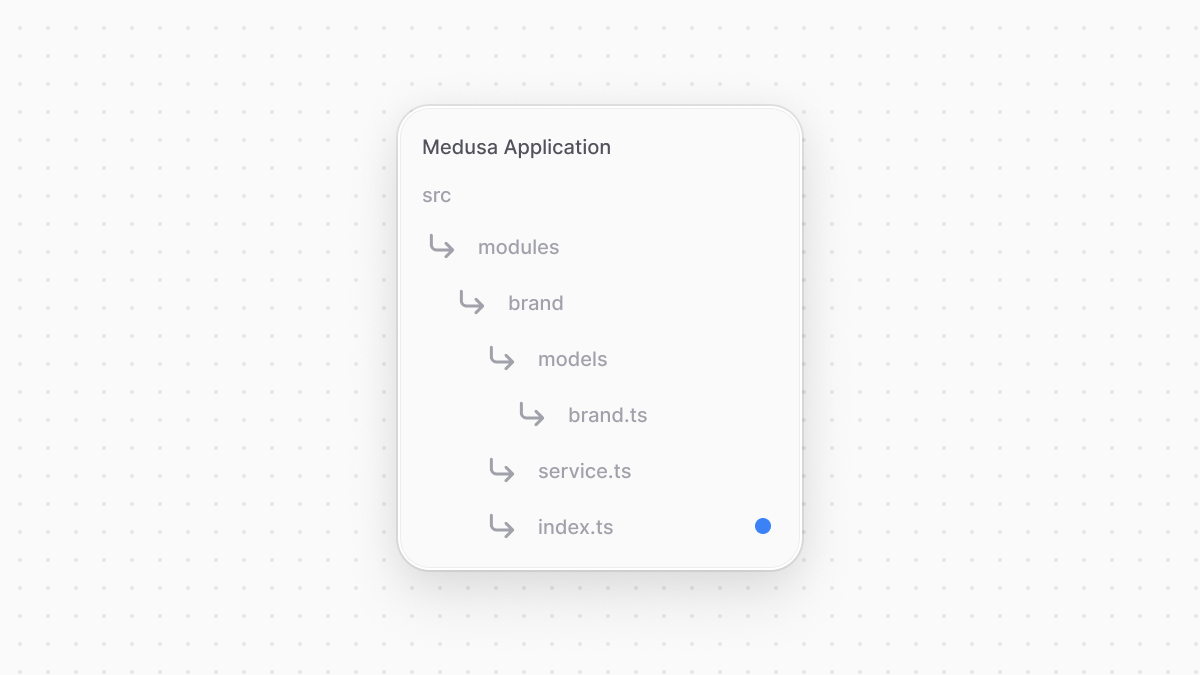 | |
| ```ts title="src/modules/brand/index.ts" | |
| import { Module } from "@medusajs/framework/utils" | |
| import BrandModuleService from "./service" | |
| export const BRAND_MODULE = "brand" | |
| export default Module(BRAND_MODULE, { | |
| service: BrandModuleService, | |
| }) | |
| ``` | |
| You use `Module` from the Modules SDK to create the module's definition. It accepts two parameters: | |
| 1. The module's name (`brand`). You'll use this name when you use this module in other customizations. | |
| 2. An object with a required property `service` indicating the module's main service. | |
| You export `BRAND_MODULE` to reference the module's name more reliably in other customizations. | |
| *** | |
| ## 5. Add Module to Medusa's Configurations | |
| To start using your module, you must add it to Medusa's configurations in `medusa-config.ts`. | |
| The object passed to `defineConfig` in `medusa-config.ts` accepts a `modules` property, whose value is an array of modules to add to the application. So, add the following in `medusa-config.ts`: | |
| ```ts title="medusa-config.ts" | |
| module.exports = defineConfig({ | |
| // ... | |
| modules: [ | |
| { | |
| resolve: "./src/modules/brand", | |
| }, | |
| ], | |
| }) | |
| ``` | |
| The Brand Module is now added to your Medusa application. You'll start using it in the [next chapter](https://docs.medusajs.com/learn/customization/custom-features/workflow/index.html.md). | |
| *** | |
| ## 6. Generate and Run Migrations | |
| A migration is a TypeScript or JavaScript file that defines database changes made by a module. Migrations ensure that your module is re-usable and removes friction when working in a team, making it easy to reflect changes across team members' databases. | |
| Learn more about migrations in [this chapter](https://docs.medusajs.com/learn/fundamentals/modules#5-generate-migrations/index.html.md). | |
| [Medusa's CLI tool](https://docs.medusajs.com/resources/medusa-cli/index.html.md) allows you to generate migration files for your module, then run those migrations to reflect the changes in the database. So, run the following commands in your Medusa application's directory: | |
| ```bash | |
| npx medusa db:generate brand | |
| npx medusa db:migrate | |
| ``` | |
| The `db:generate` command accepts as an argument the name of the module to generate the migrations for, and the `db:migrate` command runs all migrations that haven't been run yet in the Medusa application. | |
| *** | |
| ## Next Step: Create Brand Workflow | |
| The Brand Module now creates a `brand` table in the database and provides a class to manage its records. | |
| In the next chapter, you'll implement the functionality to create a brand in a workflow. You'll then use that workflow in a later chapter to expose an endpoint that allows admin users to create a brand. | |
| # Admin Development Tips | |
| In this chapter, you'll find some tips for your admin development. | |
| ## Send Requests to API Routes | |
| To send a request to an API route in the Medusa Application, use Medusa's [JS SDK](https://docs.medusajs.com/resources/js-sdk/index.html.md) with [Tanstack Query](https://tanstack.com/query/latest). Both of these tools are installed in your project by default. | |
| Do not install Tanstack Query as that will cause unexpected errors in your development. If you prefer installing it for better auto-completion in your code editor, make sure to install `v5.64.2` as a development dependency. | |
| First, create the file `src/admin/lib/config.ts` to setup the SDK for use in your customizations: | |
| ```ts | |
| import Medusa from "@medusajs/js-sdk" | |
| export const sdk = new Medusa({ | |
| baseUrl: import.meta.env.VITE_BACKEND_URL || "/", | |
| debug: import.meta.env.DEV, | |
| auth: { | |
| type: "session", | |
| }, | |
| }) | |
| ``` | |
| Notice that you use `import.meta.env` to access environment variables in your customizations, as explained in [this chapter](https://docs.medusajs.com/learn/fundamentals/admin/environment-variables/index.html.md). | |
| Learn more about the JS SDK's configurations [this documentation](https://docs.medusajs.com/resources/js-sdk#js-sdk-configurations/index.html.md). | |
| Then, use the configured SDK with the `useQuery` Tanstack Query hook to send `GET` requests, and `useMutation` hook to send `POST` or `DELETE` requests. | |
| For example: | |
| ### Query | |
| ```tsx title="src/admin/widgets/product-widget.ts" highlights={queryHighlights} | |
| import { defineWidgetConfig } from "@medusajs/admin-sdk" | |
| import { Button, Container } from "@medusajs/ui" | |
| import { useQuery } from "@tanstack/react-query" | |
| import { sdk } from "../lib/config" | |
| import { DetailWidgetProps, HttpTypes } from "@medusajs/framework/types" | |
| const ProductWidget = () => { | |
| const { data, isLoading } = useQuery({ | |
| queryFn: () => sdk.admin.product.list(), | |
| queryKey: ["products"], | |
| }) | |
| return ( | |
| <Container className="divide-y p-0"> | |
| {isLoading && <span>Loading...</span>} | |
| {data?.products && ( | |
| <ul> | |
| {data.products.map((product) => ( | |
| <li key={product.id}>{product.title}</li> | |
| ))} | |
| </ul> | |
| )} | |
| </Container> | |
| ) | |
| } | |
| export const config = defineWidgetConfig({ | |
| zone: "product.list.before", | |
| }) | |
| export default ProductWidget | |
| ``` | |
| ### Mutation | |
| ```tsx title="src/admin/widgets/product-widget.ts" highlights={mutationHighlights} | |
| import { defineWidgetConfig } from "@medusajs/admin-sdk" | |
| import { Button, Container } from "@medusajs/ui" | |
| import { useMutation } from "@tanstack/react-query" | |
| import { sdk } from "../lib/config" | |
| import { DetailWidgetProps, HttpTypes } from "@medusajs/framework/types" | |
| const ProductWidget = ({ | |
| data: productData, | |
| }: DetailWidgetProps<HttpTypes.AdminProduct>) => { | |
| const { mutateAsync } = useMutation({ | |
| mutationFn: (payload: HttpTypes.AdminUpdateProduct) => | |
| sdk.admin.product.update(productData.id, payload), | |
| onSuccess: () => alert("updated product"), | |
| }) | |
| const handleUpdate = () => { | |
| mutateAsync({ | |
| title: "New Product Title", | |
| }) | |
| } | |
| return ( | |
| <Container className="divide-y p-0"> | |
| <Button onClick={handleUpdate}>Update Title</Button> | |
| </Container> | |
| ) | |
| } | |
| export const config = defineWidgetConfig({ | |
| zone: "product.details.before", | |
| }) | |
| export default ProductWidget | |
| ``` | |
| You can also send requests to custom routes as explained in the [JS SDK reference](https://docs.medusajs.com/resources/js-sdk/index.html.md). | |
| *** | |
| ## Routing Functionalities | |
| To navigate or link to other pages, or perform other routing functionalities, use the [react-router-dom](https://reactrouter.com/en/main) package. It's installed in your project through the Medusa Admin. | |
| For example: | |
| ```tsx title="src/admin/widgets/product-widget.tsx" highlights={highlights} | |
| import { defineWidgetConfig } from "@medusajs/admin-sdk" | |
| import { Container } from "@medusajs/ui" | |
| import { Link } from "react-router-dom" | |
| // The widget | |
| const ProductWidget = () => { | |
| return ( | |
| <Container className="divide-y p-0"> | |
| <Link to={"/orders"}>View Orders</Link> | |
| </Container> | |
| ) | |
| } | |
| // The widget's configurations | |
| export const config = defineWidgetConfig({ | |
| zone: "product.details.before", | |
| }) | |
| export default ProductWidget | |
| ``` | |
| This adds a widget in a product's details page with a link to the Orders page. The link's path must be without the `/app` prefix. | |
| Refer to [react-router-dom’s documentation](https://reactrouter.com/en/main) for other available components and hooks. | |
| *** | |
| ## Admin Translations | |
| The Medusa Admin dashboard can be displayed in languages other than English, which is the default. Other languages are added through community contributions. | |
| Learn how to add a new language translation for the Medusa Admin in [this guide](https://docs.medusajs.com/resources/contribution-guidelines/admin-translations/index.html.md). | |
| # Admin UI Routes | |
| In this chapter, you’ll learn how to create a UI route in the admin dashboard. | |
| ## What is a UI Route? | |
| The Medusa Admin dashboard is customizable, allowing you to add new pages, called UI routes. You create a UI route as a React component showing custom content that allow admin users to perform custom actions. | |
| For example, you can add a new page to show and manage product reviews, which aren't available natively in Medusa. | |
| *** | |
| ## How to Create a UI Route? | |
| ### Prerequisites | |
| - [Medusa application installed](https://docs.medusajs.com/learn/installation/index.html.md) | |
| You create a UI route in a `page.tsx` file under a sub-directory of `src/admin/routes` directory. The file's path relative to `src/admin/routes` determines its path in the dashboard. The file’s default export must be the UI route’s React component. | |
| For example, create the file `src/admin/routes/custom/page.tsx` with the following content: | |
| 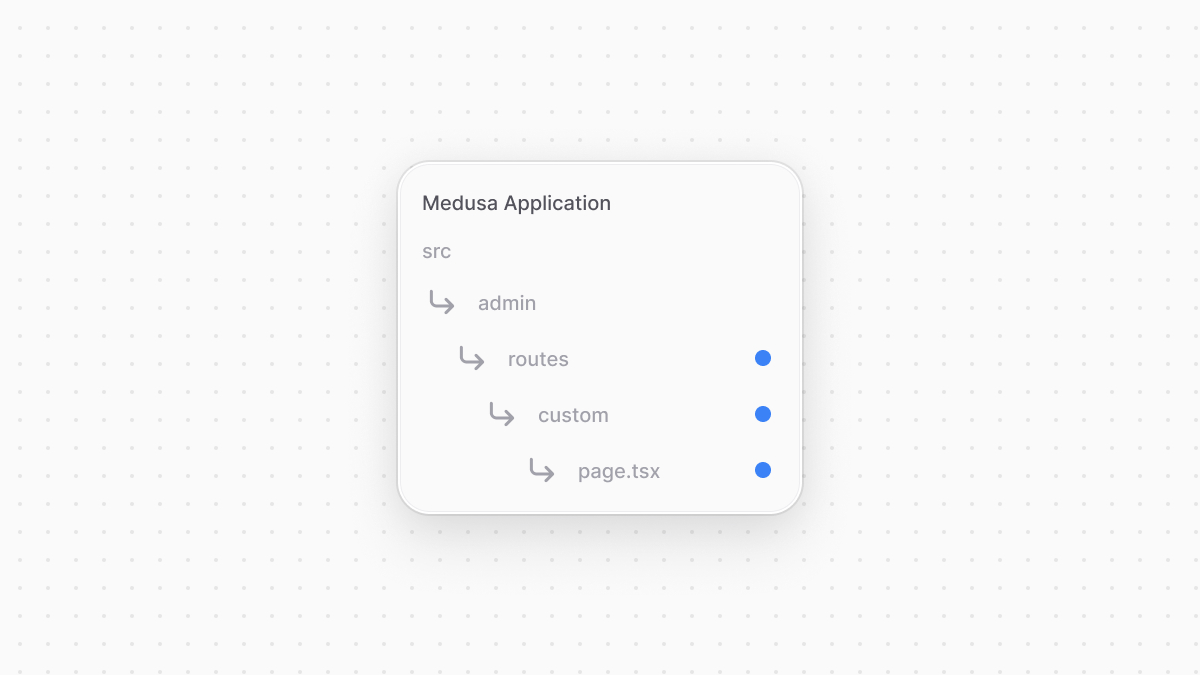 | |
| ```tsx title="src/admin/routes/custom/page.tsx" | |
| import { Container, Heading } from "@medusajs/ui" | |
| const CustomPage = () => { | |
| return ( | |
| <Container className="divide-y p-0"> | |
| <div className="flex items-center justify-between px-6 py-4"> | |
| <Heading level="h2">This is my custom route</Heading> | |
| </div> | |
| </Container> | |
| ) | |
| } | |
| export default CustomPage | |
| ``` | |
| You add a new route at `http://localhost:9000/app/custom`. The `CustomPage` component holds the page's content, which currently only shows a heading. | |
| In the route, you use [Medusa UI](https://docs.medusajs.com/ui/index.html.md), a package that Medusa maintains to allow you to customize the dashboard with the same components used to build it. | |
| The UI route component must be created as an arrow function. | |
| ### Test the UI Route | |
| To test the UI route, start the Medusa application: | |
| ```bash npm2yarn | |
| npm run dev | |
| ``` | |
| Then, after logging into the admin dashboard, open the page `http://localhost:9000/app/custom` to see your custom page. | |
| *** | |
| ## Show UI Route in the Sidebar | |
| To add a sidebar item for your custom UI route, export a configuration object in the UI route's file: | |
| ```tsx title="src/admin/routes/custom/page.tsx" highlights={highlights} | |
| import { defineRouteConfig } from "@medusajs/admin-sdk" | |
| import { ChatBubbleLeftRight } from "@medusajs/icons" | |
| import { Container, Heading } from "@medusajs/ui" | |
| const CustomPage = () => { | |
| return ( | |
| <Container className="divide-y p-0"> | |
| <div className="flex items-center justify-between px-6 py-4"> | |
| <Heading level="h2">This is my custom route</Heading> | |
| </div> | |
| </Container> | |
| ) | |
| } | |
| export const config = defineRouteConfig({ | |
| label: "Custom Route", | |
| icon: ChatBubbleLeftRight, | |
| }) | |
| export default CustomPage | |
| ``` | |
| The configuration object is created using `defineRouteConfig` from the Medusa Framework. It accepts the following properties: | |
| - `label`: the sidebar item’s label. | |
| - `icon`: an optional React component used as an icon in the sidebar. | |
| The above example adds a new sidebar item with the label `Custom Route` and an icon from the [Medusa UI Icons package](https://docs.medusajs.com/ui/icons/overview/index.html.md). | |
| ### Nested UI Routes | |
| Consider that along the UI route above at `src/admin/routes/custom/page.tsx` you create a nested UI route at `src/admin/routes/custom/nested/page.tsx` that also exports route configurations: | |
|  | |
| ```tsx title="src/admin/routes/custom/nested/page.tsx" | |
| import { defineRouteConfig } from "@medusajs/admin-sdk" | |
| import { Container, Heading } from "@medusajs/ui" | |
| const NestedCustomPage = () => { | |
| return ( | |
| <Container className="divide-y p-0"> | |
| <div className="flex items-center justify-between px-6 py-4"> | |
| <Heading level="h2">This is my nested custom route</Heading> | |
| </div> | |
| </Container> | |
| ) | |
| } | |
| export const config = defineRouteConfig({ | |
| label: "Nested Route", | |
| }) | |
| export default NestedCustomPage | |
| ``` | |
| This UI route is shown in the sidebar as an item nested in the parent "Custom Route" item. Nested items are only shown when the parent sidebar items (in this case, "Custom Route") are clicked. | |
| #### Caveats | |
| Some caveats for nested UI routes in the sidebar: | |
| - Nested dynamic UI routes, such as one created at `src/admin/routes/custom/[id]/page.tsx` aren't added to the sidebar as it's not possible to link to a dynamic route. If the dynamic route exports route configurations, a warning is logged in the browser's console. | |
| - Nested routes in setting pages aren't shown in the sidebar to follow the admin's design conventions. | |
| - The `icon` configuration is ignored for the sidebar item of nested UI route to follow the admin's design conventions. | |
| ### Route Under Existing Admin Route | |
| You can add a custom UI route under an existing route. For example, you can add a route under the orders route: | |
| ```tsx title="src/admin/routes/orders/nested/page.tsx" | |
| import { defineRouteConfig } from "@medusajs/admin-sdk" | |
| import { Container, Heading } from "@medusajs/ui" | |
| const NestedOrdersPage = () => { | |
| return ( | |
| <Container className="divide-y p-0"> | |
| <div className="flex items-center justify-between px-6 py-4"> | |
| <Heading level="h1">Nested Orders Page</Heading> | |
| </div> | |
| </Container> | |
| ) | |
| } | |
| export const config = defineRouteConfig({ | |
| label: "Nested Orders", | |
| nested: "/orders", | |
| }) | |
| export default NestedOrdersPage | |
| ``` | |
| The `nested` property passed to `defineRouteConfig` specifies which route this custom route is nested under. This route will now show in the sidebar under the existing "Orders" sidebar item. | |
| *** | |
| ## Create Settings Page | |
| To create a page under the settings section of the admin dashboard, create a UI route under the path `src/admin/routes/settings`. | |
| For example, create a UI route at `src/admin/routes/settings/custom/page.tsx`: | |
|  | |
| ```tsx title="src/admin/routes/settings/custom/page.tsx" | |
| import { defineRouteConfig } from "@medusajs/admin-sdk" | |
| import { Container, Heading } from "@medusajs/ui" | |
| const CustomSettingPage = () => { | |
| return ( | |
| <Container className="divide-y p-0"> | |
| <div className="flex items-center justify-between px-6 py-4"> | |
| <Heading level="h1">Custom Setting Page</Heading> | |
| </div> | |
| </Container> | |
| ) | |
| } | |
| export const config = defineRouteConfig({ | |
| label: "Custom", | |
| }) | |
| export default CustomSettingPage | |
| ``` | |
| This adds a page under the path `/app/settings/custom`. An item is also added to the settings sidebar with the label `Custom`. | |
| *** | |
| ## Path Parameters | |
| A UI route can accept path parameters if the name of any of the directories in its path is of the format `[param]`. | |
| For example, create the file `src/admin/routes/custom/[id]/page.tsx` with the following content: | |
| 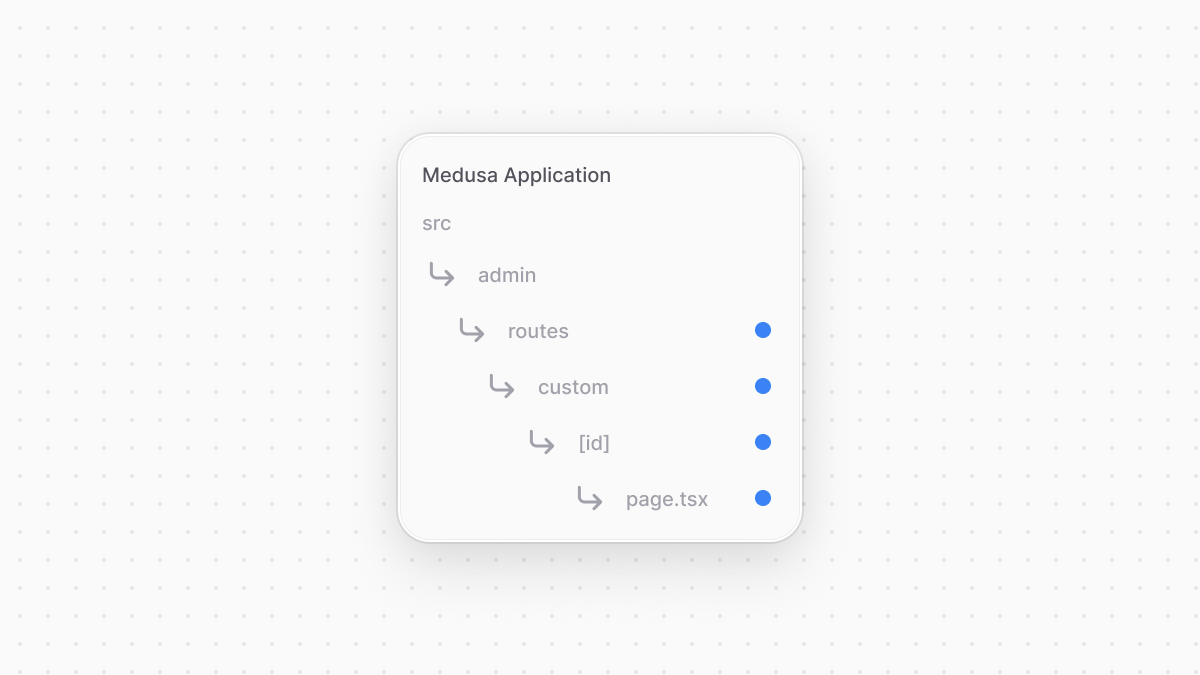 | |
| ```tsx title="src/admin/routes/custom/[id]/page.tsx" highlights={[["5", "", "Retrieve the path parameter."], ["10", "{id}", "Show the path parameter."]]} | |
| import { useParams } from "react-router-dom" | |
| import { Container, Heading } from "@medusajs/ui" | |
| const CustomPage = () => { | |
| const { id } = useParams() | |
| return ( | |
| <Container className="divide-y p-0"> | |
| <div className="flex items-center justify-between px-6 py-4"> | |
| <Heading level="h1">Passed ID: {id}</Heading> | |
| </div> | |
| </Container> | |
| ) | |
| } | |
| export default CustomPage | |
| ``` | |
| You access the passed parameter using `react-router-dom`'s [useParams hook](https://reactrouter.com/en/main/hooks/use-params). | |
| If you run the Medusa application and go to `localhost:9000/app/custom/123`, you'll see `123` printed in the page. | |
| *** | |
| ## Admin Components List | |
| To build admin customizations that match the Medusa Admin's designs and layouts, refer to [this guide](https://docs.medusajs.com/resources/admin-components/index.html.md) to find common components. | |
| # Handling CORS in API Routes | |
| In this chapter, you’ll learn about the CORS middleware and how to configure it for custom API routes. | |
| ## CORS Overview | |
| Cross-Origin Resource Sharing (CORS) allows only configured origins to access your API Routes. | |
| For example, if you allow only origins starting with `http://localhost:7001` to access your Admin API Routes, other origins accessing those routes get a CORS error. | |
| ### CORS Configurations | |
| The `storeCors` and `adminCors` properties of Medusa's `http` configuration set the allowed origins for routes starting with `/store` and `/admin` respectively. | |
| These configurations accept a URL pattern to identify allowed origins. | |
| For example: | |
| ```js title="medusa-config.ts" | |
| module.exports = defineConfig({ | |
| projectConfig: { | |
| http: { | |
| storeCors: "http://localhost:8000", | |
| adminCors: "http://localhost:7001", | |
| // ... | |
| }, | |
| }, | |
| }) | |
| ``` | |
| This allows the `http://localhost:7001` origin to access the Admin API Routes, and the `http://localhost:8000` origin to access Store API Routes. | |
| Learn more about the CORS configurations in [this resource guide](https://docs.medusajs.com/resources/references/medusa-config#http/index.html.md). | |
| *** | |
| ## CORS in Store and Admin Routes | |
| To disable the CORS middleware for a route, export a `CORS` variable in the route file with its value set to `false`. | |
| For example: | |
| ```ts title="src/api/store/custom/route.ts" highlights={[["15"]]} | |
| import type { | |
| MedusaRequest, | |
| MedusaResponse, | |
| } from "@medusajs/framework/http" | |
| export const GET = ( | |
| req: MedusaRequest, | |
| res: MedusaResponse | |
| ) => { | |
| res.json({ | |
| message: "[GET] Hello world!", | |
| }) | |
| } | |
| export const CORS = false | |
| ``` | |
| This disables the CORS middleware on API Routes at the path `/store/custom`. | |
| *** | |
| ## CORS in Custom Routes | |
| If you create a route that doesn’t start with `/store` or `/admin`, you must apply the CORS middleware manually. Otherwise, all requests to your API route lead to a CORS error. | |
| You can do that in the exported middlewares configurations in `src/api/middlewares.ts`. | |
| For example: | |
| ```ts title="src/api/middlewares.ts" highlights={highlights} collapsibleLines="1-10" expandButtonLabel="Show Imports" | |
| import { defineMiddlewares } from "@medusajs/framework/http" | |
| import type { | |
| MedusaNextFunction, | |
| MedusaRequest, | |
| MedusaResponse, | |
| } from "@medusajs/framework/http" | |
| import { ConfigModule } from "@medusajs/framework/types" | |
| import { parseCorsOrigins } from "@medusajs/framework/utils" | |
| import cors from "cors" | |
| export default defineMiddlewares({ | |
| routes: [ | |
| { | |
| matcher: "/custom*", | |
| middlewares: [ | |
| ( | |
| req: MedusaRequest, | |
| res: MedusaResponse, | |
| next: MedusaNextFunction | |
| ) => { | |
| const configModule: ConfigModule = | |
| req.scope.resolve("configModule") | |
| return cors({ | |
| origin: parseCorsOrigins( | |
| configModule.projectConfig.http.storeCors | |
| ), | |
| credentials: true, | |
| })(req, res, next) | |
| }, | |
| ], | |
| }, | |
| ], | |
| }) | |
| ``` | |
| This retrieves the configurations exported from `medusa-config.ts` and applies the `storeCors` to routes starting with `/custom`. | |
| # Throwing and Handling Errors | |
| In this guide, you'll learn how to throw errors in your Medusa application, how it affects an API route's response, and how to change the default error handler of your Medusa application. | |
| ## Throw MedusaError | |
| When throwing an error in your API routes, middlewares, workflows, or any customization, throw a `MedusaError` from the Medusa Framework. | |
| The Medusa application's API route error handler then wraps your thrown error in a uniform object and returns it in the response. | |
| For example: | |
| ```ts | |
| import { MedusaRequest, MedusaResponse } from "@medusajs/framework/http" | |
| import { MedusaError } from "@medusajs/framework/utils" | |
| export const GET = async ( | |
| req: MedusaRequest, | |
| res: MedusaResponse | |
| ) => { | |
| if (!req.query.q) { | |
| throw new MedusaError( | |
| MedusaError.Types.INVALID_DATA, | |
| "The `q` query parameter is required." | |
| ) | |
| } | |
| // ... | |
| } | |
| ``` | |
| The `MedusaError` class accepts in its constructor two parameters: | |
| 1. The first is the error's type. `MedusaError` has a static property `Types` that you can use. `Types` is an enum whose possible values are explained in the next section. | |
| 2. The second is the message to show in the error response. | |
| ### Error Object in Response | |
| The error object returned in the response has two properties: | |
| - `type`: The error's type. | |
| - `message`: The error message, if available. | |
| - `code`: A common snake-case code. Its values can be: | |
| - `invalid_request_error` for the `DUPLICATE_ERROR` type. | |
| - `api_error`: for the `DB_ERROR` type. | |
| - `invalid_state_error` for `CONFLICT` error type. | |
| - `unknown_error` for any unidentified error type. | |
| - For other error types, this property won't be available unless you provide a code as a third parameter to the `MedusaError` constructor. | |
| ### MedusaError Types | |
| |Type|Description|Status Code| | |
| |---|---|---|---|---| | |
| |\`DB\_ERROR\`|Indicates a database error.|\`500\`| | |
| |\`DUPLICATE\_ERROR\`|Indicates a duplicate of a record already exists. For example, when trying to create a customer whose email is registered by another customer.|\`422\`| | |
| |\`INVALID\_ARGUMENT\`|Indicates an error that occurred due to incorrect arguments or other unexpected state.|\`500\`| | |
| |\`INVALID\_DATA\`|Indicates a validation error.|\`400\`| | |
| |\`UNAUTHORIZED\`|Indicates that a user is not authorized to perform an action or access a route.|\`401\`| | |
| |\`NOT\_FOUND\`|Indicates that the requested resource, such as a route or a record, isn't found.|\`404\`| | |
| |\`NOT\_ALLOWED\`|Indicates that an operation isn't allowed.|\`400\`| | |
| |\`CONFLICT\`|Indicates that a request conflicts with another previous or ongoing request. The error message in this case is ignored for a default message.|\`409\`| | |
| |\`PAYMENT\_AUTHORIZATION\_ERROR\`|Indicates an error has occurred while authorizing a payment.|\`422\`| | |
| |Other error types|Any other error type results in an |\`500\`| | |
| *** | |
| ## Override Error Handler | |
| The `defineMiddlewares` function used to apply middlewares on routes accepts an `errorHandler` in its object parameter. Use it to override the default error handler for API routes. | |
| This error handler will also be used for errors thrown in Medusa's API routes and resources. | |
| For example, create `src/api/middlewares.ts` with the following: | |
| ```ts title="src/api/middlewares.ts" collapsibleLines="1-8" expandMoreLabel="Show Imports" | |
| import { | |
| defineMiddlewares, | |
| MedusaNextFunction, | |
| MedusaRequest, | |
| MedusaResponse, | |
| } from "@medusajs/framework/http" | |
| import { MedusaError } from "@medusajs/framework/utils" | |
| export default defineMiddlewares({ | |
| errorHandler: ( | |
| error: MedusaError | any, | |
| req: MedusaRequest, | |
| res: MedusaResponse, | |
| next: MedusaNextFunction | |
| ) => { | |
| res.status(400).json({ | |
| error: "Something happened.", | |
| }) | |
| }, | |
| }) | |
| ``` | |
| The `errorHandler` property's value is a function that accepts four parameters: | |
| 1. The error thrown. Its type can be `MedusaError` or any other thrown error type. | |
| 2. A request object of type `MedusaRequest`. | |
| 3. A response object of type `MedusaResponse`. | |
| 4. A function of type MedusaNextFunction that executes the next middleware in the stack. | |
| This example overrides Medusa's default error handler with a handler that always returns a `400` status code with the same message. | |
| # Pass Additional Data to Medusa's API Route | |
| In this chapter, you'll learn how to pass additional data in requests to Medusa's API Route. | |
| ## Why Pass Additional Data? | |
| Some of Medusa's API Routes accept an `additional_data` parameter whose type is an object. The API Route passes the `additional_data` to the workflow, which in turn passes it to its hooks. | |
| This is useful when you have a link from your custom module to a commerce module, and you want to perform an additional action when a request is sent to an existing API route. | |
| For example, the [Create Product API Route](https://docs.medusajs.com/api/admin#products_postproducts/index.html.md) accepts an `additional_data` parameter. If you have a data model linked to it, you consume the `productsCreated` hook to create a record of the data model using the custom data and link it to the product. | |
| ### API Routes Accepting Additional Data | |
| ### API Routes List | |
| - Campaigns | |
| - [Create Campaign](https://docs.medusajs.com/api/admin#campaigns_postcampaigns/index.html.md) | |
| - [Update Campaign](https://docs.medusajs.com/api/admin#campaigns_postcampaignsid/index.html.md) | |
| - Cart | |
| - [Create Cart](https://docs.medusajs.com/api/store#carts_postcarts/index.html.md) | |
| - [Update Cart](https://docs.medusajs.com/api/store#carts_postcartsid/index.html.md) | |
| - Collections | |
| - [Create Collection](https://docs.medusajs.com/api/admin#collections_postcollections/index.html.md) | |
| - [Update Collection](https://docs.medusajs.com/api/admin#collections_postcollectionsid/index.html.md) | |
| - Customers | |
| - [Create Customer](https://docs.medusajs.com/api/admin#customers_postcustomers/index.html.md) | |
| - [Update Customer](https://docs.medusajs.com/api/admin#customers_postcustomersid/index.html.md) | |
| - [Create Address](https://docs.medusajs.com/api/admin#customers_postcustomersidaddresses/index.html.md) | |
| - [Update Address](https://docs.medusajs.com/api/admin#customers_postcustomersidaddressesaddress_id/index.html.md) | |
| - Draft Orders | |
| - [Create Draft Order](https://docs.medusajs.com/api/admin#draft-orders_postdraftorders/index.html.md) | |
| - Orders | |
| - [Complete Orders](https://docs.medusajs.com/api/admin#orders_postordersidcomplete/index.html.md) | |
| - [Cancel Order's Fulfillment](https://docs.medusajs.com/api/admin#orders_postordersidfulfillmentsfulfillment_idcancel/index.html.md) | |
| - [Create Shipment](https://docs.medusajs.com/api/admin#orders_postordersidfulfillmentsfulfillment_idshipments/index.html.md) | |
| - [Create Fulfillment](https://docs.medusajs.com/api/admin#orders_postordersidfulfillments/index.html.md) | |
| - Products | |
| - [Create Product](https://docs.medusajs.com/api/admin#products_postproducts/index.html.md) | |
| - [Update Product](https://docs.medusajs.com/api/admin#products_postproductsid/index.html.md) | |
| - [Create Product Variant](https://docs.medusajs.com/api/admin#products_postproductsidvariants/index.html.md) | |
| - [Update Product Variant](https://docs.medusajs.com/api/admin#products_postproductsidvariantsvariant_id/index.html.md) | |
| - [Create Product Option](https://docs.medusajs.com/api/admin#products_postproductsidoptions/index.html.md) | |
| - [Update Product Option](https://docs.medusajs.com/api/admin#products_postproductsidoptionsoption_id/index.html.md) | |
| - Product Tags | |
| - [Create Product Tag](https://docs.medusajs.com/api/admin#product-tags_postproducttags/index.html.md) | |
| - [Update Product Tag](https://docs.medusajs.com/api/admin#product-tags_postproducttagsid/index.html.md) | |
| - Product Types | |
| - [Create Product Type](https://docs.medusajs.com/api/admin#product-types_postproducttypes/index.html.md) | |
| - [Update Product Type](https://docs.medusajs.com/api/admin#product-types_postproducttypesid/index.html.md) | |
| - Promotions | |
| - [Create Promotion](https://docs.medusajs.com/api/admin#promotions_postpromotions/index.html.md) | |
| - [Update Promotion](https://docs.medusajs.com/api/admin#promotions_postpromotionsid/index.html.md) | |
| *** | |
| ## How to Pass Additional Data | |
| ### 1. Specify Validation of Additional Data | |
| Before passing custom data in the `additional_data` object parameter, you must specify validation rules for the allowed properties in the object. | |
| To do that, use the middleware route object defined in `src/api/middlewares.ts`. | |
| For example, create the file `src/api/middlewares.ts` with the following content: | |
| ```ts title="src/api/middlewares.ts" | |
| import { defineMiddlewares } from "@medusajs/framework/http" | |
| import { z } from "zod" | |
| export default defineMiddlewares({ | |
| routes: [ | |
| { | |
| method: "POST", | |
| matcher: "/admin/products", | |
| additionalDataValidator: { | |
| brand: z.string().optional(), | |
| }, | |
| }, | |
| ], | |
| }) | |
| ``` | |
| The middleware route object accepts an optional parameter `additionalDataValidator` whose value is an object of key-value pairs. The keys indicate the name of accepted properties in the `additional_data` parameter, and the value is [Zod](https://zod.dev/) validation rules of the property. | |
| In this example, you indicate that the `additional_data` parameter accepts a `brand` property whose value is an optional string. | |
| Refer to [Zod's documentation](https://zod.dev) for all available validation rules. | |
| ### 2. Pass the Additional Data in a Request | |
| You can now pass a `brand` property in the `additional_data` parameter of a request to the Create Product API Route. | |
| For example: | |
| ```bash | |
| curl -X POST 'http://localhost:9000/admin/products' \ | |
| -H 'Content-Type: application/json' \ | |
| -H 'Authorization: Bearer {token}' \ | |
| --data '{ | |
| "title": "Product 1", | |
| "options": [ | |
| { | |
| "title": "Default option", | |
| "values": ["Default option value"] | |
| } | |
| ], | |
| "additional_data": { | |
| "brand": "Acme" | |
| } | |
| }' | |
| ``` | |
| Make sure to replace the `{token}` in the authorization header with an admin user's authentication token. | |
| In this request, you pass in the `additional_data` parameter a `brand` property and set its value to `Acme`. | |
| The `additional_data` is then passed to hooks in the `createProductsWorkflow` used by the API route. | |
| *** | |
| ## Use Additional Data in a Hook | |
| Learn about workflow hooks in [this guide](https://docs.medusajs.com/learn/fundamentals/workflows/workflow-hooks/index.html.md). | |
| Step functions consuming the workflow hook can access the `additional_data` in the first parameter. | |
| For example, consider you want to store the data passed in `additional_data` in the product's `metadata` property. | |
| To do that, create the file `src/workflows/hooks/product-created.ts` with the following content: | |
| ```ts title="src/workflows/hooks/product-created.ts" | |
| import { StepResponse } from "@medusajs/framework/workflows-sdk" | |
| import { createProductsWorkflow } from "@medusajs/medusa/core-flows" | |
| import { Modules } from "@medusajs/framework/utils" | |
| createProductsWorkflow.hooks.productsCreated( | |
| async ({ products, additional_data }, { container }) => { | |
| if (!additional_data?.brand) { | |
| return | |
| } | |
| const productModuleService = container.resolve( | |
| Modules.PRODUCT | |
| ) | |
| await productModuleService.upsertProducts( | |
| products.map((product) => ({ | |
| ...product, | |
| metadata: { | |
| ...product.metadata, | |
| brand: additional_data.brand, | |
| }, | |
| })) | |
| ) | |
| return new StepResponse(products, { | |
| products, | |
| additional_data, | |
| }) | |
| } | |
| ) | |
| ``` | |
| This consumes the `productsCreated` hook, which runs after the products are created. | |
| If `brand` is passed in `additional_data`, you resolve the Product Module's main service and use its `upsertProducts` method to update the products, adding the brand to the `metadata` property. | |
| ### Compensation Function | |
| Hooks also accept a compensation function as a second parameter to undo the actions made by the step function. | |
| For example, pass the following second parameter to the `productsCreated` hook: | |
| ```ts title="src/workflows/hooks/product-created.ts" | |
| createProductsWorkflow.hooks.productsCreated( | |
| async ({ products, additional_data }, { container }) => { | |
| // ... | |
| }, | |
| async ({ products, additional_data }, { container }) => { | |
| if (!additional_data.brand) { | |
| return | |
| } | |
| const productModuleService = container.resolve( | |
| Modules.PRODUCT | |
| ) | |
| await productModuleService.upsertProducts( | |
| products | |
| ) | |
| } | |
| ) | |
| ``` | |
| This updates the products to their original state before adding the brand to their `metadata` property. | |
| # HTTP Methods | |
| In this chapter, you'll learn about how to add new API routes for each HTTP method. | |
| ## HTTP Method Handler | |
| An API route is created for every HTTP method you export a handler function for in a route file. | |
| Allowed HTTP methods are: `GET`, `POST`, `DELETE`, `PUT`, `PATCH`, `OPTIONS`, and `HEAD`. | |
| For example, create the file `src/api/hello-world/route.ts` with the following content: | |
| ```ts title="src/api/hello-world/route.ts" | |
| import type { | |
| MedusaRequest, | |
| MedusaResponse, | |
| } from "@medusajs/framework/http" | |
| export const GET = async ( | |
| req: MedusaRequest, | |
| res: MedusaResponse | |
| ) => { | |
| res.json({ | |
| message: "[GET] Hello world!", | |
| }) | |
| } | |
| export const POST = async ( | |
| req: MedusaRequest, | |
| res: MedusaResponse | |
| ) => { | |
| res.json({ | |
| message: "[POST] Hello world!", | |
| }) | |
| } | |
| ``` | |
| This adds two API Routes: | |
| - A `GET` route at `http://localhost:9000/hello-world`. | |
| - A `POST` route at `http://localhost:9000/hello-world`. | |
| # Middlewares | |
| In this chapter, you’ll learn about middlewares and how to create them. | |
| ## What is a Middleware? | |
| A middleware is a function executed when a request is sent to an API Route. It's executed before the route handler function. | |
| Middlwares are used to guard API routes, parse request content types other than `application/json`, manipulate request data, and more. | |
| As Medusa's server is based on Express, you can use any [Express middleware](https://expressjs.com/en/resources/middleware.html). | |
| *** | |
| ## How to Create a Middleware? | |
| Middlewares are defined in the special file `src/api/middlewares.ts`. Use the `defineMiddlewares` function from the Medusa Framework to define the middlewares, and export its value. | |
| For example: | |
| ```ts title="src/api/middlewares.ts" | |
| import { | |
| defineMiddlewares, | |
| MedusaNextFunction, | |
| MedusaRequest, | |
| MedusaResponse, | |
| } from "@medusajs/framework/http" | |
| export default defineMiddlewares({ | |
| routes: [ | |
| { | |
| matcher: "/custom*", | |
| middlewares: [ | |
| ( | |
| req: MedusaRequest, | |
| res: MedusaResponse, | |
| next: MedusaNextFunction | |
| ) => { | |
| console.log("Received a request!") | |
| next() | |
| }, | |
| ], | |
| }, | |
| ], | |
| }) | |
| ``` | |
| The `defineMiddlewares` function accepts a middleware configurations object that has the property `routes`. `routes`'s value is an array of middleware route objects, each having the following properties: | |
| - `matcher`: a string or regular expression indicating the API route path to apply the middleware on. The regular expression must be compatible with [path-to-regexp](https://github.com/pillarjs/path-to-regexp). | |
| - `middlewares`: An array of middleware functions. | |
| In the example above, you define a middleware that logs the message `Received a request!` whenever a request is sent to an API route path starting with `/custom`. | |
| *** | |
| ## Test the Middleware | |
| To test the middleware: | |
| 1. Start the application: | |
| ```bash npm2yarn | |
| npm run dev | |
| ``` | |
| 2. Send a request to any API route starting with `/custom`. | |
| 3. See the following message in the terminal: | |
| ```bash | |
| Received a request! | |
| ``` | |
| *** | |
| ## When to Use Middlewares | |
| - You want to protect API routes by a custom condition. | |
| - You're modifying the request body. | |
| *** | |
| ## Middleware Function Parameters | |
| The middleware function accepts three parameters: | |
| 1. A request object of type `MedusaRequest`. | |
| 2. A response object of type `MedusaResponse`. | |
| 3. A function of type `MedusaNextFunction` that executes the next middleware in the stack. | |
| You must call the `next` function in the middleware. Otherwise, other middlewares and the API route handler won’t execute. | |
| *** | |
| ## Middleware for Routes with Path Parameters | |
| To indicate a path parameter in a middleware's `matcher` pattern, use the format `:{param-name}`. | |
| For example: | |
| ```ts title="src/api/middlewares.ts" collapsibleLines="1-7" expandMoreLabel="Show Imports" highlights={pathParamHighlights} | |
| import { | |
| MedusaNextFunction, | |
| MedusaRequest, | |
| MedusaResponse, | |
| defineMiddlewares, | |
| } from "@medusajs/framework/http" | |
| export default defineMiddlewares({ | |
| routes: [ | |
| { | |
| matcher: "/custom/:id", | |
| middlewares: [ | |
| // ... | |
| ], | |
| }, | |
| ], | |
| }) | |
| ``` | |
| This applies a middleware to the routes defined in the file `src/api/custom/[id]/route.ts`. | |
| *** | |
| ## Restrict HTTP Methods | |
| Restrict which HTTP methods the middleware is applied to using the `method` property of the middleware route object. | |
| For example: | |
| ```ts title="src/api/middlewares.ts" highlights={highlights} collapsibleLines="1-7" expandButtonLabel="Show Imports" | |
| import { | |
| MedusaNextFunction, | |
| MedusaRequest, | |
| MedusaResponse, | |
| defineMiddlewares, | |
| } from "@medusajs/framework/http" | |
| export default defineMiddlewares({ | |
| routes: [ | |
| { | |
| matcher: "/custom*", | |
| method: ["POST", "PUT"], | |
| middlewares: [ | |
| // ... | |
| ], | |
| }, | |
| ], | |
| }) | |
| ``` | |
| `method`'s value is one or more HTTP methods to apply the middleware to. | |
| This example applies the middleware only when a `POST` or `PUT` request is sent to an API route path starting with `/custom`. | |
| *** | |
| ## Request URLs with Trailing Backslashes | |
| A middleware whose `matcher` pattern doesn't end with a backslash won't be applied for requests to URLs with a trailing backslash. | |
| For example, consider you have the following middleware: | |
| ```ts collapsibleLines="1-7" expandMoreLabel="Show Imports" | |
| import { | |
| MedusaNextFunction, | |
| MedusaRequest, | |
| MedusaResponse, | |
| defineMiddlewares, | |
| } from "@medusajs/framework/http" | |
| export default defineMiddlewares({ | |
| routes: [ | |
| { | |
| matcher: "/custom", | |
| middlewares: [ | |
| ( | |
| req: MedusaRequest, | |
| res: MedusaResponse, | |
| next: MedusaNextFunction | |
| ) => { | |
| console.log("Received a request!") | |
| next() | |
| }, | |
| ], | |
| }, | |
| ], | |
| }) | |
| ``` | |
| If you send a request to `http://localhost:9000/custom`, the middleware will run. | |
| However, if you send a request to `http://localhost:9000/custom/`, the middleware won't run. | |
| In general, avoid adding trailing backslashes when sending requests to API routes. | |
| # API Route Parameters | |
| In this chapter, you’ll learn about path, query, and request body parameters. | |
| ## Path Parameters | |
| To create an API route that accepts a path parameter, create a directory within the route file's path whose name is of the format `[param]`. | |
| For example, to create an API Route at the path `/hello-world/:id`, where `:id` is a path parameter, create the file `src/api/hello-world/[id]/route.ts` with the following content: | |
| ```ts title="src/api/hello-world/[id]/route.ts" highlights={singlePathHighlights} | |
| import type { | |
| MedusaRequest, | |
| MedusaResponse, | |
| } from "@medusajs/framework/http" | |
| export const GET = async ( | |
| req: MedusaRequest, | |
| res: MedusaResponse | |
| ) => { | |
| res.json({ | |
| message: `[GET] Hello ${req.params.id}!`, | |
| }) | |
| } | |
| ``` | |
| The `MedusaRequest` object has a `params` property. `params` holds the path parameters in key-value pairs. | |
| ### Multiple Path Parameters | |
| To create an API route that accepts multiple path parameters, create within the file's path multiple directories whose names are of the format `[param]`. | |
| For example, to create an API route at `/hello-world/:id/name/:name`, create the file `src/api/hello-world/[id]/name/[name]/route.ts` with the following content: | |
| ```ts title="src/api/hello-world/[id]/name/[name]/route.ts" highlights={multiplePathHighlights} | |
| import type { | |
| MedusaRequest, | |
| MedusaResponse, | |
| } from "@medusajs/framework/http" | |
| export const GET = async ( | |
| req: MedusaRequest, | |
| res: MedusaResponse | |
| ) => { | |
| res.json({ | |
| message: `[GET] Hello ${ | |
| req.params.id | |
| } - ${req.params.name}!`, | |
| }) | |
| } | |
| ``` | |
| You access the `id` and `name` path parameters using the `req.params` property. | |
| *** | |
| ## Query Parameters | |
| You can access all query parameters in the `query` property of the `MedusaRequest` object. `query` is an object of key-value pairs, where the key is a query parameter's name, and the value is its value. | |
| For example: | |
| ```ts title="src/api/hello-world/route.ts" highlights={queryHighlights} | |
| import type { | |
| MedusaRequest, | |
| MedusaResponse, | |
| } from "@medusajs/framework/http" | |
| export const GET = async ( | |
| req: MedusaRequest, | |
| res: MedusaResponse | |
| ) => { | |
| res.json({ | |
| message: `Hello ${req.query.name}`, | |
| }) | |
| } | |
| ``` | |
| The value of `req.query.name` is the value passed in `?name=John`, for example. | |
| ### Validate Query Parameters | |
| You can apply validation rules on received query parameters to ensure they match specified rules and types. | |
| Learn more in [this documentation](https://docs.medusajs.com/learn/fundamentals/api-routes/validation#how-to-validate-request-query-paramters/index.html.md). | |
| *** | |
| ## Request Body Parameters | |
| The Medusa application parses the body of any request having its `Content-Type` header set to `application/json`. The request body parameters are set in the `MedusaRequest`'s `body` property. | |
| For example: | |
| ```ts title="src/api/hello-world/route.ts" highlights={bodyHighlights} | |
| import type { | |
| MedusaRequest, | |
| MedusaResponse, | |
| } from "@medusajs/framework/http" | |
| type HelloWorldReq = { | |
| name: string | |
| } | |
| export const POST = async ( | |
| req: MedusaRequest<HelloWorldReq>, | |
| res: MedusaResponse | |
| ) => { | |
| res.json({ | |
| message: `[POST] Hello ${req.body.name}!`, | |
| }) | |
| } | |
| ``` | |
| In this example, you use the `name` request body parameter to create the message in the returned response. | |
| The `MedusaRequest` type accepts a type argument that indicates the type of the request body. This is useful for auto-completion and to avoid typing errors. | |
| To test it out, send the following request to your Medusa application: | |
| ```bash | |
| curl -X POST 'http://localhost:9000/hello-world' \ | |
| -H 'Content-Type: application/json' \ | |
| --data-raw '{ | |
| "name": "John" | |
| }' | |
| ``` | |
| This returns the following JSON object: | |
| ```json | |
| { | |
| "message": "[POST] Hello John!" | |
| } | |
| ``` | |
| ### Validate Body Parameters | |
| You can apply validation rules on received body parameters to ensure they match specified rules and types. | |
| Learn more in [this documentation](https://docs.medusajs.com/learn/fundamentals/api-routes/validation#how-to-validate-request-body/index.html.md). | |
| # Protected Routes | |
| In this chapter, you’ll learn how to create protected routes. | |
| ## What is a Protected Route? | |
| A protected route is a route that requires requests to be user-authenticated before performing the route's functionality. Otherwise, the request fails, and the user is prevented access. | |
| *** | |
| ## Default Protected Routes | |
| Medusa applies an authentication guard on routes starting with `/admin`, including custom API routes. | |
| Requests to `/admin` must be user-authenticated to access the route. | |
| Refer to the API Reference for [Admin](https://docs.medusajs.com/api/admin#authentication/index.html.md) and [Store](https://docs.medusajs.com/api/store#authentication/index.html.md) authentication methods. | |
| *** | |
| ## Protect Custom API Routes | |
| To protect custom API Routes to only allow authenticated customer or admin users, use the `authenticate` middleware from the Medusa Framework. | |
| For example: | |
| ```ts title="src/api/middlewares.ts" highlights={highlights} | |
| import { | |
| defineMiddlewares, | |
| authenticate, | |
| } from "@medusajs/framework/http" | |
| export default defineMiddlewares({ | |
| routes: [ | |
| { | |
| matcher: "/custom/admin*", | |
| middlewares: [authenticate("user", ["session", "bearer", "api-key"])], | |
| }, | |
| { | |
| matcher: "/custom/customer*", | |
| middlewares: [authenticate("customer", ["session", "bearer"])], | |
| }, | |
| ], | |
| }) | |
| ``` | |
| The `authenticate` middleware function accepts three parameters: | |
| 1. The type of user authenticating. Use `user` for authenticating admin users, and `customer` for authenticating customers. You can also pass `*` to allow all types of users. | |
| 2. An array of types of authentication methods allowed. Both `user` and `customer` scopes support `session` and `bearer`. The `admin` scope also supports the `api-key` authentication method. | |
| 3. An optional object of configurations accepting the following properties: | |
| - `allowUnauthenticated`: (default: `false`) A boolean indicating whether authentication is required. For example, you may have an API route where you want to access the logged-in customer if available, but guest customers can still access it too. | |
| - `allowUnregistered` (default: `false`): A boolean indicating if unregistered users should be allowed access. This is useful when you want to allow users who aren’t registered to access certain routes. | |
| *** | |
| ## Authentication Opt-Out | |
| To disable the authentication guard on custom routes under the `/admin` path prefix, export an `AUTHENTICATE` variable in the route file with its value set to `false`. | |
| For example: | |
| ```ts title="src/api/admin/custom/route.ts" highlights={[["15"]]} | |
| import type { | |
| AuthenticatedMedusaRequest, | |
| MedusaResponse, | |
| } from "@medusajs/framework/http" | |
| export const GET = async ( | |
| req: AuthenticatedMedusaRequest, | |
| res: MedusaResponse | |
| ) => { | |
| res.json({ | |
| message: "Hello", | |
| }) | |
| } | |
| export const AUTHENTICATE = false | |
| ``` | |
| Now, any request sent to the `/admin/custom` API route is allowed, regardless if the admin user is authenticated. | |
| *** | |
| ## Authenticated Request Type | |
| To access the authentication details in an API route, such as the logged-in user's ID, set the type of the first request parameter to `AuthenticatedMedusaRequest`. It extends `MedusaRequest`. | |
| The `auth_context.actor_id` property of `AuthenticatedMedusaRequest` holds the ID of the authenticated user or customer. If there isn't any authenticated user or customer, `auth_context` is `undefined`. | |
| If you opt-out of authentication in a route as mentioned in the [previous section](#authentication-opt-out), you can't access the authenticated user or customer anymore. Use the [authenticate middleware](#protect-custom-api-routes) instead. | |
| ### Retrieve Logged-In Customer's Details | |
| You can access the logged-in customer’s ID in all API routes starting with `/store` using the `auth_context.actor_id` property of the `AuthenticatedMedusaRequest` object. | |
| For example: | |
| ```ts title="src/api/store/custom/route.ts" highlights={[["19", "req.auth_context.actor_id", "Access the logged-in customer's ID."]]} collapsibleLines="1-7" expandButtonLabel="Show Imports" | |
| import type { | |
| AuthenticatedMedusaRequest, | |
| MedusaResponse, | |
| } from "@medusajs/framework/http" | |
| import { Modules } from "@medusajs/framework/utils" | |
| import { ICustomerModuleService } from "@medusajs/framework/types" | |
| export const GET = async ( | |
| req: AuthenticatedMedusaRequest, | |
| res: MedusaResponse | |
| ) => { | |
| if (req.auth_context?.actor_id) { | |
| // retrieve customer | |
| const customerModuleService: ICustomerModuleService = req.scope.resolve( | |
| Modules.CUSTOMER | |
| ) | |
| const customer = await customerModuleService.retrieveCustomer( | |
| req.auth_context.actor_id | |
| ) | |
| } | |
| // ... | |
| } | |
| ``` | |
| In this example, you resolve the Customer Module's main service, then use it to retrieve the logged-in customer, if available. | |
| ### Retrieve Logged-In Admin User's Details | |
| You can access the logged-in admin user’s ID in all API Routes starting with `/admin` using the `auth_context.actor_id` property of the `AuthenticatedMedusaRequest` object. | |
| For example: | |
| ```ts title="src/api/admin/custom/route.ts" highlights={[["17", "req.auth_context.actor_id", "Access the logged-in admin user's ID."]]} collapsibleLines="1-7" expandButtonLabel="Show Imports" | |
| import type { | |
| AuthenticatedMedusaRequest, | |
| MedusaResponse, | |
| } from "@medusajs/framework/http" | |
| import { Modules } from "@medusajs/framework/utils" | |
| import { IUserModuleService } from "@medusajs/framework/types" | |
| export const GET = async ( | |
| req: AuthenticatedMedusaRequest, | |
| res: MedusaResponse | |
| ) => { | |
| const userModuleService: IUserModuleService = req.scope.resolve( | |
| Modules.USER | |
| ) | |
| const user = await userModuleService.retrieveUser( | |
| req.auth_context.actor_id | |
| ) | |
| // ... | |
| } | |
| ``` | |
| In the route handler, you resolve the User Module's main service, then use it to retrieve the logged-in admin user. | |
| # Admin Widgets | |
| In this chapter, you’ll learn more about widgets and how to use them. | |
| ## What is an Admin Widget? | |
| The Medusa Admin dashboard's pages are customizable to insert widgets of custom content in pre-defined injection zones. You create these widgets as React components that allow admin users to perform custom actions. | |
| For example, you can add a widget on the product details page that allow admin users to sync products to a third-party service. | |
| *** | |
| ## How to Create a Widget? | |
| ### Prerequisites | |
| - [Medusa application installed](https://docs.medusajs.com/learn/installation/index.html.md) | |
| You create a widget in a `.tsx` file under the `src/admin/widgets` directory. The file’s default export must be the widget, which is the React component that renders the custom content. The file must also export the widget’s configurations indicating where to insert the widget. | |
| For example, create the file `src/admin/widgets/product-widget.tsx` with the following content: | |
| 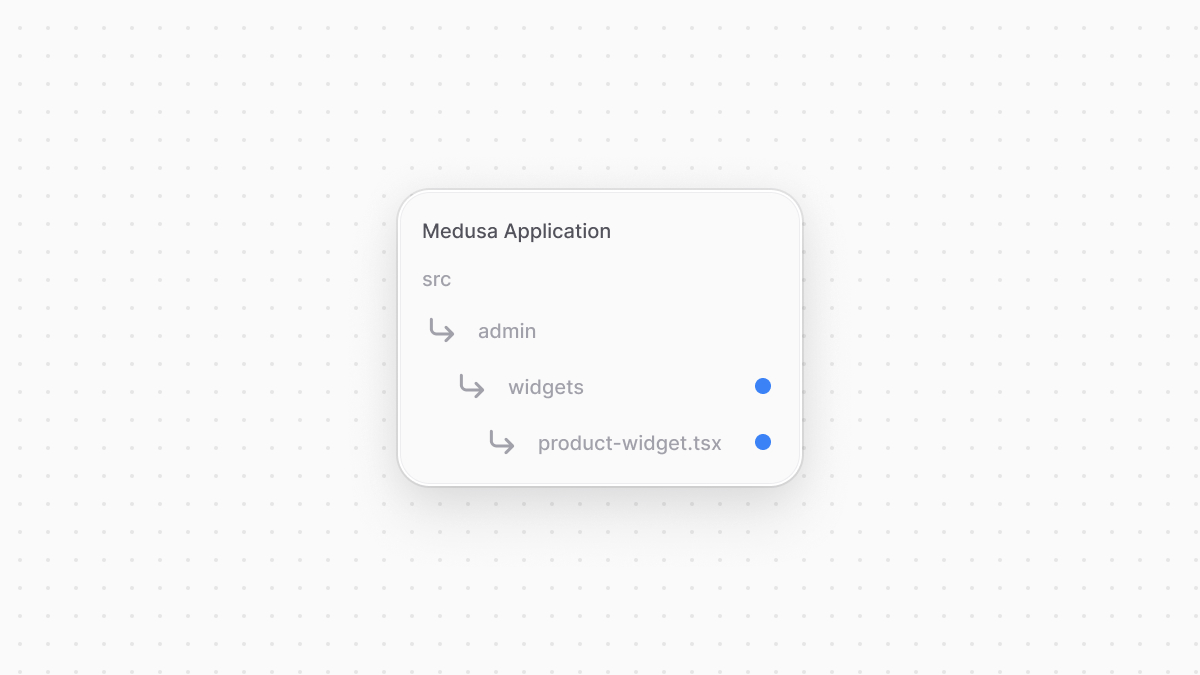 | |
| ```tsx title="src/admin/widgets/product-widget.tsx" highlights={widgetHighlights} | |
| import { defineWidgetConfig } from "@medusajs/admin-sdk" | |
| import { Container, Heading } from "@medusajs/ui" | |
| // The widget | |
| const ProductWidget = () => { | |
| return ( | |
| <Container className="divide-y p-0"> | |
| <div className="flex items-center justify-between px-6 py-4"> | |
| <Heading level="h2">Product Widget</Heading> | |
| </div> | |
| </Container> | |
| ) | |
| } | |
| // The widget's configurations | |
| export const config = defineWidgetConfig({ | |
| zone: "product.details.before", | |
| }) | |
| export default ProductWidget | |
| ``` | |
| You export the `ProductWidget` component, which shows the heading `Product Widget`. In the widget, you use [Medusa UI](https://docs.medusajs.com/ui/index.html.md), a package that Medusa maintains to allow you to customize the dashboard with the same components used to build it. | |
| To export the widget's configurations, you use `defineWidgetConfig` from the Admin Extension SDK. It accepts as a parameter an object with the `zone` property, whose value is a string or an array of strings, each being the name of the zone to inject the widget into. | |
| In the example above, the widget is injected at the top of a product’s details. | |
| The widget component must be created as an arrow function. | |
| ### Test the Widget | |
| To test out the widget, start the Medusa application: | |
| ```bash npm2yarn | |
| npm run dev | |
| ``` | |
| Then, open a product’s details page. You’ll find your custom widget at the top of the page. | |
| *** | |
| ## Props Passed in Detail Pages | |
| Widgets that are injected into a details page receive a `data` prop, which is the main data of the details page. | |
| For example, a widget injected into the `product.details.before` zone receives the product's details in the `data` prop: | |
| ```tsx title="src/admin/widgets/product-widget.tsx" highlights={detailHighlights} | |
| import { defineWidgetConfig } from "@medusajs/admin-sdk" | |
| import { Container, Heading } from "@medusajs/ui" | |
| import { | |
| DetailWidgetProps, | |
| AdminProduct, | |
| } from "@medusajs/framework/types" | |
| // The widget | |
| const ProductWidget = ({ | |
| data, | |
| }: DetailWidgetProps<AdminProduct>) => { | |
| return ( | |
| <Container className="divide-y p-0"> | |
| <div className="flex items-center justify-between px-6 py-4"> | |
| <Heading level="h2"> | |
| Product Widget {data.title} | |
| </Heading> | |
| </div> | |
| </Container> | |
| ) | |
| } | |
| // The widget's configurations | |
| export const config = defineWidgetConfig({ | |
| zone: "product.details.before", | |
| }) | |
| export default ProductWidget | |
| ``` | |
| The props type is `DetailWidgetProps`, and it accepts as a type argument the expected type of `data`. For the product details page, it's `AdminProduct`. | |
| *** | |
| ## Injection Zone | |
| Refer to [this reference](https://docs.medusajs.com/resources/admin-widget-injection-zones/index.html.md) for the full list of injection zones and their props. | |
| *** | |
| ## Admin Components List | |
| To build admin customizations that match the Medusa Admin's designs and layouts, refer to [this guide](https://docs.medusajs.com/resources/admin-components/index.html.md) to find common components. | |
| # API Route Response | |
| In this chapter, you'll learn how to send a response in your API route. | |
| ## Send a JSON Response | |
| To send a JSON response, use the `json` method of the `MedusaResponse` object passed as the second parameter of your API route handler. | |
| For example: | |
| ```ts title="src/api/custom/route.ts" highlights={jsonHighlights} | |
| import { MedusaRequest, MedusaResponse } from "@medusajs/framework/http" | |
| export const GET = async ( | |
| req: MedusaRequest, | |
| res: MedusaResponse | |
| ) => { | |
| res.json({ | |
| message: "Hello, World!", | |
| }) | |
| } | |
| ``` | |
| This API route returns the following JSON object: | |
| ```json | |
| { | |
| "message": "Hello, World!" | |
| } | |
| ``` | |
| *** | |
| ## Set Response Status Code | |
| By default, setting the JSON data using the `json` method returns a response with a `200` status code. | |
| To change the status code, use the `status` method of the `MedusaResponse` object. | |
| For example: | |
| ```ts title="src/api/custom/route.ts" highlights={statusHighlight} | |
| import { MedusaRequest, MedusaResponse } from "@medusajs/framework/http" | |
| export const GET = async ( | |
| req: MedusaRequest, | |
| res: MedusaResponse | |
| ) => { | |
| res.status(201).json({ | |
| message: "Hello, World!", | |
| }) | |
| } | |
| ``` | |
| The response of this API route has the status code `201`. | |
| *** | |
| ## Change Response Content Type | |
| To return response data other than a JSON object, use the `writeHead` method of the `MedusaResponse` object. It allows you to set the response headers, including the content type. | |
| For example, to create an API route that returns an event stream: | |
| ```ts highlights={streamHighlights} | |
| import { MedusaRequest, MedusaResponse } from "@medusajs/framework/http" | |
| export const GET = async ( | |
| req: MedusaRequest, | |
| res: MedusaResponse | |
| ) => { | |
| res.writeHead(200, { | |
| "Content-Type": "text/event-stream", | |
| "Cache-Control": "no-cache", | |
| Connection: "keep-alive", | |
| }) | |
| const interval = setInterval(() => { | |
| res.write("Streaming data...\n") | |
| }, 3000) | |
| req.on("end", () => { | |
| clearInterval(interval) | |
| res.end() | |
| }) | |
| } | |
| ``` | |
| The `writeHead` method accepts two parameters: | |
| 1. The first one is the response's status code. | |
| 2. The second is an object of key-value pairs to set the headers of the response. | |
| This API route opens a stream by setting the `Content-Type` in the header to `text/event-stream`. It then simulates a stream by creating an interval that writes the stream data every three seconds. | |
| *** | |
| ## Do More with Responses | |
| The `MedusaResponse` type is based on [Express's Response](https://expressjs.com/en/api.html#res). Refer to their API reference for other uses of responses. | |
| # Seed Data with Custom CLI Script | |
| In this chapter, you'll learn how to seed data using a custom CLI script. | |
| ## How to Seed Data | |
| To seed dummy data for development or demo purposes, use a custom CLI script. | |
| In the CLI script, use your custom workflows or Medusa's existing workflows, which you can browse in [this reference](https://docs.medusajs.com/resources/medusa-workflows-reference/index.html.md), to seed data. | |
| ### Example: Seed Dummy Products | |
| In this section, you'll follow an example of creating a custom CLI script that seeds fifty dummy products. | |
| First, install the [Faker](https://fakerjs.dev/) library to generate random data in your script: | |
| ```bash npm2yarn | |
| npm install --save-dev @faker-js/faker | |
| ``` | |
| Then, create the file `src/scripts/demo-products.ts` with the following content: | |
| ```ts title="src/scripts/demo-products.ts" highlights={highlights} collapsibleLines="1-12" expandButtonLabel="Show Imports" | |
| import { ExecArgs } from "@medusajs/framework/types" | |
| import { faker } from "@faker-js/faker" | |
| import { | |
| ContainerRegistrationKeys, | |
| Modules, | |
| ProductStatus, | |
| } from "@medusajs/framework/utils" | |
| import { | |
| createInventoryLevelsWorkflow, | |
| createProductsWorkflow, | |
| } from "@medusajs/medusa/core-flows" | |
| export default async function seedDummyProducts({ | |
| container, | |
| }: ExecArgs) { | |
| const salesChannelModuleService = container.resolve( | |
| Modules.SALES_CHANNEL | |
| ) | |
| const logger = container.resolve( | |
| ContainerRegistrationKeys.LOGGER | |
| ) | |
| const query = container.resolve( | |
| ContainerRegistrationKeys.QUERY | |
| ) | |
| const defaultSalesChannel = await salesChannelModuleService | |
| .listSalesChannels({ | |
| name: "Default Sales Channel", | |
| }) | |
| const sizeOptions = ["S", "M", "L", "XL"] | |
| const colorOptions = ["Black", "White"] | |
| const currency_code = "eur" | |
| const productsNum = 50 | |
| // TODO seed products | |
| } | |
| ``` | |
| So far, in the script, you: | |
| - Resolve the Sales Channel Module's main service to retrieve the application's default sales channel. This is the sales channel the dummy products will be available in. | |
| - Resolve the Logger to log messages in the terminal, and Query to later retrieve data useful for the seeded products. | |
| - Initialize some default data to use when seeding the products next. | |
| Next, replace the `TODO` with the following: | |
| ```ts title="src/scripts/demo-products.ts" | |
| const productsData = new Array(productsNum).fill(0).map((_, index) => { | |
| const title = faker.commerce.product() + "_" + index | |
| return { | |
| title, | |
| is_giftcard: true, | |
| description: faker.commerce.productDescription(), | |
| status: ProductStatus.PUBLISHED, | |
| options: [ | |
| { | |
| title: "Size", | |
| values: sizeOptions, | |
| }, | |
| { | |
| title: "Color", | |
| values: colorOptions, | |
| }, | |
| ], | |
| images: [ | |
| { | |
| url: faker.image.urlPlaceholder({ | |
| text: title, | |
| }), | |
| }, | |
| { | |
| url: faker.image.urlPlaceholder({ | |
| text: title, | |
| }), | |
| }, | |
| ], | |
| variants: new Array(10).fill(0).map((_, variantIndex) => ({ | |
| title: `${title} ${variantIndex}`, | |
| sku: `variant-${variantIndex}${index}`, | |
| prices: new Array(10).fill(0).map((_, priceIndex) => ({ | |
| currency_code, | |
| amount: 10 * priceIndex, | |
| })), | |
| options: { | |
| Size: sizeOptions[Math.floor(Math.random() * 3)], | |
| }, | |
| })), | |
| sales_channels: [ | |
| { | |
| id: defaultSalesChannel[0].id, | |
| }, | |
| ], | |
| } | |
| }) | |
| // TODO seed products | |
| ``` | |
| You generate fifty products using the sales channel and variables you initialized, and using Faker for random data, such as the product's title or images. | |
| Then, replace the new `TODO` with the following: | |
| ```ts title="src/scripts/demo-products.ts" | |
| const { result: products } = await createProductsWorkflow(container).run({ | |
| input: { | |
| products: productsData, | |
| }, | |
| }) | |
| logger.info(`Seeded ${products.length} products.`) | |
| // TODO add inventory levels | |
| ``` | |
| You create the generated products using the `createProductsWorkflow` imported previously from `@medusajs/medusa/core-flows`. It accepts the product data as input, and returns the created products. | |
| Only thing left is to create inventory levels for the products. So, replace the last `TODO` with the following: | |
| ```ts title="src/scripts/demo-products.ts" | |
| logger.info("Seeding inventory levels.") | |
| const { data: stockLocations } = await query.graph({ | |
| entity: "stock_location", | |
| fields: ["id"], | |
| }) | |
| const { data: inventoryItems } = await query.graph({ | |
| entity: "inventory_item", | |
| fields: ["id"], | |
| }) | |
| const inventoryLevels = inventoryItems.map((inventoryItem) => ({ | |
| location_id: stockLocations[0].id, | |
| stocked_quantity: 1000000, | |
| inventory_item_id: inventoryItem.id, | |
| })) | |
| await createInventoryLevelsWorkflow(container).run({ | |
| input: { | |
| inventory_levels: inventoryLevels, | |
| }, | |
| }) | |
| logger.info("Finished seeding inventory levels data.") | |
| ``` | |
| You use Query to retrieve the stock location, to use the first location in the application, and the inventory items. | |
| Then, you generate inventory levels for each inventory item, associating it with the first stock location. | |
| Finally, you use the `createInventoryLevelsWorkflow` from Medusa's core workflows to create the inventory levels. | |
| ### Test Script | |
| To test out the script, run the following command in your project's directory: | |
| ```bash | |
| npx medusa exec ./src/scripts/demo-products.ts | |
| ``` | |
| This seeds the products to your database. If you run your Medusa application and view the products in the dashboard, you'll find fifty new products. | |
| # Request Body and Query Parameter Validation | |
| In this chapter, you'll learn how to validate request body and query parameters in your custom API route. | |
| ## Request Validation | |
| Consider you're creating a `POST` API route at `/custom`. It accepts two parameters `a` and `b` that are required numbers, and returns their sum. | |
| Medusa provides two middlewares to validate the request body and query paramters of incoming requests to your custom API routes: | |
| - `validateAndTransformBody` to validate the request's body parameters against a schema. | |
| - `validateAndTransformQuery` to validate the request's query parameters against a schema. | |
| Both middlewares accept a [Zod](https://zod.dev/) schema as a parameter, which gives you flexibility in how you define your validation schema with complex rules. | |
| The next steps explain how to add request body and query parameter validation to the API route mentioned earlier. | |
| *** | |
| ## How to Validate Request Body | |
| ### Step 1: Create Validation Schema | |
| Medusa uses [Zod](https://zod.dev/) to create validation schemas. These schemas are then used to validate incoming request bodies or query parameters. | |
| To create a validation schema with Zod, create a `validators.ts` file in any `src/api` subfolder. This file holds Zod schemas for each of your API routes. | |
| For example, create the file `src/api/custom/validators.ts` with the following content: | |
| ```ts title="src/api/custom/validators.ts" | |
| import { z } from "zod" | |
| export const PostStoreCustomSchema = z.object({ | |
| a: z.number(), | |
| b: z.number(), | |
| }) | |
| ``` | |
| The `PostStoreCustomSchema` variable is a Zod schema that indicates the request body is valid if: | |
| 1. It's an object. | |
| 2. It has a property `a` that is a required number. | |
| 3. It has a property `b` that is a required number. | |
| ### Step 2: Add Request Body Validation Middleware | |
| To use this schema for validating the body parameters of requests to `/custom`, use the `validateAndTransformBody` middleware provided by `@medusajs/framework/http`. It accepts the Zod schema as a parameter. | |
| For example, create the file `src/api/middlewares.ts` with the following content: | |
| ```ts title="src/api/middlewares.ts" | |
| import { | |
| defineMiddlewares, | |
| validateAndTransformBody, | |
| } from "@medusajs/framework/http" | |
| import { PostStoreCustomSchema } from "./custom/validators" | |
| export default defineMiddlewares({ | |
| routes: [ | |
| { | |
| matcher: "/custom", | |
| method: "POST", | |
| middlewares: [ | |
| validateAndTransformBody(PostStoreCustomSchema), | |
| ], | |
| }, | |
| ], | |
| }) | |
| ``` | |
| This applies the `validateAndTransformBody` middleware on `POST` requests to `/custom`. It uses the `PostStoreCustomSchema` as the validation schema. | |
| #### How the Validation Works | |
| If a request's body parameters don't pass the validation, the `validateAndTransformBody` middleware throws an error indicating the validation errors. | |
| If a request's body parameters are validated successfully, the middleware sets the validated body parameters in the `validatedBody` property of `MedusaRequest`. | |
| ### Step 3: Use Validated Body in API Route | |
| In your API route, consume the validated body using the `validatedBody` property of `MedusaRequest`. | |
| For example, create the file `src/api/custom/route.ts` with the following content: | |
| ```ts title="src/api/custom/route.ts" highlights={routeHighlights} | |
| import { MedusaRequest, MedusaResponse } from "@medusajs/framework/http" | |
| import { z } from "zod" | |
| import { PostStoreCustomSchema } from "./validators" | |
| type PostStoreCustomSchemaType = z.infer< | |
| typeof PostStoreCustomSchema | |
| > | |
| export const POST = async ( | |
| req: MedusaRequest<PostStoreCustomSchemaType>, | |
| res: MedusaResponse | |
| ) => { | |
| res.json({ | |
| sum: req.validatedBody.a + req.validatedBody.b, | |
| }) | |
| } | |
| ``` | |
| In the API route, you use the `validatedBody` property of `MedusaRequest` to access the values of the `a` and `b` properties. | |
| To pass the request body's type as a type parameter to `MedusaRequest`, use Zod's `infer` type that accepts the type of a schema as a parameter. | |
| ### Test it Out | |
| To test out the validation, send a `POST` request to `/custom` passing `a` and `b` body parameters. You can try sending incorrect request body parameters to test out the validation. | |
| For example, if you omit the `a` parameter, you'll receive a `400` response code with the following response data: | |
| ```json | |
| { | |
| "type": "invalid_data", | |
| "message": "Invalid request: Field 'a' is required" | |
| } | |
| ``` | |
| *** | |
| ## How to Validate Request Query Paramters | |
| The steps to validate the request query parameters are the similar to that of [validating the body](#how-to-validate-request-body). | |
| ### Step 1: Create Validation Schema | |
| The first step is to create a schema with Zod with the rules of the accepted query parameters. | |
| Consider that the API route accepts two query parameters `a` and `b` that are numbers, similar to the previous section. | |
| Create the file `src/api/custom/validators.ts` with the following content: | |
| ```ts title="src/api/custom/validators.ts" | |
| import { z } from "zod" | |
| export const PostStoreCustomSchema = z.object({ | |
| a: z.preprocess( | |
| (val) => { | |
| if (val && typeof val === "string") { | |
| return parseInt(val) | |
| } | |
| return val | |
| }, | |
| z | |
| .number() | |
| ), | |
| b: z.preprocess( | |
| (val) => { | |
| if (val && typeof val === "string") { | |
| return parseInt(val) | |
| } | |
| return val | |
| }, | |
| z | |
| .number() | |
| ), | |
| }) | |
| ``` | |
| Since a query parameter's type is originally a string or array of strings, you have to use Zod's `preprocess` method to validate other query types, such as numbers. | |
| For both `a` and `b`, you transform the query parameter's value to an integer first if it's a string, then, you check that the resulting value is a number. | |
| ### Step 2: Add Request Query Validation Middleware | |
| Next, you'll use the schema to validate incoming requests' query parameters to the `/custom` API route. | |
| Add the `validateAndTransformQuery` middleware to the API route in the file `src/api/middlewares.ts`: | |
| ```ts title="src/api/middlewares.ts" | |
| import { | |
| validateAndTransformQuery, | |
| defineMiddlewares, | |
| } from "@medusajs/framework/http" | |
| import { PostStoreCustomSchema } from "./custom/validators" | |
| export default defineMiddlewares({ | |
| routes: [ | |
| { | |
| matcher: "/custom", | |
| method: "POST", | |
| middlewares: [ | |
| validateAndTransformQuery( | |
| PostStoreCustomSchema, | |
| {} | |
| ), | |
| ], | |
| }, | |
| ], | |
| }) | |
| ``` | |
| The `validateAndTransformQuery` accepts two parameters: | |
| - The first one is the Zod schema to validate the query parameters against. | |
| - The second one is an object of options for retrieving data using Query, which you can learn more about in [this chapter](https://docs.medusajs.com/learn/fundamentals/module-links/query/index.html.md). | |
| #### How the Validation Works | |
| If a request's query parameters don't pass the validation, the `validateAndTransformQuery` middleware throws an error indicating the validation errors. | |
| If a request's query parameters are validated successfully, the middleware sets the validated query parameters in the `validatedQuery` property of `MedusaRequest`. | |
| ### Step 3: Use Validated Query in API Route | |
| Finally, use the validated query in the API route. The `MedusaRequest` parameter has a `validatedQuery` parameter that you can use to access the validated parameters. | |
| For example, create the file `src/api/custom/route.ts` with the following content: | |
| ```ts title="src/api/custom/route.ts" | |
| import { MedusaRequest, MedusaResponse } from "@medusajs/framework/http" | |
| export const GET = async ( | |
| req: MedusaRequest, | |
| res: MedusaResponse | |
| ) => { | |
| const a = req.validatedQuery.a as number | |
| const b = req.validatedQuery.b as number | |
| res.json({ | |
| sum: a + b, | |
| }) | |
| } | |
| ``` | |
| In the API route, you use the `validatedQuery` property of `MedusaRequest` to access the values of the `a` and `b` properties as numbers, then return in the response their sum. | |
| ### Test it Out | |
| To test out the validation, send a `POST` request to `/custom` with `a` and `b` query parameters. You can try sending incorrect query parameters to see how the validation works. | |
| For example, if you omit the `a` parameter, you'll receive a `400` response code with the following response data: | |
| ```json | |
| { | |
| "type": "invalid_data", | |
| "message": "Invalid request: Field 'a' is required" | |
| } | |
| ``` | |
| *** | |
| ## Learn More About Validation Schemas | |
| To see different examples and learn more about creating a validation schema, refer to [Zod's documentation](https://zod.dev). | |
| # Add Data Model Check Constraints | |
| In this chapter, you'll learn how to add check constraints to your data model. | |
| ## What is a Check Constraint? | |
| A check constraint is a condition that must be satisfied by records inserted into a database table, otherwise an error is thrown. | |
| For example, if you have a data model with a `price` property, you want to only allow positive number values. So, you add a check constraint that fails when inserting a record with a negative price value. | |
| *** | |
| ## How to Set a Check Constraint? | |
| To set check constraints on a data model, use the `checks` method. This method accepts an array of check constraints to apply on the data model. | |
| For example, to set a check constraint on a `price` property that ensures its value can only be a positive number: | |
| ```ts highlights={checks1Highlights} | |
| import { model } from "@medusajs/framework/utils" | |
| const CustomProduct = model.define("custom_product", { | |
| // ... | |
| price: model.bigNumber(), | |
| }) | |
| .checks([ | |
| (columns) => `${columns.price} >= 0`, | |
| ]) | |
| ``` | |
| The item passed in the array parameter of `checks` can be a callback function that accepts as a parameter an object whose keys are the names of the properties in the data model schema, and values the respective column name in the database. | |
| The function returns a string indicating the [SQL check constraint expression](https://www.postgresql.org/docs/current/ddl-constraints.html#DDL-CONSTRAINTS-CHECK-CONSTRAINTS). In the expression, use the `columns` parameter to access a property's column name. | |
| You can also pass an object to the `checks` method: | |
| ```ts highlights={checks2Highlights} | |
| import { model } from "@medusajs/framework/utils" | |
| const CustomProduct = model.define("custom_product", { | |
| // ... | |
| price: model.bigNumber(), | |
| }) | |
| .checks([ | |
| { | |
| name: "custom_product_price_check", | |
| expression: (columns) => `${columns.price} >= 0`, | |
| }, | |
| ]) | |
| ``` | |
| The object accepts the following properties: | |
| - `name`: The check constraint's name. | |
| - `expression`: A function similar to the one that can be passed to the array. It accepts an object of columns and returns an [SQL check constraint expression](https://www.postgresql.org/docs/current/ddl-constraints.html#DDL-CONSTRAINTS-CHECK-CONSTRAINTS). | |
| *** | |
| ## Apply in Migrations | |
| After adding the check constraint, make sure to generate and run migrations if you already have the table in the database. Otherwise, the check constraint won't be reflected. | |
| To generate a migration for the data model's module then reflect it on the database, run the following command: | |
| ```bash | |
| npx medusa db:generate custom_module | |
| npx medusa db:migrate | |
| ``` | |
| The first command generates the migration under the `migrations` directory of your module's directory, and the second reflects it on the database. | |
| # Configure Data Model Properties | |
| In this chapter, you’ll learn how to configure data model properties. | |
| ## Property’s Default Value | |
| Use the `default` method on a property's definition to specify the default value of a property. | |
| For example: | |
| ```ts highlights={defaultHighlights} | |
| import { model } from "@medusajs/framework/utils" | |
| const MyCustom = model.define("my_custom", { | |
| color: model | |
| .enum(["black", "white"]) | |
| .default("black"), | |
| age: model | |
| .number() | |
| .default(0), | |
| // ... | |
| }) | |
| export default MyCustom | |
| ``` | |
| In this example, you set the default value of the `color` enum property to `black`, and that of the `age` number property to `0`. | |
| *** | |
| ## Nullable Property | |
| Use the `nullable` method to indicate that a property’s value can be `null`. | |
| For example: | |
| ```ts highlights={nullableHighlights} | |
| import { model } from "@medusajs/framework/utils" | |
| const MyCustom = model.define("my_custom", { | |
| price: model.bigNumber().nullable(), | |
| // ... | |
| }) | |
| export default MyCustom | |
| ``` | |
| *** | |
| ## Unique Property | |
| The `unique` method indicates that a property’s value must be unique in the database through a unique index. | |
| For example: | |
| ```ts highlights={uniqueHighlights} | |
| import { model } from "@medusajs/framework/utils" | |
| const User = model.define("user", { | |
| email: model.text().unique(), | |
| // ... | |
| }) | |
| export default User | |
| ``` | |
| In this example, multiple users can’t have the same email. | |
| # Data Model Default Properties | |
| In this chapter, you'll learn about the properties available by default in your data model. | |
| When you create a data model, the following properties are created for you by Medusa: | |
| - `created_at`: A `dateTime` property that stores when a record of the data model was created. | |
| - `updated_at`: A `dateTime` property that stores when a record of the data model was updated. | |
| - `deleted_at`: A `dateTime` property that stores when a record of the data model was deleted. When you soft-delete a record, Medusa sets the `deleted_at` property to the current date. | |
| # Infer Type of Data Model | |
| In this chapter, you'll learn how to infer the type of a data model. | |
| ## How to Infer Type of Data Model? | |
| Consider you have a `MyCustom` data model. You can't reference this data model in a type, such as a workflow input or service method output types, since it's a variable. | |
| Instead, Medusa provides `InferTypeOf` that transforms your data model to a type. | |
| For example: | |
| ```ts | |
| import { InferTypeOf } from "@medusajs/framework/types" | |
| import { MyCustom } from "../models/my-custom" // relative path to the model | |
| export type MyCustom = InferTypeOf<typeof MyCustom> | |
| ``` | |
| `InferTypeOf` accepts as a type argument the type of the data model. | |
| Since the `MyCustom` data model is a variable, use the `typeof` operator to pass the data model as a type argument to `InferTypeOf`. | |
| You can now use the `MyCustom` type to reference a data model in other types, such as in workflow inputs or service method outputs: | |
| ```ts title="Example Service" | |
| // other imports... | |
| import { InferTypeOf } from "@medusajs/framework/types" | |
| import { MyCustom } from "../models/my-custom" | |
| type MyCustom = InferTypeOf<typeof MyCustom> | |
| class HelloModuleService extends MedusaService({ MyCustom }) { | |
| async doSomething(): Promise<MyCustom> { | |
| // ... | |
| } | |
| } | |
| ``` | |
| # Manage Relationships | |
| In this chapter, you'll learn how to manage relationships between data models when creating, updating, or retrieving records using the module's main service. | |
| ## Manage One-to-One Relationship | |
| ### BelongsTo Side of One-to-One | |
| When you create a record of a data model that belongs to another through a one-to-one relation, pass the ID of the other data model's record in the relation property. | |
| For example, assuming you have the [User and Email data models from the previous chapter](https://docs.medusajs.com/learn/fundamentals/data-models/relationships#one-to-one-relationship/index.html.md), set an email's user ID as follows: | |
| ```ts highlights={belongsHighlights} | |
| // when creating an email | |
| const email = await helloModuleService.createEmails({ | |
| // other properties... | |
| user: "123", | |
| }) | |
| // when updating an email | |
| const email = await helloModuleService.updateEmails({ | |
| id: "321", | |
| // other properties... | |
| user: "123", | |
| }) | |
| ``` | |
| In the example above, you pass the `user` property when creating or updating an email to specify the user it belongs to. | |
| ### HasOne Side | |
| When you create a record of a data model that has one of another, pass the ID of the other data model's record in the relation property. | |
| For example, assuming you have the [User and Email data models from the previous chapter](https://docs.medusajs.com/learn/fundamentals/data-models/relationships#one-to-one-relationship/index.html.md), set a user's email ID as follows: | |
| ```ts highlights={hasOneHighlights} | |
| // when creating a user | |
| const user = await helloModuleService.createUsers({ | |
| // other properties... | |
| email: "123", | |
| }) | |
| // when updating a user | |
| const user = await helloModuleService.updateUsers({ | |
| id: "321", | |
| // other properties... | |
| email: "123", | |
| }) | |
| ``` | |
| In the example above, you pass the `email` property when creating or updating a user to specify the email it has. | |
| *** | |
| ## Manage One-to-Many Relationship | |
| In a one-to-many relationship, you can only manage the associations from the `belongsTo` side. | |
| When you create a record of the data model on the `belongsTo` side, pass the ID of the other data model's record in the `{relation}_id` property, where `{relation}` is the name of the relation property. | |
| For example, assuming you have the [Product and Store data models from the previous chapter](https://docs.medusajs.com/learn/fundamentals/data-models/relationships#one-to-many-relationship/index.html.md), set a product's store ID as follows: | |
| ```ts highlights={manyBelongsHighlights} | |
| // when creating a product | |
| const product = await helloModuleService.createProducts({ | |
| // other properties... | |
| store_id: "123", | |
| }) | |
| // when updating a product | |
| const product = await helloModuleService.updateProducts({ | |
| id: "321", | |
| // other properties... | |
| store_id: "123", | |
| }) | |
| ``` | |
| In the example above, you pass the `store_id` property when creating or updating a product to specify the store it belongs to. | |
| *** | |
| ## Manage Many-to-Many Relationship | |
| If your many-to-many relation is represented with a [pivotEntity](https://docs.medusajs.com/learn/fundamentals/data-models/relationships#many-to-many-with-custom-columns/index.html.md), refer to [this section](#manage-many-to-many-relationship-with-pivotentity) instead. | |
| ### Create Associations | |
| When you create a record of a data model that has a many-to-many relationship to another data model, pass an array of IDs of the other data model's records in the relation property. | |
| For example, assuming you have the [Order and Product data models from the previous chapter](https://docs.medusajs.com/learn/fundamentals/data-models/relationships#many-to-many-relationship/index.html.md), set the association between products and orders as follows: | |
| ```ts highlights={manyHighlights} | |
| // when creating a product | |
| const product = await helloModuleService.createProducts({ | |
| // other properties... | |
| orders: ["123", "321"], | |
| }) | |
| // when creating an order | |
| const order = await helloModuleService.createOrders({ | |
| id: "321", | |
| // other properties... | |
| products: ["123", "321"], | |
| }) | |
| ``` | |
| In the example above, you pass the `orders` property when you create a product, and you pass the `products` property when you create an order. | |
| ### Update Associations | |
| When you use the `update` methods generated by the service factory, you also pass an array of IDs as the relation property's value to add new associated records. | |
| However, this removes any existing associations to records whose IDs aren't included in the array. | |
| For example, assuming you have the [Order and Product data models from the previous chapter](https://docs.medusajs.com/learn/fundamentals/data-models/relationships#many-to-many-relationship/index.html.md), you update the product's related orders as so: | |
| ```ts | |
| const product = await helloModuleService.updateProducts({ | |
| id: "123", | |
| // other properties... | |
| orders: ["321"], | |
| }) | |
| ``` | |
| If the product was associated with an order, and you don't include that order's ID in the `orders` array, the association between the product and order is removed. | |
| So, to add a new association without removing existing ones, retrieve the product first to pass its associated orders when updating the product: | |
| ```ts highlights={updateAssociationHighlights} | |
| const product = await helloModuleService.retrieveProduct( | |
| "123", | |
| { | |
| relations: ["orders"], | |
| } | |
| ) | |
| const updatedProduct = await helloModuleService.updateProducts({ | |
| id: product.id, | |
| // other properties... | |
| orders: [ | |
| ...product.orders.map((order) => order.id), | |
| "321", | |
| ], | |
| }) | |
| ``` | |
| This keeps existing associations between the product and orders, and adds a new one. | |
| *** | |
| ## Manage Many-to-Many Relationship with pivotEntity | |
| If your many-to-many relation is represented without a [pivotEntity](https://docs.medusajs.com/learn/fundamentals/data-models/relationships#many-to-many-with-custom-columns/index.html.md), refer to [this section](#manage-many-to-many-relationship) instead. | |
| If you have a many-to-many relation with a `pivotEntity` specified, make sure to pass the data model representing the pivot table to [MedusaService](https://docs.medusajs.com/learn/fundamentals/modules/service-factory/index.html.md) that your module's service extends. | |
| For example, assuming you have the [Order, Product, and OrderProduct models from the previous chapter](https://docs.medusajs.com/learn/fundamentals/data-models/relationships#many-to-many-with-custom-columns/index.html.md), add `OrderProduct` to `MedusaService`'s object parameter: | |
| ```ts highlights={["4"]} | |
| class HelloModuleService extends MedusaService({ | |
| Order, | |
| Product, | |
| OrderProduct, | |
| }) {} | |
| ``` | |
| This will generate Create, Read, Update and Delete (CRUD) methods for the `OrderProduct` data model, which you can use to create relations between orders and products and manage the extra columns in the pivot table. | |
| For example: | |
| ```ts | |
| // create order-product association | |
| const orderProduct = await helloModuleService.createOrderProducts({ | |
| order_id: "123", | |
| product_id: "123", | |
| metadata: { | |
| test: true, | |
| }, | |
| }) | |
| // update order-product association | |
| const orderProduct = await helloModuleService.updateOrderProducts({ | |
| id: "123", | |
| metadata: { | |
| test: false, | |
| }, | |
| }) | |
| // delete order-product association | |
| await helloModuleService.deleteOrderProducts("123") | |
| ``` | |
| Since the `OrderProduct` data model belongs to the `Order` and `Product` data models, you can set its order and product as explained in the [one-to-many relationship section](#manage-one-to-many-relationship) using `order_id` and `product_id`. | |
| Refer to the [service factory reference](https://docs.medusajs.com/resources/service-factory-reference/index.html.md) for a full list of generated methods and their usages. | |
| *** | |
| ## Retrieve Records of Relation | |
| The `list`, `listAndCount`, and `retrieve` methods of a module's main service accept as a second parameter an object of options. | |
| To retrieve the records associated with a data model's records through a relationship, pass in the second parameter object a `relations` property whose value is an array of relationship names. | |
| For example, assuming you have the [Order and Product data models from the previous chapter](https://docs.medusajs.com/learn/fundamentals/data-models/relationships#many-to-many-relationship/index.html.md), you retrieve a product's orders as follows: | |
| ```ts highlights={retrieveHighlights} | |
| const product = await helloModuleService.retrieveProducts( | |
| "123", | |
| { | |
| relations: ["orders"], | |
| } | |
| ) | |
| ``` | |
| In the example above, the retrieved product has an `orders` property, whose value is an array of orders associated with the product. | |
| # Data Model’s Primary Key | |
| In this chapter, you’ll learn how to configure the primary key of a data model. | |
| ## primaryKey Method | |
| To set any `id`, `text`, or `number` property as a primary key, use the `primaryKey` method. | |
| For example: | |
| ```ts highlights={highlights} | |
| import { model } from "@medusajs/framework/utils" | |
| const MyCustom = model.define("my_custom", { | |
| id: model.id().primaryKey(), | |
| // ... | |
| }) | |
| export default MyCustom | |
| ``` | |
| In the example above, the `id` property is defined as the data model's primary key. | |
| # Data Model Property Types | |
| In this chapter, you’ll learn about the types of properties in a data model’s schema. | |
| ## id | |
| The `id` method defines an automatically generated string ID property. The generated ID is a unique string that has a mix of letters and numbers. | |
| For example: | |
| ```ts highlights={idHighlights} | |
| import { model } from "@medusajs/framework/utils" | |
| const MyCustom = model.define("my_custom", { | |
| id: model.id(), | |
| // ... | |
| }) | |
| export default MyCustom | |
| ``` | |
| *** | |
| ## text | |
| The `text` method defines a string property. | |
| For example: | |
| ```ts highlights={textHighlights} | |
| import { model } from "@medusajs/framework/utils" | |
| const MyCustom = model.define("my_custom", { | |
| name: model.text(), | |
| // ... | |
| }) | |
| export default MyCustom | |
| ``` | |
| *** | |
| ## number | |
| The `number` method defines a number property. | |
| For example: | |
| ```ts highlights={numberHighlights} | |
| import { model } from "@medusajs/framework/utils" | |
| const MyCustom = model.define("my_custom", { | |
| age: model.number(), | |
| // ... | |
| }) | |
| export default MyCustom | |
| ``` | |
| *** | |
| ## float | |
| This property is only available after [Medusa v2.1.2](https://github.com/medusajs/medusa/releases/tag/v2.1.2). | |
| The `float` method defines a number property that allows for values with decimal places. | |
| Use this property type when it's less important to have high precision for numbers with large decimal places. Alternatively, for higher percision, use the [bigNumber property](#bignumber). | |
| For example: | |
| ```ts highlights={floatHighlights} | |
| import { model } from "@medusajs/framework/utils" | |
| const MyCustom = model.define("my_custom", { | |
| rating: model.float(), | |
| // ... | |
| }) | |
| export default MyCustom | |
| ``` | |
| *** | |
| ## bigNumber | |
| The `bigNumber` method defines a number property that expects large numbers, such as prices. | |
| Use this property type when it's important to have high precision for numbers with large decimal places. Alternatively, for less percision, use the [float property](#float). | |
| For example: | |
| ```ts highlights={bigNumberHighlights} | |
| import { model } from "@medusajs/framework/utils" | |
| const MyCustom = model.define("my_custom", { | |
| price: model.bigNumber(), | |
| // ... | |
| }) | |
| export default MyCustom | |
| ``` | |
| *** | |
| ## boolean | |
| The `boolean` method defines a boolean property. | |
| For example: | |
| ```ts highlights={booleanHighlights} | |
| import { model } from "@medusajs/framework/utils" | |
| const MyCustom = model.define("my_custom", { | |
| hasAccount: model.boolean(), | |
| // ... | |
| }) | |
| export default MyCustom | |
| ``` | |
| *** | |
| ### enum | |
| The `enum` method defines a property whose value can only be one of the specified values. | |
| For example: | |
| ```ts highlights={enumHighlights} | |
| import { model } from "@medusajs/framework/utils" | |
| const MyCustom = model.define("my_custom", { | |
| color: model.enum(["black", "white"]), | |
| // ... | |
| }) | |
| export default MyCustom | |
| ``` | |
| The `enum` method accepts an array of possible string values. | |
| *** | |
| ## dateTime | |
| The `dateTime` method defines a timestamp property. | |
| For example: | |
| ```ts highlights={dateTimeHighlights} | |
| import { model } from "@medusajs/framework/utils" | |
| const MyCustom = model.define("my_custom", { | |
| date_of_birth: model.dateTime(), | |
| // ... | |
| }) | |
| export default MyCustom | |
| ``` | |
| *** | |
| ## json | |
| The `json` method defines a property whose value is a stringified JSON object. | |
| For example: | |
| ```ts highlights={jsonHighlights} | |
| import { model } from "@medusajs/framework/utils" | |
| const MyCustom = model.define("my_custom", { | |
| metadata: model.json(), | |
| // ... | |
| }) | |
| export default MyCustom | |
| ``` | |
| *** | |
| ## array | |
| The `array` method defines an array of strings property. | |
| For example: | |
| ```ts highlights={arrHightlights} | |
| import { model } from "@medusajs/framework/utils" | |
| const MyCustom = model.define("my_custom", { | |
| names: model.array(), | |
| // ... | |
| }) | |
| export default MyCustom | |
| ``` | |
| *** | |
| ## Properties Reference | |
| Refer to the [Data Model API reference](https://docs.medusajs.com/resources/references/data-model/index.html.md) for a full reference of the properties. | |
| # Data Model Relationships | |
| In this chapter, you’ll learn how to define relationships between data models in your module. | |
| ## What is a Relationship Property? | |
| A relationship property defines an association in the database between two models. It's created using the Data Model Language (DML) methods, such as `hasOne` or `belongsTo`. | |
| When you generate a migration for these data models, the migrations include foreign key columns or pivot tables, based on the relationship's type. | |
| You want to create a relation between data models in the same module. | |
| You want to create a relationship between data models in different modules. Use module links instead. | |
| *** | |
| ## One-to-One Relationship | |
| A one-to-one relationship indicates that one record of a data model belongs to or is associated with another. | |
| To define a one-to-one relationship, create relationship properties in the data models using the following methods: | |
| 1. `hasOne`: indicates that the model has one record of the specified model. | |
| 2. `belongsTo`: indicates that the model belongs to one record of the specified model. | |
| For example: | |
| ```ts highlights={oneToOneHighlights} | |
| import { model } from "@medusajs/framework/utils" | |
| const User = model.define("user", { | |
| id: model.id().primaryKey(), | |
| email: model.hasOne(() => Email), | |
| }) | |
| const Email = model.define("email", { | |
| id: model.id().primaryKey(), | |
| user: model.belongsTo(() => User, { | |
| mappedBy: "email", | |
| }), | |
| }) | |
| ``` | |
| In the example above, a user has one email, and an email belongs to one user. | |
| The `hasOne` and `belongsTo` methods accept a function as the first parameter. The function returns the associated data model. | |
| The `belongsTo` method also requires passing as a second parameter an object with the property `mappedBy`. Its value is the name of the relationship property in the other data model. | |
| ### Optional Relationship | |
| To make the relationship optional on the `hasOne` or `belongsTo` side, use the `nullable` method on either property as explained in [this chapter](https://docs.medusajs.com/learn/fundamentals/data-models/configure-properties#nullable-property/index.html.md). | |
| ### One-sided One-to-One Relationship | |
| If the one-to-one relationship is only defined on one side, pass `undefined` to the `mappedBy` property in the `belongsTo` method. | |
| For example: | |
| ```ts highlights={oneToOneUndefinedHighlights} | |
| import { model } from "@medusajs/framework/utils" | |
| const User = model.define("user", { | |
| id: model.id().primaryKey(), | |
| }) | |
| const Email = model.define("email", { | |
| id: model.id().primaryKey(), | |
| user: model.belongsTo(() => User, { | |
| mappedBy: undefined, | |
| }), | |
| }) | |
| ``` | |
| ### One-to-One Relationship in the Database | |
| When you generate the migrations of data models that have a one-to-one relationship, the migration adds to the table of the data model that has the `belongsTo` property: | |
| 1. A column of the format `{relation_name}_id` to store the ID of the record of the related data model. For example, the `email` table will have a `user_id` column. | |
| 2. A foreign key on the `{relation_name}_id` column to the table of the related data model. | |
| 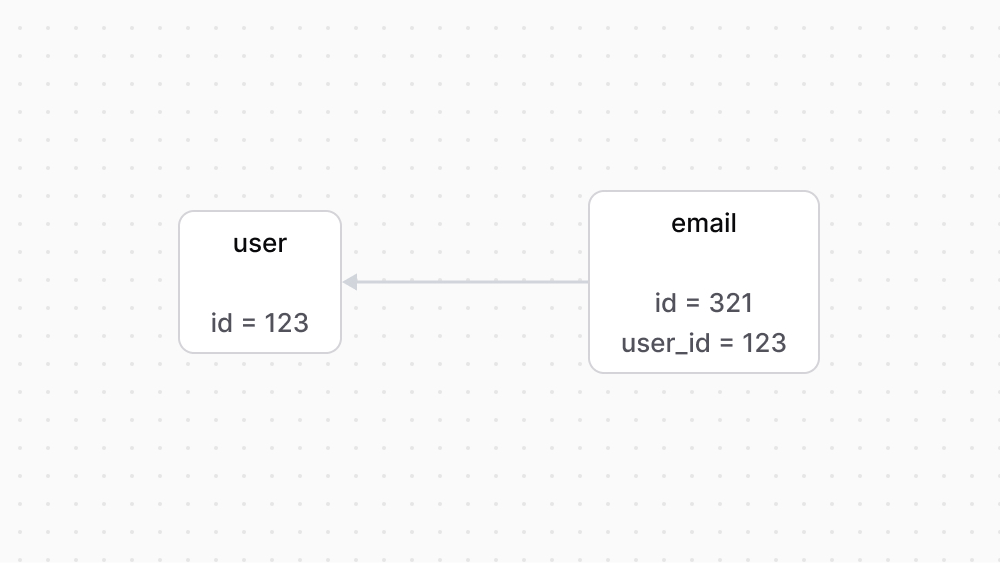 | |
| *** | |
| ## One-to-Many Relationship | |
| A one-to-many relationship indicates that one record of a data model has many records of another data model. | |
| To define a one-to-many relationship, create relationship properties in the data models using the following methods: | |
| 1. `hasMany`: indicates that the model has more than one record of the specified model. | |
| 2. `belongsTo`: indicates that the model belongs to one record of the specified model. | |
| For example: | |
| ```ts highlights={oneToManyHighlights} | |
| import { model } from "@medusajs/framework/utils" | |
| const Store = model.define("store", { | |
| id: model.id().primaryKey(), | |
| products: model.hasMany(() => Product), | |
| }) | |
| const Product = model.define("product", { | |
| id: model.id().primaryKey(), | |
| store: model.belongsTo(() => Store, { | |
| mappedBy: "products", | |
| }), | |
| }) | |
| ``` | |
| In this example, a store has many products, but a product belongs to one store. | |
| ### Optional Relationship | |
| To make the relationship optional on the `belongsTo` side, use the `nullable` method on the property as explained in [this chapter](https://docs.medusajs.com/learn/fundamentals/data-models/configure-properties#nullable-property/index.html.md). | |
| ### One-to-Many Relationship in the Database | |
| When you generate the migrations of data models that have a one-to-many relationship, the migration adds to the table of the data model that has the `belongsTo` property: | |
| 1. A column of the format `{relation_name}_id` to store the ID of the record of the related data model. For example, the `product` table will have a `store_id` column. | |
| 2. A foreign key on the `{relation_name}_id` column to the table of the related data model. | |
| 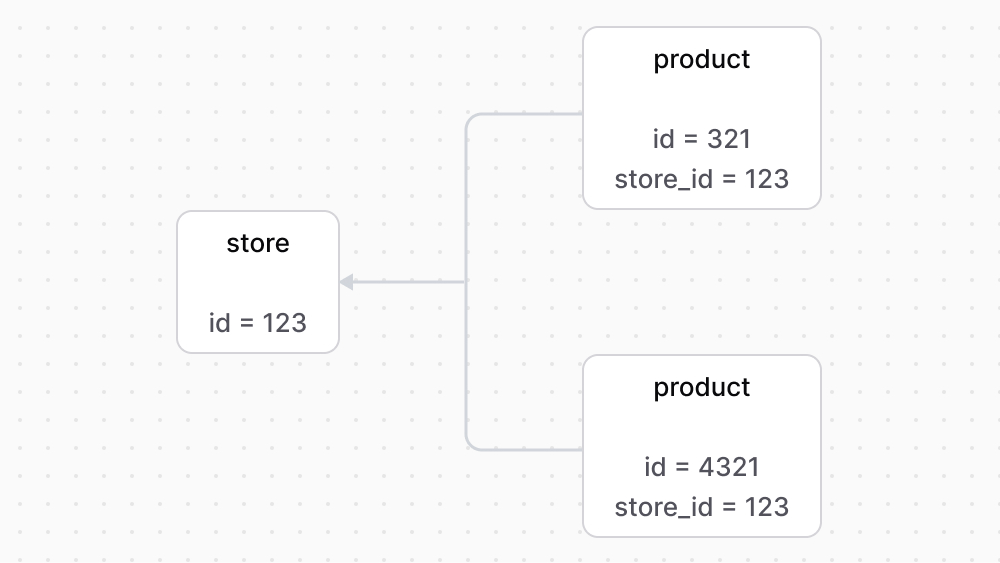 | |
| *** | |
| ## Many-to-Many Relationship | |
| A many-to-many relationship indicates that many records of a data model can be associated with many records of another data model. | |
| To define a many-to-many relationship, create relationship properties in the data models using the `manyToMany` method. | |
| For example: | |
| ```ts highlights={manyToManyHighlights} | |
| import { model } from "@medusajs/framework/utils" | |
| const Order = model.define("order", { | |
| id: model.id().primaryKey(), | |
| products: model.manyToMany(() => Product, { | |
| mappedBy: "orders", | |
| pivotTable: "order_product", | |
| joinColumn: "order_id", | |
| inverseJoinColumn: "product_id", | |
| }), | |
| }) | |
| const Product = model.define("product", { | |
| id: model.id().primaryKey(), | |
| orders: model.manyToMany(() => Order, { | |
| mappedBy: "products", | |
| }), | |
| }) | |
| ``` | |
| The `manyToMany` method accepts two parameters: | |
| 1. A function that returns the associated data model. | |
| 2. An object of optional configuration. Only one of the data models in the relation can define the `pivotTable`, `joinColumn`, and `inverseJoinColumn` configurations, and it's considered the owner data model. The object can accept the following properties: | |
| - `mappedBy`: The name of the relationship property in the other data model. If not set, the property's name is inferred from the associated data model's name. | |
| - `pivotTable`: The name of the pivot table created in the database for the many-to-many relation. If not set, the pivot table is inferred by combining the names of the data models' tables in alphabetical order, separating them by `_`, and pluralizing the last name. For example, `order_products`. | |
| - `joinColumn`: The name of the column in the pivot table that points to the owner model's primary key. | |
| - `inverseJoinColumn`: The name of the column in the pivot table that points to the owned model's primary key. | |
| The `pivotTable`, `joinColumn`, and `inverseJoinColumn` properties are only available after [Medusa v2.0.7](https://github.com/medusajs/medusa/releases/tag/v2.0.7). | |
| Following [Medusa v2.1.0](https://github.com/medusajs/medusa/releases/tag/v2.1.0), if `pivotTable`, `joinColumn`, and `inverseJoinColumn` aren't specified on either model, the owner is decided based on alphabetical order. So, in the example above, the `Order` data model would be the owner. | |
| In this example, an order is associated with many products, and a product is associated with many orders. Since the `pivotTable`, `joinColumn`, and `inverseJoinColumn` configurations are defined on the order, it's considered the owner data model. | |
| ### Many-to-Many Relationship in the Database | |
| When you generate the migrations of data models that have a many-to-many relationship, the migration adds a new pivot table. Its name is either the name you specify in the `pivotTable` configuration or the inferred name combining the names of the data models' tables in alphabetical order, separating them by `_`, and pluralizing the last name. For example, `order_products`. | |
| The pivot table has a column with the name `{data_model}_id` for each of the data model's tables. It also has foreign keys on each of these columns to their respective tables. | |
| The pivot table has columns with foreign keys pointing to the primary key of the associated tables. The column's name is either: | |
| - The value of the `joinColumn` configuration for the owner table, and the `inverseJoinColumn` configuration for the owned table; | |
| - Or the inferred name `{table_name}_id`. | |
|  | |
| ### Many-To-Many with Custom Columns | |
| To add custom columns to the pivot table between two data models having a many-to-many relationship, you must define a new data model that represents the pivot table. | |
| For example: | |
| ```ts highlights={manyToManyColumnHighlights} | |
| import { model } from "@medusajs/framework/utils" | |
| export const Order = model.define("order_test", { | |
| id: model.id().primaryKey(), | |
| products: model.manyToMany(() => Product, { | |
| pivotEntity: () => OrderProduct, | |
| }), | |
| }) | |
| export const Product = model.define("product_test", { | |
| id: model.id().primaryKey(), | |
| orders: model.manyToMany(() => Order), | |
| }) | |
| export const OrderProduct = model.define("orders_products", { | |
| id: model.id().primaryKey(), | |
| order: model.belongsTo(() => Order, { | |
| mappedBy: "products", | |
| }), | |
| product: model.belongsTo(() => Product, { | |
| mappedBy: "orders", | |
| }), | |
| metadata: model.json().nullable(), | |
| }) | |
| ``` | |
| The `Order` and `Product` data models have a many-to-many relationship. To add extra columns to the created pivot table, you pass a `pivotEntity` option to the `products` relation in `Order` (since `Order` is the owner). The value of `pivotEntity` is a function that returns the data model representing the pivot table. | |
| The `OrderProduct` model defines, aside from the ID, the following properties: | |
| - `order`: A relation that indicates this model belongs to the `Order` data model. You set the `mappedBy` option to the many-to-many relation's name in the `Order` data model. | |
| - `product`: A relation that indicates this model belongs to the `Product` data model. You set the `mappedBy` option to the many-to-many relation's name in the `Product` data model. | |
| - `metadata`: An extra column to add to the pivot table of type `json`. You can add other columns as well to the model. | |
| *** | |
| ## Set Relationship Name in the Other Model | |
| The relationship property methods accept as a second parameter an object of options. The `mappedBy` property defines the name of the relationship in the other data model. | |
| This is useful if the relationship property’s name is different from that of the associated data model. | |
| As seen in previous examples, the `mappedBy` option is required for the `belongsTo` method. | |
| For example: | |
| ```ts highlights={relationNameHighlights} | |
| import { model } from "@medusajs/framework/utils" | |
| const User = model.define("user", { | |
| id: model.id().primaryKey(), | |
| email: model.hasOne(() => Email, { | |
| mappedBy: "owner", | |
| }), | |
| }) | |
| const Email = model.define("email", { | |
| id: model.id().primaryKey(), | |
| owner: model.belongsTo(() => User, { | |
| mappedBy: "email", | |
| }), | |
| }) | |
| ``` | |
| In this example, you specify in the `User` data model’s relationship property that the name of the relationship in the `Email` data model is `owner`. | |
| *** | |
| ## Cascades | |
| When an operation is performed on a data model, such as record deletion, the relationship cascade specifies what related data model records should be affected by it. | |
| For example, if a store is deleted, its products should also be deleted. | |
| The `cascades` method used on a data model configures which child records an operation is cascaded to. | |
| For example: | |
| ```ts highlights={highlights} | |
| import { model } from "@medusajs/framework/utils" | |
| const Store = model.define("store", { | |
| id: model.id().primaryKey(), | |
| products: model.hasMany(() => Product), | |
| }) | |
| .cascades({ | |
| delete: ["products"], | |
| }) | |
| const Product = model.define("product", { | |
| id: model.id().primaryKey(), | |
| store: model.belongsTo(() => Store, { | |
| mappedBy: "products", | |
| }), | |
| }) | |
| ``` | |
| The `cascades` method accepts an object. Its key is the operation’s name, such as `delete`. The value is an array of relationship property names that the operation is cascaded to. | |
| In the example above, when a store is deleted, its associated products are also deleted. | |
| # Searchable Data Model Property | |
| In this chapter, you'll learn what a searchable property is and how to define it. | |
| ## What is a Searchable Property? | |
| Methods generated by the [service factory](https://docs.medusajs.com/learn/fundamentals/modules/service-factory/index.html.md) that accept filters, such as `list{ModelName}s`, accept a `q` property as part of the filters. | |
| When the `q` filter is passed, the data model's searchable properties are queried to find matching records. | |
| *** | |
| ## Define a Searchable Property | |
| Use the `searchable` method on a `text` property to indicate that it's searchable. | |
| For example: | |
| ```ts highlights={searchableHighlights} | |
| import { model } from "@medusajs/framework/utils" | |
| const MyCustom = model.define("my_custom", { | |
| name: model.text().searchable(), | |
| // ... | |
| }) | |
| export default MyCustom | |
| ``` | |
| In this example, the `name` property is searchable. | |
| ### Search Example | |
| If you pass a `q` filter to the `listMyCustoms` method: | |
| ```ts | |
| const myCustoms = await helloModuleService.listMyCustoms({ | |
| q: "John", | |
| }) | |
| ``` | |
| This retrieves records that include `John` in their `name` property. | |
| # Write Migration | |
| In this chapter, you'll learn how to create a migration and write it manually. | |
| ## What is a Migration? | |
| A migration is a class created in a TypeScript or JavaScript file under a module's `migrations` directory. It has two methods: | |
| - The `up` method reflects changes on the database. | |
| - The `down` method reverts the changes made in the `up` method. | |
| *** | |
| ## How to Write a Migration? | |
| The Medusa CLI tool provides a [db:generate](https://docs.medusajs.com/resources/medusa-cli/commands/db#dbgenerate/index.html.md) command to generate a migration for the specified modules' data models. | |
| Alternatively, you can manually create a migration file under the `migrations` directory of your module. | |
| For example: | |
| ```ts title="src/modules/hello/migrations/Migration20240429.ts" | |
| import { Migration } from "@mikro-orm/migrations" | |
| export class Migration20240702105919 extends Migration { | |
| async up(): Promise<void> { | |
| this.addSql("create table if not exists \"my_custom\" (\"id\" text not null, \"name\" text not null, \"created_at\" timestamptz not null default now(), \"updated_at\" timestamptz not null default now(), \"deleted_at\" timestamptz null, constraint \"my_custom_pkey\" primary key (\"id\"));") | |
| } | |
| async down(): Promise<void> { | |
| this.addSql("drop table if exists \"my_custom\" cascade;") | |
| } | |
| } | |
| ``` | |
| The migration's file name should be of the format `Migration{YEAR}{MONTH}{DAY}.ts`. The migration class in the file extends the `Migration` class imported from `@mikro-orm/migrations`. | |
| In the `up` and `down` method of the migration class, you use the `addSql` method provided by MikroORM's `Migration` class to run PostgreSQL syntax. | |
| In the example above, the `up` method creates the table `my_custom`, and the `down` method drops the table if the migration is reverted. | |
| Refer to [MikroORM's documentation](https://mikro-orm.io/docs/migrations#migration-class) for more details on writing migrations. | |
| *** | |
| ## Run the Migration | |
| To run your migration, run the following command: | |
| This command also syncs module links. If you don't want that, use the `--skip-links` option. | |
| ```bash | |
| npx medusa db:migrate | |
| ``` | |
| This reflects the changes in the database as implemented in the migration's `up` method. | |
| *** | |
| ## Rollback the Migration | |
| To rollback or revert the last migration you ran for a module, run the following command: | |
| ```bash | |
| npx medusa db:rollback helloModuleService | |
| ``` | |
| This rolls back the last ran migration on the Hello Module. | |
| *** | |
| ## More Database Commands | |
| To learn more about the Medusa CLI's database commands, refer to [this CLI reference](https://docs.medusajs.com/resources/medusa-cli/commands/db/index.html.md). | |
| # Data Model Database Index | |
| In this chapter, you’ll learn how to define a database index on a data model. | |
| ## Define Database Index on Property | |
| Use the `index` method on a property's definition to define a database index. | |
| For example: | |
| ```ts highlights={highlights} | |
| import { model } from "@medusajs/framework/utils" | |
| const MyCustom = model.define("my_custom", { | |
| id: model.id().primaryKey(), | |
| name: model.text().index( | |
| "IDX_MY_CUSTOM_NAME" | |
| ), | |
| }) | |
| export default MyCustom | |
| ``` | |
| The `index` method optionally accepts the name of the index as a parameter. | |
| In this example, you define an index on the `name` property. | |
| *** | |
| ## Define Database Index on Data Model | |
| A data model has an `indexes` method that defines database indices on its properties. | |
| The index can be on multiple columns (composite index). For example: | |
| ```ts highlights={dataModelIndexHighlights} | |
| import { model } from "@medusajs/framework/utils" | |
| const MyCustom = model.define("my_custom", { | |
| id: model.id().primaryKey(), | |
| name: model.text(), | |
| age: model.number(), | |
| }).indexes([ | |
| { | |
| on: ["name", "age"], | |
| }, | |
| ]) | |
| export default MyCustom | |
| ``` | |
| The `indexes` method receives an array of indices as a parameter. Each index is an object with a required `on` property indicating the properties to apply the index on. | |
| In the above example, you define a composite index on the `name` and `age` properties. | |
| ### Index Conditions | |
| An index can have conditions. For example: | |
| ```ts highlights={conditionHighlights} | |
| import { model } from "@medusajs/framework/utils" | |
| const MyCustom = model.define("my_custom", { | |
| id: model.id().primaryKey(), | |
| name: model.text(), | |
| age: model.number(), | |
| }).indexes([ | |
| { | |
| on: ["name", "age"], | |
| where: { | |
| age: 30, | |
| }, | |
| }, | |
| ]) | |
| export default MyCustom | |
| ``` | |
| The index object passed to `indexes` accepts a `where` property whose value is an object of conditions. The object's key is a property's name, and its value is the condition on that property. | |
| In the example above, the composite index is created on the `name` and `age` properties when the `age`'s value is `30`. | |
| A property's condition can be a negation. For example: | |
| ```ts highlights={negationHighlights} | |
| import { model } from "@medusajs/framework/utils" | |
| const MyCustom = model.define("my_custom", { | |
| id: model.id().primaryKey(), | |
| name: model.text(), | |
| age: model.number().nullable(), | |
| }).indexes([ | |
| { | |
| on: ["name", "age"], | |
| where: { | |
| age: { | |
| $ne: null, | |
| }, | |
| }, | |
| }, | |
| ]) | |
| export default MyCustom | |
| ``` | |
| A property's value in `where` can be an object having a `$ne` property. `$ne`'s value indicates what the specified property's value shouldn't be. | |
| In the example above, the composite index is created on the `name` and `age` properties when `age`'s value is not `null`. | |
| ### Unique Database Index | |
| The object passed to `indexes` accepts a `unique` property indicating that the created index must be a unique index. | |
| For example: | |
| ```ts highlights={uniqueHighlights} | |
| import { model } from "@medusajs/framework/utils" | |
| const MyCustom = model.define("my_custom", { | |
| id: model.id().primaryKey(), | |
| name: model.text(), | |
| age: model.number(), | |
| }).indexes([ | |
| { | |
| on: ["name", "age"], | |
| unique: true, | |
| }, | |
| ]) | |
| export default MyCustom | |
| ``` | |
| This creates a unique composite index on the `name` and `age` properties. | |
| # Event Data Payload | |
| In this chapter, you'll learn how subscribers receive an event's data payload. | |
| ## Access Event's Data Payload | |
| When events are emitted, they’re emitted with a data payload. | |
| The object that the subscriber function receives as a parameter has an `event` property, which is an object holding the event payload in a `data` property with additional context. | |
| For example: | |
| ```ts title="src/subscribers/product-created.ts" highlights={highlights} collapsibleLines="1-5" expandButtonLabel="Show Imports" | |
| import type { | |
| SubscriberArgs, | |
| SubscriberConfig, | |
| } from "@medusajs/framework" | |
| export default async function productCreateHandler({ | |
| event, | |
| }: SubscriberArgs<{ id: string }>) { | |
| const productId = event.data.id | |
| console.log(`The product ${productId} was created`) | |
| } | |
| export const config: SubscriberConfig = { | |
| event: "product.created", | |
| } | |
| ``` | |
| The `event` object has the following properties: | |
| - data: (\`object\`) The data payload of the event. Its properties are different for each event. | |
| - name: (string) The name of the triggered event. | |
| - metadata: (\`object\`) Additional data and context of the emitted event. | |
| This logs the product ID received in the `product.created` event’s data payload to the console. | |
| {/* --- | |
| ## List of Events with Data Payload | |
| Refer to [this reference](!resources!/events-reference) for a full list of events emitted by Medusa and their data payloads. */} | |
| # Guide: Sync Brands from Medusa to CMS | |
| In the [previous chapter](https://docs.medusajs.com/learn/customization/integrate-systems/service/index.html.md), you created a CMS Module that integrates a dummy third-party system. You can now perform actions using that module within your custom flows. | |
| In another previous chapter, you [added a workflow](https://docs.medusajs.com/learn/customization/custom-features/workflow/index.html.md) that creates a brand. After integrating the CMS, you want to sync that brand to the third-party system as well. | |
| Medusa has an event system that emits events when an operation is performed. It allows you to listen to those events and perform an asynchronous action in a function called a [subscriber](https://docs.medusajs.com/learn/fundamentals/events-and-subscribers/index.html.md). This is useful to perform actions that aren't integral to the original flow, such as syncing data to a third-party system. | |
| Learn more about Medusa's event system and subscribers in [this chapter](https://docs.medusajs.com/learn/fundamentals/events-and-subscribers/index.html.md). | |
| In this chapter, you'll modify the `createBrandWorkflow` you created before to emit a custom event that indicates a brand was created. Then, you'll listen to that event in a subscriber to sync the brand to the third-party CMS. You'll implement the sync logic within a workflow that you execute in the subscriber. | |
| ### Prerequisites | |
| - [createBrandWorkflow](https://docs.medusajs.com/learn/customization/custom-features/workflow/index.html.md) | |
| - [CMS Module](https://docs.medusajs.com/learn/customization/integrate-systems/service/index.html.md) | |
| ## 1. Emit Event in createBrandWorkflow | |
| Since syncing the brand to the third-party system isn't integral to creating a brand, you'll emit a custom event indicating that a brand was created. | |
| Medusa provides an `emitEventStep` that allows you to emit an event in your workflows. So, in the `createBrandWorkflow` defined in `src/workflows/create-brand.ts`, use the `emitEventStep` helper step after the `createBrandStep`: | |
| ```ts title="src/workflows/create-brand.ts" highlights={eventHighlights} | |
| // other imports... | |
| import { | |
| emitEventStep, | |
| } from "@medusajs/medusa/core-flows" | |
| // ... | |
| export const createBrandWorkflow = createWorkflow( | |
| "create-brand", | |
| (input: CreateBrandInput) => { | |
| // ... | |
| emitEventStep({ | |
| eventName: "brand.created", | |
| data: { | |
| id: brand.id, | |
| }, | |
| }) | |
| return new WorkflowResponse(brand) | |
| } | |
| ) | |
| ``` | |
| The `emitEventStep` accepts an object parameter having two properties: | |
| - `eventName`: The name of the event to emit. You'll use this name later to listen to the event in a subscriber. | |
| - `data`: The data payload to emit with the event. This data is passed to subscribers that listen to the event. You add the brand's ID to the data payload, informing the subscribers which brand was created. | |
| You'll learn how to handle this event in a later step. | |
| *** | |
| ## 2. Create Sync to Third-Party System Workflow | |
| The subscriber that will listen to the `brand.created` event will sync the created brand to the third-party CMS. So, you'll implement the syncing logic in a workflow, then execute the workflow in the subscriber. | |
| Workflows have a built-in durable execution engine that helps you complete tasks spanning multiple systems. Also, their rollback mechanism ensures that data is consistent across systems even when errors occur during execution. | |
| Learn more about workflows in [this chapter](https://docs.medusajs.com/learn/fundamentals/workflows/index.html.md). | |
| You'll create a `syncBrandToSystemWorkflow` that has two steps: | |
| - `useQueryGraphStep`: a step that Medusa provides to retrieve data using [Query](https://docs.medusajs.com/learn/fundamentals/module-links/query/index.html.md). You'll use this to retrieve the brand's details using its ID. | |
| - `syncBrandToCmsStep`: a step that you'll create to sync the brand to the CMS. | |
| ### syncBrandToCmsStep | |
| To implement the step that syncs the brand to the CMS, create the file `src/workflows/sync-brands-to-cms.ts` with the following content: | |
| 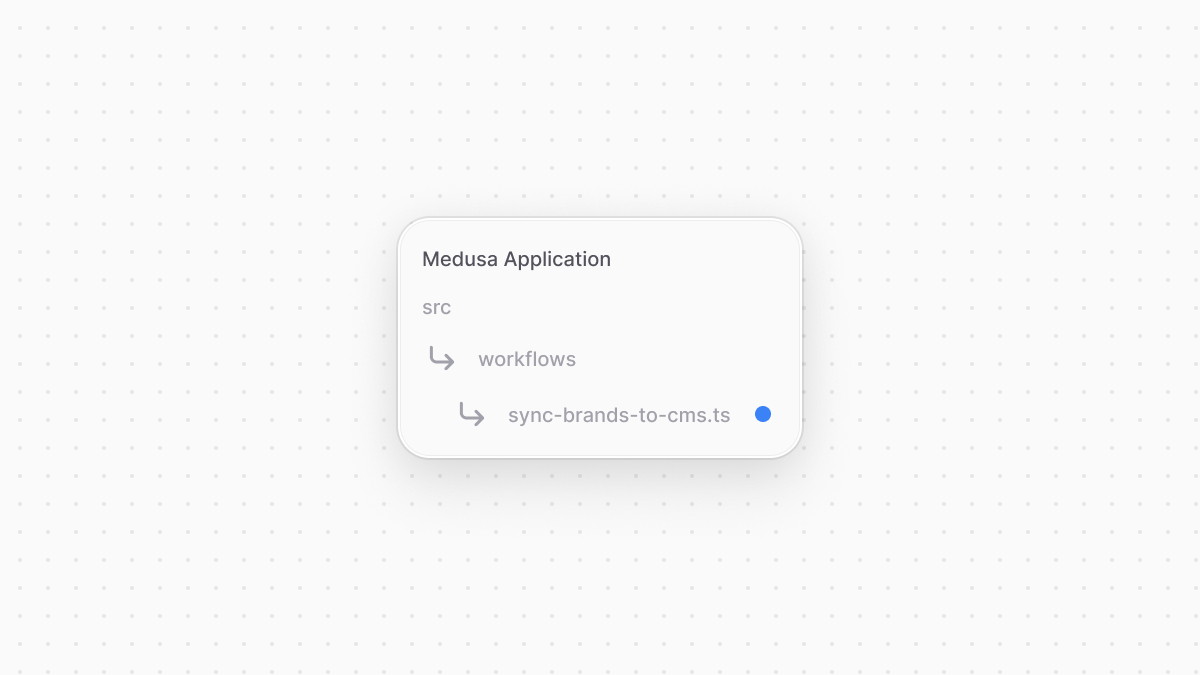 | |
| ```ts title="src/workflows/sync-brands-to-cms.ts" highlights={syncStepHighlights} collapsibleLines="1-6" expandButtonLabel="Show Imports" | |
| import { createStep, StepResponse } from "@medusajs/framework/workflows-sdk" | |
| import { InferTypeOf } from "@medusajs/framework/types" | |
| import { Brand } from "../modules/brand/models/brand" | |
| import { CMS_MODULE } from "../modules/cms" | |
| import CmsModuleService from "../modules/cms/service" | |
| type SyncBrandToCmsStepInput = { | |
| brand: InferTypeOf<typeof Brand> | |
| } | |
| const syncBrandToCmsStep = createStep( | |
| "sync-brand-to-cms", | |
| async ({ brand }: SyncBrandToCmsStepInput, { container }) => { | |
| const cmsModuleService: CmsModuleService = container.resolve(CMS_MODULE) | |
| await cmsModuleService.createBrand(brand) | |
| return new StepResponse(null, brand.id) | |
| }, | |
| async (id, { container }) => { | |
| if (!id) { | |
| return | |
| } | |
| const cmsModuleService: CmsModuleService = container.resolve(CMS_MODULE) | |
| await cmsModuleService.deleteBrand(id) | |
| } | |
| ) | |
| ``` | |
| You create the `syncBrandToCmsStep` that accepts a brand as an input. In the step, you resolve the CMS Module's service from the [Medusa container](https://docs.medusajs.com/learn/fundamentals/medusa-container/index.html.md) and use its `createBrand` method. This method will create the brand in the third-party CMS. | |
| You also pass the brand's ID to the step's compensation function. In this function, you delete the brand in the third-party CMS if an error occurs during the workflow's execution. | |
| Learn more about compensation functions in [this chapter](https://docs.medusajs.com/learn/fundamentals/workflows/compensation-function/index.html.md). | |
| ### Create Workflow | |
| You can now create the workflow that uses the above step. Add the workflow to the same `src/workflows/sync-brands-to-cms.ts` file: | |
| ```ts title="src/workflows/sync-brands-to-cms.ts" highlights={syncWorkflowHighlights} | |
| // other imports... | |
| import { | |
| // ... | |
| createWorkflow, | |
| WorkflowResponse, | |
| } from "@medusajs/framework/workflows-sdk" | |
| import { useQueryGraphStep } from "@medusajs/medusa/core-flows" | |
| // ... | |
| type SyncBrandToCmsWorkflowInput = { | |
| id: string | |
| } | |
| export const syncBrandToCmsWorkflow = createWorkflow( | |
| "sync-brand-to-cms", | |
| (input: SyncBrandToCmsWorkflowInput) => { | |
| // @ts-ignore | |
| const { data: brands } = useQueryGraphStep({ | |
| entity: "brand", | |
| fields: ["*"], | |
| filters: { | |
| id: input.id, | |
| }, | |
| options: { | |
| throwIfKeyNotFound: true, | |
| }, | |
| }) | |
| syncBrandToCmsStep({ | |
| brand: brands[0], | |
| } as SyncBrandToCmsStepInput) | |
| return new WorkflowResponse({}) | |
| } | |
| ) | |
| ``` | |
| You create a `syncBrandToCmsWorkflow` that accepts the brand's ID as input. The workflow has the following steps: | |
| - `useQueryGraphStep`: Retrieve the brand's details using Query. You pass the brand's ID as a filter, and set the `throwIfKeyNotFound` option to true so that the step throws an error if a brand with the specified ID doesn't exist. | |
| - `syncBrandToCmsStep`: Create the brand in the third-party CMS. | |
| You'll execute this workflow in the subscriber next. | |
| Learn more about `useQueryGraphStep` in [this reference](https://docs.medusajs.com/resources/references/helper-steps/useQueryGraphStep/index.html.md). | |
| *** | |
| ## 3. Handle brand.created Event | |
| You now have a workflow with the logic to sync a brand to the CMS. You need to execute this workflow whenever the `brand.created` event is emitted. So, you'll create a subscriber that listens to and handle the event. | |
| Subscribers are created in a TypeScript or JavaScript file under the `src/subscribers` directory. So, create the file `src/subscribers/brand-created.ts` with the following content: | |
| 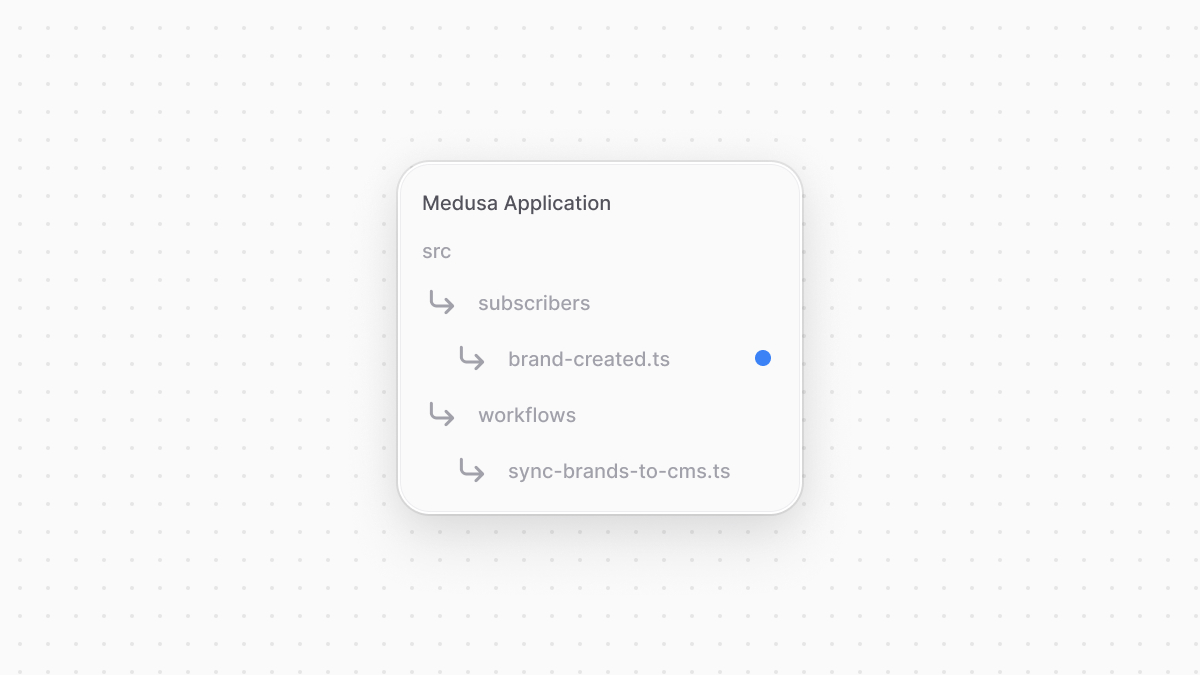 | |
| ```ts title="src/subscribers/brand-created.ts" highlights={subscriberHighlights} | |
| import type { | |
| SubscriberConfig, | |
| SubscriberArgs, | |
| } from "@medusajs/framework" | |
| import { syncBrandToCmsWorkflow } from "../workflows/sync-brands-to-cms" | |
| export default async function brandCreatedHandler({ | |
| event: { data }, | |
| container, | |
| }: SubscriberArgs<{ id: string }>) { | |
| await syncBrandToCmsWorkflow(container).run({ | |
| input: data, | |
| }) | |
| } | |
| export const config: SubscriberConfig = { | |
| event: "brand.created", | |
| } | |
| ``` | |
| A subscriber file must export: | |
| - The asynchronous function that's executed when the event is emitted. This must be the file's default export. | |
| - An object that holds the subscriber's configurations. It has an `event` property that indicates the name of the event that the subscriber is listening to. | |
| The subscriber function accepts an object parameter that has two properties: | |
| - `event`: An object of event details. Its `data` property holds the event's data payload, which is the brand's ID. | |
| - `container`: The Medusa container used to resolve framework and commerce tools. | |
| In the function, you execute the `syncBrandToCmsWorkflow`, passing it the data payload as an input. So, everytime a brand is created, Medusa will execute this function, which in turn executes the workflow to sync the brand to the CMS. | |
| Learn more about subscribers in [this chapter](https://docs.medusajs.com/learn/fundamentals/events-and-subscribers/index.html.md). | |
| *** | |
| ## Test it Out | |
| To test the subscriber and workflow out, you'll use the [Create Brand API route](https://docs.medusajs.com/learn/customization/custom-features/api-route/index.html.md) you created in a previous chapter. | |
| First, start the Medusa application: | |
| ```bash npm2yarn | |
| npm run dev | |
| ``` | |
| Since the `/admin/brands` API route has a `/admin` prefix, it's only accessible by authenticated admin users. So, to retrieve an authenticated token of your admin user, send a `POST` request to the `/auth/user/emailpass` API Route: | |
| ```bash | |
| curl -X POST 'http://localhost:9000/auth/user/emailpass' \ | |
| -H 'Content-Type: application/json' \ | |
| --data-raw '{ | |
| "email": "[email protected]", | |
| "password": "supersecret" | |
| }' | |
| ``` | |
| Make sure to replace the email and password with your admin user's credentials. | |
| Don't have an admin user? Refer to [this guide](https://docs.medusajs.com/learn/installation#create-medusa-admin-user/index.html.md). | |
| Then, send a `POST` request to `/admin/brands`, passing the token received from the previous request in the `Authorization` header: | |
| ```bash | |
| curl -X POST 'http://localhost:9000/admin/brands' \ | |
| -H 'Content-Type: application/json' \ | |
| -H 'Authorization: Bearer {token}' \ | |
| --data '{ | |
| "name": "Acme" | |
| }' | |
| ``` | |
| This request returns the created brand. If you check the logs, you'll find the `brand.created` event was emitted, and that the request to the third-party system was simulated: | |
| ```plain | |
| info: Processing brand.created which has 1 subscribers | |
| http: POST /admin/brands ← - (200) - 16.418 ms | |
| info: Sending a POST request to /brands. | |
| info: Request Data: { | |
| "id": "01JEDWENYD361P664WRQPMC3J8", | |
| "name": "Acme", | |
| "created_at": "2024-12-06T11:42:32.909Z", | |
| "updated_at": "2024-12-06T11:42:32.909Z", | |
| "deleted_at": null | |
| } | |
| info: API Key: "123" | |
| ``` | |
| *** | |
| ## Next Chapter: Sync Brand from Third-Party CMS to Medusa | |
| You can also automate syncing data from a third-party system to Medusa at a regular interval. In the next chapter, you'll learn how to sync brands from the third-party CMS to Medusa once a day. | |
| # Emit Workflow and Service Events | |
| In this chapter, you'll learn about event types and how to emit an event in a service or workflow. | |
| ## Event Types | |
| In your customization, you can emit an event, then listen to it in a subscriber and perform an asynchronus action, such as send a notification or data to a third-party system. | |
| There are two types of events in Medusa: | |
| 1. Workflow event: an event that's emitted in a workflow after a commerce feature is performed. For example, Medusa emits the `order.placed` event after a cart is completed. | |
| 2. Service event: an event that's emitted to track, trace, or debug processes under the hood. For example, you can emit an event with an audit trail. | |
| ### Which Event Type to Use? | |
| **Workflow events** are the most common event type in development, as most custom features and customizations are built around workflows. | |
| Some examples of workflow events: | |
| 1. When a user creates a blog post and you're emitting an event to send a newsletter email. | |
| 2. When you finish syncing products to a third-party system and you want to notify the admin user of new products added. | |
| 3. When a customer purchases a digital product and you want to generate and send it to them. | |
| You should only go for a **service event** if you're emitting an event for processes under the hood that don't directly affect front-facing features. | |
| Some examples of service events: | |
| 1. When you're tracing data manipulation and changes, and you want to track every time some custom data is changed. | |
| 2. When you're syncing data with a search engine. | |
| *** | |
| ## Emit Event in a Workflow | |
| To emit a workflow event, use the `emitEventStep` helper step provided in the `@medusajs/medusa/core-flows` package. | |
| For example: | |
| ```ts highlights={highlights} | |
| import { | |
| createWorkflow, | |
| } from "@medusajs/framework/workflows-sdk" | |
| import { | |
| emitEventStep, | |
| } from "@medusajs/medusa/core-flows" | |
| const helloWorldWorkflow = createWorkflow( | |
| "hello-world", | |
| () => { | |
| // ... | |
| emitEventStep({ | |
| eventName: "custom.created", | |
| data: { | |
| id: "123", | |
| // other data payload | |
| }, | |
| }) | |
| } | |
| ) | |
| ``` | |
| The `emitEventStep` accepts an object having the following properties: | |
| - `eventName`: The event's name. | |
| - `data`: The data payload as an object. You can pass any properties in the object, and subscribers listening to the event will receive this data in the event's payload. | |
| In this example, you emit the event `custom.created` and pass in the data payload an ID property. | |
| ### Test it Out | |
| If you execute the workflow, the event is emitted and you can see it in your application's logs. | |
| Any subscribers listening to the event are executed. | |
| *** | |
| ## Emit Event in a Service | |
| To emit a service event: | |
| 1. Resolve `event_bus` from the module's container in your service's constructor: | |
| ### Extending Service Factory | |
| ```ts title="src/modules/hello/service.ts" highlights={["9"]} | |
| import { IEventBusService } from "@medusajs/framework/types" | |
| import { MedusaService } from "@medusajs/framework/utils" | |
| class HelloModuleService extends MedusaService({ | |
| MyCustom, | |
| }){ | |
| protected eventBusService_: AbstractEventBusModuleService | |
| constructor({ event_bus }) { | |
| super(...arguments) | |
| this.eventBusService_ = event_bus | |
| } | |
| } | |
| ``` | |
| ### Without Service Factory | |
| ```ts title="src/modules/hello/service.ts" highlights={["6"]} | |
| import { IEventBusService } from "@medusajs/framework/types" | |
| class HelloModuleService { | |
| protected eventBusService_: AbstractEventBusModuleService | |
| constructor({ event_bus }) { | |
| this.eventBusService_ = event_bus | |
| } | |
| } | |
| ``` | |
| 2. Use the event bus service's `emit` method in the service's methods to emit an event: | |
| ```ts title="src/modules/hello/service.ts" highlights={serviceHighlights} | |
| class HelloModuleService { | |
| // ... | |
| performAction() { | |
| // TODO perform action | |
| this.eventBusService_.emit({ | |
| name: "custom.event", | |
| data: { | |
| id: "123", | |
| // other data payload | |
| }, | |
| }) | |
| } | |
| } | |
| ``` | |
| The method accepts an object having the following properties: | |
| - `name`: The event's name. | |
| - `data`: The data payload as an object. You can pass any properties in the object, and subscribers listening to the event will receive this data in the event's payload. | |
| 3. By default, the Event Module's service isn't injected into your module's container. To add it to the container, pass it in the module's registration object in `medusa-config.ts` in the `dependencies` property: | |
| ```ts title="medusa-config.ts" highlights={depsHighlight} | |
| import { Modules } from "@medusajs/framework/utils" | |
| module.exports = defineConfig({ | |
| // ... | |
| modules: [ | |
| { | |
| resolve: "./src/modules/hello", | |
| dependencies: [ | |
| Modules.EVENT_BUS, | |
| ], | |
| }, | |
| ], | |
| }) | |
| ``` | |
| The `dependencies` property accepts an array of module registration keys. The specified modules' main services are injected into the module's container. | |
| That's how you can resolve it in your module's main service's constructor. | |
| ### Test it Out | |
| If you execute the `performAction` method of your service, the event is emitted and you can see it in your application's logs. | |
| Any subscribers listening to the event are also executed. | |
| # Module Link Direction | |
| In this chapter, you'll learn about the difference in module link directions, and which to use based on your use case. | |
| ## Link Direction | |
| The module link's direction depends on the order you pass the data model configuration parameters to `defineLink`. | |
| For example, the following defines a link from the `helloModuleService`'s `myCustom` data model to the Product Module's `product` data model: | |
| ```ts | |
| export default defineLink( | |
| HelloModule.linkable.myCustom, | |
| ProductModule.linkable.product | |
| ) | |
| ``` | |
| Whereas the following defines a link from the Product Module's `product` data model to the `helloModuleService`'s `myCustom` data model: | |
| ```ts | |
| export default defineLink( | |
| ProductModule.linkable.product, | |
| HelloModule.linkable.myCustom | |
| ) | |
| ``` | |
| The above links are two different links that serve different purposes. | |
| *** | |
| ## Which Link Direction to Use? | |
| ### Extend Data Models | |
| If you're adding a link to a data model to extend it and add new fields, define the link from the main data model to the custom data model. | |
| For example, consider you want to add a `subtitle` custom field to the `product` data model. To do that, you define a `Subtitle` data model in your module, then define a link from the `Product` data model to it: | |
| ```ts | |
| export default defineLink( | |
| ProductModule.linkable.product, | |
| HelloModule.linkable.subtitle | |
| ) | |
| ``` | |
| ### Associate Data Models | |
| If you're linking data models to indicate an association between them, define the link from the custom data model to the main data model. | |
| For example, consider you have `Post` data model representing a blog post, and you want to associate a blog post with a product. To do that, define a link from the `Post` data model to `Product`: | |
| ```ts | |
| export default defineLink( | |
| HelloModule.linkable.post, | |
| ProductModule.linkable.product | |
| ) | |
| ``` | |
| # Add Columns to a Link | |
| In this chapter, you'll learn how to add custom columns to a link definition and manage them. | |
| ## How to Add Custom Columns to a Link's Table? | |
| The `defineLink` function used to define a link accepts a third parameter, which is an object of options. | |
| To add custom columns to a link's table, pass in the third parameter of `defineLink` a `database` property: | |
| ```ts highlights={linkHighlights} | |
| import HelloModule from "../modules/hello" | |
| import ProductModule from "@medusajs/medusa/product" | |
| import { defineLink } from "@medusajs/framework/utils" | |
| export default defineLink( | |
| ProductModule.linkable.product, | |
| HelloModule.linkable.myCustom, | |
| { | |
| database: { | |
| extraColumns: { | |
| metadata: { | |
| type: "json", | |
| }, | |
| }, | |
| }, | |
| } | |
| ) | |
| ``` | |
| This adds to the table created for the link between `product` and `myCustom` a `metadata` column of type `json`. | |
| ### Database Options | |
| The `database` property defines configuration for the table created in the database. | |
| Its `extraColumns` property defines custom columns to create in the link's table. | |
| `extraColumns`'s value is an object whose keys are the names of the columns, and values are the column's configurations as an object. | |
| ### Column Configurations | |
| The column's configurations object accepts the following properties: | |
| - `type`: The column's type. Possible values are: | |
| - `string` | |
| - `text` | |
| - `integer` | |
| - `boolean` | |
| - `date` | |
| - `time` | |
| - `datetime` | |
| - `enum` | |
| - `json` | |
| - `array` | |
| - `enumArray` | |
| - `float` | |
| - `double` | |
| - `decimal` | |
| - `bigint` | |
| - `mediumint` | |
| - `smallint` | |
| - `tinyint` | |
| - `blob` | |
| - `uuid` | |
| - `uint8array` | |
| - `defaultValue`: The column's default value. | |
| - `nullable`: Whether the column can have `null` values. | |
| *** | |
| ## Set Custom Column when Creating Link | |
| The object you pass to Link's `create` method accepts a `data` property. Its value is an object whose keys are custom column names, and values are the value of the custom column for this link. | |
| For example: | |
| Learn more about Link, how to resolve it, and its methods in [this chapter](https://docs.medusajs.com/learn/fundamentals/module-links/link/index.html.md). | |
| ```ts | |
| await link.create({ | |
| [Modules.PRODUCT]: { | |
| product_id: "123", | |
| }, | |
| HELLO_MODULE: { | |
| my_custom_id: "321", | |
| }, | |
| data: { | |
| metadata: { | |
| test: true, | |
| }, | |
| }, | |
| }) | |
| ``` | |
| *** | |
| ## Retrieve Custom Column with Link | |
| To retrieve linked records with their custom columns, use [Query](https://docs.medusajs.com/learn/fundamentals/module-links/query/index.html.md). A module link's definition, exported by a file under `src/links`, has a special `entryPoint` property. Use this property when specifying the `entity` property in Query's `graph` method. | |
| For example: | |
| ```ts highlights={retrieveHighlights} | |
| import productHelloLink from "../links/product-hello" | |
| // ... | |
| const { data } = await query.graph({ | |
| entity: productHelloLink.entryPoint, | |
| fields: ["metadata", "product.*", "my_custom.*"], | |
| filters: { | |
| product_id: "prod_123", | |
| }, | |
| }) | |
| ``` | |
| This retrieves the product of id `prod_123` and its linked `my_custom` records. | |
| In the `fields` array you pass `metadata`, which is the custom column to retrieve of the link. | |
| *** | |
| ## Update Custom Column's Value | |
| Link's `create` method updates a link's data if the link between the specified records already exists. | |
| So, to update the value of a custom column in a created link, use the `create` method again passing it a new value for the custom column. | |
| For example: | |
| ```ts | |
| await link.create({ | |
| [Modules.PRODUCT]: { | |
| product_id: "123", | |
| }, | |
| HELLO_MODULE: { | |
| my_custom_id: "321", | |
| }, | |
| data: { | |
| metadata: { | |
| test: false, | |
| }, | |
| }, | |
| }) | |
| ``` | |
| # Guide: Integrate CMS Brand System | |
| In the previous chapters, you've created a [Brand Module](https://docs.medusajs.com/learn/customization/custom-features/module/index.html.md) that adds brands to your application. In this chapter, you'll integrate a dummy Content-Management System (CMS) in a new module. The module's service will provide methods to retrieve and manage brands in the CMS. You'll later use this service to sync data from and to the CMS. | |
| Learn more about modules in [this chapter](https://docs.medusajs.com/learn/fundamentals/modules/index.html.md). | |
| ## 1. Create Module Directory | |
| You'll integrate the third-party system in a new CMS Module. So, create the directory `src/modules/cms` that will hold the module's resources. | |
| 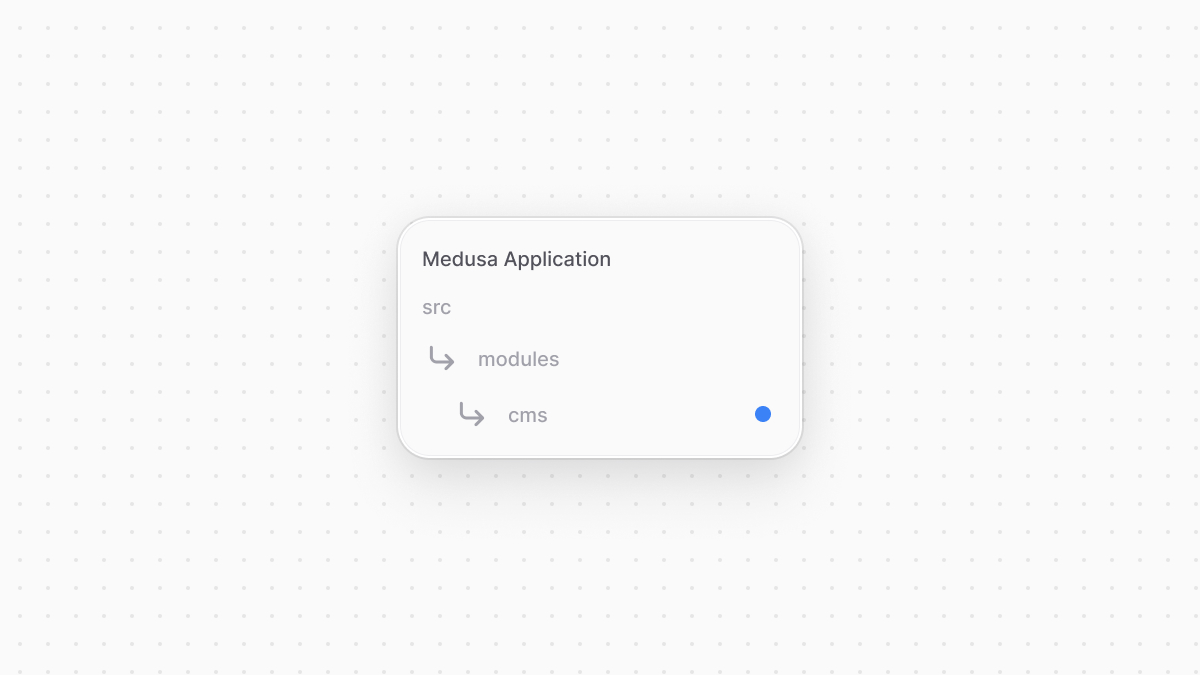 | |
| *** | |
| ## 2. Create Module Service | |
| Next, you'll create the module's service. It will provide methods to connect and perform actions with the third-party system. | |
| Create the CMS Module's service at `src/modules/cms/service.ts` with the following content: | |
| 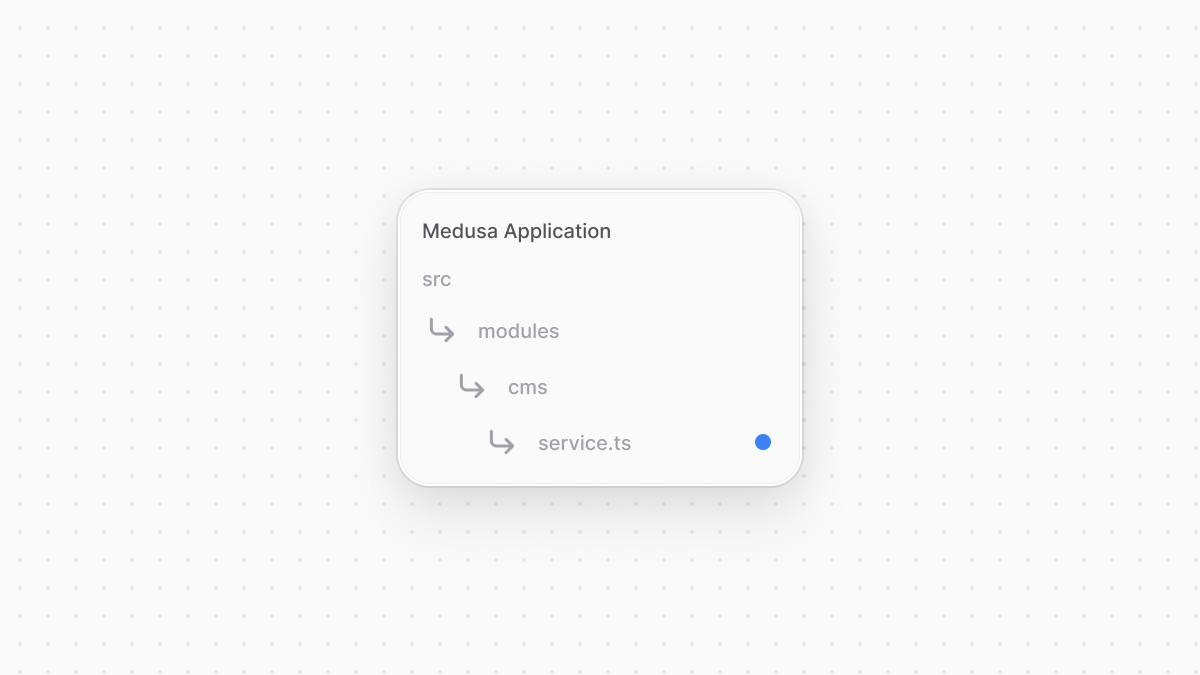 | |
| ```ts title="src/modules/cms/service.ts" highlights={serviceHighlights} | |
| import { Logger, ConfigModule } from "@medusajs/framework/types" | |
| export type ModuleOptions = { | |
| apiKey: string | |
| } | |
| type InjectedDependencies = { | |
| logger: Logger | |
| configModule: ConfigModule | |
| } | |
| class CmsModuleService { | |
| private options_: ModuleOptions | |
| private logger_: Logger | |
| constructor({ logger }: InjectedDependencies, options: ModuleOptions) { | |
| this.logger_ = logger | |
| this.options_ = options | |
| // TODO initialize SDK | |
| } | |
| } | |
| export default CmsModuleService | |
| ``` | |
| You create a `CmsModuleService` that will hold the methods to connect to the third-party CMS. A service's constructor accepts two parameters: | |
| 1. The module's container. Since a module is [isolated](https://docs.medusajs.com/learn/fundamentals/modules/isolation/index.html.md), it has a [local container](https://docs.medusajs.com/learn/fundamentals/modules/container/index.html.md) different than the Medusa container you use in other customizations. This container holds framework tools like the [Logger utility](https://docs.medusajs.com/learn/debugging-and-testing/logging/index.html.md) and resources within the module. | |
| 2. Options passed to the module when it's later added in Medusa's configurations. These options are useful to pass secret keys or configurations that ensure your module is re-usable across applications. For the CMS Module, you accept the API key to connect to the dummy CMS as an option. | |
| When integrating a third-party system that has a Node.js SDK or client, you can initialize that client in the constructor to be used in the service's methods. | |
| ### Integration Methods | |
| Next, you'll add methods that simulate sending requests to a third-party CMS. You'll use these methods later to sync brands from and to the CMS. | |
| Add the following methods in the `CmsModuleService`: | |
| ```ts title="src/modules/cms/service.ts" highlights={methodsHighlights} | |
| export class CmsModuleService { | |
| // ... | |
| // a dummy method to simulate sending a request, | |
| // in a realistic scenario, you'd use an SDK, fetch, or axios clients | |
| private async sendRequest(url: string, method: string, data?: any) { | |
| this.logger_.info(`Sending a ${method} request to ${url}.`) | |
| this.logger_.info(`Request Data: ${JSON.stringify(data, null, 2)}`) | |
| this.logger_.info(`API Key: ${JSON.stringify(this.options_.apiKey, null, 2)}`) | |
| } | |
| async createBrand(brand: Record<string, unknown>) { | |
| await this.sendRequest("/brands", "POST", brand) | |
| } | |
| async deleteBrand(id: string) { | |
| await this.sendRequest(`/brands/${id}`, "DELETE") | |
| } | |
| async retrieveBrands(): Promise<Record<string, unknown>[]> { | |
| await this.sendRequest("/brands", "GET") | |
| return [] | |
| } | |
| } | |
| ``` | |
| The `sendRequest` method sends requests to the third-party CMS. Since this guide isn't using a real CMS, it only simulates the sending by logging messages in the terminal. | |
| You also add three methods that use the `sendRequest` method: | |
| - `createBrand` that creates a brand in the third-party system. | |
| - `deleteBrand` that deletes the brand in the third-party system. | |
| - `retrieveBrands` to retrieve a brand from the third-party system. | |
| *** | |
| ## 3. Export Module Definition | |
| After creating the module's service, you'll export the module definition indicating the module's name and service. | |
| Create the file `src/modules/cms/index.ts` with the following content: | |
|  | |
| ```ts title="src/modules/cms/index.ts" | |
| import { Module } from "@medusajs/framework/utils" | |
| import CmsModuleService from "./service" | |
| export const CMS_MODULE = "cms" | |
| export default Module(CMS_MODULE, { | |
| service: CmsModuleService, | |
| }) | |
| ``` | |
| You use `Module` from the Modules SDK to export the module's defintion, indicating that the module's name is `cms` and its service is `CmsModuleService`. | |
| *** | |
| ## 4. Add Module to Medusa's Configurations | |
| Finally, add the module to the Medusa configurations at `medusa-config.ts`: | |
| ```ts title="medusa-config.ts" | |
| module.exports = defineConfig({ | |
| // ... | |
| modules: [ | |
| // ... | |
| { | |
| resolve: "./src/modules/cms", | |
| options: { | |
| apiKey: process.env.CMS_API_KEY, | |
| }, | |
| }, | |
| ], | |
| }) | |
| ``` | |
| The object passed in `modules` accept an `options` property, whose value is an object of options to pass to the module. These are the options you receive in the `CmsModuleService`'s constructor. | |
| You can add the `CMS_API_KEY` environment variable to `.env`: | |
| ```bash | |
| CMS_API_KEY=123 | |
| ``` | |
| *** | |
| ## Next Steps: Sync Brand From Medusa to CMS | |
| You can now use the CMS Module's service to perform actions on the third-party CMS. | |
| In the next chapter, you'll learn how to emit an event when a brand is created, then handle that event to sync the brand from Medusa to the third-party service. | |
| # Query | |
| In this chapter, you’ll learn about Query and how to use it to fetch data from modules. | |
| ## What is Query? | |
| Query fetches data across modules. It’s a set of methods registered in the Medusa container under the `query` key. | |
| In your resources, such as API routes or workflows, you can resolve Query to fetch data across custom modules and Medusa’s commerce modules. | |
| *** | |
| ## Query Example | |
| For example, create the route `src/api/query/route.ts` with the following content: | |
| ```ts title="src/api/query/route.ts" highlights={exampleHighlights} collapsibleLines="1-8" expandButtonLabel="Show Imports" | |
| import { | |
| MedusaRequest, | |
| MedusaResponse, | |
| } from "@medusajs/framework/http" | |
| import { | |
| ContainerRegistrationKeys, | |
| } from "@medusajs/framework/utils" | |
| export const GET = async ( | |
| req: MedusaRequest, | |
| res: MedusaResponse | |
| ) => { | |
| const query = req.scope.resolve(ContainerRegistrationKeys.QUERY) | |
| const { data: myCustoms } = await query.graph({ | |
| entity: "my_custom", | |
| fields: ["id", "name"], | |
| }) | |
| res.json({ my_customs: myCustoms }) | |
| } | |
| ``` | |
| In the above example, you resolve Query from the Medusa container using the `ContainerRegistrationKeys.QUERY` (`query`) key. | |
| Then, you run a query using its `graph` method. This method accepts as a parameter an object with the following required properties: | |
| - `entity`: The data model's name, as specified in the first parameter of the `model.define` method used for the data model's definition. | |
| - `fields`: An array of the data model’s properties to retrieve in the result. | |
| The method returns an object that has a `data` property, which holds an array of the retrieved data. For example: | |
| ```json title="Returned Data" | |
| { | |
| "data": [ | |
| { | |
| "id": "123", | |
| "name": "test" | |
| } | |
| ] | |
| } | |
| ``` | |
| *** | |
| ## Querying the Graph | |
| When you use the `query.graph` method, you're running a query through an internal graph that the Medusa application creates. | |
| This graph collects data models of all modules in your application, including commerce and custom modules, and identifies relations and links between them. | |
| *** | |
| ## Retrieve Linked Records | |
| Retrieve the records of a linked data model by passing in `fields` the data model's name suffixed with `.*`. | |
| For example: | |
| ```ts highlights={[["6"]]} | |
| const { data: myCustoms } = await query.graph({ | |
| entity: "my_custom", | |
| fields: [ | |
| "id", | |
| "name", | |
| "product.*", | |
| ], | |
| }) | |
| ``` | |
| `.*` means that all of data model's properties should be retrieved. To retrieve a specific property, replace the `*` with the property's name. For example, `product.title`. | |
| ### Retrieve List Link Records | |
| If the linked data model has `isList` enabled in the link definition, pass in `fields` the data model's plural name suffixed with `.*`. | |
| For example: | |
| ```ts highlights={[["6"]]} | |
| const { data: myCustoms } = await query.graph({ | |
| entity: "my_custom", | |
| fields: [ | |
| "id", | |
| "name", | |
| "products.*", | |
| ], | |
| }) | |
| ``` | |
| ### Apply Filters and Pagination on Linked Records | |
| Consider you want to apply filters or pagination configurations on the product(s) linked to `my_custom`. To do that, you must query the module link's table instead. | |
| As mentioned in the [Module Link](https://docs.medusajs.com/learn/fundamentals/module-links/index.html.md) documentation, Medusa creates a table for your module link. So, not only can you retrieve linked records, but you can also retrieve the records in a module link's table. | |
| A module link's definition, exported by a file under `src/links`, has a special `entryPoint` property. Use this property when specifying the `entity` property in Query's `graph` method. | |
| For example: | |
| ```ts highlights={queryLinkTableHighlights} | |
| import productCustomLink from "../../../links/product-custom" | |
| // ... | |
| const { data: productCustoms } = await query.graph({ | |
| entity: productCustomLink.entryPoint, | |
| fields: ["*", "product.*", "my_custom.*"], | |
| pagination: { | |
| take: 5, | |
| skip: 0, | |
| }, | |
| }) | |
| ``` | |
| In the object passed to the `graph` method: | |
| - You pass the `entryPoint` property of the link definition as the value for `entity`. So, Query will retrieve records from the module link's table. | |
| - You pass three items to the `field` property: | |
| - `*` to retrieve the link table's fields. This is useful if the link table has [custom columns](https://docs.medusajs.com/learn/fundamentals/module-links/custom-columns/index.html.md). | |
| - `product.*` to retrieve the fields of a product record linked to a `MyCustom` record. | |
| - `my_custom.*` to retrieve the fields of a `MyCustom` record linked to a product record. | |
| You can then apply any [filters](#apply-filters) or [pagination configurations](#apply-pagination). | |
| The returned `data` is similar to the following: | |
| ```json title="Example Result" | |
| [{ | |
| "id": "123", | |
| "product_id": "prod_123", | |
| "my_custom_id": "123", | |
| "product": { | |
| "id": "prod_123", | |
| // other product fields... | |
| }, | |
| "my_custom": { | |
| "id": "123", | |
| // other my_custom fields... | |
| } | |
| }] | |
| ``` | |
| *** | |
| ## Apply Filters | |
| ```ts highlights={[["6"], ["7"], ["8"], ["9"]]} | |
| const { data: myCustoms } = await query.graph({ | |
| entity: "my_custom", | |
| fields: ["id", "name"], | |
| filters: { | |
| id: [ | |
| "mc_01HWSVWR4D2XVPQ06DQ8X9K7AX", | |
| "mc_01HWSVWK3KYHKQEE6QGS2JC3FX", | |
| ], | |
| }, | |
| }) | |
| ``` | |
| The `query.graph` function accepts a `filters` property. You can use this property to filter retrieved records. | |
| In the example above, you filter the `my_custom` records by multiple IDs. | |
| Filters don't apply on fields of linked data models from other modules. | |
| *** | |
| ## Apply Pagination | |
| ```ts highlights={[["8", "skip", "The number of records to skip before fetching the results."], ["9", "take", "The number of records to fetch."]]} | |
| const { | |
| data: myCustoms, | |
| metadata: { count, take, skip } = {}, | |
| } = await query.graph({ | |
| entity: "my_custom", | |
| fields: ["id", "name"], | |
| pagination: { | |
| skip: 0, | |
| take: 10, | |
| }, | |
| }) | |
| ``` | |
| The `graph` method's object parameter accepts a `pagination` property to configure the pagination of retrieved records. | |
| To paginate the returned records, pass the following properties to `pagination`: | |
| - `skip`: (required to apply pagination) The number of records to skip before fetching the results. | |
| - `take`: The number of records to fetch. | |
| When you provide the pagination fields, the `query.graph` method's returned object has a `metadata` property. Its value is an object having the following properties: | |
| - skip: (\`number\`) The number of records skipped. | |
| - take: (\`number\`) The number of records requested to fetch. | |
| - count: (\`number\`) The total number of records. | |
| ### Sort Records | |
| ```ts highlights={[["5"], ["6"], ["7"]]} | |
| const { data: myCustoms } = await query.graph({ | |
| entity: "my_custom", | |
| fields: ["id", "name"], | |
| pagination: { | |
| order: { | |
| name: "DESC", | |
| }, | |
| }, | |
| }) | |
| ``` | |
| Sorting doesn't work on fields of linked data models from other modules. | |
| To sort returned records, pass an `order` property to `pagination`. | |
| The `order` property is an object whose keys are property names, and values are either: | |
| - `ASC` to sort records by that property in ascending order. | |
| - `DESC` to sort records by that property in descending order. | |
| *** | |
| ## Request Query Configurations | |
| For API routes that retrieve a single or list of resources, Medusa provides a `validateAndTransformQuery` middleware that: | |
| - Validates accepted query parameters, as explained in [this documentation](https://docs.medusajs.com/learn/fundamentals/api-routes/validation/index.html.md). | |
| - Parses configurations that are received as query parameters to be passed to Query. | |
| Using this middleware allows you to have default configurations for retrieved fields and relations or pagination, while allowing clients to customize them per request. | |
| ### Step 1: Add Middleware | |
| The first step is to use the `validateAndTransformQuery` middleware on the `GET` route. You add the middleware in `src/api/middlewares.ts`: | |
| ```ts title="src/api/middlewares.ts" | |
| import { | |
| validateAndTransformQuery, | |
| defineMiddlewares, | |
| } from "@medusajs/framework/http" | |
| import { createFindParams } from "@medusajs/medusa/api/utils/validators" | |
| export const GetCustomSchema = createFindParams() | |
| export default defineMiddlewares({ | |
| routes: [ | |
| { | |
| matcher: "/customs", | |
| method: "GET", | |
| middlewares: [ | |
| validateAndTransformQuery( | |
| GetCustomSchema, | |
| { | |
| defaults: [ | |
| "id", | |
| "name", | |
| "products.*", | |
| ], | |
| isList: true, | |
| } | |
| ), | |
| ], | |
| }, | |
| ], | |
| }) | |
| ``` | |
| The `validateAndTransformQuery` accepts two parameters: | |
| 1. A Zod validation schema for the query parameters, which you can learn more about in the [API Route Validation documentation](https://docs.medusajs.com/learn/fundamentals/api-routes/validation/index.html.md). Medusa has a `createFindParams` utility that generates a Zod schema that accepts four query parameters: | |
| 1. `fields`: The fields and relations to retrieve in the returned resources. | |
| 2. `offset`: The number of items to skip before retrieving the returned items. | |
| 3. `limit`: The maximum number of items to return. | |
| 4. `order`: The fields to order the returned items by in ascending or descending order. | |
| 2. A Query configuration object. It accepts the following properties: | |
| 1. `defaults`: An array of default fields and relations to retrieve in each resource. | |
| 2. `isList`: A boolean indicating whether a list of items are returned in the response. | |
| 3. `allowed`: An array of fields and relations allowed to be passed in the `fields` query parameter. | |
| 4. `defaultLimit`: A number indicating the default limit to use if no limit is provided. By default, it's `50`. | |
| ### Step 2: Use Configurations in API Route | |
| After applying this middleware, your API route now accepts the `fields`, `offset`, `limit`, and `order` query parameters mentioned above. | |
| The middleware transforms these parameters to configurations that you can pass to Query in your API route handler. These configurations are stored in the `queryConfig` parameter of the `MedusaRequest` object. | |
| As of [Medusa v2.2.0](https://github.com/medusajs/medusa/releases/tag/v2.2.0), `remoteQueryConfig` has been depercated in favor of `queryConfig`. Their usage is still the same, only the property name has changed. | |
| For example, Create the file `src/api/customs/route.ts` with the following content: | |
| ```ts title="src/api/customs/route.ts" | |
| import { | |
| MedusaRequest, | |
| MedusaResponse, | |
| } from "@medusajs/framework/http" | |
| import { | |
| ContainerRegistrationKeys, | |
| } from "@medusajs/framework/utils" | |
| export const GET = async ( | |
| req: MedusaRequest, | |
| res: MedusaResponse | |
| ) => { | |
| const query = req.scope.resolve(ContainerRegistrationKeys.QUERY) | |
| const { data: myCustoms } = await query.graph({ | |
| entity: "my_custom", | |
| ...req.queryConfig, | |
| }) | |
| res.json({ my_customs: myCustoms }) | |
| } | |
| ``` | |
| This adds a `GET` API route at `/customs`, which is the API route you added the middleware for. | |
| In the API route, you pass `req.queryConfig` to `query.graph`. `queryConfig` has properties like `fields` and `pagination` to configure the query based on the default values you specified in the middleware, and the query parameters passed in the request. | |
| ### Test it Out | |
| To test it out, start your Medusa application and send a `GET` request to the `/customs` API route. A list of records are retrieved with the specified fields in the middleware. | |
| ```json title="Returned Data" | |
| { | |
| "my_customs": [ | |
| { | |
| "id": "123", | |
| "name": "test" | |
| } | |
| ] | |
| } | |
| ``` | |
| Try passing one of the Query configuration parameters, like `fields` or `limit`, and you'll see its impact on the returned result. | |
| Learn more about [specifing fields and relations](https://docs.medusajs.com/api/store#select-fields-and-relations/index.html.md) and [pagination](https://docs.medusajs.com/api/store#pagination/index.html.md) in the API reference. | |
| # Guide: Schedule Syncing Brands from CMS | |
| In the previous chapters, you've [integrated a third-party CMS](https://docs.medusajs.com/learn/customization/integrate-systems/service/index.html.md) and implemented the logic to [sync created brands](https://docs.medusajs.com/learn/customization/integrate-systems/handle-event/index.html.md) from Medusa to the CMS. | |
| However, when you integrate a third-party system, you want the data to be in sync between the Medusa application and the system. One way to do so is by automatically syncing the data once a day. | |
| You can create an action to be automatically executed at a specified interval using scheduled jobs. A scheduled job is an asynchronous function with a specified schedule of when the Medusa application should run it. Scheduled jobs are useful to automate repeated tasks. | |
| Learn more about scheduled jobs in [this chapter](https://docs.medusajs.com/learn/fundamentals/scheduled-jobs/index.html.md). | |
| In this chapter, you'll create a scheduled job that triggers syncing the brands from the third-party CMS to Medusa once a day. You'll implement the syncing logic in a workflow, and execute that workflow in the scheduled job. | |
| ### Prerequisites | |
| - [CMS Module](https://docs.medusajs.com/learn/customization/integrate-systems/service/index.html.md) | |
| *** | |
| ## 1. Implement Syncing Workflow | |
| You'll start by implementing the syncing logic in a workflow, then execute the workflow later in the scheduled job. | |
| Workflows have a built-in durable execution engine that helps you complete tasks spanning multiple systems. Also, their rollback mechanism ensures that data is consistent across systems even when errors occur during execution. | |
| Learn more about workflows in [this chapter](https://docs.medusajs.com/learn/fundamentals/workflows/index.html.md). | |
| This workflow will have three steps: | |
| 1. `retrieveBrandsFromCmsStep` to retrieve the brands from the CMS. | |
| 2. `createBrandsStep` to create the brands retrieved in the first step that don't exist in Medusa. | |
| 3. `updateBrandsStep` to update the brands retrieved in the first step that exist in Medusa. | |
| ### retrieveBrandsFromCmsStep | |
| To create the step that retrieves the brands from the third-party CMS, create the file `src/workflows/sync-brands-from-cms.ts` with the following content: | |
| 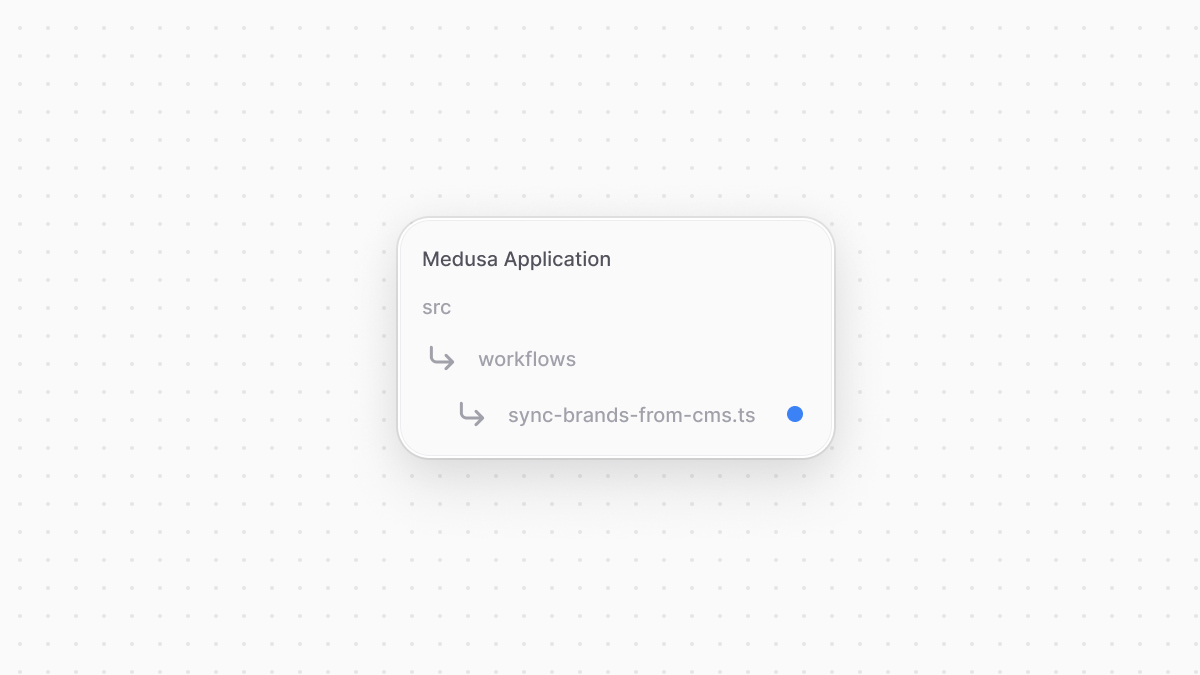 | |
| ```ts title="src/workflows/sync-brands-from-cms.ts" collapsibleLines="1-7" expandButtonLabel="Show Imports" | |
| import { | |
| createStep, | |
| StepResponse, | |
| } from "@medusajs/framework/workflows-sdk" | |
| import CmsModuleService from "../modules/cms/service" | |
| import { CMS_MODULE } from "../modules/cms" | |
| const retrieveBrandsFromCmsStep = createStep( | |
| "retrieve-brands-from-cms", | |
| async (_, { container }) => { | |
| const cmsModuleService: CmsModuleService = container.resolve( | |
| CMS_MODULE | |
| ) | |
| const brands = await cmsModuleService.retrieveBrands() | |
| return new StepResponse(brands) | |
| } | |
| ) | |
| ``` | |
| You create a `retrieveBrandsFromCmsStep` that resolves the CMS Module's service and uses its `retrieveBrands` method to retrieve the brands in the CMS. You return those brands in the step's response. | |
| ### createBrandsStep | |
| The brands retrieved in the first step may have brands that don't exist in Medusa. So, you'll create a step that creates those brands. Add the step to the same `src/workflows/sync-brands-from-cms.ts` file: | |
| ```ts title="src/workflows/sync-brands-from-cms.ts" highlights={createBrandsHighlights} collapsibleLines="1-8" expandButtonLabel="Show Imports" | |
| // other imports... | |
| import BrandModuleService from "../modules/brand/service" | |
| import { BRAND_MODULE } from "../modules/brand" | |
| // ... | |
| type CreateBrand = { | |
| name: string | |
| } | |
| type CreateBrandsInput = { | |
| brands: CreateBrand[] | |
| } | |
| export const createBrandsStep = createStep( | |
| "create-brands-step", | |
| async (input: CreateBrandsInput, { container }) => { | |
| const brandModuleService: BrandModuleService = container.resolve( | |
| BRAND_MODULE | |
| ) | |
| const brands = await brandModuleService.createBrands(input.brands) | |
| return new StepResponse(brands, brands) | |
| }, | |
| async (brands, { container }) => { | |
| if (!brands) { | |
| return | |
| } | |
| const brandModuleService: BrandModuleService = container.resolve( | |
| BRAND_MODULE | |
| ) | |
| await brandModuleService.deleteBrands(brands.map((brand) => brand.id)) | |
| } | |
| ) | |
| ``` | |
| The `createBrandsStep` accepts the brands to create as an input. It resolves the [Brand Module](https://docs.medusajs.com/learn/customization/custom-features/module/index.html.md)'s service and uses the generated `createBrands` method to create the brands. | |
| The step passes the created brands to the compensation function, which deletes those brands if an error occurs during the workflow's execution. | |
| Learn more about compensation functions in [this chapter](https://docs.medusajs.com/learn/fundamentals/workflows/compensation-function/index.html.md). | |
| ### Update Brands Step | |
| The brands retrieved in the first step may also have brands that exist in Medusa. So, you'll create a step that updates their details to match that of the CMS. Add the step to the same `src/workflows/sync-brands-from-cms.ts` file: | |
| ```ts title="src/workflows/sync-brands-from-cms.ts" highlights={updateBrandsHighlights} | |
| // ... | |
| type UpdateBrand = { | |
| id: string | |
| name: string | |
| } | |
| type UpdateBrandsInput = { | |
| brands: UpdateBrand[] | |
| } | |
| export const updateBrandsStep = createStep( | |
| "update-brands-step", | |
| async ({ brands }: UpdateBrandsInput, { container }) => { | |
| const brandModuleService: BrandModuleService = container.resolve( | |
| BRAND_MODULE | |
| ) | |
| const prevUpdatedBrands = await brandModuleService.listBrands({ | |
| id: brands.map((brand) => brand.id), | |
| }) | |
| const updatedBrands = await brandModuleService.updateBrands(brands) | |
| return new StepResponse(updatedBrands, prevUpdatedBrands) | |
| }, | |
| async (prevUpdatedBrands, { container }) => { | |
| if (!prevUpdatedBrands) { | |
| return | |
| } | |
| const brandModuleService: BrandModuleService = container.resolve( | |
| BRAND_MODULE | |
| ) | |
| await brandModuleService.updateBrands(prevUpdatedBrands) | |
| } | |
| ) | |
| ``` | |
| The `updateBrandsStep` receives the brands to update in Medusa. In the step, you retrieve the brand's details in Medusa before the update to pass them to the compensation function. You then update the brands using the Brand Module's `updateBrands` generated method. | |
| In the compensation function, which receives the brand's old data, you revert the update using the same `updateBrands` method. | |
| ### Create Workflow | |
| Finally, you'll create the workflow that uses the above steps to sync the brands from the CMS to Medusa. Add to the same `src/workflows/sync-brands-from-cms.ts` file the following: | |
| ```ts title="src/workflows/sync-brands-from-cms.ts" | |
| // other imports... | |
| import { | |
| // ... | |
| createWorkflow, | |
| transform, | |
| WorkflowResponse, | |
| } from "@medusajs/framework/workflows-sdk" | |
| // ... | |
| export const syncBrandsFromCmsWorkflow = createWorkflow( | |
| "sync-brands-from-system", | |
| () => { | |
| const brands = retrieveBrandsFromCmsStep() | |
| // TODO create and update brands | |
| } | |
| ) | |
| ``` | |
| In the workflow, you only use the `retrieveBrandsFromCmsStep` for now, which retrieves the brands from the third-party CMS. | |
| Next, you need to identify which brands must be created or updated. Since workflows are constructed internally and are only evaluated during execution, you can't access values to perform data manipulation directly. Instead, use [transform](https://docs.medusajs.com/learn/fundamentals/workflows/variable-manipulation/index.html.md) from the Workflows SDK that gives you access to the real-time values of the data, allowing you to create new variables using those values. | |
| Learn more about data manipulation using `transform` in [this chapter](https://docs.medusajs.com/learn/fundamentals/workflows/variable-manipulation/index.html.md). | |
| So, replace the `TODO` with the following: | |
| ```ts title="src/workflows/sync-brands-from-cms.ts" | |
| const { toCreate, toUpdate } = transform( | |
| { | |
| brands, | |
| }, | |
| (data) => { | |
| const toCreate: CreateBrand[] = [] | |
| const toUpdate: UpdateBrand[] = [] | |
| data.brands.forEach((brand) => { | |
| if (brand.external_id) { | |
| toUpdate.push({ | |
| id: brand.external_id as string, | |
| name: brand.name as string, | |
| }) | |
| } else { | |
| toCreate.push({ | |
| name: brand.name as string, | |
| }) | |
| } | |
| }) | |
| return { toCreate, toUpdate } | |
| } | |
| ) | |
| // TODO create and update the brands | |
| ``` | |
| `transform` accepts two parameters: | |
| 1. The data to be passed to the function in the second parameter. | |
| 2. A function to execute only when the workflow is executed. Its return value can be consumed by the rest of the workflow. | |
| In `transform`'s function, you loop over the brands array to check which should be created or updated. This logic assumes that a brand in the CMS has an `external_id` property whose value is the brand's ID in Medusa. | |
| You now have the list of brands to create and update. So, replace the new `TODO` with the following: | |
| ```ts title="src/workflows/sync-brands-from-cms.ts" | |
| const created = createBrandsStep({ brands: toCreate }) | |
| const updated = updateBrandsStep({ brands: toUpdate }) | |
| return new WorkflowResponse({ | |
| created, | |
| updated, | |
| }) | |
| ``` | |
| You first run the `createBrandsStep` to create the brands that don't exist in Medusa, then the `updateBrandsStep` to update the brands that exist in Medusa. You pass the arrays returned by `transform` as the inputs for the steps. | |
| Finally, you return an object of the created and updated brands. You'll execute this workflow in the scheduled job next. | |
| *** | |
| ## 2. Schedule Syncing Task | |
| You now have the workflow to sync the brands from the CMS to Medusa. Next, you'll create a scheduled job that runs this workflow once a day to ensure the data between Medusa and the CMS are always in sync. | |
| A scheduled job is created in a TypeScript or JavaScript file under the `src/jobs` directory. So, create the file `src/jobs/sync-brands-from-cms.ts` with the following content: | |
| 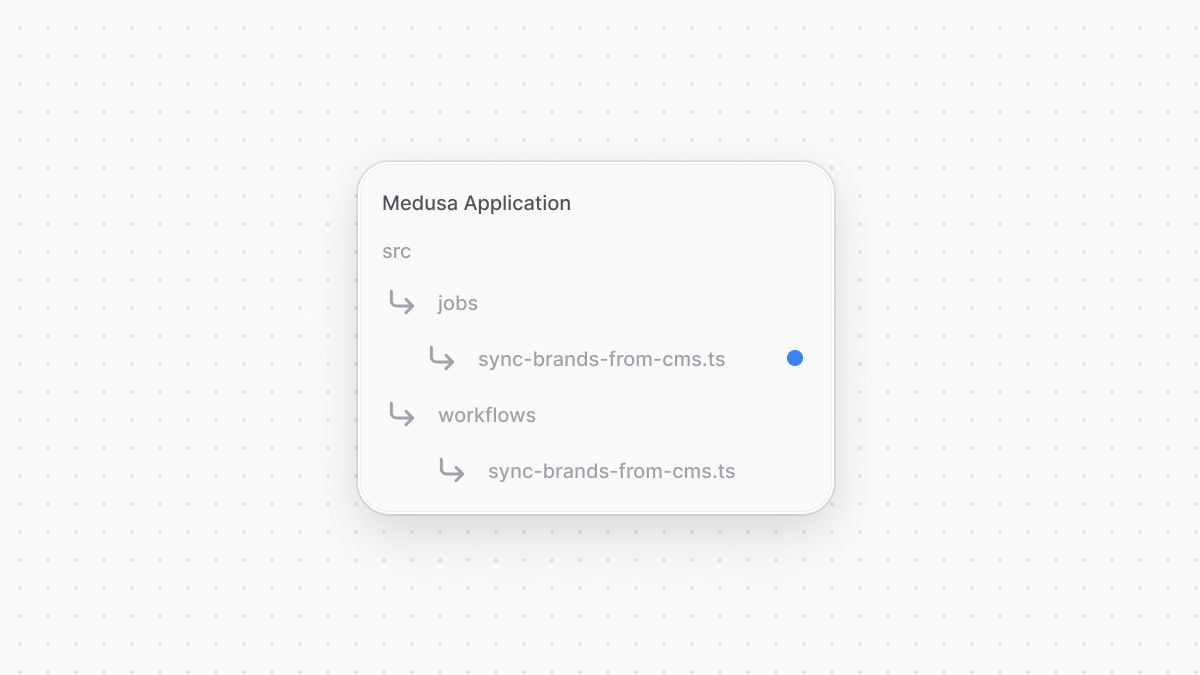 | |
| ```ts title="src/jobs/sync-brands-from-cms.ts" | |
| import { MedusaContainer } from "@medusajs/framework/types" | |
| import { syncBrandsFromCmsWorkflow } from "../workflows/sync-brands-from-cms" | |
| export default async function (container: MedusaContainer) { | |
| const logger = container.resolve("logger") | |
| const { result } = await syncBrandsFromCmsWorkflow(container).run() | |
| logger.info( | |
| `Synced brands from third-party system: ${ | |
| result.created.length | |
| } brands created and ${result.updated.length} brands updated.`) | |
| } | |
| export const config = { | |
| name: "sync-brands-from-system", | |
| schedule: "0 0 * * *", // change to * * * * * for debugging | |
| } | |
| ``` | |
| A scheduled job file must export: | |
| - An asynchronous function that will be executed at the specified schedule. This function must be the file's default export. | |
| - An object of scheduled jobs configuration. It has two properties: | |
| - `name`: A unique name for the scheduled job. | |
| - `schedule`: A string that holds a [cron expression](https://crontab.guru/) indicating the schedule to run the job. | |
| The scheduled job function accepts as a parameter the [Medusa container](https://docs.medusajs.com/learn/fundamentals/medusa-container/index.html.md) used to resolve framework and commerce tools. You then execute the `syncBrandsFromCmsWorkflow` and use its result to log how many brands were created or updated. | |
| Based on the cron expression specified in `config.schedule`, Medusa will run the scheduled job every day at midnight. You can also change it to `* * * * *` to run it every minute for easier debugging. | |
| *** | |
| ## Test it Out | |
| To test out the scheduled job, start the Medusa application: | |
| ```bash npm2yarn | |
| npm run dev | |
| ``` | |
| If you set the schedule to `* * * * *` for debugging, the scheduled job will run in a minute. You'll see in the logs how many brands were created or updated. | |
| *** | |
| ## Summary | |
| By following the previous chapters, you utilized Medusa's framework and orchestration tools to perform and automate tasks that span across systems. | |
| With Medusa, you can integrate any service from your commerce ecosystem with ease. You don't have to set up separate applications to manage your different customizations, or worry about data inconsistency across systems. Your efforts only go into implementing the business logic that ties your systems together. | |
| # Link | |
| In this chapter, you’ll learn what Link is and how to use it to manage links. | |
| As of [Medusa v2.2.0](https://github.com/medusajs/medusa/releases/tag/v2.2.0), Remote Link has been deprecated in favor of Link. They have the same usage, so you only need to change the key used to resolve the tool from the Medusa container as explained below. | |
| ## What is Link? | |
| Link is a class with utility methods to manage links between data models. It’s registered in the Medusa container under the `link` registration name. | |
| For example: | |
| ```ts collapsibleLines="1-9" expandButtonLabel="Show Imports" | |
| import { | |
| MedusaRequest, | |
| MedusaResponse, | |
| } from "@medusajs/framework/http" | |
| import { | |
| ContainerRegistrationKeys, | |
| } from "@medusajs/framework/utils" | |
| export async function POST( | |
| req: MedusaRequest, | |
| res: MedusaResponse | |
| ): Promise<void> { | |
| const link = req.scope.resolve( | |
| ContainerRegistrationKeys.LINK | |
| ) | |
| // ... | |
| } | |
| ``` | |
| You can use its methods to manage links, such as create or delete links. | |
| *** | |
| ## Create Link | |
| To create a link between records of two data models, use the `create` method of Link. | |
| For example: | |
| ```ts | |
| import { Modules } from "@medusajs/framework/utils" | |
| // ... | |
| await link.create({ | |
| [Modules.PRODUCT]: { | |
| product_id: "prod_123", | |
| }, | |
| "helloModuleService": { | |
| my_custom_id: "mc_123", | |
| }, | |
| }) | |
| ``` | |
| The `create` method accepts as a parameter an object. The object’s keys are the names of the linked modules. | |
| The keys (names of linked modules) must be in the same [direction](https://docs.medusajs.com/learn/fundamentals/module-links/directions/index.html.md) of the link definition. | |
| The value of each module’s property is an object, whose keys are of the format `{data_model_snake_name}_id`, and values are the IDs of the linked record. | |
| So, in the example above, you link a record of the `MyCustom` data model in a `hello` module to a `Product` record in the Product Module. | |
| *** | |
| ## Dismiss Link | |
| To remove a link between records of two data models, use the `dismiss` method of Link. | |
| For example: | |
| ```ts | |
| import { Modules } from "@medusajs/framework/utils" | |
| // ... | |
| await link.dismiss({ | |
| [Modules.PRODUCT]: { | |
| product_id: "prod_123", | |
| }, | |
| "helloModuleService": { | |
| my_custom_id: "mc_123", | |
| }, | |
| }) | |
| ``` | |
| The `dismiss` method accepts the same parameter type as the [create method](#create-link). | |
| The keys (names of linked modules) must be in the same [direction](https://docs.medusajs.com/learn/fundamentals/module-links/directions/index.html.md) of the link definition. | |
| *** | |
| ## Cascade Delete Linked Records | |
| If a record is deleted, use the `delete` method of Link to delete all linked records. | |
| For example: | |
| ```ts | |
| import { Modules } from "@medusajs/framework/utils" | |
| // ... | |
| await productModuleService.deleteVariants([variant.id]) | |
| await link.delete({ | |
| [Modules.PRODUCT]: { | |
| product_id: "prod_123", | |
| }, | |
| }) | |
| ``` | |
| This deletes all records linked to the deleted product. | |
| *** | |
| ## Restore Linked Records | |
| If a record that was previously soft-deleted is now restored, use the `restore` method of Link to restore all linked records. | |
| For example: | |
| ```ts | |
| import { Modules } from "@medusajs/framework/utils" | |
| // ... | |
| await productModuleService.restoreProducts(["prod_123"]) | |
| await link.restore({ | |
| [Modules.PRODUCT]: { | |
| product_id: "prod_123", | |
| }, | |
| }) | |
| ``` | |
| # Query Context | |
| In this chapter, you'll learn how to pass contexts when retrieving data with [Query](https://docs.medusajs.com/learn/fundamentals/module-links/query/index.html.md). | |
| ## What is Query Context? | |
| Query context is a way to pass additional information when retrieving data with Query. This data can be useful when applying custom transformations to the retrieved data based on the current context. | |
| For example, consider you have a Blog Module with posts and authors. You can accept the user's language as a context and return the posts in the user's language. Another example is how Medusa uses Query Context to [retrieve product variants' prices based on the customer's currency](https://docs.medusajs.com/resources/commerce-modules/product/guides/price/index.html.md). | |
| *** | |
| ## How to Use Query Context | |
| The `query.graph` method accepts an optional `context` parameter that can be used to pass additional context either to the data model you're retrieving (for example, `post`), or its related and linked models (for example, `author`). | |
| You initialize a context using `QueryContext` from the Modules SDK. It accepts an object of contexts as an argument. | |
| For example, to retrieve posts using Query while passing the user's language as a context: | |
| ```ts | |
| const { data } = await query.graph({ | |
| entity: "post", | |
| fields: ["*"], | |
| context: QueryContext({ | |
| lang: "es", | |
| }) | |
| }) | |
| ``` | |
| In this example, you pass in the context a `lang` property whose value is `es`. | |
| Then, to handle the context while retrieving records of the data model, in the associated module's service you override the generated `list` method of the data model. | |
| For example, continuing the example above, you can override the `listPosts` method of the Blog Module's service to handle the context: | |
| ```ts highlights={highlights2} | |
| import { MedusaContext, MedusaService } from "@medusajs/framework/utils" | |
| import { Context, FindConfig } from "@medusajs/framework/types" | |
| import Post from "./models/post" | |
| import Author from "./models/author" | |
| class BlogModuleService extends MedusaService({ | |
| Post, | |
| Author | |
| }){ | |
| // @ts-ignore | |
| async listPosts( | |
| filters?: any, | |
| config?: FindConfig<any> | undefined, | |
| @MedusaContext() sharedContext?: Context | undefined | |
| ) { | |
| const context = filters.context ?? {} | |
| delete filters.context | |
| let posts = await super.listPosts(filters, config, sharedContext) | |
| if (context.lang === "es") { | |
| posts = posts.map((post) => { | |
| return { | |
| ...post, | |
| title: post.title + " en español", | |
| } | |
| }) | |
| } | |
| return posts | |
| } | |
| } | |
| export default BlogModuleService | |
| ``` | |
| In the above example, you override the generated `listPosts` method. This method receives as a first parameter the filters passed to the query, but it also includes a `context` property that holds the context passed to the query. | |
| You extract the context from `filters`, then retrieve the posts using the parent's `listPosts` method. After that, if the language is set in the context, you transform the titles of the posts. | |
| All posts returned will now have their titles appended with "en español". | |
| Learn more about the generated `list` method in [this reference](https://docs.medusajs.com/resources/service-factory-reference/methods/list/index.html.md). | |
| *** | |
| ## Passing Query Context to Related Data Models | |
| If you're retrieving a data model and you want to pass context to its associated model in the same module, you can pass them as part of `QueryContext`'s parameter, then handle them in the same `list` method. | |
| For linked data models, check out the [next section](#passing-query-context-to-linked-data-models). | |
| For example, to pass a context for the post's authors: | |
| ```ts highlights={highlights3} | |
| const { data } = await query.graph({ | |
| entity: "post", | |
| fields: ["*"], | |
| context: QueryContext({ | |
| lang: "es", | |
| author: QueryContext({ | |
| lang: "es", | |
| }) | |
| }) | |
| }) | |
| ``` | |
| Then, in the `listPosts` method, you can handle the context for the post's authors: | |
| ```ts highlights={highlights4} | |
| import { MedusaContext, MedusaService } from "@medusajs/framework/utils" | |
| import { Context, FindConfig } from "@medusajs/framework/types" | |
| import Post from "./models/post" | |
| import Author from "./models/author" | |
| class BlogModuleService extends MedusaService({ | |
| Post, | |
| Author | |
| }){ | |
| // @ts-ignore | |
| async listPosts( | |
| filters?: any, | |
| config?: FindConfig<any> | undefined, | |
| @MedusaContext() sharedContext?: Context | undefined | |
| ) { | |
| const context = filters.context ?? {} | |
| delete filters.context | |
| let posts = await super.listPosts(filters, config, sharedContext) | |
| const isPostLangEs = context.lang === "es" | |
| const isAuthorLangEs = context.author?.lang === "es" | |
| if (isPostLangEs || isAuthorLangEs) { | |
| posts = posts.map((post) => { | |
| return { | |
| ...post, | |
| title: isPostLangEs ? post.title + " en español" : post.title, | |
| author: { | |
| ...post.author, | |
| name: isAuthorLangEs ? post.author.name + " en español" : post.author.name, | |
| } | |
| } | |
| }) | |
| } | |
| return posts | |
| } | |
| } | |
| export default BlogModuleService | |
| ``` | |
| The context in `filters` will also have the context for `author`, which you can use to make transformations to the post's authors. | |
| *** | |
| ## Passing Query Context to Linked Data Models | |
| If you're retrieving a data model and you want to pass context to a linked model in a different module, pass to the `context` property an object instead, where its keys are the linked model's name and the values are the context for that linked model. | |
| For example, consider the Product Module's `Product` data model is linked to the Blog Module's `Post` data model. You can pass context to the `Post` data model while retrieving products like so: | |
| ```ts highlights={highlights5} | |
| const { data } = await query.graph({ | |
| entity: "product", | |
| fields: ["*", "post.*"], | |
| context: { | |
| post: QueryContext({ | |
| lang: "es", | |
| }) | |
| } | |
| }) | |
| ``` | |
| In this example, you retrieve products and their associated posts. You also pass a context for `post`, indicating the customer's language. | |
| To handle the context, you override the generated `listPosts` method of the Blog Module as explained [previously](#how-to-use-query-context). | |
| # Module Container | |
| In this chapter, you'll learn about the module's container and how to resolve resources in that container. | |
| Since modules are isolated, each module has a local container only used by the resources of that module. | |
| So, resources in the module, such as services or loaders, can only resolve other resources registered in the module's container. | |
| ### List of Registered Resources | |
| Find a list of resources or dependencies registered in a module's container in [this Development Resources reference](https://docs.medusajs.com/resources/medusa-container-resources/index.html.md). | |
| *** | |
| ## Resolve Resources | |
| ### Services | |
| A service's constructor accepts as a first parameter an object used to resolve resources registered in the module's container. | |
| For example: | |
| ```ts highlights={[["4"], ["10"]]} | |
| import { Logger } from "@medusajs/framework/types" | |
| type InjectedDependencies = { | |
| logger: Logger | |
| } | |
| export default class HelloModuleService { | |
| protected logger_: Logger | |
| constructor({ logger }: InjectedDependencies) { | |
| this.logger_ = logger | |
| this.logger_.info("[HelloModuleService]: Hello World!") | |
| } | |
| // ... | |
| } | |
| ``` | |
| ### Loader | |
| A loader function accepts as a parameter an object having the property `container`. Its value is the module's container used to resolve resources. | |
| For example: | |
| ```ts highlights={[["9"]]} | |
| import { | |
| LoaderOptions, | |
| } from "@medusajs/framework/types" | |
| import { | |
| ContainerRegistrationKeys, | |
| } from "@medusajs/framework/utils" | |
| export default async function helloWorldLoader({ | |
| container, | |
| }: LoaderOptions) { | |
| const logger = container.resolve(ContainerRegistrationKeys.LOGGER) | |
| logger.info("[helloWorldLoader]: Hello, World!") | |
| } | |
| ``` | |
| # Architectural Modules | |
| In this chapter, you’ll learn about architectural modules. | |
| ## What is an Architectural Module? | |
| An architectural module implements features and mechanisms related to the Medusa application’s architecture and infrastructure. | |
| Since modules are interchangeable, you have more control over Medusa’s architecture. For example, you can choose to use Memcached for event handling instead of Redis. | |
| *** | |
| ## Architectural Module Types | |
| There are different architectural module types including: | |
| 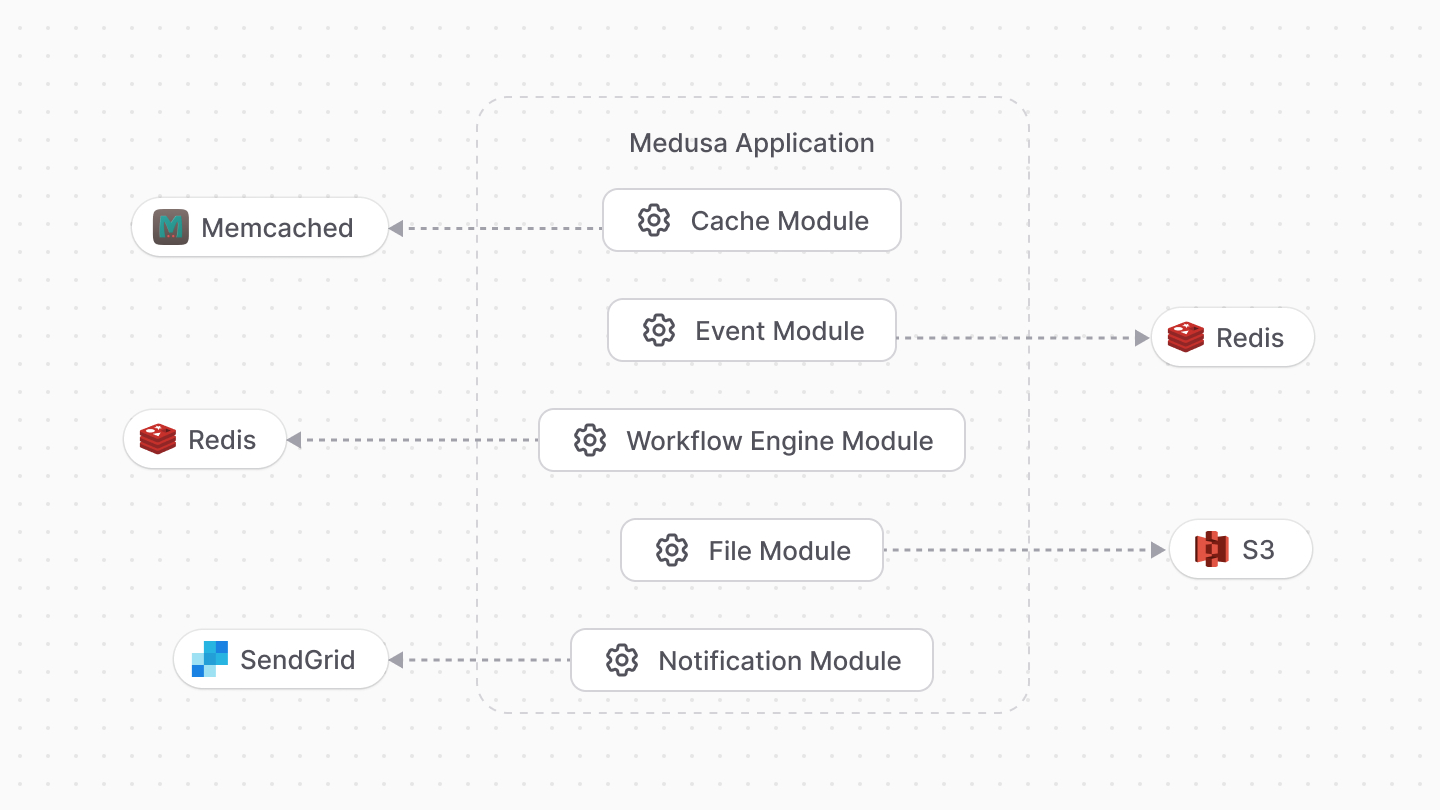 | |
| - Cache Module: Defines the caching mechanism or logic to cache computational results. | |
| - Event Module: Integrates a pub/sub service to handle subscribing to and emitting events. | |
| - Workflow Engine Module: Integrates a service to store and track workflow executions and steps. | |
| - File Module: Integrates a storage service to handle uploading and managing files. | |
| - Notification Module: Integrates a third-party service or defines custom logic to send notifications to users and customers. | |
| *** | |
| ## Architectural Modules List | |
| Refer to the [Architectural Modules reference](https://docs.medusajs.com/resources/architectural-modules/index.html.md) for a list of Medusa’s architectural modules, available modules to install, and how to create an architectural module. | |
| # Perform Database Operations in a Service | |
| In this chapter, you'll learn how to perform database operations in a module's service. | |
| This chapter is intended for more advanced database use-cases where you need more control over queries and operations. For basic database operations, such as creating or retrieving data of a model, use the [Service Factory](https://docs.medusajs.com/learn/fundamentals/modules/service-factory/index.html.md) instead. | |
| ## Run Queries | |
| [MikroORM's entity manager](https://mikro-orm.io/docs/entity-manager) is a class that has methods to run queries on the database and perform operations. | |
| Medusa provides an `InjectManager` decorator from the Modules SDK that injects a service's method with a [forked entity manager](https://mikro-orm.io/docs/identity-map#forking-entity-manager). | |
| So, to run database queries in a service: | |
| 1. Add the `InjectManager` decorator to the method. | |
| 2. Add as a last parameter an optional `sharedContext` parameter that has the `MedusaContext` decorator from the Modules SDK. This context holds database-related context, including the manager injected by `InjectManager` | |
| For example, in your service, add the following methods: | |
| ```ts highlights={methodsHighlight} | |
| // other imports... | |
| import { | |
| InjectManager, | |
| MedusaContext, | |
| } from "@medusajs/framework/utils" | |
| import { SqlEntityManager } from "@mikro-orm/knex" | |
| class HelloModuleService { | |
| // ... | |
| @InjectManager() | |
| async getCount( | |
| @MedusaContext() sharedContext?: Context<EntityManager> | |
| ): Promise<number> { | |
| return await sharedContext.manager.count("my_custom") | |
| } | |
| @InjectManager() | |
| async getCountSql( | |
| @MedusaContext() sharedContext?: Context<EntityManager> | |
| ): Promise<number> { | |
| const data = await sharedContext.manager.execute( | |
| "SELECT COUNT(*) as num FROM my_custom" | |
| ) | |
| return parseInt(data[0].num) | |
| } | |
| } | |
| ``` | |
| You add two methods `getCount` and `getCountSql` that have the `InjectManager` decorator. Each of the methods also accept the `sharedContext` parameter which has the `MedusaContext` decorator. | |
| The entity manager is injected to the `sharedContext.manager` property, which is an instance of [EntityManager from the @mikro-orm/knex package](https://mikro-orm.io/api/knex/class/EntityManager). | |
| You use the manager in the `getCount` method to retrieve the number of records in a table, and in the `getCountSql` to run a PostgreSQL query that retrieves the count. | |
| Refer to [MikroORM's reference](https://mikro-orm.io/api/knex/class/EntityManager) for a full list of the entity manager's methods. | |
| *** | |
| ## Execute Operations in Transactions | |
| To wrap database operations in a transaction, you create two methods: | |
| 1. A private or protected method that's wrapped in a transaction. To wrap it in a transaction, you use the `InjectTransactionManager` decorator from the Modules SDK. | |
| 2. A public method that calls the transactional method. You use on it the `InjectManager` decorator as explained in the previous section. | |
| Both methods must accept as a last parameter an optional `sharedContext` parameter that has the `MedusaContext` decorator from the Modules SDK. It holds database-related contexts passed through the Medusa application. | |
| For example: | |
| ```ts highlights={opHighlights} | |
| import { | |
| InjectManager, | |
| InjectTransactionManager, | |
| MedusaContext, | |
| } from "@medusajs/framework/utils" | |
| import { Context } from "@medusajs/framework/types" | |
| import { EntityManager } from "@mikro-orm/knex" | |
| class HelloModuleService { | |
| // ... | |
| @InjectTransactionManager() | |
| protected async update_( | |
| input: { | |
| id: string, | |
| name: string | |
| }, | |
| @MedusaContext() sharedContext?: Context<EntityManager> | |
| ): Promise<any> { | |
| const transactionManager = sharedContext.transactionManager | |
| await transactionManager.nativeUpdate( | |
| "my_custom", | |
| { | |
| id: input.id, | |
| }, | |
| { | |
| name: input.name, | |
| } | |
| ) | |
| // retrieve again | |
| const updatedRecord = await transactionManager.execute( | |
| `SELECT * FROM my_custom WHERE id = '${input.id}'` | |
| ) | |
| return updatedRecord | |
| } | |
| @InjectManager() | |
| async update( | |
| input: { | |
| id: string, | |
| name: string | |
| }, | |
| @MedusaContext() sharedContext?: Context<EntityManager> | |
| ) { | |
| return await this.update_(input, sharedContext) | |
| } | |
| } | |
| ``` | |
| The `HelloModuleService` has two methods: | |
| - A protected `update_` that performs the database operations inside a transaction. | |
| - A public `update` that executes the transactional protected method. | |
| The shared context's `transactionManager` property holds the transactional entity manager (injected by `InjectTransactionManager`) that you use to perform database operations. | |
| Refer to [MikroORM's reference](https://mikro-orm.io/api/knex/class/EntityManager) for a full list of the entity manager's methods. | |
| ### Why Wrap a Transactional Method | |
| The variables in the transactional method (for example, `update_`) hold values that are uncommitted to the database. They're only committed once the method finishes execution. | |
| So, if in your method you perform database operations, then use their result to perform other actions, such as connecting to a third-party service, you'll be working with uncommitted data. | |
| By placing only the database operations in a method that has the `InjectTransactionManager` and using it in a wrapper method, the wrapper method receives the committed result of the transactional method. | |
| This is also useful if you perform heavy data normalization outside of the database operations. In that case, you don't hold the transaction for a longer time than needed. | |
| For example, the `update` method could be changed to the following: | |
| ```ts | |
| // other imports... | |
| import { EntityManager } from "@mikro-orm/knex" | |
| class HelloModuleService { | |
| // ... | |
| @InjectManager() | |
| async update( | |
| input: { | |
| id: string, | |
| name: string | |
| }, | |
| @MedusaContext() sharedContext?: Context<EntityManager> | |
| ) { | |
| const newData = await this.update_(input, sharedContext) | |
| await sendNewDataToSystem(newData) | |
| return newData | |
| } | |
| } | |
| ``` | |
| In this case, only the `update_` method is wrapped in a transaction. The returned value `newData` holds the committed result, which can be used for other operations, such as passed to a `sendNewDataToSystem` method. | |
| ### Using Methods in Transactional Methods | |
| If your transactional method uses other methods that accept a Medusa context, pass the shared context to those methods. | |
| For example: | |
| ```ts | |
| // other imports... | |
| import { EntityManager } from "@mikro-orm/knex" | |
| class HelloModuleService { | |
| // ... | |
| @InjectTransactionManager() | |
| protected async anotherMethod( | |
| @MedusaContext() sharedContext?: Context<EntityManager> | |
| ) { | |
| // ... | |
| } | |
| @InjectTransactionManager() | |
| protected async update_( | |
| input: { | |
| id: string, | |
| name: string | |
| }, | |
| @MedusaContext() sharedContext?: Context<EntityManager> | |
| ): Promise<any> { | |
| this.anotherMethod(sharedContext) | |
| } | |
| } | |
| ``` | |
| You use the `anotherMethod` transactional method in the `update_` transactional method, so you pass it the shared context. | |
| The `anotherMethod` now runs in the same transaction as the `update_` method. | |
| *** | |
| ## Configure Transactions | |
| To configure the transaction, such as its [isolation level](https://www.postgresql.org/docs/current/transaction-iso.html), use the `baseRepository` dependency registered in your module's container. | |
| The `baseRepository` is an instance of a repository class that provides methods to create transactions, run database operations, and more. | |
| The `baseRepository` has a `transaction` method that allows you to run a function within a transaction and configure that transaction. | |
| For example, resolve the `baseRepository` in your service's constructor: | |
| ### Extending Service Factory | |
| ```ts highlights={[["14"]]} | |
| import { MedusaService } from "@medusajs/framework/utils" | |
| import MyCustom from "./models/my-custom" | |
| import { DAL } from "@medusajs/framework/types" | |
| type InjectedDependencies = { | |
| baseRepository: DAL.RepositoryService | |
| } | |
| class HelloModuleService extends MedusaService({ | |
| MyCustom, | |
| }){ | |
| protected baseRepository_: DAL.RepositoryService | |
| constructor({ baseRepository }: InjectedDependencies) { | |
| super(...arguments) | |
| this.baseRepository_ = baseRepository | |
| } | |
| } | |
| export default HelloModuleService | |
| ``` | |
| ### Without Service Factory | |
| ```ts highlights={[["10"]]} | |
| import { DAL } from "@medusajs/framework/types" | |
| type InjectedDependencies = { | |
| baseRepository: DAL.RepositoryService | |
| } | |
| class HelloModuleService { | |
| protected baseRepository_: DAL.RepositoryService | |
| constructor({ baseRepository }: InjectedDependencies) { | |
| this.baseRepository_ = baseRepository | |
| } | |
| } | |
| export default HelloModuleService | |
| ``` | |
| Then, add the following method that uses it: | |
| ```ts highlights={repoHighlights} | |
| // ... | |
| import { | |
| InjectManager, | |
| InjectTransactionManager, | |
| MedusaContext, | |
| } from "@medusajs/framework/utils" | |
| import { Context } from "@medusajs/framework/types" | |
| import { EntityManager } from "@mikro-orm/knex" | |
| class HelloModuleService { | |
| // ... | |
| @InjectTransactionManager() | |
| protected async update_( | |
| input: { | |
| id: string, | |
| name: string | |
| }, | |
| @MedusaContext() sharedContext?: Context<EntityManager> | |
| ): Promise<any> { | |
| return await this.baseRepository_.transaction( | |
| async (transactionManager) => { | |
| await transactionManager.nativeUpdate( | |
| "my_custom", | |
| { | |
| id: input.id, | |
| }, | |
| { | |
| name: input.name, | |
| } | |
| ) | |
| // retrieve again | |
| const updatedRecord = await transactionManager.execute( | |
| `SELECT * FROM my_custom WHERE id = '${input.id}'` | |
| ) | |
| return updatedRecord | |
| }, | |
| { | |
| transaction: sharedContext.transactionManager, | |
| } | |
| ) | |
| } | |
| @InjectManager() | |
| async update( | |
| input: { | |
| id: string, | |
| name: string | |
| }, | |
| @MedusaContext() sharedContext?: Context<EntityManager> | |
| ) { | |
| return await this.update_(input, sharedContext) | |
| } | |
| } | |
| ``` | |
| The `update_` method uses the `baseRepository_.transaction` method to wrap a function in a transaction. | |
| The function parameter receives a transactional entity manager as a parameter. Use it to perform the database operations. | |
| The `baseRepository_.transaction` method also receives as a second parameter an object of options. You must pass in it the `transaction` property and set its value to the `sharedContext.transactionManager` property so that the function wrapped in the transaction uses the injected transaction manager. | |
| Refer to [MikroORM's reference](https://mikro-orm.io/api/knex/class/EntityManager) for a full list of the entity manager's methods. | |
| ### Transaction Options | |
| The second parameter of the `baseRepository_.transaction` method is an object of options that accepts the following properties: | |
| 1. `transaction`: Set the transactional entity manager passed to the function. You must provide this option as explained in the previous section. | |
| ```ts highlights={[["16"]]} | |
| // other imports... | |
| import { EntityManager } from "@mikro-orm/knex" | |
| class HelloModuleService { | |
| // ... | |
| @InjectTransactionManager() | |
| async update_( | |
| input: { | |
| id: string, | |
| name: string | |
| }, | |
| @MedusaContext() sharedContext?: Context<EntityManager> | |
| ): Promise<any> { | |
| return await this.baseRepository_.transaction<EntityManager>( | |
| async (transactionManager) => { | |
| // ... | |
| }, | |
| { | |
| transaction: sharedContext.transactionManager, | |
| } | |
| ) | |
| } | |
| } | |
| ``` | |
| 2. `isolationLevel`: Sets the transaction's [isolation level](https://www.postgresql.org/docs/current/transaction-iso.html). Its values can be: | |
| - `read committed` | |
| - `read uncommitted` | |
| - `snapshot` | |
| - `repeatable read` | |
| - `serializable` | |
| ```ts highlights={[["19"]]} | |
| // other imports... | |
| import { IsolationLevel } from "@mikro-orm/core" | |
| class HelloModuleService { | |
| // ... | |
| @InjectTransactionManager() | |
| async update_( | |
| input: { | |
| id: string, | |
| name: string | |
| }, | |
| @MedusaContext() sharedContext?: Context<EntityManager> | |
| ): Promise<any> { | |
| return await this.baseRepository_.transaction<EntityManager>( | |
| async (transactionManager) => { | |
| // ... | |
| }, | |
| { | |
| isolationLevel: IsolationLevel.READ_COMMITTED, | |
| } | |
| ) | |
| } | |
| } | |
| ``` | |
| 3. `enableNestedTransactions`: (default: `false`) whether to allow using nested transactions. | |
| - If `transaction` is provided and this is disabled, the manager in `transaction` is re-used. | |
| ```ts highlights={[["16"]]} | |
| class HelloModuleService { | |
| // ... | |
| @InjectTransactionManager() | |
| async update_( | |
| input: { | |
| id: string, | |
| name: string | |
| }, | |
| @MedusaContext() sharedContext?: Context<EntityManager> | |
| ): Promise<any> { | |
| return await this.baseRepository_.transaction<EntityManager>( | |
| async (transactionManager) => { | |
| // ... | |
| }, | |
| { | |
| enableNestedTransactions: false, | |
| } | |
| ) | |
| } | |
| } | |
| ``` | |
| # Module Isolation | |
| In this chapter, you'll learn how modules are isolated, and what that means for your custom development. | |
| - Modules can't access resources, such as services or data models, from other modules. | |
| - Use Medusa's linking concepts, as explained in the [Module Links chapters](https://docs.medusajs.com/learn/fundamentals/module-links/index.html.md), to extend a module's data models and retrieve data across modules. | |
| ## How are Modules Isolated? | |
| A module is unaware of any resources other than its own, such as services or data models. This means it can't access these resources if they're implemented in another module. | |
| For example, your custom module can't resolve the Product Module's main service or have direct relationships from its data model to the Product Module's data models. | |
| *** | |
| ## Why are Modules Isolated | |
| Some of the module isolation's benefits include: | |
| - Integrate your module into any Medusa application without side-effects to your setup. | |
| - Replace existing modules with your custom implementation, if your use case is drastically different. | |
| - Use modules in other environments, such as Edge functions and Next.js apps. | |
| *** | |
| ## How to Extend Data Model of Another Module? | |
| To extend the data model of another module, such as the `product` data model of the Product Module, use Medusa's linking concepts as explained in the [Module Links chapters](https://docs.medusajs.com/learn/fundamentals/module-links/index.html.md). | |
| *** | |
| ## How to Use Services of Other Modules? | |
| If you're building a feature that uses functionalities from different modules, use a workflow whose steps resolve the modules' services to perform these functionalities. | |
| Workflows ensure data consistency through their roll-back mechanism and tracking of each execution's status, steps, input, and output. | |
| ### Example | |
| For example, consider you have two modules: | |
| 1. A module that stores and manages brands in your application. | |
| 2. A module that integrates a third-party Content Management System (CMS). | |
| To sync brands from your application to the third-party system, create the following steps: | |
| ```ts title="Example Steps" highlights={stepsHighlights} | |
| const retrieveBrandsStep = createStep( | |
| "retrieve-brands", | |
| async (_, { container }) => { | |
| const brandModuleService = container.resolve( | |
| "brandModuleService" | |
| ) | |
| const brands = await brandModuleService.listBrands() | |
| return new StepResponse(brands) | |
| } | |
| ) | |
| const createBrandsInCmsStep = createStep( | |
| "create-brands-in-cms", | |
| async ({ brands }, { container }) => { | |
| const cmsModuleService = container.resolve( | |
| "cmsModuleService" | |
| ) | |
| const cmsBrands = await cmsModuleService.createBrands(brands) | |
| return new StepResponse(cmsBrands, cmsBrands) | |
| }, | |
| async (brands, { container }) => { | |
| const cmsModuleService = container.resolve( | |
| "cmsModuleService" | |
| ) | |
| await cmsModuleService.deleteBrands( | |
| brands.map((brand) => brand.id) | |
| ) | |
| } | |
| ) | |
| ``` | |
| The `retrieveBrandsStep` retrieves the brands from a brand module, and the `createBrandsInCmsStep` creates the brands in a third-party system using a CMS module. | |
| Then, create the following workflow that uses these steps: | |
| ```ts title="Example Workflow" | |
| export const syncBrandsWorkflow = createWorkflow( | |
| "sync-brands", | |
| () => { | |
| const brands = retrieveBrandsStep() | |
| createBrandsInCmsStep({ brands }) | |
| } | |
| ) | |
| ``` | |
| You can then use this workflow in an API route, scheduled job, or other resources that use this functionality. | |
| # Loaders | |
| In this chapter, you’ll learn about loaders and how to use them. | |
| ## What is a Loader? | |
| When building a commerce application, you'll often need to execute an action the first time the application starts. For example, if your application needs to connect to databases other than Medusa's PostgreSQL database, you might need to establish a connection on application startup. | |
| In Medusa, you can execute an action when the application starts using a loader. A loader is a function exported by a [module](https://docs.medusajs.com/learn/fundamentals/modules/index.html.md), which is a package of business logic for a single domain. When the Medusa application starts, it executes all loaders exported by configured modules. | |
| Loaders are useful to register custom resources, such as database connections, in the [module's container](https://docs.medusajs.com/learn/fundamentals/modules/container/index.html.md), which is similar to the [Medusa container](https://docs.medusajs.com/learn/fundamentals/medusa-container/index.html.md) but includes only [resources available to the module](https://docs.medusajs.com/resources/medusa-container-resources#module-container-resources/index.html.md). Modules are isolated, so they can't access resources outside of them, such as a service in another module. | |
| Medusa isolates modules to ensure that they're re-usable across applications, aren't tightly coupled to other resources, and don't have implications when integrated into the Medusa application. Learn more about why modules are isolated in [this chapter](https://docs.medusajs.com/learn/fundamentals/modules/isolation/index.html.md), and check out [this reference for the list of resources in the module's container](https://docs.medusajs.com/resources/medusa-container-resources#module-container-resources/index.html.md). | |
| *** | |
| ## How to Create a Loader? | |
| ### 1. Implement Loader Function | |
| You create a loader function in a TypeScript or JavaScript file under a module's `loaders` directory. | |
| For example, consider you have a `hello` module, you can create a loader at `src/modules/hello/loaders/hello-world.ts` with the following content: | |
| 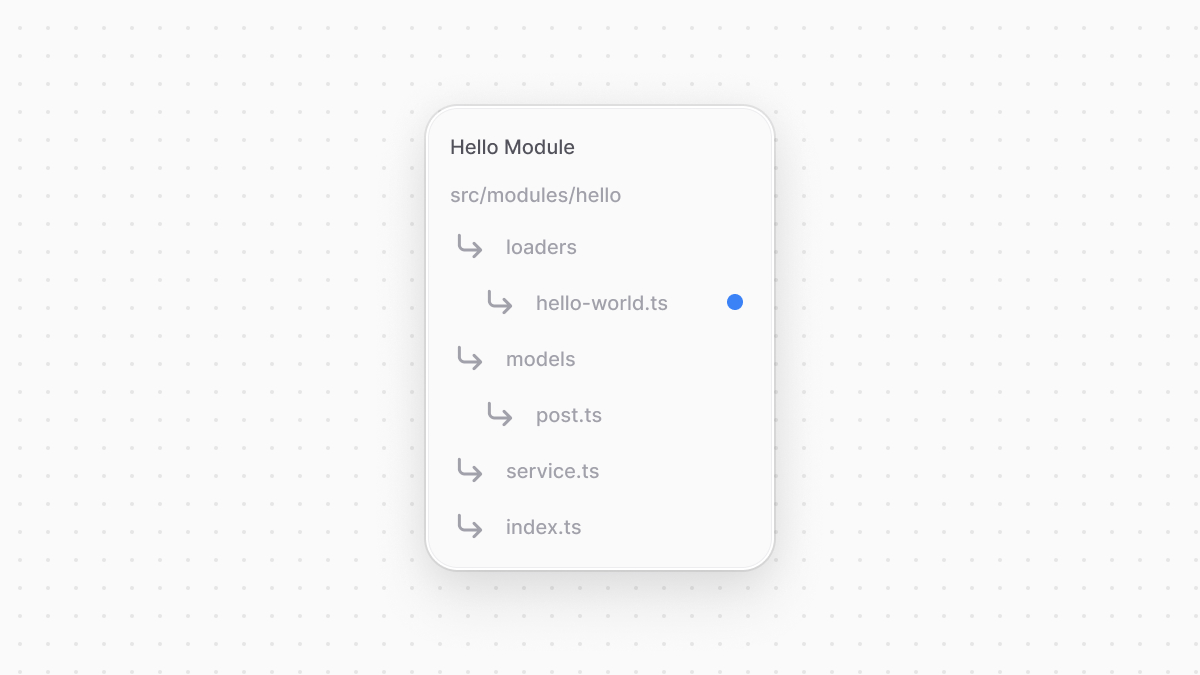 | |
| Learn how to create a module in [this chapter](https://docs.medusajs.com/learn/fundamentals/modules/index.html.md). | |
| ```ts title="src/modules/hello/loaders/hello-world.ts" | |
| import { | |
| LoaderOptions, | |
| } from "@medusajs/framework/types" | |
| export default async function helloWorldLoader({ | |
| container, | |
| }: LoaderOptions) { | |
| const logger = container.resolve("logger") | |
| logger.info("[helloWorldLoader]: Hello, World!") | |
| } | |
| ``` | |
| The loader file exports an async function, which is the function executed when the application loads. | |
| The function receives an object parameter that has a `container` property, which is the module's container that you can use to resolve resources from. In this example, you resolve the Logger utility to log a message in the terminal. | |
| Find the list of resources in the module's container in [this reference](https://docs.medusajs.com/resources/medusa-container-resources#module-container-resources/index.html.md). | |
| ### 2. Export Loader in Module Definition | |
| After implementing the loader, you must export it in the module's definition in the `index.ts` file at the root of the module's directory. Otherwise, the Medusa application will not run it. | |
| So, to export the loader you implemented above in the `hello` module, add the following to `src/modules/hello/index.ts`: | |
| ```ts title="src/modules/hello/index.ts" | |
| // other imports... | |
| import helloWorldLoader from "./loaders/hello-world" | |
| export default Module("hello", { | |
| // ... | |
| loaders: [helloWorldLoader], | |
| }) | |
| ``` | |
| The second parameter of the `Module` function accepts a `loaders` property whose value is an array of loader functions. The Medusa application will execute these functions when it starts. | |
| ### Test the Loader | |
| Assuming your module is [added to Medusa's configuration](https://docs.medusajs.com/learn/fundamentals/modules#4-add-module-to-medusas-configurations/index.html.md), you can test the loader by starting the Medusa application: | |
| ```bash npm2yarn | |
| npm run dev | |
| ``` | |
| Then, you'll find the following message logged in the terminal: | |
| ```plain | |
| info: [HELLO MODULE] Just started the Medusa application! | |
| ``` | |
| This indicates that the loader in the `hello` module ran and logged this message. | |
| *** | |
| ## Example: Register Custom MongoDB Connection | |
| As mentioned in this chapter's introduction, loaders are most useful when you need to register a custom resource in the module's container to re-use it in other customizations in the module. | |
| Consider your have a MongoDB module that allows you to perform operations on a MongoDB database. | |
| ### Prerequisites | |
| - [MongoDB database that you can connect to from a local machine.](https://www.mongodb.com) | |
| - [Install the MongoDB SDK in your Medusa application.](https://www.mongodb.com/docs/drivers/node/current/quick-start/download-and-install/#install-the-node.js-driver) | |
| To connect to the database, you create the following loader in your module: | |
| ```ts title="src/modules/mongo/loaders/connection.ts" highlights={loaderHighlights} | |
| import { LoaderOptions } from "@medusajs/framework/types" | |
| import { asValue } from "awilix" | |
| import { MongoClient } from "mongodb" | |
| type ModuleOptions = { | |
| connection_url?: string | |
| db_name?: string | |
| } | |
| export default async function mongoConnectionLoader({ | |
| container, | |
| options, | |
| }: LoaderOptions<ModuleOptions>) { | |
| if (!options.connection_url) { | |
| throw new Error(`[MONGO MDOULE]: connection_url option is required.`) | |
| } | |
| if (!options.db_name) { | |
| throw new Error(`[MONGO MDOULE]: db_name option is required.`) | |
| } | |
| const logger = container.resolve("logger") | |
| try { | |
| const clientDb = ( | |
| await (new MongoClient(options.connection_url)).connect() | |
| ).db(options.db_name) | |
| logger.info("Connected to MongoDB") | |
| container.register( | |
| "mongoClient", | |
| asValue(clientDb) | |
| ) | |
| } catch (e) { | |
| logger.error( | |
| `[MONGO MDOULE]: An error occurred while connecting to MongoDB: ${e}` | |
| ) | |
| } | |
| } | |
| ``` | |
| The loader function accepts in its object parameter an `options` property, which is the options passed to the module in Medusa's configurations. For example: | |
| ```ts title="medusa-config.ts" highlights={optionHighlights} | |
| module.exports = defineConfig({ | |
| // ... | |
| modules: [ | |
| { | |
| resolve: "./src/modules/mongo", | |
| options: { | |
| connection_url: process.env.MONGO_CONNECTION_URL, | |
| db_name: process.env.MONGO_DB_NAME, | |
| }, | |
| }, | |
| ], | |
| }) | |
| ``` | |
| Passing options is useful when your module needs informations like connection URLs or API keys, as it ensures your module can be re-usable across applications. For the MongoDB Module, you expect two options: | |
| - `connection_url`: the URL to connect to the MongoDB database. | |
| - `db_name`: The name of the database to connect to. | |
| In the loader, you check first that these options are set before proceeding. Then, you create an instance of the MongoDB client and connect to the database specified in the options. | |
| After creating the client, you register it in the module's container using the container's `register` method. The method accepts two parameters: | |
| 1. The key to register the resource under, which in this case is `mongoClient`. You'll use this name later to resolve the client. | |
| 2. The resource to register in the container, which is the MongoDB client you created. However, you don't pass the resource as-is. Instead, you need to use an `asValue` function imported from the [awilix package](https://github.com/jeffijoe/awilix), which is the package used to implement the container functionality in Medusa. | |
| ### Use Custom Registered Resource in Module's Service | |
| After registering the custom MongoDB client in the module's container, you can now resolve and use it in the module's service. | |
| For example: | |
| ```ts title="src/modules/mongo/service.ts" | |
| import type { Db } from "mongodb" | |
| type InjectedDependencies = { | |
| mongoClient: Db | |
| } | |
| export default class MongoModuleService { | |
| private mongoClient_: Db | |
| constructor({ mongoClient }: InjectedDependencies) { | |
| this.mongoClient_ = mongoClient | |
| } | |
| async createMovie({ title }: { | |
| title: string | |
| }) { | |
| const moviesCol = this.mongoClient_.collection("movie") | |
| const insertedMovie = await moviesCol.insertOne({ | |
| title, | |
| }) | |
| const movie = await moviesCol.findOne({ | |
| _id: insertedMovie.insertedId, | |
| }) | |
| return movie | |
| } | |
| async deleteMovie(id: string) { | |
| const moviesCol = this.mongoClient_.collection("movie") | |
| await moviesCol.deleteOne({ | |
| _id: { | |
| equals: id, | |
| }, | |
| }) | |
| } | |
| } | |
| ``` | |
| The service `MongoModuleService` resolves the `mongoClient` resource you registered in the loader and sets it as a class property. You then use it in the `createMovie` and `deleteMovie` methods, which create and delete a document in a `movie` collection in the MongoDB database, respectively. | |
| Make sure to export the loader in the module's definition in the `index.ts` file at the root directory of the module: | |
| ```ts title="src/modules/mongo/index.ts" highlights={[["9"]]} | |
| import { Module } from "@medusajs/framework/utils" | |
| import MongoModuleService from "./service" | |
| import mongoConnectionLoader from "./loaders/connection" | |
| export const MONGO_MODULE = "mongo" | |
| export default Module(MONGO_MODULE, { | |
| service: MongoModuleService, | |
| loaders: [mongoConnectionLoader], | |
| }) | |
| ``` | |
| ### Test it Out | |
| You can test the connection out by starting the Medusa application. If it's successful, you'll see the following message logged in the terminal: | |
| ```bash | |
| info: Connected to MongoDB | |
| ``` | |
| You can now resolve the MongoDB Module's main service in your customizations to perform operations on the MongoDB database. | |
| # Modules Directory Structure | |
| In this document, you'll learn about the expected files and directories in your module. | |
| 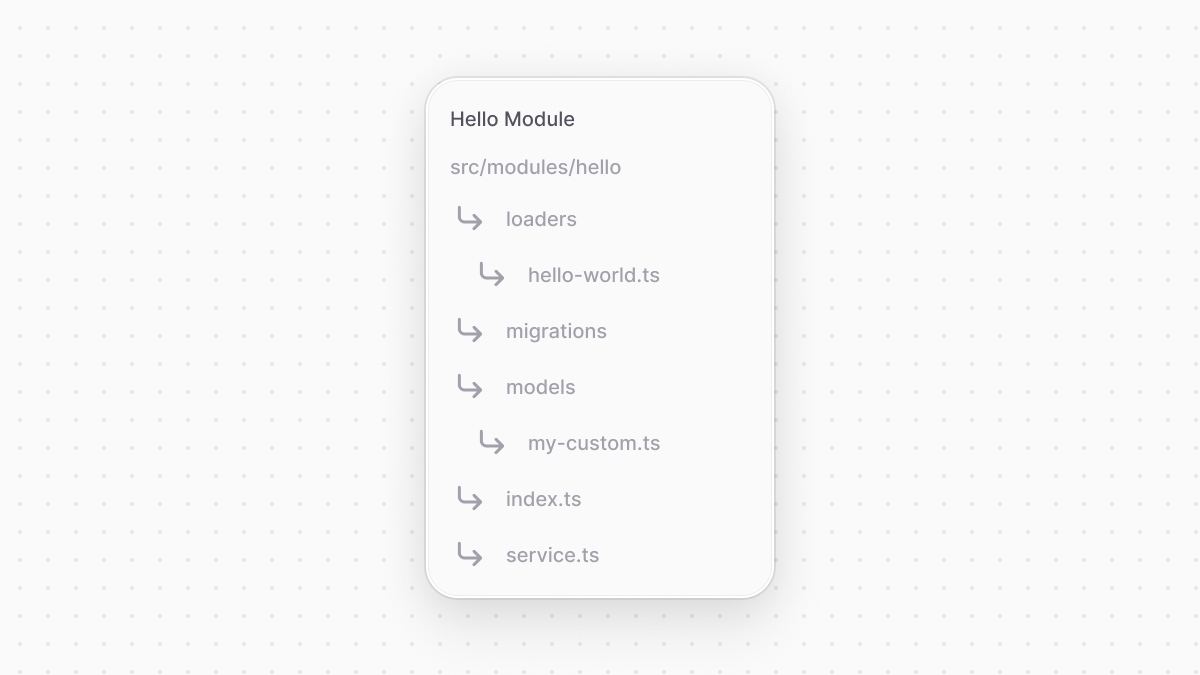 | |
| ## index.ts | |
| The `index.ts` file in the root of your module's directory is the only required file. It must export the module's definition as explained in a [previous chapter](https://docs.medusajs.com/learn/fundamentals/modules/index.html.md). | |
| *** | |
| ## service.ts | |
| A module must have a main service. It's created in the `service.ts` file at the root of your module directory as explained in a [previous chapter](https://docs.medusajs.com/learn/fundamentals/modules/index.html.md). | |
| *** | |
| ## Other Directories | |
| The following directories are optional and their content are explained more in the following chapters: | |
| - `models`: Holds the data models representing tables in the database. | |
| - `migrations`: Holds the migration files used to reflect changes on the database. | |
| - `loaders`: Holds the scripts to run on the Medusa application's start-up. | |
| # Commerce Modules | |
| In this chapter, you'll learn about Medusa's commerce modules. | |
| ## What is a Commerce Module? | |
| Commerce modules are built-in [modules](https://docs.medusajs.com/learn/fundamentals/modules/index.html.md) of Medusa that provide core commerce logic specific to domains like Products, Orders, Customers, Fulfillment, and much more. | |
| Medusa's commerce modules are used to form Medusa's default [workflows](https://docs.medusajs.com/resources/medusa-workflows-reference/index.html.md) and [APIs](https://docs.medusajs.com/api/store/index.html.md). For example, when you call the add to cart endpoint. the add to cart workflow runs which uses the Product Module to check if the product exists, the Inventory Module to ensure the product is available in the inventory, and the Cart Module to finally add the product to the cart. | |
| You'll find the details and steps of the add-to-cart workflow in [this workflow reference](https://docs.medusajs.com/resources/references/medusa-workflows/addToCartWorkflow/index.html.md) | |
| The core commerce logic contained in Commerce Modules is also available directly when you are building customizations. This granular access to commerce functionality is unique and expands what's possible to build with Medusa drastically. | |
| ### List of Medusa's Commerce Modules | |
| Refer to [this reference](https://docs.medusajs.com/resources/commerce-modules/index.html.md) for a full list of commerce modules in Medusa. | |
| *** | |
| ## Use Commerce Modules in Custom Flows | |
| Similar to your [custom modules](https://docs.medusajs.com/learn/fundamentals/modules/index.html.md), the Medusa application registers a commerce module's service in the [container](https://docs.medusajs.com/learn/fundamentals/medusa-container/index.html.md). So, you can resolve it in your custom flows. This is useful as you build unique requirements extending core commerce features. | |
| For example, consider you have a [workflow](https://docs.medusajs.com/learn/fundamentals/workflows/index.html.md) (a special function that performs a task in a series of steps with rollback mechanism) that needs a step to retrieve the total number of products. You can create a step in the workflow that resolves the Product Module's service from the container to use its methods: | |
| ```ts highlights={highlights} | |
| import { createStep, StepResponse } from "@medusajs/framework/workflows-sdk" | |
| export const countProductsStep = createStep( | |
| "count-products", | |
| async ({ }, { container }) => { | |
| const productModuleService = container.resolve("product") | |
| const [,count] = await productModuleService.listAndCountProducts() | |
| return new StepResponse(count) | |
| } | |
| ) | |
| ``` | |
| Your workflow can use services of both custom and commerce modules, supporting you in building custom flows without having to re-build core commerce features. | |
| # Multiple Services in a Module | |
| In this chapter, you'll learn how to use multiple services in a module. | |
| ## Module's Main and Internal Services | |
| A module has one main service only, which is the service exported in the module's definition. | |
| However, you may use other services in your module to better organize your code or split functionalities. These are called internal services that can be resolved within your module, but not in external resources. | |
| *** | |
| ## How to Add an Internal Service | |
| ### 1. Create Service | |
| To add an internal service, create it in the `services` directory of your module. | |
| For example, create the file `src/modules/hello/services/client.ts` with the following content: | |
| ```ts title="src/modules/hello/services/client.ts" | |
| export class ClientService { | |
| async getMessage(): Promise<string> { | |
| return "Hello, World!" | |
| } | |
| } | |
| ``` | |
| ### 2. Export Service in Index | |
| Next, create an `index.ts` file under the `services` directory of the module that exports your internal services. | |
| For example, create the file `src/modules/hello/services/index.ts` with the following content: | |
| ```ts title="src/modules/hello/services/index.ts" | |
| export * from "./client" | |
| ``` | |
| This exports the `ClientService`. | |
| ### 3. Resolve Internal Service | |
| Internal services exported in the `services/index.ts` file of your module are now registered in the container and can be resolved in other services in the module as well as loaders. | |
| For example, in your main service: | |
| ```ts title="src/modules/hello/service.ts" highlights={[["5"], ["13"]]} | |
| // other imports... | |
| import { ClientService } from "./services" | |
| type InjectedDependencies = { | |
| clientService: ClientService | |
| } | |
| class HelloModuleService extends MedusaService({ | |
| MyCustom, | |
| }){ | |
| protected clientService_: ClientService | |
| constructor({ clientService }: InjectedDependencies) { | |
| super(...arguments) | |
| this.clientService_ = clientService | |
| } | |
| } | |
| ``` | |
| You can now use your internal service in your main service. | |
| *** | |
| ## Resolve Resources in Internal Service | |
| Resolve dependencies from your module's container in the constructor of your internal service. | |
| For example: | |
| ```ts | |
| import { Logger } from "@medusajs/framework/types" | |
| type InjectedDependencies = { | |
| logger: Logger | |
| } | |
| export class ClientService { | |
| protected logger_: Logger | |
| constructor({ logger }: InjectedDependencies) { | |
| this.logger_ = logger | |
| } | |
| } | |
| ``` | |
| *** | |
| ## Access Module Options | |
| Your internal service can't access the module's options. | |
| To retrieve the module's options, use the `configModule` registered in the module's container, which is the configurations in `medusa-config.ts`. | |
| For example: | |
| ```ts | |
| import { ConfigModule } from "@medusajs/framework/types" | |
| import { HELLO_MODULE } from ".." | |
| export type InjectedDependencies = { | |
| configModule: ConfigModule | |
| } | |
| export class ClientService { | |
| protected options: Record<string, any> | |
| constructor({ configModule }: InjectedDependencies) { | |
| const moduleDef = configModule.modules[HELLO_MODULE] | |
| if (typeof moduleDef !== "boolean") { | |
| this.options = moduleDef.options | |
| } | |
| } | |
| } | |
| ``` | |
| The `configModule` has a `modules` property that includes all registered modules. Retrieve the module's configuration using its registration key. | |
| If its value is not a `boolean`, set the service's options to the module configuration's `options` property. | |
| # Module Options | |
| In this chapter, you’ll learn about passing options to your module from the Medusa application’s configurations and using them in the module’s resources. | |
| ## What are Module Options? | |
| A module can receive options to customize or configure its functionality. For example, if you’re creating a module that integrates a third-party service, you’ll want to receive the integration credentials in the options rather than adding them directly in your code. | |
| *** | |
| ## How to Pass Options to a Module? | |
| To pass options to a module, add an `options` property to the module’s configuration in `medusa-config.ts`. | |
| For example: | |
| ```ts title="medusa-config.ts" | |
| module.exports = defineConfig({ | |
| // ... | |
| modules: [ | |
| { | |
| resolve: "./src/modules/hello", | |
| options: { | |
| capitalize: true, | |
| }, | |
| }, | |
| ], | |
| }) | |
| ``` | |
| The `options` property’s value is an object. You can pass any properties you want. | |
| ### Pass Options to a Module in a Plugin | |
| If your module is part of a plugin, you can pass options to the module in the plugin’s configuration. | |
| For example: | |
| ```ts title="medusa-config.ts" | |
| import { defineConfig } from "@medusajs/framework/utils" | |
| module.exports = defineConfig({ | |
| plugins: [ | |
| { | |
| resolve: "@myorg/plugin-name", | |
| options: { | |
| capitalize: true, | |
| }, | |
| }, | |
| ], | |
| }) | |
| ``` | |
| The `options` property in the plugin configuration is passed to all modules in a plugin. | |
| *** | |
| ## Access Module Options in Main Service | |
| The module’s main service receives the module options as a second parameter. | |
| For example: | |
| ```ts title="src/modules/hello/service.ts" highlights={[["12"], ["14", "options?: ModuleOptions"], ["17"], ["18"], ["19"]]} | |
| import { MedusaService } from "@medusajs/framework/utils" | |
| import MyCustom from "./models/my-custom" | |
| // recommended to define type in another file | |
| type ModuleOptions = { | |
| capitalize?: boolean | |
| } | |
| export default class HelloModuleService extends MedusaService({ | |
| MyCustom, | |
| }){ | |
| protected options_: ModuleOptions | |
| constructor({}, options?: ModuleOptions) { | |
| super(...arguments) | |
| this.options_ = options || { | |
| capitalize: false, | |
| } | |
| } | |
| // ... | |
| } | |
| ``` | |
| *** | |
| ## Access Module Options in Loader | |
| The object that a module’s loaders receive as a parameter has an `options` property holding the module's options. | |
| For example: | |
| ```ts title="src/modules/hello/loaders/hello-world.ts" highlights={[["11"], ["12", "ModuleOptions", "The type of expected module options."], ["16"]]} | |
| import { | |
| LoaderOptions, | |
| } from "@medusajs/framework/types" | |
| // recommended to define type in another file | |
| type ModuleOptions = { | |
| capitalize?: boolean | |
| } | |
| export default async function helloWorldLoader({ | |
| options, | |
| }: LoaderOptions<ModuleOptions>) { | |
| console.log( | |
| "[HELLO MODULE] Just started the Medusa application!", | |
| options | |
| ) | |
| } | |
| ``` | |
| # Service Constraints | |
| This chapter lists constraints to keep in mind when creating a service. | |
| ## Use Async Methods | |
| Medusa wraps service method executions to inject useful context or transactions. However, since Medusa can't detect whether the method is asynchronous, it always executes methods in the wrapper with the `await` keyword. | |
| For example, if you have a synchronous `getMessage` method, and you use it in other resources like workflows, Medusa executes it as an async method: | |
| ```ts | |
| await helloModuleService.getMessage() | |
| ``` | |
| So, make sure your service's methods are always async to avoid unexpected errors or behavior. | |
| ```ts highlights={[["8", "", "Method must be async."], ["13", "async", "Correct way of defining the method."]]} | |
| import { MedusaService } from "@medusajs/framework/utils" | |
| import MyCustom from "./models/my-custom" | |
| class HelloModuleService extends MedusaService({ | |
| MyCustom, | |
| }){ | |
| // Don't | |
| getMessage(): string { | |
| return "Hello, World!" | |
| } | |
| // Do | |
| async getMessage(): Promise<string> { | |
| return "Hello, World!" | |
| } | |
| } | |
| export default HelloModuleService | |
| ``` | |
| # Guide: Define Module Link Between Brand and Product | |
| In this chapter, you'll learn how to define a module link between a brand defined in the [custom Brand Module](https://docs.medusajs.com/learn/customization/custom-features/module/index.html.md), and a product defined in the [Product Module](https://docs.medusajs.com/resources/commerce-modules/product/index.html.md) that's available in your Medusa application out-of-the-box. | |
| Modules are [isolated](https://docs.medusajs.com/learn/fundamentals/modules/isolation/index.html.md) from other resources, ensuring that they're integrated into the Medusa application without side effects. However, you may need to associate data models of different modules, or you're trying to extend data models from commerce modules with custom properties. To do that, you define module links. | |
| A module link forms an association between two data models of different modules while maintaining module isolation. You can then manage and query linked records of the data models using Medusa's Modules SDK. | |
| In this chapter, you'll define a module link between the `Brand` data model of the Brand Module, and the `Product` data model of the Product Module. In later chapters, you'll manage and retrieve linked product and brand records. | |
| Learn more about module links in [this chapters](https://docs.medusajs.com/learn/fundamentals/module-links/index.html.md). | |
| ### Prerequisites | |
| - [Brand Module having a Brand data model](https://docs.medusajs.com/learn/customization/custom-features/module/index.html.md) | |
| ## 1. Define Link | |
| Links are defined in a TypeScript or JavaScript file under the `src/links` directory. The file defines and exports the link using `defineLink` from the Modules SDK. | |
| So, to define a link between the `Product` and `Brand` models, create the file `src/links/product-brand.ts` with the following content: | |
| 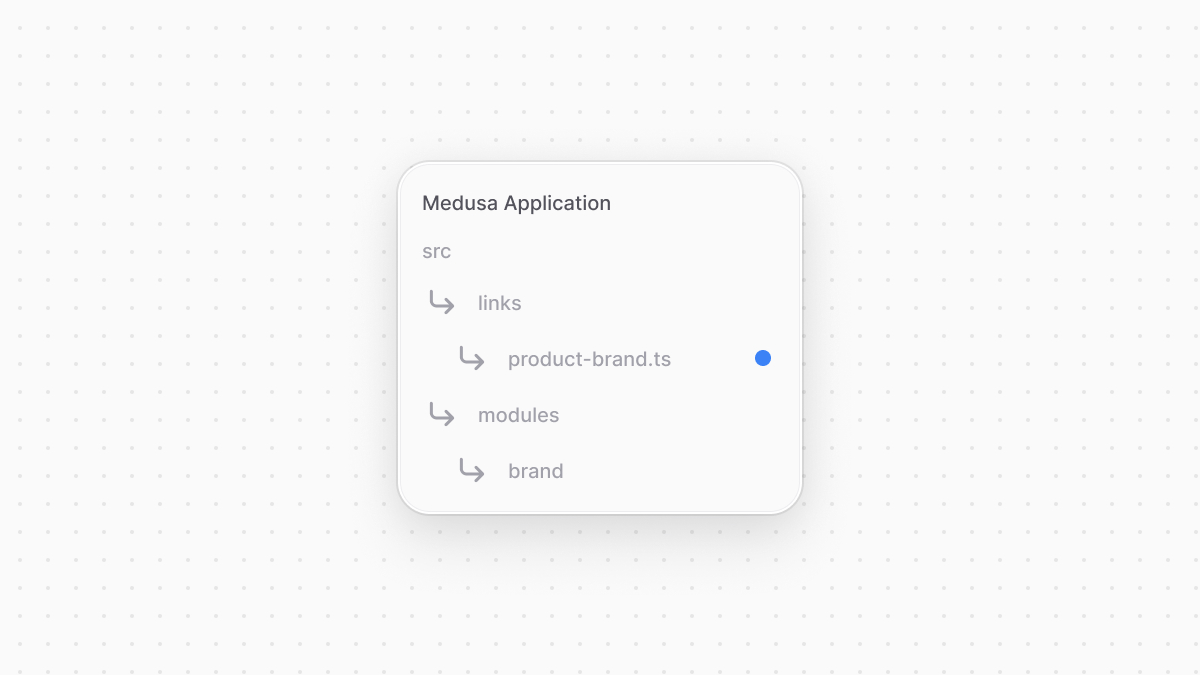 | |
| ```ts title="src/links/product-brand.ts" highlights={highlights} | |
| import BrandModule from "../modules/brand" | |
| import ProductModule from "@medusajs/medusa/product" | |
| import { defineLink } from "@medusajs/framework/utils" | |
| export default defineLink( | |
| { | |
| linkable: ProductModule.linkable.product, | |
| isList: true, | |
| }, | |
| BrandModule.linkable.brand | |
| ) | |
| ``` | |
| You import each module's definition object from the `index.ts` file of the module's directory. Each module object has a special `linkable` property that holds the data models' link configurations. | |
| The `defineLink` function accepts two parameters of the same type, which is either: | |
| - The data model's link configuration, which you access from the Module's `linkable` property; | |
| - Or an object that has two properties: | |
| - `linkable`: the data model's link configuration, which you access from the Module's `linkable` property. | |
| - `isList`: A boolean indicating whether many records of the data model can be linked to the other model. | |
| So, in the above code snippet, you define a link between the `Product` and `Brand` data models. Since a brand can be associated with multiple products, you enable `isList` in the `Product` model's object. | |
| *** | |
| ## 2. Sync the Link to the Database | |
| A module link is represented in the database as a table that stores the IDs of linked records. So, after defining the link, run the following command to create the module link's table in the database: | |
| ```bash | |
| npx medusa db:migrate | |
| ``` | |
| This command reflects migrations on the database and syncs module links, which creates a table for the `product-brand` link. | |
| You can also run the `npx medusa db:sync-links` to just sync module links without running migrations. | |
| *** | |
| ## Next Steps: Extend Create Product Flow | |
| In the next chapter, you'll extend Medusa's workflow and API route that create a product to allow associating a brand with a product. You'll also learn how to link brand and product records. | |
| # Guide: Query Product's Brands | |
| In the previous chapters, you [defined a link](https://docs.medusajs.com/learn/customization/extend-features/define-link/index.html.md) between the [custom Brand Module](https://docs.medusajs.com/learn/customization/custom-features/module/index.html.md) and Medusa's [Product Module](https://docs.medusajs.com/resources/commerce-modules/product/index.html.md), then [extended the create-product flow](https://docs.medusajs.com/learn/customization/extend-features/extend-create-product/index.html.md) to link a product to a brand. | |
| In this chapter, you'll learn how to retrieve a product's brand (and vice-versa) in two ways: Using Medusa's existing API route, or in customizations, such as a custom API route. | |
| ### Prerequisites | |
| - [Brand Module](https://docs.medusajs.com/learn/customization/custom-features/module/index.html.md) | |
| - [Defined link between the Brand and Product data models.](https://docs.medusajs.com/learn/customization/extend-features/define-link/index.html.md) | |
| *** | |
| ## Approach 1: Retrieve Brands in Existing API Routes | |
| Medusa's existing API routes accept a `fields` query parameter that allows you to specify the fields and relations of a model to retrieve. So, when you send a request to the [List Products](https://docs.medusajs.com/api/admin#products_getproducts/index.html.md), [Get Product](https://docs.medusajs.com/api/admin#products_getproductsid/index.html.md), or any product-related store or admin routes that accept a `fields` query parameter, you can specify in this parameter to return the product's brands. | |
| Learn more about selecting fields and relations in the [API Reference](https://docs.medusajs.com/api/admin#select-fields-and-relations/index.html.md). | |
| For example, send the following request to retrieve the list of products with their brands: | |
| ```bash | |
| curl 'http://localhost:9000/admin/products?fields=+brand.*' \ | |
| --header 'Authorization: Bearer {token}' | |
| ``` | |
| Make sure to replace `{token}` with your admin user's authentication token. Learn how to retrieve it in the [API reference](https://docs.medusajs.com/api/store#authentication/index.html.md). | |
| Any product that is linked to a brand will have a `brand` property in its object: | |
| ```json title="Example Product Object" | |
| { | |
| "id": "prod_123", | |
| // ... | |
| "brand": { | |
| "id": "01JEB44M61BRM3ARM2RRMK7GJF", | |
| "name": "Acme", | |
| "created_at": "2024-12-05T09:59:08.737Z", | |
| "updated_at": "2024-12-05T09:59:08.737Z", | |
| "deleted_at": null | |
| } | |
| } | |
| ``` | |
| By using the `fields` query parameter, you don't have to re-create existing API routes to get custom data models that you linked to core data models. | |
| *** | |
| ## Approach 2: Use Query to Retrieve Linked Records | |
| You can also retrieve linked records using Query. Query allows you to retrieve data across modules with filters, pagination, and more. You can resolve Query from the Medusa container and use it in your API route or workflow. | |
| Learn more about Query in [this chapter](https://docs.medusajs.com/learn/fundamentals/module-links/query/index.html.md). | |
| For example, you can create an API route that retrieves brands and their products. If you followed the [Create Brands API route chapter](https://docs.medusajs.com/learn/customization/custom-features/api-route/index.html.md), you'll have the file `src/api/admin/brands/route.ts` with a `POST` API route. Add a new `GET` function to the same file: | |
| ```ts title="src/api/admin/brands/route.ts" highlights={highlights} | |
| // other imports... | |
| import { | |
| MedusaRequest, | |
| MedusaResponse, | |
| } from "@medusajs/framework/http" | |
| export const GET = async ( | |
| req: MedusaRequest, | |
| res: MedusaResponse | |
| ) => { | |
| const query = req.scope.resolve("query") | |
| const { data: brands } = await query.graph({ | |
| entity: "brand", | |
| fields: ["*", "products.*"], | |
| }) | |
| res.json({ brands }) | |
| } | |
| ``` | |
| This adds a `GET` API route at `/admin/brands`. In the API route, you resolve Query from the Medusa container. Query has a `graph` method that runs a query to retrieve data. It accepts an object having the following properties: | |
| - `entity`: The data model's name as specified in the first parameter of `model.define`. | |
| - `fields`: An array of properties and relations to retrieve. You can pass: | |
| - A property's name, such as `id`, or `*` for all properties. | |
| - A relation or linked model's name, such as `products` (use the plural name since brands are linked to list of products). You suffix the name with `.*` to retrieve all its properties. | |
| `graph` returns an object having a `data` property, which is the retrieved brands. You return the brands in the response. | |
| ### Test it Out | |
| To test the API route out, send a `GET` request to `/admin/brands`: | |
| ```bash | |
| curl 'http://localhost:9000/admin/brands' \ | |
| -H 'Authorization: Bearer {token}' | |
| ``` | |
| Make sure to replace `{token}` with your admin user's authentication token. Learn how to retrieve it in the [API reference](https://docs.medusajs.com/api/store#authentication/index.html.md). | |
| This returns the brands in your store with their linked products. For example: | |
| ```json title="Example Response" | |
| { | |
| "brands": [ | |
| { | |
| "id": "123", | |
| // ... | |
| "products": [ | |
| { | |
| "id": "prod_123", | |
| // ... | |
| } | |
| ] | |
| } | |
| ] | |
| } | |
| ``` | |
| *** | |
| ## Summary | |
| By following the examples of the previous chapters, you: | |
| - Defined a link between the Brand and Product modules's data models, allowing you to associate a product with a brand. | |
| - Extended the create-product workflow and route to allow setting the product's brand while creating the product. | |
| - Queried a product's brand, and vice versa. | |
| *** | |
| ## Next Steps: Customize Medusa Admin | |
| Clients, such as the Medusa Admin dashboard, can now use brand-related features, such as creating a brand or setting the brand of a product. | |
| In the next chapters, you'll learn how to customize the Medusa Admin to show a product's brand on its details page, and to show a new page with the list of brands in your store. | |
| # Guide: Extend Create Product Flow | |
| After linking the [custom Brand data model](https://docs.medusajs.com/learn/customization/custom-features/module/index.html.md) and Medusa's [Product Module](https://docs.medusajs.com/resources/commerce-modules/product/index.html.md) in the [previous chapter](https://docs.medusajs.com/learn/customization/extend-features/define-link/index.html.md), you'll extend the create product workflow and API route to allow associating a brand with a product. | |
| Some API routes, including the [Create Product API route](https://docs.medusajs.com/api/admin#products_postproducts/index.html.md), accept an `additional_data` request body parameter. This parameter can hold custom data that's passed to the [hooks](https://docs.medusajs.com/learn/fundamentals/workflows/workflow-hooks/index.html.md) of the workflow executed in the API route, allowing you to consume those hooks and perform actions with the custom data. | |
| So, in this chapter, to extend the create product flow and associate a brand with a product, you will: | |
| - Consume the [productsCreated](https://docs.medusajs.com/resources/references/medusa-workflows/createProductsWorkflow#productsCreated/index.html.md) hook of the [createProductsWorkflow](https://docs.medusajs.com/resources/references/medusa-workflows/createProductsWorkflow/index.html.md), which is executed within the workflow after the product is created. You'll link the product with the brand passed in the `additional_data` parameter. | |
| - Extend the Create Product API route to allow passing a brand ID in `additional_data`. | |
| To learn more about the `additional_data` property and the API routes that accept additional data, refer to [this chapter](https://docs.medusajs.com/learn/fundamentals/api-routes/additional-data/index.html.md). | |
| ### Prerequisites | |
| - [Brand Module](https://docs.medusajs.com/learn/customization/custom-features/module/index.html.md) | |
| - [Defined link between the Brand and Product data models.](https://docs.medusajs.com/learn/customization/extend-features/define-link/index.html.md) | |
| *** | |
| ## 1. Consume the productCreated Hook | |
| A workflow hook is a point in a workflow where you can inject a step to perform a custom functionality. Consuming a workflow hook allows you to extend the features of a workflow and, consequently, the API route that uses it. | |
| Learn more about the workflow hooks in [this chapter](https://docs.medusajs.com/learn/fundamentals/workflows/workflow-hooks/index.html.md). | |
| The [createProductsWorkflow](https://docs.medusajs.com/resources/references/medusa-workflows/createProductsWorkflow/index.html.md) used in the [Create Product API route](https://docs.medusajs.com/api/admin#products_postproducts/index.html.md) has a `productsCreated` hook that runs after the product is created. You'll consume this hook to link the created product with the brand specified in the request parameters. | |
| To consume the `productsCreated` hook, create the file `src/workflows/hooks/created-product.ts` with the following content: | |
| 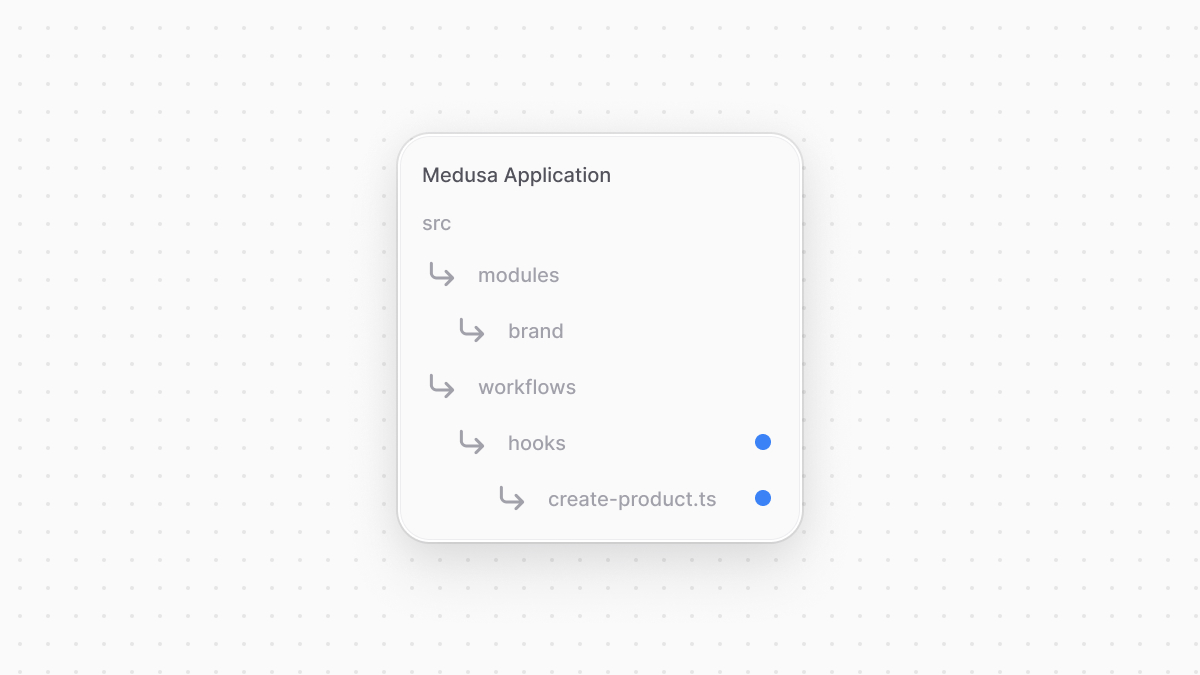 | |
| ```ts title="src/workflows/hooks/created-product.ts" highlights={hook1Highlights} | |
| import { createProductsWorkflow } from "@medusajs/medusa/core-flows" | |
| import { StepResponse } from "@medusajs/framework/workflows-sdk" | |
| import { Modules } from "@medusajs/framework/utils" | |
| import { LinkDefinition } from "@medusajs/framework/types" | |
| import { BRAND_MODULE } from "../../modules/brand" | |
| import BrandModuleService from "../../modules/brand/service" | |
| createProductsWorkflow.hooks.productsCreated( | |
| (async ({ products, additional_data }, { container }) => { | |
| if (!additional_data?.brand_id) { | |
| return new StepResponse([], []) | |
| } | |
| const brandModuleService: BrandModuleService = container.resolve( | |
| BRAND_MODULE | |
| ) | |
| // if the brand doesn't exist, an error is thrown. | |
| await brandModuleService.retrieveBrand(additional_data.brand_id as string) | |
| // TODO link brand to product | |
| }) | |
| ) | |
| ``` | |
| Workflows have a special `hooks` property to access its hooks and consume them. Each hook, such as `productCreated`, accepts a step function as a parameter. The step function accepts the following parameters: | |
| 1. An object having an `additional_data` property, which is the custom data passed in the request body under `additional_data`. The object will also have properties passed from the workflow to the hook, which in this case is the `products` property that holds an array of the created products. | |
| 2. An object of properties related to the step's context. It has a `container` property whose value is the [Medusa container](https://docs.medusajs.com/learn/fundamentals/medusa-container/index.html.md) to resolve framework and commerce tools. | |
| In the step, if a brand ID is passed in `additional_data`, you resolve the Brand Module's service and use its generated `retrieveBrand` method to retrieve the brand by its ID. The `retrieveBrand` method will throw an error if the brand doesn't exist. | |
| ### Link Brand to Product | |
| Next, you want to create a link between the created products and the brand. To do so, you use Link, which is a class from the Modules SDK that provides methods to manage linked records. | |
| Learn more about Link in [this chapter](https://docs.medusajs.com/learn/fundamentals/module-links/link/index.html.md). | |
| To use Link in the `productCreated` hook, replace the `TODO` with the following: | |
| ```ts title="src/workflows/hooks/created-product.ts" highlights={hook2Highlights} | |
| const link = container.resolve("link") | |
| const logger = container.resolve("logger") | |
| const links: LinkDefinition[] = [] | |
| for (const product of products) { | |
| links.push({ | |
| [Modules.PRODUCT]: { | |
| product_id: product.id, | |
| }, | |
| [BRAND_MODULE]: { | |
| brand_id: additional_data.brand_id, | |
| }, | |
| }) | |
| } | |
| await link.create(links) | |
| logger.info("Linked brand to products") | |
| return new StepResponse(links, links) | |
| ``` | |
| You resolve Link from the container. Then you loop over the created products to assemble an array of links to be created. After that, you pass the array of links to Link's `create` method, which will link the product and brand records. | |
| Each property in the link object is the name of a module, and its value is an object having a `{model_name}_id` property, where `{model_name}` is the snake-case name of the module's data model. Its value is the ID of the record to be linked. The link object's properties must be set in the same order as the link configurations passed to `defineLink`. | |
| 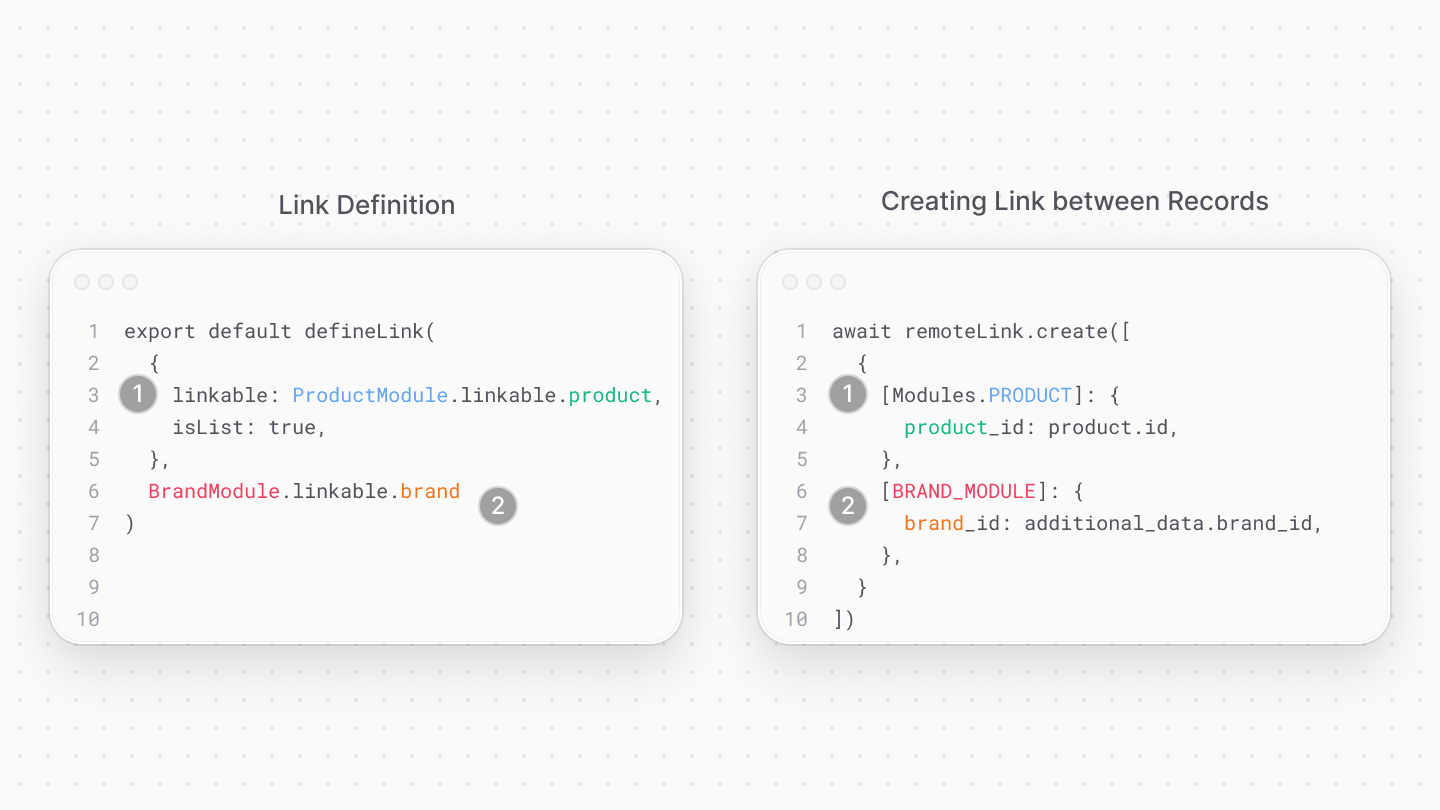 | |
| Finally, you return an instance of `StepResponse` returning the created links. | |
| ### Dismiss Links in Compensation | |
| You can pass as a second parameter of the hook a compensation function that undoes what the step did. It receives as a first parameter the returned `StepResponse`'s second parameter, and the step context object as a second parameter. | |
| To undo creating the links in the hook, pass the following compensation function as a second parameter to `productsCreated`: | |
| ```ts title="src/workflows/hooks/created-product.ts" | |
| createProductsWorkflow.hooks.productsCreated( | |
| // ... | |
| (async (links, { container }) => { | |
| if (!links?.length) { | |
| return | |
| } | |
| const link = container.resolve("link") | |
| await link.dismiss(links) | |
| }) | |
| ) | |
| ``` | |
| In the compensation function, if the `links` parameter isn't empty, you resolve Link from the container and use its `dismiss` method. This method removes a link between two records. It accepts the same parameter as the `create` method. | |
| *** | |
| ## 2. Configure Additional Data Validation | |
| Now that you've consumed the `productCreated` hook, you want to configure the `/admin/products` API route that creates a new product to accept a brand ID in its `additional_data` parameter. | |
| You configure the properties accepted in `additional_data` in the `src/api/middlewares.ts` that exports middleware configurations. So, create the file (or, if already existing, add to the file) `src/api/middlewares.ts` the following content: | |
|  | |
| ```ts title="src/api/middlewares.ts" | |
| import { defineMiddlewares } from "@medusajs/framework/http" | |
| import { z } from "zod" | |
| // ... | |
| export default defineMiddlewares({ | |
| routes: [ | |
| // ... | |
| { | |
| matcher: "/admin/products", | |
| method: ["POST"], | |
| additionalDataValidator: { | |
| brand_id: z.string().optional(), | |
| }, | |
| }, | |
| ], | |
| }) | |
| ``` | |
| Objects in `routes` accept an `additionalDataValidator` property that configures the validation rules for custom properties passed in the `additional_data` request parameter. It accepts an object whose keys are custom property names, and their values are validation rules created using [Zod](https://zod.dev/). | |
| So, `POST` requests sent to `/admin/products` can now pass the ID of a brand in the `brand_id` property of `additional_data`. | |
| *** | |
| ## Test it Out | |
| To test it out, first, retrieve the authentication token of your admin user by sending a `POST` request to `/auth/user/emailpass`: | |
| ```bash | |
| curl -X POST 'http://localhost:9000/auth/user/emailpass' \ | |
| -H 'Content-Type: application/json' \ | |
| --data-raw '{ | |
| "email": "[email protected]", | |
| "password": "supersecret" | |
| }' | |
| ``` | |
| Make sure to replace the email and password in the request body with your user's credentials. | |
| Then, send a `POST` request to `/admin/products` to create a product, and pass in the `additional_data` parameter a brand's ID: | |
| ```bash | |
| curl -X POST 'http://localhost:9000/admin/products' \ | |
| -H 'Content-Type: application/json' \ | |
| -H 'Authorization: Bearer {token}' \ | |
| --data '{ | |
| "title": "Product 1", | |
| "options": [ | |
| { | |
| "title": "Default option", | |
| "values": ["Default option value"] | |
| } | |
| ], | |
| "additional_data": { | |
| "brand_id": "{brand_id}" | |
| } | |
| }' | |
| ``` | |
| Make sure to replace `{token}` with the token you received from the previous request, and `{brand_id}` with the ID of a brand in your application. | |
| The request creates a product and returns it. | |
| In the Medusa application's logs, you'll find the message `Linked brand to products`, indicating that the workflow hook handler ran and linked the brand to the products. | |
| *** | |
| ## Next Steps: Query Linked Brands and Products | |
| Now that you've extending the create-product flow to link a brand to it, you want to retrieve the brand details of a product. You'll learn how to do so in the next chapter. | |
| # Service Factory | |
| In this chapter, you’ll learn about what the service factory is and how to use it. | |
| ## What is the Service Factory? | |
| Medusa provides a service factory that your module’s main service can extend. | |
| The service factory generates data management methods for your data models in the database, so you don't have to implement these methods manually. | |
| Your service provides data-management functionalities of your data models. | |
| *** | |
| ## How to Extend the Service Factory? | |
| Medusa provides the service factory as a `MedusaService` function your service extends. The function creates and returns a service class with generated data-management methods. | |
| For example, create the file `src/modules/hello/service.ts` with the following content: | |
| ```ts title="src/modules/hello/service.ts" highlights={highlights} | |
| import { MedusaService } from "@medusajs/framework/utils" | |
| import MyCustom from "./models/my-custom" | |
| class HelloModuleService extends MedusaService({ | |
| MyCustom, | |
| }){ | |
| // TODO implement custom methods | |
| } | |
| export default HelloModuleService | |
| ``` | |
| ### MedusaService Parameters | |
| The `MedusaService` function accepts one parameter, which is an object of data models to generate data-management methods for. | |
| In the example above, since the `HelloModuleService` extends `MedusaService`, it has methods to manage the `MyCustom` data model, such as `createMyCustoms`. | |
| ### Generated Methods | |
| The service factory generates methods to manage the records of each of the data models provided in the first parameter in the database. | |
| The method's names are the operation's name, suffixed by the data model's key in the object parameter passed to `MedusaService`. | |
| For example, the following methods are generated for the service above: | |
| Find a complete reference of each of the methods in [this documentation](https://docs.medusajs.com/resources/service-factory-reference/index.html.md) | |
| ### listMyCustoms | |
| ### listMyCustoms | |
| This method retrieves an array of records based on filters and pagination configurations. | |
| For example: | |
| ```ts | |
| const myCustoms = await helloModuleService | |
| .listMyCustoms() | |
| // with filters | |
| const myCustoms = await helloModuleService | |
| .listMyCustoms({ | |
| id: ["123"] | |
| }) | |
| ``` | |
| ### listAndCount | |
| ### retrieveMyCustom | |
| This method retrieves a record by its ID. | |
| For example: | |
| ```ts | |
| const myCustom = await helloModuleService | |
| .retrieveMyCustom("123") | |
| ``` | |
| ### retrieveMyCustom | |
| ### updateMyCustoms | |
| This method updates and retrieves records of the data model. | |
| For example: | |
| ```ts | |
| const myCustom = await helloModuleService | |
| .updateMyCustoms({ | |
| id: "123", | |
| name: "test" | |
| }) | |
| // update multiple | |
| const myCustoms = await helloModuleService | |
| .updateMyCustoms([ | |
| { | |
| id: "123", | |
| name: "test" | |
| }, | |
| { | |
| id: "321", | |
| name: "test 2" | |
| }, | |
| ]) | |
| // use filters | |
| const myCustoms = await helloModuleService | |
| .updateMyCustoms([ | |
| { | |
| selector: { | |
| id: ["123", "321"] | |
| }, | |
| data: { | |
| name: "test" | |
| } | |
| }, | |
| ]) | |
| ``` | |
| ### createMyCustoms | |
| ### softDeleteMyCustoms | |
| This method soft-deletes records using an array of IDs or an object of filters. | |
| For example: | |
| ```ts | |
| await helloModuleService.softDeleteMyCustoms("123") | |
| // soft-delete multiple | |
| await helloModuleService.softDeleteMyCustoms([ | |
| "123", "321" | |
| ]) | |
| // use filters | |
| await helloModuleService.softDeleteMyCustoms({ | |
| id: ["123", "321"] | |
| }) | |
| ``` | |
| ### updateMyCustoms | |
| ### deleteMyCustoms | |
| ### softDeleteMyCustoms | |
| ### restoreMyCustoms | |
| ### Using a Constructor | |
| If you implement the `constructor` of your service, make sure to call `super` passing it `...arguments`. | |
| For example: | |
| ```ts highlights={[["8"]]} | |
| import { MedusaService } from "@medusajs/framework/utils" | |
| import MyCustom from "./models/my-custom" | |
| class HelloModuleService extends MedusaService({ | |
| MyCustom, | |
| }){ | |
| constructor() { | |
| super(...arguments) | |
| } | |
| } | |
| export default HelloModuleService | |
| ``` | |
| # Scheduled Jobs Number of Executions | |
| In this chapter, you'll learn how to set a limit on the number of times a scheduled job is executed. | |
| ## numberOfExecutions Option | |
| The export configuration object of the scheduled job accepts an optional property `numberOfExecutions`. Its value is a number indicating how many times the scheduled job can be executed during the Medusa application's runtime. | |
| For example: | |
| ```ts highlights={highlights} | |
| export default async function myCustomJob() { | |
| console.log("I'll be executed three times only.") | |
| } | |
| export const config = { | |
| name: "hello-world", | |
| // execute every minute | |
| schedule: "* * * * *", | |
| numberOfExecutions: 3, | |
| } | |
| ``` | |
| The above scheduled job has the `numberOfExecutions` configuration set to `3`. | |
| So, it'll only execute 3 times, each every minute, then it won't be executed anymore. | |
| If you restart the Medusa application, the scheduled job will be executed again until reaching the number of executions specified. | |
| # Example: Write Integration Tests for API Routes | |
| In this chapter, you'll learn how to write integration tests for API routes using [medusaIntegrationTestRunner](https://docs.medusajs.com/learn/debugging-and-testing/testing-tools/integration-tests/index.html.md) from Medusa's Testing Framework. | |
| ### Prerequisites | |
| - [Testing Tools Setup](https://docs.medusajs.com/learn/debugging-and-testing/testing-tools/index.html.md) | |
| ## Test a GET API Route | |
| Consider the following API route created at `src/api/custom/route.ts`: | |
| ```ts title="src/api/custom/route.ts" | |
| import { MedusaRequest, MedusaResponse } from "@medusajs/framework/http" | |
| export async function GET( | |
| req: MedusaRequest, | |
| res: MedusaResponse | |
| ){ | |
| res.json({ | |
| message: "Hello, World!", | |
| }) | |
| } | |
| ``` | |
| To write an integration test that tests this API route, create the file `integration-tests/http/custom-routes.spec.ts` with the following content: | |
| ```ts title="integration-tests/http/custom-routes.spec.ts" highlights={getHighlights} | |
| import { medusaIntegrationTestRunner } from "@medusajs/test-utils" | |
| medusaIntegrationTestRunner({ | |
| testSuite: ({ api, getContainer }) => { | |
| describe("Custom endpoints", () => { | |
| describe("GET /custom", () => { | |
| it("returns correct message", async () => { | |
| const response = await api.get( | |
| `/custom` | |
| ) | |
| expect(response.status).toEqual(200) | |
| expect(response.data).toHaveProperty("message") | |
| expect(response.data.message).toEqual("Hello, World!") | |
| }) | |
| }) | |
| }) | |
| }, | |
| }) | |
| jest.setTimeout(60 * 1000) | |
| ``` | |
| You use the `medusaIntegrationTestRunner` to write your tests. | |
| You add a single test that sends a `GET` request to `/custom` using the `api.get` method. For the test to pass, the response is expected to: | |
| - Have a code status `200`, | |
| - Have a `message` property in the returned data. | |
| - Have the value of the `message` property equal to `Hello, World!`. | |
| ### Run Tests | |
| Run the following command to run your tests: | |
| ```bash npm2yarn | |
| npm run test:integration | |
| ``` | |
| If you don't have a `test:integration` script in `package.json`, refer to the [Medusa Testing Tools chapter](https://docs.medusajs.com/learn/debugging-and-testing/testing-tools#add-test-commands/index.html.md). | |
| This runs your Medusa application and runs the tests available under the `src/integrations/http` directory. | |
| ### Jest Timeout | |
| Since your tests connect to the database and perform actions that require more time than the typical tests, make sure to increase the timeout in your test: | |
| ```ts title="integration-tests/http/custom-routes.spec.ts" | |
| // in your test's file | |
| jest.setTimeout(60 * 1000) | |
| ``` | |
| *** | |
| ## Test a POST API Route | |
| Suppose you have a `hello` module whose main service extends the service factory, and that has the following model: | |
| ```ts title="src/modules/hello/models/my-custom.ts" | |
| import { model } from "@medusajs/framework/utils" | |
| const MyCustom = model.define("my_custom", { | |
| id: model.id().primaryKey(), | |
| name: model.text(), | |
| }) | |
| export default MyCustom | |
| ``` | |
| And consider that the file `src/api/custom/route.ts` defines another route handler for `POST` requests: | |
| ```ts title="src/api/custom/route.ts" | |
| // other imports... | |
| import HelloModuleService from "../../../modules/hello/service" | |
| // ... | |
| export async function POST( | |
| req: MedusaRequest, | |
| res: MedusaResponse | |
| ) { | |
| const helloModuleService: HelloModuleService = req.scope.resolve( | |
| "helloModuleService" | |
| ) | |
| const myCustom = await helloModuleService.createMyCustoms( | |
| req.body | |
| ) | |
| res.json({ | |
| my_custom: myCustom, | |
| }) | |
| } | |
| ``` | |
| This API route creates a new record of `MyCustom`. | |
| To write tests for this API route, add the following at the end of the `testSuite` function in `integration-tests/http/custom-routes.spec.ts`: | |
| ```ts title="integration-tests/http/custom-routes.spec.ts" highlights={postHighlights} | |
| // other imports... | |
| import HelloModuleService from "../../src/modules/hello/service" | |
| medusaIntegrationTestRunner({ | |
| testSuite: ({ api, getContainer }) => { | |
| describe("Custom endpoints", () => { | |
| // other tests... | |
| describe("POST /custom", () => { | |
| const id = "1" | |
| it("Creates my custom", async () => { | |
| const response = await api.post( | |
| `/custom`, | |
| { | |
| id, | |
| name: "Test", | |
| } | |
| ) | |
| expect(response.status).toEqual(200) | |
| expect(response.data).toHaveProperty("my_custom") | |
| expect(response.data.my_custom).toEqual({ | |
| id, | |
| name: "Test", | |
| created_at: expect.any(String), | |
| updated_at: expect.any(String), | |
| }) | |
| }) | |
| }) | |
| }) | |
| }, | |
| }) | |
| ``` | |
| This adds a test for the `POST /custom` API route. It uses `api.post` to send the POST request. The `api.post` method accepts as a second parameter the data to pass in the request body. | |
| The test passes if the response has: | |
| - Status code `200`. | |
| - A `my_custom` property in its data. | |
| - Its `id` and `name` match the ones provided to the request. | |
| ### Tear Down Created Record | |
| To ensure consistency in the database for the rest of the tests after the above test is executed, utilize [Jest's setup and teardown hooks](https://jestjs.io/docs/setup-teardown) to delete the created record. | |
| Use the `getContainer` function passed as a parameter to the `testSuite` function to resolve a service and use it for setup or teardown purposes | |
| So, add an `afterAll` hook in the `describe` block for `POST /custom`: | |
| ```ts title="integration-tests/http/custom-routes.spec.ts" | |
| // other imports... | |
| import HelloModuleService from "../../src/modules/hello/service" | |
| medusaIntegrationTestRunner({ | |
| testSuite: ({ api, getContainer }) => { | |
| describe("Custom endpoints", () => { | |
| // other tests... | |
| describe("POST /custom", () => { | |
| // ... | |
| afterAll(() => async () => { | |
| const helloModuleService: HelloModuleService = getContainer().resolve( | |
| "helloModuleService" | |
| ) | |
| await helloModuleService.deleteMyCustoms(id) | |
| }) | |
| }) | |
| }) | |
| }, | |
| }) | |
| ``` | |
| The `afterAll` hook resolves the `HelloModuleService` and use its `deleteMyCustoms` to delete the record created by the test. | |
| *** | |
| ## Test a DELETE API Route | |
| Consider a `/custom/:id` API route created at `src/api/custom/[id]/route.ts`: | |
| ```ts title="src/api/custom/[id]/route.ts" | |
| import { MedusaRequest, MedusaResponse } from "@medusajs/framework/http" | |
| import HelloModuleService from "../../../modules/hello/service" | |
| export async function DELETE( | |
| req: MedusaRequest, | |
| res: MedusaResponse | |
| ) { | |
| const helloModuleService: HelloModuleService = req.scope.resolve( | |
| "helloModuleService" | |
| ) | |
| await helloModuleService.deleteMyCustoms(req.params.id) | |
| res.json({ | |
| success: true, | |
| }) | |
| } | |
| ``` | |
| This API route accepts an ID path parameter, and uses the `HelloModuleService` to delete a `MyCustom` record by that ID. | |
| To add tests for this API route, add the following to `integration-tests/http/custom-routes.spec.ts`: | |
| ```ts title="integration-tests/http/custom-routes.spec.ts" highlights={deleteHighlights} | |
| medusaIntegrationTestRunner({ | |
| testSuite: ({ api, getContainer }) => { | |
| describe("Custom endpoints", () => { | |
| // ... | |
| describe("DELETE /custom/:id", () => { | |
| const id = "1" | |
| beforeAll(() => async () => { | |
| const helloModuleService: HelloModuleService = getContainer().resolve( | |
| "helloModuleService" | |
| ) | |
| await helloModuleService.createMyCustoms({ | |
| id, | |
| name: "Test", | |
| }) | |
| }) | |
| it("Deletes my custom", async () => { | |
| const response = await api.delete( | |
| `/custom/${id}` | |
| ) | |
| expect(response.status).toEqual(200) | |
| expect(response.data).toHaveProperty("success") | |
| expect(response.data.success).toBeTruthy() | |
| }) | |
| }) | |
| }) | |
| }, | |
| }) | |
| ``` | |
| This adds a new test for the `DELETE /custom/:id` API route. You use the `beforeAll` hook to create a `MyCustom` record using the `HelloModuleService`. | |
| In the test, you use the `api.delete` method to send a `DELETE` request to `/custom/:id`. The test passes if the response: | |
| - Has a `200` status code. | |
| - Has a `success` property in its data. | |
| - The `success` property's value is true. | |
| *** | |
| ## Pass Headers in Test Requests | |
| Some requests require passing headers. For example, all routes prefixed with `/store` must pass a publishable API key in the header. | |
| The `get`, `post`, and `delete` methods accept an optional third parameter that you can pass a `headers` property to, whose value is an object of headers to pass in the request. | |
| For example, to pass a publishable API key in the header for a request to a `/store` route: | |
| ```ts title="integration-tests/http/custom-routes.spec.ts" highlights={headersHighlights} | |
| import { medusaIntegrationTestRunner } from "@medusajs/test-utils" | |
| import { ApiKeyDTO } from "@medusajs/framework/types" | |
| import { createApiKeysWorkflow } from "@medusajs/medusa/core-flows" | |
| medusaIntegrationTestRunner({ | |
| testSuite: ({ api, getContainer }) => { | |
| describe("Custom endpoints", () => { | |
| let pak: ApiKeyDTO | |
| beforeAll(async () => { | |
| pak = (await createApiKeysWorkflow(getContainer()).run({ | |
| input: { | |
| api_keys: [ | |
| { | |
| type: "publishable", | |
| title: "Test Key", | |
| created_by: "" | |
| } | |
| ] | |
| } | |
| })).result[0] | |
| }) | |
| describe("GET /custom", () => { | |
| it("returns correct message", async () => { | |
| const response = await api.get( | |
| `/store/custom`, | |
| { | |
| headers: { | |
| "x-publishable-api-key": pak.token | |
| } | |
| } | |
| ) | |
| expect(response.status).toEqual(200) | |
| expect(response.data).toHaveProperty("message") | |
| expect(response.data.message).toEqual("Hello, World!") | |
| }) | |
| }) | |
| }) | |
| }, | |
| }) | |
| jest.setTimeout(60 * 1000) | |
| ``` | |
| In your test suit, you add a `beforeAll` hook to create a publishable API key before the tests run. To create the API key, you can use the `createApiKeysWorkflow` or the [API Key Module's service](https://docs.medusajs.com/resources/commerce-modules/api-key/index.html.md). | |
| Then, in the test, you pass an object as the last parameter to `api.get` with a `headers` property. The `headers` property is an object with the key `x-publishable-api-key` and the value of the API key's token. | |
| # Example: Write Integration Tests for Workflows | |
| In this chapter, you'll learn how to write integration tests for workflows using [medusaIntegrationTestRunner](https://docs.medusajs.com/learn/debugging-and-testing/testing-tools/integration-tests/index.html.md) from Medusa's Testing Framwork. | |
| ### Prerequisites | |
| - [Testing Tools Setup](https://docs.medusajs.com/learn/debugging-and-testing/testing-tools/index.html.md) | |
| ## Write Integration Test for Workflow | |
| Consider you have the following workflow defined at `src/workflows/hello-world.ts`: | |
| ```ts title="src/workflows/hello-world.ts" | |
| import { | |
| createWorkflow, | |
| createStep, | |
| StepResponse, | |
| WorkflowResponse, | |
| } from "@medusajs/framework/workflows-sdk" | |
| const step1 = createStep("step-1", () => { | |
| return new StepResponse("Hello, World!") | |
| }) | |
| export const helloWorldWorkflow = createWorkflow( | |
| "hello-world-workflow", | |
| () => { | |
| const message = step1() | |
| return new WorkflowResponse(message) | |
| } | |
| ) | |
| ``` | |
| To write a test for this workflow, create the file `integration-tests/http/workflow.spec.ts` with the following content: | |
| ```ts title="integration-tests/http/workflow.spec.ts" | |
| import { medusaIntegrationTestRunner } from "@medusajs/test-utils" | |
| import { helloWorldWorkflow } from "../../src/workflows/hello-world" | |
| medusaIntegrationTestRunner({ | |
| testSuite: ({ getContainer }) => { | |
| describe("Test hello-world workflow", () => { | |
| it("returns message", async () => { | |
| const { result } = await helloWorldWorkflow(getContainer()) | |
| .run() | |
| expect(result).toEqual("Hello, World!") | |
| }) | |
| }) | |
| }, | |
| }) | |
| jest.setTimeout(60 * 1000) | |
| ``` | |
| You use the `medusaIntegrationTestRunner` to write an integration test for the workflow. The test pases if the workflow returns the string `"Hello, World!"`. | |
| ### Jest Timeout | |
| Since your tests connect to the database and perform actions that require more time than the typical tests, make sure to increase the timeout in your test: | |
| ```ts title="integration-tests/http/custom-routes.spec.ts" | |
| // in your test's file | |
| jest.setTimeout(60 * 1000) | |
| ``` | |
| *** | |
| ## Run Test | |
| Run the following command to run your tests: | |
| ```bash npm2yarn | |
| npm run test:integration | |
| ``` | |
| If you don't have a `test:integration` script in `package.json`, refer to the [Medusa Testing Tools chapter](https://docs.medusajs.com/learn/debugging-and-testing/testing-tools#add-test-commands/index.html.md). | |
| This runs your Medusa application and runs the tests available under the `integrations/http` directory. | |
| *** | |
| ## Test That a Workflow Throws an Error | |
| You might want to test that a workflow throws an error in certain cases. To test this: | |
| - Disable the `throwOnError` option when executing the workflow. | |
| - Use the returned `errors` property to check what errors were thrown. | |
| For example, if you have a step that throws this error: | |
| ```ts title="src/workflows/hello-world.ts" | |
| import { MedusaError } from "@medusajs/framework/utils" | |
| import { createStep } from "@medusajs/framework/workflows-sdk" | |
| const step1 = createStep("step-1", () => { | |
| throw new MedusaError(MedusaError.Types.NOT_FOUND, "Item doesn't exist") | |
| }) | |
| ``` | |
| You can write the following test to ensure that the workflow throws that error: | |
| ```ts title="integration-tests/http/workflow.spec.ts" | |
| import { medusaIntegrationTestRunner } from "@medusajs/test-utils" | |
| import { helloWorldWorkflow } from "../../src/workflows/hello-world" | |
| medusaIntegrationTestRunner({ | |
| testSuite: ({ getContainer }) => { | |
| describe("Test hello-world workflow", () => { | |
| it("returns message", async () => { | |
| const { errors } = await helloWorldWorkflow(getContainer()) | |
| .run({ | |
| throwOnError: false | |
| }) | |
| expect(errors.length).toBeGreaterThan(0) | |
| expect(errors[0].error.message).toBe("Item doesn't exist") | |
| }) | |
| }) | |
| }, | |
| }) | |
| jest.setTimeout(60 * 1000) | |
| ``` | |
| The `errors` property contains an array of errors thrown during the execution of the workflow. Each error item has an `error` object, being the error thrown. | |
| If you threw a `MedusaError`, then you can check the error message in `errors[0].error.message`. | |
| # Expose a Workflow Hook | |
| In this chapter, you'll learn how to expose a hook in your workflow. | |
| ## When to Expose a Hook | |
| Your workflow is reusable in other applications, and you allow performing an external action at some point in your workflow. | |
| Your workflow isn't reusable by other applications. Use a step that performs what a hook handler would instead. | |
| *** | |
| ## How to Expose a Hook in a Workflow? | |
| To expose a hook in your workflow, use `createHook` from the Workflows SDK. | |
| For example: | |
| ```ts title="src/workflows/my-workflow/index.ts" highlights={hookHighlights} | |
| import { | |
| createStep, | |
| createHook, | |
| createWorkflow, | |
| WorkflowResponse, | |
| } from "@medusajs/framework/workflows-sdk" | |
| import { createProductStep } from "./steps/create-product" | |
| export const myWorkflow = createWorkflow( | |
| "my-workflow", | |
| function (input) { | |
| const product = createProductStep(input) | |
| const productCreatedHook = createHook( | |
| "productCreated", | |
| { productId: product.id } | |
| ) | |
| return new WorkflowResponse(product, { | |
| hooks: [productCreatedHook], | |
| }) | |
| } | |
| ) | |
| ``` | |
| The `createHook` function accepts two parameters: | |
| 1. The first is a string indicating the hook's name. You use this to consume the hook later. | |
| 2. The second is the input to pass to the hook handler. | |
| The workflow must also pass an object having a `hooks` property as a second parameter to the `WorkflowResponse` constructor. Its value is an array of the workflow's hooks. | |
| ### How to Consume the Hook? | |
| To consume the hook of the workflow, create the file `src/workflows/hooks/my-workflow.ts` with the following content: | |
| ```ts title="src/workflows/hooks/my-workflow.ts" highlights={handlerHighlights} | |
| import { myWorkflow } from "../my-workflow" | |
| myWorkflow.hooks.productCreated( | |
| async ({ productId }, { container }) => { | |
| // TODO perform an action | |
| } | |
| ) | |
| ``` | |
| The hook is available on the workflow's `hooks` property using its name `productCreated`. | |
| You invoke the hook, passing a step function (the hook handler) as a parameter. | |
| # Access Workflow Errors | |
| In this chapter, you’ll learn how to access errors that occur during a workflow’s execution. | |
| ## How to Access Workflow Errors? | |
| By default, when an error occurs in a workflow, it throws that error, and the execution stops. | |
| You can configure the workflow to return the errors instead so that you can access and handle them differently. | |
| For example: | |
| ```ts title="src/api/workflows/route.ts" highlights={highlights} collapsibleLines="1-6" expandButtonLabel="Show Imports" | |
| import type { | |
| MedusaRequest, | |
| MedusaResponse, | |
| } from "@medusajs/framework/http" | |
| import myWorkflow from "../../../workflows/hello-world" | |
| export async function GET( | |
| req: MedusaRequest, | |
| res: MedusaResponse | |
| ) { | |
| const { result, errors } = await myWorkflow(req.scope) | |
| .run({ | |
| // ... | |
| throwOnError: false, | |
| }) | |
| if (errors.length) { | |
| return res.send({ | |
| errors: errors.map((error) => error.error), | |
| }) | |
| } | |
| res.send(result) | |
| } | |
| ``` | |
| The object passed to the `run` method accepts a `throwOnError` property. When disabled, the errors are returned in the `errors` property of `run`'s output. | |
| The value of `errors` is an array of error objects. Each object has an `error` property, whose value is the name or text of the thrown error. | |
| # Compensation Function | |
| In this chapter, you'll learn what a compensation function is and how to add it to a step. | |
| ## What is a Compensation Function | |
| A compensation function rolls back or undoes changes made by a step when an error occurs in the workflow. | |
| For example, if a step creates a record, the compensation function deletes the record when an error occurs later in the workflow. | |
| By using compensation functions, you provide a mechanism that guarantees data consistency in your application and across systems. | |
| *** | |
| ## How to add a Compensation Function? | |
| A compensation function is passed as a second parameter to the `createStep` function. | |
| For example, create the file `src/workflows/hello-world.ts` with the following content: | |
| ```ts title="src/workflows/hello-world.ts" highlights={[["15"], ["16"], ["17"]]} collapsibleLines="1-5" expandButtonLabel="Show Imports" | |
| import { | |
| createStep, | |
| StepResponse, | |
| } from "@medusajs/framework/workflows-sdk" | |
| const step1 = createStep( | |
| "step-1", | |
| async () => { | |
| const message = `Hello from step one!` | |
| console.log(message) | |
| return new StepResponse(message) | |
| }, | |
| async () => { | |
| console.log("Oops! Rolling back my changes...") | |
| } | |
| ) | |
| ``` | |
| Each step can have a compensation function. The compensation function only runs if an error occurs throughout the workflow. | |
| *** | |
| ## Test the Compensation Function | |
| Create a step in the same `src/workflows/hello-world.ts` file that throws an error: | |
| ```ts title="src/workflows/hello-world.ts" | |
| const step2 = createStep( | |
| "step-2", | |
| async () => { | |
| throw new Error("Throwing an error...") | |
| } | |
| ) | |
| ``` | |
| Then, create a workflow that uses the steps: | |
| ```ts title="src/workflows/hello-world.ts" collapsibleLines="1-8" expandButtonLabel="Show Imports" | |
| import { | |
| createWorkflow, | |
| WorkflowResponse, | |
| } from "@medusajs/framework/workflows-sdk" | |
| // other imports... | |
| // steps... | |
| const myWorkflow = createWorkflow( | |
| "hello-world", | |
| function (input) { | |
| const str1 = step1() | |
| step2() | |
| return new WorkflowResponse({ | |
| message: str1, | |
| }) | |
| }) | |
| export default myWorkflow | |
| ``` | |
| Finally, execute the workflow from an API route: | |
| ```ts title="src/api/workflow/route.ts" collapsibleLines="1-6" expandButtonLabel="Show Imports" | |
| import type { | |
| MedusaRequest, | |
| MedusaResponse, | |
| } from "@medusajs/framework/http" | |
| import myWorkflow from "../../../workflows/hello-world" | |
| export async function GET( | |
| req: MedusaRequest, | |
| res: MedusaResponse | |
| ) { | |
| const { result } = await myWorkflow(req.scope) | |
| .run() | |
| res.send(result) | |
| } | |
| ``` | |
| Run the Medusa application and send a `GET` request to `/workflow`: | |
| ```bash | |
| curl http://localhost:9000/workflow | |
| ``` | |
| In the console, you'll see: | |
| - `Hello from step one!` logged in the terminal, indicating that the first step ran successfully. | |
| - `Oops! Rolling back my changes...` logged in the terminal, indicating that the second step failed and the compensation function of the first step ran consequently. | |
| *** | |
| ## Pass Input to Compensation Function | |
| If a step creates a record, the compensation function must receive the ID of the record to remove it. | |
| To pass input to the compensation function, pass a second parameter in the `StepResponse` returned by the step. | |
| For example: | |
| ```ts highlights={inputHighlights} | |
| import { | |
| createStep, | |
| StepResponse, | |
| } from "@medusajs/framework/workflows-sdk" | |
| const step1 = createStep( | |
| "step-1", | |
| async () => { | |
| return new StepResponse( | |
| `Hello from step one!`, | |
| { message: "Oops! Rolling back my changes..." } | |
| ) | |
| }, | |
| async ({ message }) => { | |
| console.log(message) | |
| } | |
| ) | |
| ``` | |
| In this example, the step passes an object as a second parameter to `StepResponse`. | |
| The compensation function receives the object and uses its `message` property to log a message. | |
| *** | |
| ## Resolve Resources from the Medusa Container | |
| The compensation function receives an object second parameter. The object has a `container` property that you use to resolve resources from the Medusa container. | |
| For example: | |
| ```ts | |
| import { | |
| createStep, | |
| StepResponse, | |
| } from "@medusajs/framework/workflows-sdk" | |
| import { ContainerRegistrationKeys } from "@medusajs/framework/utils" | |
| const step1 = createStep( | |
| "step-1", | |
| async () => { | |
| return new StepResponse( | |
| `Hello from step one!`, | |
| { message: "Oops! Rolling back my changes..." } | |
| ) | |
| }, | |
| async ({ message }, { container }) => { | |
| const logger = container.resolve( | |
| ContainerRegistrationKeys.LOGGER | |
| ) | |
| logger.info(message) | |
| } | |
| ) | |
| ``` | |
| In this example, you use the `container` property in the second object parameter of the compensation function to resolve the logger. | |
| You then use the logger to log a message. | |
| *** | |
| ## Handle Errors in Loops | |
| This feature is only available after [Medusa v2.0.5](https://github.com/medusajs/medusa/releases/tag/v2.0.5). | |
| Consider you have a module that integrates a third-party ERP system, and you're creating a workflow that deletes items in that ERP. You may have the following step: | |
| ```ts | |
| // other imports... | |
| import { promiseAll } from "@medusajs/framework/utils" | |
| type StepInput = { | |
| ids: string[] | |
| } | |
| const step1 = createStep( | |
| "step-1", | |
| async ({ ids }: StepInput, { container }) => { | |
| const erpModuleService = container.resolve( | |
| ERP_MODULE | |
| ) | |
| const prevData: unknown[] = [] | |
| await promiseAll( | |
| ids.map(async (id) => { | |
| const data = await erpModuleService.retrieve(id) | |
| await erpModuleService.delete(id) | |
| prevData.push(id) | |
| }) | |
| ) | |
| return new StepResponse(ids, prevData) | |
| } | |
| ) | |
| ``` | |
| In the step, you loop over the IDs to retrieve the item's data, store them in a `prevData` variable, then delete them using the ERP Module's service. You then pass the `prevData` variable to the compensation function. | |
| However, if an error occurs in the loop, the `prevData` variable won't be passed to the compensation function as the execution never reached the return statement. | |
| To handle errors in the loop so that the compensation function receives the last version of `prevData` before the error occurred, you wrap the loop in a try-catch block. Then, in the catch block, you invoke and return the `StepResponse.permanentFailure` function: | |
| ```ts highlights={highlights} | |
| try { | |
| await promiseAll( | |
| ids.map(async (id) => { | |
| const data = await erpModuleService.retrieve(id) | |
| await erpModuleService.delete(id) | |
| prevData.push(id) | |
| }) | |
| ) | |
| } catch (e) { | |
| return StepResponse.permanentFailure( | |
| `An error occurred: ${e}`, | |
| prevData | |
| ) | |
| } | |
| ``` | |
| The `StepResponse.permanentFailure` fails the step and its workflow, triggering current and previous steps' compensation functions. The `permanentFailure` function accepts as a first parameter the error message, which is saved in the workflow's error details, and as a second parameter the data to pass to the compensation function. | |
| So, if an error occurs during the loop, the compensation function will still receive the `prevData` variable to undo the changes made before the step failed. | |
| # Workflow Constraints | |
| This chapter lists constraints of defining a workflow or its steps. | |
| ## Workflow Constraints | |
| ### No Async Functions | |
| The function passed to `createWorkflow` can’t be an async function: | |
| ```ts highlights={[["4", "async", "Function can't be async."], ["11", "", "Correct way of defining the function."]]} | |
| // Don't | |
| const myWorkflow = createWorkflow( | |
| "hello-world", | |
| async function (input: WorkflowInput) { | |
| // ... | |
| }) | |
| // Do | |
| const myWorkflow = createWorkflow( | |
| "hello-world", | |
| function (input: WorkflowInput) { | |
| // ... | |
| }) | |
| ``` | |
| ### No Direct Variable Manipulation | |
| You can’t directly manipulate variables within the workflow's constructor function. | |
| Learn more about why you can't manipulate variables [in this chapter](https://docs.medusajs.com/learn/fundamentals/workflows/variable-manipulation/index.html.md) | |
| Instead, use `transform` from the Workflows SDK: | |
| ```ts highlights={highlights} | |
| // Don't | |
| const myWorkflow = createWorkflow( | |
| "hello-world", | |
| function (input: WorkflowInput) { | |
| const str1 = step1(input) | |
| const str2 = step2(input) | |
| return new WorkflowResponse({ | |
| message: `${str1}${str2}`, | |
| }) | |
| }) | |
| // Do | |
| const myWorkflow = createWorkflow( | |
| "hello-world", | |
| function (input: WorkflowInput) { | |
| const str1 = step1(input) | |
| const str2 = step2(input) | |
| const result = transform( | |
| { | |
| str1, | |
| str2, | |
| }, | |
| (input) => ({ | |
| message: `${input.str1}${input.str2}`, | |
| }) | |
| ) | |
| return new WorkflowResponse(result) | |
| }) | |
| ``` | |
| ### Create Dates in transform | |
| When you use `new Date()` in a workflow's constructor function, the date is evaluated when Medusa creates the internal representation of the workflow, not during execution. | |
| Instead, create the date using `transform`. | |
| Learn more about how Medusa creates an internal representation of a workflow [in this chapter](https://docs.medusajs.com/learn/fundamentals/workflows/variable-manipulation/index.html.md). | |
| For example: | |
| ```ts highlights={dateHighlights} | |
| // Don't | |
| const myWorkflow = createWorkflow( | |
| "hello-world", | |
| function (input: WorkflowInput) { | |
| const today = new Date() | |
| return new WorkflowResponse({ | |
| today, | |
| }) | |
| }) | |
| // Do | |
| const myWorkflow = createWorkflow( | |
| "hello-world", | |
| function (input: WorkflowInput) { | |
| const today = transform({}, () => new Date()) | |
| return new WorkflowResponse({ | |
| today, | |
| }) | |
| }) | |
| ``` | |
| ### No If Conditions | |
| You can't use if-conditions in a workflow. | |
| Learn more about why you can't use if-conditions [in this chapter](https://docs.medusajs.com/learn/fundamentals/workflows/conditions#why-if-conditions-arent-allowed-in-workflows/index.html.md) | |
| Instead, use when-then from the Workflows SDK: | |
| ```ts | |
| // Don't | |
| const myWorkflow = createWorkflow( | |
| "hello-world", | |
| function (input: WorkflowInput) { | |
| if (input.is_active) { | |
| // perform an action | |
| } | |
| }) | |
| // Do (explained in the next chapter) | |
| const myWorkflow = createWorkflow( | |
| "hello-world", | |
| function (input: WorkflowInput) { | |
| when(input, (input) => { | |
| return input.is_active | |
| }) | |
| .then(() => { | |
| // perform an action | |
| }) | |
| }) | |
| ``` | |
| You can also pair multiple `when-then` blocks to implement an `if-else` condition as explained in [this chapter](https://docs.medusajs.com/learn/fundamentals/workflows/conditions/index.html.md). | |
| ### No Conditional Operators | |
| You can't use conditional operators in a workflow, such as `??` or `||`. | |
| Learn more about why you can't use conditional operators [in this chapter](https://docs.medusajs.com/learn/fundamentals/workflows/conditions#why-if-conditions-arent-allowed-in-workflows/index.html.md) | |
| Instead, use `transform` to store the desired value in a variable. | |
| ### Logical Or (||) Alternative | |
| ```ts | |
| // Don't | |
| const myWorkflow = createWorkflow( | |
| "hello-world", | |
| function (input: WorkflowInput) { | |
| const message = input.message || "Hello" | |
| }) | |
| // Do | |
| // other imports... | |
| import { transform } from "@medusajs/framework/workflows-sdk" | |
| const myWorkflow = createWorkflow( | |
| "hello-world", | |
| function (input: WorkflowInput) { | |
| const message = transform( | |
| { | |
| input, | |
| }, | |
| (data) => data.input.message || "hello" | |
| ) | |
| }) | |
| ``` | |
| ### Nullish Coalescing (??) Alternative | |
| ```ts | |
| // Don't | |
| const myWorkflow = createWorkflow( | |
| "hello-world", | |
| function (input: WorkflowInput) { | |
| const message = input.message ?? "Hello" | |
| }) | |
| // Do | |
| // other imports... | |
| import { transform } from "@medusajs/framework/workflows-sdk" | |
| const myWorkflow = createWorkflow( | |
| "hello-world", | |
| function (input: WorkflowInput) { | |
| const message = transform( | |
| { | |
| input, | |
| }, | |
| (data) => data.input.message ?? "hello" | |
| ) | |
| }) | |
| ``` | |
| ### Double Not (!!) Alternative | |
| ```ts | |
| // Don't | |
| const myWorkflow = createWorkflow( | |
| "hello-world", | |
| function (input: WorkflowInput) { | |
| step1({ | |
| isActive: !!input.is_active, | |
| }) | |
| }) | |
| // Do | |
| // other imports... | |
| import { transform } from "@medusajs/framework/workflows-sdk" | |
| const myWorkflow = createWorkflow( | |
| "hello-world", | |
| function (input: WorkflowInput) { | |
| const isActive = transform( | |
| { | |
| input, | |
| }, | |
| (data) => !!data.input.is_active | |
| ) | |
| step1({ | |
| isActive, | |
| }) | |
| }) | |
| ``` | |
| ### Ternary Alternative | |
| ```ts | |
| // Don't | |
| const myWorkflow = createWorkflow( | |
| "hello-world", | |
| function (input: WorkflowInput) { | |
| step1({ | |
| message: input.is_active ? "active" : "inactive", | |
| }) | |
| }) | |
| // Do | |
| // other imports... | |
| import { transform } from "@medusajs/framework/workflows-sdk" | |
| const myWorkflow = createWorkflow( | |
| "hello-world", | |
| function (input: WorkflowInput) { | |
| const message = transform( | |
| { | |
| input, | |
| }, | |
| (data) => { | |
| return data.input.is_active ? "active" : "inactive" | |
| } | |
| ) | |
| step1({ | |
| message, | |
| }) | |
| }) | |
| ``` | |
| ### Optional Chaining (?.) Alternative | |
| ```ts | |
| // Don't | |
| const myWorkflow = createWorkflow( | |
| "hello-world", | |
| function (input: WorkflowInput) { | |
| step1({ | |
| name: input.customer?.name, | |
| }) | |
| }) | |
| // Do | |
| // other imports... | |
| import { transform } from "@medusajs/framework/workflows-sdk" | |
| const myWorkflow = createWorkflow( | |
| "hello-world", | |
| function (input: WorkflowInput) { | |
| const name = transform( | |
| { | |
| input, | |
| }, | |
| (data) => data.input.customer?.name | |
| ) | |
| step1({ | |
| name, | |
| }) | |
| }) | |
| ``` | |
| *** | |
| ## Step Constraints | |
| ### Returned Values | |
| A step must only return serializable values, such as [primitive values](https://developer.mozilla.org/en-US/docs/Web/JavaScript/Data_structures#primitive_values) or an object. | |
| Values of other types, such as Maps, aren't allowed. | |
| ```ts | |
| // Don't | |
| import { | |
| createStep, | |
| StepResponse, | |
| } from "@medusajs/framework/workflows-sdk" | |
| const step1 = createStep( | |
| "step-1", | |
| (input, { container }) => { | |
| const myMap = new Map() | |
| // ... | |
| return new StepResponse({ | |
| myMap, | |
| }) | |
| } | |
| ) | |
| // Do | |
| import { | |
| createStep, | |
| StepResponse, | |
| } from "@medusajs/framework/workflows-sdk" | |
| const step1 = createStep( | |
| "step-1", | |
| (input, { container }) => { | |
| const myObj: Record<string, unknown> = {} | |
| // ... | |
| return new StepResponse({ | |
| myObj, | |
| }) | |
| } | |
| ) | |
| ``` | |
| # Conditions in Workflows with When-Then | |
| In this chapter, you'll learn how to execute an action based on a condition in a workflow using when-then from the Workflows SDK. | |
| ## Why If-Conditions Aren't Allowed in Workflows? | |
| Medusa creates an internal representation of the workflow definition you pass to `createWorkflow` to track and store its steps. At that point, variables in the workflow don't have any values. They only do when you execute the workflow. | |
| So, you can't use an if-condition that checks a variable's value, as the condition will be evaluated when Medusa creates the internal representation of the workflow, rather than during execution. | |
| Instead, use when-then from the Workflows SDK. It allows you to perform steps in a workflow only if a condition that you specify is satisfied. | |
| Restrictions for conditions is only applicable in a workflow's definition. You can still use if-conditions in your step's code. | |
| *** | |
| ## How to use When-Then? | |
| The Workflows SDK provides a `when` function that is used to check whether a condition is true. You chain a `then` function to `when` that specifies the steps to execute if the condition in `when` is satisfied. | |
| For example: | |
| ```ts highlights={highlights} | |
| import { | |
| createWorkflow, | |
| WorkflowResponse, | |
| when, | |
| } from "@medusajs/framework/workflows-sdk" | |
| // step imports... | |
| const workflow = createWorkflow( | |
| "workflow", | |
| function (input: { | |
| is_active: boolean | |
| }) { | |
| const result = when( | |
| input, | |
| (input) => { | |
| return input.is_active | |
| } | |
| ).then(() => { | |
| const stepResult = isActiveStep() | |
| return stepResult | |
| }) | |
| // executed without condition | |
| const anotherStepResult = anotherStep(result) | |
| return new WorkflowResponse( | |
| anotherStepResult | |
| ) | |
| } | |
| ) | |
| ``` | |
| In this code snippet, you execute the `isActiveStep` only if the `input.is_active`'s value is `true`. | |
| ### When Parameters | |
| `when` accepts the following parameters: | |
| 1. The first parameter is either an object or the workflow's input. This data is passed as a parameter to the function in `when`'s second parameter. | |
| 2. The second parameter is a function that returns a boolean indicating whether to execute the action in `then`. | |
| ### Then Parameters | |
| To specify the action to perform if the condition is satisfied, chain a `then` function to `when` and pass it a callback function. | |
| The callback function is only executed if `when`'s second parameter function returns a `true` value. | |
| *** | |
| ## Implementing If-Else with When-Then | |
| when-then doesn't support if-else conditions. Instead, use two `when-then` conditions in your workflow. | |
| For example: | |
| ```ts highlights={ifElseHighlights} | |
| const workflow = createWorkflow( | |
| "workflow", | |
| function (input: { | |
| is_active: boolean | |
| }) { | |
| const isActiveResult = when( | |
| input, | |
| (input) => { | |
| return input.is_active | |
| } | |
| ).then(() => { | |
| return isActiveStep() | |
| }) | |
| const notIsActiveResult = when( | |
| input, | |
| (input) => { | |
| return !input.is_active | |
| } | |
| ).then(() => { | |
| return notIsActiveStep() | |
| }) | |
| // ... | |
| } | |
| ) | |
| ``` | |
| In the above workflow, you use two `when-then` blocks. The first one performs a step if `input.is_active` is `true`, and the second performs a step if `input.is_active` is `false`, acting as an else condition. | |
| *** | |
| ## Specify Name for When-Then | |
| Internally, `when-then` blocks have a unique name similar to a step. When you return a step's result in a `when-then` block, the block's name is derived from the step's name. For example: | |
| ```ts | |
| const isActiveResult = when( | |
| input, | |
| (input) => { | |
| return input.is_active | |
| } | |
| ).then(() => { | |
| return isActiveStep() | |
| }) | |
| ``` | |
| This `when-then` block's internal name will be `when-then-is-active`, where `is-active` is the step's name. | |
| However, if you need to return in your `when-then` block something other than a step's result, you need to specify a unique step name for that block. Otherwise, Medusa will generate a random name for it which can cause unexpected errors in production. | |
| You pass a name for `when-then` as a first parameter of `when`, whose signature can accept three parameters in this case. For example: | |
| ```ts highlights={nameHighlights} | |
| const { isActive } = when( | |
| "check-is-active", | |
| input, | |
| (input) => { | |
| return input.is_active | |
| } | |
| ).then(() => { | |
| const isActive = isActiveStep() | |
| return { | |
| isActive, | |
| } | |
| }) | |
| ``` | |
| Since `then` returns a value different than the step's result, you pass to the `when` function the following parameters: | |
| 1. A unique name to be assigned to the `when-then` block. | |
| 2. Either an object or the workflow's input. This data is passed as a parameter to the function in `when`'s second parameter. | |
| 3. A function that returns a boolean indicating whether to execute the action in `then`. | |
| The second and third parameters are the same as the parameters you previously passed to `when`. | |
| # Long-Running Workflows | |
| In this chapter, you’ll learn what a long-running workflow is and how to configure it. | |
| ## What is a Long-Running Workflow? | |
| When you execute a workflow, you wait until the workflow finishes execution to receive the output. | |
| A long-running workflow is a workflow that continues its execution in the background. You don’t receive its output immediately. Instead, you subscribe to the workflow execution to listen to status changes and receive its result once the execution is finished. | |
| ### Why use Long-Running Workflows? | |
| Long-running workflows are useful if: | |
| - A task takes too long. For example, you're importing data from a CSV file. | |
| - The workflow's steps wait for an external action to finish before resuming execution. For example, before you import the data from the CSV file, you wait until the import is confirmed by the user. | |
| *** | |
| ## Configure Long-Running Workflows | |
| A workflow is considered long-running if at least one step has its `async` configuration set to `true` and doesn't return a step response. | |
| For example, consider the following workflow and steps: | |
| ```ts title="src/workflows/hello-world.ts" highlights={[["15"]]} collapsibleLines="1-11" expandButtonLabel="Show More" | |
| import { | |
| createStep, | |
| createWorkflow, | |
| WorkflowResponse, | |
| StepResponse, | |
| } from "@medusajs/framework/workflows-sdk" | |
| const step1 = createStep("step-1", async () => { | |
| return new StepResponse({}) | |
| }) | |
| const step2 = createStep( | |
| { | |
| name: "step-2", | |
| async: true, | |
| }, | |
| async () => { | |
| console.log("Waiting to be successful...") | |
| } | |
| ) | |
| const step3 = createStep("step-3", async () => { | |
| return new StepResponse("Finished three steps") | |
| }) | |
| const myWorkflow = createWorkflow( | |
| "hello-world", | |
| function () { | |
| step1() | |
| step2() | |
| const message = step3() | |
| return new WorkflowResponse({ | |
| message, | |
| }) | |
| }) | |
| export default myWorkflow | |
| ``` | |
| The second step has in its configuration object `async` set to `true` and it doesn't return a step response. This indicates that this step is an asynchronous step. | |
| So, when you execute the `hello-world` workflow, it continues its execution in the background once it reaches the second step. | |
| A workflow is also considered long-running if one of its steps has their `retryInterval` option set as explained in [this chapter](https://docs.medusajs.com/learn/fundamentals/workflows/retry-failed-steps/index.html.md). | |
| *** | |
| ## Change Step Status | |
| Once the workflow's execution reaches an async step, it'll wait in the background for the step to succeed or fail before it moves to the next step. | |
| To fail or succeed a step, use the Workflow Engine Module's main service that is registered in the Medusa Container under the `Modules.WORKFLOW_ENGINE` (or `workflowsModuleService`) key. | |
| ### Retrieve Transaction ID | |
| Before changing the status of a workflow execution's async step, you must have the execution's transaction ID. | |
| When you execute the workflow, the object returned has a `transaction` property, which is an object that holds the details of the workflow execution's transaction. Use its `transactionId` to later change async steps' statuses: | |
| ```ts | |
| const { transaction } = await myWorkflow(req.scope) | |
| .run() | |
| // use transaction.transactionId later | |
| ``` | |
| ### Change Step Status to Successful | |
| The Workflow Engine Module's main service has a `setStepSuccess` method to set a step's status to successful. If you use it on a workflow execution's async step, the workflow continues execution to the next step. | |
| For example, consider the following step: | |
| ```ts highlights={successStatusHighlights} collapsibleLines="1-9" expandButtonLabel="Show Imports" | |
| import { | |
| Modules, | |
| TransactionHandlerType, | |
| } from "@medusajs/framework/utils" | |
| import { | |
| StepResponse, | |
| createStep, | |
| } from "@medusajs/framework/workflows-sdk" | |
| type SetStepSuccessStepInput = { | |
| transactionId: string | |
| }; | |
| export const setStepSuccessStep = createStep( | |
| "set-step-success-step", | |
| async function ( | |
| { transactionId }: SetStepSuccessStepInput, | |
| { container } | |
| ) { | |
| const workflowEngineService = container.resolve( | |
| Modules.WORKFLOW_ENGINE | |
| ) | |
| await workflowEngineService.setStepSuccess({ | |
| idempotencyKey: { | |
| action: TransactionHandlerType.INVOKE, | |
| transactionId, | |
| stepId: "step-2", | |
| workflowId: "hello-world", | |
| }, | |
| stepResponse: new StepResponse("Done!"), | |
| options: { | |
| container, | |
| }, | |
| }) | |
| } | |
| ) | |
| ``` | |
| In this step (which you use in a workflow other than the long-running workflow), you resolve the Workflow Engine Module's main service and set `step-2` of the previous workflow as successful. | |
| The `setStepSuccess` method of the workflow engine's main service accepts as a parameter an object having the following properties: | |
| - idempotencyKey: (\`object\`) The details of the workflow execution. | |
| - action: (\`invoke\` | \`compensate\`) If the step's compensation function is running, use \`compensate\`. Otherwise, use \`invoke\`. | |
| - transactionId: (\`string\`) The ID of the workflow execution's transaction. | |
| - stepId: (\`string\`) The ID of the step to change its status. This is the first parameter passed to \`createStep\` when creating the step. | |
| - workflowId: (\`string\`) The ID of the workflow. This is the first parameter passed to \`createWorkflow\` when creating the workflow. | |
| - stepResponse: (\`StepResponse\`) Set the response of the step. This is similar to the response you return in a step's definition, but since the \`async\` step doesn't have a response, you set its response when changing its status. | |
| - options: (\`Record\<string, any>\`) Options to pass to the step. | |
| - container: (\`MedusaContainer\`) An instance of the Medusa Container | |
| ### Change Step Status to Failed | |
| The Workflow Engine Module's main service also has a `setStepFailure` method that changes a step's status to failed. It accepts the same parameter as `setStepSuccess`. | |
| After changing the async step's status to failed, the workflow execution fails and the compensation functions of previous steps are executed. | |
| For example: | |
| ```ts highlights={failureStatusHighlights} collapsibleLines="1-9" expandButtonLabel="Show Imports" | |
| import { | |
| Modules, | |
| TransactionHandlerType, | |
| } from "@medusajs/framework/utils" | |
| import { | |
| StepResponse, | |
| createStep, | |
| } from "@medusajs/framework/workflows-sdk" | |
| type SetStepFailureStepInput = { | |
| transactionId: string | |
| }; | |
| export const setStepFailureStep = createStep( | |
| "set-step-success-step", | |
| async function ( | |
| { transactionId }: SetStepFailureStepInput, | |
| { container } | |
| ) { | |
| const workflowEngineService = container.resolve( | |
| Modules.WORKFLOW_ENGINE | |
| ) | |
| await workflowEngineService.setStepFailure({ | |
| idempotencyKey: { | |
| action: TransactionHandlerType.INVOKE, | |
| transactionId, | |
| stepId: "step-2", | |
| workflowId: "hello-world", | |
| }, | |
| stepResponse: new StepResponse("Failed!"), | |
| options: { | |
| container, | |
| }, | |
| }) | |
| } | |
| ) | |
| ``` | |
| You use this step in another workflow that changes the status of an async step in a long-running workflow's execution to failed. | |
| *** | |
| ## Access Long-Running Workflow Status and Result | |
| To access the status and result of a long-running workflow execution, use the `subscribe` and `unsubscribe` methods of the Workflow Engine Module's main service. | |
| To retrieve the workflow execution's details at a later point, you must enable [storing the workflow's executions](https://docs.medusajs.com/learn/fundamentals/workflows/store-executions/index.html.md). | |
| For example: | |
| ```ts title="src/api/workflows/route.ts" highlights={highlights} collapsibleLines="1-11" expandButtonLabel="Show Imports" | |
| import type { MedusaRequest, MedusaResponse } from "@medusajs/framework/http" | |
| import myWorkflow from "../../../workflows/hello-world" | |
| import { | |
| IWorkflowEngineService, | |
| } from "@medusajs/framework/types" | |
| import { Modules } from "@medusajs/framework/utils" | |
| export async function GET(req: MedusaRequest, res: MedusaResponse) { | |
| const { transaction, result } = await myWorkflow(req.scope).run() | |
| const workflowEngineService = req.scope.resolve< | |
| IWorkflowEngineService | |
| >( | |
| Modules.WORKFLOW_ENGINE | |
| ) | |
| const subscriptionOptions = { | |
| workflowId: "hello-world", | |
| transactionId: transaction.transactionId, | |
| subscriberId: "hello-world-subscriber", | |
| } | |
| await workflowEngineService.subscribe({ | |
| ...subscriptionOptions, | |
| subscriber: async (data) => { | |
| if (data.eventType === "onFinish") { | |
| console.log("Finished execution", data.result) | |
| // unsubscribe | |
| await workflowEngineService.unsubscribe({ | |
| ...subscriptionOptions, | |
| subscriberOrId: subscriptionOptions.subscriberId, | |
| }) | |
| } else if (data.eventType === "onStepFailure") { | |
| console.log("Workflow failed", data.step) | |
| } | |
| }, | |
| }) | |
| res.send(result) | |
| } | |
| ``` | |
| In the above example, you execute the long-running workflow `hello-world` and resolve the Workflow Engine Module's main service from the Medusa container. | |
| ### subscribe Method | |
| The main service's `subscribe` method allows you to listen to changes in the workflow execution’s status. It accepts an object having three properties: | |
| - workflowId: (\`string\`) The name of the workflow. | |
| - transactionId: (\`string\`) The ID of the workflow exection's transaction. The transaction's details are returned in the response of the workflow execution. | |
| - subscriberId: (\`string\`) The ID of the subscriber. | |
| - subscriber: (\`(data: \{ eventType: string, result?: any }) => Promise\<void>\`) The function executed when the workflow execution's status changes. The function receives a data object. It has an \`eventType\` property, which you use to check the status of the workflow execution. | |
| If the value of `eventType` in the `subscriber` function's first parameter is `onFinish`, the workflow finished executing. The first parameter then also has a `result` property holding the workflow's output. | |
| ### unsubscribe Method | |
| You can unsubscribe from the workflow using the workflow engine's `unsubscribe` method, which requires the same object parameter as the `subscribe` method. | |
| However, instead of the `subscriber` property, it requires a `subscriberOrId` property whose value is the same `subscriberId` passed to the `subscribe` method. | |
| *** | |
| ## Example: Restaurant-Delivery Recipe | |
| To find a full example of a long-running workflow, refer to the [restaurant-delivery recipe](https://docs.medusajs.com/resources/recipes/marketplace/examples/restaurant-delivery/index.html.md). | |
| In the recipe, you use a long-running workflow that moves an order from placed to completed. The workflow waits for the restaurant to accept the order, the driver to pick up the order, and other external actions. | |
| # Multiple Step Usage in Workflow | |
| In this chapter, you'll learn how to use a step multiple times in a workflow. | |
| ## Problem Reusing a Step in a Workflow | |
| In some cases, you may need to use a step multiple times in the same workflow. | |
| The most common example is using the `useQueryGraphStep` multiple times in a workflow to retrieve multiple unrelated data, such as customers and products. | |
| Each workflow step must have a unique ID, which is the ID passed as a first parameter when creating the step: | |
| ```ts | |
| const useQueryGraphStep = createStep( | |
| "use-query-graph" | |
| // ... | |
| ) | |
| ``` | |
| This causes an error when you use the same step multiple times in a workflow, as it's registered in the workflow as two steps having the same ID: | |
| ```ts | |
| const helloWorkflow = createWorkflow( | |
| "hello", | |
| () => { | |
| const { data: products } = useQueryGraphStep({ | |
| entity: "product", | |
| fields: ["id"], | |
| }) | |
| // ERROR OCCURS HERE: A STEP HAS THE SAME ID AS ANOTHER IN THE WORKFLOW | |
| const { data: customers } = useQueryGraphStep({ | |
| entity: "customer", | |
| fields: ["id"], | |
| }) | |
| } | |
| ) | |
| ``` | |
| The next section explains how to fix this issue to use the same step multiple times in a workflow. | |
| *** | |
| ## How to Use a Step Multiple Times in a Workflow? | |
| When you execute a step in a workflow, you can chain a `config` method to it to change the step's config. | |
| Use the `config` method to change a step's ID for a single execution. | |
| So, this is the correct way to write the example above: | |
| ```ts highlights={highlights} | |
| const helloWorkflow = createWorkflow( | |
| "hello", | |
| () => { | |
| const { data: products } = useQueryGraphStep({ | |
| entity: "product", | |
| fields: ["id"], | |
| }) | |
| // ✓ No error occurs, the step has a different ID. | |
| const { data: customers } = useQueryGraphStep({ | |
| entity: "customer", | |
| fields: ["id"], | |
| }).config({ name: "fetch-customers" }) | |
| } | |
| ) | |
| ``` | |
| The `config` method accepts an object with a `name` property. Its value is a new ID of the step to use for this execution only. | |
| The first `useQueryGraphStep` usage has the ID `use-query-graph`, and the second `useQueryGraphStep` usage has the ID `fetch-customers`. | |
| # Run Workflow Steps in Parallel | |
| In this chapter, you’ll learn how to run workflow steps in parallel. | |
| ## parallelize Utility Function | |
| If your workflow has steps that don’t rely on one another’s results, run them in parallel using `parallelize` from the Workflows SDK. | |
| The workflow waits until all steps passed to the `parallelize` function finish executing before continuing to the next step. | |
| For example: | |
| ```ts highlights={highlights} collapsibleLines="1-12" expandButtonLabel="Show Imports" | |
| import { | |
| createWorkflow, | |
| WorkflowResponse, | |
| parallelize, | |
| } from "@medusajs/framework/workflows-sdk" | |
| import { | |
| createProductStep, | |
| getProductStep, | |
| createPricesStep, | |
| attachProductToSalesChannelStep, | |
| } from "./steps" | |
| interface WorkflowInput { | |
| title: string | |
| } | |
| const myWorkflow = createWorkflow( | |
| "my-workflow", | |
| (input: WorkflowInput) => { | |
| const product = createProductStep(input) | |
| const [prices, productSalesChannel] = parallelize( | |
| createPricesStep(product), | |
| attachProductToSalesChannelStep(product) | |
| ) | |
| const id = product.id | |
| const refetchedProduct = getProductStep(product.id) | |
| return new WorkflowResponse(refetchedProduct) | |
| } | |
| ) | |
| ``` | |
| The `parallelize` function accepts the steps to run in parallel as a parameter. | |
| It returns an array of the steps' results in the same order they're passed to the `parallelize` function. | |
| So, `prices` is the result of `createPricesStep`, and `productSalesChannel` is the result of `attachProductToSalesChannelStep`. | |
| # Retry Failed Steps | |
| In this chapter, you’ll learn how to configure steps to allow retrial on failure. | |
| ## Configure a Step’s Retrial | |
| By default, when an error occurs in a step, the step and the workflow fail, and the execution stops. | |
| You can configure the step to retry on failure. The `createStep` function can accept a configuration object instead of the step’s name as a first parameter. | |
| For example: | |
| ```ts title="src/workflows/hello-world.ts" highlights={[["10"]]} collapsibleLines="1-6" expandButtonLabel="Show Imports" | |
| import { | |
| createStep, | |
| createWorkflow, | |
| WorkflowResponse, | |
| } from "@medusajs/framework/workflows-sdk" | |
| const step1 = createStep( | |
| { | |
| name: "step-1", | |
| maxRetries: 2, | |
| }, | |
| async () => { | |
| console.log("Executing step 1") | |
| throw new Error("Oops! Something happened.") | |
| } | |
| ) | |
| const myWorkflow = createWorkflow( | |
| "hello-world", | |
| function () { | |
| const str1 = step1() | |
| return new WorkflowResponse({ | |
| message: str1, | |
| }) | |
| }) | |
| export default myWorkflow | |
| ``` | |
| The step’s configuration object accepts a `maxRetries` property, which is a number indicating the number of times a step can be retried when it fails. | |
| When you execute the above workflow, you’ll see the following result in the terminal: | |
| ```bash | |
| Executing step 1 | |
| Executing step 1 | |
| Executing step 1 | |
| error: Oops! Something happened. | |
| Error: Oops! Something happened. | |
| ``` | |
| The first line indicates the first time the step was executed, and the next two lines indicate the times the step was retried. After that, the step and workflow fail. | |
| *** | |
| ## Step Retry Intervals | |
| By default, a step is retried immediately after it fails. To specify a wait time before a step is retried, pass a `retryInterval` property to the step's configuration object. Its value is a number of seconds to wait before retrying the step. | |
| For example: | |
| ```ts title="src/workflows/hello-world.ts" highlights={[["5"]]} | |
| const step1 = createStep( | |
| { | |
| name: "step-1", | |
| maxRetries: 2, | |
| retryInterval: 2, // 2 seconds | |
| }, | |
| async () => { | |
| // ... | |
| } | |
| ) | |
| ``` | |
| ### Interval Changes Workflow to Long-Running | |
| By setting `retryInterval` on a step, a workflow becomes a [long-running workflow](https://docs.medusajs.com/learn/fundamentals/workflows/long-running-workflow/index.html.md) that runs asynchronously in the background. So, you won't receive its result or errors immediately when you execute the workflow. | |
| Instead, you must subscribe to the workflow's execution using the Workflow Engine Module Service. Learn more about it in [this chapter](https://docs.medusajs.com/learn/fundamentals/workflows/long-running-workflow#access-long-running-workflow-status-and-result/index.html.md). | |
| # Store Workflow Executions | |
| In this chapter, you'll learn how to store workflow executions in the database and access them later. | |
| ## Workflow Execution Retention | |
| Medusa doesn't store your workflow's execution details by default. However, you can configure a workflow to keep its execution details stored in the database. | |
| This is useful for auditing and debugging purposes. When you store a workflow's execution, you can view details around its steps, their states and their output. You can also check whether the workflow or any of its steps failed. | |
| You can view stored workflow executions from the Medusa Admin dashboard by going to Settings -> Workflows. | |
| *** | |
| ## How to Store Workflow's Executions? | |
| ### Prerequisites | |
| - [Redis Workflow Engine must be installed and configured.](https://docs.medusajs.com/resources/architectural-modules/workflow-engine/redis/index.html.md) | |
| `createWorkflow` from the Workflows SDK can accept an object as a first parameter to set the workflow's configuration. To enable storing a workflow's executions: | |
| - Enable the `store` option. If your workflow is a [Long-Running Workflow](https://docs.medusajs.com/learn/fundamentals/workflows/long-running-workflow/index.html.md), this option is enabled by default. | |
| - Set the `retentionTime` option to the number of seconds that the workflow execution should be stored in the database. | |
| For example: | |
| ```ts highlights={highlights} | |
| import { createStep, createWorkflow } from "@medusajs/framework/workflows-sdk" | |
| const step1 = createStep( | |
| { | |
| name: "step-1" | |
| }, | |
| async () => { | |
| console.log("Hello from step 1") | |
| } | |
| ) | |
| export const helloWorkflow = createWorkflow( | |
| { | |
| name: "hello-workflow", | |
| retentionTime: 99999, | |
| store: true | |
| }, | |
| () => { | |
| step1() | |
| } | |
| ) | |
| ``` | |
| Whenever you execute the `helloWorkflow` now, its execution details will be stored in the database. | |
| *** | |
| ## Retrieve Workflow Executions | |
| You can view stored workflow executions from the Medusa Admin dashboard by going to Settings -> Workflows. | |
| When you execute a workflow, the returned object has a `transaction` property containing the workflow execution's transaction details: | |
| ```ts | |
| const { transaction } = await helloWorkflow(container).run() | |
| ``` | |
| To retrieve a workflow's execution details from the database, resolve the Workflow Engine Module from the container and use its `listWorkflowExecutions` method. | |
| For example, you can create a `GET` API Route at `src/workflows/[id]/route.ts` that retrieves a workflow execution for the specified transaction ID: | |
| ```ts title="src/workflows/[id]/route.ts" highlights={retrieveHighlights} | |
| import { MedusaRequest, MedusaResponse } from "@medusajs/framework"; | |
| import { Modules } from "@medusajs/framework/utils"; | |
| export async function GET( | |
| req: MedusaRequest, | |
| res: MedusaResponse | |
| ) { | |
| const { transaction_id } = req.params | |
| const workflowEngineService = req.scope.resolve( | |
| Modules.WORKFLOW_ENGINE | |
| ) | |
| const [workflowExecution] = await workflowEngineService.listWorkflowExecutions({ | |
| transaction_id: transaction_id | |
| }) | |
| res.json({ | |
| workflowExecution | |
| }) | |
| } | |
| ``` | |
| In the above example, you resolve the Workflow Engine Module from the container and use its `listWorkflowExecutions` method, passing the `transaction_id` as a filter to retrieve its workflow execution details. | |
| A workflow execution object will be similar to the following: | |
| ```json | |
| { | |
| "workflow_id": "hello-workflow", | |
| "transaction_id": "01JJC2T6AVJCQ3N4BRD1EB88SP", | |
| "id": "wf_exec_01JJC2T6B3P76JD35F12QTTA78", | |
| "execution": { | |
| "state": "done", | |
| "steps": {}, | |
| "modelId": "hello-workflow", | |
| "options": {}, | |
| "metadata": {}, | |
| "startedAt": 1737719880027, | |
| "definition": {}, | |
| "timedOutAt": null, | |
| "hasAsyncSteps": false, | |
| "transactionId": "01JJC2T6AVJCQ3N4BRD1EB88SP", | |
| "hasFailedSteps": false, | |
| "hasSkippedSteps": false, | |
| "hasWaitingSteps": false, | |
| "hasRevertedSteps": false, | |
| "hasSkippedOnFailureSteps": false | |
| }, | |
| "context": { | |
| "data": {}, | |
| "errors": [] | |
| }, | |
| "state": "done", | |
| "created_at": "2025-01-24T09:58:00.036Z", | |
| "updated_at": "2025-01-24T09:58:00.046Z", | |
| "deleted_at": null | |
| } | |
| ``` | |
| ### Example: Check if Stored Workflow Execution Failed | |
| To check if a stored workflow execution failed, you can check its `state` property: | |
| ```ts | |
| if (workflowExecution.state === "failed") { | |
| return res.status(500).json({ | |
| error: "Workflow failed" | |
| }) | |
| } | |
| ``` | |
| Other state values include `done`, `invoking`, and `compensating`. | |
| # Variable Manipulation in Workflows with transform | |
| In this chapter, you'll learn how to use `transform` from the Workflows SDK to manipulate variables in a workflow. | |
| ## Why Variable Manipulation isn't Allowed in Workflows | |
| Medusa creates an internal representation of the workflow definition you pass to `createWorkflow` to track and store its steps. | |
| At that point, variables in the workflow don't have any values. They only do when you execute the workflow. | |
| So, you can only pass variables as parameters to steps. But, in a workflow, you can't change a variable's value or, if the variable is an array, loop over its items. | |
| Instead, use `transform` from the Workflows SDK. | |
| Restrictions for variable manipulation is only applicable in a workflow's definition. You can still manipulate variables in your step's code. | |
| *** | |
| ## What is the transform Utility? | |
| `transform` creates a new variable as the result of manipulating other variables. | |
| For example, consider you have two strings as the output of two steps: | |
| ```ts | |
| const str1 = step1() | |
| const str2 = step2() | |
| ``` | |
| To concatenate the strings, you create a new variable `str3` using the `transform` function: | |
| ```ts highlights={highlights} | |
| import { | |
| createWorkflow, | |
| WorkflowResponse, | |
| transform, | |
| } from "@medusajs/framework/workflows-sdk" | |
| // step imports... | |
| const myWorkflow = createWorkflow( | |
| "hello-world", | |
| function (input) { | |
| const str1 = step1(input) | |
| const str2 = step2(input) | |
| const str3 = transform( | |
| { str1, str2 }, | |
| (data) => `${data.str1}${data.str2}` | |
| ) | |
| return new WorkflowResponse(str3) | |
| } | |
| ) | |
| ``` | |
| `transform` accepts two parameters: | |
| 1. The first parameter is an object of variables to manipulate. The object is passed as a parameter to `transform`'s second parameter function. | |
| 2. The second parameter is the function performing the variable manipulation. | |
| The value returned by the second parameter function is returned by `transform`. So, the `str3` variable holds the concatenated string. | |
| You can use the returned value in the rest of the workflow, either to pass it as an input to other steps or to return it in the workflow's response. | |
| *** | |
| ## Example: Looping Over Array | |
| Use `transform` to loop over arrays to create another variable from the array's items. | |
| For example: | |
| ```ts collapsibleLines="1-7" expandButtonLabel="Show Imports" | |
| import { | |
| createWorkflow, | |
| WorkflowResponse, | |
| transform, | |
| } from "@medusajs/framework/workflows-sdk" | |
| // step imports... | |
| type WorkflowInput = { | |
| items: { | |
| id: string | |
| name: string | |
| }[] | |
| } | |
| const myWorkflow = createWorkflow( | |
| "hello-world", | |
| function ({ items }: WorkflowInput) { | |
| const ids = transform( | |
| { items }, | |
| (data) => data.items.map((item) => item.id) | |
| ) | |
| doSomethingStep(ids) | |
| // ... | |
| } | |
| ) | |
| ``` | |
| This workflow receives an `items` array in its input. | |
| You use `transform` to create an `ids` variable, which is an array of strings holding the `id` of each item in the `items` array. | |
| You then pass the `ids` variable as a parameter to the `doSomethingStep`. | |
| *** | |
| ## Example: Creating a Date | |
| If you create a date with `new Date()` in a workflow's constructor function, Medusa evaluates the date's value when it creates the internal representation of the workflow, not when the workflow is executed. | |
| So, use `transform` instead to create a date variable with `new Date()`. | |
| For example: | |
| ```ts | |
| const myWorkflow = createWorkflow( | |
| "hello-world", | |
| () => { | |
| const today = transform({}, () => new Date()) | |
| doSomethingStep(today) | |
| } | |
| ) | |
| ``` | |
| In this workflow, `today` is only evaluated when the workflow is executed. | |
| *** | |
| ## Caveats | |
| ### Transform Evaluation | |
| `transform`'s value is only evaluated if you pass its output to a step or in the workflow response. | |
| For example, if you have the following workflow: | |
| ```ts | |
| const myWorkflow = createWorkflow( | |
| "hello-world", | |
| function (input) { | |
| const str = transform( | |
| { input }, | |
| (data) => `${data.input.str1}${data.input.str2}` | |
| ) | |
| return new WorkflowResponse("done") | |
| } | |
| ) | |
| ``` | |
| Since `str`'s value isn't used as a step's input or passed to `WorkflowResponse`, its value is never evaluated. | |
| ### Data Validation | |
| `transform` should only be used to perform variable or data manipulation. | |
| If you want to perform some validation on the data, use a step or [when-then](https://docs.medusajs.com/learn/fundamentals/workflows/conditions/index.html.md) instead. | |
| For example: | |
| ```ts | |
| // DON'T | |
| const myWorkflow = createWorkflow( | |
| "hello-world", | |
| function (input) { | |
| const str = transform( | |
| { input }, | |
| (data) => { | |
| if (!input.str1) { | |
| throw new Error("Not allowed!") | |
| } | |
| } | |
| ) | |
| } | |
| ) | |
| // DO | |
| const validateHasStr1Step = createStep( | |
| "validate-has-str1", | |
| ({ input }) => { | |
| if (!input.str1) { | |
| throw new Error("Not allowed!") | |
| } | |
| } | |
| ) | |
| const myWorkflow = createWorkflow( | |
| "hello-world", | |
| function (input) { | |
| validateHasStr1({ | |
| input, | |
| }) | |
| // workflow continues its execution only if | |
| // the step doesn't throw the error. | |
| } | |
| ) | |
| ``` | |
| # Execute Another Workflow | |
| In this chapter, you'll learn how to execute a workflow in another. | |
| ## Execute in a Workflow | |
| To execute a workflow in another, use the `runAsStep` method that every workflow has. | |
| For example: | |
| ```ts highlights={workflowsHighlights} collapsibleLines="1-7" expandMoreButton="Show Imports" | |
| import { | |
| createWorkflow, | |
| } from "@medusajs/framework/workflows-sdk" | |
| import { | |
| createProductsWorkflow, | |
| } from "@medusajs/medusa/core-flows" | |
| const workflow = createWorkflow( | |
| "hello-world", | |
| async (input) => { | |
| const products = createProductsWorkflow.runAsStep({ | |
| input: { | |
| products: [ | |
| // ... | |
| ], | |
| }, | |
| }) | |
| // ... | |
| } | |
| ) | |
| ``` | |
| Instead of invoking the workflow and passing it the container, you use its `runAsStep` method and pass it an object as a parameter. | |
| The object has an `input` property to pass input to the workflow. | |
| *** | |
| ## Preparing Input Data | |
| If you need to perform some data manipulation to prepare the other workflow's input data, use `transform` from the Workflows SDK. | |
| Learn about transform in [this chapter](https://docs.medusajs.com/learn/fundamentals/workflows/variable-manipulation/index.html.md). | |
| For example: | |
| ```ts highlights={transformHighlights} collapsibleLines="1-12" | |
| import { | |
| createWorkflow, | |
| transform, | |
| } from "@medusajs/framework/workflows-sdk" | |
| import { | |
| createProductsWorkflow, | |
| } from "@medusajs/medusa/core-flows" | |
| type WorkflowInput = { | |
| title: string | |
| } | |
| const workflow = createWorkflow( | |
| "hello-product", | |
| async (input: WorkflowInput) => { | |
| const createProductsData = transform({ | |
| input, | |
| }, (data) => [ | |
| { | |
| title: `Hello ${data.input.title}`, | |
| }, | |
| ]) | |
| const products = createProductsWorkflow.runAsStep({ | |
| input: { | |
| products: createProductsData, | |
| }, | |
| }) | |
| // ... | |
| } | |
| ) | |
| ``` | |
| In this example, you use the `transform` function to prepend `Hello` to the title of the product. Then, you pass the result as an input to the `createProductsWorkflow`. | |
| *** | |
| ## Run Workflow Conditionally | |
| To run a workflow in another based on a condition, use when-then from the Workflows SDK. | |
| Learn about when-then in [this chapter](https://docs.medusajs.com/learn/fundamentals/workflows/conditions/index.html.md). | |
| For example: | |
| ```ts highlights={whenHighlights} collapsibleLines="1-16" | |
| import { | |
| createWorkflow, | |
| when, | |
| } from "@medusajs/framework/workflows-sdk" | |
| import { | |
| createProductsWorkflow, | |
| } from "@medusajs/medusa/core-flows" | |
| import { | |
| CreateProductWorkflowInputDTO, | |
| } from "@medusajs/framework/types" | |
| type WorkflowInput = { | |
| product?: CreateProductWorkflowInputDTO | |
| should_create?: boolean | |
| } | |
| const workflow = createWorkflow( | |
| "hello-product", | |
| async (input: WorkflowInput) => { | |
| const product = when(input, ({ should_create }) => should_create) | |
| .then(() => { | |
| return createProductsWorkflow.runAsStep({ | |
| input: { | |
| products: [input.product], | |
| }, | |
| }) | |
| }) | |
| } | |
| ) | |
| ``` | |
| In this example, you use when-then to run the `createProductsWorkflow` only if `should_create` (passed in the `input`) is enabled. | |
| # Workflow Hooks | |
| In this chapter, you'll learn what a workflow hook is and how to consume them. | |
| ## What is a Workflow Hook? | |
| A workflow hook is a point in a workflow where you can inject custom functionality as a step function, called a hook handler. | |
| Medusa exposes hooks in many of its workflows that are used in its API routes. You can consume those hooks to add your custom logic. | |
| Refer to the [Workflows Reference](https://docs.medusajs.com/resources/medusa-workflows-reference/index.html.md) to view all workflows and their hooks. | |
| You want to perform a custom action during a workflow's execution, such as when a product is created. | |
| *** | |
| ## How to Consume a Hook? | |
| A workflow has a special `hooks` property which is an object that holds its hooks. | |
| So, in a TypeScript or JavaScript file created under the `src/workflows/hooks` directory: | |
| - Import the workflow. | |
| - Access its hook using the `hooks` property. | |
| - Pass the hook a step function as a parameter to consume it. | |
| For example, to consume the `productsCreated` hook of Medusa's `createProductsWorkflow`, create the file `src/workflows/hooks/product-created.ts` with the following content: | |
| ```ts title="src/workflows/hooks/product-created.ts" highlights={handlerHighlights} | |
| import { createProductsWorkflow } from "@medusajs/medusa/core-flows" | |
| createProductsWorkflow.hooks.productsCreated( | |
| async ({ products }, { container }) => { | |
| // TODO perform an action | |
| } | |
| ) | |
| ``` | |
| The `productsCreated` hook is available on the workflow's `hooks` property by its name. | |
| You invoke the hook, passing a step function (the hook handler) as a parameter. | |
| Now, when a product is created using the [Create Product API route](https://docs.medusajs.com/api/admin#products_postproducts/index.html.md), your hook handler is executed after the product is created. | |
| A hook can have only one handler. | |
| Refer to the [createProductsWorkflow reference](https://docs.medusajs.com/resources/references/medusa-workflows/createProductsWorkflow/index.html.md) to see at which point the hook handler is executed. | |
| ### Hook Handler Parameter | |
| Since a hook handler is essentially a step function, it receives the hook's input as a first parameter, and an object holding a `container` property as a second parameter. | |
| Each hook has different input. For example, the `productsCreated` hook receives an object having a `products` property holding the created product. | |
| ### Hook Handler Compensation | |
| Since the hook handler is a step function, you can set its compensation function as a second parameter of the hook. | |
| For example: | |
| ```ts title="src/workflows/hooks/product-created.ts" | |
| import { createProductsWorkflow } from "@medusajs/medusa/core-flows" | |
| createProductsWorkflow.hooks.productCreated( | |
| async ({ productId }, { container }) => { | |
| // TODO perform an action | |
| return new StepResponse(undefined, { ids }) | |
| }, | |
| async ({ ids }, { container }) => { | |
| // undo the performed action | |
| } | |
| ) | |
| ``` | |
| The compensation function is executed if an error occurs in the workflow to undo the actions performed by the hook handler. | |
| The compensation function receives as an input the second parameter passed to the `StepResponse` returned by the step function. | |
| It also accepts as a second parameter an object holding a `container` property to resolve resources from the Medusa container. | |
| ### Additional Data Property | |
| Medusa's workflows pass in the hook's input an `additional_data` property: | |
| ```ts title="src/workflows/hooks/product-created.ts" highlights={[["4", "additional_data"]]} | |
| import { createProductsWorkflow } from "@medusajs/medusa/core-flows" | |
| createProductsWorkflow.hooks.productsCreated( | |
| async ({ products, additional_data }, { container }) => { | |
| // TODO perform an action | |
| } | |
| ) | |
| ``` | |
| This property is an object that holds additional data passed to the workflow through the request sent to the API route using the workflow. | |
| Learn how to pass `additional_data` in requests to API routes in [this chapter](https://docs.medusajs.com/learn/fundamentals/api-routes/additional-data/index.html.md). | |
| ### Pass Additional Data to Workflow | |
| You can also pass that additional data when executing the workflow. Pass it as a parameter to the `.run` method of the workflow: | |
| ```ts title="src/workflows/hooks/product-created.ts" highlights={[["10", "additional_data"]]} | |
| import type { MedusaRequest, MedusaResponse } from "@medusajs/framework/http" | |
| import { createProductsWorkflow } from "@medusajs/medusa/core-flows" | |
| export async function POST(req: MedusaRequest, res: MedusaResponse) { | |
| await createProductsWorkflow(req.scope).run({ | |
| input: { | |
| products: [ | |
| // ... | |
| ], | |
| additional_data: { | |
| custom_field: "test", | |
| }, | |
| }, | |
| }) | |
| } | |
| ``` | |
| Your hook handler then receives that passed data in the `additional_data` object. | |
| # Create a Plugin | |
| In this chapter, you'll learn how to create a Medusa plugin and publish it. | |
| A [plugin](https://docs.medusajs.com/learn/fundamentals/plugins/index.html.md) is a package of reusable Medusa customizations that you can install in any Medusa application. By creating and publishing a plugin, you can reuse your Medusa customizations across multiple projects or share them with the community. | |
| Plugins are available starting from [Medusa v2.3.0](https://github.com/medusajs/medusa/releases/tag/v2.3.0). | |
| ## 1. Create a Plugin Project | |
| Plugins are created in a separate Medusa project. This makes the development and publishing of the plugin easier. Later, you'll install that plugin in your Medusa application to test it out and use it. | |
| Medusa's `create-medusa-app` CLI tool provides the option to create a plugin project. Run the following command to create a new plugin project: | |
| ```bash | |
| npx create-medusa-app my-plugin --plugin | |
| ``` | |
| This will create a new Medusa plugin project in the `my-plugin` directory. | |
| ### Plugin Directory Structure | |
| After the installation is done, the plugin structure will look like this: | |
| 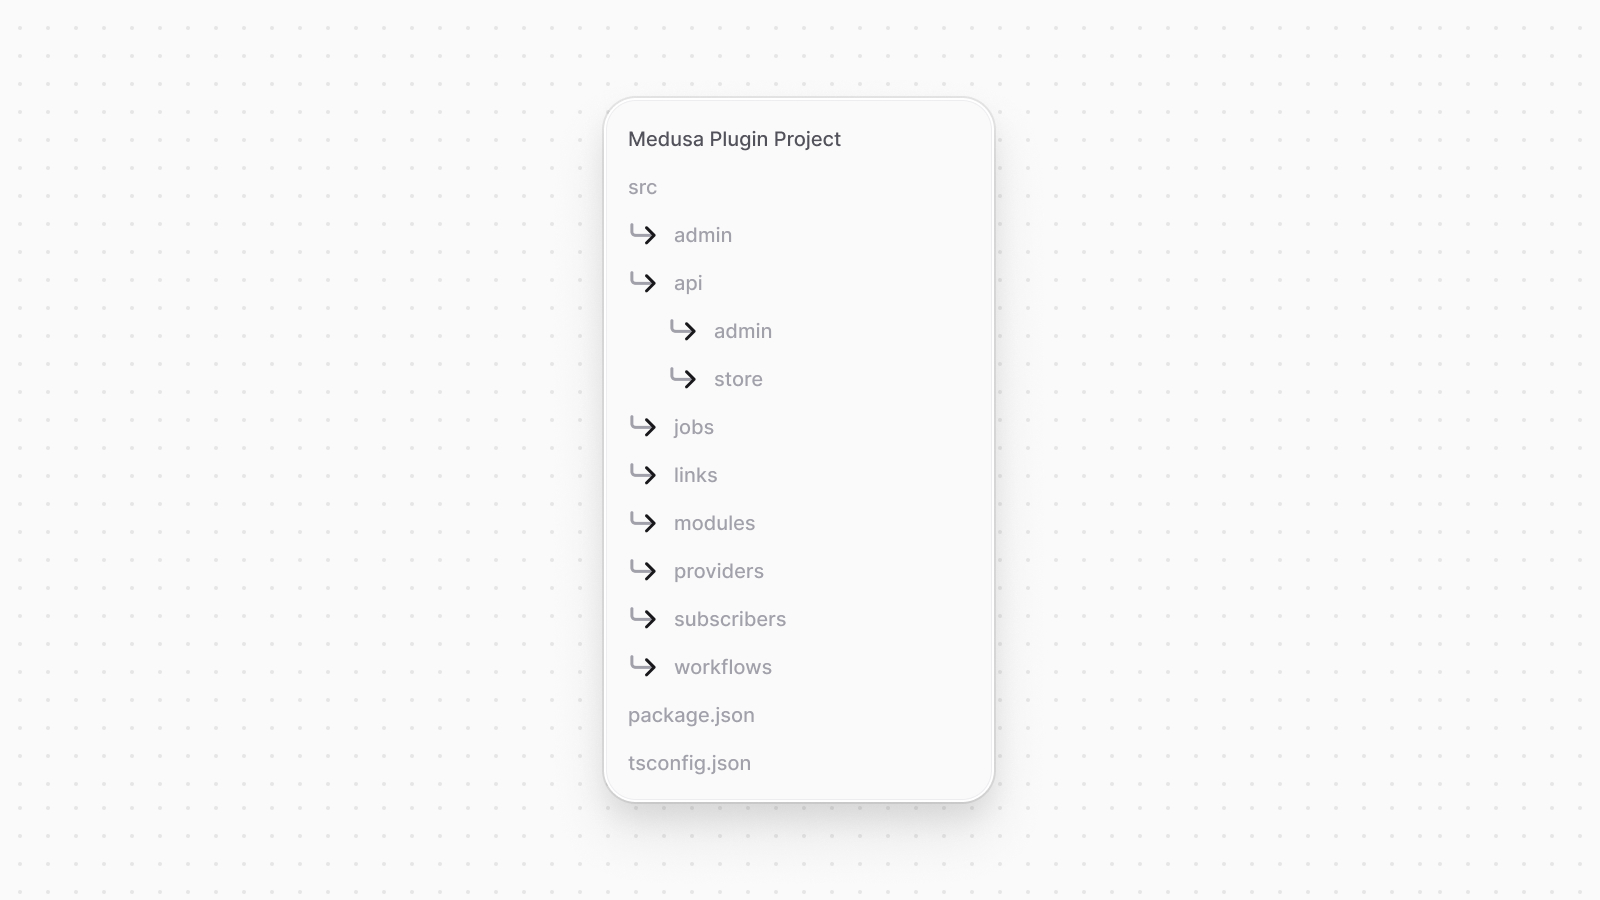 | |
| - `src/`: Contains the Medusa customizations. | |
| - `src/admin`: Contains [admin extensions](https://docs.medusajs.com/learn/fundamentals/admin/index.html.md). | |
| - `src/api`: Contains [API routes](https://docs.medusajs.com/learn/fundamentals/api-routes/index.html.md) and [middlewares](https://docs.medusajs.com/learn/fundamentals/api-routes/middlewares/index.html.md). You can add store, admin, or any custom API routes. | |
| - `src/jobs`: Contains [scheduled jobs](https://docs.medusajs.com/learn/fundamentals/scheduled-jobs/index.html.md). | |
| - `src/links`: Contains [module links](https://docs.medusajs.com/learn/fundamentals/module-links/index.html.md). | |
| - `src/modules`: Contains [modules](https://docs.medusajs.com/learn/fundamentals/modules/index.html.md). | |
| - `src/subscribers`: Contains [subscribers](https://docs.medusajs.com/learn/fundamentals/events-and-subscribers/index.html.md). | |
| - `src/workflows`: Contains [workflows](https://docs.medusajs.com/learn/fundamentals/workflows/index.html.md). You can also add [hooks](https://docs.medusajs.com/learn/fundamentals/workflows/add-workflow-hook/index.html.md) under `src/workflows/hooks`. | |
| - `package.json`: Contains the plugin's package information, including general information and dependencies. | |
| - `tsconfig.json`: Contains the TypeScript configuration for the plugin. | |
| *** | |
| ## 2. Prepare Plugin | |
| Before developing, testing, and publishing your plugin, make sure its name in `package.json` is correct. This is the name you'll use to install the plugin in your Medusa application. | |
| For example: | |
| ```json title="package.json" | |
| { | |
| "name": "@myorg/plugin-name", | |
| // ... | |
| } | |
| ``` | |
| In addition, make sure that the `keywords` field in `package.json` includes the keyword `medusa-plugin` and `medusa-v2`. This helps Medusa list community plugins on the Medusa website: | |
| ```json title="package.json" | |
| { | |
| "keywords": [ | |
| "medusa-plugin", | |
| "medusa-v2" | |
| ], | |
| // ... | |
| } | |
| ``` | |
| *** | |
| ## 3. Publish Plugin Locally for Development and Testing | |
| Medusa's CLI tool provides commands to simplify developing and testing your plugin in a local Medusa application. You start by publishing your plugin in the local package registry, then install it in your Medusa application. You can then watch for changes in the plugin as you develop it. | |
| ### Publish and Install Local Package | |
| ### Prerequisites | |
| - [Medusa application installed.](https://docs.medusajs.com/learn/installation/index.html.md) | |
| The first time you create your plugin, you need to publish the package into a local package registry, then install it in your Medusa application. This is a one-time only process. | |
| To publish the plugin to the local registry, run the following command in your plugin project: | |
| ```bash title="Plugin project" | |
| npx medusa plugin:publish | |
| ``` | |
| This command uses [Yalc](https://github.com/wclr/yalc) under the hood to publish the plugin to a local package registry. The plugin is published locally under the name you specified in `package.json`. | |
| Next, navigate to your Medusa application: | |
| ```bash title="Medusa application" | |
| cd ~/path/to/medusa-app | |
| ``` | |
| Make sure to replace `~/path/to/medusa-app` with the path to your Medusa application. | |
| Then, if your project was created before v2.3.1 of Medusa, make sure to install `yalc` as a development dependency: | |
| ```bash npm2yarn title="Medusa application" | |
| npm install --save-dev yalc | |
| ``` | |
| After that, run the following Medusa CLI command to install the plugin: | |
| ```bash title="Medusa application" | |
| npx medusa plugin:add @myorg/plugin-name | |
| ``` | |
| Make sure to replace `@myorg/plugin-name` with the name of your plugin as specified in `package.json`. Your plugin will be installed from the local package registry into your Medusa application. | |
| ### Register Plugin in Medusa Application | |
| After installing the plugin, you need to register it in your Medusa application in the configurations defined in `medusa-config.ts`. | |
| Add the plugin to the `plugins` array in the `medusa-config.ts` file: | |
| ```ts title="medusa-config.ts" highlights={pluginHighlights} | |
| module.exports = defineConfig({ | |
| // ... | |
| plugins: [ | |
| { | |
| resolve: "@myorg/plugin-name", | |
| options: {}, | |
| }, | |
| ], | |
| }) | |
| ``` | |
| The `plugins` configuration is an array of objects where each object has a `resolve` key whose value is the name of the plugin package. | |
| #### Pass Module Options through Plugin | |
| Each plugin configuration also accepts an `options` property, whose value is an object of options to pass to the plugin's modules. | |
| For example: | |
| ```ts title="medusa-config.ts" highlights={pluginOptionsHighlight} | |
| module.exports = defineConfig({ | |
| // ... | |
| plugins: [ | |
| { | |
| resolve: "@myorg/plugin-name", | |
| options: { | |
| apiKey: true, | |
| }, | |
| }, | |
| ], | |
| }) | |
| ``` | |
| The `options` property in the plugin configuration is passed to all modules in the plugin. Learn more about module options in [this chapter](https://docs.medusajs.com/learn/fundamentals/modules/options/index.html.md). | |
| ### Watch Plugin Changes During Development | |
| While developing your plugin, you can watch for changes in the plugin and automatically update the plugin in the Medusa application using it. This is the only command you'll continuously need during your plugin development. | |
| To do that, run the following command in your plugin project: | |
| ```bash title="Plugin project" | |
| npx medusa plugin:develop | |
| ``` | |
| This command will: | |
| - Watch for changes in the plugin. Whenever a file is changed, the plugin is automatically built. | |
| - Publish the plugin changes to the local package registry. This will automatically update the plugin in the Medusa application using it. You can also benefit from real-time HMR updates of admin extensions. | |
| ### Start Medusa Application | |
| You can start your Medusa application's development server to test out your plugin: | |
| ```bash npm2yarn title="Medusa application" | |
| npm run dev | |
| ``` | |
| While your Medusa application is running and the plugin is being watched, you can test your plugin while developing it in the Medusa application. | |
| *** | |
| ## 4. Create Customizations in the Plugin | |
| You can now build your plugin's customizations. The following guide explains how to build different customizations in your plugin. | |
| - [Create a module](https://docs.medusajs.com/learn/fundamentals/modules/index.html.md) | |
| - [Create a module link](https://docs.medusajs.com/learn/fundamentals/module-links/index.html.md) | |
| - [Create a workflow](https://docs.medusajs.com/learn/fundamentals/workflows/index.html.md) | |
| - [Add a workflow hook](https://docs.medusajs.com/learn/fundamentals/workflows/add-workflow-hook/index.html.md) | |
| - [Create an API route](https://docs.medusajs.com/learn/fundamentals/api-routes/index.html.md) | |
| - [Add a subscriber](https://docs.medusajs.com/learn/fundamentals/events-and-subscribers/index.html.md) | |
| - [Add a scheduled job](https://docs.medusajs.com/learn/fundamentals/scheduled-jobs/index.html.md) | |
| - [Add an admin widget](https://docs.medusajs.com/learn/fundamentals/admin/widgets/index.html.md) | |
| - [Add an admin UI route](https://docs.medusajs.com/learn/fundamentals/admin/ui-routes/index.html.md) | |
| While building those customizations, you can test them in your Medusa application by [watching the plugin changes](#watch-plugin-changes-during-development) and [starting the Medusa application](#start-medusa-application). | |
| ### Generating Migrations for Modules | |
| During your development, you may need to generate migrations for modules in your plugin. To do that, use the `plugin:db:generate` command: | |
| ```bash title="Plugin project" | |
| npx medusa plugin:db:generate | |
| ``` | |
| This command generates migrations for all modules in the plugin. You can then run these migrations on the Medusa application that the plugin is installed in using the `db:migrate` command: | |
| ```bash title="Medusa application" | |
| npx medusa db:migrate | |
| ``` | |
| *** | |
| ## 5. Publish Plugin to NPM | |
| Medusa's CLI tool provides a command that bundles your plugin to be published to npm. Once you're ready to publish your plugin publicly, run the following command in your plugin project: | |
| ```bash | |
| npx medusa plugin:build | |
| ``` | |
| The command will compile an output in the `.medusa/server` directory. | |
| You can now publish the plugin to npm using the [NPM CLI tool](https://docs.npmjs.com/downloading-and-installing-node-js-and-npm). Run the following command to publish the plugin to npm: | |
| ```bash | |
| npm publish | |
| ``` | |
| If you haven't logged in before with your NPM account, you'll be asked to log in first. Then, your package is published publicly to be used in any Medusa application. | |
| ### Install Public Plugin in Medusa Application | |
| You install a plugin that's published publicly using your package manager. For example: | |
| ```bash npm2yarn | |
| npm install @myorg/plugin-name | |
| ``` | |
| Where `@myorg/plugin-name` is the name of your plugin as published on NPM. | |
| Then, register the plugin in your Medusa application's configurations as explained in [this section](#register-plugin-in-medusa-application). | |
| *** | |
| ## Update a Published Plugin | |
| To update the Medusa dependencies in a plugin, refer to [this documentation](https://docs.medusajs.com/learn/update#update-plugin-project/index.html.md). | |
| If you've published a plugin and you've made changes to it, you'll have to publish the update to NPM again. | |
| First, run the following command to change the version of the plugin: | |
| ```bash | |
| npm version <type> | |
| ``` | |
| Where `<type>` indicates the type of version update you’re publishing. For example, it can be `major` or `minor`. Refer to the [npm version documentation](https://docs.npmjs.com/cli/v10/commands/npm-version) for more information. | |
| Then, re-run the same commands for publishing a plugin: | |
| ```bash | |
| npx medusa plugin:build | |
| npm publish | |
| ``` | |
| This will publish an updated version of your plugin under a new version. | |
| # Workflow Timeout | |
| In this chapter, you’ll learn how to set a timeout for workflows and steps. | |
| ## What is a Workflow Timeout? | |
| By default, a workflow doesn’t have a timeout. It continues execution until it’s finished or an error occurs. | |
| You can configure a workflow’s timeout to indicate how long the workflow can execute. If a workflow's execution time passes the configured timeout, it is failed and an error is thrown. | |
| ### Timeout Doesn't Stop Step Execution | |
| Configuring a timeout doesn't stop the execution of a step in progress. The timeout only affects the status of the workflow and its result. | |
| *** | |
| ## Configure Workflow Timeout | |
| The `createWorkflow` function can accept a configuration object instead of the workflow’s name. | |
| In the configuration object, you pass a `timeout` property, whose value is a number indicating the timeout in seconds. | |
| For example: | |
| ```ts title="src/workflows/hello-world.ts" highlights={[["16"]]} collapsibleLines="1-13" expandButtonLabel="Show More" | |
| import { | |
| createStep, | |
| createWorkflow, | |
| WorkflowResponse, | |
| } from "@medusajs/framework/workflows-sdk" | |
| const step1 = createStep( | |
| "step-1", | |
| async () => { | |
| // ... | |
| } | |
| ) | |
| const myWorkflow = createWorkflow({ | |
| name: "hello-world", | |
| timeout: 2, // 2 seconds | |
| }, function () { | |
| const str1 = step1() | |
| return new WorkflowResponse({ | |
| message: str1, | |
| }) | |
| }) | |
| export default myWorkflow | |
| ``` | |
| This workflow's executions fail if they run longer than two seconds. | |
| A workflow’s timeout error is returned in the `errors` property of the workflow’s execution, as explained in [this chapter](https://docs.medusajs.com/learn/fundamentals/workflows/access-workflow-errors/index.html.md). The error’s name is `TransactionTimeoutError`. | |
| *** | |
| ## Configure Step Timeout | |
| Alternatively, you can configure the timeout for a step rather than the entire workflow. | |
| As mentioned in the previous section, the timeout doesn't stop the execution of the step. It only affects the step's status and output. | |
| The step’s configuration object accepts a `timeout` property, whose value is a number indicating the timeout in seconds. | |
| For example: | |
| ```tsx | |
| const step1 = createStep( | |
| { | |
| name: "step-1", | |
| timeout: 2, // 2 seconds | |
| }, | |
| async () => { | |
| // ... | |
| } | |
| ) | |
| ``` | |
| This step's executions fail if they run longer than two seconds. | |
| A step’s timeout error is returned in the `errors` property of the workflow’s execution, as explained in [this chapter](https://docs.medusajs.com/learn/fundamentals/workflows/access-workflow-errors/index.html.md). The error’s name is `TransactionStepTimeoutError`. | |
| # Example: Integration Tests for a Module | |
| In this chapter, find an example of writing an integration test for a module using [moduleIntegrationTestRunner](https://docs.medusajs.com/learn/debugging-and-testing/testing-tools/modules-tests/index.html.md) from Medusa's Testing Framework. | |
| ### Prerequisites | |
| - [Testing Tools Setup](https://docs.medusajs.com/learn/debugging-and-testing/testing-tools/index.html.md) | |
| ## Write Integration Test for Module | |
| Consider a `hello` module with a `HelloModuleService` that has a `getMessage` method: | |
| ```ts title="src/modules/hello/service.ts" | |
| import { MedusaService } from "@medusajs/framework/utils" | |
| import MyCustom from "./models/my-custom" | |
| class HelloModuleService extends MedusaService({ | |
| MyCustom, | |
| }){ | |
| getMessage(): string { | |
| return "Hello, World!" | |
| } | |
| } | |
| export default HelloModuleService | |
| ``` | |
| To create an integration test for the method, create the file `src/modules/hello/__tests__/service.spec.ts` with the following content: | |
| ```ts title="src/modules/hello/__tests__/service.spec.ts" | |
| import { moduleIntegrationTestRunner } from "@medusajs/test-utils" | |
| import { HELLO_MODULE } from ".." | |
| import HelloModuleService from "../service" | |
| import MyCustom from "../models/my-custom" | |
| moduleIntegrationTestRunner<HelloModuleService>({ | |
| moduleName: HELLO_MODULE, | |
| moduleModels: [MyCustom], | |
| resolve: "./src/modules/hello", | |
| testSuite: ({ service }) => { | |
| describe("HelloModuleService", () => { | |
| it("says hello world", () => { | |
| const message = service.getMessage() | |
| expect(message).toEqual("Hello, World!") | |
| }) | |
| }) | |
| }, | |
| }) | |
| jest.setTimeout(60 * 1000) | |
| ``` | |
| You use the `moduleIntegrationTestRunner` function to add tests for the `hello` module. You have one test that passes if the `getMessage` method returns the `"Hello, World!"` string. | |
| *** | |
| ## Run Test | |
| Run the following command to run your module integration tests: | |
| ```bash npm2yarn | |
| npm run test:integration:modules | |
| ``` | |
| If you don't have a `test:integration:modules` script in `package.json`, refer to the [Medusa Testing Tools chapter](https://docs.medusajs.com/learn/debugging-and-testing/testing-tools#add-test-commands/index.html.md). | |
| This runs your Medusa application and runs the tests available in any `__tests__` directory under the `src/modules` directory. | |
| # Commerce Modules | |
| In this section of the documentation, you'll find guides and references related to Medusa's commerce modules. | |
| A commerce module provides features for a commerce domain within its service. The Medusa application exposes these features in its API routes to clients. | |
| A commerce module also defines data models, representing tables in the database. Medusa's framework and tools allow you to extend these data models to add custom fields. | |
| ## Commerce Modules List | |
| *** | |
| ## How to Use Modules | |
| The Commerce Modules can be used in many use cases, including: | |
| - Medusa Application: The Medusa application uses the Commerce Modules to expose commerce features through the REST APIs. | |
| - Serverless Application: Use the Commerce Modules in a serverless application, such as a Next.js application, without having to manage a fully-fledged ecommerce system. You can use it by installing it in your Node.js project as an NPM package. | |
| - Node.js Application: Use the Commerce Modules in any Node.js application by installing it with NPM. | |
| # API Key Module | |
| In this section of the documentation, you will find resources to learn more about the API Key Module and how to use it in your application. | |
| Medusa has API-key related features available out-of-the-box through the API Key Module. A [module](https://docs.medusajs.com/docs/learn/fundamentals/modules/index.html.md) is a standalone package that provides features for a single domain. Each of Medusa's commerce features are placed in commerce modules, such as this API Key Module. | |
| Learn more about why modules are isolated in [this documentation](https://docs.medusajs.com/docs/learn/fundamentals/modules/isolation/index.html.md). | |
| ## API Key Features | |
| - [API Key Types and Management](https://docs.medusajs.com/Users/shahednasser/medusa/www/apps/resources/app/commerce-modules/api-key/concepts/index.html.md): Manage API keys in your store. You can create both publishable and secret API keys for different use cases. | |
| - [Token Verification](https://docs.medusajs.com/Users/shahednasser/medusa/www/apps/resources/app/commerce-modules/api-key/concepts#token-verification/index.html.md): Verify tokens of secret API keys to authenticate users or actions. | |
| - [Revoke Keys](https://docs.medusajs.com/Users/shahednasser/medusa/www/apps/resources/app/commerce-modules/api-key/concepts#api-key-expiration/index.html.md): Revoke keys to disable their use permanently. | |
| - Roll API Keys: Roll API keys by [revoking](https://docs.medusajs.com/references/api-key/revoke/index.html.md) a key then [re-creating it](https://docs.medusajs.com/references/api-key/createApiKeys/index.html.md). | |
| *** | |
| ## How to Use the API Key Module | |
| In your Medusa application, you build flows around commerce modules. A flow is built as a [Workflow](https://docs.medusajs.com/docs/learn/fundamentals/workflows/index.html.md), which is a special function composed of a series of steps that guarantees data consistency and reliable roll-back mechanism. | |
| You can build custom workflows and steps. You can also re-use Medusa's workflows and steps, which are provided by the `@medusajs/medusa/core-flows` package. | |
| For example: | |
| ```ts title="src/workflows/create-api-key.ts" highlights={highlights} | |
| import { | |
| createWorkflow, | |
| WorkflowResponse, | |
| createStep, | |
| StepResponse, | |
| } from "@medusajs/framework/workflows-sdk" | |
| import { Modules } from "@medusajs/framework/utils" | |
| const createApiKeyStep = createStep( | |
| "create-api-key", | |
| async ({}, { container }) => { | |
| const apiKeyModuleService = container.resolve(Modules.API_KEY) | |
| const apiKey = await apiKeyModuleService.createApiKeys({ | |
| title: "Publishable API key", | |
| type: "publishable", | |
| created_by: "user_123", | |
| }) | |
| return new StepResponse({ apiKey }, apiKey.id) | |
| }, | |
| async (apiKeyId, { container }) => { | |
| const apiKeyModuleService = container.resolve(Modules.API_KEY) | |
| await apiKeyModuleService.deleteApiKeys([apiKeyId]) | |
| } | |
| ) | |
| export const createApiKeyWorkflow = createWorkflow( | |
| "create-api-key", | |
| () => { | |
| const { apiKey } = createApiKeyStep() | |
| return new WorkflowResponse({ | |
| apiKey, | |
| }) | |
| } | |
| ) | |
| ``` | |
| You can then execute the workflow in your custom API routes, scheduled jobs, or subscribers: | |
| ### API Route | |
| ```ts title="src/api/workflow/route.ts" highlights={[["11"], ["12"]]} collapsibleLines="1-6" expandButtonLabel="Show Imports" | |
| import type { | |
| MedusaRequest, | |
| MedusaResponse, | |
| } from "@medusajs/framework/http" | |
| import { createApiKeyWorkflow } from "../../workflows/create-api-key" | |
| export async function GET( | |
| req: MedusaRequest, | |
| res: MedusaResponse | |
| ) { | |
| const { result } = await createApiKeyWorkflow(req.scope) | |
| .run() | |
| res.send(result) | |
| } | |
| ``` | |
| ### Subscriber | |
| ```ts title="src/subscribers/user-created.ts" highlights={[["11"], ["12"]]} collapsibleLines="1-6" expandButtonLabel="Show Imports" | |
| import { | |
| type SubscriberConfig, | |
| type SubscriberArgs, | |
| } from "@medusajs/framework" | |
| import { createApiKeyWorkflow } from "../workflows/create-api-key" | |
| export default async function handleUserCreated({ | |
| event: { data }, | |
| container, | |
| }: SubscriberArgs<{ id: string }>) { | |
| const { result } = await createApiKeyWorkflow(container) | |
| .run() | |
| console.log(result) | |
| } | |
| export const config: SubscriberConfig = { | |
| event: "user.created", | |
| } | |
| ``` | |
| ### Scheduled Job | |
| ```ts title="src/jobs/run-daily.ts" highlights={[["7"], ["8"]]} | |
| import { MedusaContainer } from "@medusajs/framework/types" | |
| import { createApiKeyWorkflow } from "../workflows/create-api-key" | |
| export default async function myCustomJob( | |
| container: MedusaContainer | |
| ) { | |
| const { result } = await createApiKeyWorkflow(container) | |
| .run() | |
| console.log(result) | |
| } | |
| export const config = { | |
| name: "run-once-a-day", | |
| schedule: `0 0 * * *`, | |
| } | |
| ``` | |
| Learn more about workflows in [this documentation](https://docs.medusajs.com/docs/learn/fundamentals/workflows/index.html.md). | |
| *** | |
| # Auth Module | |
| In this section of the documentation, you will find resources to learn more about the Auth Module and how to use it in your application. | |
| Medusa has auth related features available out-of-the-box through the Auth Module. A [module](https://docs.medusajs.com/docs/learn/fundamentals/modules/index.html.md) is a standalone package that provides features for a single domain. Each of Medusa's commerce features are placed in commerce modules, such as this Auth Module. | |
| Learn more about why modules are isolated in [this documentation](https://docs.medusajs.com/docs/learn/fundamentals/modules/isolation/index.html.md). | |
| ## Auth Features | |
| - [Basic User Authentication](https://docs.medusajs.com/Users/shahednasser/medusa/www/apps/resources/app/commerce-modules/auth/authentication-route#1-basic-authentication-flow/index.html.md): Authenticate users using their email and password credentials. | |
| - [Third-Party and Social Authentication](https://docs.medusajs.com/Users/shahednasser/medusa/www/apps/resources/app/commerce-modules/auth/authentication-route#2-third-party-service-authenticate-flow/index.html.md): Authenticate users using third-party services and social platforms, such as [Google](https://docs.medusajs.com/Users/shahednasser/medusa/www/apps/resources/app/commerce-modules/auth/auth-providers/google/index.html.md) and [GitHub](https://docs.medusajs.com/Users/shahednasser/medusa/www/apps/resources/app/commerce-modules/auth/auth-providers/github/index.html.md). | |
| - [Authenticate Custom Actor Types](https://docs.medusajs.com/Users/shahednasser/medusa/www/apps/resources/app/commerce-modules/auth/create-actor-type/index.html.md): Create custom user or actor types, such as managers, authenticate them in your application, and guard routes based on the custom user types. | |
| - [Custom Authentication Providers](https://docs.medusajs.com/references/auth/provider/index.html.md): Integrate third-party services with custom authentication providors. | |
| *** | |
| ## How to Use the Auth Module | |
| In your Medusa application, you build flows around commerce modules. A flow is built as a [Workflow](https://docs.medusajs.com/docs/learn/fundamentals/workflows/index.html.md), which is a special function composed of a series of steps that guarantees data consistency and reliable roll-back mechanism. | |
| You can build custom workflows and steps. You can also re-use Medusa's workflows and steps, which are provided by the `@medusajs/medusa/core-flows` package. | |
| For example: | |
| ```ts title="src/workflows/authenticate-user.ts" highlights={highlights} | |
| import { | |
| createWorkflow, | |
| WorkflowResponse, | |
| createStep, | |
| StepResponse, | |
| } from "@medusajs/framework/workflows-sdk" | |
| import { Modules, MedusaError } from "@medusajs/framework/utils" | |
| import { MedusaRequest } from "@medusajs/framework/http" | |
| import { AuthenticationInput } from "@medusajs/framework/types" | |
| type Input = { | |
| req: MedusaRequest | |
| } | |
| const authenticateUserStep = createStep( | |
| "authenticate-user", | |
| async ({ req }: Input, { container }) => { | |
| const authModuleService = container.resolve(Modules.AUTH) | |
| const { success, authIdentity, error } = await authModuleService | |
| .authenticate( | |
| "emailpass", | |
| { | |
| url: req.url, | |
| headers: req.headers, | |
| query: req.query, | |
| body: req.body, | |
| authScope: "admin", // or custom actor type | |
| protocol: req.protocol, | |
| } as AuthenticationInput | |
| ) | |
| if (!success) { | |
| // incorrect authentication details | |
| throw new MedusaError( | |
| MedusaError.Types.UNAUTHORIZED, | |
| error || "Incorrect authentication details" | |
| ) | |
| } | |
| return new StepResponse({ authIdentity }, authIdentity?.id) | |
| }, | |
| async (authIdentityId, { container }) => { | |
| if (!authIdentityId) { | |
| return | |
| } | |
| const authModuleService = container.resolve(Modules.AUTH) | |
| await authModuleService.deleteAuthIdentities([authIdentityId]) | |
| } | |
| ) | |
| export const authenticateUserWorkflow = createWorkflow( | |
| "authenticate-user", | |
| (input: Input) => { | |
| const { authIdentity } = authenticateUserStep(input) | |
| return new WorkflowResponse({ | |
| authIdentity, | |
| }) | |
| } | |
| ) | |
| ``` | |
| You can then execute the workflow in your custom API routes, scheduled jobs, or subscribers: | |
| ```ts title="API Route" highlights={[["11"], ["12"]]} collapsibleLines="1-6" expandButtonLabel="Show Imports" | |
| import type { | |
| MedusaRequest, | |
| MedusaResponse, | |
| } from "@medusajs/framework/http" | |
| import { authenticateUserWorkflow } from "../../workflows/authenticate-user" | |
| export async function GET( | |
| req: MedusaRequest, | |
| res: MedusaResponse | |
| ) { | |
| const { result } = await authenticateUserWorkflow(req.scope) | |
| .run({ | |
| req, | |
| }) | |
| res.send(result) | |
| } | |
| ``` | |
| Learn more about workflows in [this documentation](https://docs.medusajs.com/docs/learn/fundamentals/workflows/index.html.md). | |
| *** | |
| ## Configure Auth Module | |
| The Auth Module accepts options for further configurations. Refer to [this documentation](https://docs.medusajs.com/Users/shahednasser/medusa/www/apps/resources/app/commerce-modules/auth/module-options/index.html.md) for details on the module's options. | |
| *** | |
| ## Providers | |
| Medusa provides the following authentication providers out-of-the-box. You can use them to authenticate admin users, customers, or custom actor types. | |
| *** | |
| # Currency Module | |
| In this section of the documentation, you will find resources to learn more about the Currency Module and how to use it in your application. | |
| Medusa has currency related features available out-of-the-box through the Currency Module. A [module](https://docs.medusajs.com/docs/learn/fundamentals/modules/index.html.md) is a standalone package that provides features for a single domain. Each of Medusa's commerce features are placed in commerce modules, such as this Currency Module. | |
| Learn more about why modules are isolated in [this documentation](https://docs.medusajs.com/docs/learn/fundamentals/modules/isolation/index.html.md). | |
| ## Currency Features | |
| - [Currency Management and Retrieval](https://docs.medusajs.com/references/currency/listAndCountCurrencies/index.html.md): This module adds all common currencies to your application and allows you to retrieve them. | |
| - [Support Currencies in Modules](https://docs.medusajs.com/Users/shahednasser/medusa/www/apps/resources/app/commerce-modules/currency/links-to-other-modules/index.html.md): Other commerce modules use currency codes in their data models or operations. Use the Currency Module to retrieve a currency code and its details. | |
| *** | |
| ## How to Use the Currency Module | |
| In your Medusa application, you build flows around commerce modules. A flow is built as a [Workflow](https://docs.medusajs.com/docs/learn/fundamentals/workflows/index.html.md), which is a special function composed of a series of steps that guarantees data consistency and reliable roll-back mechanism. | |
| You can build custom workflows and steps. You can also re-use Medusa's workflows and steps, which are provided by the `@medusajs/medusa/core-flows` package. | |
| For example: | |
| ```ts title="src/workflows/retrieve-price-with-currency.ts" highlights={highlights} | |
| import { | |
| createWorkflow, | |
| WorkflowResponse, | |
| createStep, | |
| StepResponse, | |
| transform, | |
| } from "@medusajs/framework/workflows-sdk" | |
| import { Modules } from "@medusajs/framework/utils" | |
| const retrieveCurrencyStep = createStep( | |
| "retrieve-currency", | |
| async ({}, { container }) => { | |
| const currencyModuleService = container.resolve(Modules.CURRENCY) | |
| const currency = await currencyModuleService | |
| .retrieveCurrency("usd") | |
| return new StepResponse({ currency }) | |
| } | |
| ) | |
| type Input = { | |
| price: number | |
| } | |
| export const retrievePriceWithCurrency = createWorkflow( | |
| "create-currency", | |
| (input: Input) => { | |
| const { currency } = retrieveCurrencyStep() | |
| const formattedPrice = transform({ | |
| input, | |
| currency, | |
| }, (data) => { | |
| return `${data.currency.symbol}${data.input.price}` | |
| }) | |
| return new WorkflowResponse({ | |
| formattedPrice, | |
| }) | |
| } | |
| ) | |
| ``` | |
| You can then execute the workflow in your custom API routes, scheduled jobs, or subscribers: | |
| ### API Route | |
| ```ts title="src/api/workflow/route.ts" highlights={[["11"], ["12"], ["13"], ["14"]]} collapsibleLines="1-6" expandButtonLabel="Show Imports" | |
| import type { | |
| MedusaRequest, | |
| MedusaResponse, | |
| } from "@medusajs/framework/http" | |
| import { retrievePriceWithCurrency } from "../../workflows/retrieve-price-with-currency" | |
| export async function GET( | |
| req: MedusaRequest, | |
| res: MedusaResponse | |
| ) { | |
| const { result } = await retrievePriceWithCurrency(req.scope) | |
| .run({ | |
| price: 10, | |
| }) | |
| res.send(result) | |
| } | |
| ``` | |
| ### Subscriber | |
| ```ts title="src/subscribers/user-created.ts" highlights={[["11"], ["12"], ["13"], ["14"]]} collapsibleLines="1-6" expandButtonLabel="Show Imports" | |
| import { | |
| type SubscriberConfig, | |
| type SubscriberArgs, | |
| } from "@medusajs/framework" | |
| import { retrievePriceWithCurrency } from "../workflows/retrieve-price-with-currency" | |
| export default async function handleUserCreated({ | |
| event: { data }, | |
| container, | |
| }: SubscriberArgs<{ id: string }>) { | |
| const { result } = await retrievePriceWithCurrency(container) | |
| .run({ | |
| price: 10, | |
| }) | |
| console.log(result) | |
| } | |
| export const config: SubscriberConfig = { | |
| event: "user.created", | |
| } | |
| ``` | |
| ### Scheduled Job | |
| ```ts title="src/jobs/run-daily.ts" highlights={[["7"], ["8"], ["9"], ["10"]]} | |
| import { MedusaContainer } from "@medusajs/framework/types" | |
| import { retrievePriceWithCurrency } from "../workflows/retrieve-price-with-currency" | |
| export default async function myCustomJob( | |
| container: MedusaContainer | |
| ) { | |
| const { result } = await retrievePriceWithCurrency(container) | |
| .run({ | |
| price: 10, | |
| }) | |
| console.log(result) | |
| } | |
| export const config = { | |
| name: "run-once-a-day", | |
| schedule: `0 0 * * *`, | |
| } | |
| ``` | |
| Learn more about workflows in [this documentation](https://docs.medusajs.com/docs/learn/fundamentals/workflows/index.html.md). | |
| *** | |
| # Customer Module | |
| In this section of the documentation, you will find resources to learn more about the Customer Module and how to use it in your application. | |
| Medusa has customer related features available out-of-the-box through the Customer Module. A [module](https://docs.medusajs.com/docs/learn/fundamentals/modules/index.html.md) is a standalone package that provides features for a single domain. Each of Medusa's commerce features are placed in commerce modules, such as this Customer Module. | |
| Learn more about why modules are isolated in [this documentation](https://docs.medusajs.com/docs/learn/fundamentals/modules/isolation/index.html.md). | |
| ## Customer Features | |
| - [Customer Management](https://docs.medusajs.com/Users/shahednasser/medusa/www/apps/resources/app/commerce-modules/customer/customer-accounts/index.html.md): Store and manage guest and registered customers in your store. | |
| - [Customer Organization](https://docs.medusajs.com/references/customer/models/index.html.md): Organize customers into groups. This has a lot of benefits and supports many use cases, such as provide discounts for specific customer groups using the [Promotion Module](https://docs.medusajs.com/Users/shahednasser/medusa/www/apps/resources/app/commerce-modules/promotion/index.html.md). | |
| *** | |
| ## How to Use the Customer Module | |
| In your Medusa application, you build flows around commerce modules. A flow is built as a [Workflow](https://docs.medusajs.com/docs/learn/fundamentals/workflows/index.html.md), which is a special function composed of a series of steps that guarantees data consistency and reliable roll-back mechanism. | |
| You can build custom workflows and steps. You can also re-use Medusa's workflows and steps, which are provided by the `@medusajs/medusa/core-flows` package. | |
| For example: | |
| ```ts title="src/workflows/create-customer.ts" highlights={highlights} | |
| import { | |
| createWorkflow, | |
| WorkflowResponse, | |
| createStep, | |
| StepResponse, | |
| } from "@medusajs/framework/workflows-sdk" | |
| import { Modules } from "@medusajs/framework/utils" | |
| const createCustomerStep = createStep( | |
| "create-customer", | |
| async ({}, { container }) => { | |
| const customerModuleService = container.resolve(Modules.CUSTOMER) | |
| const customer = await customerModuleService.createCustomers({ | |
| first_name: "Peter", | |
| last_name: "Hayes", | |
| email: "[email protected]", | |
| }) | |
| return new StepResponse({ customer }, customer.id) | |
| }, | |
| async (customerId, { container }) => { | |
| if (!customerId) { | |
| return | |
| } | |
| const customerModuleService = container.resolve(Modules.CUSTOMER) | |
| await customerModuleService.deleteCustomers([customerId]) | |
| } | |
| ) | |
| export const createCustomerWorkflow = createWorkflow( | |
| "create-customer", | |
| () => { | |
| const { customer } = createCustomerStep() | |
| return new WorkflowResponse({ | |
| customer, | |
| }) | |
| } | |
| ) | |
| ``` | |
| You can then execute the workflow in your custom API routes, scheduled jobs, or subscribers: | |
| ### API Route | |
| ```ts title="src/api/workflow/route.ts" highlights={[["11"], ["12"]]} collapsibleLines="1-6" expandButtonLabel="Show Imports" | |
| import type { | |
| MedusaRequest, | |
| MedusaResponse, | |
| } from "@medusajs/framework/http" | |
| import { createCustomerWorkflow } from "../../workflows/create-customer" | |
| export async function GET( | |
| req: MedusaRequest, | |
| res: MedusaResponse | |
| ) { | |
| const { result } = await createCustomerWorkflow(req.scope) | |
| .run() | |
| res.send(result) | |
| } | |
| ``` | |
| ### Subscriber | |
| ```ts title="src/subscribers/user-created.ts" highlights={[["11"], ["12"]]} collapsibleLines="1-6" expandButtonLabel="Show Imports" | |
| import { | |
| type SubscriberConfig, | |
| type SubscriberArgs, | |
| } from "@medusajs/framework" | |
| import { createCustomerWorkflow } from "../workflows/create-customer" | |
| export default async function handleUserCreated({ | |
| event: { data }, | |
| container, | |
| }: SubscriberArgs<{ id: string }>) { | |
| const { result } = await createCustomerWorkflow(container) | |
| .run() | |
| console.log(result) | |
| } | |
| export const config: SubscriberConfig = { | |
| event: "user.created", | |
| } | |
| ``` | |
| ### Scheduled Job | |
| ```ts title="src/jobs/run-daily.ts" highlights={[["7"], ["8"]]} | |
| import { MedusaContainer } from "@medusajs/framework/types" | |
| import { createCustomerWorkflow } from "../workflows/create-customer" | |
| export default async function myCustomJob( | |
| container: MedusaContainer | |
| ) { | |
| const { result } = await createCustomerWorkflow(container) | |
| .run() | |
| console.log(result) | |
| } | |
| export const config = { | |
| name: "run-once-a-day", | |
| schedule: `0 0 * * *`, | |
| } | |
| ``` | |
| Learn more about workflows in [this documentation](https://docs.medusajs.com/docs/learn/fundamentals/workflows/index.html.md). | |
| *** | |
| # Cart Module | |
| In this section of the documentation, you will find resources to learn more about the Cart Module and how to use it in your application. | |
| Medusa has cart related features available out-of-the-box through the Cart Module. A [module](https://docs.medusajs.com/docs/learn/fundamentals/modules/index.html.md) is a standalone package that provides features for a single domain. Each of Medusa's commerce features are placed in commerce modules, such as this Cart Module. | |
| Learn more about why modules are isolated in [this documentation](https://docs.medusajs.com/docs/learn/fundamentals/modules/isolation/index.html.md). | |
| ## Cart Features | |
| - [Cart Management](https://docs.medusajs.com/Users/shahednasser/medusa/www/apps/resources/app/commerce-modules/cart/concepts/index.html.md): Store and manage carts, including their addresses, line items, shipping methods, and more. | |
| - [Apply Promotion Adjustments](https://docs.medusajs.com/Users/shahednasser/medusa/www/apps/resources/app/commerce-modules/cart/promotions/index.html.md): Apply promotions or discounts to line items and shipping methods by adding adjustment lines that are factored into their subtotals. | |
| - [Apply Tax Lines](https://docs.medusajs.com/Users/shahednasser/medusa/www/apps/resources/app/commerce-modules/cart/tax-lines/index.html.md): Apply tax lines to line items and shipping methods. | |
| - [Cart Scoping](https://docs.medusajs.com/Users/shahednasser/medusa/www/apps/resources/app/commerce-modules/cart/links-to-other-modules/index.html.md): When used in the Medusa application, Medusa creates links to other commerce modules, scoping a cart to a sales channel, region, and a customer. | |
| *** | |
| ## How to Use the Cart Module | |
| In your Medusa application, you build flows around commerce modules. A flow is built as a [Workflow](https://docs.medusajs.com/docs/learn/fundamentals/workflows/index.html.md), which is a special function composed of a series of steps that guarantees data consistency and reliable roll-back mechanism. | |
| You can build custom workflows and steps. You can also re-use Medusa's workflows and steps, which are provided by the `@medusajs/medusa/core-flows` package. | |
| For example: | |
| ```ts title="src/workflows/create-cart.ts" highlights={highlights} | |
| import { | |
| createWorkflow, | |
| WorkflowResponse, | |
| createStep, | |
| StepResponse, | |
| } from "@medusajs/framework/workflows-sdk" | |
| import { Modules } from "@medusajs/framework/utils" | |
| const createCartStep = createStep( | |
| "create-cart", | |
| async ({}, { container }) => { | |
| const cartModuleService = container.resolve(Modules.CART) | |
| const cart = await cartModuleService.createCarts({ | |
| currency_code: "usd", | |
| shipping_address: { | |
| address_1: "1512 Barataria Blvd", | |
| country_code: "us", | |
| }, | |
| items: [ | |
| { | |
| title: "Shirt", | |
| unit_price: 1000, | |
| quantity: 1, | |
| }, | |
| ], | |
| }) | |
| return new StepResponse({ cart }, cart.id) | |
| }, | |
| async (cartId, { container }) => { | |
| if (!cartId) { | |
| return | |
| } | |
| const cartModuleService = container.resolve(Modules.CART) | |
| await cartModuleService.deleteCarts([cartId]) | |
| } | |
| ) | |
| export const createCartWorkflow = createWorkflow( | |
| "create-cart", | |
| () => { | |
| const { cart } = createCartStep() | |
| return new WorkflowResponse({ | |
| cart, | |
| }) | |
| } | |
| ) | |
| ``` | |
| You can then execute the workflow in your custom API routes, scheduled jobs, or subscribers: | |
| ### API Route | |
| ```ts title="src/api/workflow/route.ts" highlights={[["11"], ["12"]]} collapsibleLines="1-6" expandButtonLabel="Show Imports" | |
| import type { | |
| MedusaRequest, | |
| MedusaResponse, | |
| } from "@medusajs/framework/http" | |
| import { createCartWorkflow } from "../../workflows/create-cart" | |
| export async function GET( | |
| req: MedusaRequest, | |
| res: MedusaResponse | |
| ) { | |
| const { result } = await createCartWorkflow(req.scope) | |
| .run() | |
| res.send(result) | |
| } | |
| ``` | |
| ### Subscriber | |
| ```ts title="src/subscribers/user-created.ts" highlights={[["11"], ["12"]]} collapsibleLines="1-6" expandButtonLabel="Show Imports" | |
| import { | |
| type SubscriberConfig, | |
| type SubscriberArgs, | |
| } from "@medusajs/framework" | |
| import { createCartWorkflow } from "../workflows/create-cart" | |
| export default async function handleUserCreated({ | |
| event: { data }, | |
| container, | |
| }: SubscriberArgs<{ id: string }>) { | |
| const { result } = await createCartWorkflow(container) | |
| .run() | |
| console.log(result) | |
| } | |
| export const config: SubscriberConfig = { | |
| event: "user.created", | |
| } | |
| ``` | |
| ### Scheduled Job | |
| ```ts title="src/jobs/run-daily.ts" highlights={[["7"], ["8"]]} | |
| import { MedusaContainer } from "@medusajs/framework/types" | |
| import { createCartWorkflow } from "../workflows/create-cart" | |
| export default async function myCustomJob( | |
| container: MedusaContainer | |
| ) { | |
| const { result } = await createCartWorkflow(container) | |
| .run() | |
| console.log(result) | |
| } | |
| export const config = { | |
| name: "run-once-a-day", | |
| schedule: `0 0 * * *`, | |
| } | |
| ``` | |
| Learn more about workflows in [this documentation](https://docs.medusajs.com/docs/learn/fundamentals/workflows/index.html.md). | |
| *** | |
| # Fulfillment Module | |
| In this section of the documentation, you will find resources to learn more about the Fulfillment Module and how to use it in your application. | |
| Medusa has fulfillment related features available out-of-the-box through the Fulfillment Module. A [module](https://docs.medusajs.com/docs/learn/fundamentals/modules/index.html.md) is a standalone package that provides features for a single domain. Each of Medusa's commerce features are placed in commerce modules, such as this Fulfillment Module. | |
| Learn more about why modules are isolated in [this documentation](https://docs.medusajs.com/docs/learn/fundamentals/modules/isolation/index.html.md). | |
| ## Fulfillment Features | |
| - [Fulfillment Management](https://docs.medusajs.com/Users/shahednasser/medusa/www/apps/resources/app/commerce-modules/fulfillment/item-fulfillment/index.html.md): Create fulfillments and keep track of their status, items, and more. | |
| - [Integrate Third-Party Fulfillment Providers](https://docs.medusajs.com/Users/shahednasser/medusa/www/apps/resources/app/commerce-modules/fulfillment/fulfillment-provider/index.html.md): Create third-party fulfillment providers to provide customers with shipping options and fulfill their orders. | |
| - [Restrict By Location and Rules](https://docs.medusajs.com/Users/shahednasser/medusa/www/apps/resources/app/commerce-modules/fulfillment/shipping-option/index.html.md): Shipping options can be restricted to specific geographical locations. You can also specify custom rules to restrict shipping options. | |
| - [Support Different Fulfillment Forms](https://docs.medusajs.com/Users/shahednasser/medusa/www/apps/resources/app/commerce-modules/fulfillment/concepts/index.html.md): Support various fulfillment forms, such as shipping or pick up. | |
| *** | |
| ## How to Use the Fulfillment Module | |
| In your Medusa application, you build flows around commerce modules. A flow is built as a [Workflow](https://docs.medusajs.com/docs/learn/fundamentals/workflows/index.html.md), which is a special function composed of a series of steps that guarantees data consistency and reliable roll-back mechanism. | |
| You can build custom workflows and steps. You can also re-use Medusa's workflows and steps, which are provided by the `@medusajs/medusa/core-flows` package. | |
| For example: | |
| ```ts title="src/workflows/create-fulfillment.ts" highlights={highlights} | |
| import { | |
| createWorkflow, | |
| WorkflowResponse, | |
| createStep, | |
| StepResponse, | |
| } from "@medusajs/framework/workflows-sdk" | |
| import { Modules } from "@medusajs/framework/utils" | |
| const createFulfillmentStep = createStep( | |
| "create-fulfillment", | |
| async ({}, { container }) => { | |
| const fulfillmentModuleService = container.resolve(Modules.FULFILLMENT) | |
| const fulfillment = await fulfillmentModuleService.createFulfillment({ | |
| location_id: "loc_123", | |
| provider_id: "webshipper", | |
| delivery_address: { | |
| country_code: "us", | |
| city: "Strongsville", | |
| address_1: "18290 Royalton Rd", | |
| }, | |
| items: [ | |
| { | |
| title: "Shirt", | |
| sku: "SHIRT", | |
| quantity: 1, | |
| barcode: "123456", | |
| }, | |
| ], | |
| labels: [], | |
| order: {}, | |
| }) | |
| return new StepResponse({ fulfillment }, fulfillment.id) | |
| }, | |
| async (fulfillmentId, { container }) => { | |
| if (!fulfillmentId) { | |
| return | |
| } | |
| const fulfillmentModuleService = container.resolve(Modules.FULFILLMENT) | |
| await fulfillmentModuleService.deleteFulfillment(fulfillmentId) | |
| } | |
| ) | |
| export const createFulfillmentWorkflow = createWorkflow( | |
| "create-fulfillment", | |
| () => { | |
| const { fulfillment } = createFulfillmentStep() | |
| return new WorkflowResponse({ | |
| fulfillment, | |
| }) | |
| } | |
| ) | |
| ``` | |
| You can then execute the workflow in your custom API routes, scheduled jobs, or subscribers: | |
| ### API Route | |
| ```ts title="src/api/workflow/route.ts" highlights={[["11"], ["12"]]} collapsibleLines="1-6" expandButtonLabel="Show Imports" | |
| import type { | |
| MedusaRequest, | |
| MedusaResponse, | |
| } from "@medusajs/framework/http" | |
| import { createFulfillmentWorkflow } from "../../workflows/create-fuilfillment" | |
| export async function GET( | |
| req: MedusaRequest, | |
| res: MedusaResponse | |
| ) { | |
| const { result } = await createFulfillmentWorkflow(req.scope) | |
| .run() | |
| res.send(result) | |
| } | |
| ``` | |
| ### Subscriber | |
| ```ts title="src/subscribers/user-created.ts" highlights={[["11"], ["12"]]} collapsibleLines="1-6" expandButtonLabel="Show Imports" | |
| import { | |
| type SubscriberConfig, | |
| type SubscriberArgs, | |
| } from "@medusajs/framework" | |
| import { createFulfillmentWorkflow } from "../workflows/create-fuilfillment" | |
| export default async function handleUserCreated({ | |
| event: { data }, | |
| container, | |
| }: SubscriberArgs<{ id: string }>) { | |
| const { result } = await createFulfillmentWorkflow(container) | |
| .run() | |
| console.log(result) | |
| } | |
| export const config: SubscriberConfig = { | |
| event: "user.created", | |
| } | |
| ``` | |
| ### Scheduled Job | |
| ```ts title="src/jobs/run-daily.ts" highlights={[["7"], ["8"]]} | |
| import { MedusaContainer } from "@medusajs/framework/types" | |
| import { createFulfillmentWorkflow } from "../workflows/create-fuilfillment" | |
| export default async function myCustomJob( | |
| container: MedusaContainer | |
| ) { | |
| const { result } = await createFulfillmentWorkflow(container) | |
| .run() | |
| console.log(result) | |
| } | |
| export const config = { | |
| name: "run-once-a-day", | |
| schedule: `0 0 * * *`, | |
| } | |
| ``` | |
| Learn more about workflows in [this documentation](https://docs.medusajs.com/docs/learn/fundamentals/workflows/index.html.md). | |
| *** | |
| ## Configure Fulfillment Module | |
| The Fulfillment Module accepts options for further configurations. Refer to [this documentation](https://docs.medusajs.com/Users/shahednasser/medusa/www/apps/resources/app/commerce-modules/fulfillment/module-options/index.html.md) for details on the module's options. | |
| *** | |
| # Inventory Module | |
| In this section of the documentation, you will find resources to learn more about the Inventory Module and how to use it in your application. | |
| Medusa has inventory related features available out-of-the-box through the Inventory Module. A [module](https://docs.medusajs.com/docs/learn/fundamentals/modules/index.html.md) is a standalone package that provides features for a single domain. Each of Medusa's commerce features are placed in commerce modules, such as this Inventory Module. | |
| Learn more about why modules are isolated in [this documentation](https://docs.medusajs.com/docs/learn/fundamentals/modules/isolation/index.html.md). | |
| ## Inventory Features | |
| - [Inventory Items Management](https://docs.medusajs.com/Users/shahednasser/medusa/www/apps/resources/app/commerce-modules/inventory/concepts/index.html.md): Store and manage inventory of any stock-kept item, such as product variants. | |
| - [Inventory Across Locations](https://docs.medusajs.com/Users/shahednasser/medusa/www/apps/resources/app/commerce-modules/inventory/concepts#inventorylevel/index.html.md): Manage inventory levels across different locations, such as warehouses. | |
| - [Reservation Management](https://docs.medusajs.com/Users/shahednasser/medusa/www/apps/resources/app/commerce-modules/inventory/concepts#reservationitem/index.html.md): Reserve quantities of inventory items at specific locations for orders or other purposes. | |
| - [Check Inventory Availability](https://docs.medusajs.com/references/inventory-next/confirmInventory/index.html.md): Check whether an inventory item has the necessary quantity for purchase. | |
| - [Inventory Kits](https://docs.medusajs.com/Users/shahednasser/medusa/www/apps/resources/app/commerce-modules/inventory/inventory-kit/index.html.md): Create and manage inventory kits for a single product, allowing you to implement use cases like bundled or multi-part products. | |
| *** | |
| ## How to Use the Inventory Module | |
| In your Medusa application, you build flows around commerce modules. A flow is built as a [Workflow](https://docs.medusajs.com/docs/learn/fundamentals/workflows/index.html.md), which is a special function composed of a series of steps that guarantees data consistency and reliable roll-back mechanism. | |
| You can build custom workflows and steps. You can also re-use Medusa's workflows and steps, which are provided by the `@medusajs/medusa/core-flows` package. | |
| For example: | |
| ```ts title="src/workflows/create-inventory-item.ts" highlights={highlights} | |
| import { | |
| createWorkflow, | |
| WorkflowResponse, | |
| createStep, | |
| StepResponse, | |
| } from "@medusajs/framework/workflows-sdk" | |
| import { Modules } from "@medusajs/framework/utils" | |
| const createInventoryItemStep = createStep( | |
| "create-inventory-item", | |
| async ({}, { container }) => { | |
| const inventoryModuleService = container.resolve(Modules.INVENTORY) | |
| const inventoryItem = await inventoryModuleService.createInventoryItems({ | |
| sku: "SHIRT", | |
| title: "Green Medusa Shirt", | |
| requires_shipping: true, | |
| }) | |
| return new StepResponse({ inventoryItem }, inventoryItem.id) | |
| }, | |
| async (inventoryItemId, { container }) => { | |
| if (!inventoryItemId) { | |
| return | |
| } | |
| const inventoryModuleService = container.resolve(Modules.INVENTORY) | |
| await inventoryModuleService.deleteInventoryItems([inventoryItemId]) | |
| } | |
| ) | |
| export const createInventoryItemWorkflow = createWorkflow( | |
| "create-inventory-item-workflow", | |
| () => { | |
| const { inventoryItem } = createInventoryItemStep() | |
| return new WorkflowResponse({ | |
| inventoryItem, | |
| }) | |
| } | |
| ) | |
| ``` | |
| You can then execute the workflow in your custom API routes, scheduled jobs, or subscribers: | |
| ### API Route | |
| ```ts title="src/api/workflow/route.ts" highlights={[["11"], ["12"]]} collapsibleLines="1-6" expandButtonLabel="Show Imports" | |
| import type { | |
| MedusaRequest, | |
| MedusaResponse, | |
| } from "@medusajs/framework/http" | |
| import { createInventoryItemWorkflow } from "../../workflows/create-inventory-item" | |
| export async function GET( | |
| req: MedusaRequest, | |
| res: MedusaResponse | |
| ) { | |
| const { result } = await createInventoryItemWorkflow(req.scope) | |
| .run() | |
| res.send(result) | |
| } | |
| ``` | |
| ### Subscriber | |
| ```ts title="src/subscribers/user-created.ts" highlights={[["11"], ["12"]]} collapsibleLines="1-6" expandButtonLabel="Show Imports" | |
| import { | |
| type SubscriberConfig, | |
| type SubscriberArgs, | |
| } from "@medusajs/framework" | |
| import { createInventoryItemWorkflow } from "../workflows/create-inventory-item" | |
| export default async function handleUserCreated({ | |
| event: { data }, | |
| container, | |
| }: SubscriberArgs<{ id: string }>) { | |
| const { result } = await createInventoryItemWorkflow(container) | |
| .run() | |
| console.log(result) | |
| } | |
| export const config: SubscriberConfig = { | |
| event: "user.created", | |
| } | |
| ``` | |
| ### Scheduled Job | |
| ```ts title="src/jobs/run-daily.ts" highlights={[["7"], ["8"]]} | |
| import { MedusaContainer } from "@medusajs/framework/types" | |
| import { createInventoryItemWorkflow } from "../workflows/create-inventory-item" | |
| export default async function myCustomJob( | |
| container: MedusaContainer | |
| ) { | |
| const { result } = await createInventoryItemWorkflow(container) | |
| .run() | |
| console.log(result) | |
| } | |
| export const config = { | |
| name: "run-once-a-day", | |
| schedule: `0 0 * * *`, | |
| } | |
| ``` | |
| Learn more about workflows in [this documentation](https://docs.medusajs.com/docs/learn/fundamentals/workflows/index.html.md). | |
| *** | |
| # Order Module | |
| In this section of the documentation, you will find resources to learn more about the Order Module and how to use it in your application. | |
| Medusa has order related features available out-of-the-box through the Order Module. A [module](https://docs.medusajs.com/docs/learn/fundamentals/modules/index.html.md) is a standalone package that provides features for a single domain. Each of Medusa's commerce features are placed in commerce modules, such as this Order Module. | |
| Learn more about why modules are isolated in [this documentation](https://docs.medusajs.com/docs/learn/fundamentals/modules/isolation/index.html.md). | |
| ## Order Features | |
| - [Order Management](https://docs.medusajs.com/Users/shahednasser/medusa/www/apps/resources/app/commerce-modules/order/concepts/index.html.md): Store and manage your orders to retrieve, create, cancel, and perform other operations. | |
| - Draft Orders: Allow merchants to create orders on behalf of their customers as draft orders that later are transformed to regular orders. | |
| - [Apply Promotion Adjustments](https://docs.medusajs.com/Users/shahednasser/medusa/www/apps/resources/app/commerce-modules/order/promotion-adjustments/index.html.md): Apply promotions or discounts to the order's items and shipping methods by adding adjustment lines that are factored into their subtotals. | |
| - [Apply Tax Lines](https://docs.medusajs.com/Users/shahednasser/medusa/www/apps/resources/app/commerce-modules/order/tax-lines/index.html.md): Apply tax lines to an order's line items and shipping methods. | |
| - [Returns](https://docs.medusajs.com/Users/shahednasser/medusa/www/apps/resources/app/commerce-modules/order/return/index.html.md), [Edits](https://docs.medusajs.com/Users/shahednasser/medusa/www/apps/resources/app/commerce-modules/order/edit/index.html.md), [Exchanges](https://docs.medusajs.com/Users/shahednasser/medusa/www/apps/resources/app/commerce-modules/order/exchange/index.html.md), and [Claims](https://docs.medusajs.com/Users/shahednasser/medusa/www/apps/resources/app/commerce-modules/order/claim/index.html.md): Make [changes](https://docs.medusajs.com/Users/shahednasser/medusa/www/apps/resources/app/commerce-modules/order/order-change/index.html.md) to an order to edit, return, or exchange its items, with [version-based control](https://docs.medusajs.com/Users/shahednasser/medusa/www/apps/resources/app/commerce-modules/order/order-versioning/index.html.md) over the order's timeline. | |
| *** | |
| ## How to Use the Order Module | |
| In your Medusa application, you build flows around commerce modules. A flow is built as a [Workflow](https://docs.medusajs.com/docs/learn/fundamentals/workflows/index.html.md), which is a special function composed of a series of steps that guarantees data consistency and reliable roll-back mechanism. | |
| You can build custom workflows and steps. You can also re-use Medusa's workflows and steps, which are provided by the `@medusajs/medusa/core-flows` package. | |
| For example: | |
| ```ts title="src/workflows/create-draft-order.ts" highlights={highlights} | |
| import { | |
| createWorkflow, | |
| WorkflowResponse, | |
| createStep, | |
| StepResponse, | |
| } from "@medusajs/framework/workflows-sdk" | |
| import { Modules } from "@medusajs/framework/utils" | |
| const createDraftOrderStep = createStep( | |
| "create-order", | |
| async ({}, { container }) => { | |
| const orderModuleService = container.resolve(Modules.ORDER) | |
| const draftOrder = await orderModuleService.createOrders({ | |
| currency_code: "usd", | |
| items: [ | |
| { | |
| title: "Shirt", | |
| quantity: 1, | |
| unit_price: 3000, | |
| }, | |
| ], | |
| shipping_methods: [ | |
| { | |
| name: "Express shipping", | |
| amount: 3000, | |
| }, | |
| ], | |
| status: "draft", | |
| }) | |
| return new StepResponse({ draftOrder }, draftOrder.id) | |
| }, | |
| async (draftOrderId, { container }) => { | |
| if (!draftOrderId) { | |
| return | |
| } | |
| const orderModuleService = container.resolve(Modules.ORDER) | |
| await orderModuleService.deleteOrders([draftOrderId]) | |
| } | |
| ) | |
| export const createDraftOrderWorkflow = createWorkflow( | |
| "create-draft-order", | |
| () => { | |
| const { draftOrder } = createDraftOrderStep() | |
| return new WorkflowResponse({ | |
| draftOrder, | |
| }) | |
| } | |
| ) | |
| ``` | |
| You can then execute the workflow in your custom API routes, scheduled jobs, or subscribers: | |
| ### API Route | |
| ```ts title="src/api/workflow/route.ts" highlights={[["11"], ["12"]]} collapsibleLines="1-6" expandButtonLabel="Show Imports" | |
| import type { | |
| MedusaRequest, | |
| MedusaResponse, | |
| } from "@medusajs/framework/http" | |
| import { createDraftOrderWorkflow } from "../../workflows/create-draft-order" | |
| export async function GET( | |
| req: MedusaRequest, | |
| res: MedusaResponse | |
| ) { | |
| const { result } = await createDraftOrderWorkflow(req.scope) | |
| .run() | |
| res.send(result) | |
| } | |
| ``` | |
| ### Subscriber | |
| ```ts title="src/subscribers/user-created.ts" highlights={[["11"], ["12"]]} collapsibleLines="1-6" expandButtonLabel="Show Imports" | |
| import { | |
| type SubscriberConfig, | |
| type SubscriberArgs, | |
| } from "@medusajs/framework" | |
| import { createDraftOrderWorkflow } from "../workflows/create-draft-order" | |
| export default async function handleUserCreated({ | |
| event: { data }, | |
| container, | |
| }: SubscriberArgs<{ id: string }>) { | |
| const { result } = await createDraftOrderWorkflow(container) | |
| .run() | |
| console.log(result) | |
| } | |
| export const config: SubscriberConfig = { | |
| event: "user.created", | |
| } | |
| ``` | |
| ### Scheduled Job | |
| ```ts title="src/jobs/run-daily.ts" highlights={[["7"], ["8"]]} | |
| import { MedusaContainer } from "@medusajs/framework/types" | |
| import { createDraftOrderWorkflow } from "../workflows/create-draft-order" | |
| export default async function myCustomJob( | |
| container: MedusaContainer | |
| ) { | |
| const { result } = await createDraftOrderWorkflow(container) | |
| .run() | |
| console.log(result) | |
| } | |
| export const config = { | |
| name: "run-once-a-day", | |
| schedule: `0 0 * * *`, | |
| } | |
| ``` | |
| Learn more about workflows in [this documentation](https://docs.medusajs.com/docs/learn/fundamentals/workflows/index.html.md). | |
| *** | |
| # Pricing Module | |
| In this section of the documentation, you will find resources to learn more about the Pricing Module and how to use it in your application. | |
| Medusa has pricing related features available out-of-the-box through the Pricing Module. A [module](https://docs.medusajs.com/docs/learn/fundamentals/modules/index.html.md) is a standalone package that provides features for a single domain. Each of Medusa's commerce features are placed in commerce modules, such as this Pricing Module. | |
| Learn more about why modules are isolated in [this documentation](https://docs.medusajs.com/docs/learn/fundamentals/modules/isolation/index.html.md). | |
| ## Pricing Features | |
| - [Price Management](https://docs.medusajs.com/Users/shahednasser/medusa/www/apps/resources/app/commerce-modules/pricing/concepts/index.html.md): Store and manage prices of a resource, such as a product or a variant. | |
| - [Advanced Rule Engine](https://docs.medusajs.com/Users/shahednasser/medusa/www/apps/resources/app/commerce-modules/pricing/price-rules/index.html.md): Create prices with custom rules to condition prices based on different contexts. | |
| - [Price Lists](https://docs.medusajs.com/Users/shahednasser/medusa/www/apps/resources/app/commerce-modules/pricing/concepts#price-list/index.html.md): Group prices and apply them only in specific conditions with price lists. | |
| - [Price Calculation Strategy](https://docs.medusajs.com/Users/shahednasser/medusa/www/apps/resources/app/commerce-modules/pricing/price-calculation/index.html.md): Retrieve the best price in a given context and for the specified rule values. | |
| - [Tax-Inclusive Pricing](https://docs.medusajs.com/Users/shahednasser/medusa/www/apps/resources/app/commerce-modules/pricing/tax-inclusive-pricing/index.html.md): Calculate prices with taxes included in the price, and Medusa will handle calculating the taxes automatically. | |
| *** | |
| ## How to Use the Pricing Module | |
| In your Medusa application, you build flows around commerce modules. A flow is built as a [Workflow](https://docs.medusajs.com/docs/learn/fundamentals/workflows/index.html.md), which is a special function composed of a series of steps that guarantees data consistency and reliable roll-back mechanism. | |
| You can build custom workflows and steps. You can also re-use Medusa's workflows and steps, which are provided by the `@medusajs/medusa/core-flows` package. | |
| For example: | |
| ```ts title="src/workflows/create-price-set.ts" highlights={highlights} | |
| import { | |
| createWorkflow, | |
| WorkflowResponse, | |
| createStep, | |
| StepResponse, | |
| } from "@medusajs/framework/workflows-sdk" | |
| import { Modules } from "@medusajs/framework/utils" | |
| const createPriceSetStep = createStep( | |
| "create-price-set", | |
| async ({}, { container }) => { | |
| const pricingModuleService = container.resolve(Modules.PRICING) | |
| const priceSet = await pricingModuleService.createPriceSets({ | |
| prices: [ | |
| { | |
| amount: 500, | |
| currency_code: "USD", | |
| }, | |
| { | |
| amount: 400, | |
| currency_code: "EUR", | |
| min_quantity: 0, | |
| max_quantity: 4, | |
| rules: {}, | |
| }, | |
| ], | |
| }) | |
| return new StepResponse({ priceSet }, priceSet.id) | |
| }, | |
| async (priceSetId, { container }) => { | |
| if (!priceSetId) { | |
| return | |
| } | |
| const pricingModuleService = container.resolve(Modules.PRICING) | |
| await pricingModuleService.deletePriceSets([priceSetId]) | |
| } | |
| ) | |
| export const createPriceSetWorkflow = createWorkflow( | |
| "create-price-set", | |
| () => { | |
| const { priceSet } = createPriceSetStep() | |
| return new WorkflowResponse({ | |
| priceSet, | |
| }) | |
| } | |
| ) | |
| ``` | |
| You can then execute the workflow in your custom API routes, scheduled jobs, or subscribers: | |
| ### API Route | |
| ```ts title="src/api/workflow/route.ts" highlights={[["11"], ["12"]]} collapsibleLines="1-6" expandButtonLabel="Show Imports" | |
| import type { | |
| MedusaRequest, | |
| MedusaResponse, | |
| } from "@medusajs/framework/http" | |
| import { createPriceSetWorkflow } from "../../workflows/create-price-set" | |
| export async function GET( | |
| req: MedusaRequest, | |
| res: MedusaResponse | |
| ) { | |
| const { result } = await createPriceSetWorkflow(req.scope) | |
| .run() | |
| res.send(result) | |
| } | |
| ``` | |
| ### Subscriber | |
| ```ts title="src/subscribers/user-created.ts" highlights={[["11"], ["12"]]} collapsibleLines="1-6" expandButtonLabel="Show Imports" | |
| import { | |
| type SubscriberConfig, | |
| type SubscriberArgs, | |
| } from "@medusajs/framework" | |
| import { createPriceSetWorkflow } from "../workflows/create-price-set" | |
| export default async function handleUserCreated({ | |
| event: { data }, | |
| container, | |
| }: SubscriberArgs<{ id: string }>) { | |
| const { result } = await createPriceSetWorkflow(container) | |
| .run() | |
| console.log(result) | |
| } | |
| export const config: SubscriberConfig = { | |
| event: "user.created", | |
| } | |
| ``` | |
| ### Scheduled Job | |
| ```ts title="src/jobs/run-daily.ts" highlights={[["7"], ["8"]]} | |
| import { MedusaContainer } from "@medusajs/framework/types" | |
| import { createPriceSetWorkflow } from "../workflows/create-price-set" | |
| export default async function myCustomJob( | |
| container: MedusaContainer | |
| ) { | |
| const { result } = await createPriceSetWorkflow(container) | |
| .run() | |
| console.log(result) | |
| } | |
| export const config = { | |
| name: "run-once-a-day", | |
| schedule: `0 0 * * *`, | |
| } | |
| ``` | |
| Learn more about workflows in [this documentation](https://docs.medusajs.com/docs/learn/fundamentals/workflows/index.html.md). | |
| *** | |
| # Payment Module | |
| In this section of the documentation, you will find resources to learn more about the Payment Module and how to use it in your application. | |
| Medusa has payment related features available out-of-the-box through the Payment Module. A [module](https://docs.medusajs.com/docs/learn/fundamentals/modules/index.html.md) is a standalone package that provides features for a single domain. Each of Medusa's commerce features are placed in commerce modules, such as this Payment Module. | |
| Learn more about why modules are isolated in [this documentation](https://docs.medusajs.com/docs/learn/fundamentals/modules/isolation/index.html.md). | |
| ## Payment Features | |
| - [Authorize, Capture, and Refund Payments](https://docs.medusajs.com/Users/shahednasser/medusa/www/apps/resources/app/commerce-modules/payment/payment/index.html.md): Authorize, capture, and refund payments for a single resource. | |
| - [Payment Collection Management](https://docs.medusajs.com/Users/shahednasser/medusa/www/apps/resources/app/commerce-modules/payment/payment-collection/index.html.md): Store and manage all payments of a single resources, such as a cart, in payment collections. | |
| - [Integrate Third-Party Payment Providers](https://docs.medusajs.com/Users/shahednasser/medusa/www/apps/resources/app/commerce-modules/payment/payment-provider/index.html.md): Use payment providers like [Stripe](https://docs.medusajs.com/Users/shahednasser/medusa/www/apps/resources/app/commerce-modules/payment/payment-provider/stripe/index.html.md) to handle and process payments, or integrate custom payment providers. | |
| - [Handle Webhook Events](https://docs.medusajs.com/Users/shahednasser/medusa/www/apps/resources/app/commerce-modules/payment/webhook-events/index.html.md): Handle webhook events from third-party providers and process the associated payment. | |
| *** | |
| ## How to Use the Payment Module | |
| In your Medusa application, you build flows around commerce modules. A flow is built as a [Workflow](https://docs.medusajs.com/docs/learn/fundamentals/workflows/index.html.md), which is a special function composed of a series of steps that guarantees data consistency and reliable roll-back mechanism. | |
| You can build custom workflows and steps. You can also re-use Medusa's workflows and steps, which are provided by the `@medusajs/medusa/core-flows` package. | |
| For example: | |
| ```ts title="src/workflows/create-payment-collection.ts" highlights={highlights} | |
| import { | |
| createWorkflow, | |
| WorkflowResponse, | |
| createStep, | |
| StepResponse, | |
| } from "@medusajs/framework/workflows-sdk" | |
| import { Modules } from "@medusajs/framework/utils" | |
| const createPaymentCollectionStep = createStep( | |
| "create-payment-collection", | |
| async ({}, { container }) => { | |
| const paymentModuleService = container.resolve(Modules.PAYMENT) | |
| const paymentCollection = await paymentModuleService.createPaymentCollections({ | |
| currency_code: "usd", | |
| amount: 5000, | |
| }) | |
| return new StepResponse({ paymentCollection }, paymentCollection.id) | |
| }, | |
| async (paymentCollectionId, { container }) => { | |
| if (!paymentCollectionId) { | |
| return | |
| } | |
| const paymentModuleService = container.resolve(Modules.PAYMENT) | |
| await paymentModuleService.deletePaymentCollections([paymentCollectionId]) | |
| } | |
| ) | |
| export const createPaymentCollectionWorkflow = createWorkflow( | |
| "create-payment-collection", | |
| () => { | |
| const { paymentCollection } = createPaymentCollectionStep() | |
| return new WorkflowResponse({ | |
| paymentCollection, | |
| }) | |
| } | |
| ) | |
| ``` | |
| You can then execute the workflow in your custom API routes, scheduled jobs, or subscribers: | |
| ### API Route | |
| ```ts title="src/api/workflow/route.ts" highlights={[["11"], ["12"]]} collapsibleLines="1-6" expandButtonLabel="Show Imports" | |
| import type { | |
| MedusaRequest, | |
| MedusaResponse, | |
| } from "@medusajs/framework/http" | |
| import { createPaymentCollectionWorkflow } from "../../workflows/create-payment-collection" | |
| export async function GET( | |
| req: MedusaRequest, | |
| res: MedusaResponse | |
| ) { | |
| const { result } = await createPaymentCollectionWorkflow(req.scope) | |
| .run() | |
| res.send(result) | |
| } | |
| ``` | |
| ### Subscriber | |
| ```ts title="src/subscribers/user-created.ts" highlights={[["11"], ["12"]]} collapsibleLines="1-6" expandButtonLabel="Show Imports" | |
| import { | |
| type SubscriberConfig, | |
| type SubscriberArgs, | |
| } from "@medusajs/framework" | |
| import { createPaymentCollectionWorkflow } from "../workflows/create-payment-collection" | |
| export default async function handleUserCreated({ | |
| event: { data }, | |
| container, | |
| }: SubscriberArgs<{ id: string }>) { | |
| const { result } = await createPaymentCollectionWorkflow(container) | |
| .run() | |
| console.log(result) | |
| } | |
| export const config: SubscriberConfig = { | |
| event: "user.created", | |
| } | |
| ``` | |
| ### Scheduled Job | |
| ```ts title="src/jobs/run-daily.ts" highlights={[["7"], ["8"]]} | |
| import { MedusaContainer } from "@medusajs/framework/types" | |
| import { createPaymentCollectionWorkflow } from "../workflows/create-payment-collection" | |
| export default async function myCustomJob( | |
| container: MedusaContainer | |
| ) { | |
| const { result } = await createPaymentCollectionWorkflow(container) | |
| .run() | |
| console.log(result) | |
| } | |
| export const config = { | |
| name: "run-once-a-day", | |
| schedule: `0 0 * * *`, | |
| } | |
| ``` | |
| Learn more about workflows in [this documentation](https://docs.medusajs.com/docs/learn/fundamentals/workflows/index.html.md). | |
| *** | |
| ## Configure Payment Module | |
| The Payment Module accepts options for further configurations. Refer to [this documentation](https://docs.medusajs.com/Users/shahednasser/medusa/www/apps/resources/app/commerce-modules/payment/module-options/index.html.md) for details on the module's options. | |
| *** | |
| ## Providers | |
| Medusa provides the following payment providers out-of-the-box. You can use them to process payments for orders, returns, and other resources. | |
| *** | |
| # Promotion Module | |
| In this section of the documentation, you will find resources to learn more about the Promotion Module and how to use it in your application. | |
| Medusa has promotion related features available out-of-the-box through the Promotion Module. A [module](https://docs.medusajs.com/docs/learn/fundamentals/modules/index.html.md) is a standalone package that provides features for a single domain. Each of Medusa's commerce features are placed in commerce modules, such as this Promotion Module. | |
| Learn more about why modules are isolated in [this documentation](https://docs.medusajs.com/docs/learn/fundamentals/modules/isolation/index.html.md). | |
| ## Promotion Features | |
| - [Discount Functionalities](https://docs.medusajs.com/Users/shahednasser/medusa/www/apps/resources/app/commerce-modules/promotion/concepts/index.html.md): A promotion discounts an amount or percentage of a cart's items, shipping methods, or the entire order. | |
| - [Flexible Promotion Rules](https://docs.medusajs.com/Users/shahednasser/medusa/www/apps/resources/app/commerce-modules/promotion/concepts#flexible-rules/index.html.md): A promotion has rules that restricts when the promotion is applied. | |
| - [Campaign Management](https://docs.medusajs.com/Users/shahednasser/medusa/www/apps/resources/app/commerce-modules/promotion/campaign/index.html.md): A campaign combines promotions under the same conditions, such as start and end dates, and budget configurations. | |
| - [Apply Promotion on Carts and Orders](https://docs.medusajs.com/Users/shahednasser/medusa/www/apps/resources/app/commerce-modules/promotion/actions/index.html.md): Apply promotions on carts and orders to discount items, shipping methods, or the entire order. | |
| *** | |
| ## How to Use the Promotion Module | |
| In your Medusa application, you build flows around commerce modules. A flow is built as a [Workflow](https://docs.medusajs.com/docs/learn/fundamentals/workflows/index.html.md), which is a special function composed of a series of steps that guarantees data consistency and reliable roll-back mechanism. | |
| You can build custom workflows and steps. You can also re-use Medusa's workflows and steps, which are provided by the `@medusajs/medusa/core-flows` package. | |
| For example: | |
| ```ts title="src/workflows/create-promotion.ts" highlights={highlights} | |
| import { | |
| createWorkflow, | |
| WorkflowResponse, | |
| createStep, | |
| StepResponse, | |
| } from "@medusajs/framework/workflows-sdk" | |
| import { Modules } from "@medusajs/framework/utils" | |
| const createPromotionStep = createStep( | |
| "create-promotion", | |
| async ({}, { container }) => { | |
| const promotionModuleService = container.resolve(Modules.PROMOTION) | |
| const promotion = await promotionModuleService.createPromotions({ | |
| code: "10%OFF", | |
| type: "standard", | |
| application_method: { | |
| type: "percentage", | |
| target_type: "order", | |
| value: 10, | |
| currency_code: "usd", | |
| }, | |
| }) | |
| return new StepResponse({ promotion }, promotion.id) | |
| }, | |
| async (promotionId, { container }) => { | |
| if (!promotionId) { | |
| return | |
| } | |
| const promotionModuleService = container.resolve(Modules.PROMOTION) | |
| await promotionModuleService.deletePromotions(promotionId) | |
| } | |
| ) | |
| export const createPromotionWorkflow = createWorkflow( | |
| "create-promotion", | |
| () => { | |
| const { promotion } = createPromotionStep() | |
| return new WorkflowResponse({ | |
| promotion, | |
| }) | |
| } | |
| ) | |
| ``` | |
| You can then execute the workflow in your custom API routes, scheduled jobs, or subscribers: | |
| ### API Route | |
| ```ts title="src/api/workflow/route.ts" highlights={[["11"], ["12"]]} collapsibleLines="1-6" expandButtonLabel="Show Imports" | |
| import type { | |
| MedusaRequest, | |
| MedusaResponse, | |
| } from "@medusajs/framework/http" | |
| import { createPromotionWorkflow } from "../../workflows/create-cart" | |
| export async function GET( | |
| req: MedusaRequest, | |
| res: MedusaResponse | |
| ) { | |
| const { result } = await createPromotionWorkflow(req.scope) | |
| .run() | |
| res.send(result) | |
| } | |
| ``` | |
| ### Subscriber | |
| ```ts title="src/subscribers/user-created.ts" highlights={[["11"], ["12"]]} collapsibleLines="1-6" expandButtonLabel="Show Imports" | |
| import { | |
| type SubscriberConfig, | |
| type SubscriberArgs, | |
| } from "@medusajs/framework" | |
| import { createPromotionWorkflow } from "../workflows/create-cart" | |
| export default async function handleUserCreated({ | |
| event: { data }, | |
| container, | |
| }: SubscriberArgs<{ id: string }>) { | |
| const { result } = await createPromotionWorkflow(container) | |
| .run() | |
| console.log(result) | |
| } | |
| export const config: SubscriberConfig = { | |
| event: "user.created", | |
| } | |
| ``` | |
| ### Scheduled Job | |
| ```ts title="src/jobs/run-daily.ts" highlights={[["7"], ["8"]]} | |
| import { MedusaContainer } from "@medusajs/framework/types" | |
| import { createPromotionWorkflow } from "../workflows/create-cart" | |
| export default async function myCustomJob( | |
| container: MedusaContainer | |
| ) { | |
| const { result } = await createPromotionWorkflow(container) | |
| .run() | |
| console.log(result) | |
| } | |
| export const config = { | |
| name: "run-once-a-day", | |
| schedule: `0 0 * * *`, | |
| } | |
| ``` | |
| Learn more about workflows in [this documentation](https://docs.medusajs.com/docs/learn/fundamentals/workflows/index.html.md). | |
| *** | |
| # Region Module | |
| In this section of the documentation, you will find resources to learn more about the Region Module and how to use it in your application. | |
| Medusa has region related features available out-of-the-box through the Region Module. A [module](https://docs.medusajs.com/docs/learn/fundamentals/modules/index.html.md) is a standalone package that provides features for a single domain. Each of Medusa's commerce features are placed in commerce modules, such as this Region Module. | |
| Learn more about why modules are isolated in [this documentation](https://docs.medusajs.com/docs/learn/fundamentals/modules/isolation/index.html.md). | |
| *** | |
| ## Region Features | |
| - [Region Management](https://docs.medusajs.com/references/region/models/Region/index.html.md): Manage regions in your store. You can create regions with different currencies and settings. | |
| - [Multi-Currency Support](https://docs.medusajs.com/references/region/models/Region/index.html.md): Each region has a currency. You can support multiple currencies in your store by creating multiple regions. | |
| - [Different Settings Per Region](https://docs.medusajs.com/references/region/models/Region/index.html.md): Each region has its own settings, such as what countries belong to a region or its tax settings. | |
| *** | |
| ## How to Use Region Module's Service | |
| In your Medusa application, you build flows around commerce modules. A flow is built as a [Workflow](https://docs.medusajs.com/docs/learn/fundamentals/workflows/index.html.md), which is a special function composed of a series of steps that guarantees data consistency and reliable roll-back mechanism. | |
| You can build custom workflows and steps. You can also re-use Medusa's workflows and steps, which are provided by the `@medusajs/medusa/core-flows` package. | |
| For example: | |
| ```ts title="src/workflows/create-region.ts" highlights={highlights} | |
| import { | |
| createWorkflow, | |
| WorkflowResponse, | |
| createStep, | |
| StepResponse, | |
| } from "@medusajs/framework/workflows-sdk" | |
| import { Modules } from "@medusajs/framework/utils" | |
| const createRegionStep = createStep( | |
| "create-region", | |
| async ({}, { container }) => { | |
| const regionModuleService = container.resolve(Modules.REGION) | |
| const region = await regionModuleService.createRegions({ | |
| name: "Europe", | |
| currency_code: "eur", | |
| }) | |
| return new StepResponse({ region }, region.id) | |
| }, | |
| async (regionId, { container }) => { | |
| if (!regionId) { | |
| return | |
| } | |
| const regionModuleService = container.resolve(Modules.REGION) | |
| await regionModuleService.deleteRegions([regionId]) | |
| } | |
| ) | |
| export const createRegionWorkflow = createWorkflow( | |
| "create-region", | |
| () => { | |
| const { region } = createRegionStep() | |
| return new WorkflowResponse({ | |
| region, | |
| }) | |
| } | |
| ) | |
| ``` | |
| You can then execute the workflow in your custom API routes, scheduled jobs, or subscribers: | |
| ### API Route | |
| ```ts title="src/api/workflow/route.ts" highlights={[["11"], ["12"]]} collapsibleLines="1-6" expandButtonLabel="Show Imports" | |
| import type { | |
| MedusaRequest, | |
| MedusaResponse, | |
| } from "@medusajs/framework/http" | |
| import { createRegionWorkflow } from "../../workflows/create-region" | |
| export async function GET( | |
| req: MedusaRequest, | |
| res: MedusaResponse | |
| ) { | |
| const { result } = await createRegionWorkflow(req.scope) | |
| .run() | |
| res.send(result) | |
| } | |
| ``` | |
| ### Subscriber | |
| ```ts title="src/subscribers/user-created.ts" highlights={[["11"], ["12"]]} collapsibleLines="1-6" expandButtonLabel="Show Imports" | |
| import { | |
| type SubscriberConfig, | |
| type SubscriberArgs, | |
| } from "@medusajs/framework" | |
| import { createRegionWorkflow } from "../workflows/create-region" | |
| export default async function handleUserCreated({ | |
| event: { data }, | |
| container, | |
| }: SubscriberArgs<{ id: string }>) { | |
| const { result } = await createRegionWorkflow(container) | |
| .run() | |
| console.log(result) | |
| } | |
| export const config: SubscriberConfig = { | |
| event: "user.created", | |
| } | |
| ``` | |
| ### Scheduled Job | |
| ```ts title="src/jobs/run-daily.ts" highlights={[["7"], ["8"]]} | |
| import { MedusaContainer } from "@medusajs/framework/types" | |
| import { createRegionWorkflow } from "../workflows/create-region" | |
| export default async function myCustomJob( | |
| container: MedusaContainer | |
| ) { | |
| const { result } = await createRegionWorkflow(container) | |
| .run() | |
| console.log(result) | |
| } | |
| export const config = { | |
| name: "run-once-a-day", | |
| schedule: `0 0 * * *`, | |
| } | |
| ``` | |
| Learn more about workflows in [this documentation](https://docs.medusajs.com/docs/learn/fundamentals/workflows/index.html.md). | |
| *** | |
| # Sales Channel Module | |
| In this section of the documentation, you will find resources to learn more about the Sales Channel Module and how to use it in your application. | |
| Medusa has sales channel related features available out-of-the-box through the Sales Channel Module. A [module](https://docs.medusajs.com/docs/learn/fundamentals/modules/index.html.md) is a standalone package that provides features for a single domain. Each of Medusa's commerce features are placed in commerce modules, such as this Sales Channel Module. | |
| Learn more about why modules are isolated in [this documentation](https://docs.medusajs.com/docs/learn/fundamentals/modules/isolation/index.html.md). | |
| ## What's a Sales Channel? | |
| A sales channel indicates an online or offline channel that you sell products on. | |
| Some use case examples for using a sales channel: | |
| - Implement a B2B Ecommerce Store. | |
| - Specify different products for each channel you sell in. | |
| - Support omnichannel in your ecommerce store. | |
| *** | |
| ## Sales Channel Features | |
| - [Sales Channel Management](https://docs.medusajs.com/references/sales-channel/models/SalesChannel/index.html.md): Manage sales channels in your store. Each sales channel has different meta information such as name or description, allowing you to easily differentiate between sales channels. | |
| - [Product Availability](https://docs.medusajs.com/Users/shahednasser/medusa/www/apps/resources/app/commerce-modules/sales-channel/links-to-other-modules/index.html.md): Medusa uses the Product and Sales Channel modules to allow merchants to specify a product's availability per sales channel. | |
| - [Cart and Order Scoping](https://docs.medusajs.com/Users/shahednasser/medusa/www/apps/resources/app/commerce-modules/sales-channel/links-to-other-modules/index.html.md): Carts, available through the Cart Module, are scoped to a sales channel. Paired with the product availability feature, you benefit from more features like allowing only products available in sales channel in a cart. | |
| - [Inventory Availability Per Sales Channel](https://docs.medusajs.com/Users/shahednasser/medusa/www/apps/resources/app/commerce-modules/sales-channel/links-to-other-modules/index.html.md): Medusa links sales channels to stock locations, allowing you to retrieve available inventory of products based on the specified sales channel. | |
| *** | |
| ## How to Use Sales Channel Module's Service | |
| In your Medusa application, you build flows around commerce modules. A flow is built as a [Workflow](https://docs.medusajs.com/docs/learn/fundamentals/workflows/index.html.md), which is a special function composed of a series of steps that guarantees data consistency and reliable roll-back mechanism. | |
| You can build custom workflows and steps. You can also re-use Medusa's workflows and steps, which are provided by the `@medusajs/medusa/core-flows` package. | |
| For example: | |
| ```ts title="src/workflows/create-sales-channel.ts" highlights={highlights} | |
| import { | |
| createWorkflow, | |
| WorkflowResponse, | |
| createStep, | |
| StepResponse, | |
| } from "@medusajs/framework/workflows-sdk" | |
| import { Modules } from "@medusajs/framework/utils" | |
| const createSalesChannelStep = createStep( | |
| "create-sales-channel", | |
| async ({}, { container }) => { | |
| const salesChannelModuleService = container.resolve(Modules.SALES_CHANNEL) | |
| const salesChannels = await salesChannelModuleService.createSalesChannels([ | |
| { | |
| name: "B2B", | |
| }, | |
| { | |
| name: "Mobile App", | |
| }, | |
| ]) | |
| return new StepResponse({ salesChannels }, salesChannels.map((sc) => sc.id)) | |
| }, | |
| async (salesChannelIds, { container }) => { | |
| if (!salesChannelIds) { | |
| return | |
| } | |
| const salesChannelModuleService = container.resolve(Modules.SALES_CHANNEL) | |
| await salesChannelModuleService.deleteSalesChannels( | |
| salesChannelIds | |
| ) | |
| } | |
| ) | |
| export const createSalesChannelWorkflow = createWorkflow( | |
| "create-sales-channel", | |
| () => { | |
| const { salesChannels } = createSalesChannelStep() | |
| return new WorkflowResponse({ | |
| salesChannels, | |
| }) | |
| } | |
| ) | |
| ``` | |
| You can then execute the workflow in your custom API routes, scheduled jobs, or subscribers: | |
| ### API Route | |
| ```ts title="src/api/workflow/route.ts" highlights={[["11"], ["12"]]} collapsibleLines="1-6" expandButtonLabel="Show Imports" | |
| import type { | |
| MedusaRequest, | |
| MedusaResponse, | |
| } from "@medusajs/framework/http" | |
| import { createSalesChannelWorkflow } from "../../workflows/create-sales-channel" | |
| export async function GET( | |
| req: MedusaRequest, | |
| res: MedusaResponse | |
| ) { | |
| const { result } = await createSalesChannelWorkflow(req.scope) | |
| .run() | |
| res.send(result) | |
| } | |
| ``` | |
| ### Subscriber | |
| ```ts title="src/subscribers/user-created.ts" highlights={[["11"], ["12"]]} collapsibleLines="1-6" expandButtonLabel="Show Imports" | |
| import { | |
| type SubscriberConfig, | |
| type SubscriberArgs, | |
| } from "@medusajs/framework" | |
| import { createSalesChannelWorkflow } from "../workflows/create-sales-channel" | |
| export default async function handleUserCreated({ | |
| event: { data }, | |
| container, | |
| }: SubscriberArgs<{ id: string }>) { | |
| const { result } = await createSalesChannelWorkflow(container) | |
| .run() | |
| console.log(result) | |
| } | |
| export const config: SubscriberConfig = { | |
| event: "user.created", | |
| } | |
| ``` | |
| ### Scheduled Job | |
| ```ts title="src/jobs/run-daily.ts" highlights={[["7"], ["8"]]} | |
| import { MedusaContainer } from "@medusajs/framework/types" | |
| import { createSalesChannelWorkflow } from "../workflows/create-sales-channel" | |
| export default async function myCustomJob( | |
| container: MedusaContainer | |
| ) { | |
| const { result } = await createSalesChannelWorkflow(container) | |
| .run() | |
| console.log(result) | |
| } | |
| export const config = { | |
| name: "run-once-a-day", | |
| schedule: `0 0 * * *`, | |
| } | |
| ``` | |
| Learn more about workflows in [this documentation](https://docs.medusajs.com/docs/learn/fundamentals/workflows/index.html.md). | |
| *** | |
| # Product Module | |
| In this section of the documentation, you will find resources to learn more about the Product Module and how to use it in your application. | |
| Medusa has product related features available out-of-the-box through the Product Module. A [module](https://docs.medusajs.com/docs/learn/fundamentals/modules/index.html.md) is a standalone package that provides features for a single domain. Each of Medusa's commerce features are placed in commerce modules, such as this Product Module. | |
| Learn more about why modules are isolated in [this documentation](https://docs.medusajs.com/docs/learn/fundamentals/modules/isolation/index.html.md). | |
| ## Product Features | |
| - [Products Management](https://docs.medusajs.com/references/product/models/Product/index.html.md): Store and manage products. Products have custom options, such as color or size, and each variant in the product sets the value for these options. | |
| - [Product Organization](https://docs.medusajs.com/references/product/models/index.html.md): The Product Module provides different data models used to organize products, including categories, collections, tags, and more. | |
| - [Bundled and Multi-Part Products](https://docs.medusajs.com/Users/shahednasser/medusa/www/apps/resources/app/commerce-modules/inventory/inventory-kit/index.html.md): Create and manage inventory kits for a single product, allowing you to implement use cases like bundled or multi-part products. | |
| *** | |
| ## How to Use the Product Module | |
| In your Medusa application, you build flows around commerce modules. A flow is built as a [Workflow](https://docs.medusajs.com/docs/learn/fundamentals/workflows/index.html.md), which is a special function composed of a series of steps that guarantees data consistency and reliable roll-back mechanism. | |
| You can build custom workflows and steps. You can also re-use Medusa's workflows and steps, which are provided by the `@medusajs/medusa/core-flows` package. | |
| For example: | |
| ```ts title="src/workflows/create-product.ts" highlights={highlights} | |
| import { | |
| createWorkflow, | |
| WorkflowResponse, | |
| createStep, | |
| StepResponse, | |
| } from "@medusajs/framework/workflows-sdk" | |
| import { Modules } from "@medusajs/framework/utils" | |
| const createProductStep = createStep( | |
| "create-product", | |
| async ({}, { container }) => { | |
| const productService = container.resolve(Modules.PRODUCT) | |
| const product = await productService.createProducts({ | |
| title: "Medusa Shirt", | |
| options: [ | |
| { | |
| title: "Color", | |
| values: ["Black", "White"], | |
| }, | |
| ], | |
| variants: [ | |
| { | |
| title: "Black Shirt", | |
| options: { | |
| Color: "Black", | |
| }, | |
| }, | |
| ], | |
| }) | |
| return new StepResponse({ product }, product.id) | |
| }, | |
| async (productId, { container }) => { | |
| if (!productId) { | |
| return | |
| } | |
| const productService = container.resolve(Modules.PRODUCT) | |
| await productService.deleteProducts([productId]) | |
| } | |
| ) | |
| export const createProductWorkflow = createWorkflow( | |
| "create-product", | |
| () => { | |
| const { product } = createProductStep() | |
| return new WorkflowResponse({ | |
| product, | |
| }) | |
| } | |
| ) | |
| ``` | |
| You can then execute the workflow in your custom API routes, scheduled jobs, or subscribers: | |
| ### API Route | |
| ```ts title="src/api/workflow/route.ts" highlights={[["11"], ["12"]]} collapsibleLines="1-6" expandButtonLabel="Show Imports" | |
| import type { | |
| MedusaRequest, | |
| MedusaResponse, | |
| } from "@medusajs/framework/http" | |
| import { createProductWorkflow } from "../../workflows/create-product" | |
| export async function GET( | |
| req: MedusaRequest, | |
| res: MedusaResponse | |
| ) { | |
| const { result } = await createProductWorkflow(req.scope) | |
| .run() | |
| res.send(result) | |
| } | |
| ``` | |
| ### Subscriber | |
| ```ts title="src/subscribers/user-created.ts" highlights={[["11"], ["12"]]} collapsibleLines="1-6" expandButtonLabel="Show Imports" | |
| import { | |
| type SubscriberConfig, | |
| type SubscriberArgs, | |
| } from "@medusajs/framework" | |
| import { createProductWorkflow } from "../workflows/create-product" | |
| export default async function handleUserCreated({ | |
| event: { data }, | |
| container, | |
| }: SubscriberArgs<{ id: string }>) { | |
| const { result } = await createProductWorkflow(container) | |
| .run() | |
| console.log(result) | |
| } | |
| export const config: SubscriberConfig = { | |
| event: "user.created", | |
| } | |
| ``` | |
| ### Scheduled Job | |
| ```ts title="src/jobs/run-daily.ts" highlights={[["7"], ["8"]]} | |
| import { MedusaContainer } from "@medusajs/framework/types" | |
| import { createProductWorkflow } from "../workflows/create-product" | |
| export default async function myCustomJob( | |
| container: MedusaContainer | |
| ) { | |
| const { result } = await createProductWorkflow(container) | |
| .run() | |
| console.log(result) | |
| } | |
| export const config = { | |
| name: "run-once-a-day", | |
| schedule: `0 0 * * *`, | |
| } | |
| ``` | |
| Learn more about workflows in [this documentation](https://docs.medusajs.com/docs/learn/fundamentals/workflows/index.html.md). | |
| *** | |
| # Stock Location Module | |
| In this section of the documentation, you will find resources to learn more about the Stock Location Module and how to use it in your application. | |
| Medusa has stock location related features available out-of-the-box through the Stock Location Module. A [module](https://docs.medusajs.com/docs/learn/fundamentals/modules/index.html.md) is a standalone package that provides features for a single domain. Each of Medusa's commerce features are placed in commerce modules, such as this Stock Location Module. | |
| Learn more about why modules are isolated in [this documentation](https://docs.medusajs.com/docs/learn/fundamentals/modules/isolation/index.html.md). | |
| ## Stock Location Features | |
| - [Stock Location Management](https://docs.medusajs.com/references/stock-location-next/models/index.html.md): Store and manage stock locations. Medusa links stock locations with data models of other modules that require a location, such as the [Inventory Module's InventoryLevel](https://docs.medusajs.com/Users/shahednasser/medusa/www/apps/resources/app/commerce-modules/stock-location/links-to-other-modules/index.html.md). | |
| - [Address Management](https://docs.medusajs.com/references/stock-location-next/models/StockLocationAddress/index.html.md): Manage the address of each stock location. | |
| *** | |
| ## How to Use Stock Location Module's Service | |
| In your Medusa application, you build flows around commerce modules. A flow is built as a [Workflow](https://docs.medusajs.com/docs/learn/fundamentals/workflows/index.html.md), which is a special function composed of a series of steps that guarantees data consistency and reliable roll-back mechanism. | |
| You can build custom workflows and steps. You can also re-use Medusa's workflows and steps, which are provided by the `@medusajs/medusa/core-flows` package. | |
| For example: | |
| ```ts title="src/workflows/create-stock-location.ts" highlights={highlights} | |
| import { | |
| createWorkflow, | |
| WorkflowResponse, | |
| createStep, | |
| StepResponse, | |
| } from "@medusajs/framework/workflows-sdk" | |
| import { Modules } from "@medusajs/framework/utils" | |
| const createStockLocationStep = createStep( | |
| "create-stock-location", | |
| async ({}, { container }) => { | |
| const stockLocationModuleService = container.resolve(Modules.STOCK_LOCATION) | |
| const stockLocation = await stockLocationModuleService.createStockLocations({ | |
| name: "Warehouse 1", | |
| }) | |
| return new StepResponse({ stockLocation }, stockLocation.id) | |
| }, | |
| async (stockLocationId, { container }) => { | |
| if (!stockLocationId) { | |
| return | |
| } | |
| const stockLocationModuleService = container.resolve(Modules.STOCK_LOCATION) | |
| await stockLocationModuleService.deleteStockLocations([stockLocationId]) | |
| } | |
| ) | |
| export const createStockLocationWorkflow = createWorkflow( | |
| "create-stock-location", | |
| () => { | |
| const { stockLocation } = createStockLocationStep() | |
| return new WorkflowResponse({ stockLocation }) | |
| } | |
| ) | |
| ``` | |
| You can then execute the workflow in your custom API routes, scheduled jobs, or subscribers: | |
| ### API Route | |
| ```ts title="src/api/workflow/route.ts" highlights={[["11"], ["12"]]} collapsibleLines="1-6" expandButtonLabel="Show Imports" | |
| import type { | |
| MedusaRequest, | |
| MedusaResponse, | |
| } from "@medusajs/framework/http" | |
| import { createStockLocationWorkflow } from "../../workflows/create-stock-location" | |
| export async function GET( | |
| req: MedusaRequest, | |
| res: MedusaResponse | |
| ) { | |
| const { result } = await createStockLocationWorkflow(req.scope) | |
| .run() | |
| res.send(result) | |
| } | |
| ``` | |
| ### Subscriber | |
| ```ts title="src/subscribers/user-created.ts" highlights={[["11"], ["12"]]} collapsibleLines="1-6" expandButtonLabel="Show Imports" | |
| import { | |
| type SubscriberConfig, | |
| type SubscriberArgs, | |
| } from "@medusajs/framework" | |
| import { createStockLocationWorkflow } from "../workflows/create-stock-location" | |
| export default async function handleUserCreated({ | |
| event: { data }, | |
| container, | |
| }: SubscriberArgs<{ id: string }>) { | |
| const { result } = await createStockLocationWorkflow(container) | |
| .run() | |
| console.log(result) | |
| } | |
| export const config: SubscriberConfig = { | |
| event: "user.created", | |
| } | |
| ``` | |
| ### Scheduled Job | |
| ```ts title="src/jobs/run-daily.ts" highlights={[["7"], ["8"]]} | |
| import { MedusaContainer } from "@medusajs/framework/types" | |
| import { createStockLocationWorkflow } from "../workflows/create-stock-location" | |
| export default async function myCustomJob( | |
| container: MedusaContainer | |
| ) { | |
| const { result } = await createStockLocationWorkflow(container) | |
| .run() | |
| console.log(result) | |
| } | |
| export const config = { | |
| name: "run-once-a-day", | |
| schedule: `0 0 * * *`, | |
| } | |
| ``` | |
| Learn more about workflows in [this documentation](https://docs.medusajs.com/docs/learn/fundamentals/workflows/index.html.md). | |
| *** | |
| # Store Module | |
| In this section of the documentation, you will find resources to learn more about the Store Module and how to use it in your application. | |
| Medusa has store related features available out-of-the-box through the Store Module. A [module](https://docs.medusajs.com/docs/learn/fundamentals/modules/index.html.md) is a standalone package that provides features for a single domain. Each of Medusa's commerce features are placed in commerce modules, such as this Store Module. | |
| Learn more about why modules are isolated in [this documentation](https://docs.medusajs.com/docs/learn/fundamentals/modules/isolation/index.html.md). | |
| ## Store Features | |
| - [Store Management](https://docs.medusajs.com/references/store/models/Store/index.html.md): Create and manage stores in your application. | |
| - [Multi-Tenancy Support](https://docs.medusajs.com/references/store/models/Store/index.html.md): Create multiple stores, each having its own configurations. | |
| *** | |
| ## How to Use Store Module's Service | |
| In your Medusa application, you build flows around commerce modules. A flow is built as a [Workflow](https://docs.medusajs.com/docs/learn/fundamentals/workflows/index.html.md), which is a special function composed of a series of steps that guarantees data consistency and reliable roll-back mechanism. | |
| You can build custom workflows and steps. You can also re-use Medusa's workflows and steps, which are provided by the `@medusajs/medusa/core-flows` package. | |
| For example: | |
| ```ts title="src/workflows/create-store.ts" highlights={highlights} | |
| import { | |
| createWorkflow, | |
| WorkflowResponse, | |
| createStep, | |
| StepResponse, | |
| } from "@medusajs/framework/workflows-sdk" | |
| import { Modules } from "@medusajs/framework/utils" | |
| const createStoreStep = createStep( | |
| "create-store", | |
| async ({}, { container }) => { | |
| const storeModuleService = container.resolve(Modules.STORE) | |
| const store = await storeModuleService.createStores({ | |
| name: "My Store", | |
| supported_currencies: [{ | |
| currency_code: "usd", | |
| is_default: true, | |
| }], | |
| }) | |
| return new StepResponse({ store }, store.id) | |
| }, | |
| async (storeId, { container }) => { | |
| if(!storeId) { | |
| return | |
| } | |
| const storeModuleService = container.resolve(Modules.STORE) | |
| await storeModuleService.deleteStores([storeId]) | |
| } | |
| ) | |
| export const createStoreWorkflow = createWorkflow( | |
| "create-store", | |
| () => { | |
| const { store } = createStoreStep() | |
| return new WorkflowResponse({ store }) | |
| } | |
| ) | |
| ``` | |
| You can then execute the workflow in your custom API routes, scheduled jobs, or subscribers: | |
| ### API Route | |
| ```ts title="src/api/workflow/route.ts" highlights={[["11"], ["12"]]} collapsibleLines="1-6" expandButtonLabel="Show Imports" | |
| import type { | |
| MedusaRequest, | |
| MedusaResponse, | |
| } from "@medusajs/framework/http" | |
| import { createStoreWorkflow } from "../../workflows/create-store" | |
| export async function GET( | |
| req: MedusaRequest, | |
| res: MedusaResponse | |
| ) { | |
| const { result } = await createStoreWorkflow(req.scope) | |
| .run() | |
| res.send(result) | |
| } | |
| ``` | |
| ### Subscriber | |
| ```ts title="src/subscribers/user-created.ts" highlights={[["11"], ["12"]]} collapsibleLines="1-6" expandButtonLabel="Show Imports" | |
| import { | |
| type SubscriberConfig, | |
| type SubscriberArgs, | |
| } from "@medusajs/framework" | |
| import { createStoreWorkflow } from "../workflows/create-store" | |
| export default async function handleUserCreated({ | |
| event: { data }, | |
| container, | |
| }: SubscriberArgs<{ id: string }>) { | |
| const { result } = await createStoreWorkflow(container) | |
| .run() | |
| console.log(result) | |
| } | |
| export const config: SubscriberConfig = { | |
| event: "user.created", | |
| } | |
| ``` | |
| ### Scheduled Job | |
| ```ts title="src/jobs/run-daily.ts" highlights={[["7"], ["8"]]} | |
| import { MedusaContainer } from "@medusajs/framework/types" | |
| import { createStoreWorkflow } from "../workflows/create-store" | |
| export default async function myCustomJob( | |
| container: MedusaContainer | |
| ) { | |
| const { result } = await createStoreWorkflow(container) | |
| .run() | |
| console.log(result) | |
| } | |
| export const config = { | |
| name: "run-once-a-day", | |
| schedule: `0 0 * * *`, | |
| } | |
| ``` | |
| Learn more about workflows in [this documentation](https://docs.medusajs.com/docs/learn/fundamentals/workflows/index.html.md). | |
| *** | |
| # Tax Module | |
| In this section of the documentation, you will find resources to learn more about the Tax Module and how to use it in your application. | |
| Medusa has tax related features available out-of-the-box through the Tax Module. A [module](https://docs.medusajs.com/docs/learn/fundamentals/modules/index.html.md) is a standalone package that provides features for a single domain. Each of Medusa's commerce features are placed in commerce modules, such as this Tax Module. | |
| Learn more about why modules are isolated in [this documentation](https://docs.medusajs.com/docs/learn/fundamentals/modules/isolation/index.html.md). | |
| ## Tax Features | |
| - [Tax Settings Per Region](https://docs.medusajs.com/Users/shahednasser/medusa/www/apps/resources/app/commerce-modules/tax/tax-region/index.html.md): Set different tax settings for each tax region. | |
| - [Tax Rates and Rules](https://docs.medusajs.com/Users/shahednasser/medusa/www/apps/resources/app/commerce-modules/tax/tax-rates-and-rules/index.html.md): Manage each region's default tax rates and override them with conditioned tax rates. | |
| - [Retrieve Tax Lines for carts and orders](https://docs.medusajs.com/Users/shahednasser/medusa/www/apps/resources/app/commerce-modules/tax/tax-calculation-with-provider/index.html.md): Calculate and retrieve the tax lines of a cart or order's line items and shipping methods with tax providers. | |
| *** | |
| ## How to Use Tax Module's Service | |
| In your Medusa application, you build flows around commerce modules. A flow is built as a [Workflow](https://docs.medusajs.com/docs/learn/fundamentals/workflows/index.html.md), which is a special function composed of a series of steps that guarantees data consistency and reliable roll-back mechanism. | |
| You can build custom workflows and steps. You can also re-use Medusa's workflows and steps, which are provided by the `@medusajs/medusa/core-flows` package. | |
| For example: | |
| ```ts title="src/workflows/create-tax-region.ts" highlights={highlights} | |
| import { | |
| createWorkflow, | |
| WorkflowResponse, | |
| createStep, | |
| StepResponse, | |
| } from "@medusajs/framework/workflows-sdk" | |
| import { Modules } from "@medusajs/framework/utils" | |
| const createTaxRegionStep = createStep( | |
| "create-tax-region", | |
| async ({}, { container }) => { | |
| const taxModuleService = container.resolve(Modules.TAX) | |
| const taxRegion = await taxModuleService.createTaxRegions({ | |
| country_code: "us", | |
| }) | |
| return new StepResponse({ taxRegion }, taxRegion.id) | |
| }, | |
| async (taxRegionId, { container }) => { | |
| if (!taxRegionId) { | |
| return | |
| } | |
| const taxModuleService = container.resolve(Modules.TAX) | |
| await taxModuleService.deleteTaxRegions([taxRegionId]) | |
| } | |
| ) | |
| export const createTaxRegionWorkflow = createWorkflow( | |
| "create-tax-region", | |
| () => { | |
| const { taxRegion } = createTaxRegionStep() | |
| return new WorkflowResponse({ taxRegion }) | |
| } | |
| ) | |
| ``` | |
| You can then execute the workflow in your custom API routes, scheduled jobs, or subscribers: | |
| ### API Route | |
| ```ts title="src/api/workflow/route.ts" highlights={[["11"], ["12"]]} collapsibleLines="1-6" expandButtonLabel="Show Imports" | |
| import type { | |
| MedusaRequest, | |
| MedusaResponse, | |
| } from "@medusajs/framework/http" | |
| import { createTaxRegionWorkflow } from "../../workflows/create-tax-region" | |
| export async function GET( | |
| req: MedusaRequest, | |
| res: MedusaResponse | |
| ) { | |
| const { result } = await createTaxRegionWorkflow(req.scope) | |
| .run() | |
| res.send(result) | |
| } | |
| ``` | |
| ### Subscriber | |
| ```ts title="src/subscribers/user-created.ts" highlights={[["11"], ["12"]]} collapsibleLines="1-6" expandButtonLabel="Show Imports" | |
| import { | |
| type SubscriberConfig, | |
| type SubscriberArgs, | |
| } from "@medusajs/framework" | |
| import { createTaxRegionWorkflow } from "../workflows/create-tax-region" | |
| export default async function handleUserCreated({ | |
| event: { data }, | |
| container, | |
| }: SubscriberArgs<{ id: string }>) { | |
| const { result } = await createTaxRegionWorkflow(container) | |
| .run() | |
| console.log(result) | |
| } | |
| export const config: SubscriberConfig = { | |
| event: "user.created", | |
| } | |
| ``` | |
| ### Scheduled Job | |
| ```ts title="src/jobs/run-daily.ts" highlights={[["7"], ["8"]]} | |
| import { MedusaContainer } from "@medusajs/framework/types" | |
| import { createTaxRegionWorkflow } from "../workflows/create-tax-region" | |
| export default async function myCustomJob( | |
| container: MedusaContainer | |
| ) { | |
| const { result } = await createTaxRegionWorkflow(container) | |
| .run() | |
| console.log(result) | |
| } | |
| export const config = { | |
| name: "run-once-a-day", | |
| schedule: `0 0 * * *`, | |
| } | |
| ``` | |
| Learn more about workflows in [this documentation](https://docs.medusajs.com/docs/learn/fundamentals/workflows/index.html.md). | |
| *** | |
| ## Configure Tax Module | |
| The Tax Module accepts options for further configurations. Refer to [this documentation](https://docs.medusajs.com/Users/shahednasser/medusa/www/apps/resources/app/commerce-modules/tax/module-options/index.html.md) for details on the module's options. | |
| *** | |
| # User Module | |
| In this section of the documentation, you will find resources to learn more about the User Module and how to use it in your application. | |
| Medusa has user related features available out-of-the-box through the User Module. A [module](https://docs.medusajs.com/docs/learn/fundamentals/modules/index.html.md) is a standalone package that provides features for a single domain. Each of Medusa's commerce features are placed in commerce modules, such as this User Module. | |
| Learn more about why modules are isolated in [this documentation](https://docs.medusajs.com/docs/learn/fundamentals/modules/isolation/index.html.md). | |
| ## User Features | |
| - [User Management](https://docs.medusajs.com/Users/shahednasser/medusa/www/apps/resources/app/commerce-modules/user/user-creation-flows/index.html.md): Store and manage users in your store. | |
| - [Invite Users](https://docs.medusajs.com/Users/shahednasser/medusa/www/apps/resources/app/commerce-modules/user/user-creation-flows#invite-users/index.html.md): Invite users to join your store and manage those invites. | |
| *** | |
| ## How to Use User Module's Service | |
| In your Medusa application, you build flows around commerce modules. A flow is built as a [Workflow](https://docs.medusajs.com/docs/learn/fundamentals/workflows/index.html.md), which is a special function composed of a series of steps that guarantees data consistency and reliable roll-back mechanism. | |
| You can build custom workflows and steps. You can also re-use Medusa's workflows and steps, which are provided by the `@medusajs/medusa/core-flows` package. | |
| For example: | |
| ```ts title="src/workflows/create-user.ts" highlights={highlights} | |
| import { | |
| createWorkflow, | |
| WorkflowResponse, | |
| createStep, | |
| StepResponse, | |
| } from "@medusajs/framework/workflows-sdk" | |
| import { Modules } from "@medusajs/framework/utils" | |
| const createUserStep = createStep( | |
| "create-user", | |
| async ({}, { container }) => { | |
| const userModuleService = container.resolve(Modules.USER) | |
| const user = await userModuleService.createUsers({ | |
| email: "[email protected]", | |
| first_name: "John", | |
| last_name: "Smith", | |
| }) | |
| return new StepResponse({ user }, user.id) | |
| }, | |
| async (userId, { container }) => { | |
| if (!userId) { | |
| return | |
| } | |
| const userModuleService = container.resolve(Modules.USER) | |
| await userModuleService.deleteUsers([userId]) | |
| } | |
| ) | |
| export const createUserWorkflow = createWorkflow( | |
| "create-user", | |
| () => { | |
| const { user } = createUserStep() | |
| return new WorkflowResponse({ | |
| user, | |
| }) | |
| } | |
| ) | |
| ``` | |
| You can then execute the workflow in your custom API routes, scheduled jobs, or subscribers: | |
| ### API Route | |
| ```ts title="src/api/workflow/route.ts" highlights={[["11"], ["12"]]} collapsibleLines="1-6" expandButtonLabel="Show Imports" | |
| import type { | |
| MedusaRequest, | |
| MedusaResponse, | |
| } from "@medusajs/framework/http" | |
| import { createUserWorkflow } from "../../workflows/create-user" | |
| export async function GET( | |
| req: MedusaRequest, | |
| res: MedusaResponse | |
| ) { | |
| const { result } = await createUserWorkflow(req.scope) | |
| .run() | |
| res.send(result) | |
| } | |
| ``` | |
| ### Subscriber | |
| ```ts title="src/subscribers/user-created.ts" highlights={[["11"], ["12"]]} collapsibleLines="1-6" expandButtonLabel="Show Imports" | |
| import { | |
| type SubscriberConfig, | |
| type SubscriberArgs, | |
| } from "@medusajs/framework" | |
| import { createUserWorkflow } from "../workflows/create-user" | |
| export default async function handleUserCreated({ | |
| event: { data }, | |
| container, | |
| }: SubscriberArgs<{ id: string }>) { | |
| const { result } = await createUserWorkflow(container) | |
| .run() | |
| console.log(result) | |
| } | |
| export const config: SubscriberConfig = { | |
| event: "user.created", | |
| } | |
| ``` | |
| ### Scheduled Job | |
| ```ts title="src/jobs/run-daily.ts" highlights={[["7"], ["8"]]} | |
| import { MedusaContainer } from "@medusajs/framework/types" | |
| import { createUserWorkflow } from "../workflows/create-user" | |
| export default async function myCustomJob( | |
| container: MedusaContainer | |
| ) { | |
| const { result } = await createUserWorkflow(container) | |
| .run() | |
| console.log(result) | |
| } | |
| export const config = { | |
| name: "run-once-a-day", | |
| schedule: `0 0 * * *`, | |
| } | |
| ``` | |
| Learn more about workflows in [this documentation](https://docs.medusajs.com/docs/learn/fundamentals/workflows/index.html.md). | |
| *** | |
| ## Configure User Module | |
| The User Module accepts options for further configurations. Refer to [this documentation](https://docs.medusajs.com/Users/shahednasser/medusa/www/apps/resources/app/commerce-modules/user/module-options/index.html.md) for details on the module's options. | |
| *** | |
| # API Key Concepts | |
| In this document, you’ll learn about the different types of API keys, their expiration and verification. | |
| ## API Key Types | |
| There are two types of API keys: | |
| - `publishable`: A public key used in client applications, such as a storefront. | |
| - `secret`: A secret key used for authentication and verification purposes, such as an admin user’s authentication token or a password reset token. | |
| The API key’s type is stored in the `type` property of the [ApiKey data model](https://docs.medusajs.com/references/api-key/models/ApiKey/index.html.md). | |
| *** | |
| ## API Key Expiration | |
| An API key expires when it’s revoked using the [revoke method of the module’s main service](https://docs.medusajs.com/references/api-key/revoke/index.html.md). | |
| The associated token is no longer usable or verifiable. | |
| *** | |
| ## Token Verification | |
| To verify a token received as an input or in a request, use the [authenticate method of the module’s main service](https://docs.medusajs.com/references/api-key/authenticate/index.html.md) which validates the token against all non-expired tokens. | |
| # Links between API Key Module and Other Modules | |
| This document showcases the module links defined between the API Key Module and other commerce modules. | |
| ## Summary | |
| The API Key Module has the following links to other modules: | |
| - [`ApiKey` data model \<> `SalesChannel` data model of Sales Channel Module](#sales-channel-module). | |
| *** | |
| ## Sales Channel Module | |
| You can create a publishable API key and associate it with a sales channel. Medusa defines a link between the `ApiKey` and the `SalesChannel` data models. | |
|  | |
| This is useful to avoid passing the sales channel's ID as a parameter of every request, and instead pass the publishable API key in the header of any request to the Store API route. | |
| Learn more about this in the [Sales Channel Module's documentation](https://docs.medusajs.com/Users/shahednasser/medusa/www/apps/resources/app/commerce-modules/sales-channel/publishable-api-keys/index.html.md). | |
| ### Retrieve with Query | |
| To retrieve the sales channels of an API key with [Query](https://docs.medusajs.com/docs/learn/fundamentals/module-links/query/index.html.md), pass `sales_channels.*` in `fields`: | |
| ### query.graph | |
| ```ts | |
| const { data: apiKeys } = await query.graph({ | |
| entity: "api_key", | |
| fields: [ | |
| "sales_channels.*", | |
| ], | |
| }) | |
| // apiKeys.sales_channels | |
| ``` | |
| ### useQueryGraphStep | |
| ```ts | |
| import { useQueryGraphStep } from "@medusajs/medusa/core-flows" | |
| // ... | |
| const { data: apiKeys } = useQueryGraphStep({ | |
| entity: "api_key", | |
| fields: [ | |
| "sales_channels.*", | |
| ], | |
| }) | |
| // apiKeys.sales_channels | |
| ``` | |
| ### Manage with Link | |
| To manage the sales channels of an API key, use [Link](https://docs.medusajs.com/docs/learn/fundamentals/module-links/link/index.html.md): | |
| ### link.create | |
| ```ts | |
| import { Modules } from "@medusajs/framework/utils" | |
| // ... | |
| await link.create({ | |
| [Modules.API_KEY]: { | |
| api_key_id: "apk_123", | |
| }, | |
| [Modules.SALES_CHANNEL]: { | |
| sales_channel_id: "sc_123", | |
| }, | |
| }) | |
| ``` | |
| ### createRemoteLinkStep | |
| ```ts | |
| import { Modules } from "@medusajs/framework/utils" | |
| import { createRemoteLinkStep } from "@medusajs/medusa/core-flows" | |
| // ... | |
| createRemoteLinkStep({ | |
| [Modules.API_KEY]: { | |
| api_key_id: "apk_123", | |
| }, | |
| [Modules.SALES_CHANNEL]: { | |
| sales_channel_id: "sc_123", | |
| }, | |
| }) | |
| ``` | |
| # Authentication Flows with the Auth Main Service | |
| In this document, you'll learn how to use the Auth Module's main service's methods to implement authentication flows and reset a user's password. | |
| ## Authentication Methods | |
| ### Register | |
| The [register method of the Auth Module's main service](https://docs.medusajs.com/references/auth/register/index.html.md) creates an auth identity that can be authenticated later. | |
| For example: | |
| ```ts | |
| const data = await authModuleService.register( | |
| "emailpass", | |
| // passed to auth provider | |
| { | |
| // ... | |
| } | |
| ) | |
| ``` | |
| This method calls the `register` method of the provider specified in the first parameter and returns its data. | |
| ### Authenticate | |
| To authenticate a user, you use the [authenticate method of the Auth Module's main service](https://docs.medusajs.com/references/auth/authenticate/index.html.md). For example: | |
| ```ts | |
| const data = await authModuleService.authenticate( | |
| "emailpass", | |
| // passed to auth provider | |
| { | |
| // ... | |
| } | |
| ) | |
| ``` | |
| This method calls the `authenticate` method of the provider specified in the first parameter and returns its data. | |
| *** | |
| ## Auth Flow 1: Basic Authentication | |
| The basic authentication flow requires first using the `register` method, then the `authenticate` method: | |
| ```ts | |
| const { success, authIdentity, error } = await authModuleService.register( | |
| "emailpass", | |
| // passed to auth provider | |
| { | |
| // ... | |
| } | |
| ) | |
| if (error) { | |
| // registration failed | |
| // TODO return an error | |
| return | |
| } | |
| // later (can be another route for log-in) | |
| const { success, authIdentity, location } = await authModuleService.authenticate( | |
| "emailpass", | |
| // passed to auth provider | |
| { | |
| // ... | |
| } | |
| ) | |
| if (success && !location) { | |
| // user is authenticated | |
| } | |
| ``` | |
| If `success` is true and `location` isn't set, the user is authenticated successfully, and their authentication details are available within the `authIdentity` object. | |
| The next section explains the flow if `location` is set. | |
| Check out the [AuthIdentity](https://docs.medusajs.com/references/auth/models/AuthIdentity/index.html.md) reference for the received properties in `authIdentity`. | |
| 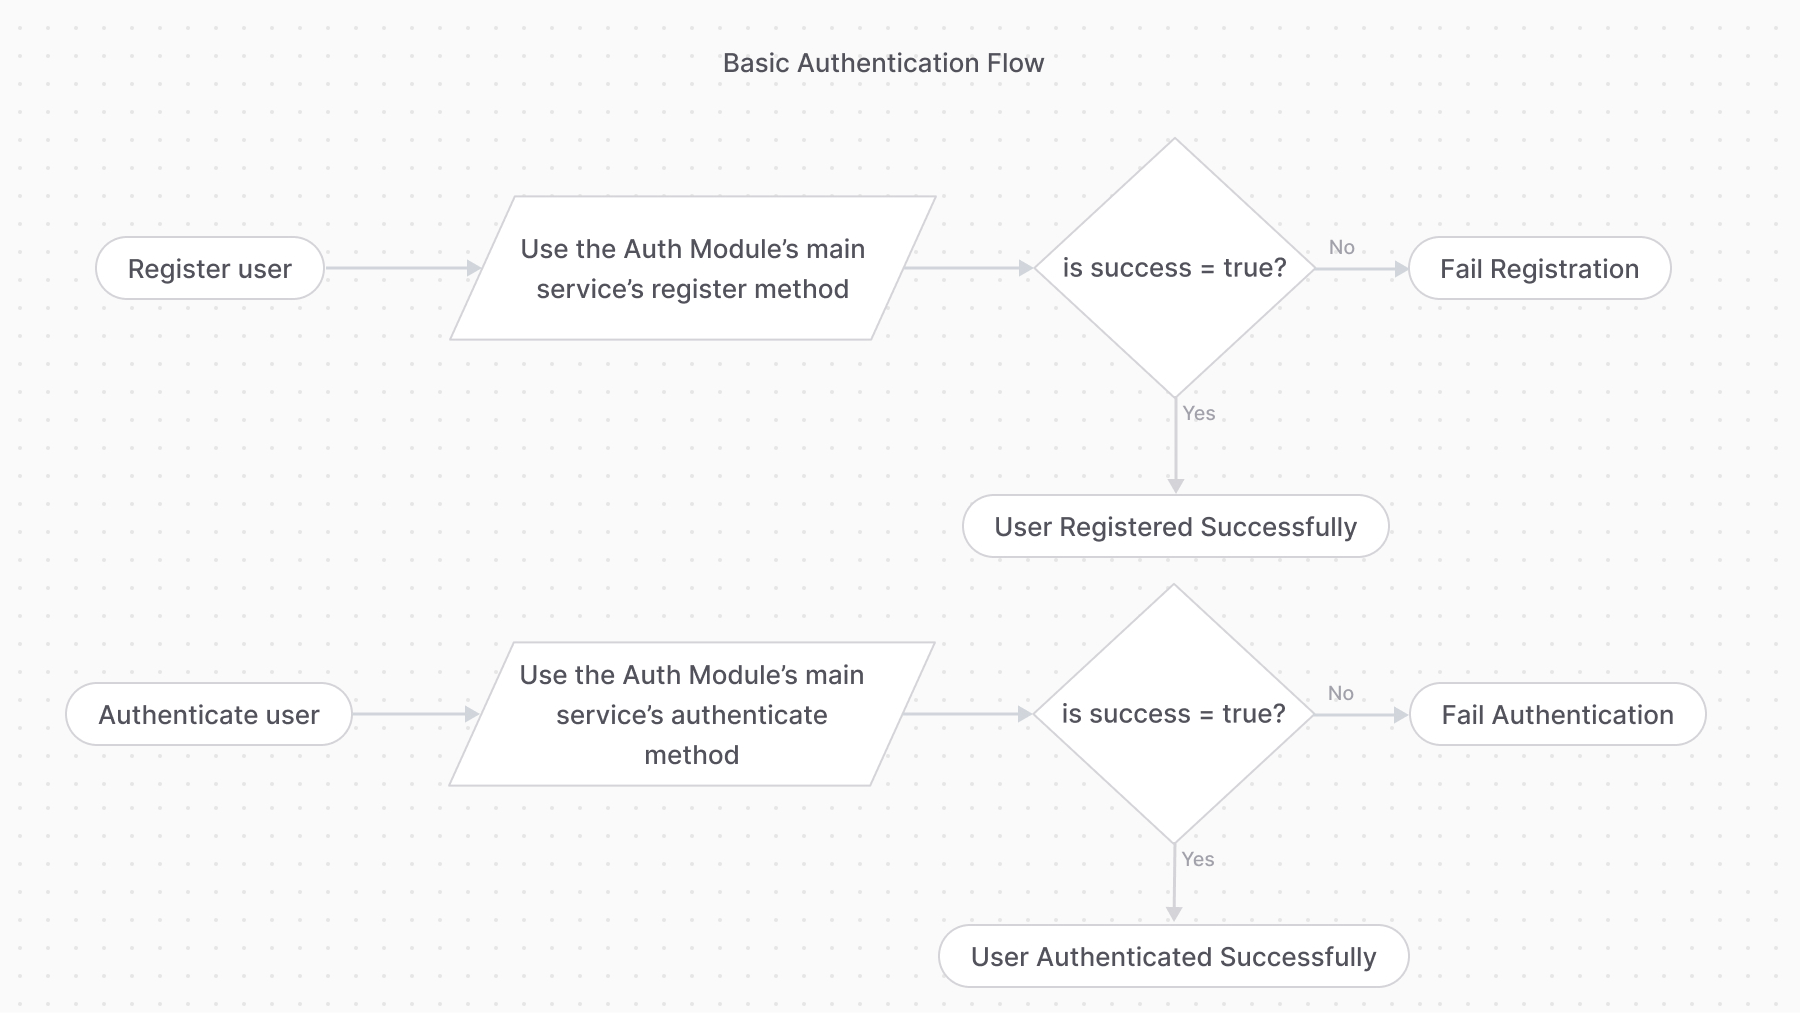 | |
| ### Auth Identity with Same Identifier | |
| If an auth identity, such as a `customer`, tries to register with an email of another auth identity, the `register` method returns an error. This can happen either if another customer is using the same email, or an admin user has the same email. | |
| There are two ways to handle this: | |
| - Consider the customer authenticated if the `authenticate` method validates that the email and password are correct. This allows admin users, for example, to authenticate as customers. | |
| - Return an error message to the customer, informing them that the email is already in use. | |
| *** | |
| ## Auth Flow 2: Third-Party Service Authentication | |
| The third-party service authentication method requires using the `authenticate` method first: | |
| ```ts | |
| const { success, authIdentity, location } = await authModuleService.authenticate( | |
| "google", | |
| // passed to auth provider | |
| { | |
| // ... | |
| } | |
| ) | |
| if (location) { | |
| // return the location for the front-end to redirect to | |
| } | |
| if (!success) { | |
| // authentication failed | |
| } | |
| // authentication successful | |
| ``` | |
| If the `authenticate` method returns a `location` property, the authentication process requires the user to perform an action with a third-party service. So, you return the `location` to the front-end or client to redirect to that URL. | |
| For example, when using the `google` provider, the `location` is the URL that the user is navigated to login. | |
|  | |
| ### Overriding Callback URL | |
| The Google and GitHub providers allow you to override their `callbackUrl` option during authentication. This is useful when you redirect the user after authentication to a URL based on its actor type. For example, you redirect admin users and customers to different pages. | |
| ```ts | |
| const { success, authIdentity, location } = await authModuleService.authenticate( | |
| "google", | |
| // passed to auth provider | |
| { | |
| // ... | |
| callback_url: "example.com", | |
| } | |
| ) | |
| ``` | |
| ### validateCallback | |
| Providers handling this authentication flow must implement the `validateCallback` method. It implements the logic to validate the authentication with the third-party service. | |
| So, once the user performs the required action with the third-party service (for example, log-in with Google), the frontend must redirect to an API route that uses the [validateCallback method of the Auth Module's main service](https://docs.medusajs.com/references/auth/validateCallback/index.html.md). | |
| The method calls the specified provider’s `validateCallback` method passing it the authentication details it received in the second parameter: | |
| ```ts | |
| const { success, authIdentity } = await authModuleService.validateCallback( | |
| "google", | |
| // passed to auth provider | |
| { | |
| // request data, such as | |
| url, | |
| headers, | |
| query, | |
| body, | |
| protocol, | |
| } | |
| ) | |
| if (success) { | |
| // authentication succeeded | |
| } | |
| ``` | |
| For providers like Google, the `query` object contains the query parameters from the original callback URL, such as the `code` and `state` parameters. | |
| If the returned `success` property is `true`, the authentication with the third-party provider was successful. | |
| 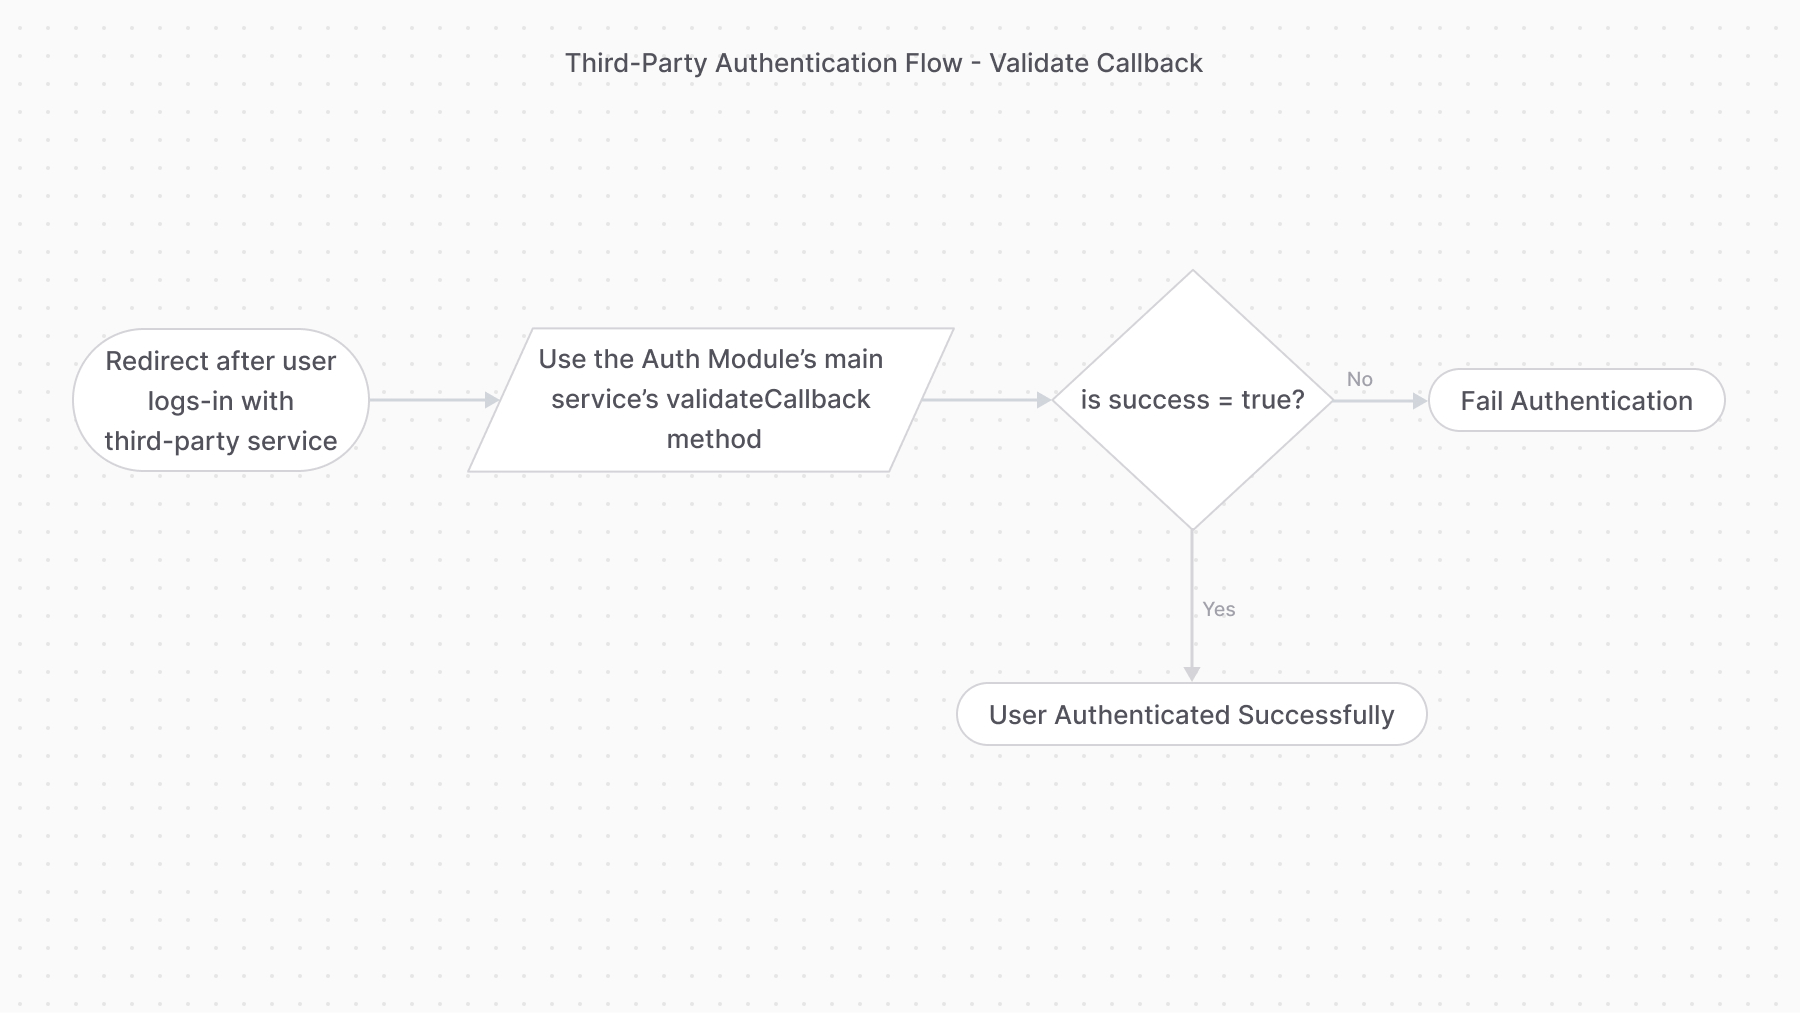 | |
| *** | |
| ## Reset Password | |
| To update a user's password or other authentication details, use the `updateProvider` method of the Auth Module's main service. It calls the `update` method of the specified authentication provider. | |
| For example: | |
| ```ts | |
| const { success } = await authModuleService.updateProvider( | |
| "emailpass", | |
| // passed to the auth provider | |
| { | |
| entity_id: "[email protected]", | |
| password: "supersecret", | |
| } | |
| ) | |
| if (success) { | |
| // password reset successfully | |
| } | |
| ``` | |
| The method accepts as a first parameter the ID of the provider, and as a second parameter the data necessary to reset the password. | |
| In the example above, you use the `emailpass` provider, so you have to pass an object having an `email` and `password` properties. | |
| If the returned `success` property is `true`, the password has reset successfully. | |
| # Auth Identity and Actor Types | |
| In this document, you’ll learn about concepts related to identity and actors in the Auth Module. | |
| ## What is an Auth Identity? | |
| The [AuthIdentity data model](https://docs.medusajs.com/references/auth/models/AuthIdentity/index.html.md) represents a user registered by an [authentication provider](https://docs.medusajs.com/Users/shahednasser/medusa/www/apps/resources/app/commerce-modules/auth/auth-providers/index.html.md). When a user is registered using an authentication provider, the provider creates a record of `AuthIdentity`. | |
| Then, when the user logs-in in the future with the same authentication provider, the associated auth identity is used to validate their credentials. | |
| *** | |
| ## Actor Types | |
| An actor type is a type of user that can be authenticated. The Auth Module doesn't store or manage any user-like models, such as for customers or users. Instead, the user types are created and managed by other modules. For example, a customer is managed by the [Customer Module](https://docs.medusajs.com/Users/shahednasser/medusa/www/apps/resources/app/commerce-modules/customer/index.html.md). | |
| Then, when an auth identity is created for the actor type, the ID of the user is stored in the `app_metadata` property of the auth identity. | |
| For example, an auth identity of a customer has the following `app_metadata` property: | |
| ```json | |
| { | |
| "app_metadata": { | |
| "customer_id": "cus_123" | |
| } | |
| } | |
| ``` | |
| The ID of the user is stored in the key `{actor_type}_id` of the `app_metadata` property. | |
| *** | |
| ## Protect Routes by Actor Type | |
| When you protect routes with the `authenticate` middleware, you specify in its first parameter the actor type that must be authenticated to access the specified API routes. | |
| For example: | |
| ```ts title="src/api/middlewares.ts" highlights={highlights} | |
| import { | |
| defineMiddlewares, | |
| authenticate, | |
| } from "@medusajs/framework/http" | |
| export default defineMiddlewares({ | |
| routes: [ | |
| { | |
| matcher: "/custom/admin*", | |
| middlewares: [ | |
| authenticate("user", ["session", "bearer", "api-key"]), | |
| ], | |
| }, | |
| ], | |
| }) | |
| ``` | |
| By specifying `user` as the first parameter of `authenticate`, only authenticated users of actor type `user` (admin users) can access API routes starting with `/custom/admin`. | |
| *** | |
| ## Custom Actor Types | |
| You can define custom actor types that allows a custom user, managed by your custom module, to authenticate into Medusa. | |
| For example, if you have a custom module with a `Manager` data model, you can authenticate managers with the `manager` actor type. | |
| Learn how to create a custom actor type in [this guide](https://docs.medusajs.com/Users/shahednasser/medusa/www/apps/resources/app/commerce-modules/auth/create-actor-type/index.html.md). | |
| # Auth Providers | |
| In this document, you’ll learn how the Auth Module handles authentication using providers. | |
| ## What's an Auth Module Provider? | |
| An auth module provider handles authenticating customers and users, either using custom logic or by integrating a third-party service. | |
| For example, the EmailPass Auth Module Provider authenticates a user using their email and password, whereas the Google Auth Module Provider authenticates users using their Google account. | |
| ### Auth Providers List | |
| - [Emailpass](https://docs.medusajs.com/commerce-modules/auth/auth-providers/emailpass/index.html.md) | |
| - [Google](https://docs.medusajs.com/commerce-modules/auth/auth-providers/google/index.html.md) | |
| - [GitHub](https://docs.medusajs.com/commerce-modules/auth/auth-providers/github/index.html.md) | |
| *** | |
| ## Configure Allowed Auth Providers of Actor Types | |
| By default, users of all actor types can authenticate with all installed auth module providers. | |
| To restrict the auth providers used for actor types, use the [authMethodsPerActor option](https://docs.medusajs.com/references/medusa-config#http-authMethodsPerActor-1-3/index.html.md) in Medusa's configurations: | |
| ```ts title="medusa-config.ts" | |
| module.exports = defineConfig({ | |
| projectConfig: { | |
| http: { | |
| authMethodsPerActor: { | |
| user: ["google"], | |
| customer: ["emailpass"], | |
| }, | |
| // ... | |
| }, | |
| // ... | |
| }, | |
| }) | |
| ``` | |
| When you specify the `authMethodsPerActor` configuration, it overrides the default. So, if you don't specify any providers for an actor type, users of that actor type can't authenticate with any provider. | |
| *** | |
| ## How to Create an Auth Module Provider | |
| Refer to [this guide](https://docs.medusajs.com/references/auth/provider/index.html.md) to learn how to create an auth module provider. | |
| # How to Use Authentication Routes | |
| In this document, you'll learn about the authentication routes and how to use them to create and log-in users, and reset their password. | |
| These routes are added by Medusa's HTTP layer, not the Auth Module. | |
| ## Types of Authentication Flows | |
| ### 1. Basic Authentication Flow | |
| This authentication flow doesn't require validation with third-party services. | |
| [How to register customer in storefront using basic authentication flow](https://docs.medusajs.com/Users/shahednasser/medusa/www/apps/resources/app/storefront-development/customers/register/index.html.md). | |
| The steps are: | |
| 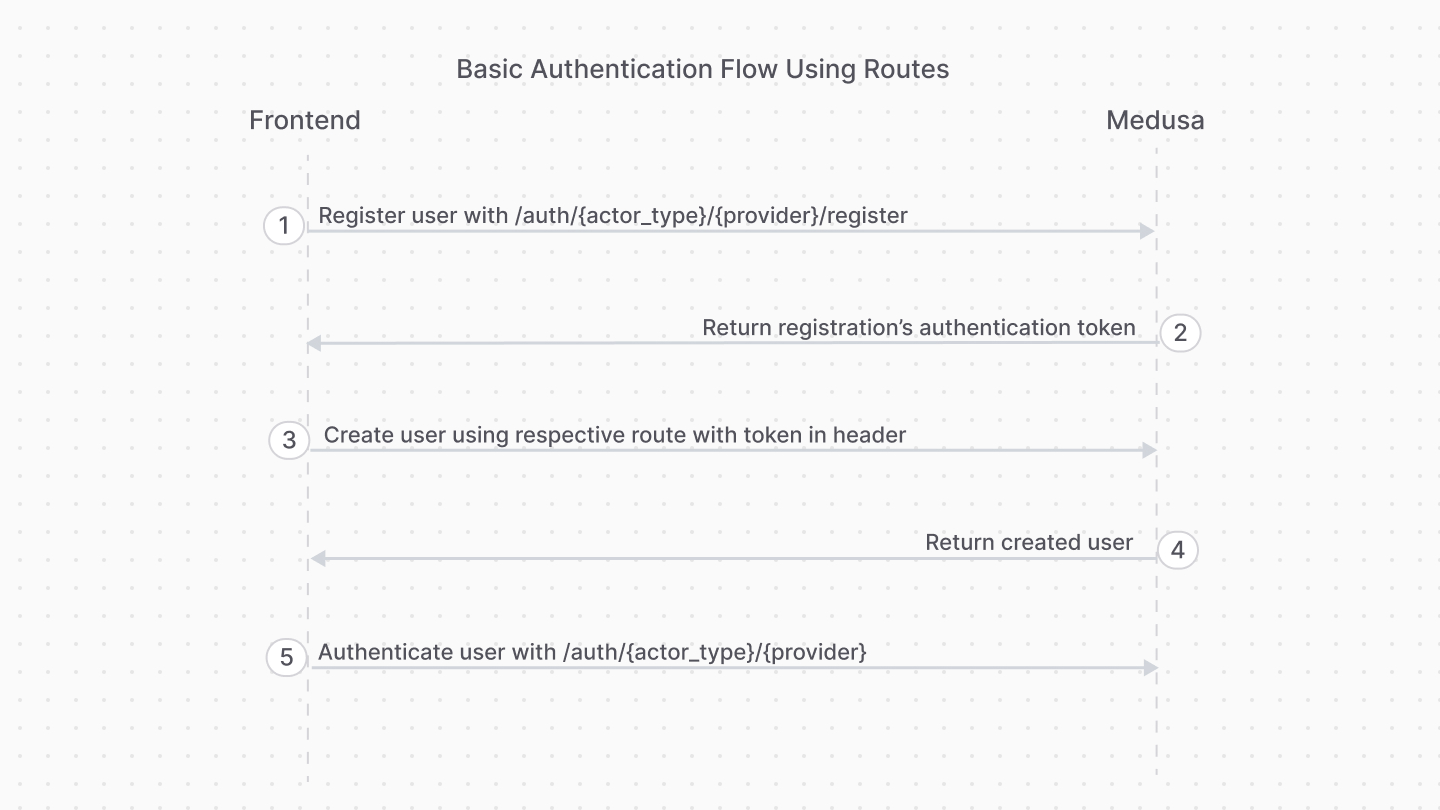 | |
| 1. Register the user with the [Register Route](#register-route). | |
| 2. Use the authentication token to create the user with their respective API route. | |
| - For example, for customers you would use the [Create Customer API route](https://docs.medusajs.com/api/store#customers_postcustomers/index.html.md). | |
| - For admin users, you accept an invite using the [Accept Invite API route](https://docs.medusajs.com/api/admin#invites_postinvitesaccept/index.html.md) | |
| 3. Authenticate the user with the [Auth Route](#login-route). | |
| After registration, you only use the [Auth Route](#login-route) for subsequent authentication. | |
| To handle errors related to existing identities, refer to [this section](#handling-existing-identities). | |
| ### 2. Third-Party Service Authenticate Flow | |
| This authentication flow authenticates the user with a third-party service, such as Google. | |
| [How to authenticate customer with a third-party provider in the storefront.](https://docs.medusajs.com/Users/shahednasser/medusa/www/apps/resources/app/storefront-development/customers/third-party-login/index.html.md). | |
| It requires the following steps: | |
| 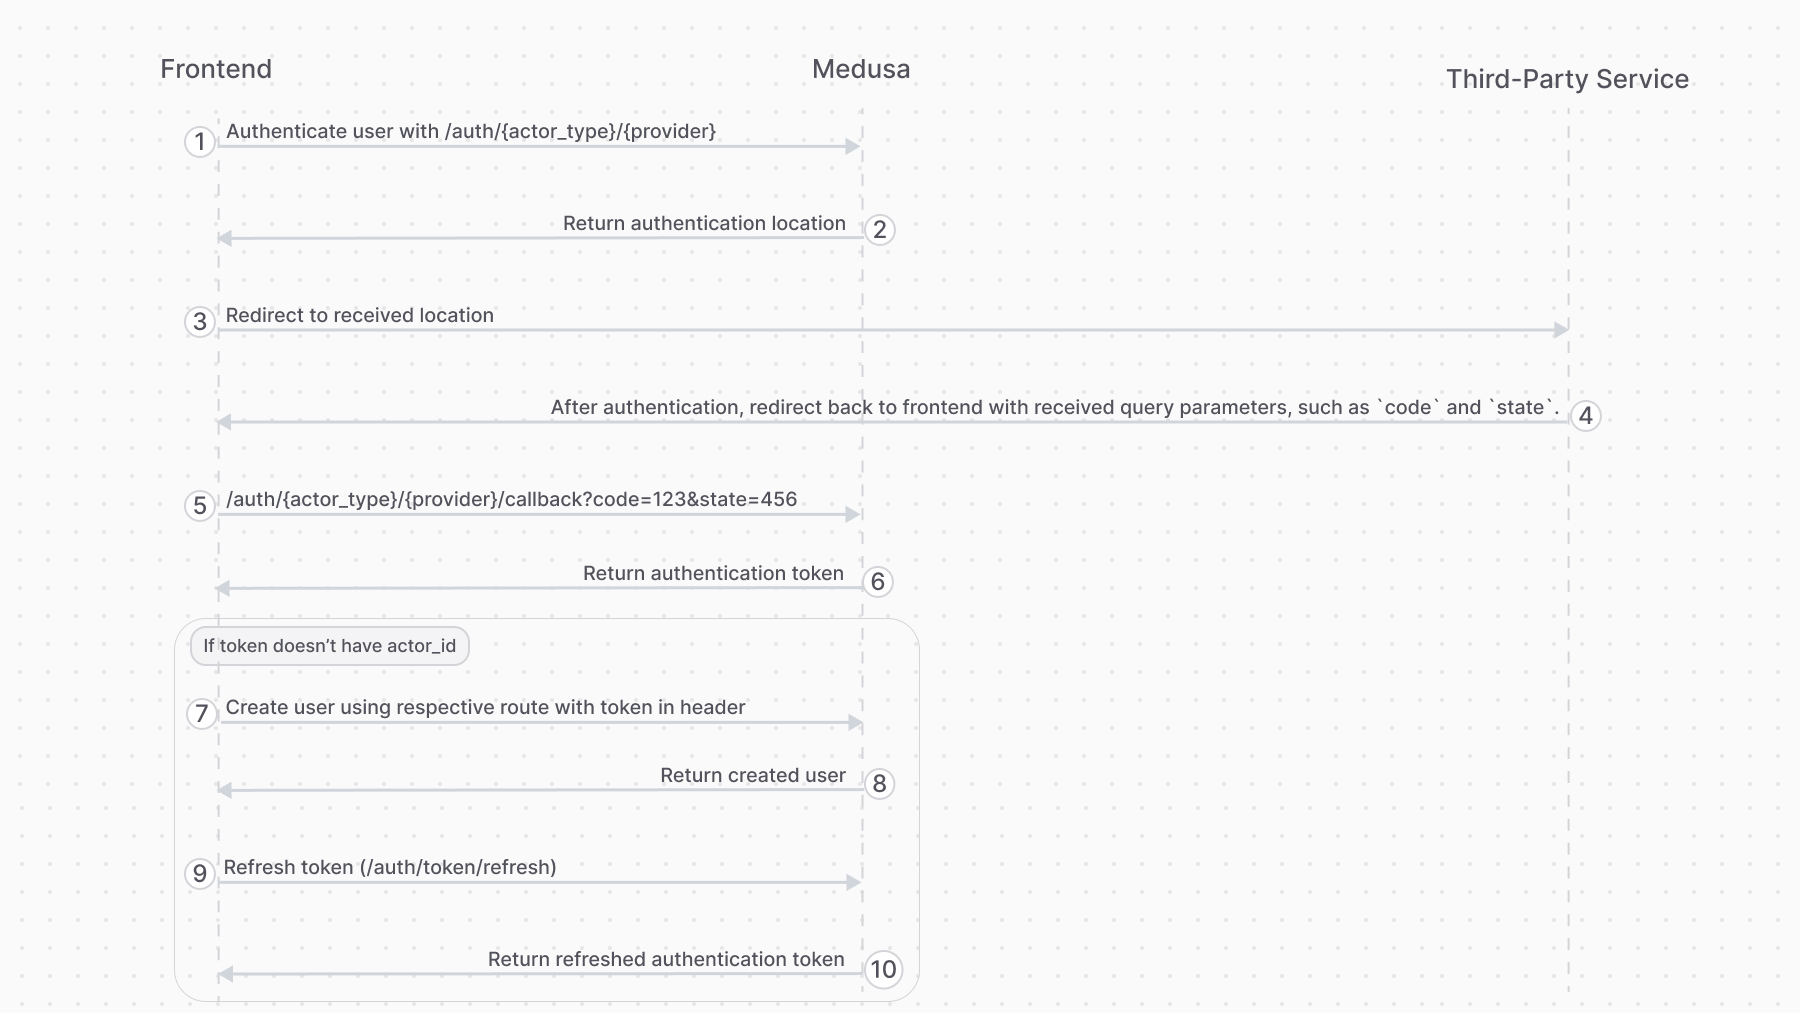 | |
| 1. Authenticate the user with the [Auth Route](#login-route). | |
| 2. The auth route returns a URL to authenticate with third-party service, such as login with Google. The frontend (such as a storefront), when it receives a `location` property in the response, must redirect to the returned location. | |
| 3. Once the authentication with the third-party service finishes, it redirects back to the frontend with a `code` query parameter. So, make sure your third-party service is configured to redirect to your frontend page after successful authentication. | |
| 4. The frontend sends a request to the [Validate Callback Route](#validate-callback-route) passing it the query parameters received from the third-party service, such as the `code` and `state` query parameters. | |
| 5. If the callback validation is successful, the frontend receives the authentication token. | |
| 6. Decode the received token in the frontend using tools like [react-jwt](https://www.npmjs.com/package/react-jwt). | |
| - If the decoded data has an `actor_id` property, then the user is already registered. So, use this token for subsequent authenticated requests. | |
| - If not, follow the rest of the steps. | |
| 7. The frontend uses the authentication token to create the user with their respective API route. | |
| - For example, for customers you would use the [Create Customer API route](https://docs.medusajs.com/api/store#customers_postcustomers/index.html.md). | |
| - For admin users, you accept an invite using the [Accept Invite API route](https://docs.medusajs.com/api/admin#invites_postinvitesaccept/index.html.md) | |
| 8. The frontend sends a request to the [Refresh Token Route](#refresh-token-route) to retrieve a new token with the user information populated. | |
| *** | |
| ## Register Route | |
| The Medusa application defines an API route at `/auth/{actor_type}/{provider}/register` that creates an auth identity for an actor type, such as a `customer`. It returns a JWT token that you pass to an API route that creates the user. | |
| ```bash | |
| curl -X POST http://localhost:9000/auth/{actor_type}/{providers}/register | |
| -H 'Content-Type: application/json' \ | |
| --data-raw '{ | |
| "email": "[email protected]" | |
| // ... | |
| }' | |
| ``` | |
| This API route is useful for providers like `emailpass` that uses custom logic to authenticate a user. For authentication providers that authenticate with third-party services, such as Google, use the [Auth Route](#login-route) instead. | |
| For example, if you're registering a customer, you: | |
| 1. Send a request to `/auth/customer/emailpass/register` to retrieve the registration JWT token. | |
| 2. Send a request to the [Create Customer API route](https://docs.medusajs.com/api/store#customers_postcustomers/index.html.md) to create the customer, passing the [JWT token in the header](https://docs.medusajs.com/api/store#authentication/index.html.md). | |
| ### Path Parameters | |
| Its path parameters are: | |
| - `{actor_type}`: the actor type of the user you're authenticating. For example, `customer`. | |
| - `{provider}`: the auth provider to handle the authentication. For example, `emailpass`. | |
| ### Request Body Parameters | |
| This route accepts in the request body the data that the specified authentication provider requires to handle authentication. | |
| For example, the EmailPass provider requires an `email` and `password` fields in the request body. | |
| ### Response Fields | |
| If the authentication is successful, you'll receive a `token` field in the response body object: | |
| ```json | |
| { | |
| "token": "..." | |
| } | |
| ``` | |
| Use that token in the header of subsequent requests to send authenticated requests. | |
| ### Handling Existing Identities | |
| An auth identity with the same email may already exist in Medusa. This can happen if: | |
| - Another actor type is using that email. For example, an admin user is trying to register as a customer. | |
| - The same email belongs to a record of the same actor type. For example, another customer has the same email. | |
| In these scenarios, the Register Route will return an error instead of a token: | |
| ```json | |
| { | |
| "type": "unauthorized", | |
| "message": "Identity with email already exists" | |
| } | |
| ``` | |
| To handle these scenarios, you can use the [Login Route](#login-route) to validate that the email and password match the existing identity. If so, you can allow the admin user, for example, to register as a customer. | |
| Otherwise, if the email and password don't match the existing identity, such as when the email belongs to another customer, the [Login Route](#login-route) returns an error: | |
| ```json | |
| { | |
| "type": "unauthorized", | |
| "message": "Invalid email or password" | |
| } | |
| ``` | |
| You can show that error message to the customer. | |
| *** | |
| ## Login Route | |
| The Medusa application defines an API route at `/auth/{actor_type}/{provider}` that authenticates a user of an actor type. It returns a JWT token that can be passed in [the header of subsequent requests](https://docs.medusajs.com/api/store#authentication/index.html.md) to send authenticated requests. | |
| ```bash | |
| curl -X POST http://localhost:9000/auth/{actor_type}/{providers} | |
| -H 'Content-Type: application/json' \ | |
| --data-raw '{ | |
| "email": "[email protected]" | |
| // ... | |
| }' | |
| ``` | |
| For example, if you're authenticating a customer, you send a request to `/auth/customer/emailpass`. | |
| ### Path Parameters | |
| Its path parameters are: | |
| - `{actor_type}`: the actor type of the user you're authenticating. For example, `customer`. | |
| - `{provider}`: the auth provider to handle the authentication. For example, `emailpass`. | |
| ### Request Body Parameters | |
| This route accepts in the request body the data that the specified authentication provider requires to handle authentication. | |
| For example, the EmailPass provider requires an `email` and `password` fields in the request body. | |
| #### Overriding Callback URL | |
| For the [GitHub](https://docs.medusajs.com/Users/shahednasser/medusa/www/apps/resources/app/commerce-modules/auth/auth-providers/github/index.html.md) and [Google](https://docs.medusajs.com/Users/shahednasser/medusa/www/apps/resources/app/commerce-modules/auth/auth-providers/google/index.html.md) providers, you can pass a `callback_url` body parameter that overrides the `callbackUrl` set in the provider's configurations. | |
| This is useful if you want to redirect the user to a different URL after authentication based on their actor type. For example, you can set different `callback_url` for admin users and customers. | |
| ### Response Fields | |
| If the authentication is successful, you'll receive a `token` field in the response body object: | |
| ```json | |
| { | |
| "token": "..." | |
| } | |
| ``` | |
| Use that token in the header of subsequent requests to send authenticated requests. | |
| If the authentication requires more action with a third-party service, you'll receive a `location` property: | |
| ```json | |
| { | |
| "location": "https://..." | |
| } | |
| ``` | |
| Redirect to that URL in the frontend to continue the authentication process with the third-party service. | |
| [How to login Customers using the authentication route](https://docs.medusajs.com/Users/shahednasser/medusa/www/apps/resources/app/storefront-development/customers/login/index.html.md). | |
| *** | |
| ## Validate Callback Route | |
| The Medusa application defines an API route at `/auth/{actor_type}/{provider}/callback` that's useful for validating the authentication callback or redirect from third-party services like Google. | |
| ```bash | |
| curl -X POST http://localhost:9000/auth/{actor_type}/{providers}/callback?code=123&state=456 | |
| ``` | |
| Refer to the [third-party authentication flow](#2-third-party-service-authenticate-flow) section to see how this route fits into the authentication flow. | |
| ### Path Parameters | |
| Its path parameters are: | |
| - `{actor_type}`: the actor type of the user you're authenticating. For example, `customer`. | |
| - `{provider}`: the auth provider to handle the authentication. For example, `google`. | |
| ### Query Parameters | |
| This route accepts all the query parameters that the third-party service sends to the frontend after the user completes the authentication process, such as the `code` and `state` query parameters. | |
| ### Response Fields | |
| If the authentication is successful, you'll receive a `token` field in the response body object: | |
| ```json | |
| { | |
| "token": "..." | |
| } | |
| ``` | |
| In your frontend, decode the token using tools like [react-jwt](https://www.npmjs.com/package/react-jwt): | |
| - If the decoded data has an `actor_id` property, the user is already registered. So, use this token for subsequent authenticated requests. | |
| - If not, use the token in the header of a request that creates the user, such as the [Create Customer API route](https://docs.medusajs.com/api/store#customers_postcustomers/index.html.md). | |
| *** | |
| ## Refresh Token Route | |
| The Medusa application defines an API route at `/auth/token/refresh` that's useful after authenticating a user with a third-party service to populate the user's token with their new information. | |
| It requires the user's JWT token that they received from the authentication or callback routes. | |
| ```bash | |
| curl -X POST http://localhost:9000/auth/token/refresh \ | |
| -H 'Authorization: Bearer {token}' | |
| ``` | |
| ### Response Fields | |
| If the token was refreshed successfully, you'll receive a `token` field in the response body object: | |
| ```json | |
| { | |
| "token": "..." | |
| } | |
| ``` | |
| Use that token in the header of subsequent requests to send authenticated requests. | |
| *** | |
| ## Reset Password Routes | |
| To reset a user's password: | |
| 1. Generate a token using the [Generate Reset Password Token API route](#generate-reset-password-token-route). | |
| - The API route emits the `auth.password_reset` event, passing the token in the payload. | |
| - You can create a subscriber, as seen in [this guide](https://docs.medusajs.com/Users/shahednasser/medusa/www/apps/resources/app/commerce-modules/auth/reset-password/index.html.md), that listens to the event and send a notification to the user. | |
| 2. Pass the token to the [Reset Password API route](#reset-password-route) to reset the password. | |
| - The URL in the user's notification should direct them to a frontend URL, which sends a request to this route. | |
| [Storefront Development: How to Reset a Customer's Password.](https://docs.medusajs.com/Users/shahednasser/medusa/www/apps/resources/app/storefront-development/customers/reset-password/index.html.md) | |
| ### Generate Reset Password Token Route | |
| The Medusa application defines an API route at `/auth/{actor_type}/{auth_provider}/reset-password` that emits the `auth.password_reset` event, passing the token in the payload. | |
| ```bash | |
| curl -X POST http://localhost:9000/auth/{actor_type}/{providers}/reset-password | |
| -H 'Content-Type: application/json' \ | |
| --data-raw '{ | |
| "identifier": "[email protected]" | |
| }' | |
| ``` | |
| This API route is useful for providers like `emailpass` that store a user's password and use it for authentication. | |
| #### Path Parameters | |
| Its path parameters are: | |
| - `{actor_type}`: the actor type of the user you're authenticating. For example, `customer`. | |
| - `{provider}`: the auth provider to handle the authentication. For example, `emailpass`. | |
| #### Request Body Parameters | |
| This route accepts in the request body an object having the following property: | |
| - `identifier`: The user's identifier in the specified auth provider. For example, for the `emailpass` auth provider, you pass the user's email. | |
| #### Response Fields | |
| If the authentication is successful, the request returns a `201` response code. | |
| ### Reset Password Route | |
| The Medusa application defines an API route at `/auth/{actor_type}/{auth_provider}/update` that accepts a token and, if valid, updates the user's password. | |
| ```bash | |
| curl -X POST http://localhost:9000/auth/{actor_type}/{providers}/update?token=123 | |
| -H 'Content-Type: application/json' \ | |
| --data-raw '{ | |
| "email": "[email protected]", | |
| "password": "supersecret" | |
| }' | |
| ``` | |
| This API route is useful for providers like `emailpass` that store a user's password and use it for logging them in. | |
| #### Path Parameters | |
| Its path parameters are: | |
| - `{actor_type}`: the actor type of the user you're authenticating. For example, `customer`. | |
| - `{provider}`: the auth provider to handle the authentication. For example, `emailpass`. | |
| #### Query Parameters | |
| The route accepts a `token` query parameter, which is the token generated using the [Generate Reset Password Token route](#generate-reset-password-token-route). | |
| ### Request Body Parameters | |
| This route accepts in the request body an object that has the data necessary for the provider to update the user's password. | |
| For the `emailpass` provider, you must pass the following properties: | |
| - `email`: The user's email. | |
| - `password`: The new password. | |
| ### Response Fields | |
| If the authentication is successful, the request returns an object with a `success` property set to `true`: | |
| ```json | |
| { | |
| "success": "true" | |
| } | |
| ``` | |
| # How to Create an Actor Type | |
| In this document, learn how to create an actor type and authenticate its associated data model. | |
| ## 0. Create Module with Data Model | |
| Before creating an actor type, you must have a module with a data model representing the actor type. | |
| Learn how to create a module in [this guide](https://docs.medusajs.com/docs/learn/fundamentals/modules/index.html.md). | |
| The rest of this guide uses this `Manager` data model as an example: | |
| ```ts title="src/modules/manager/models/manager.ts" | |
| import { model } from "@medusajs/framework/utils" | |
| const Manager = model.define("manager", { | |
| id: model.id().primaryKey(), | |
| firstName: model.text(), | |
| lastName: model.text(), | |
| email: model.text(), | |
| }) | |
| export default Manager | |
| ``` | |
| *** | |
| ## 1. Create Workflow | |
| Start by creating a workflow that does two things: | |
| - Creates a record of the `Manager` data model. | |
| - Sets the `app_metadata` property of the associated `AuthIdentity` record based on the new actor type. | |
| For example, create the file `src/workflows/create-manager.ts`. with the following content: | |
| ```ts title="src/workflows/create-manager.ts" highlights={workflowHighlights} | |
| import { | |
| createWorkflow, | |
| createStep, | |
| StepResponse, | |
| WorkflowResponse, | |
| } from "@medusajs/framework/workflows-sdk" | |
| import { | |
| setAuthAppMetadataStep, | |
| } from "@medusajs/medusa/core-flows" | |
| import ManagerModuleService from "../modules/manager/service" | |
| type CreateManagerWorkflowInput = { | |
| manager: { | |
| first_name: string | |
| last_name: string | |
| email: string | |
| } | |
| authIdentityId: string | |
| } | |
| const createManagerStep = createStep( | |
| "create-manager-step", | |
| async ({ | |
| manager: managerData, | |
| }: Pick<CreateManagerWorkflowInput, "manager">, | |
| { container }) => { | |
| const managerModuleService: ManagerModuleService = | |
| container.resolve("managerModuleService") | |
| const manager = await managerModuleService.createManager( | |
| managerData | |
| ) | |
| return new StepResponse(manager) | |
| } | |
| ) | |
| const createManagerWorkflow = createWorkflow( | |
| "create-manager", | |
| function (input: CreateManagerWorkflowInput) { | |
| const manager = createManagerStep({ | |
| manager: input.manager, | |
| }) | |
| setAuthAppMetadataStep({ | |
| authIdentityId: input.authIdentityId, | |
| actorType: "manager", | |
| value: manager.id, | |
| }) | |
| return new WorkflowResponse(manager) | |
| } | |
| ) | |
| export default createManagerWorkflow | |
| ``` | |
| This workflow accepts the manager’s data and the associated auth identity’s ID as inputs. The next sections explain how the auth identity ID is retrieved. | |
| The workflow has two steps: | |
| 1. Create the manager using the `createManagerStep`. | |
| 2. Set the `app_metadata` property of the associated auth identity using the `setAuthAppMetadataStep` from Medusa's core workflows. You specify the actor type `manager` in the `actorType` property of the step’s input. | |
| *** | |
| ## 2. Define the Create API Route | |
| Next, you’ll use the workflow defined in the previous section in an API route that creates a manager. | |
| So, create the file `src/api/manager/route.ts` with the following content: | |
| ```ts title="src/api/manager/route.ts" highlights={createRouteHighlights} | |
| import type { | |
| AuthenticatedMedusaRequest, | |
| MedusaResponse, | |
| } from "@medusajs/framework/http" | |
| import { MedusaError } from "@medusajs/framework/utils" | |
| import createManagerWorkflow from "../../workflows/create-manager" | |
| type RequestBody = { | |
| first_name: string | |
| last_name: string | |
| email: string | |
| } | |
| export async function POST( | |
| req: AuthenticatedMedusaRequest<RequestBody>, | |
| res: MedusaResponse | |
| ) { | |
| // If `actor_id` is present, the request carries | |
| // authentication for an existing manager | |
| if (req.auth_context.actor_id) { | |
| throw new MedusaError( | |
| MedusaError.Types.INVALID_DATA, | |
| "Request already authenticated as a manager." | |
| ) | |
| } | |
| const { result } = await createManagerWorkflow(req.scope) | |
| .run({ | |
| input: { | |
| manager: req.body, | |
| authIdentityId: req.auth_context.auth_identity_id, | |
| }, | |
| }) | |
| res.status(200).json({ manager: result }) | |
| } | |
| ``` | |
| Since the manager must be associated with an `AuthIdentity` record, the request is expected to be authenticated, even if the manager isn’t created yet. This can be achieved by: | |
| 1. Obtaining a token usng the [/auth route](https://docs.medusajs.com/Users/shahednasser/medusa/www/apps/resources/app/commerce-modules/auth/authentication-route/index.html.md). | |
| 2. Passing the token in the bearer header of the request to this route. | |
| In the API route, you create the manager using the workflow from the previous section and return it in the response. | |
| *** | |
| ## 3. Apply the `authenticate` Middleware | |
| The last step is to apply the `authenticate` middleware on the API routes that require a manager’s authentication. | |
| To do that, create the file `src/api/middlewares.ts` with the following content: | |
| ```ts title="src/api/middlewares.ts" highlights={middlewareHighlights} | |
| import { | |
| defineMiddlewares, | |
| authenticate, | |
| } from "@medusajs/framework/http" | |
| export default defineMiddlewares({ | |
| routes: [ | |
| { | |
| matcher: "/manager", | |
| method: "POST", | |
| middlewares: [ | |
| authenticate("manager", ["session", "bearer"], { | |
| allowUnregistered: true, | |
| }), | |
| ], | |
| }, | |
| { | |
| matcher: "/manager/me*", | |
| middlewares: [ | |
| authenticate("manager", ["session", "bearer"]), | |
| ], | |
| }, | |
| ], | |
| }) | |
| ``` | |
| This applies middlewares on two route patterns: | |
| 1. The `authenticate` middleware is applied on the `/manager` API route for `POST` requests while allowing unregistered managers. This requires that a bearer token be passed in the request to access the manager’s auth identity but doesn’t require the manager to be registered. | |
| 2. The `authenticate` middleware is applied on all routes starting with `/manager/me`, restricting these routes to authenticated managers only. | |
| ### Retrieve Manager API Route | |
| For example, create the file `src/api/manager/me/route.ts` with the following content: | |
| ```ts title="src/api/manager/me/route.ts" | |
| import { | |
| AuthenticatedMedusaRequest, | |
| MedusaResponse, | |
| } from "@medusajs/framework/http" | |
| import ManagerModuleService from "../../../modules/manager/service" | |
| export async function GET( | |
| req: AuthenticatedMedusaRequest, | |
| res: MedusaResponse | |
| ): Promise<void> { | |
| const managerModuleService: ManagerModuleService = | |
| req.scope.resolve("managerModuleService") | |
| const manager = await managerModuleService.retrieveManager( | |
| req.auth_context.actor_id | |
| ) | |
| res.json({ manager }) | |
| } | |
| ``` | |
| This route is only accessible by authenticated managers. You access the manager’s ID using `req.auth_context.actor_id`. | |
| *** | |
| ## Test Custom Actor Type Authentication Flow | |
| To authenticate managers: | |
| 1. Send a `POST` request to `/auth/manager/emailpass/register` to create an auth identity for the manager: | |
| ```bash | |
| curl -X POST 'http://localhost:9000/auth/manager/emailpass/register' \ | |
| -H 'Content-Type: application/json' \ | |
| --data-raw '{ | |
| "email": "[email protected]", | |
| "password": "supersecret" | |
| }' | |
| ``` | |
| Copy the returned token to use it in the next request. | |
| 2. Send a `POST` request to `/manager` to create a manager: | |
| ```bash | |
| curl -X POST 'http://localhost:9000/manager' \ | |
| -H 'Content-Type: application/json' \ | |
| -H 'Authorization: Bearer {token}' \ | |
| --data-raw '{ | |
| "first_name": "John", | |
| "last_name": "Doe", | |
| "email": "[email protected]" | |
| }' | |
| ``` | |
| Replace `{token}` with the token returned in the previous step. | |
| 3. Send a `POST` request to `/auth/manager/emailpass` again to retrieve an authenticated token for the manager: | |
| ```bash | |
| curl -X POST 'http://localhost:9000/auth/manager/emailpass' \ | |
| -H 'Content-Type: application/json' \ | |
| --data-raw '{ | |
| "email": "[email protected]", | |
| "password": "supersecret" | |
| }' | |
| ``` | |
| 4. You can now send authenticated requests as a manager. For example, send a `GET` request to `/manager/me` to retrieve the authenticated manager’s details: | |
| ```bash | |
| curl 'http://localhost:9000/manager/me' \ | |
| -H 'Authorization: Bearer {token}' | |
| ``` | |
| Whenever you want to log in as a manager, use the `/auth/manager/emailpass` API route, as explained in step 3. | |
| *** | |
| ## Delete User of Actor Type | |
| When you delete a user of the actor type, you must update its auth identity to remove the association to the user. | |
| For example, create the following workflow that deletes a manager and updates its auth identity, create the file `src/workflows/delete-manager.ts` with the following content: | |
| ```ts title="src/workflows/delete-manager.ts" collapsibleLines="1-6" expandButtonLabel="Show Imports" | |
| import { | |
| createStep, | |
| StepResponse, | |
| } from "@medusajs/framework/workflows-sdk" | |
| import ManagerModuleService from "../modules/manager/service" | |
| export type DeleteManagerWorkflow = { | |
| id: string | |
| } | |
| const deleteManagerStep = createStep( | |
| "delete-manager-step", | |
| async ( | |
| { id }: DeleteManagerWorkflow, | |
| { container }) => { | |
| const managerModuleService: ManagerModuleService = | |
| container.resolve("managerModuleService") | |
| const manager = await managerModuleService.retrieve(id) | |
| await managerModuleService.deleteManagers(id) | |
| return new StepResponse(undefined, { manager }) | |
| }, | |
| async ({ manager }, { container }) => { | |
| const managerModuleService: ManagerModuleService = | |
| container.resolve("managerModuleService") | |
| await managerModuleService.createManagers(manager) | |
| } | |
| ) | |
| ``` | |
| You add a step that deletes the manager using the `deleteManagers` method of the module's main service. In the compensation function, you create the manager again. | |
| Next, in the same file, add the workflow that deletes a manager: | |
| ```ts title="src/workflows/delete-manager.ts" collapsibleLines="1-15" expandButtonLabel="Show Imports" highlights={deleteHighlights} | |
| // other imports | |
| import { MedusaError } from "@medusajs/framework/utils" | |
| import { | |
| WorkflowData, | |
| WorkflowResponse, | |
| createWorkflow, | |
| transform, | |
| } from "@medusajs/framework/workflows-sdk" | |
| import { | |
| setAuthAppMetadataStep, | |
| useQueryGraphStep, | |
| } from "@medusajs/medusa/core-flows" | |
| // ... | |
| export const deleteManagerWorkflow = createWorkflow( | |
| "delete-manager", | |
| ( | |
| input: WorkflowData<DeleteManagerWorkflow> | |
| ): WorkflowResponse<string> => { | |
| deleteManagerStep(input) | |
| const { data: authIdentities } = useQueryGraphStep({ | |
| entity: "auth_identity", | |
| fields: ["id"], | |
| filters: { | |
| app_metadata: { | |
| // the ID is of the format `{actor_type}_id`. | |
| manager_id: input.id, | |
| }, | |
| }, | |
| }) | |
| const authIdentity = transform( | |
| { authIdentities }, | |
| ({ authIdentities }) => { | |
| const authIdentity = authIdentities[0] | |
| if (!authIdentity) { | |
| throw new MedusaError( | |
| MedusaError.Types.NOT_FOUND, | |
| "Auth identity not found" | |
| ) | |
| } | |
| return authIdentity | |
| } | |
| ) | |
| setAuthAppMetadataStep({ | |
| authIdentityId: authIdentity.id, | |
| actorType: "manager", | |
| value: null, | |
| }) | |
| return new WorkflowResponse(input.id) | |
| } | |
| ) | |
| ``` | |
| In the workflow, you: | |
| 1. Use the `deleteManagerStep` defined earlier to delete the manager. | |
| 2. Retrieve the auth identity of the manager using Query. To do that, you filter the `app_metadata` property of an auth identity, which holds the user's ID under `{actor_type_name}_id`. So, in this case, it's `manager_id`. | |
| 3. Check that the auth identity exist, then, update the auth identity to remove the ID of the manager from it. | |
| You can use this workflow when deleting a manager, such as in an API route. | |
| # Auth Module Options | |
| In this document, you'll learn about the options of the Auth Module. | |
| ## providers | |
| The `providers` option is an array of auth module providers. | |
| When the Medusa application starts, these providers are registered and can be used to handle authentication. | |
| By default, the `emailpass` provider is registered to authenticate customers and admin users. | |
| For example: | |
| ```ts title="medusa-config.ts" | |
| import { Modules, ContainerRegistrationKeys } from "@medusajs/framework/utils" | |
| // ... | |
| module.exports = defineConfig({ | |
| // ... | |
| modules: [ | |
| { | |
| resolve: "@medusajs/medusa/auth", | |
| dependencies: [Modules.CACHE, ContainerRegistrationKeys.LOGGER], | |
| options: { | |
| providers: [ | |
| { | |
| resolve: "@medusajs/medusa/auth-emailpass", | |
| id: "emailpass", | |
| options: { | |
| // provider options... | |
| }, | |
| }, | |
| ], | |
| }, | |
| }, | |
| ], | |
| }) | |
| ``` | |
| The `providers` option is an array of objects that accept the following properties: | |
| - `resolve`: A string indicating the package name of the module provider or the path to it relative to the `src` directory. | |
| - `id`: A string indicating the provider's unique name or ID. | |
| - `options`: An optional object of the module provider's options. | |
| *** | |
| ## Auth CORS | |
| The Medusa application's authentication API routes are defined under the `/auth` prefix that requires setting the `authCors` property of the `http` configuration. | |
| By default, the Medusa application you created will have an `AUTH_CORS` environment variable, which is used as the value of `authCors`. | |
| Refer to [Medusa's configuration guide](https://docs.medusajs.com/references/medusa-config#authCors/index.html.md) to learn more about the `authCors` configuration. | |
| *** | |
| ## authMethodsPerActor Configuration | |
| The Medusa application's configuration accept an `authMethodsPerActor` configuration which restricts the allowed auth providers used with an actor type. | |
| Learn more about the `authMethodsPerActor` configuration in [this guide](https://docs.medusajs.com/Users/shahednasser/medusa/www/apps/resources/app/commerce-modules/auth/auth-providers#configure-allowed-auth-providers-of-actor-types/index.html.md). | |
| # How to Handle Password Reset Token Event | |
| In this guide, you'll learn how to handle the `auth.password_reset` event, which is emitted when a request is sent to the [Generate Reset Password Token API route](https://docs.medusajs.com/Users/shahednasser/medusa/www/apps/resources/app/commerce-modules/auth/authentication-route#generate-reset-password-token-route/index.html.md). | |
| You'll create a subscriber that listens to the event. When the event is emitted, the subscriber sends an email notification to the user. | |
| ### Prerequisites | |
| - [A notification provider module, such as SendGrid](https://docs.medusajs.com/architectural-modules/notification/sendgrid/index.html.md) | |
| ## 1. Create Subscriber | |
| The first step is to create a subscriber that listens to the `auth.password_reset` and sends the user a notification with instructions to reset their password. | |
| Create the file `src/subscribers/handle-reset.ts` with the following content: | |
| ```ts title="src/subscribers/handle-reset.ts" highlights={highlights} collapsibleLines="1-6" expandMoreLabel="Show Imports" | |
| import { | |
| SubscriberArgs, | |
| type SubscriberConfig, | |
| } from "@medusajs/medusa" | |
| import { Modules } from "@medusajs/framework/utils" | |
| export default async function resetPasswordTokenHandler({ | |
| event: { data: { | |
| entity_id: email, | |
| token, | |
| actor_type, | |
| } }, | |
| container, | |
| }: SubscriberArgs<{ entity_id: string, token: string, actor_type: string }>) { | |
| const notificationModuleService = container.resolve( | |
| Modules.NOTIFICATION | |
| ) | |
| const urlPrefix = actor_type === "customer" ? | |
| "https://storefront.com" : | |
| "https://admin.com" | |
| await notificationModuleService.createNotifications({ | |
| to: email, | |
| channel: "email", | |
| template: "reset-password-template", | |
| data: { | |
| // a URL to a frontend application | |
| url: `${urlPrefix}/reset-password?token=${token}&email=${email}`, | |
| }, | |
| }) | |
| } | |
| export const config: SubscriberConfig = { | |
| event: "auth.password_reset", | |
| } | |
| ``` | |
| You subscribe to the `auth.password_reset` event. The event has a data payload object with the following properties: | |
| - `entity_id`: The identifier of the user. When using the `emailpass` provider, it's the user's email. | |
| - `token`: The token to reset the user's password. | |
| - `actor_type`: The user's actor type. For example, if the user is a customer, the `actor_type` is `customer`. If it's an admin user, the `actor_type` is `user`. | |
| This event's payload previously had an `actorType` field. It was renamed to `actor_type` after [Medusa v2.0.7](https://github.com/medusajs/medusa/releases/tag/v2.0.7). | |
| In the subscriber, you: | |
| - Decide the frontend URL based on whether the user is a customer or admin user by checking the value of `actor_type`. | |
| - Resolve the Notification Module and use its `createNotifications` method to send the notification. | |
| - You pass to the `createNotifications` method an object having the following properties: | |
| - `to`: The identifier to send the notification to, which in this case is the email. | |
| - `channel`: The channel to send the notification through, which in this case is email. | |
| - `template`: The template ID in the third-party service. | |
| - `data`: The data payload to pass to the template. You pass the URL to redirect the user to. You must pass the token and email in the URL so that the frontend can send them later to the Medusa application when reseting the password. | |
| *** | |
| ## 2. Test it Out: Generate Reset Password Token | |
| To test the subscriber out, send a request to the `/auth/{actor_type}/{auth_provider}/reset-password` API route, replacing `{actor_type}` and `{auth_provider}` with the user's actor type and provider used for authentication respectively. | |
| For example, to generate a reset password token for an admin user using the `emailpass` provider, send the following request: | |
| ```bash | |
| curl --location 'http://localhost:9000/auth/user/emailpass/reset-password' \ | |
| --header 'Content-Type: application/json' \ | |
| --data-raw '{ | |
| "identifier": "[email protected]" | |
| }' | |
| ``` | |
| In the request body, you must pass an `identifier` parameter. Its value is the user's identifier, which is the email in this case. | |
| If the token is generated successfully, the request returns a response with `201` status code. In the terminal, you'll find the following message indicating that the `auth.password_reset` event was emitted and your subscriber ran: | |
| ```plain | |
| info: Processing auth.password_reset which has 1 subscribers | |
| ``` | |
| The notification is sent to the user with the frontend URL to enter a new password. | |
| *** | |
| ## Next Steps: Implementing Frontend | |
| In your frontend, you must have a page that accepts `token` and `email` query parameters. | |
| The page shows the user password fields to enter their new password, then submits the new password, token, and email to the [Reset Password Route](https://docs.medusajs.com/Users/shahednasser/medusa/www/apps/resources/app/commerce-modules/auth/authentication-route#reset-password-route/index.html.md). | |
| ### Examples | |
| - [Storefront Guide: Reset Customer Password](https://docs.medusajs.com/Users/shahednasser/medusa/www/apps/resources/app/storefront-development/customers/reset-password/index.html.md) | |
| # Links between Currency Module and Other Modules | |
| This document showcases the module links defined between the Currency Module and other commerce modules. | |
| ## Summary | |
| The Currency Module has the following links to other modules: | |
| Read-only links are used to query data across modules, but the relations aren't stored in a pivot table in the database. | |
| - [`Currency` data model of Store Module \<> `Currency` data model of Currency Module](#store-module). (Read-only). | |
| *** | |
| ## Store Module | |
| The Store Module has a `Currency` data model that stores the supported currencies of a store. However, these currencies don't hold all the details of a currency, such as its name or symbol. | |
| Instead, Medusa defines a read-only link between the Currency Module's `Currency` data model and the [Store Module](https://docs.medusajs.com/Users/shahednasser/medusa/www/apps/resources/app/commerce-modules/store/index.html.md)'s `Currency` data model. This means you can retrieve the details of a store's supported currencies, but you don't manage the links in a pivot table in the database. The currencies of a store are determined by the `currency_code` of the `Currency` data model in the Store Module. | |
| ### Retrieve with Query | |
| To retrieve the details of a store's currencies with [Query](https://docs.medusajs.com/docs/learn/fundamentals/module-links/query/index.html.md), pass `supported_currencies.currency.*` in `fields`: | |
| ### query.graph | |
| ```ts | |
| const { data: stores } = await query.graph({ | |
| entity: "store", | |
| fields: [ | |
| "supported_currencies.currency.*", | |
| ], | |
| }) | |
| // stores.supported_currencies | |
| ``` | |
| ### useQueryGraphStep | |
| ```ts | |
| import { useQueryGraphStep } from "@medusajs/medusa/core-flows" | |
| // ... | |
| const { data: stores } = useQueryGraphStep({ | |
| entity: "store", | |
| fields: [ | |
| "supported_currencies.currency.*", | |
| ], | |
| }) | |
| // stores.supported_currencies | |
| ``` | |
| # Customer Accounts | |
| In this document, you’ll learn how registered and unregistered accounts are distinguished in the Medusa application. | |
| ## `has_account` Property | |
| The [Customer data model](https://docs.medusajs.com/references/customer/models/Customer/index.html.md) has a `has_account` property, which is a boolean that indicates whether a customer is registered. | |
| When a guest customer places an order, a new `Customer` record is created with `has_account` set to `false`. | |
| When this or another guest customer registers an account with the same email, a new `Customer` record is created with `has_account` set to `true`. | |
| *** | |
| ## Email Uniqueness | |
| The above behavior means that two `Customer` records may exist with the same email. However, the main difference is the `has_account` property's value. | |
| So, there can only be one guest customer (having `has_account=false`) and one registered customer (having `has_account=true`) with the same email. | |
| # Links between Customer Module and Other Modules | |
| This document showcases the module links defined between the Customer Module and other commerce modules. | |
| ## Summary | |
| The Customer Module has the following links to other modules: | |
| Read-only links are used to query data across modules, but the relations aren't stored in a pivot table in the database. | |
| - [`Cart` data model of Cart Module \<> `Customer` data model](#cart-module). (Read-only). | |
| - [`Order` data model of Order Module \<> `Customer` data model](#order-module). (Read-only). | |
| *** | |
| ## Cart Module | |
| Medusa defines a read-only link between the `Customer` data model and the [Cart Module](https://docs.medusajs.com/Users/shahednasser/medusa/www/apps/resources/app/commerce-modules/cart/index.html.md)'s `Cart` data model. This means you can retrieve the details of a customer's carts, but you don't manage the links in a pivot table in the database. The customer of a cart is determined by the `customer_id` property of the `Cart` data model. | |
| ### Retrieve with Query | |
| To retrieve a customer's carts with [Query](https://docs.medusajs.com/docs/learn/fundamentals/module-links/query/index.html.md), pass `carts.*` in `fields`: | |
| ### query.graph | |
| ```ts | |
| const { data: customers } = await query.graph({ | |
| entity: "customer", | |
| fields: [ | |
| "carts.*", | |
| ], | |
| }) | |
| // customers.carts | |
| ``` | |
| ### useQueryGraphStep | |
| ```ts | |
| import { useQueryGraphStep } from "@medusajs/medusa/core-flows" | |
| // ... | |
| const { data: customers } = useQueryGraphStep({ | |
| entity: "customer", | |
| fields: [ | |
| "carts.*", | |
| ], | |
| }) | |
| // customers.carts | |
| ``` | |
| *** | |
| ## Order Module | |
| Medusa defines a read-only link between the `Customer` data model and the [Order Module](https://docs.medusajs.com/Users/shahednasser/medusa/www/apps/resources/app/commerce-modules/order/index.html.md)'s `Order` data model. This means you can retrieve the details of a customer's orders, but you don't manage the links in a pivot table in the database. The customer of an order is determined by the `customer_id` property of the `Order` data model. | |
| ### Retrieve with Query | |
| To retrieve a customer's orders with [Query](https://docs.medusajs.com/docs/learn/fundamentals/module-links/query/index.html.md), pass `orders.*` in `fields`: | |
| ### query.graph | |
| ```ts | |
| const { data: customers } = await query.graph({ | |
| entity: "customer", | |
| fields: [ | |
| "orders.*", | |
| ], | |
| }) | |
| // customers.orders | |
| ``` | |
| ### useQueryGraphStep | |
| ```ts | |
| import { useQueryGraphStep } from "@medusajs/medusa/core-flows" | |
| // ... | |
| const { data: customers } = useQueryGraphStep({ | |
| entity: "customer", | |
| fields: [ | |
| "orders.*", | |
| ], | |
| }) | |
| // customers.orders | |
| ``` | |
| # Cart Concepts | |
| In this document, you’ll get an overview of the main concepts of a cart. | |
| ## Shipping and Billing Addresses | |
| A cart has a shipping and billing address. Both of these addresses are represented by the [Address data model](https://docs.medusajs.com/references/cart/models/Address/index.html.md). | |
| 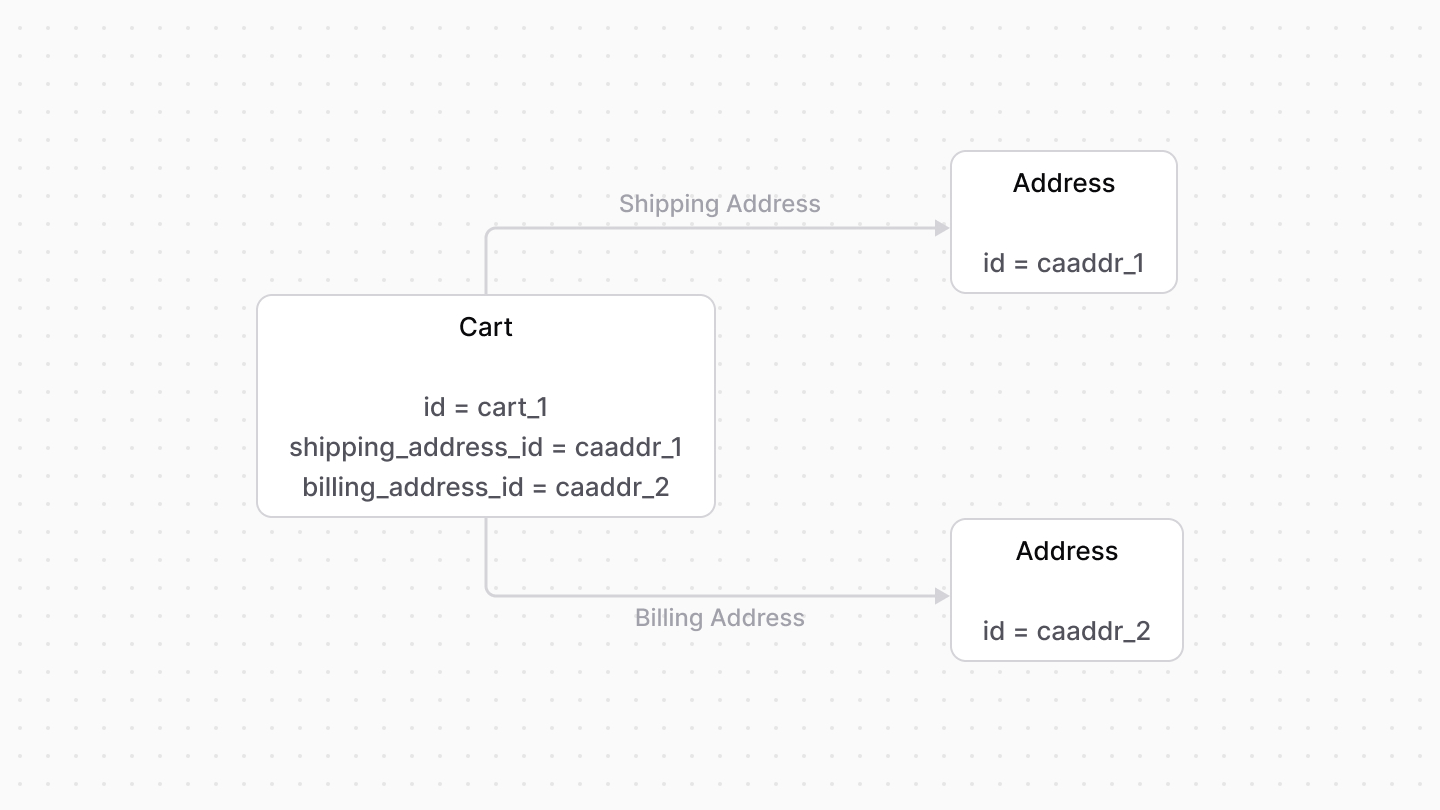 | |
| *** | |
| ## Line Items | |
| A line item, represented by the [LineItem](https://docs.medusajs.com/references/cart/models/LineItem/index.html.md) data model, is a quantity of a product variant added to the cart. A cart has multiple line items. | |
| A line item stores some of the product variant’s properties, such as the `product_title` and `product_description`. It also stores data related to the item’s quantity and price. | |
| In the Medusa application, a product variant is implemented in the [Product Module](https://docs.medusajs.com/Users/shahednasser/medusa/www/apps/resources/app/commerce-modules/product/index.html.md). | |
| *** | |
| ## Shipping Methods | |
| A shipping method, represented by the [ShippingMethod data model](https://docs.medusajs.com/references/cart/models/ShippingMethod/index.html.md), is used to fulfill the items in the cart after the order is placed. A cart can have more than one shipping method. | |
| In the Medusa application, the shipping method is created from a shipping option, available through the [Fulfillment Module](https://docs.medusajs.com/Users/shahednasser/medusa/www/apps/resources/app/commerce-modules/fulfillment/index.html.md). Its ID is stored in the `shipping_option_id` property of the method. | |
| ### data Property | |
| After an order is placed, you can use a third-party fulfillment provider to fulfill its shipments. | |
| If the fulfillment provider requires additional custom data to be passed along from the checkout process, set this data in the `ShippingMethod`'s `data` property. | |
| The `data` property is an object used to store custom data relevant later for fulfillment. | |
| # Links between Cart Module and Other Modules | |
| This document showcases the module links defined between the Cart Module and other commerce modules. | |
| ## Summary | |
| The Cart Module has the following links to other modules: | |
| Read-only links are used to query data across modules, but the relations aren't stored in a pivot table in the database. | |
| - [`Cart` data model \<> `Customer` data model of Customer Module](#customer-module). (Read-only). | |
| - [`Order` data model of Order Module \<> `Cart` data model](#order-module). | |
| - [`Cart` data model \<> `PaymentCollection` data model of Payment Module](#payment-module). | |
| - [`LineItem` data model \<> `Product` data model of Product Module](#product-module). (Read-only). | |
| - [`LineItem` data model \<> `ProductVariant` data model of Product Module](#product-module). (Read-only). | |
| - [`Cart` data model \<> `Promotion` data model of Promotion Module](#promotion-module). | |
| - [`Cart` data model \<> `Region` data model of Region Module](#region-module). (Read-only). | |
| - [`Cart` data model \<> `SalesChannel` data model of Sales Channel Module](#sales-channel-module). (Read-only). | |
| *** | |
| ## Customer Module | |
| Medusa defines a read-only link between the `Cart` data model and the [Customer Module](https://docs.medusajs.com/Users/shahednasser/medusa/www/apps/resources/app/commerce-modules/customer/index.html.md)'s `Customer` data model. This means you can retrieve the details of a cart's customer, but you don't manage the links in a pivot table in the database. The customer of a cart is determined by the `customer_id` property of the `Cart` data model. | |
| ### Retrieve with Query | |
| To retrieve the customer of a cart with [Query](https://docs.medusajs.com/docs/learn/fundamentals/module-links/query/index.html.md), pass `customer.*` in `fields`: | |
| ### query.graph | |
| ```ts | |
| const { data: carts } = await query.graph({ | |
| entity: "cart", | |
| fields: [ | |
| "customer.*", | |
| ], | |
| }) | |
| // carts.order | |
| ``` | |
| ### useQueryGraphStep | |
| ```ts | |
| import { useQueryGraphStep } from "@medusajs/medusa/core-flows" | |
| // ... | |
| const { data: carts } = useQueryGraphStep({ | |
| entity: "cart", | |
| fields: [ | |
| "customer.*", | |
| ], | |
| }) | |
| // carts.order | |
| ``` | |
| *** | |
| ## Order Module | |
| The [Order Module](https://docs.medusajs.com/Users/shahednasser/medusa/www/apps/resources/app/commerce-modules/order/index.html.md) provides order-management features. | |
| Medusa defines a link between the `Cart` and `Order` data models. The cart is linked to the order created once the cart is completed. | |
| 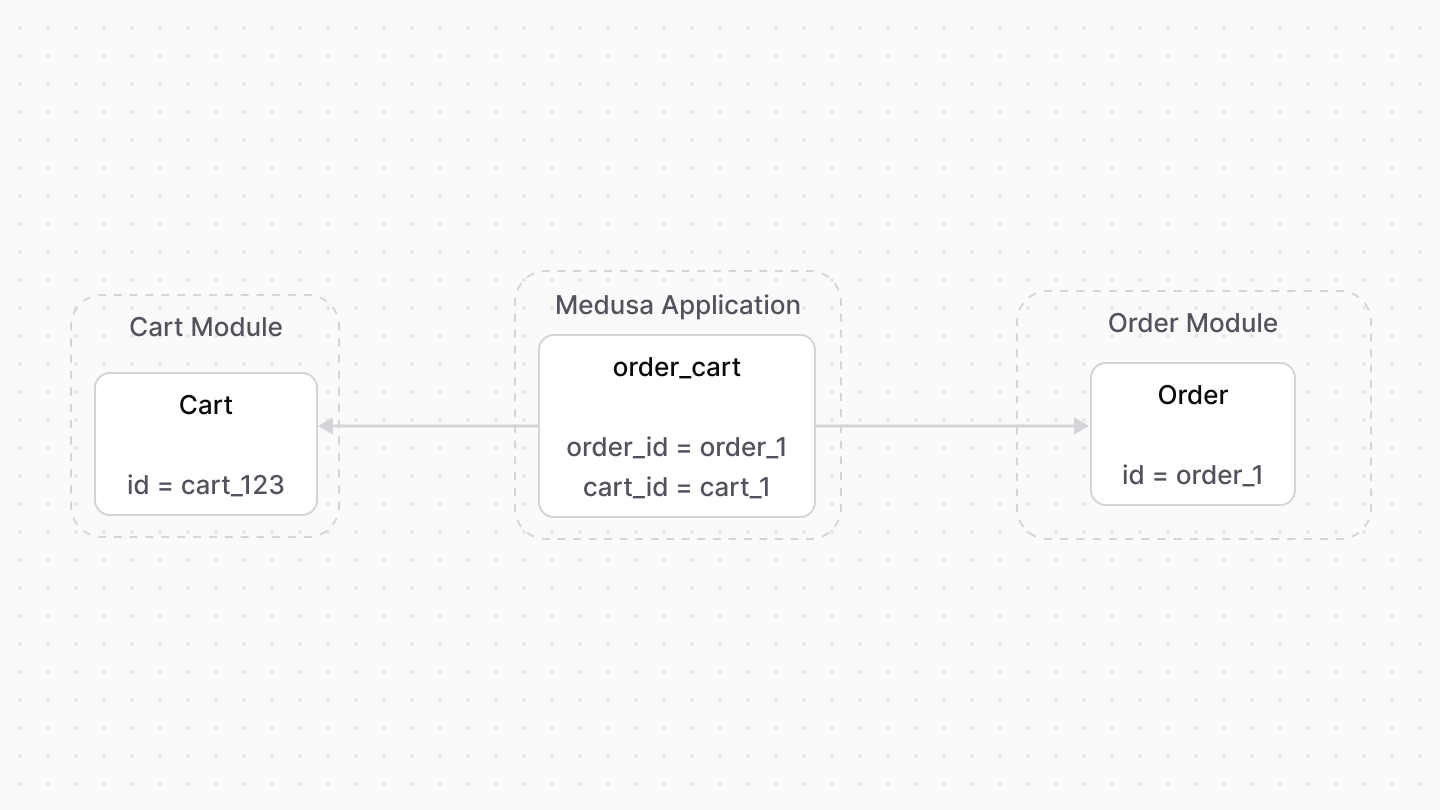 | |
| ### Retrieve with Query | |
| To retrieve the order of a cart with [Query](https://docs.medusajs.com/docs/learn/fundamentals/module-links/query/index.html.md), pass `order.*` in `fields`: | |
| ### query.graph | |
| ```ts | |
| const { data: carts } = await query.graph({ | |
| entity: "cart", | |
| fields: [ | |
| "order.*", | |
| ], | |
| }) | |
| // carts.order | |
| ``` | |
| ### useQueryGraphStep | |
| ```ts | |
| import { useQueryGraphStep } from "@medusajs/medusa/core-flows" | |
| // ... | |
| const { data: carts } = useQueryGraphStep({ | |
| entity: "cart", | |
| fields: [ | |
| "order.*", | |
| ], | |
| }) | |
| // carts.order | |
| ``` | |
| ### Manage with Link | |
| To manage the order of a cart, use [Link](https://docs.medusajs.com/docs/learn/fundamentals/module-links/link/index.html.md): | |
| ### link.create | |
| ```ts | |
| import { Modules } from "@medusajs/framework/utils" | |
| // ... | |
| await link.create({ | |
| [Modules.CART]: { | |
| cart_id: "cart_123", | |
| }, | |
| [Modules.ORDER]: { | |
| order_id: "order_123", | |
| }, | |
| }) | |
| ``` | |
| ### createRemoteLinkStep | |
| ```ts | |
| import { Modules } from "@medusajs/framework/utils" | |
| import { createRemoteLinkStep } from "@medusajs/medusa/core-flows" | |
| // ... | |
| createRemoteLinkStep({ | |
| [Modules.CART]: { | |
| cart_id: "cart_123", | |
| }, | |
| [Modules.ORDER]: { | |
| order_id: "order_123", | |
| }, | |
| }) | |
| ``` | |
| *** | |
| ## Payment Module | |
| The [Payment Module](https://docs.medusajs.com/Users/shahednasser/medusa/www/apps/resources/app/commerce-modules/payment/index.html.md) handles payment processing and management. | |
| Medusa defines a link between the `Cart` and `PaymentCollection` data models. A cart has a payment collection which holds all the authorized payment sessions and payments made related to the cart. | |
| 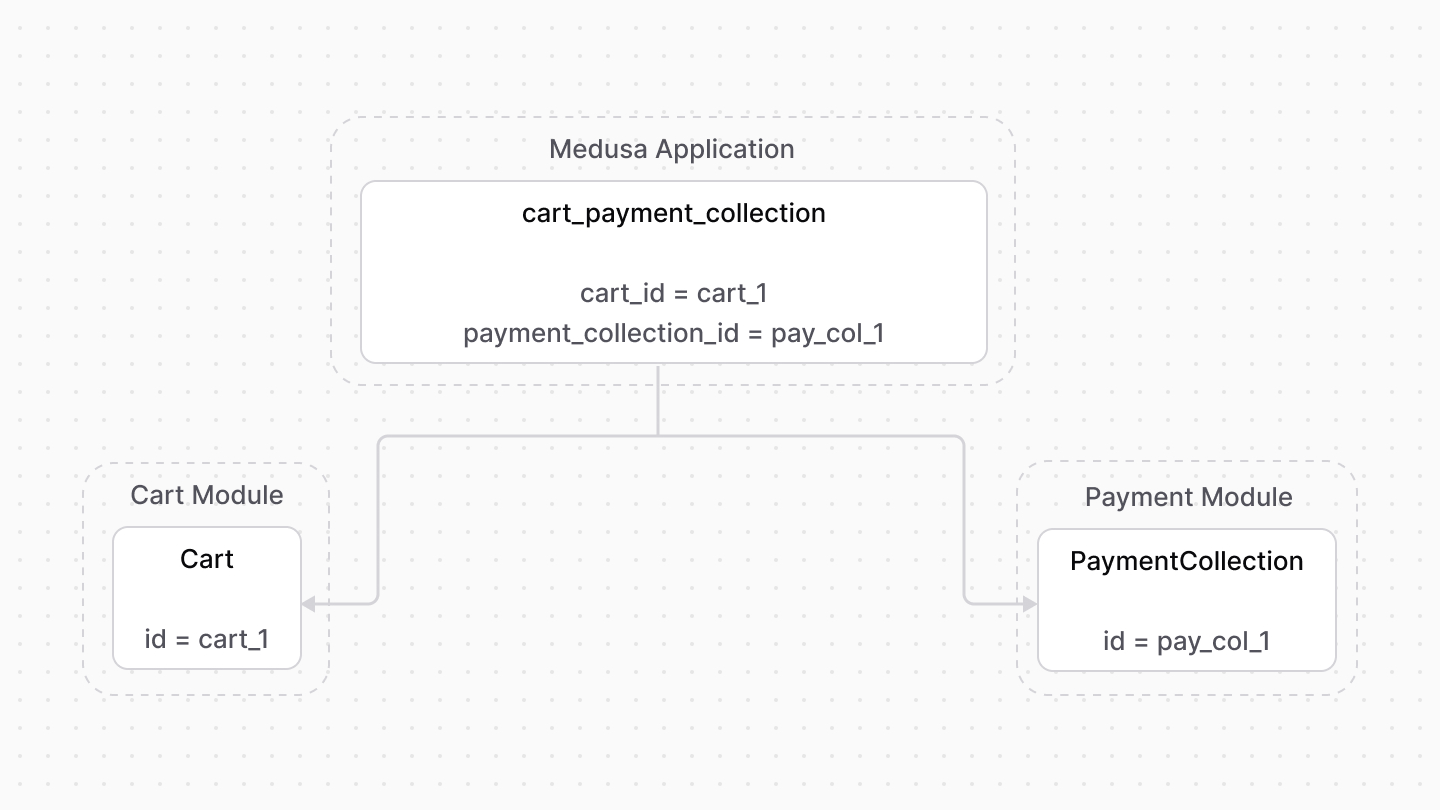 | |
| ### Retrieve with Query | |
| To retrieve the payment collection of a cart with [Query](https://docs.medusajs.com/docs/learn/fundamentals/module-links/query/index.html.md), pass `payment_collection.*` in `fields`: | |
| ### query.graph | |
| ```ts | |
| const { data: carts } = await query.graph({ | |
| entity: "cart", | |
| fields: [ | |
| "payment_collection.*", | |
| ], | |
| }) | |
| // carts.payment_collection | |
| ``` | |
| ### useQueryGraphStep | |
| ```ts | |
| import { useQueryGraphStep } from "@medusajs/medusa/core-flows" | |
| // ... | |
| const { data: carts } = useQueryGraphStep({ | |
| entity: "cart", | |
| fields: [ | |
| "payment_collection.*", | |
| ], | |
| }) | |
| // carts.payment_collection | |
| ``` | |
| ### Manage with Link | |
| To manage the payment collection of a cart, use [Link](https://docs.medusajs.com/docs/learn/fundamentals/module-links/link/index.html.md): | |
| ### link.create | |
| ```ts | |
| import { Modules } from "@medusajs/framework/utils" | |
| // ... | |
| await link.create({ | |
| [Modules.CART]: { | |
| cart_id: "cart_123", | |
| }, | |
| [Modules.PAYMENT]: { | |
| payment_collection_id: "paycol_123", | |
| }, | |
| }) | |
| ``` | |
| ### createRemoteLinkStep | |
| ```ts | |
| import { createRemoteLinkStep } from "@medusajs/medusa/core-flows" | |
| // ... | |
| createRemoteLinkStep({ | |
| [Modules.CART]: { | |
| cart_id: "cart_123", | |
| }, | |
| [Modules.PAYMENT]: { | |
| payment_collection_id: "paycol_123", | |
| }, | |
| }) | |
| ``` | |
| *** | |
| ## Product Module | |
| Medusa defines read-only links between: | |
| - the `LineItem` data model and the [Product Module](https://docs.medusajs.com/Users/shahednasser/medusa/www/apps/resources/app/commerce-modules/product/index.html.md)'s `Product` data model. This means you can retrieve the details of a line item's product, but you don't manage the links in a pivot table in the database. The product of a line item is determined by the `product_id` property of the `LineItem` data model. | |
| - the `LineItem` data model and the [Product Module](https://docs.medusajs.com/Users/shahednasser/medusa/www/apps/resources/app/commerce-modules/product/index.html.md)'s `ProductVariant` data model. This means you can retrieve the details of a line item's variant, but you don't manage the links in a pivot table in the database. The variant of a line item is determined by the `variant_id` property of the `LineItem` data model. | |
| ### Retrieve with Query | |
| To retrieve the variant of a line item with [Query](https://docs.medusajs.com/docs/learn/fundamentals/module-links/query/index.html.md), pass `variant.*` in `fields`: | |
| To retrieve the product, pass `product.*` in `fields`. | |
| ### query.graph | |
| ```ts | |
| const { data: lineItems } = await query.graph({ | |
| entity: "line_item", | |
| fields: [ | |
| "variant.*", | |
| ], | |
| }) | |
| // lineItems.variant | |
| ``` | |
| ### useQueryGraphStep | |
| ```ts | |
| import { useQueryGraphStep } from "@medusajs/medusa/core-flows" | |
| // ... | |
| const { data: lineItems } = useQueryGraphStep({ | |
| entity: "line_item", | |
| fields: [ | |
| "variant.*", | |
| ], | |
| }) | |
| // lineItems.variant | |
| ``` | |
| *** | |
| ## Promotion Module | |
| The [Promotion Module](https://docs.medusajs.com/Users/shahednasser/medusa/www/apps/resources/app/commerce-modules/promotion/index.html.md) provides discount features. | |
| Medusa defines a link between the `Cart` and `Promotion` data models. This indicates the promotions applied on a cart. | |
| 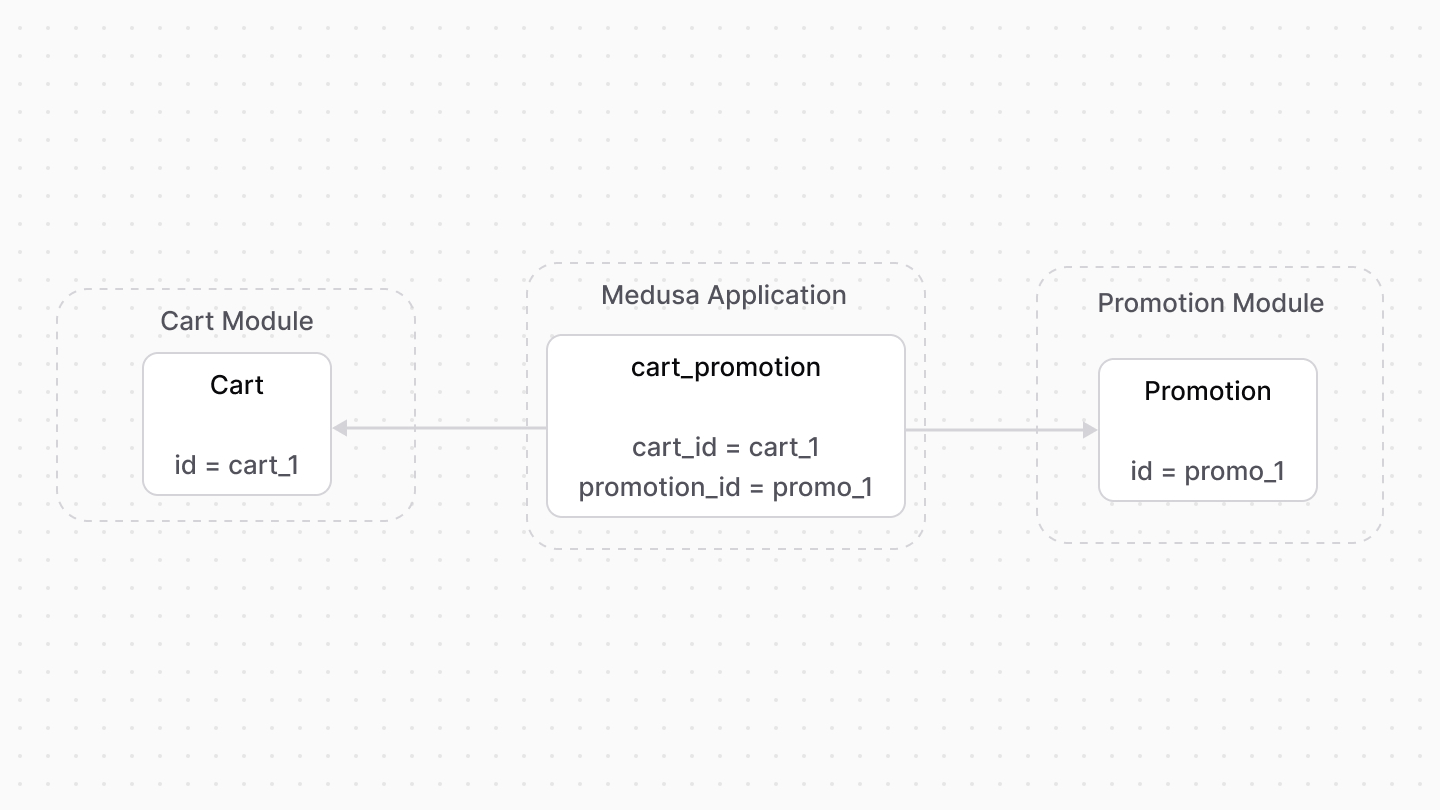 | |
| Medusa also defines a read-only link between the `LineItemAdjustment` and `Promotion` data models. This means you can retrieve the details of the promotion applied on a line item, but you don't manage the links in a pivot table in the database. The promotion of a line item is determined by the `promotion_id` property of the `LineItemAdjustment` data model. | |
| ### Retrieve with Query | |
| To retrieve the promotions of a cart with [Query](https://docs.medusajs.com/docs/learn/fundamentals/module-links/query/index.html.md), pass `promotions.*` in `fields`: | |
| To retrieve the promotion of a line item adjustment, pass `promotion.*` in `fields`. | |
| ### query.graph | |
| ```ts | |
| const { data: carts } = await query.graph({ | |
| entity: "cart", | |
| fields: [ | |
| "promotions.*", | |
| ], | |
| }) | |
| // carts.promotions | |
| ``` | |
| ### useQueryGraphStep | |
| ```ts | |
| import { useQueryGraphStep } from "@medusajs/medusa/core-flows" | |
| // ... | |
| const { data: carts } = useQueryGraphStep({ | |
| entity: "cart", | |
| fields: [ | |
| "promotions.*", | |
| ], | |
| }) | |
| // carts.promotions | |
| ``` | |
| ### Manage with Link | |
| To manage the promotions of a cart, use [Link](https://docs.medusajs.com/docs/learn/fundamentals/module-links/link/index.html.md): | |
| ### link.create | |
| ```ts | |
| import { Modules } from "@medusajs/framework/utils" | |
| // ... | |
| await link.create({ | |
| [Modules.CART]: { | |
| cart_id: "cart_123", | |
| }, | |
| [Modules.PROMOTION]: { | |
| promotion_id: "promo_123", | |
| }, | |
| }) | |
| ``` | |
| ### createRemoteLinkStep | |
| ```ts | |
| import { Modules } from "@medusajs/framework/utils" | |
| import { createRemoteLinkStep } from "@medusajs/medusa/core-flows" | |
| // ... | |
| createRemoteLinkStep({ | |
| [Modules.CART]: { | |
| cart_id: "cart_123", | |
| }, | |
| [Modules.PROMOTION]: { | |
| promotion_id: "promo_123", | |
| }, | |
| }) | |
| ``` | |
| *** | |
| ## Region Module | |
| Medusa defines a read-only link between the `Cart` data model and the [Region Module](https://docs.medusajs.com/Users/shahednasser/medusa/www/apps/resources/app/commerce-modules/region/index.html.md)'s `Region` data model. This means you can retrieve the details of a cart's region, but you don't manage the links in a pivot table in the database. The region of a cart is determined by the `region_id` property of the `Cart` data model. | |
| ### Retrieve with Query | |
| To retrieve the region of a cart with [Query](https://docs.medusajs.com/docs/learn/fundamentals/module-links/query/index.html.md), pass `region.*` in `fields`: | |
| ### query.graph | |
| ```ts | |
| const { data: carts } = await query.graph({ | |
| entity: "cart", | |
| fields: [ | |
| "region.*", | |
| ], | |
| }) | |
| // carts.region | |
| ``` | |
| ### useQueryGraphStep | |
| ```ts | |
| import { useQueryGraphStep } from "@medusajs/medusa/core-flows" | |
| // ... | |
| const { data: carts } = useQueryGraphStep({ | |
| entity: "cart", | |
| fields: [ | |
| "region.*", | |
| ], | |
| }) | |
| // carts.region | |
| ``` | |
| *** | |
| ## Sales Channel Module | |
| Medusa defines a read-only link between the `Cart` data model and the [Sales Channel Module](https://docs.medusajs.com/Users/shahednasser/medusa/www/apps/resources/app/commerce-modules/sales-channel/index.html.md)'s `SalesChannel` data model. This means you can retrieve the details of a cart's sales channel, but you don't manage the links in a pivot table in the database. The sales channel of a cart is determined by the `sales_channel_id` property of the `Cart` data model. | |
| ### Retrieve with Query | |
| To retrieve the sales channel of a cart with [Query](https://docs.medusajs.com/docs/learn/fundamentals/module-links/query/index.html.md), pass `sales_channel.*` in `fields`: | |
| ### query.graph | |
| ```ts | |
| const { data: carts } = await query.graph({ | |
| entity: "cart", | |
| fields: [ | |
| "sales_channel.*", | |
| ], | |
| }) | |
| // carts.sales_channel | |
| ``` | |
| ### useQueryGraphStep | |
| ```ts | |
| import { useQueryGraphStep } from "@medusajs/medusa/core-flows" | |
| // ... | |
| const { data: carts } = useQueryGraphStep({ | |
| entity: "cart", | |
| fields: [ | |
| "sales_channel.*", | |
| ], | |
| }) | |
| // carts.sales_channel | |
| ``` | |
| # Promotions Adjustments in Carts | |
| In this document, you’ll learn how a promotion is applied to a cart’s line items and shipping methods using adjustment lines. | |
| ## What are Adjustment Lines? | |
| An adjustment line indicates a change to an item or a shipping method’s amount. It’s used to apply promotions or discounts on a cart. | |
| The [LineItemAdjustment](https://docs.medusajs.com/references/cart/models/LineItemAdjustment/index.html.md) data model represents changes on a line item, and the [ShippingMethodAdjustment](https://docs.medusajs.com/references/cart/models/ShippingMethodAdjustment/index.html.md) data model represents changes on a shipping method. | |
| 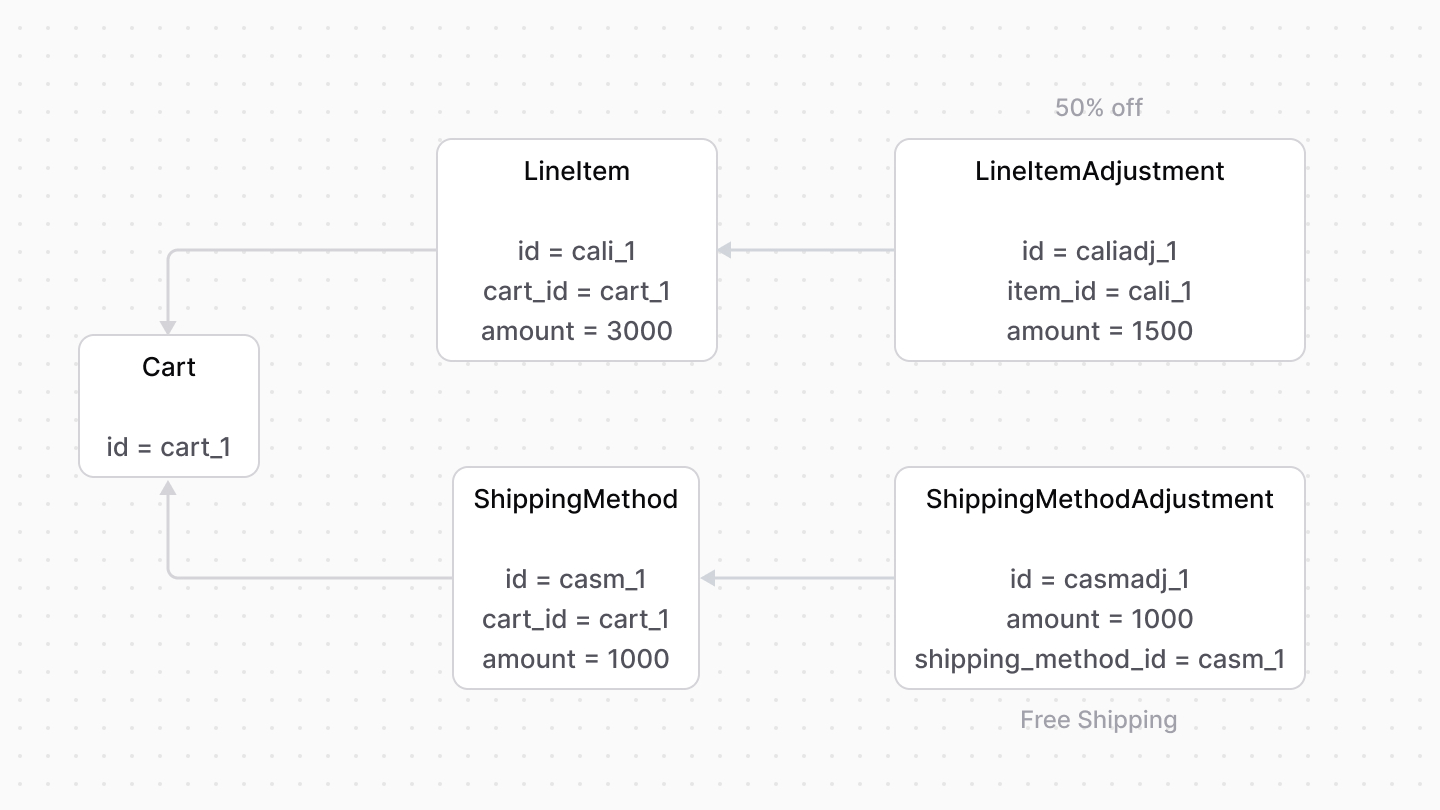 | |
| The `amount` property of the adjustment line indicates the amount to be discounted from the original amount. Also, the ID of the applied promotion is stored in the `promotion_id` property of the adjustment line. | |
| *** | |
| ## Discountable Option | |
| The [LineItem](https://docs.medusajs.com/references/cart/models/LineItem/index.html.md) data model has an `is_discountable` property that indicates whether promotions can be applied to the line item. It’s enabled by default. | |
| When disabled, a promotion can’t be applied to a line item. In the context of the Promotion Module, the promotion isn’t applied to the line item even if it matches its rules. | |
| *** | |
| ## Promotion Actions | |
| When using the Cart and Promotion modules together, such as in the Medusa application, use the [computeActions method of the Promotion Module’s main service](https://docs.medusajs.com/references/promotion/computeActions/index.html.md). It retrieves the actions of line items and shipping methods. | |
| Learn more about actions in the [Promotion Module’s documentation](https://docs.medusajs.com/Users/shahednasser/medusa/www/apps/resources/app/commerce-modules/promotion/actions/index.html.md). | |
| For example: | |
| ```ts collapsibleLines="1-8" expandButtonLabel="Show Imports" | |
| import { | |
| ComputeActionAdjustmentLine, | |
| ComputeActionItemLine, | |
| ComputeActionShippingLine, | |
| // ... | |
| } from "@medusajs/framework/types" | |
| // retrieve the cart | |
| const cart = await cartModuleService.retrieveCart("cart_123", { | |
| relations: [ | |
| "items.adjustments", | |
| "shipping_methods.adjustments", | |
| ], | |
| }) | |
| // retrieve line item adjustments | |
| const lineItemAdjustments: ComputeActionItemLine[] = [] | |
| cart.items.forEach((item) => { | |
| const filteredAdjustments = item.adjustments?.filter( | |
| (adjustment) => adjustment.code !== undefined | |
| ) as unknown as ComputeActionAdjustmentLine[] | |
| if (filteredAdjustments.length) { | |
| lineItemAdjustments.push({ | |
| ...item, | |
| adjustments: filteredAdjustments, | |
| }) | |
| } | |
| }) | |
| // retrieve shipping method adjustments | |
| const shippingMethodAdjustments: ComputeActionShippingLine[] = | |
| [] | |
| cart.shipping_methods.forEach((shippingMethod) => { | |
| const filteredAdjustments = | |
| shippingMethod.adjustments?.filter( | |
| (adjustment) => adjustment.code !== undefined | |
| ) as unknown as ComputeActionAdjustmentLine[] | |
| if (filteredAdjustments.length) { | |
| shippingMethodAdjustments.push({ | |
| ...shippingMethod, | |
| adjustments: filteredAdjustments, | |
| }) | |
| } | |
| }) | |
| // compute actions | |
| const actions = await promotionModuleService.computeActions( | |
| ["promo_123"], | |
| { | |
| items: lineItemAdjustments, | |
| shipping_methods: shippingMethodAdjustments, | |
| } | |
| ) | |
| ``` | |
| The `computeActions` method accepts the existing adjustments of line items and shipping methods to compute the actions accurately. | |
| Then, use the returned `addItemAdjustment` and `addShippingMethodAdjustment` actions to set the cart’s line item and the shipping method’s adjustments. | |
| ```ts collapsibleLines="1-8" expandButtonLabel="Show Imports" | |
| import { | |
| AddItemAdjustmentAction, | |
| AddShippingMethodAdjustment, | |
| // ... | |
| } from "@medusajs/framework/types" | |
| // ... | |
| await cartModuleService.setLineItemAdjustments( | |
| cart.id, | |
| actions.filter( | |
| (action) => action.action === "addItemAdjustment" | |
| ) as AddItemAdjustmentAction[] | |
| ) | |
| await cartModuleService.setShippingMethodAdjustments( | |
| cart.id, | |
| actions.filter( | |
| (action) => | |
| action.action === "addShippingMethodAdjustment" | |
| ) as AddShippingMethodAdjustment[] | |
| ) | |
| ``` | |
| # Tax Lines in Cart Module | |
| In this document, you’ll learn about tax lines in a cart and how to retrieve tax lines with the Tax Module. | |
| ## What are Tax Lines? | |
| A tax line indicates the tax rate of a line item or a shipping method. The [LineItemTaxLine data model](https://docs.medusajs.com/references/cart/models/LineItemTaxLine/index.html.md) represents a line item’s tax line, and the [ShippingMethodTaxLine data model](https://docs.medusajs.com/references/cart/models/ShippingMethodTaxLine/index.html.md) represents a shipping method’s tax line. | |
| 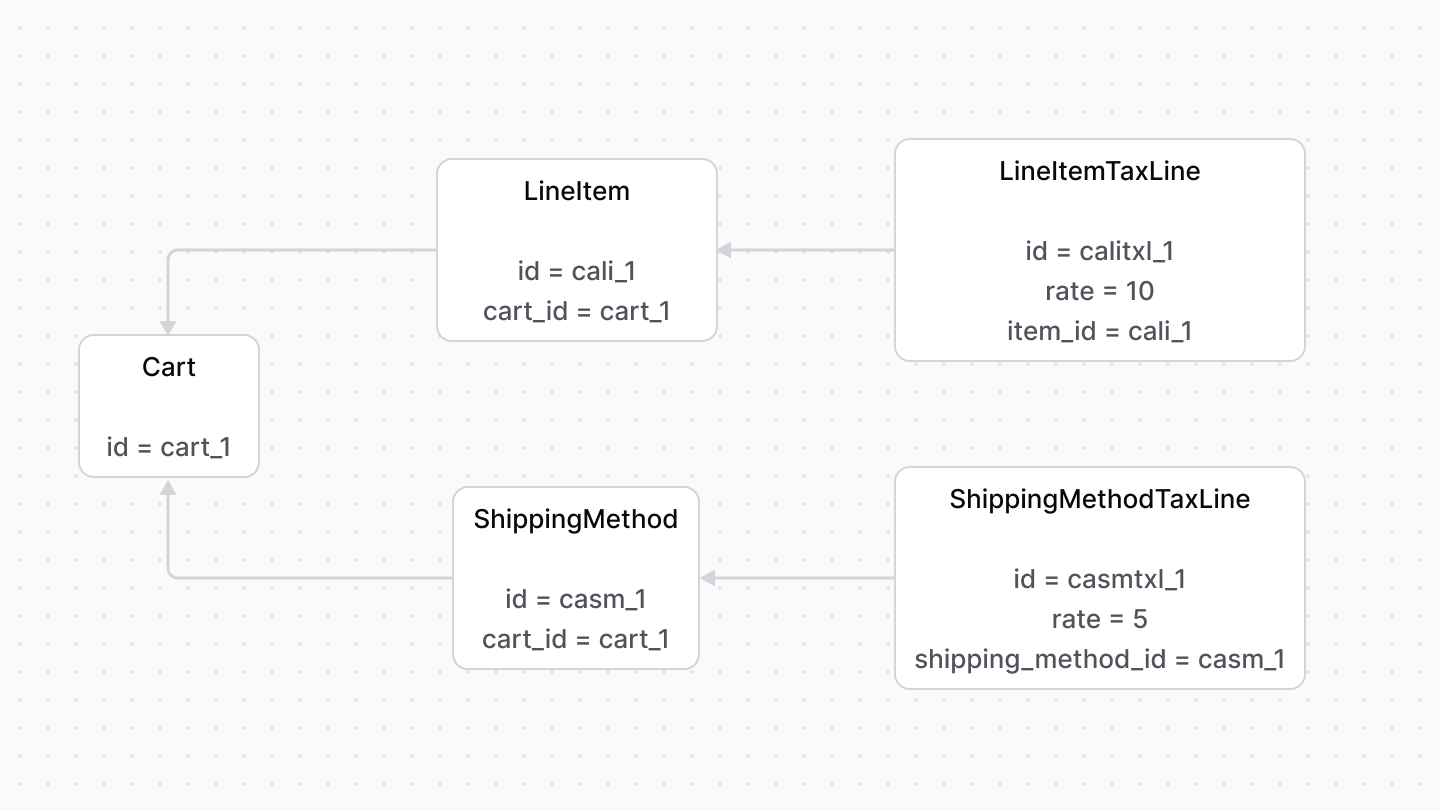 | |
| *** | |
| ## Tax Inclusivity | |
| By default, the tax amount is calculated by taking the tax rate from the line item or shipping method’s amount, and then adding them to the item/method’s subtotal. | |
| However, line items and shipping methods have an `is_tax_inclusive` property that, when enabled, indicates that the item or method’s price already includes taxes. | |
| So, instead of calculating the tax rate and adding it to the item/method’s subtotal, it’s calculated as part of the subtotal. | |
| The following diagram is a simplified showcase of how a subtotal is calculated from the taxes perspective. | |
| 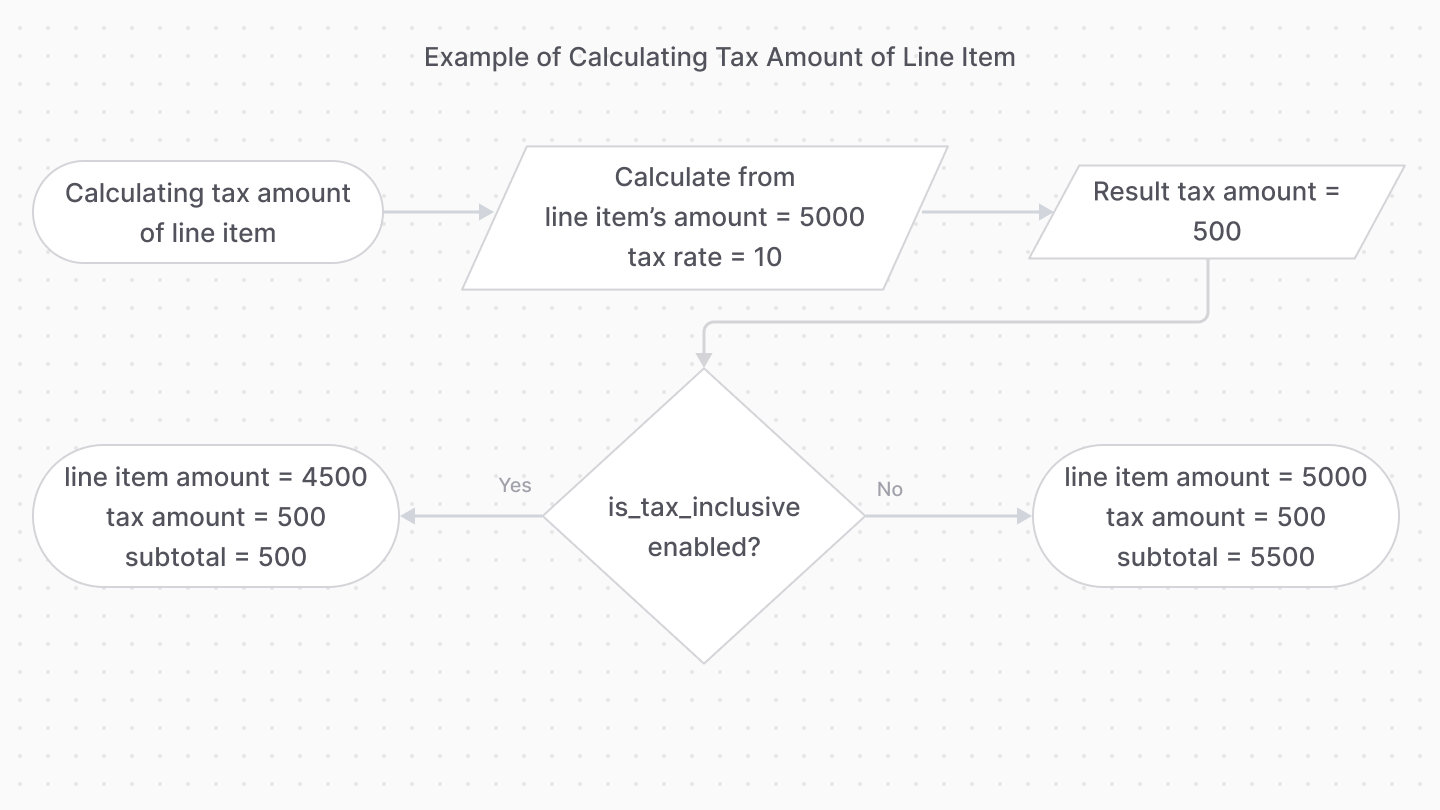 | |
| For example, if a line item's amount is `5000`, the tax rate is `10`, and tax inclusivity is enabled, the tax amount is 10% of `5000`, which is `500`, making the unit price of the line item `4500`. | |
| *** | |
| ## Retrieve Tax Lines | |
| When using the Cart and Tax modules together, you can use the `getTaxLines` method of the Tax Module’s main service. It retrieves the tax lines for a cart’s line items and shipping methods. | |
| ```ts | |
| // retrieve the cart | |
| const cart = await cartModuleService.retrieveCart("cart_123", { | |
| relations: [ | |
| "items.tax_lines", | |
| "shipping_methods.tax_lines", | |
| "shipping_address", | |
| ], | |
| }) | |
| // retrieve the tax lines | |
| const taxLines = await taxModuleService.getTaxLines( | |
| [ | |
| ...(cart.items as TaxableItemDTO[]), | |
| ...(cart.shipping_methods as TaxableShippingDTO[]), | |
| ], | |
| { | |
| address: { | |
| ...cart.shipping_address, | |
| country_code: | |
| cart.shipping_address.country_code || "us", | |
| }, | |
| } | |
| ) | |
| ``` | |
| Then, use the returned tax lines to set the line items and shipping methods’ tax lines: | |
| ```ts | |
| // set line item tax lines | |
| await cartModuleService.setLineItemTaxLines( | |
| cart.id, | |
| taxLines.filter((line) => "line_item_id" in line) | |
| ) | |
| // set shipping method tax lines | |
| await cartModuleService.setLineItemTaxLines( | |
| cart.id, | |
| taxLines.filter((line) => "shipping_line_id" in line) | |
| ) | |
| ``` | |
| # Fulfillment Concepts | |
| In this document, you’ll learn about some basic fulfillment concepts. | |
| ## Fulfillment Set | |
| A fulfillment set is a general form or way of fulfillment. For example, shipping is a form of fulfillment, and pick-up is another form of fulfillment. Each of these can be created as fulfillment sets. | |
| A fulfillment set is represented by the [FulfillmentSet data model](https://docs.medusajs.com/references/fulfillment/models/FulfillmentSet/index.html.md). All other configurations, options, and management features are related to a fulfillment set, in one way or another. | |
| ```ts | |
| const fulfillmentSets = await fulfillmentModuleService.createFulfillmentSets( | |
| [ | |
| { | |
| name: "Shipping", | |
| type: "shipping", | |
| }, | |
| { | |
| name: "Pick-up", | |
| type: "pick-up", | |
| }, | |
| ] | |
| ) | |
| ``` | |
| *** | |
| ## Service Zone | |
| A service zone is a collection of geographical zones or areas. It’s used to restrict available shipping options to a defined set of locations. | |
| A service zone is represented by the [ServiceZone data model](https://docs.medusajs.com/references/fulfillment/models/ServiceZone/index.html.md). It’s associated with a fulfillment set, as each service zone is specific to a form of fulfillment. For example, if a customer chooses to pick up items, you can restrict the available shipping options based on their location. | |
| 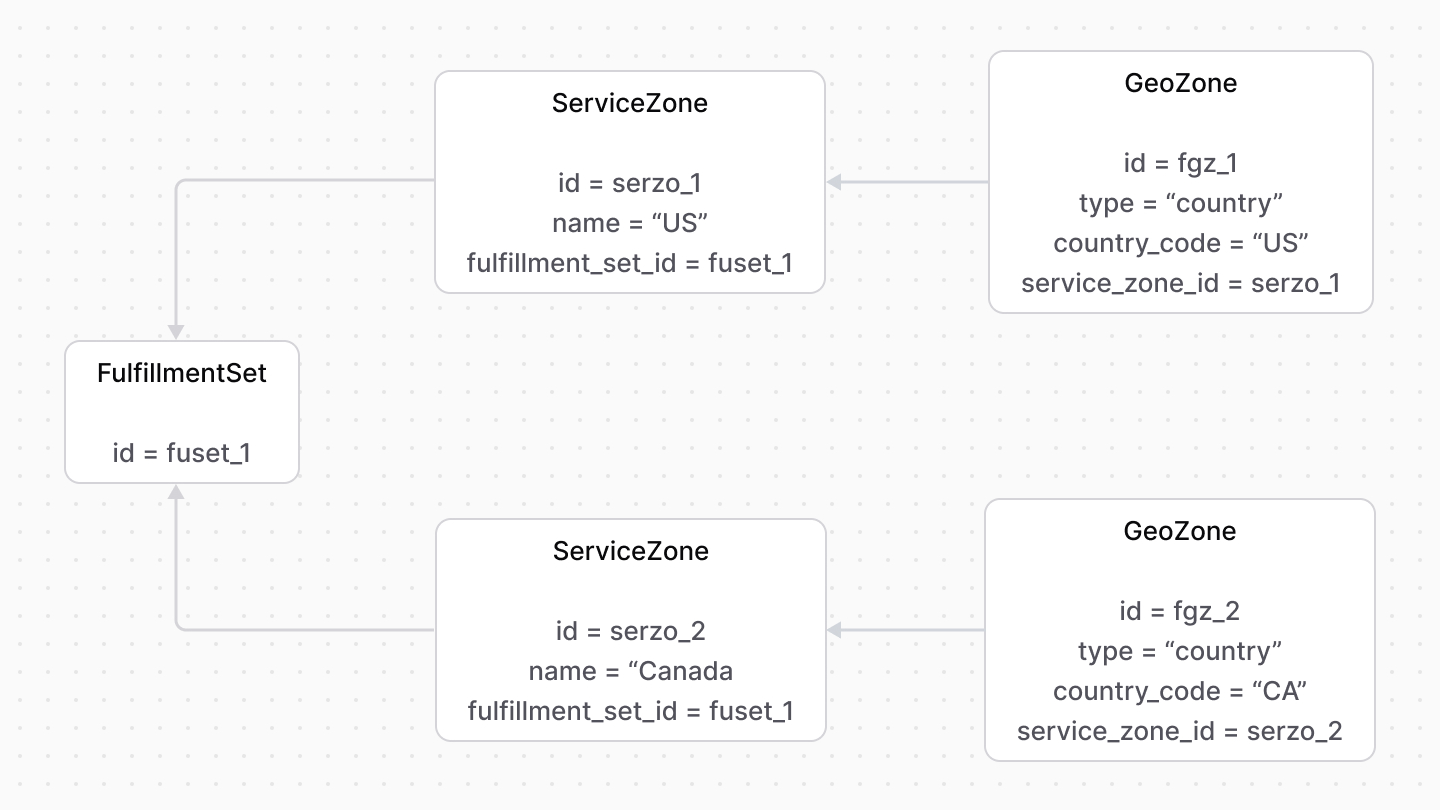 | |
| A service zone can have multiple geographical zones, each represented by the [GeoZone data model](https://docs.medusajs.com/references/fulfillment/models/GeoZone/index.html.md). It holds location-related details to narrow down supported areas, such as country, city, or province code. | |
| *** | |
| ## Shipping Profile | |
| A shipping profile defines a type of items that are shipped in a similar manner. For example, a `default` shipping profile is used for all item types, but the `digital` shipping profile is used for digital items that aren’t shipped and delivered conventionally. | |
| A shipping profile is represented by the [ShippingProfile data model](https://docs.medusajs.com/references/fulfillment/models/ShippingProfile/index.html.md). It only defines the profile’s details, but it’s associated with the shipping options available for the item type. | |
| # Item Fulfillment | |
| In this document, you’ll learn about the concepts of item fulfillment. | |
| ## Fulfillment Data Model | |
| A fulfillment is the shipping and delivery of one or more items to the customer. It’s represented by the [Fulfillment data model](https://docs.medusajs.com/references/fulfillment/models/Fulfillment/index.html.md). | |
| *** | |
| ## Fulfillment Processing by a Fulfillment Provider | |
| A fulfillment is associated with a fulfillment provider that handles all its processing, such as creating a shipment for the fulfillment’s items. | |
| The fulfillment is also associated with a shipping option of that provider, which determines how the item is shipped. | |
| 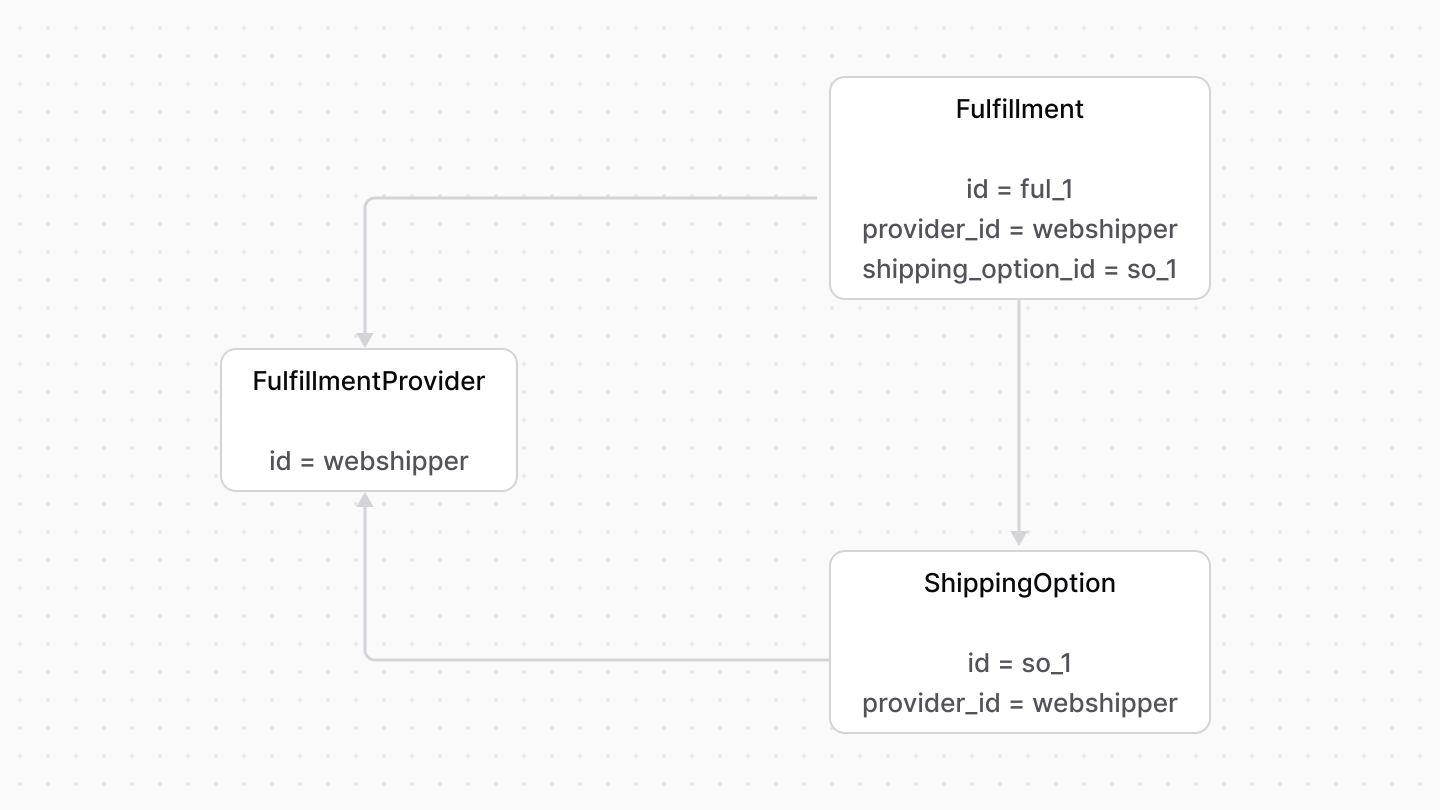 | |
| *** | |
| ## data Property | |
| The `Fulfillment` data model has a `data` property that holds any necessary data for the third-party fulfillment provider to process the fulfillment. | |
| For example, the `data` property can hold the ID of the fulfillment in the third-party provider. The associated fulfillment provider then uses it whenever it retrieves the fulfillment’s details. | |
| *** | |
| ## Fulfillment Items | |
| A fulfillment is used to fulfill one or more items. Each item is represented by the `FulfillmentItem` data model. | |
| The fulfillment item holds details relevant to fulfilling the item, such as barcode, SKU, and quantity to fulfill. | |
| 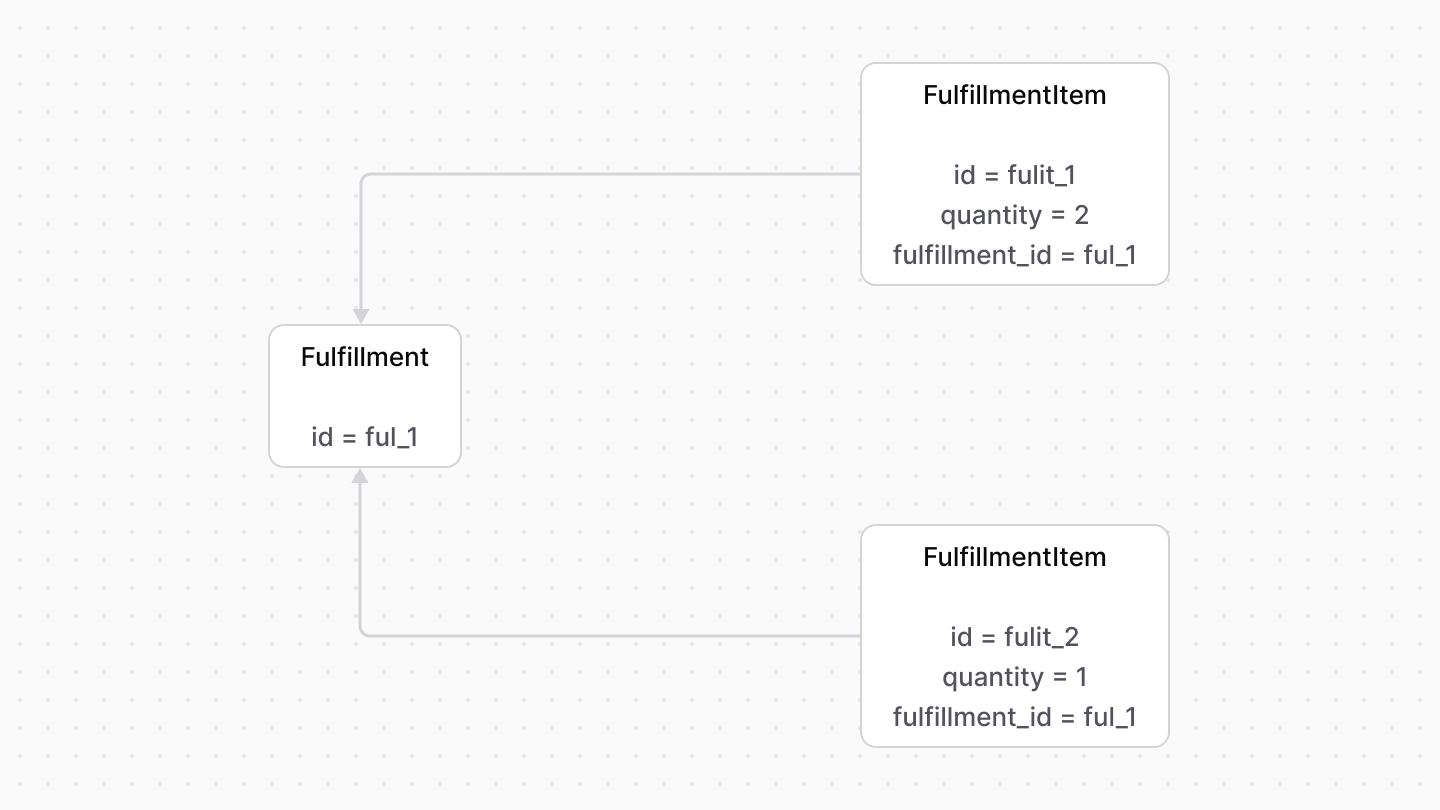 | |
| *** | |
| ## Fulfillment Label | |
| Once a shipment is created for the fulfillment, you can store its tracking number, URL, or other related details as a label, represented by the `FulfillmentLabel` data model. | |
| *** | |
| ## Fulfillment Status | |
| The `Fulfillment` data model has three properties to keep track of the current status of the fulfillment: | |
| - `packed_at`: The date the fulfillment was packed. If set, then the fulfillment has been packed. | |
| - `shipped_at`: The date the fulfillment was shipped. If set, then the fulfillment has been shipped. | |
| - `delivered_at`: The date the fulfillment was delivered. If set, then the fulfillment has been delivered. | |
| # Fulfillment Module Provider | |
| In this document, you’ll learn what a fulfillment module provider is. | |
| ## What’s a Fulfillment Module Provider? | |
| A fulfillment module provider handles fulfilling items, typically using a third-party integration. | |
| Fulfillment module providers registered in the Fulfillment Module's [options](https://docs.medusajs.com/Users/shahednasser/medusa/www/apps/resources/app/commerce-modules/fulfillment/module-options/index.html.md) are stored and represented by the [FulfillmentProvider data model](https://docs.medusajs.com/references/fulfillment/models/FulfillmentProvider/index.html.md). | |
| *** | |
| ## Configure Fulfillment Providers | |
| The Fulfillment Module accepts a `providers` option that allows you to register providers in your application. | |
| Learn more about the `providers` option in [this documentation](https://docs.medusajs.com/Users/shahednasser/medusa/www/apps/resources/app/commerce-modules/fulfillment/module-options/index.html.md). | |
| *** | |
| ## How to Create a Fulfillment Provider? | |
| Refer to [this guide](https://docs.medusajs.com/references/fulfillment/provider/index.html.md) to learn how to create a fulfillment module provider. | |
| # Links between Fulfillment Module and Other Modules | |
| This document showcases the module links defined between the Fulfillment Module and other commerce modules. | |
| ## Summary | |
| The Fulfillment Module has the following links to other modules: | |
| - [`Order` data model of the Order Module \<> `Fulfillment` data model](#order-module). | |
| - [`Return` data model of the Order Module \<> `Fulfillment` data model](#order-module). | |
| - [`PriceSet` data model of the Pricing Module \<> `ShippingOption` data model](#pricing-module). | |
| - [`StockLocation` data model of the Stock Location Module \<> `FulfillmentProvider` data model](#stock-location-module). | |
| - [`StockLocation` data model of the Stock Location Module \<> `FulfillmentSet` data model](#stock-location-module). | |
| *** | |
| ## Order Module | |
| The [Order Module](https://docs.medusajs.com/Users/shahednasser/medusa/www/apps/resources/app/commerce-modules/order/index.html.md) provides order-management functionalities. | |
| Medusa defines a link between the `Fulfillment` and `Order` data models. A fulfillment is created for an orders' items. | |
| 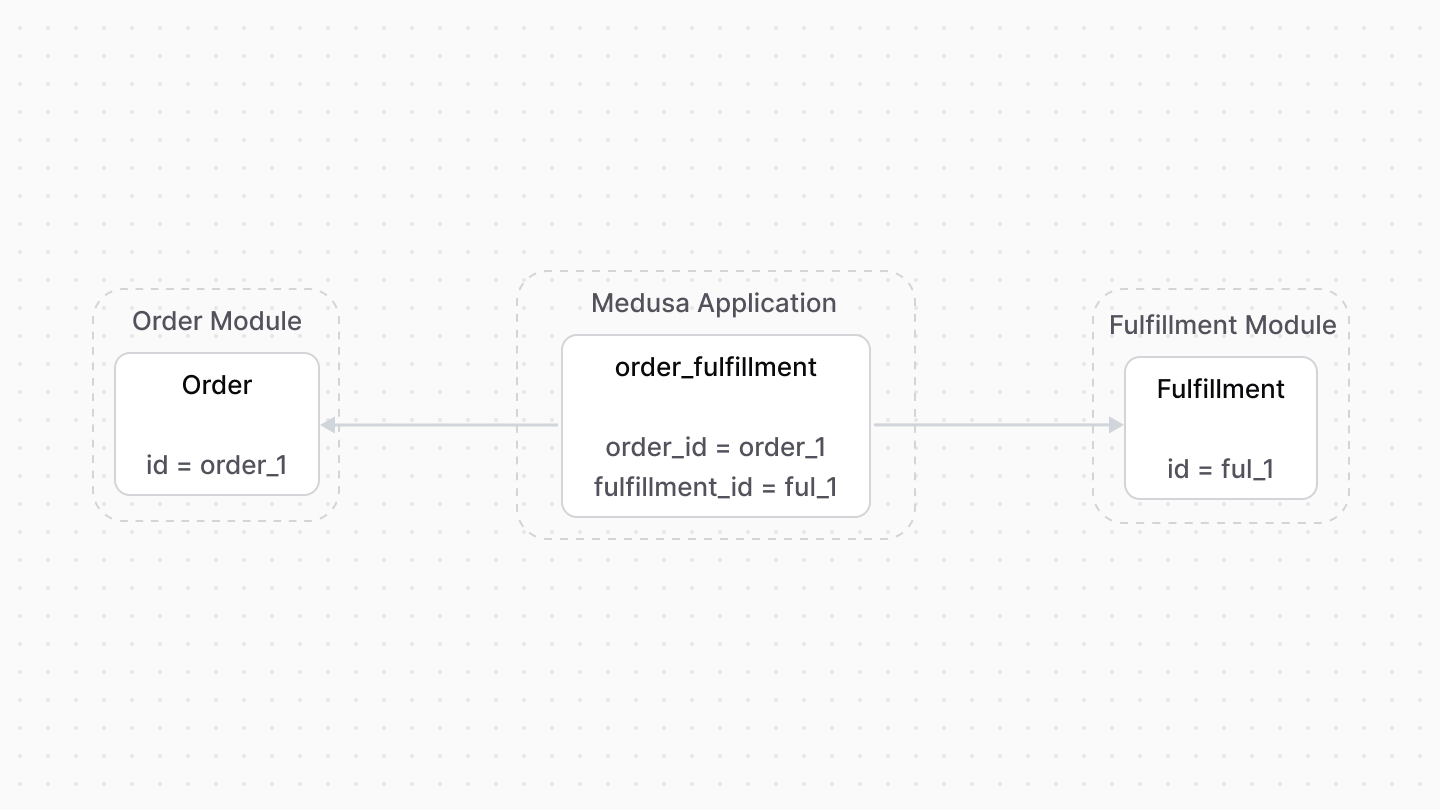 | |
| A fulfillment is also created for a return's items. So, Medusa defines a link between the `Fulfillment` and `Return` data models. | |
|  | |
| ### Retrieve with Query | |
| To retrieve the order of a fulfillment with [Query](https://docs.medusajs.com/docs/learn/fundamentals/module-links/query/index.html.md), pass `order.*` in `fields`: | |
| To retrieve the return, pass `return.*` in `fields`. | |
| ### query.graph | |
| ```ts | |
| const { data: fulfillments } = await query.graph({ | |
| entity: "fulfillment", | |
| fields: [ | |
| "order.*", | |
| ], | |
| }) | |
| // fulfillments.order | |
| ``` | |
| ### useQueryGraphStep | |
| ```ts | |
| import { useQueryGraphStep } from "@medusajs/medusa/core-flows" | |
| // ... | |
| const { data: fulfillments } = useQueryGraphStep({ | |
| entity: "fulfillment", | |
| fields: [ | |
| "order.*", | |
| ], | |
| }) | |
| // fulfillments.order | |
| ``` | |
| ### Manage with Link | |
| To manage the order of a cart, use [Link](https://docs.medusajs.com/docs/learn/fundamentals/module-links/link/index.html.md): | |
| ### link.create | |
| ```ts | |
| import { Modules } from "@medusajs/framework/utils" | |
| // ... | |
| await link.create({ | |
| [Modules.ORDER]: { | |
| order_id: "order_123", | |
| }, | |
| [Modules.FULFILLMENT]: { | |
| fulfillment_id: "ful_123", | |
| }, | |
| }) | |
| ``` | |
| ### createRemoteLinkStep | |
| ```ts | |
| import { Modules } from "@medusajs/framework/utils" | |
| import { createRemoteLinkStep } from "@medusajs/medusa/core-flows" | |
| // ... | |
| createRemoteLinkStep({ | |
| [Modules.ORDER]: { | |
| order_id: "order_123", | |
| }, | |
| [Modules.FULFILLMENT]: { | |
| fulfillment_id: "ful_123", | |
| }, | |
| }) | |
| ``` | |
| *** | |
| ## Pricing Module | |
| The Pricing Module provides features to store, manage, and retrieve the best prices in a specified context. | |
| Medusa defines a link between the `PriceSet` and `ShippingOption` data models. A shipping option's price is stored as a price set. | |
| 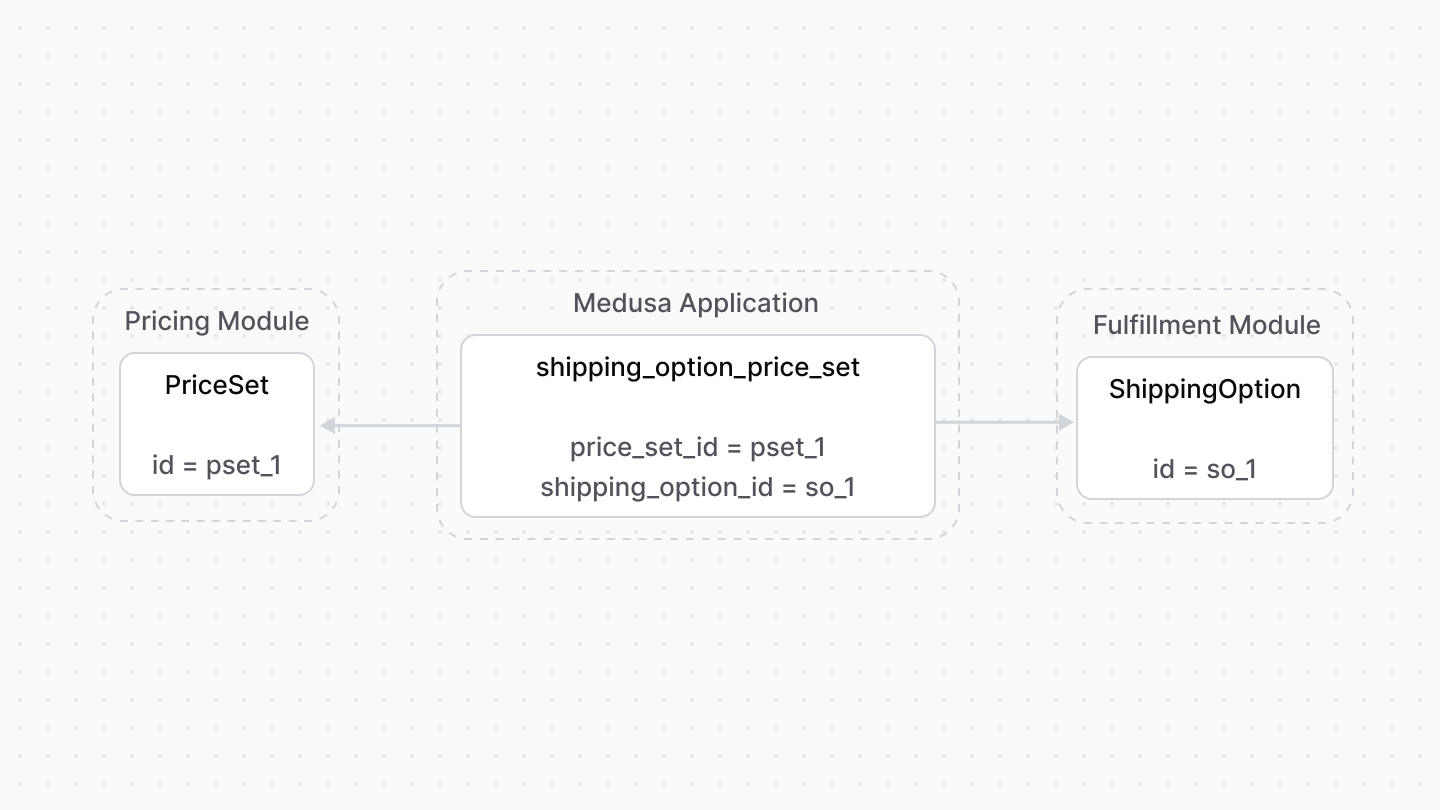 | |
| ### Retrieve with Query | |
| To retrieve the price set of a shipping option with [Query](https://docs.medusajs.com/docs/learn/fundamentals/module-links/query/index.html.md), pass `price_set.*` in `fields`: | |
| ### query.graph | |
| ```ts | |
| const { data: shippingOptions } = await query.graph({ | |
| entity: "shipping_option", | |
| fields: [ | |
| "price_set.*", | |
| ], | |
| }) | |
| // shippingOptions.price_set | |
| ``` | |
| ### useQueryGraphStep | |
| ```ts | |
| import { useQueryGraphStep } from "@medusajs/medusa/core-flows" | |
| // ... | |
| const { data: shippingOptions } = useQueryGraphStep({ | |
| entity: "shipping_option", | |
| fields: [ | |
| "price_set.*", | |
| ], | |
| }) | |
| // shippingOptions.price_set | |
| ``` | |
| ### Manage with Link | |
| To manage the price set of a shipping option, use [Link](https://docs.medusajs.com/docs/learn/fundamentals/module-links/link/index.html.md): | |
| ### link.create | |
| ```ts | |
| import { Modules } from "@medusajs/framework/utils" | |
| // ... | |
| await link.create({ | |
| [Modules.FULFILLMENT]: { | |
| shipping_option_id: "so_123", | |
| }, | |
| [Modules.PRICING]: { | |
| price_set_id: "pset_123", | |
| }, | |
| }) | |
| ``` | |
| ### createRemoteLinkStep | |
| ```ts | |
| import { Modules } from "@medusajs/framework/utils" | |
| import { createRemoteLinkStep } from "@medusajs/medusa/core-flows" | |
| // ... | |
| createRemoteLinkStep({ | |
| [Modules.FULFILLMENT]: { | |
| shipping_option_id: "so_123", | |
| }, | |
| [Modules.PRICING]: { | |
| price_set_id: "pset_123", | |
| }, | |
| }) | |
| ``` | |
| *** | |
| ## Stock Location Module | |
| The Stock Location Module provides features to manage stock locations in a store. | |
| Medusa defines a link between the `FulfillmentSet` and `StockLocation` data models. A fulfillment set can be conditioned to a specific stock location. | |
|  | |
| Medusa also defines a link between the `FulfillmentProvider` and `StockLocation` data models to indicate the providers that can be used in a location. | |
| 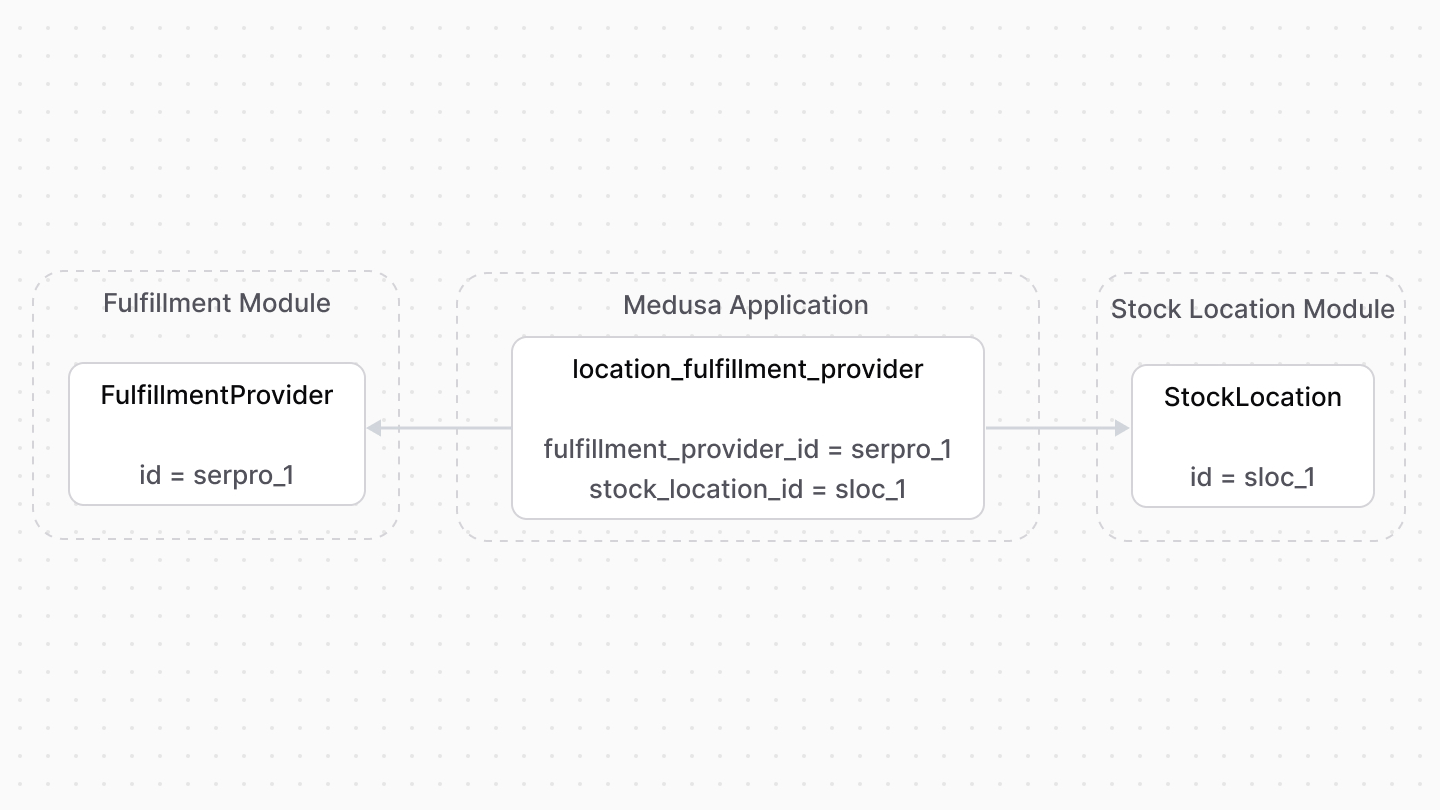 | |
| ### Retrieve with Query | |
| To retrieve the stock location of a fulfillment set with [Query](https://docs.medusajs.com/docs/learn/fundamentals/module-links/query/index.html.md), pass `location.*` in `fields`: | |
| To retrieve the stock location of a fulfillment provider, pass `locations.*` in `fields`. | |
| ### query.graph | |
| ```ts | |
| const { data: fulfillmentSets } = await query.graph({ | |
| entity: "fulfillment_set", | |
| fields: [ | |
| "location.*", | |
| ], | |
| }) | |
| // fulfillmentSets.location | |
| ``` | |
| ### useQueryGraphStep | |
| ```ts | |
| import { useQueryGraphStep } from "@medusajs/medusa/core-flows" | |
| // ... | |
| const { data: fulfillmentSets } = useQueryGraphStep({ | |
| entity: "fulfillment_set", | |
| fields: [ | |
| "location.*", | |
| ], | |
| }) | |
| // fulfillmentSets.location | |
| ``` | |
| ### Manage with Link | |
| To manage the stock location of a fulfillment set, use [Link](https://docs.medusajs.com/docs/learn/fundamentals/module-links/link/index.html.md): | |
| ### link.create | |
| ```ts | |
| import { Modules } from "@medusajs/framework/utils" | |
| // ... | |
| await link.create({ | |
| [Modules.STOCK_LOCATION]: { | |
| stock_location_id: "sloc_123", | |
| }, | |
| [Modules.FULFILLMENT]: { | |
| fulfillment_set_id: "fset_123", | |
| }, | |
| }) | |
| ``` | |
| ### createRemoteLinkStep | |
| ```ts | |
| import { Modules } from "@medusajs/framework/utils" | |
| import { createRemoteLinkStep } from "@medusajs/medusa/core-flows" | |
| // ... | |
| createRemoteLinkStep({ | |
| [Modules.STOCK_LOCATION]: { | |
| stock_location_id: "sloc_123", | |
| }, | |
| [Modules.FULFILLMENT]: { | |
| fulfillment_set_id: "fset_123", | |
| }, | |
| }) | |
| ``` | |
| # Fulfillment Module Options | |
| In this document, you'll learn about the options of the Fulfillment Module. | |
| ## providers | |
| The `providers` option is an array of fulfillment module providers. | |
| When the Medusa application starts, these providers are registered and can be used to process fulfillments. | |
| For example: | |
| ```ts title="medusa-config.ts" | |
| import { Modules } from "@medusajs/framework/utils" | |
| // ... | |
| module.exports = defineConfig({ | |
| // ... | |
| modules: [ | |
| { | |
| resolve: "@medusajs/medusa/fulfillment", | |
| options: { | |
| providers: [ | |
| { | |
| resolve: `@medusajs/medusa/fulfillment-manual`, | |
| id: "manual", | |
| options: { | |
| // provider options... | |
| }, | |
| }, | |
| ], | |
| }, | |
| }, | |
| ], | |
| }) | |
| ``` | |
| The `providers` option is an array of objects that accept the following properties: | |
| - `resolve`: A string indicating either the package name of the module provider or the path to it relative to the `src` directory. | |
| - `id`: A string indicating the provider's unique name or ID. | |
| - `options`: An optional object of the module provider's options. | |
| # Shipping Option | |
| In this document, you’ll learn about shipping options and their rules. | |
| ## What’s a Shipping Option? | |
| A shipping option is a way of shipping an item. Each fulfillment provider provides a set of shipping options. For example, a provider may provide a shipping option for express shipping and another for standard shipping. | |
| When the customer places their order, they choose a shipping option to be used to fulfill their items. | |
| A shipping option is represented by the [ShippingOption data model](https://docs.medusajs.com/references/fulfillment/models/ShippingOption/index.html.md). | |
| *** | |
| ## Service Zone Restrictions | |
| A shipping option is restricted by a service zone, limiting the locations a shipping option be used in. | |
| For example, a fulfillment provider may have a shipping option that can be used in the United States, and another in Canada. | |
| 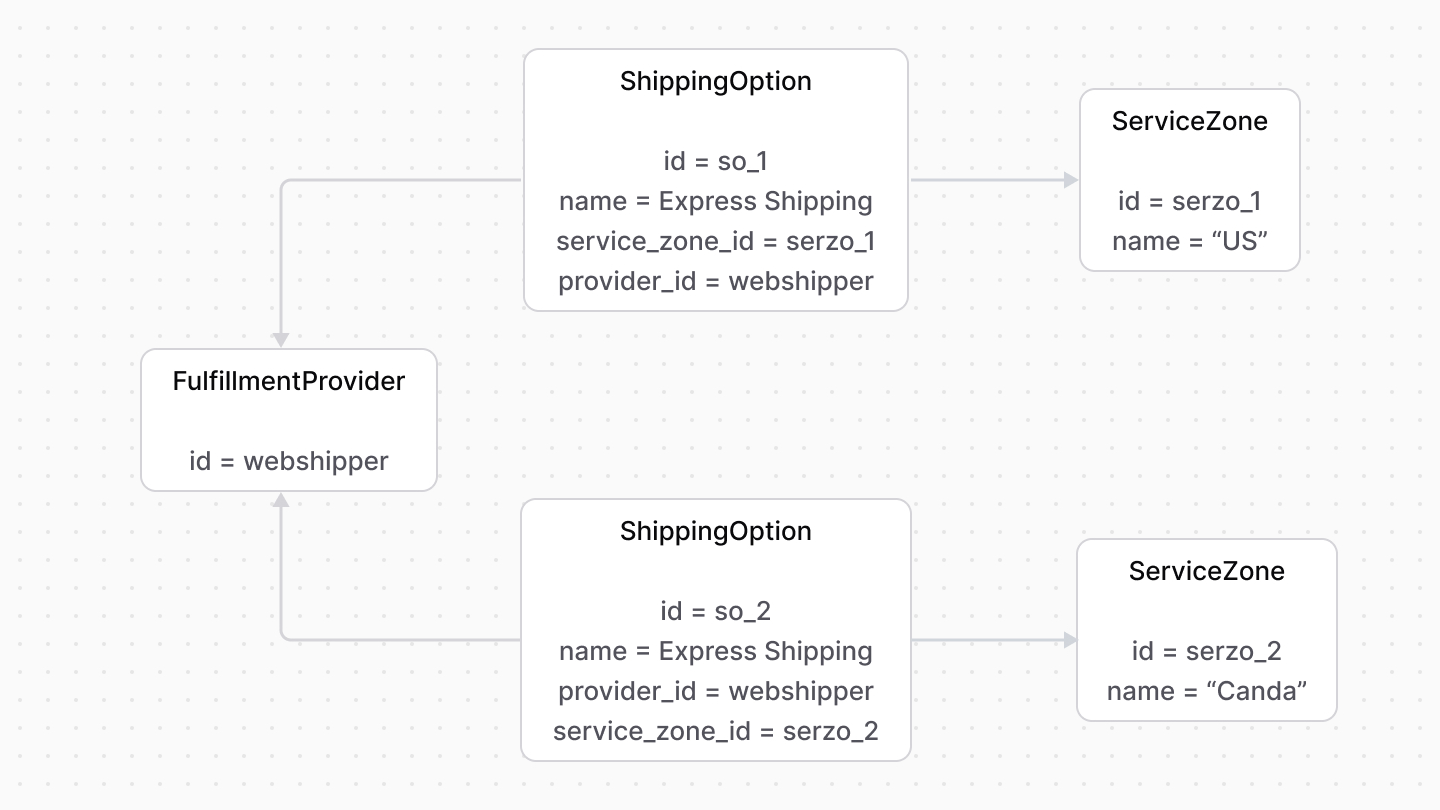 | |
| Service zones can be more restrictive, such as restricting to certain cities or province codes. | |
| 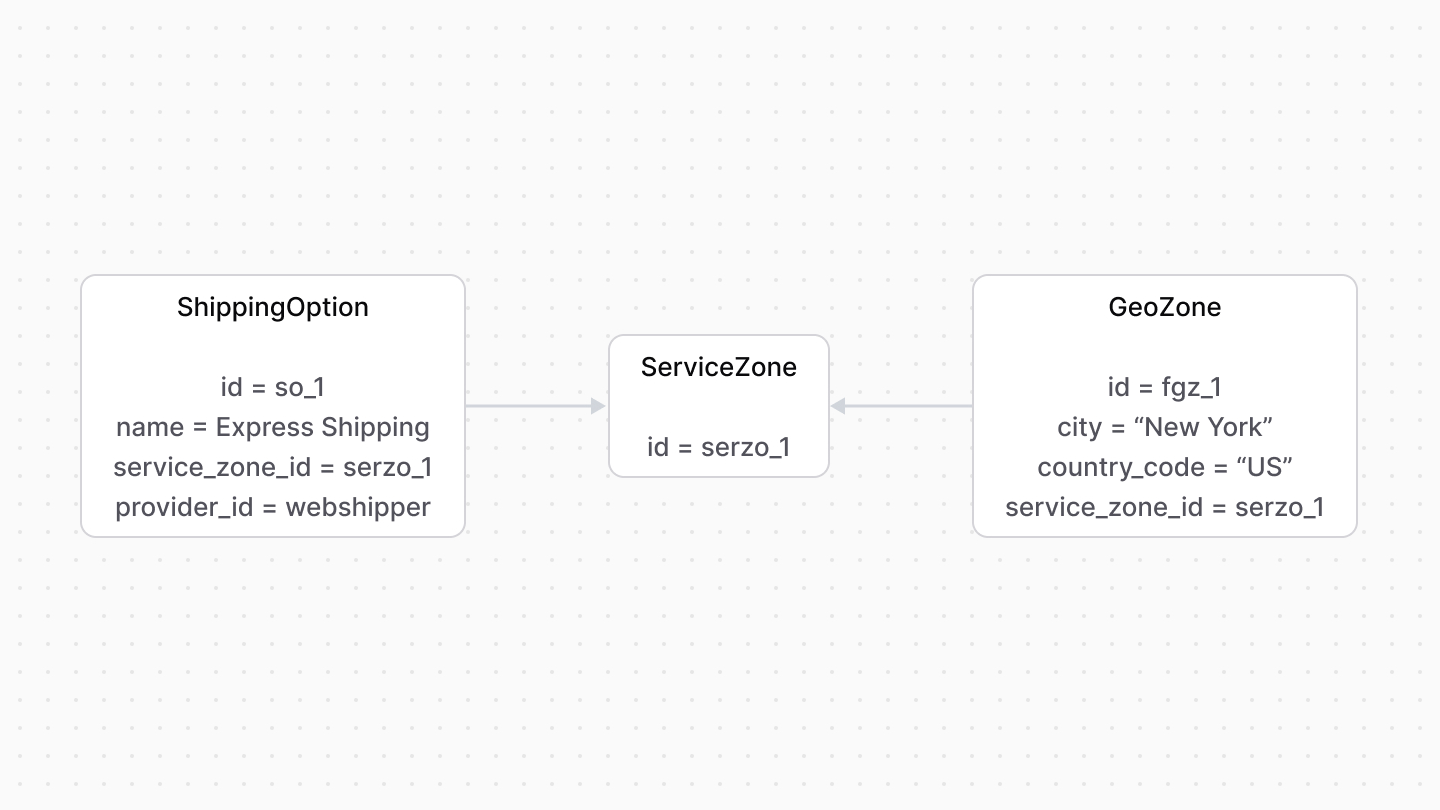 | |
| *** | |
| ## Shipping Option Rules | |
| You can restrict shipping options by custom rules, such as the item’s weight or the customer’s group. | |
| These rules are represented by the [ShippingOptionRule data model](https://docs.medusajs.com/references/fulfillment/models/ShippingOptionRule/index.html.md). Its properties define the custom rule: | |
| - `attribute`: The name of a property or table that the rule applies to. For example, `customer_group`. | |
| - `operator`: The operator used in the condition. For example: | |
| - To allow multiple values, use the operator `in`, which validates that the provided values are in the rule’s values. | |
| - To create a negation condition that considers `value` against the rule, use `nin`, which validates that the provided values aren’t in the rule’s values. | |
| - Check out more operators in [this reference](https://docs.medusajs.com/references/fulfillment/types/fulfillment.RuleOperatorType/index.html.md). | |
| - `value`: One or more values. | |
| 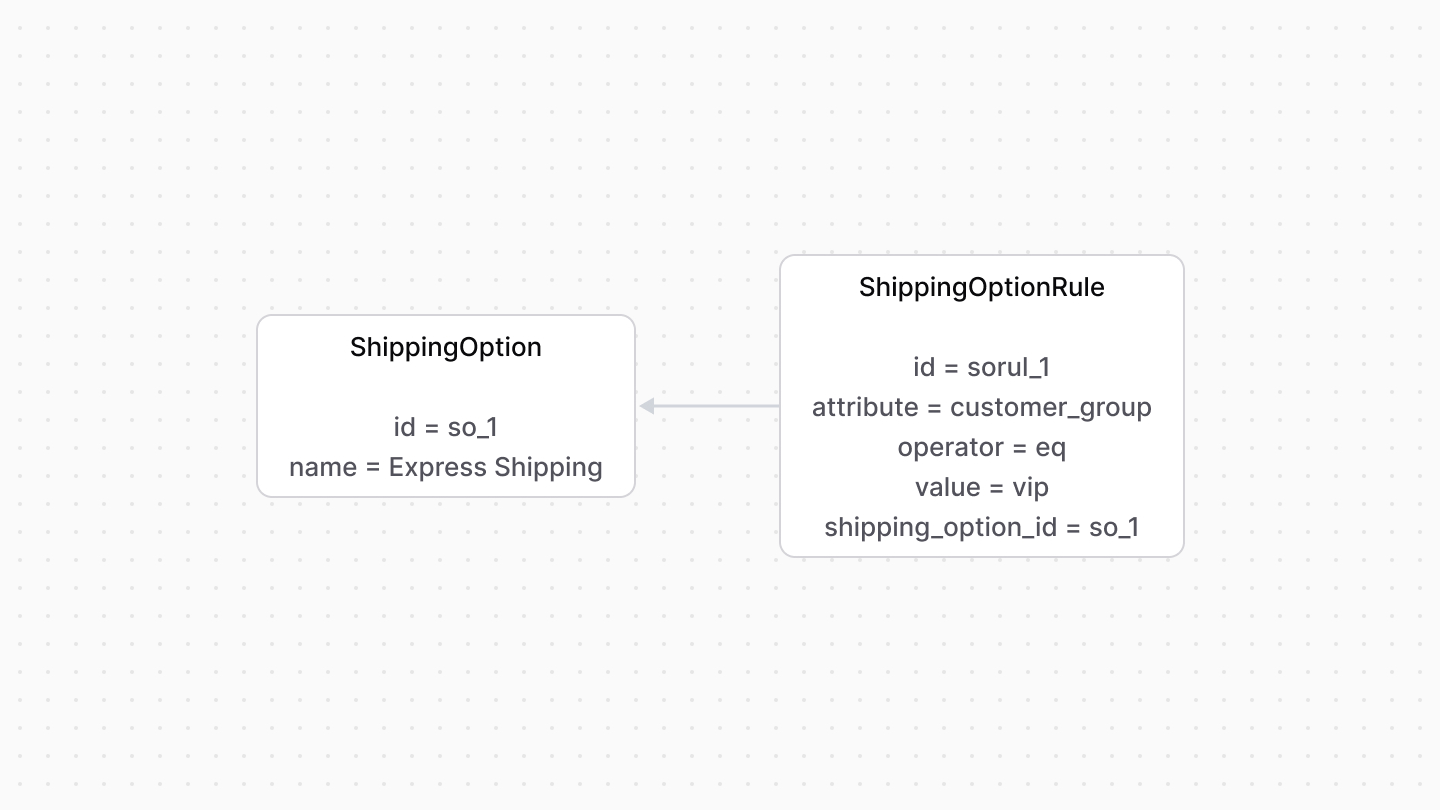 | |
| A shipping option can have multiple rules. For example, you can add rules to a shipping option so that it's available if the customer belongs to the VIP group and the total weight is less than 2000g. | |
| 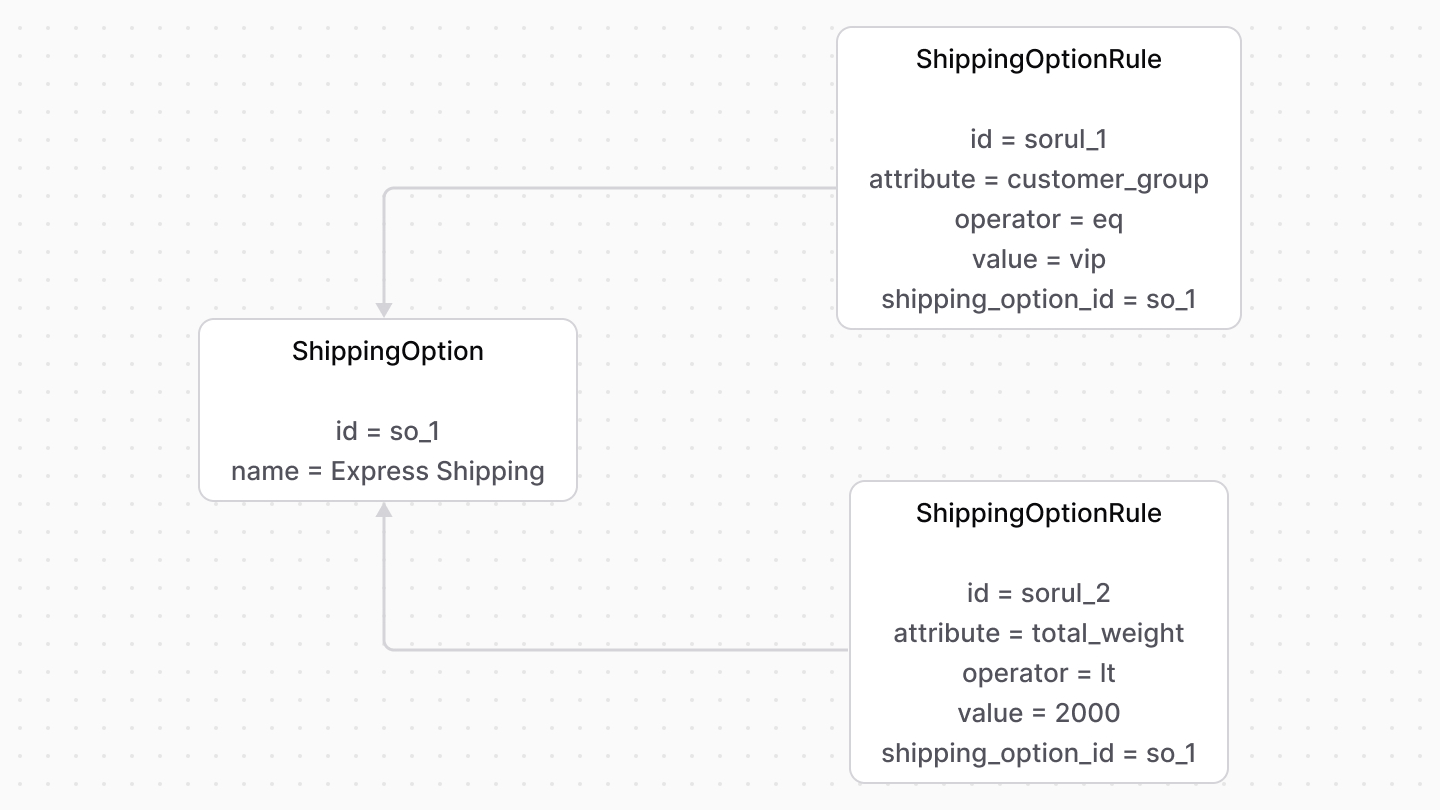 | |
| *** | |
| ## Shipping Profile and Types | |
| A shipping option belongs to a type. For example, a shipping option’s type may be `express`, while another `standard`. The type is represented by the [ShippingOptionType data model](https://docs.medusajs.com/references/fulfillment/models/ShippingOptionType/index.html.md). | |
| A shipping option also belongs to a shipping profile, as each shipping profile defines the type of items to be shipped in a similar manner. | |
| *** | |
| ## data Property | |
| When fulfilling an item, you might use a third-party fulfillment provider that requires additional custom data to be passed along from the checkout or order-creation process. | |
| The `ShippingOption` data model has a `data` property. It's an object that stores custom data relevant later when creating and processing a fulfillment. | |
| # Inventory Concepts | |
| In this document, you’ll learn about the main concepts in the Inventory Module, and how data is stored and related. | |
| ## InventoryItem | |
| An inventory item, represented by the [InventoryItem data model](https://docs.medusajs.com/references/inventory-next/models/InventoryItem/index.html.md), is a stock-kept item, such as a product, whose inventory can be managed. | |
| The `InventoryItem` data model mainly holds details related to the underlying stock item, but has relations to other data models that include its inventory details. | |
| 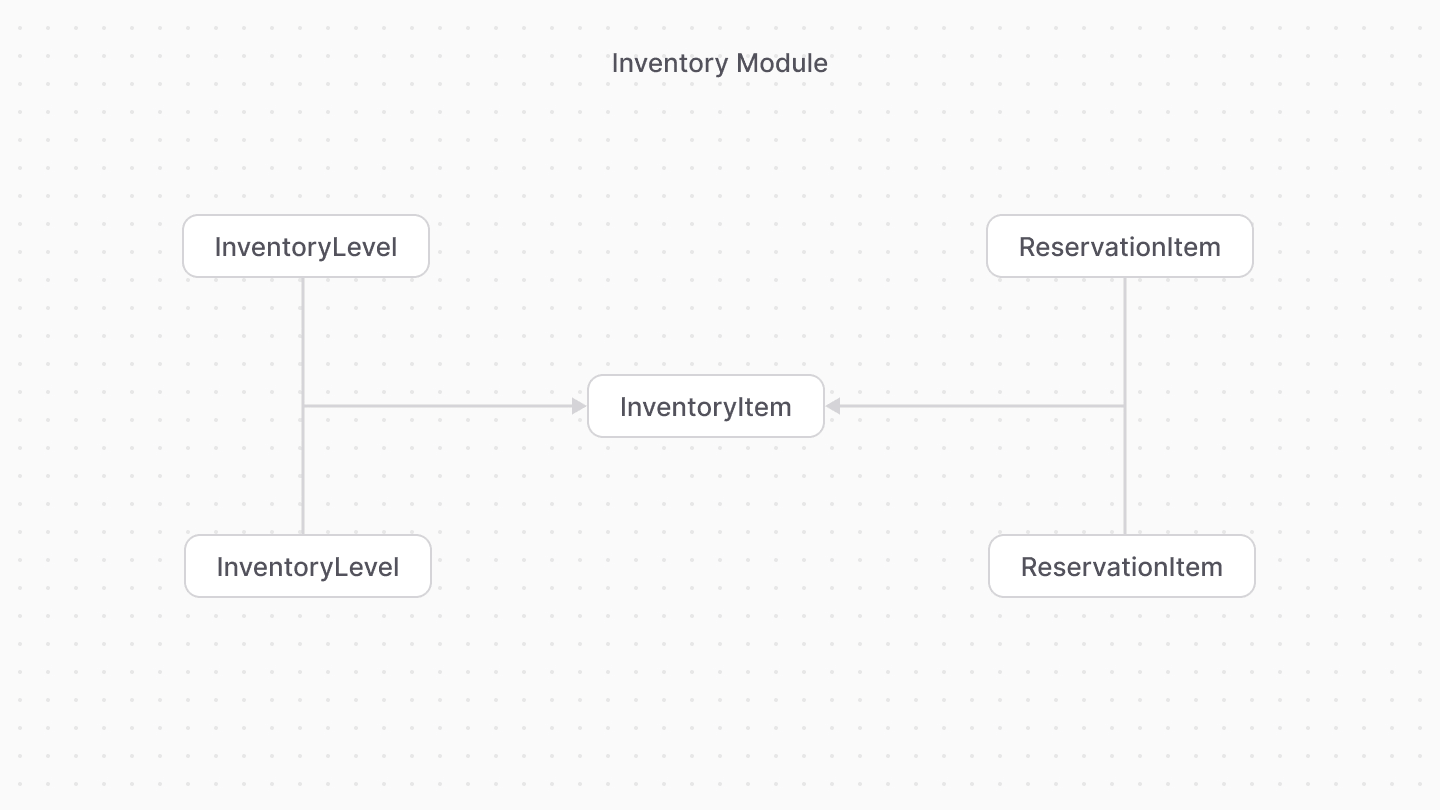 | |
| *** | |
| ## InventoryLevel | |
| An inventory level, represented by the [InventoryLevel data model](https://docs.medusajs.com/references/inventory-next/models/InventoryLevel/index.html.md), holds the inventory and quantity details of an inventory item in a specific location. | |
| It has three quantity-related properties: | |
| - `stocked_quantity`: The available stock quantity of an item in the associated location. | |
| - `reserved_quantity`: The quantity reserved from the available `stocked_quantity`. It indicates the quantity that's still not removed from stock, but considered as unavailable when checking whether an item is in stock. | |
| - `incoming_quantity`: The incoming stock quantity of an item into the associated location. This property doesn't play into the `stocked_quantity` or when checking whether an item is in stock. | |
| ### Associated Location | |
| The inventory level's location is determined by the `location_id` property. Medusa links the `InventoryLevel` data model with the `StockLocation` data model from the Stock Location Module. | |
| *** | |
| ## ReservationItem | |
| A reservation item, represented by the [ReservationItem](https://docs.medusajs.com/references/inventory-next/models/ReservationItem/index.html.md) data model, represents unavailable quantity of an inventory item in a location. It's used when an order is placed but not fulfilled yet. | |
| The reserved quantity is associated with a location, so it has a similar relation to that of the `InventoryLevel` with the Stock Location Module. | |
| # Inventory Module in Medusa Flows | |
| This document explains how the Inventory Module is used within the Medusa application's flows. | |
| ## Product Variant Creation | |
| When a product variant is created and its `manage_inventory` property's value is `true`, the Medusa application creates an inventory item associated with that product variant. | |
| This flow is implemented within the [createProductVariantsWorkflow](https://docs.medusajs.com/references/medusa-workflows/createProductVariantsWorkflow/index.html.md) | |
| 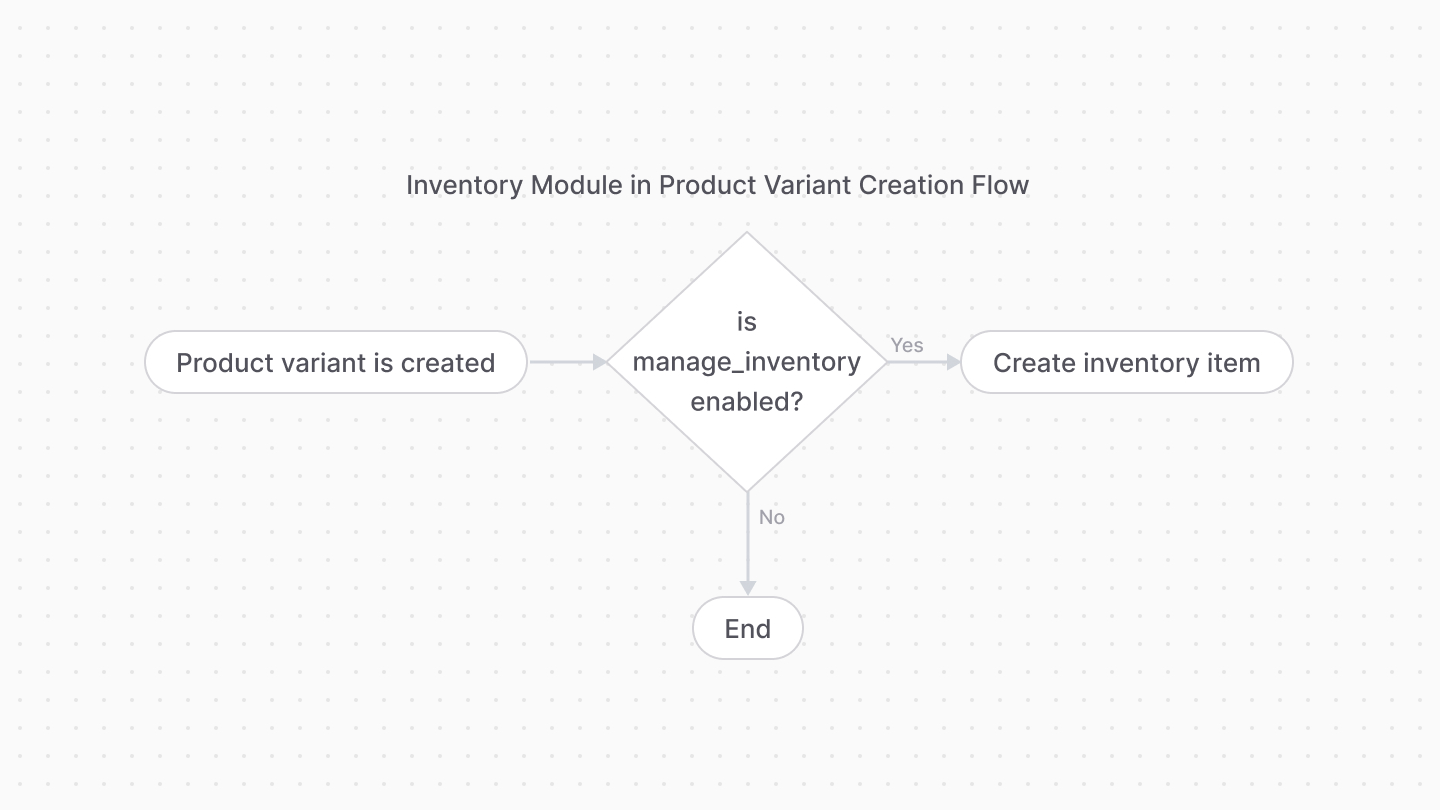 | |
| *** | |
| ## Add to Cart | |
| When a product variant with `manage_inventory` set to `true` is added to cart, the Medusa application checks whether there's sufficient stocked quantity. If not, an error is thrown and the product variant won't be added to the cart. | |
| This flow is implemented within the [addToCartWorkflow](https://docs.medusajs.com/references/medusa-workflows/addToCartWorkflow/index.html.md) | |
| 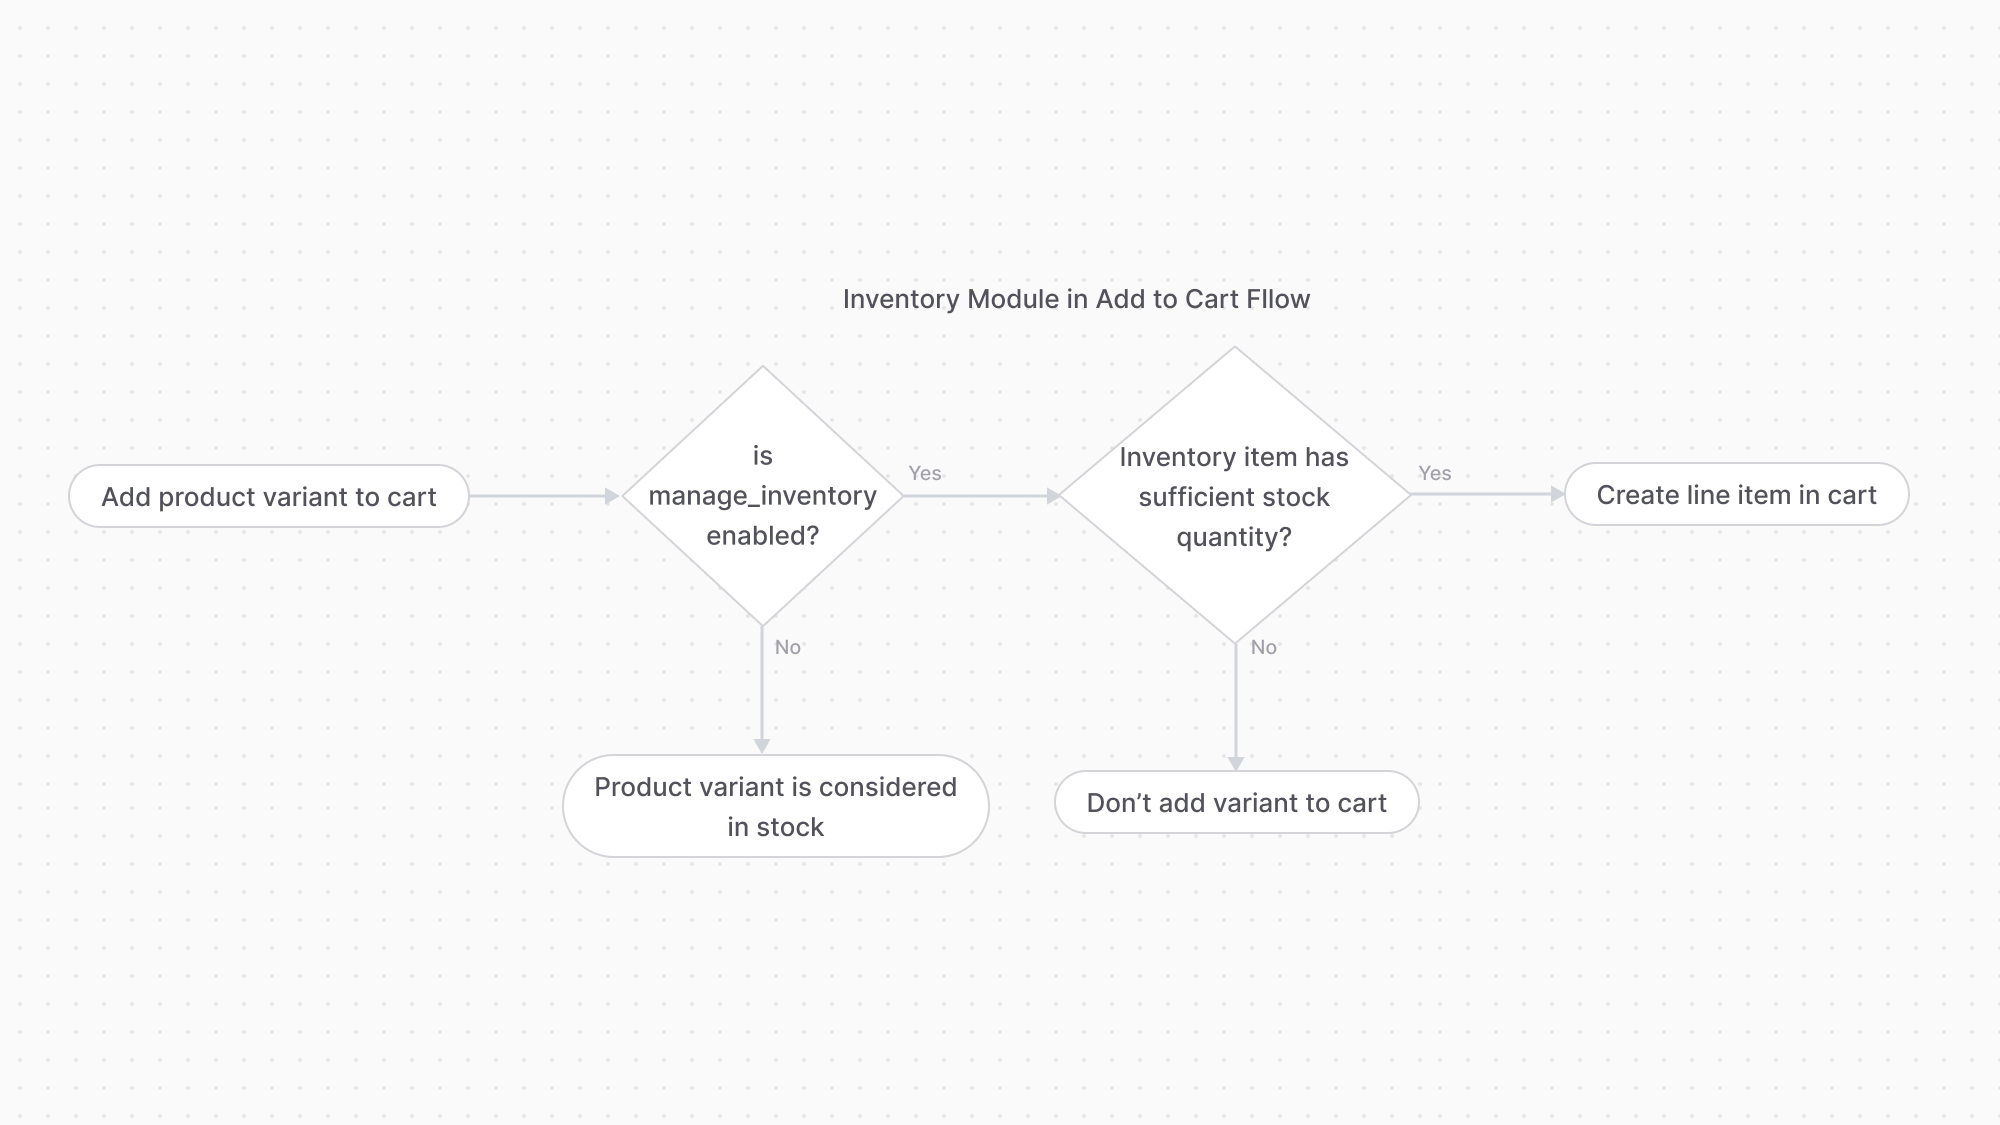 | |
| *** | |
| ## Order Placed | |
| When an order is placed, the Medusa application creates a reservation item for each product variant with `manage_inventory` set to `true`. | |
| This flow is implemented within the [completeCartWorkflow](https://docs.medusajs.com/references/medusa-workflows/completeCartWorkflow/index.html.md) | |
| 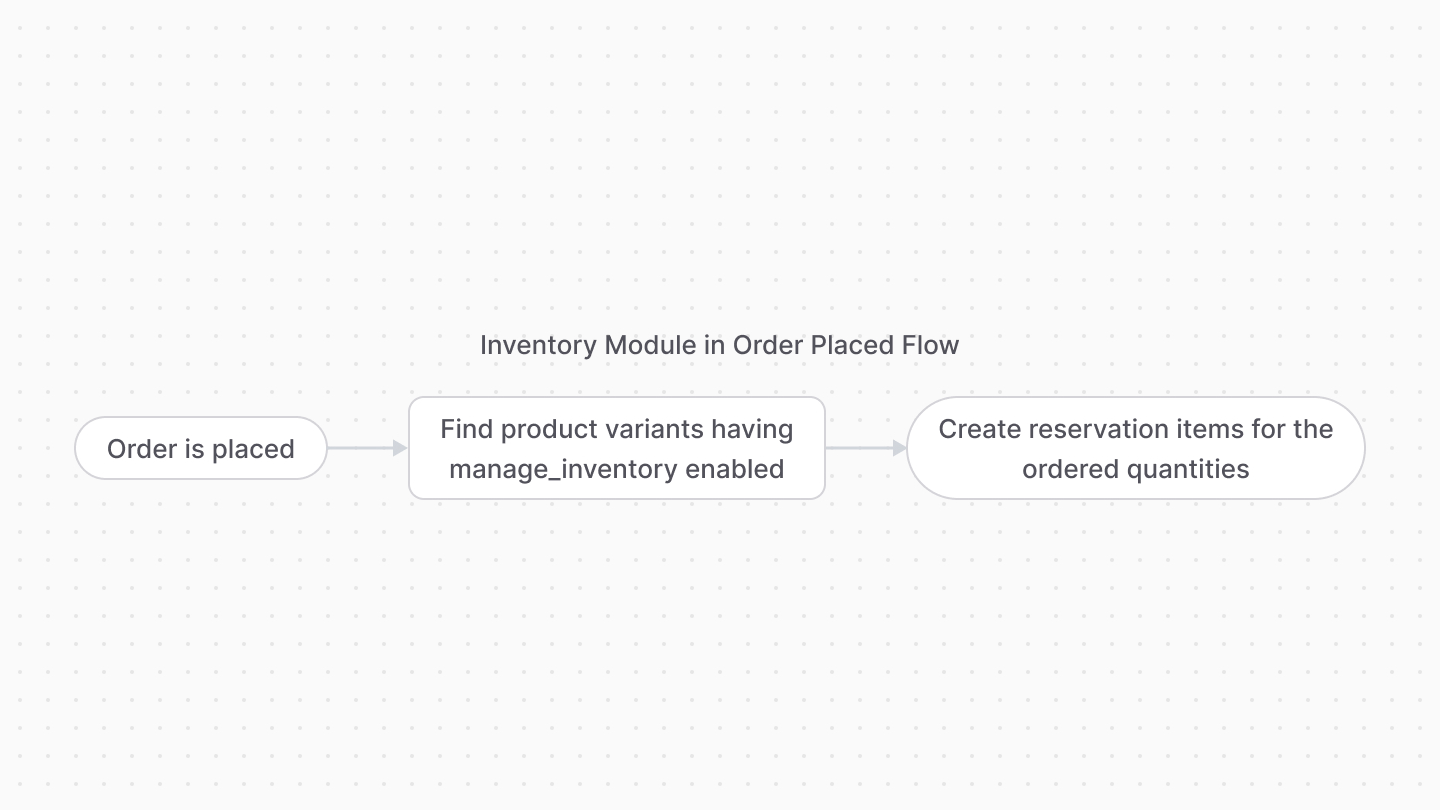 | |
| *** | |
| ## Order Fulfillment | |
| When an item in an order is fulfilled and the associated variant has its `manage_inventory` property set to `true`, the Medusa application: | |
| - Subtracts the `reserved_quantity` from the `stocked_quantity` in the inventory level associated with the variant's inventory item. | |
| - Resets the `reserved_quantity` to `0`. | |
| - Deletes the associated reservation item. | |
| This flow is implemented within the [createOrderFulfillmentWorkflow](https://docs.medusajs.com/references/medusa-workflows/createOrderFulfillmentWorkflow/index.html.md) | |
| 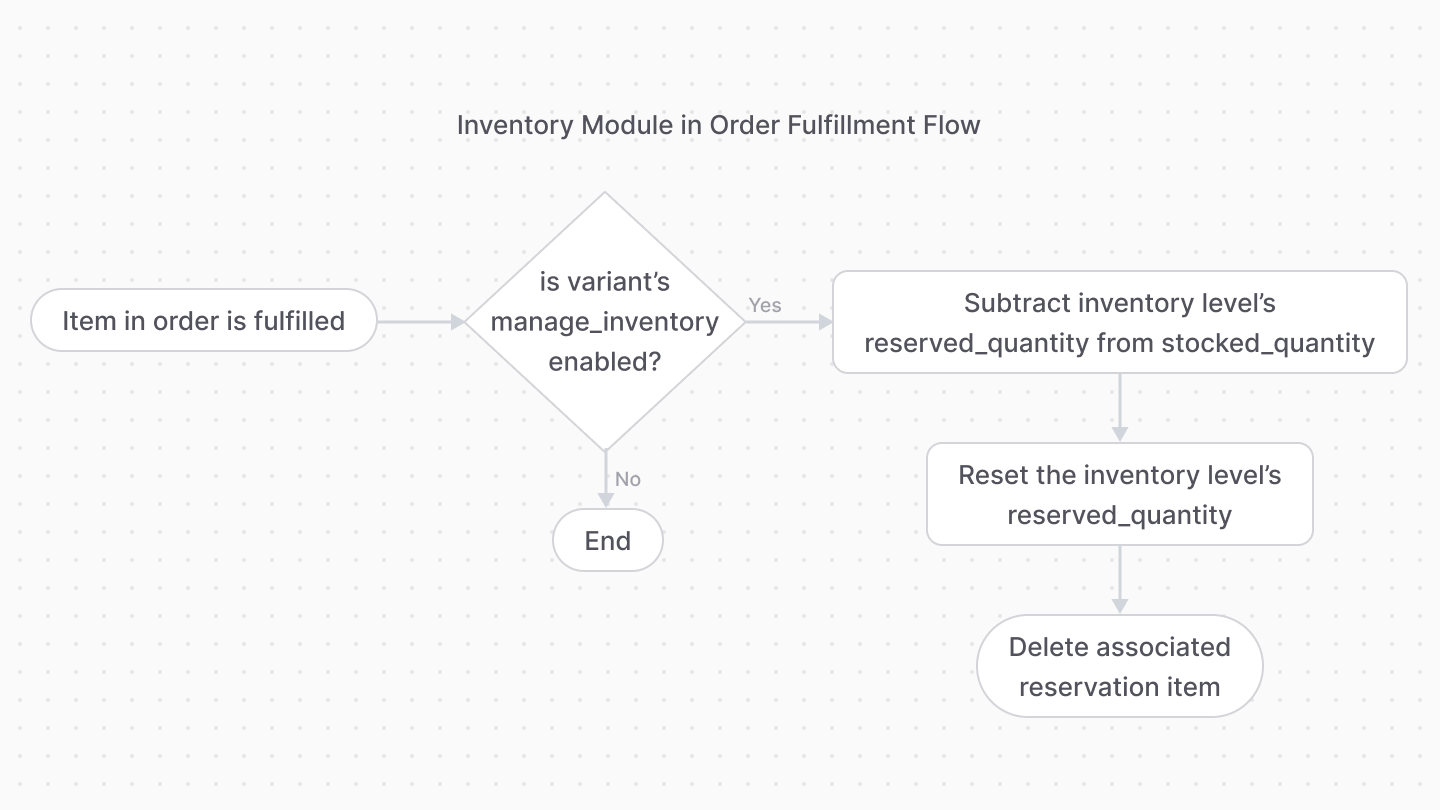 | |
| *** | |
| ## Order Return | |
| When an item in an order is returned and the associated variant has its `manage_inventory` property set to `true`, the Medusa application increments the `stocked_quantity` of the inventory item's level with the returned quantity. | |
| This flow is implemented within the [confirmReturnReceiveWorkflow](https://docs.medusajs.com/references/medusa-workflows/confirmReturnReceiveWorkflow/index.html.md) | |
| 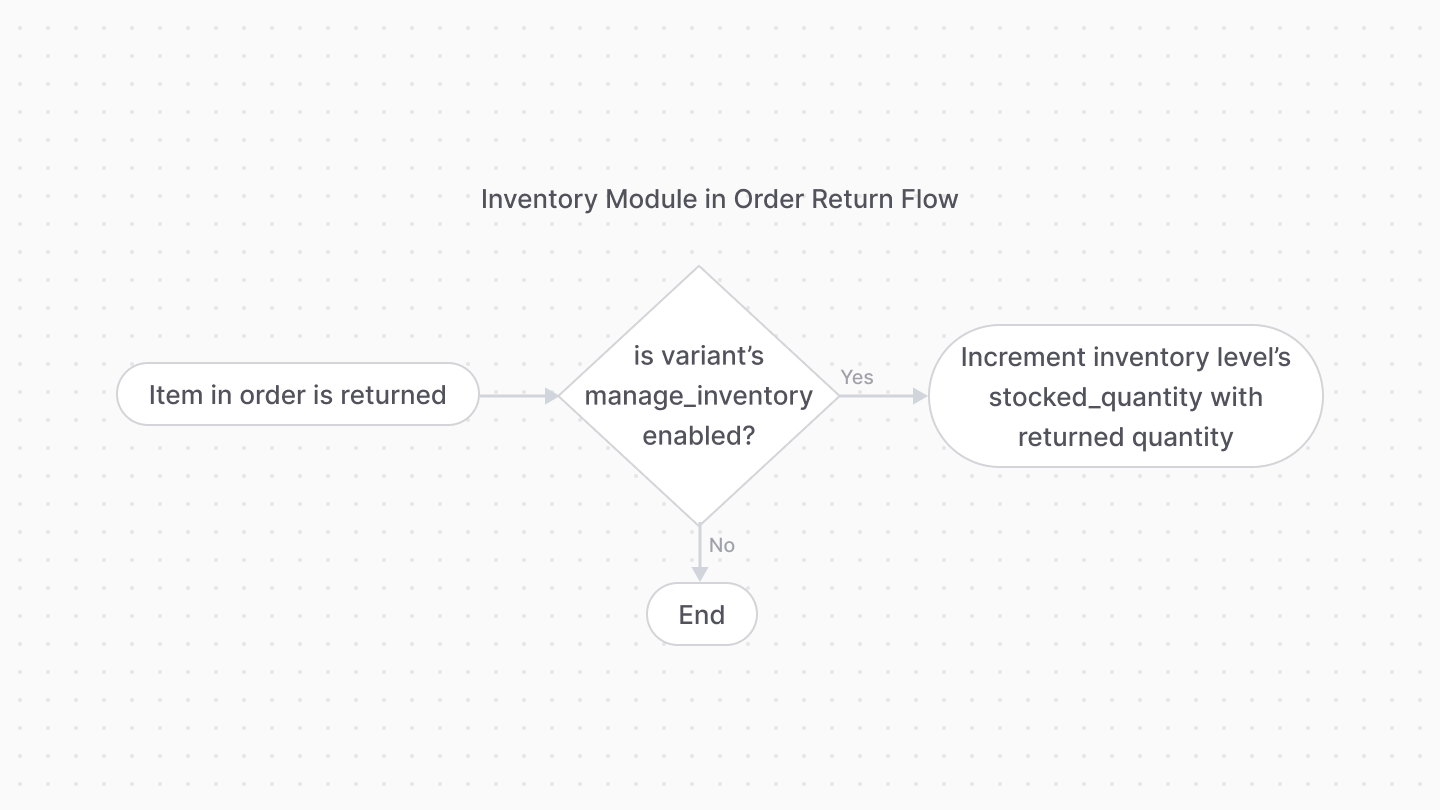 | |
| ### Dismissed Returned Items | |
| If a returned item is considered damaged or is dismissed, its quantity doesn't increment the `stocked_quantity` of the inventory item's level. | |
| # Links between Inventory Module and Other Modules | |
| This document showcases the module links defined between the Inventory Module and other commerce modules. | |
| ## Summary | |
| The Inventory Module has the following links to other modules: | |
| Read-only links are used to query data across modules, but the relations aren't stored in a pivot table in the database. | |
| - [`ProductVariant` data model of Product Module \<> `InventoryItem` data model](#product-module). | |
| - [`InventoryLevel` data model \<> `StockLocation` data model of Stock Location Module](#stock-location-module). (Read-only). | |
| *** | |
| ## Product Module | |
| Each product variant has different inventory details. Medusa defines a link between the `ProductVariant` and `InventoryItem` data models. | |
| 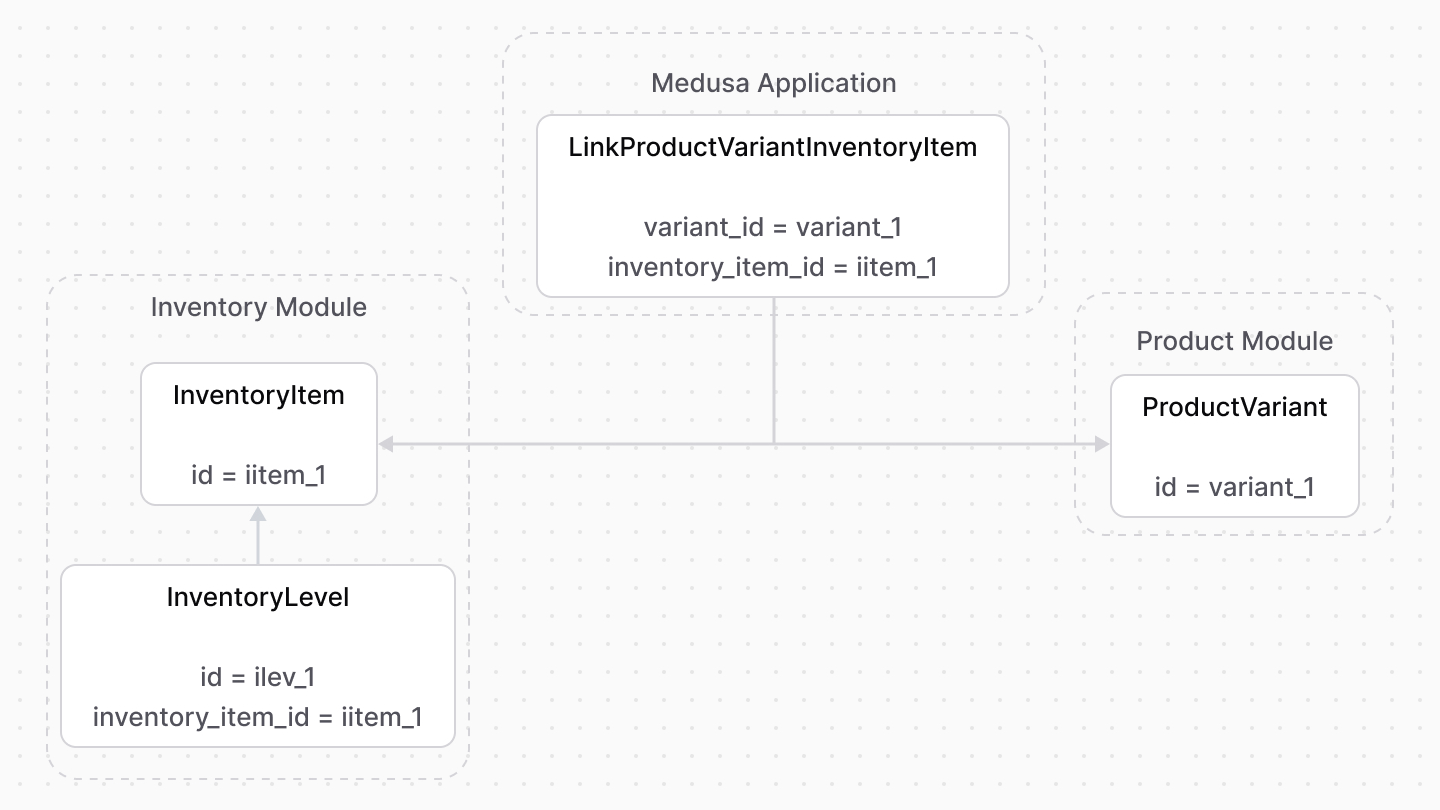 | |
| A product variant whose `manage_inventory` property is enabled has an associated inventory item. Through that inventory's items relations in the Inventory Module, you can manage and check the variant's inventory quantity. | |
| Learn more about product variant's inventory management in [this guide](https://docs.medusajs.com/Users/shahednasser/medusa/www/apps/resources/app/commerce-modules/product/variant-inventory/index.html.md). | |
| ### Retrieve with Query | |
| To retrieve the product variants of an inventory item with [Query](https://docs.medusajs.com/docs/learn/fundamentals/module-links/query/index.html.md), pass `variants.*` in `fields`: | |
| ### query.graph | |
| ```ts | |
| const { data: inventoryItems } = await query.graph({ | |
| entity: "inventory_item", | |
| fields: [ | |
| "variants.*", | |
| ], | |
| }) | |
| // inventoryItems.variants | |
| ``` | |
| ### useQueryGraphStep | |
| ```ts | |
| import { useQueryGraphStep } from "@medusajs/medusa/core-flows" | |
| // ... | |
| const { data: inventoryItems } = useQueryGraphStep({ | |
| entity: "inventory_item", | |
| fields: [ | |
| "variants.*", | |
| ], | |
| }) | |
| // inventoryItems.variants | |
| ``` | |
| ### Manage with Link | |
| To manage the variants of an inventory item, use [Link](https://docs.medusajs.com/docs/learn/fundamentals/module-links/link/index.html.md): | |
| ### link.create | |
| ```ts | |
| import { Modules } from "@medusajs/framework/utils" | |
| // ... | |
| await link.create({ | |
| [Modules.PRODUCT]: { | |
| variant_id: "variant_123", | |
| }, | |
| [Modules.INVENTORY]: { | |
| inventory_item_id: "iitem_123", | |
| }, | |
| }) | |
| ``` | |
| ### createRemoteLinkStep | |
| ```ts | |
| import { Modules } from "@medusajs/framework/utils" | |
| import { createRemoteLinkStep } from "@medusajs/medusa/core-flows" | |
| // ... | |
| createRemoteLinkStep({ | |
| [Modules.PRODUCT]: { | |
| variant_id: "variant_123", | |
| }, | |
| [Modules.INVENTORY]: { | |
| inventory_item_id: "iitem_123", | |
| }, | |
| }) | |
| ``` | |
| *** | |
| ## Stock Location Module | |
| Medusa defines a read-only link between the `InventoryLevel` data model and the [Stock Location Module](https://docs.medusajs.com/Users/shahednasser/medusa/www/apps/resources/app/commerce-modules/stock-location/index.html.md)'s `StockLocation` data model. This means you can retrieve the details of an inventory level's stock locations, but you don't manage the links in a pivot table in the database. The stock location of an inventory level is determined by the `location_id` property of the `InventoryLevel` data model. | |
| ### Retrieve with Query | |
| To retrieve the stock locations of an inventory level with [Query](https://docs.medusajs.com/docs/learn/fundamentals/module-links/query/index.html.md), pass `stock_locations.*` in `fields`: | |
| ### query.graph | |
| ```ts | |
| const { data: inventoryLevels } = await query.graph({ | |
| entity: "inventory_level", | |
| fields: [ | |
| "stock_locations.*", | |
| ], | |
| }) | |
| // inventoryLevels.stock_locations | |
| ``` | |
| ### useQueryGraphStep | |
| ```ts | |
| import { useQueryGraphStep } from "@medusajs/medusa/core-flows" | |
| // ... | |
| const { data: inventoryLevels } = useQueryGraphStep({ | |
| entity: "inventory_level", | |
| fields: [ | |
| "stock_locations.*", | |
| ], | |
| }) | |
| // inventoryLevels.stock_locations | |
| ``` | |
| # Order Claim | |
| In this document, you’ll learn about order claims. | |
| ## What is a Claim? | |
| When a customer receives a defective or incorrect item, the merchant can create a claim to refund or replace the item. | |
| The [OrderClaim data model](https://docs.medusajs.com/references/order/models/OrderClaim/index.html.md) represents a claim. | |
| *** | |
| ## Claim Type | |
| The `Claim` data model has a `type` property whose value indicates the type of the claim: | |
| - `refund`: the items are returned, and the customer is refunded. | |
| - `replace`: the items are returned, and the customer receives new items. | |
| *** | |
| ## Old and Replacement Items | |
| When the claim is created, a return, represented by the [Return data model](https://docs.medusajs.com/references/order/models/Return/index.html.md), is also created to handle receiving the old items from the customer. | |
| Learn more about returns in [this guide](https://docs.medusajs.com/Users/shahednasser/medusa/www/apps/resources/app/commerce-modules/order/return/index.html.md). | |
| If the claim’s type is `replace`, replacement items are represented by the [ClaimItem data model](https://docs.medusajs.com/references/order/models/OrderClaimItem/index.html.md). | |
| *** | |
| ## Claim Shipping Methods | |
| A claim uses shipping methods to send the replacement items to the customer. These methods are represented by the [OrderShippingMethod data model](https://docs.medusajs.com/references/order/models/OrderShippingMethod/index.html.md). | |
| The shipping methods for the returned items are associated with the claim's return, as explained in [this guide](https://docs.medusajs.com/Users/shahednasser/medusa/www/apps/resources/app/commerce-modules/order/return#return-shipping-methods/index.html.md). | |
| *** | |
| ## Claim Refund | |
| If the claim’s type is `refund`, the amount to be refunded is stored in the `refund_amount` property. | |
| The [Transaction data model](https://docs.medusajs.com/references/order/models/OrderTransaction/index.html.md) represents the refunds made for the claim. | |
| *** | |
| ## How Claims Impact an Order’s Version | |
| When a claim is confirmed, the order’s version is incremented. | |
| # Order Concepts | |
| In this document, you’ll learn about orders and related concepts | |
| ## Order Items | |
| The items purchased in the order are represented by the [OrderItem data model](https://docs.medusajs.com/references/order/models/OrderItem/index.html.md). An order can have multiple items. | |
| 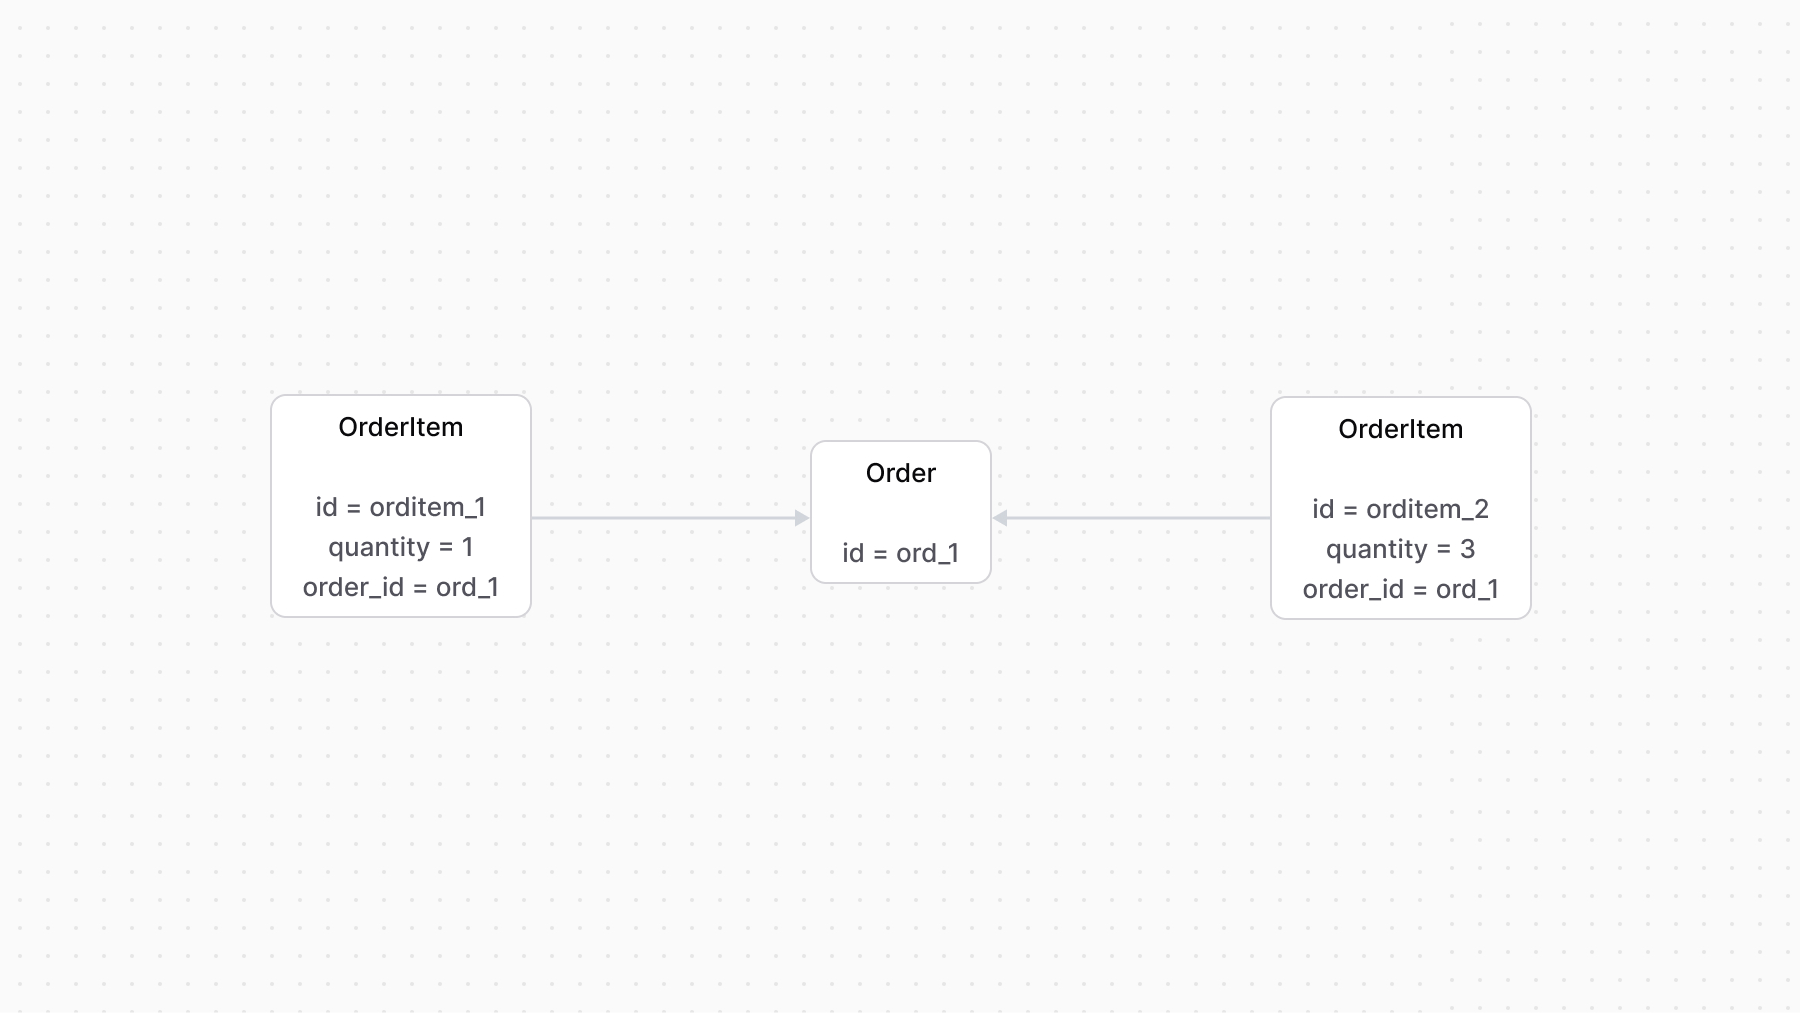 | |
| ### Item’s Product Details | |
| The details of the purchased products are represented by the [LineItem data model](https://docs.medusajs.com/references/order/models/OrderLineItem/index.html.md). Not only does a line item hold the details of the product, but also details related to its price, adjustments due to promotions, and taxes. | |
| *** | |
| ## Order’s Shipping Method | |
| An order has one or more shipping methods used to handle item shipment. | |
| Each shipping method is represented by the [OrderShippingMethod data model](https://docs.medusajs.com/references/order/models/OrderShippingMethod/index.html.md) that holds its details. The shipping method is linked to the order through the [OrderShipping data model](https://docs.medusajs.com/references/order/models/OrderShipping/index.html.md). | |
| 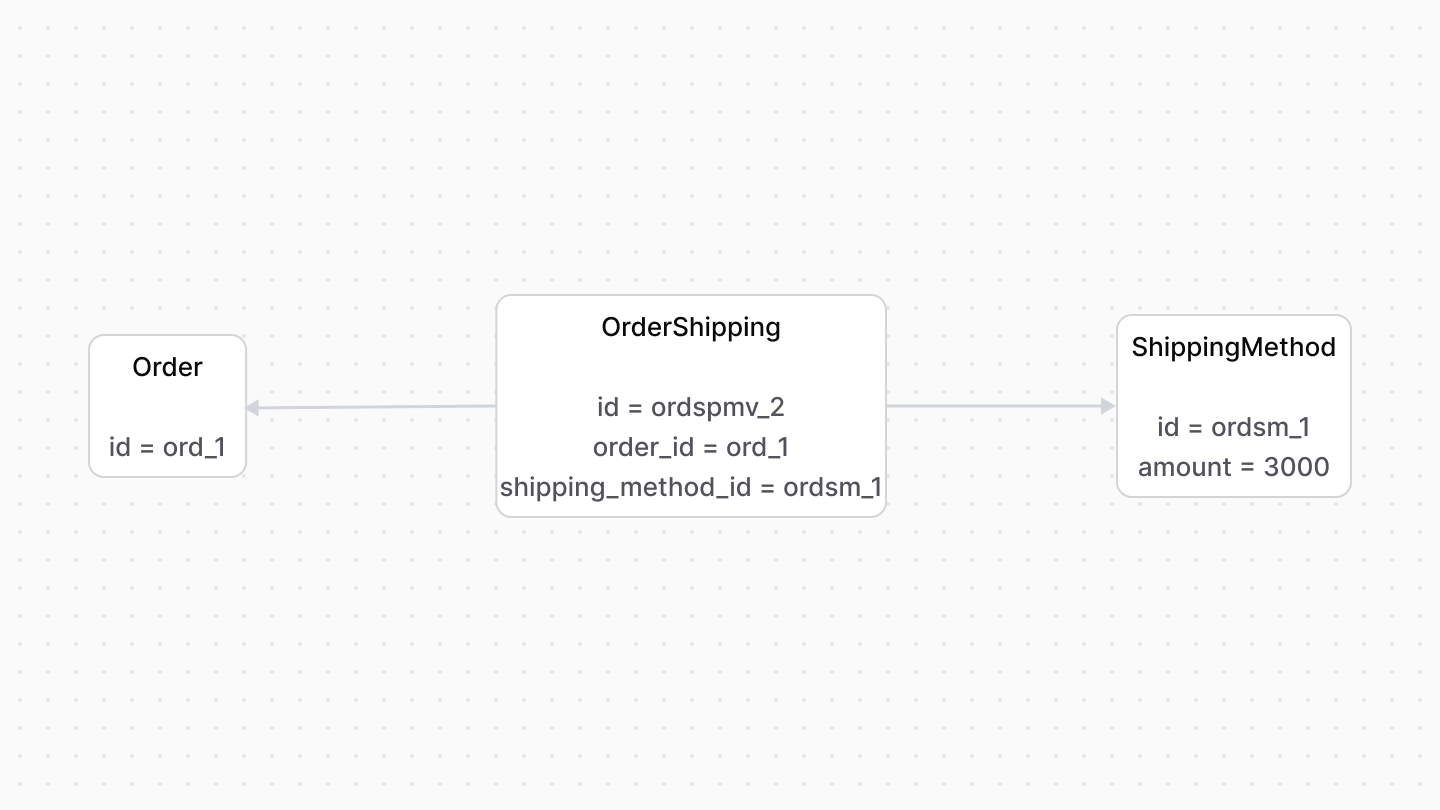 | |
| ### data Property | |
| When fulfilling the order, you can use a third-party fulfillment provider that requires additional custom data to be passed along from the order creation process. | |
| The `OrderShippingMethod` data model has a `data` property. It’s an object used to store custom data relevant later for fulfillment. | |
| The Medusa application passes the `data` property to the Fulfillment Module when fulfilling items. | |
| *** | |
| ## Order Totals | |
| The order’s total amounts (including tax total, total after an item is returned, etc…) are represented by the [OrderSummary data model](https://docs.medusajs.com/references/order/models/OrderSummary/index.html.md). | |
| *** | |
| ## Order Payments | |
| Payments made on an order, whether they’re capture or refund payments, are recorded as transactions represented by the [OrderTransaction data model](https://docs.medusajs.com/references/order/models/OrderTransaction/index.html.md). | |
| An order can have multiple transactions. The sum of these transactions must be equal to the order summary’s total. Otherwise, there’s an outstanding amount. | |
| Learn more about transactions in [this guide](https://docs.medusajs.com/Users/shahednasser/medusa/www/apps/resources/app/commerce-modules/order/transactions/index.html.md). | |
| # Inventory Kits | |
| In this guide, you'll learn how inventory kits can be used in the Medusa application to support use cases like multi-part products, bundled products, and shared inventory across products. | |
| ## What is an Inventory Kit? | |
| An inventory kit is a collection of inventory items that are linked to a single product variant. These inventory items can be used to represent different parts of a product, or to represent a bundle of products. | |
| The Medusa application links inventory items from the [Inventory Module](https://docs.medusajs.com/Users/shahednasser/medusa/www/apps/resources/app/commerce-modules/inventory/index.html.md) to product variants in the [Product Module](https://docs.medusajs.com/Users/shahednasser/medusa/www/apps/resources/app/commerce-modules/product/index.html.md). Each variant can have multiple inventory items, and these inventory items can be re-used or shared across variants. | |
| Using inventory kits, you can implement use cases like: | |
| - [Multi-part products](#multi-part-products): A product that consists of multiple parts, each with its own inventory item. | |
| - [Bundled products](#bundled-products): A product that is sold as a bundle, where each variant in the bundle product can re-use the inventory items of another product that should be sold as part of the bundle. | |
| *** | |
| ## Multi-Part Products | |
| Consider your store sells bicycles that consist of a frame, wheels, and seats, and you want to manage the inventory of these parts separately. | |
| To implement this in Medusa, you can: | |
| - Create inventory items for each of the different parts. | |
| - For each bicycle product, add a variant whose inventory kit consists of the inventory items of each of the parts. | |
| Then, whenever a customer purchases a bicycle, the inventory of each part is updated accordingly. You can also use the `required_quantity` of the variant's inventory items to set how much quantity is consumed of the part's inventory when a bicycle is sold. For example, the bicycle's wheels require 2 wheels inventory items to be sold when a bicycle is sold. | |
| 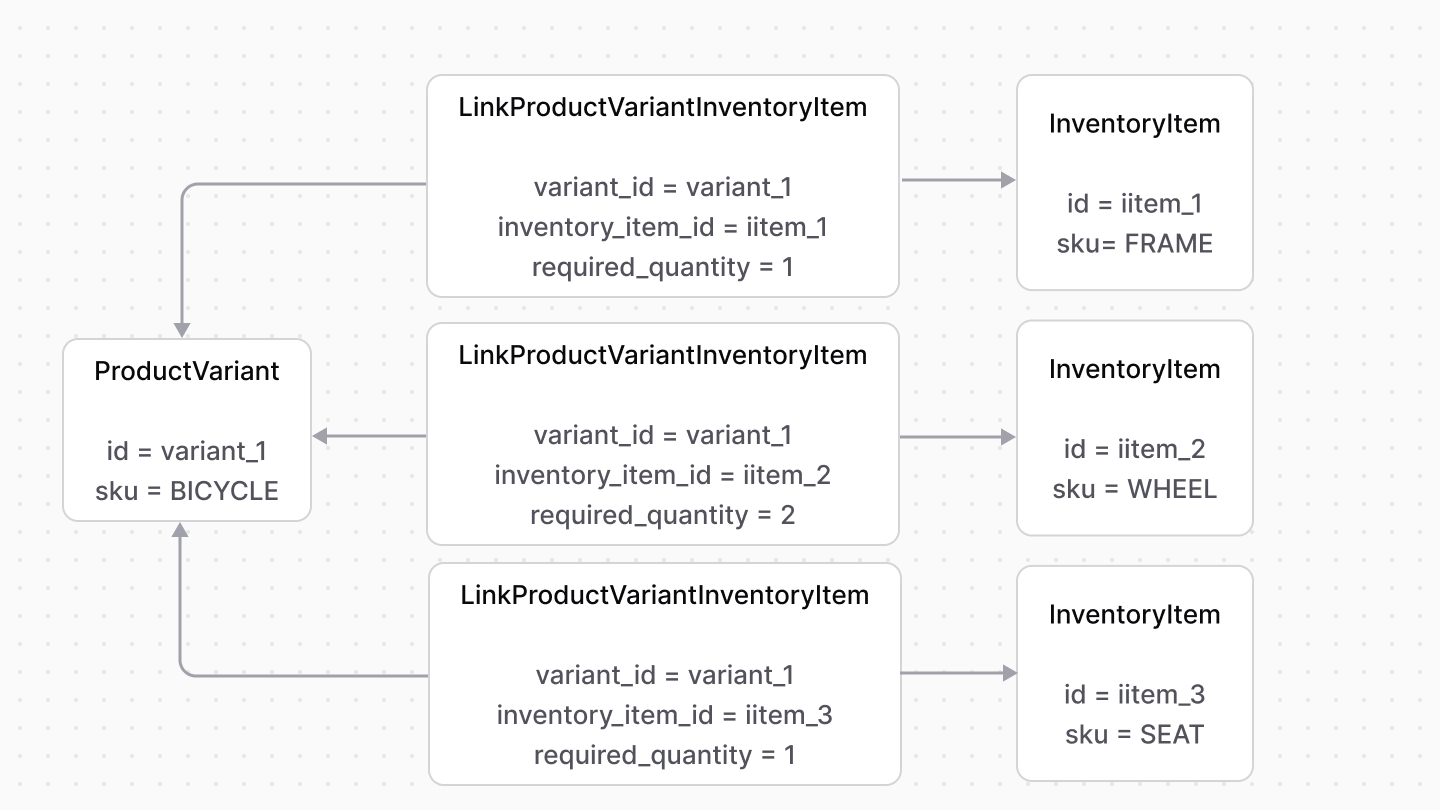 | |
| ### Create Multi-Part Product | |
| Using the Medusa Admin, you can create a multi-part product by creating its inventory items first, then assigning these inventory items to the product's variant(s). | |
| Using [workflows](https://docs.medusajs.com/docs/learn/fundamentals/workflows/index.html.md), you can implement this by first creating the inventory items: | |
| ```ts highlights={multiPartsHighlights1} | |
| import { | |
| createInventoryItemsWorkflow, | |
| useQueryGraphStep, | |
| } from "@medusajs/medusa/core-flows" | |
| import { createWorkflow } from "@medusajs/framework/workflows-sdk" | |
| export const createMultiPartProductsWorkflow = createWorkflow( | |
| "create-multi-part-products", | |
| () => { | |
| // Alternatively, you can create a stock location | |
| const { data: stockLocations } = useQueryGraphStep({ | |
| entity: "stock_location", | |
| fields: ["*"], | |
| filters: { | |
| name: "European Warehouse", | |
| }, | |
| }) | |
| const inventoryItems = createInventoryItemsWorkflow.runAsStep({ | |
| input: { | |
| items: [ | |
| { | |
| sku: "FRAME", | |
| title: "Frame", | |
| location_levels: [ | |
| { | |
| stocked_quantity: 100, | |
| location_id: stockLocations[0].id, | |
| }, | |
| ], | |
| }, | |
| { | |
| sku: "WHEEL", | |
| title: "Wheel", | |
| location_levels: [ | |
| { | |
| stocked_quantity: 100, | |
| location_id: stockLocations[0].id, | |
| }, | |
| ], | |
| }, | |
| { | |
| sku: "SEAT", | |
| title: "Seat", | |
| location_levels: [ | |
| { | |
| stocked_quantity: 100, | |
| location_id: stockLocations[0].id, | |
| }, | |
| ], | |
| }, | |
| ], | |
| }, | |
| }) | |
| // TODO create the product | |
| } | |
| ) | |
| ``` | |
| You start by retrieving the stock location to create the inventory items in. Alternatively, you can [create a stock location](https://docs.medusajs.com/references/medusa-workflows/createStockLocationsWorkflow/index.html.md). | |
| Then, you create the inventory items that the product variant consists of. | |
| Next, create the product and pass the inventory item's IDs to the product's variant: | |
| ```ts highlights={multiPartHighlights2} | |
| import { | |
| // ... | |
| transform, | |
| } from "@medusajs/framework/workflows-sdk" | |
| import { | |
| // ... | |
| createProductsWorkflow, | |
| } from "@medusajs/medusa/core-flows" | |
| export const createMultiPartProductsWorkflow = createWorkflow( | |
| "create-multi-part-products", | |
| () => { | |
| // ... | |
| const inventoryItemIds = transform({ | |
| inventoryItems, | |
| }, (data) => { | |
| return data.inventoryItems.map((inventoryItem) => { | |
| return { | |
| inventory_item_id: inventoryItem.id, | |
| // can also specify required_quantity | |
| } | |
| }) | |
| }) | |
| const products = createProductsWorkflow.runAsStep({ | |
| input: { | |
| products: [ | |
| { | |
| title: "Bicycle", | |
| variants: [ | |
| { | |
| title: "Bicycle - Small", | |
| prices: [ | |
| { | |
| amount: 100, | |
| currency_code: "usd", | |
| }, | |
| ], | |
| options: { | |
| "Default Option": "Default Variant", | |
| }, | |
| inventory_items: inventoryItemIds, | |
| }, | |
| ], | |
| options: [ | |
| { | |
| title: "Default Option", | |
| values: ["Default Variant"], | |
| }, | |
| ], | |
| }, | |
| ], | |
| }, | |
| }) | |
| } | |
| ) | |
| ``` | |
| You prepare the inventory item IDs to pass to the variant using [transform](https://docs.medusajs.com/docs/learn/fundamentals/workflows/variable-manipulation/index.html.md) from the Workflows SDK, then pass these IDs to the created product's variant. | |
| You can now [execute the workflow](https://docs.medusajs.com/docs/learn/fundamentals/workflows#3-execute-the-workflow/index.html.md) in [API routes](https://docs.medusajs.com/docs/learn/fundamentals/api-routes/index.html.md), [scheduled jobs](https://docs.medusajs.com/docs/learn/fundamentals/scheduled-jobs/index.html.md), or [subscribers](https://docs.medusajs.com/docs/learn/fundamentals/events-and-subscribers/index.html.md). | |
| *** | |
| ## Bundled Products | |
| Consider you have three products: shirt, pants, and shoes. You sell those products separately, but you also want to offer them as a bundle. | |
| 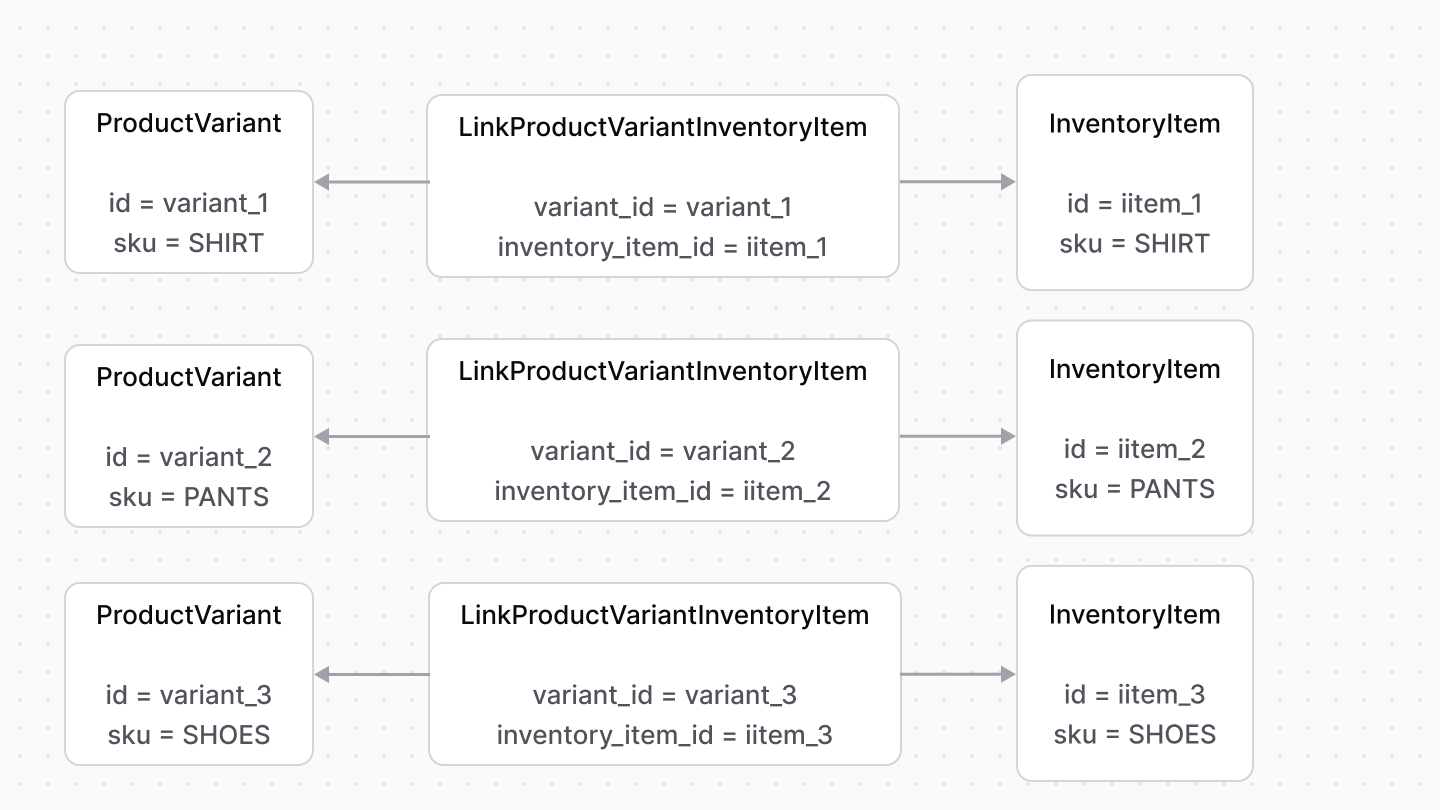 | |
| You can do that by creating a product, where each variant re-uses the inventory items of each of the shirt, pants, and shoes products. | |
| Then, when the bundled product's variant is purchased, the inventory quantity of the associated inventory items are updated. | |
|  | |
| ### Create Bundled Product | |
| You can create a bundled product in the Medusa Admin by creating the products part of the bundle first, each having its own inventory items. Then, you create the bundled product whose variant(s) have inventory kits composed of inventory items from each of the products part of the bundle. | |
| Using [workflows](https://docs.medusajs.com/docs/learn/fundamentals/workflows/index.html.md), you can implement this by first creating the products part of the bundle: | |
| ```ts highlights={bundledHighlights1} | |
| import { | |
| createWorkflow, | |
| } from "@medusajs/framework/workflows-sdk" | |
| import { | |
| createProductsWorkflow, | |
| } from "@medusajs/medusa/core-flows" | |
| export const createBundledProducts = createWorkflow( | |
| "create-bundled-products", | |
| () => { | |
| const products = createProductsWorkflow.runAsStep({ | |
| input: { | |
| products: [ | |
| { | |
| title: "Shirt", | |
| variants: [ | |
| { | |
| title: "Shirt", | |
| prices: [ | |
| { | |
| amount: 10, | |
| currency_code: "usd", | |
| }, | |
| ], | |
| options: { | |
| "Default Option": "Default Variant", | |
| }, | |
| manage_inventory: true, | |
| }, | |
| ], | |
| options: [ | |
| { | |
| title: "Default Option", | |
| values: ["Default Variant"], | |
| }, | |
| ], | |
| }, | |
| { | |
| title: "Pants", | |
| variants: [ | |
| { | |
| title: "Pants", | |
| prices: [ | |
| { | |
| amount: 10, | |
| currency_code: "usd", | |
| }, | |
| ], | |
| options: { | |
| "Default Option": "Default Variant", | |
| }, | |
| manage_inventory: true, | |
| }, | |
| ], | |
| options: [ | |
| { | |
| title: "Default Option", | |
| values: ["Default Variant"], | |
| }, | |
| ], | |
| }, | |
| { | |
| title: "Shoes", | |
| variants: [ | |
| { | |
| title: "Shoes", | |
| prices: [ | |
| { | |
| amount: 10, | |
| currency_code: "usd", | |
| }, | |
| ], | |
| options: { | |
| "Default Option": "Default Variant", | |
| }, | |
| manage_inventory: true, | |
| }, | |
| ], | |
| options: [ | |
| { | |
| title: "Default Option", | |
| values: ["Default Variant"], | |
| }, | |
| ], | |
| }, | |
| ], | |
| }, | |
| }) | |
| // TODO re-retrieve with inventory | |
| } | |
| ) | |
| ``` | |
| You create three products and enable `manage_inventory` for their variants, which will create a default inventory item. You can also create the inventory item first for more control over the quantity as explained in [the previous section](#create-multi-part-product). | |
| Next, retrieve the products again but with variant information: | |
| ```ts highlights={bundledHighlights2} | |
| import { | |
| // ... | |
| transform, | |
| } from "@medusajs/framework/workflows-sdk" | |
| import { | |
| useQueryGraphStep, | |
| } from "@medusajs/medusa/core-flows" | |
| export const createBundledProducts = createWorkflow( | |
| "create-bundled-products", | |
| () => { | |
| // ... | |
| const productIds = transform({ | |
| products, | |
| }, (data) => data.products.map((product) => product.id)) | |
| // @ts-ignore | |
| const { data: productsWithInventory } = useQueryGraphStep({ | |
| entity: "product", | |
| fields: [ | |
| "variants.*", | |
| "variants.inventory_items.*", | |
| ], | |
| filters: { | |
| id: productIds, | |
| }, | |
| }) | |
| const inventoryItemIds = transform({ | |
| productsWithInventory, | |
| }, (data) => { | |
| return data.productsWithInventory.map((product) => { | |
| return { | |
| inventory_item_id: product.variants[0].inventory_items?.[0]?.inventory_item_id, | |
| } | |
| }) | |
| }) | |
| // create bundled product | |
| } | |
| ) | |
| ``` | |
| Using [Query](https://docs.medusajs.com/docs/learn/fundamentals/module-links/query/index.html.md), you retrieve the product again with the inventory items of each variant. Then, you prepare the inventory items to pass to the bundled product's variant. | |
| Finally, create the bundled product: | |
| ```ts highlights={bundledProductHighlights3} | |
| export const createBundledProducts = createWorkflow( | |
| "create-bundled-products", | |
| () => { | |
| // ... | |
| const bundledProduct = createProductsWorkflow.runAsStep({ | |
| input: { | |
| products: [ | |
| { | |
| title: "Bundled Clothes", | |
| variants: [ | |
| { | |
| title: "Bundle", | |
| prices: [ | |
| { | |
| amount: 30, | |
| currency_code: "usd", | |
| }, | |
| ], | |
| options: { | |
| "Default Option": "Default Variant", | |
| }, | |
| inventory_items: inventoryItemIds, | |
| }, | |
| ], | |
| options: [ | |
| { | |
| title: "Default Option", | |
| values: ["Default Variant"], | |
| }, | |
| ], | |
| }, | |
| ], | |
| }, | |
| }).config({ name: "create-bundled-product" }) | |
| } | |
| ) | |
| ``` | |
| The bundled product has the same inventory items as those of the products part of the bundle. | |
| You can now [execute the workflow](https://docs.medusajs.com/docs/learn/fundamentals/workflows#3-execute-the-workflow/index.html.md) in [API routes](https://docs.medusajs.com/docs/learn/fundamentals/api-routes/index.html.md), [scheduled jobs](https://docs.medusajs.com/docs/learn/fundamentals/scheduled-jobs/index.html.md), or [subscribers](https://docs.medusajs.com/docs/learn/fundamentals/events-and-subscribers/index.html.md). | |
| # Order Edit | |
| In this document, you'll learn about order edits. | |
| ## What is an Order Edit? | |
| A merchant can edit an order to add new items or change the quantity of existing items in the order. | |
| An order edit is represented by the [OrderChange data model](https://docs.medusajs.com/references/order/models/OrderChange/index.html.md). | |
| The `OrderChange` data model is associated with any type of change, including a return or exchange. However, its `change_type` property distinguishes the type of change it's making. | |
| In the case of an order edit, the `OrderChange`'s type is `edit`. | |
| *** | |
| ## Add Items in an Order Edit | |
| When the merchant adds new items to the order in the order edit, the item is added as an [OrderItem](https://docs.medusajs.com/references/order/models/OrderItem/index.html.md). | |
| Also, an `OrderChangeAction` is created. The [OrderChangeAction data model](https://docs.medusajs.com/references/order/models/OrderChangeAction/index.html.md) represents a change made by an `OrderChange`, such as an item added. | |
| So, when an item is added, an `OrderChangeAction` is created with the type `ITEM_ADD`. In its `details` property, the item's ID, price, and quantity are stored. | |
| *** | |
| ## Update Items in an Order Edit | |
| A merchant can update an existing item's quantity or price. | |
| This change is added as an `OrderChangeAction` with the type `ITEM_UPDATE`. In its `details` property, the item's ID, new price, and new quantity are stored. | |
| *** | |
| ## Shipping Methods of New Items in the Edit | |
| Adding new items to the order requires adding shipping methods for those items. | |
| These shipping methods are represented by the [OrderShippingMethod data model](https://docs.medusajs.com/references/order/models/OrderItem/index.html.md). Also, an `OrderChangeAction` is created with the type `SHIPPING_ADD` | |
| *** | |
| ## How Order Edits Impact an Order’s Version | |
| When an order edit is confirmed, the order’s version is incremented. | |
| *** | |
| ## Payments and Refunds for Order Edit Changes | |
| Once the Order Edit is confirmed, any additional payment or refund required can be made on the original order. | |
| This is determined by the comparison between the `OrderSummary` and the order's transactions, as mentioned in [this guide](https://docs.medusajs.com/Users/shahednasser/medusa/www/apps/resources/app/commerce-modules/order/transactions#checking-outstanding-amount/index.html.md). | |
| # Order Exchange | |
| In this document, you’ll learn about order exchanges. | |
| ## What is an Exchange? | |
| An exchange is the replacement of an item that the customer ordered with another. | |
| A merchant creates the exchange, specifying the items to be replaced and the new items to be sent. | |
| The [OrderExchange data model](https://docs.medusajs.com/references/order/models/OrderExchange/index.html.md) represents an exchange. | |
| *** | |
| ## Returned and New Items | |
| When the exchange is created, a return, represented by the [Return data model](https://docs.medusajs.com/references/order/models/Return/index.html.md), is created to handle receiving the items back from the customer. | |
| Learn more about returns in [this guide](https://docs.medusajs.com/Users/shahednasser/medusa/www/apps/resources/app/commerce-modules/order/return/index.html.md). | |
| The [OrderExchangeItem data model](https://docs.medusajs.com/references/order/models/OrderExchangeItem/index.html.md) represents the new items to be sent to the customer. | |
| *** | |
| ## Exchange Shipping Methods | |
| An exchange has shipping methods used to send the new items to the customer. They’re represented by the [OrderShippingMethod data model](https://docs.medusajs.com/references/order/models/OrderShippingMethod/index.html.md). | |
| The shipping methods for the returned items are associated with the exchange's return, as explained in [this guide](https://docs.medusajs.com/Users/shahednasser/medusa/www/apps/resources/app/commerce-modules/order/return#return-shipping-methods/index.html.md). | |
| *** | |
| ## Exchange Payment | |
| The `Exchange` data model has a `difference_due` property that stores the outstanding amount. | |
| |Condition|Result| | |
| |---|---|---| | |
| |\`difference\_due \< 0\`|Merchant owes the customer a refund of the | | |
| |\`difference\_due > 0\`|Merchant requires additional payment from the customer of the | | |
| |\`difference\_due = 0\`|No payment processing is required.| | |
| Any payment or refund made is stored in the [Transaction data model](https://docs.medusajs.com/references/order/models/OrderTransaction/index.html.md). | |
| *** | |
| ## How Exchanges Impact an Order’s Version | |
| When an exchange is confirmed, the order’s version is incremented. | |
| # Order Change | |
| In this document, you'll learn about the Order Change data model and possible actions in it. | |
| ## OrderChange Data Model | |
| The [OrderChange data model](https://docs.medusajs.com/references/order/models/OrderChange/index.html.md) represents any kind of change to an order, such as a return, exchange, or edit. | |
| Its `change_type` property indicates what the order change is created for: | |
| 1. `edit`: The order change is making edits to the order, as explained in [this guide](https://docs.medusajs.com/Users/shahednasser/medusa/www/apps/resources/app/commerce-modules/order/edit/index.html.md). | |
| 2. `exchange`: The order change is associated with an exchange, which you can learn about in [this guide](https://docs.medusajs.com/Users/shahednasser/medusa/www/apps/resources/app/commerce-modules/order/exchange/index.html.md). | |
| 3. `claim`: The order change is associated with a claim, which you can learn about in [this guide](https://docs.medusajs.com/Users/shahednasser/medusa/www/apps/resources/app/commerce-modules/order/claim/index.html.md). | |
| 4. `return_request` or `return_receive`: The order change is associated with a return, which you can learn about in [this guide](https://docs.medusajs.com/Users/shahednasser/medusa/www/apps/resources/app/commerce-modules/order/return/index.html.md). | |
| Once the order change is confirmed, its changes are applied on the order. | |
| *** | |
| ## Order Change Actions | |
| The actions to perform on the original order by a change, such as adding an item, are represented by the [OrderChangeAction data model](https://docs.medusajs.com/references/order/models/OrderChangeAction/index.html.md). | |
| The `OrderChangeAction` has an `action` property that indicates the type of action to perform on the order, and a `details` property that holds more details related to the action. | |
| The following table lists the possible `action` values that Medusa uses and what `details` they carry. | |
| |Action|Description|Details| | |
| |---|---|---|---|---| | |
| |\`ITEM\_ADD\`|Add an item to the order.|\`details\`| | |
| |\`ITEM\_UPDATE\`|Update an item in the order.|\`details\`| | |
| |\`RETURN\_ITEM\`|Set an item to be returned.|\`details\`| | |
| |\`RECEIVE\_RETURN\_ITEM\`|Mark a return item as received.|\`details\`| | |
| |\`RECEIVE\_DAMAGED\_RETURN\_ITEM\`|Mark a return item that's damaged as received.|\`details\`| | |
| |\`SHIPPING\_ADD\`|Add a shipping method for new or returned items.|No details added. The ID to the shipping method is added in the | | |
| |\`SHIPPING\_ADD\`|Add a shipping method for new or returned items.|No details added. The ID to the shipping method is added in the | | |
| |\`WRITE\_OFF\_ITEM\`|Remove an item's quantity as part of the claim, without adding the quantity back to the item variant's inventory.|\`details\`| | |
| # Links between Order Module and Other Modules | |
| This document showcases the module links defined between the Order Module and other commerce modules. | |
| ## Summary | |
| The Order Module has the following links to other modules: | |
| Read-only links are used to query data across modules, but the relations aren't stored in a pivot table in the database. | |
| - [`Order` data model \<> `Customer` data model of Customer Module](#customer-module). (Read-only). | |
| - [`Order` data model \<> `Cart` data model of Cart Module](#cart-module). | |
| - [`Order` data model \<> `Fulfillment` data model of Fulfillment Module](#fulfillment-module). | |
| - [`Return` data model \<> `Fulfillment` data model of Fulfillment Module](#fulfillment-module). | |
| - [`Order` data model \<> `PaymentCollection` data model of Payment Module](#payment-module). | |
| - [`OrderClaim` data model \<> `PaymentCollection` data model of Payment Module](#payment-module). | |
| - [`OrderExchange` data model \<> `PaymentCollection` data model of Payment Module](#payment-module). | |
| - [`Order` data model \<> `Product` data model of Product Module](#product-module). (Read-only). | |
| - [`Order` data model \<> `Promotion` data model of Promotion Module](#promotion-module). | |
| - [`Order` data model \<> `Region` data model of Region Module](#region-module). (Read-only). | |
| - [`Order` data model \<> `SalesChannel` data model of Sales Channel Module](#sales-channel-module). (Read-only). | |
| *** | |
| ## Customer Module | |
| Medusa defines a read-only link between the `Order` data model and the [Customer Module](https://docs.medusajs.com/Users/shahednasser/medusa/www/apps/resources/app/commerce-modules/customer/index.html.md)'s `Customer` data model. This means you can retrieve the details of an order's customer, but you don't manage the links in a pivot table in the database. The customer of an order is determined by the `customer_id` property of the `Order` data model. | |
| ### Retrieve with Query | |
| To retrieve the customer of an order with [Query](https://docs.medusajs.com/docs/learn/fundamentals/module-links/query/index.html.md), pass `customer.*` in `fields`: | |
| ### query.graph | |
| ```ts | |
| const { data: orders } = await query.graph({ | |
| entity: "order", | |
| fields: [ | |
| "customer.*", | |
| ], | |
| }) | |
| // orders.customer | |
| ``` | |
| ### useQueryGraphStep | |
| ```ts | |
| import { useQueryGraphStep } from "@medusajs/medusa/core-flows" | |
| // ... | |
| const { data: orders } = useQueryGraphStep({ | |
| entity: "order", | |
| fields: [ | |
| "customer.*", | |
| ], | |
| }) | |
| // orders.customer | |
| ``` | |
| *** | |
| ## Cart Module | |
| The [Cart Module](https://docs.medusajs.com/Users/shahednasser/medusa/www/apps/resources/app/commerce-modules/cart/index.html.md) provides cart-management features. | |
| Medusa defines a link between the `Order` and `Cart` data models. The order is linked to the cart used for the purchased. | |
|  | |
| ### Retrieve with Query | |
| To retrieve the cart of an order with [Query](https://docs.medusajs.com/docs/learn/fundamentals/module-links/query/index.html.md), pass `cart.*` in `fields`: | |
| ### query.graph | |
| ```ts | |
| const { data: orders } = await query.graph({ | |
| entity: "order", | |
| fields: [ | |
| "cart.*", | |
| ], | |
| }) | |
| // orders.cart | |
| ``` | |
| ### useQueryGraphStep | |
| ```ts | |
| import { useQueryGraphStep } from "@medusajs/medusa/core-flows" | |
| // ... | |
| const { data: orders } = useQueryGraphStep({ | |
| entity: "order", | |
| fields: [ | |
| "cart.*", | |
| ], | |
| }) | |
| // orders.cart | |
| ``` | |
| ### Manage with Link | |
| To manage the cart of an order, use [Link](https://docs.medusajs.com/docs/learn/fundamentals/module-links/link/index.html.md): | |
| ### link.create | |
| ```ts | |
| import { Modules } from "@medusajs/framework/utils" | |
| // ... | |
| await link.create({ | |
| [Modules.ORDER]: { | |
| order_id: "order_123", | |
| }, | |
| [Modules.CART]: { | |
| cart_id: "cart_123", | |
| }, | |
| }) | |
| ``` | |
| ### createRemoteLinkStep | |
| ```ts | |
| import { Modules } from "@medusajs/framework/utils" | |
| import { createRemoteLinkStep } from "@medusajs/medusa/core-flows" | |
| // ... | |
| createRemoteLinkStep({ | |
| [Modules.ORDER]: { | |
| order_id: "order_123", | |
| }, | |
| [Modules.CART]: { | |
| cart_id: "cart_123", | |
| }, | |
| }) | |
| ``` | |
| *** | |
| ## Fulfillment Module | |
| A fulfillment is created for an orders' items. Medusa defines a link between the `Fulfillment` and `Order` data models. | |
|  | |
| A fulfillment is also created for a return's items. So, Medusa defines a link between the `Fulfillment` and `Return` data models. | |
|  | |
| ### Retrieve with Query | |
| To retrieve the fulfillments of an order with [Query](https://docs.medusajs.com/docs/learn/fundamentals/module-links/query/index.html.md), pass `fulfillments.*` in `fields`: | |
| To retrieve the fulfillments of a return, pass `fulfillments.*` in `fields`. | |
| ### query.graph | |
| ```ts | |
| const { data: orders } = await query.graph({ | |
| entity: "order", | |
| fields: [ | |
| "fulfillments.*", | |
| ], | |
| }) | |
| // orders.fulfillments | |
| ``` | |
| ### useQueryGraphStep | |
| ```ts | |
| import { useQueryGraphStep } from "@medusajs/medusa/core-flows" | |
| // ... | |
| const { data: orders } = useQueryGraphStep({ | |
| entity: "order", | |
| fields: [ | |
| "fulfillments.*", | |
| ], | |
| }) | |
| // orders.fulfillments | |
| ``` | |
| ### Manage with Link | |
| To manage the fulfillments of an order, use [Link](https://docs.medusajs.com/docs/learn/fundamentals/module-links/link/index.html.md): | |
| ### link.create | |
| ```ts | |
| import { Modules } from "@medusajs/framework/utils" | |
| // ... | |
| await link.create({ | |
| [Modules.ORDER]: { | |
| order_id: "order_123", | |
| }, | |
| [Modules.FULFILLMENT]: { | |
| fulfillment_id: "ful_123", | |
| }, | |
| }) | |
| ``` | |
| ### createRemoteLinkStep | |
| ```ts | |
| import { Modules } from "@medusajs/framework/utils" | |
| import { createRemoteLinkStep } from "@medusajs/medusa/core-flows" | |
| // ... | |
| createRemoteLinkStep({ | |
| [Modules.ORDER]: { | |
| order_id: "order_123", | |
| }, | |
| [Modules.FULFILLMENT]: { | |
| fulfillment_id: "ful_123", | |
| }, | |
| }) | |
| ``` | |
| *** | |
| ## Payment Module | |
| An order's payment details are stored in a payment collection. This also applies for claims and exchanges. | |
| So, Medusa defines links between the `PaymentCollection` data model and the `Order`, `OrderClaim`, and `OrderExchange` data models. | |
|  | |
| ### Retrieve with Query | |
| To retrieve the payment collections of an order, order exchange, or order claim with [Query](https://docs.medusajs.com/docs/learn/fundamentals/module-links/query/index.html.md), pass `payment_collections.*` in `fields`: | |
| ### query.graph | |
| ```ts | |
| const { data: orders } = await query.graph({ | |
| entity: "order", | |
| fields: [ | |
| "payment_collections.*", | |
| ], | |
| }) | |
| // orders.payment_collections | |
| ``` | |
| ### useQueryGraphStep | |
| ```ts | |
| import { useQueryGraphStep } from "@medusajs/medusa/core-flows" | |
| // ... | |
| const { data: orders } = useQueryGraphStep({ | |
| entity: "order", | |
| fields: [ | |
| "payment_collections.*", | |
| ], | |
| }) | |
| // orders.payment_collections | |
| ``` | |
| ### Manage with Link | |
| To manage the payment collections of an order, use [Link](https://docs.medusajs.com/docs/learn/fundamentals/module-links/link/index.html.md): | |
| ### link.create | |
| ```ts | |
| import { Modules } from "@medusajs/framework/utils" | |
| // ... | |
| await link.create({ | |
| [Modules.ORDER]: { | |
| order_id: "order_123", | |
| }, | |
| [Modules.PAYMENT]: { | |
| payment_collection_id: "paycol_123", | |
| }, | |
| }) | |
| ``` | |
| ### createRemoteLinkStep | |
| ```ts | |
| import { Modules } from "@medusajs/framework/utils" | |
| import { createRemoteLinkStep } from "@medusajs/medusa/core-flows" | |
| // ... | |
| createRemoteLinkStep({ | |
| [Modules.ORDER]: { | |
| order_id: "order_123", | |
| }, | |
| [Modules.PAYMENT]: { | |
| payment_collection_id: "paycol_123", | |
| }, | |
| }) | |
| ``` | |
| *** | |
| ## Product Module | |
| Medusa defines read-only links between: | |
| - the `OrderLineItem` data model and the [Product Module](https://docs.medusajs.com/Users/shahednasser/medusa/www/apps/resources/app/commerce-modules/product/index.html.md)'s `Product` data model. This means you can retrieve the details of a line item's product, but you don't manage the links in a pivot table in the database. The product of a line item is determined by the `product_id` property of the `OrderLineItem` data model. | |
| - the `OrderLineItem` data model and the [Product Module](https://docs.medusajs.com/Users/shahednasser/medusa/www/apps/resources/app/commerce-modules/product/index.html.md)'s `ProductVariant` data model. This means you can retrieve the details of a line item's variant, but you don't manage the links in a pivot table in the database. The variant of a line item is determined by the `variant_id` property of the `OrderLineItem` data model. | |
| ### Retrieve with Query | |
| To retrieve the variant of a line item with [Query](https://docs.medusajs.com/docs/learn/fundamentals/module-links/query/index.html.md), pass `variant.*` in `fields`: | |
| To retrieve the product, pass `product.*` in `fields`. | |
| ### query.graph | |
| ```ts | |
| const { data: lineItems } = await query.graph({ | |
| entity: "order_line_item", | |
| fields: [ | |
| "variant.*", | |
| ], | |
| }) | |
| // lineItems.variant | |
| ``` | |
| ### useQueryGraphStep | |
| ```ts | |
| import { useQueryGraphStep } from "@medusajs/medusa/core-flows" | |
| // ... | |
| const { data: lineItems } = useQueryGraphStep({ | |
| entity: "order_line_item", | |
| fields: [ | |
| "variant.*", | |
| ], | |
| }) | |
| // lineItems.variant | |
| ``` | |
| *** | |
| ## Promotion Module | |
| An order is associated with the promotion applied on it. Medusa defines a link between the `Order` and `Promotion` data models. | |
| 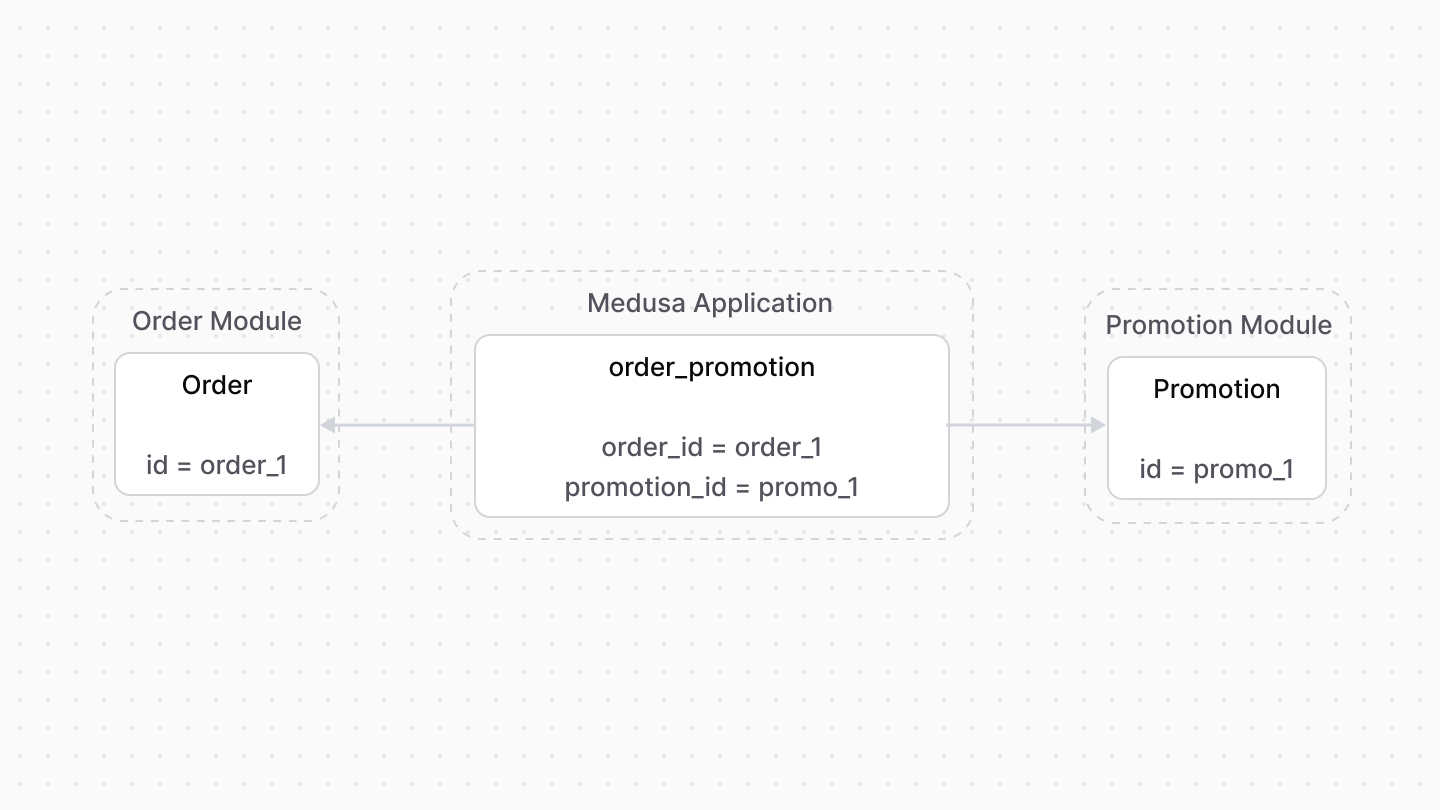 | |
| ### Retrieve with Query | |
| To retrieve the promotion applied on an order with [Query](https://docs.medusajs.com/docs/learn/fundamentals/module-links/query/index.html.md), pass `promotion.*` in `fields`: | |
| ### query.graph | |
| ```ts | |
| const { data: orders } = await query.graph({ | |
| entity: "order", | |
| fields: [ | |
| "promotion.*", | |
| ], | |
| }) | |
| // orders.promotion | |
| ``` | |
| ### useQueryGraphStep | |
| ```ts | |
| import { useQueryGraphStep } from "@medusajs/medusa/core-flows" | |
| // ... | |
| const { data: orders } = useQueryGraphStep({ | |
| entity: "order", | |
| fields: [ | |
| "promotion.*", | |
| ], | |
| }) | |
| // orders.promotion | |
| ``` | |
| ### Manage with Link | |
| To manage the promotion of an order, use [Link](https://docs.medusajs.com/docs/learn/fundamentals/module-links/link/index.html.md): | |
| ### link.create | |
| ```ts | |
| import { Modules } from "@medusajs/framework/utils" | |
| // ... | |
| await link.create({ | |
| [Modules.ORDER]: { | |
| order_id: "order_123", | |
| }, | |
| [Modules.PROMOTION]: { | |
| promotion_id: "promo_123", | |
| }, | |
| }) | |
| ``` | |
| ### createRemoteLinkStep | |
| ```ts | |
| import { Modules } from "@medusajs/framework/utils" | |
| import { createRemoteLinkStep } from "@medusajs/medusa/core-flows" | |
| // ... | |
| createRemoteLinkStep({ | |
| [Modules.ORDER]: { | |
| order_id: "order_123", | |
| }, | |
| [Modules.PROMOTION]: { | |
| promotion_id: "promo_123", | |
| }, | |
| }) | |
| ``` | |
| *** | |
| ## Region Module | |
| Medusa defines a read-only link between the `Order` data model and the [Region Module](https://docs.medusajs.com/Users/shahednasser/medusa/www/apps/resources/app/commerce-modules/region/index.html.md)'s `Region` data model. This means you can retrieve the details of an order's region, but you don't manage the links in a pivot table in the database. The region of an order is determined by the `region_id` property of the `Order` data model. | |
| ### Retrieve with Query | |
| To retrieve the region of an order with [Query](https://docs.medusajs.com/docs/learn/fundamentals/module-links/query/index.html.md), pass `region.*` in `fields`: | |
| ### query.graph | |
| ```ts | |
| const { data: orders } = await query.graph({ | |
| entity: "order", | |
| fields: [ | |
| "region.*", | |
| ], | |
| }) | |
| // orders.region | |
| ``` | |
| ### useQueryGraphStep | |
| ```ts | |
| import { useQueryGraphStep } from "@medusajs/medusa/core-flows" | |
| // ... | |
| const { data: orders } = useQueryGraphStep({ | |
| entity: "order", | |
| fields: [ | |
| "region.*", | |
| ], | |
| }) | |
| // orders.region | |
| ``` | |
| *** | |
| ## Sales Channel Module | |
| Medusa defines a read-only link between the `Order` data model and the [Sales Channel Module](https://docs.medusajs.com/Users/shahednasser/medusa/www/apps/resources/app/commerce-modules/sales-channel/index.html.md)'s `SalesChannel` data model. This means you can retrieve the details of an order's sales channel, but you don't manage the links in a pivot table in the database. The sales channel of an order is determined by the `sales_channel_id` property of the `Order` data model. | |
| ### Retrieve with Query | |
| To retrieve the sales channel of an order with [Query](https://docs.medusajs.com/docs/learn/fundamentals/module-links/query/index.html.md), pass `sales_channel.*` in `fields`: | |
| ### query.graph | |
| ```ts | |
| const { data: orders } = await query.graph({ | |
| entity: "order", | |
| fields: [ | |
| "sales_channel.*", | |
| ], | |
| }) | |
| // orders.sales_channel | |
| ``` | |
| ### useQueryGraphStep | |
| ```ts | |
| import { useQueryGraphStep } from "@medusajs/medusa/core-flows" | |
| // ... | |
| const { data: orders } = useQueryGraphStep({ | |
| entity: "order", | |
| fields: [ | |
| "sales_channel.*", | |
| ], | |
| }) | |
| // orders.sales_channel | |
| ``` | |
| # Order Versioning | |
| In this document, you’ll learn how an order and its details are versioned. | |
| ## What's Versioning? | |
| Versioning means assigning a version number to a record, such as an order and its items. This is useful to view the different versions of the order following changes in its lifetime. | |
| When changes are made on an order, such as an item is added or returned, the order's version changes. | |
| *** | |
| ## version Property | |
| The `Order` and `OrderSummary` data models have a `version` property that indicates the current version. By default, its value is `1`. | |
| Other order-related data models, such as `OrderItem`, also has a `version` property, but it indicates the version it belongs to. | |
| *** | |
| ## How the Version Changes | |
| When the order is changed, such as an item is exchanged, this changes the version of the order and its related data: | |
| 1. The version of the order and its summary is incremented. | |
| 2. Related order data that have a `version` property, such as the `OrderItem`, are duplicated. The duplicated item has the new version, whereas the original item has the previous version. | |
| When the order is retrieved, only the related data having the same version is retrieved. | |
| # Order Return | |
| In this document, you’ll learn about order returns. | |
| ## What is a Return? | |
| A return is the return of items delivered from the customer back to the merchant. It is represented by the [Return data model](https://docs.medusajs.com/references/order/models/Return/index.html.md). | |
| A return is requested either by the customer from the storefront, or the merchant from the admin. Medusa supports an automated Return Merchandise Authorization (RMA) flow. | |
| 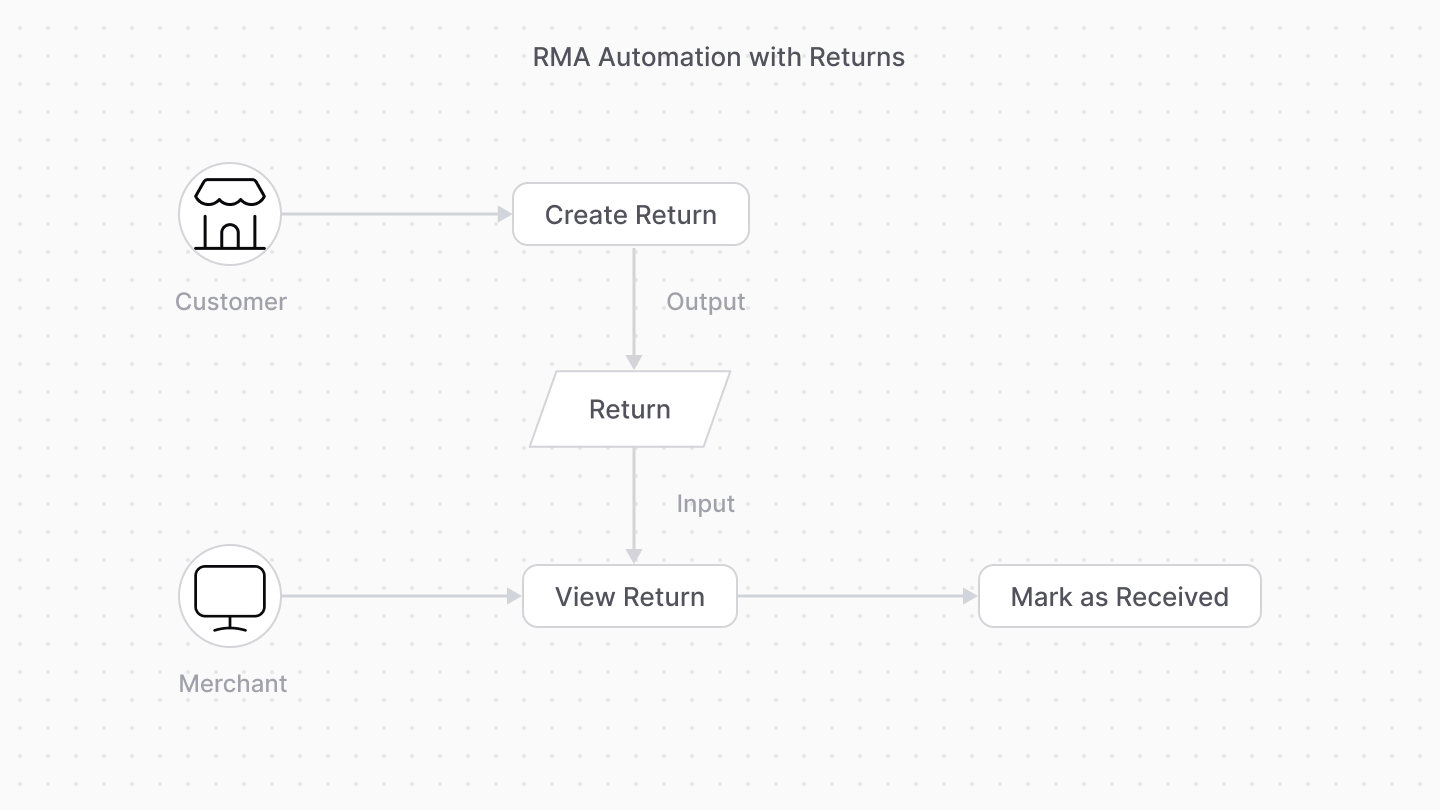 | |
| Once the merchant receives the returned items, they mark the return as received. | |
| *** | |
| ## Returned Items | |
| The items to be returned are represented by the [ReturnItem data model](references/order/models/ReturnItem). | |
| The `ReturnItem` model has two properties storing the item's quantity: | |
| 1. `received_quantity`: The quantity of the item that's received and can be added to the item's inventory quantity. | |
| 2. `damaged_quantity`: The quantity of the item that's damaged, meaning it can't be sold again or added to the item's inventory quantity. | |
| *** | |
| ## Return Shipping Methods | |
| A return has shipping methods used to return the items to the merchant. The shipping methods are represented by the [OrderShippingMethod data model](references/order/models/OrderShippingMethod). | |
| In the Medusa application, the shipping method for a return is created only from a shipping option, provided by the Fulfillment Module, that has the rule `is_return` enabled. | |
| *** | |
| ## Refund Payment | |
| The `refund_amount` property of the `Return` data model holds the amount a merchant must refund the customer. | |
| The [OrderTransaction data model](references/order/models/OrderTransaction) represents the refunds made for the return. | |
| *** | |
| ## Returns in Exchanges and Claims | |
| When a merchant creates an exchange or a claim, it includes returning items from the customer. | |
| The `Return` data model also represents the return of these items. In this case, the return is associated with the exchange or claim it was created for. | |
| *** | |
| ## How Returns Impact an Order’s Version | |
| The order’s version is incremented when: | |
| 1. A return is requested. | |
| 2. A return is marked as received. | |
| # Tax Lines in Order Module | |
| In this document, you’ll learn about tax lines in an order. | |
| ## What are Tax Lines? | |
| A tax line indicates the tax rate of a line item or a shipping method. | |
| The [OrderLineItemTaxLine data model](https://docs.medusajs.com/references/order/models/OrderLineItemTaxLine/index.html.md) represents a line item’s tax line, and the [OrderShippingMethodTaxLine data model](https://docs.medusajs.com/references/order/models/OrderShippingMethodTaxLine/index.html.md) represents a shipping method’s tax line. | |
| 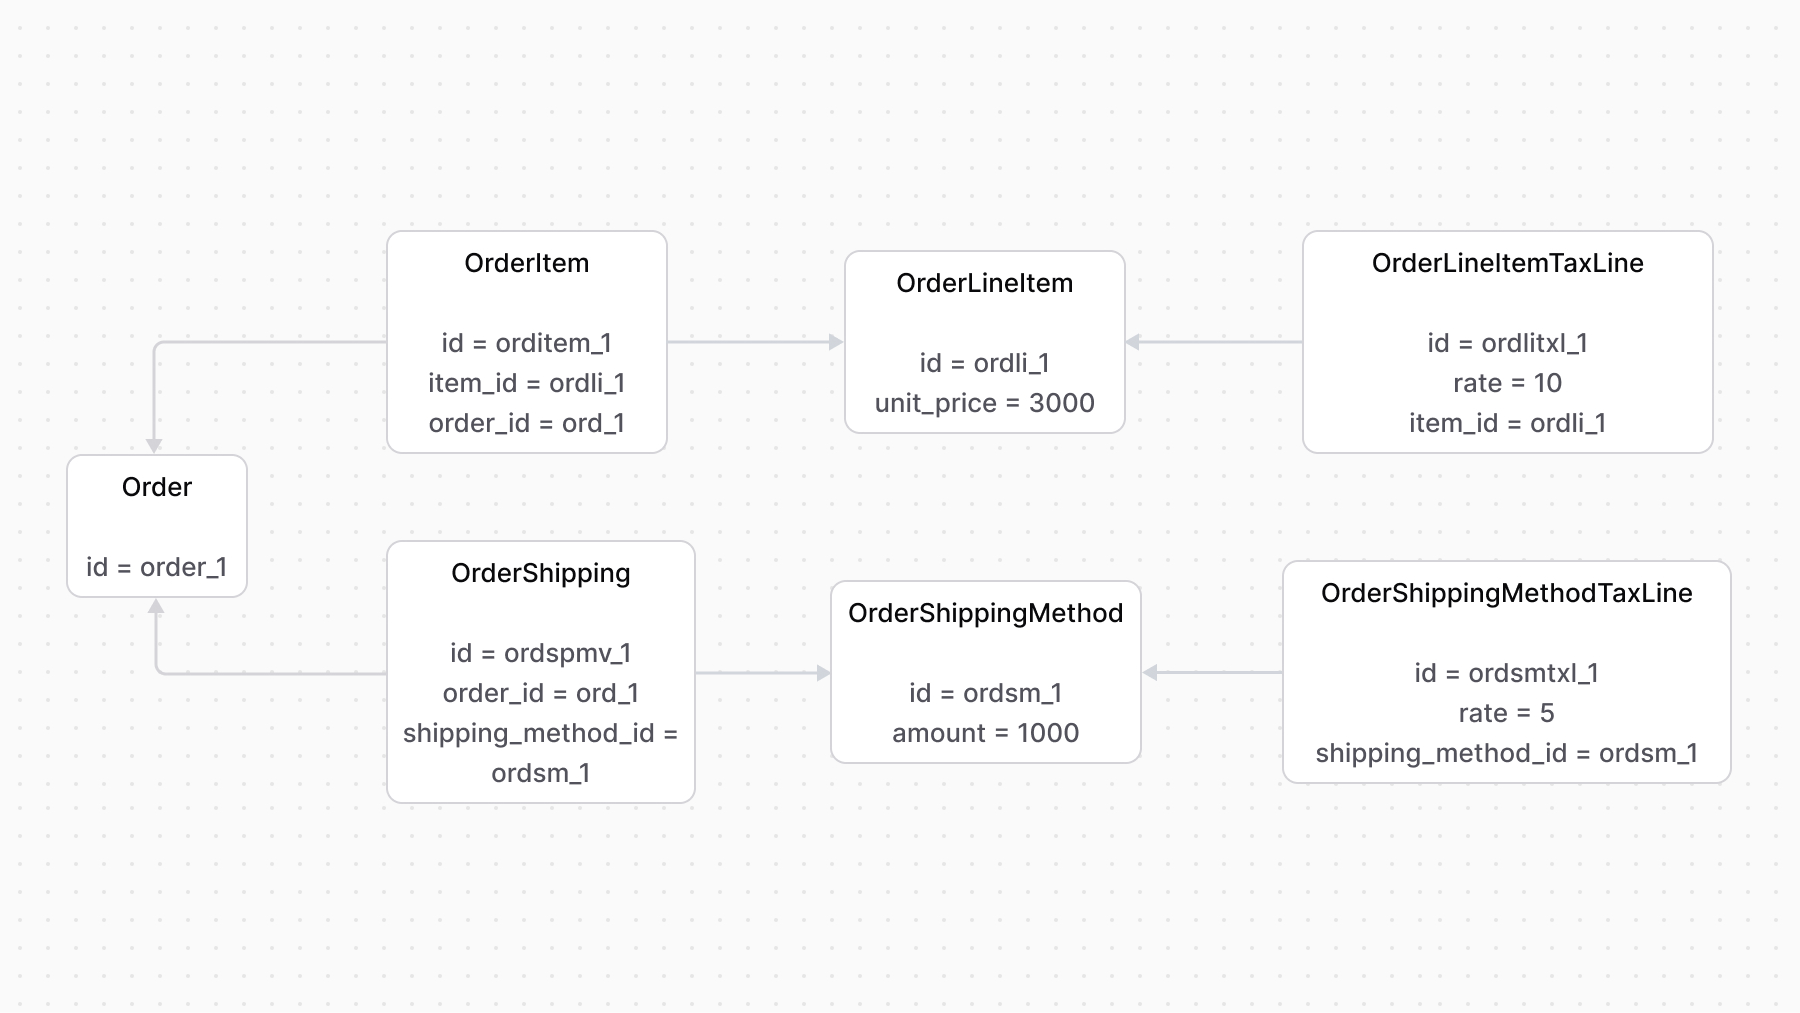 | |
| *** | |
| ## Tax Inclusivity | |
| By default, the tax amount is calculated by taking the tax rate from the line item or shipping method’s amount and then adding it to the item/method’s subtotal. | |
| However, line items and shipping methods have an `is_tax_inclusive` property that, when enabled, indicates that the item or method’s price already includes taxes. | |
| So, instead of calculating the tax rate and adding it to the item/method’s subtotal, it’s calculated as part of the subtotal. | |
| The following diagram is a simplified showcase of how a subtotal is calculated from the tax perspective. | |
|  | |
| For example, if a line item's amount is `5000`, the tax rate is `10`, and `is_tax_inclusive` is enabled, the tax amount is 10% of `5000`, which is `500`. The item's unit price becomes `4500`. | |
| # Promotions Adjustments in Orders | |
| In this document, you’ll learn how a promotion is applied to an order’s items and shipping methods using adjustment lines. | |
| ## What are Adjustment Lines? | |
| An adjustment line indicates a change to a line item or a shipping method’s amount. It’s used to apply promotions or discounts on an order. | |
| The [OrderLineItemAdjustment data model](https://docs.medusajs.com/references/order/models/OrderLineItemAdjustment/index.html.md) represents changes on a line item, and the [OrderShippingMethodAdjustment data model](https://docs.medusajs.com/references/order/models/OrderShippingMethodAdjustment/index.html.md) represents changes on a shipping method. | |
| 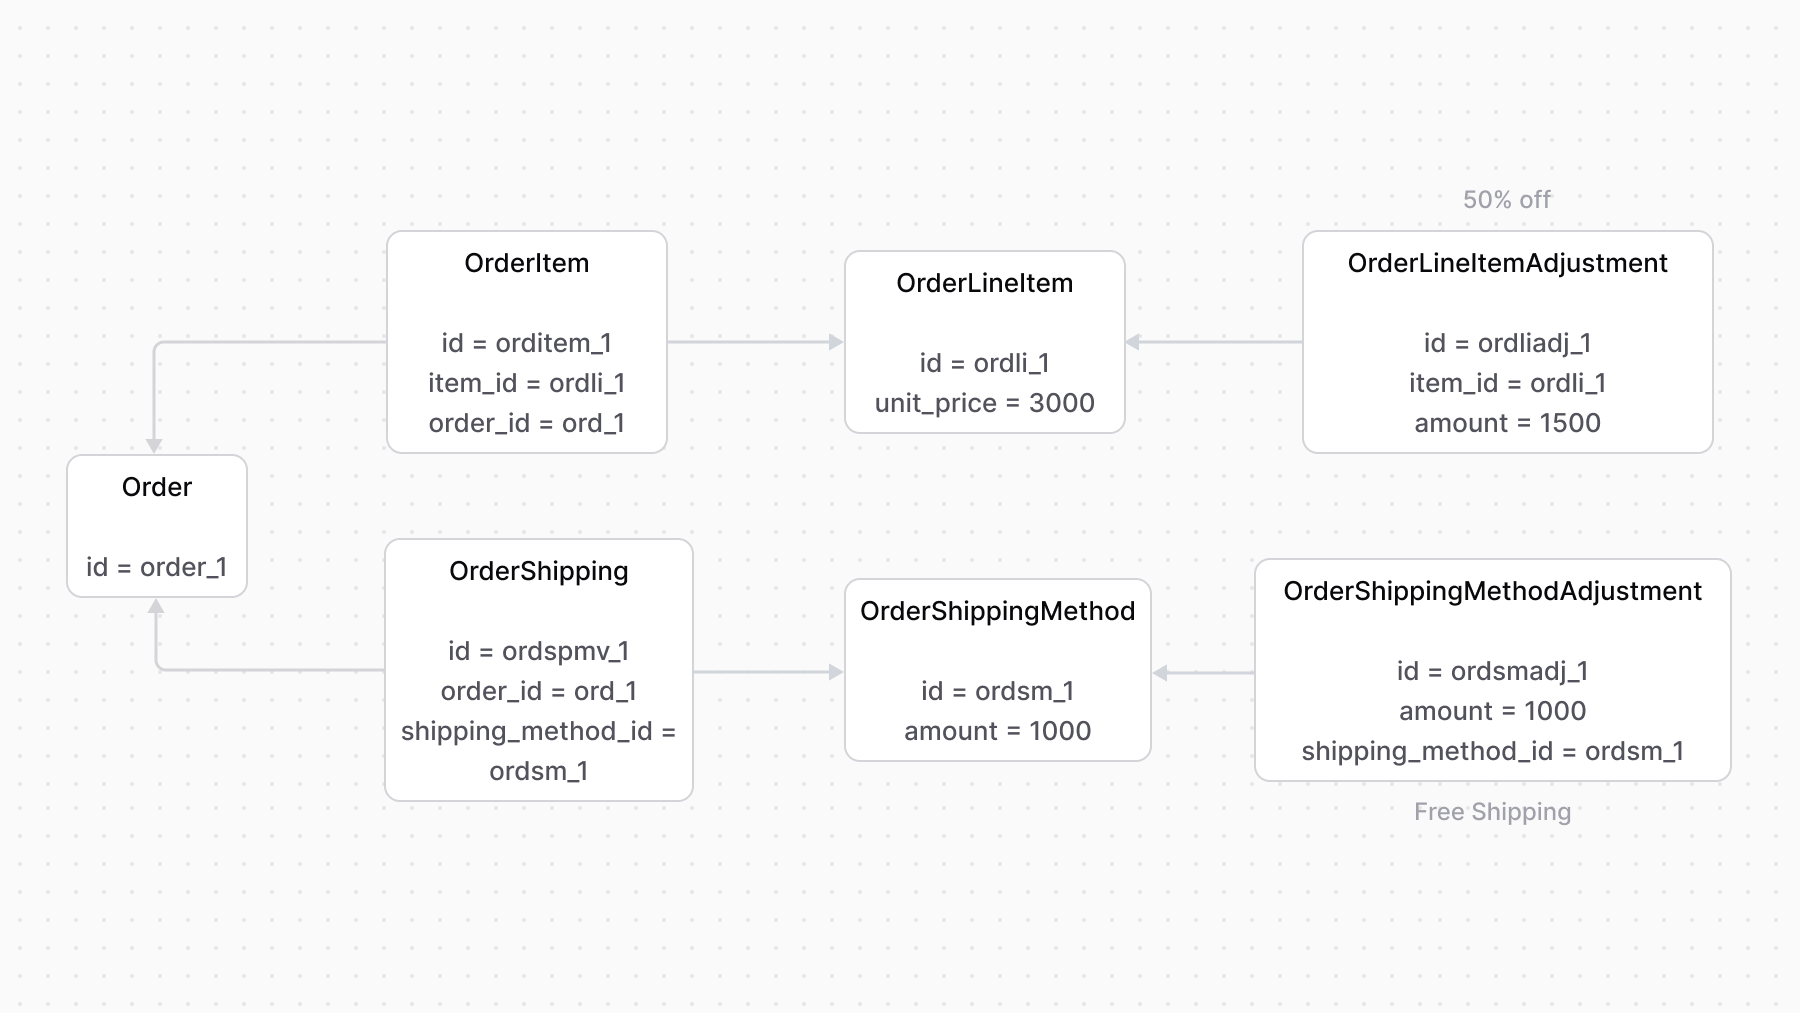 | |
| The `amount` property of the adjustment line indicates the amount to be discounted from the original amount. | |
| The ID of the applied promotion is stored in the `promotion_id` property of the adjustment line. | |
| *** | |
| ## Discountable Option | |
| The `OrderLineItem` data model has an `is_discountable` property that indicates whether promotions can be applied to the line item. It’s enabled by default. | |
| When disabled, a promotion can’t be applied to a line item. In the context of the Promotion Module, the promotion isn’t applied to the line item even if it matches its rules. | |
| *** | |
| ## Promotion Actions | |
| When using the Order and Promotion modules together, use the [computeActions method of the Promotion Module’s main service](https://docs.medusajs.com/references/promotion/computeActions/index.html.md). It retrieves the actions of line items and shipping methods. | |
| Learn more about actions in the [Promotion Module’s documentation](https://docs.medusajs.com/Users/shahednasser/medusa/www/apps/resources/app/commerce-modules/promotion/actions/index.html.md). | |
| ```ts collapsibleLines="1-10" expandButtonLabel="Show Imports" | |
| import { | |
| ComputeActionAdjustmentLine, | |
| ComputeActionItemLine, | |
| ComputeActionShippingLine, | |
| // ... | |
| } from "@medusajs/framework/types" | |
| // ... | |
| // retrieve the order | |
| const order = await orderModuleService.retrieveOrder("ord_123", { | |
| relations: [ | |
| "items.item.adjustments", | |
| "shipping_methods.shipping_method.adjustments", | |
| ], | |
| }) | |
| // retrieve the line item adjustments | |
| const lineItemAdjustments: ComputeActionItemLine[] = [] | |
| order.items.forEach((item) => { | |
| const filteredAdjustments = item.adjustments?.filter( | |
| (adjustment) => adjustment.code !== undefined | |
| ) as unknown as ComputeActionAdjustmentLine[] | |
| if (filteredAdjustments.length) { | |
| lineItemAdjustments.push({ | |
| ...item, | |
| ...item.detail, | |
| adjustments: filteredAdjustments, | |
| }) | |
| } | |
| }) | |
| //retrieve shipping method adjustments | |
| const shippingMethodAdjustments: ComputeActionShippingLine[] = | |
| [] | |
| order.shipping_methods.forEach((shippingMethod) => { | |
| const filteredAdjustments = | |
| shippingMethod.adjustments?.filter( | |
| (adjustment) => adjustment.code !== undefined | |
| ) as unknown as ComputeActionAdjustmentLine[] | |
| if (filteredAdjustments.length) { | |
| shippingMethodAdjustments.push({ | |
| ...shippingMethod, | |
| adjustments: filteredAdjustments, | |
| }) | |
| } | |
| }) | |
| // compute actions | |
| const actions = await promotionModuleService.computeActions( | |
| ["promo_123"], | |
| { | |
| items: lineItemAdjustments, | |
| shipping_methods: shippingMethodAdjustments, | |
| // TODO infer from cart or region | |
| currency_code: "usd", | |
| } | |
| ) | |
| ``` | |
| The `computeActions` method accepts the existing adjustments of line items and shipping methods to compute the actions accurately. | |
| Then, use the returned `addItemAdjustment` and `addShippingMethodAdjustment` actions to set the order’s line items and the shipping method’s adjustments. | |
| ```ts collapsibleLines="1-9" expandButtonLabel="Show Imports" | |
| import { | |
| AddItemAdjustmentAction, | |
| AddShippingMethodAdjustment, | |
| // ... | |
| } from "@medusajs/framework/types" | |
| // ... | |
| await orderModuleService.setOrderLineItemAdjustments( | |
| order.id, | |
| actions.filter( | |
| (action) => action.action === "addItemAdjustment" | |
| ) as AddItemAdjustmentAction[] | |
| ) | |
| await orderModuleService.setOrderShippingMethodAdjustments( | |
| order.id, | |
| actions.filter( | |
| (action) => | |
| action.action === "addShippingMethodAdjustment" | |
| ) as AddShippingMethodAdjustment[] | |
| ) | |
| ``` | |
| # Transactions | |
| In this document, you’ll learn about an order’s transactions and its use. | |
| ## What is a Transaction? | |
| A transaction represents any order payment process, such as capturing or refunding an amount. It’s represented by the [OrderTransaction data model](https://docs.medusajs.com/references/order/models/OrderTransaction/index.html.md). | |
| The transaction’s main purpose is to ensure a correct balance between paid and outstanding amounts. | |
| Transactions are also associated with returns, claims, and exchanges if additional payment or refund is required. | |
| *** | |
| ## Checking Outstanding Amount | |
| The order’s total amounts are stored in the `OrderSummary`'s `totals` property, which is a JSON object holding the total details of the order. | |
| ```json | |
| { | |
| "totals": { | |
| "total": 30, | |
| "subtotal": 30, | |
| // ... | |
| } | |
| } | |
| ``` | |
| To check the outstanding amount of the order, its transaction amounts are summed. Then, the following conditions are checked: | |
| |Condition|Result| | |
| |---|---|---| | |
| |summary’s total - transaction amounts total = 0|There’s no outstanding amount.| | |
| |summary’s total - transaction amounts total > 0|The customer owes additional payment to the merchant.| | |
| |summary’s total - transaction amounts total \< 0|The merchant owes the customer a refund.| | |
| *** | |
| ## Transaction Reference | |
| The Order Module doesn’t provide payment processing functionalities, so it doesn’t store payments that can be processed. Payment functionalities are provided by the [Payment Module](https://docs.medusajs.com/Users/shahednasser/medusa/www/apps/resources/app/commerce-modules/payment/index.html.md). | |
| The `OrderTransaction` data model has two properties that determine which data model and record holds the actual payment’s details: | |
| - `reference`: indicates the table’s name in the database. For example, `payment` from the Payment Module. | |
| - `reference_id`: indicates the ID of the record in the table. For example, `pay_123`. | |
| # Pricing Concepts | |
| In this document, you’ll learn about the main concepts in the Pricing Module. | |
| ## Price Set | |
| A [PriceSet](https://docs.medusajs.com/references/pricing/models/PriceSet/index.html.md) represents a collection of prices that are linked to a resource (for example, a product or a shipping option). | |
| Each of these prices are represented by the [Price data module](https://docs.medusajs.com/references/pricing/models/Price/index.html.md). | |
| 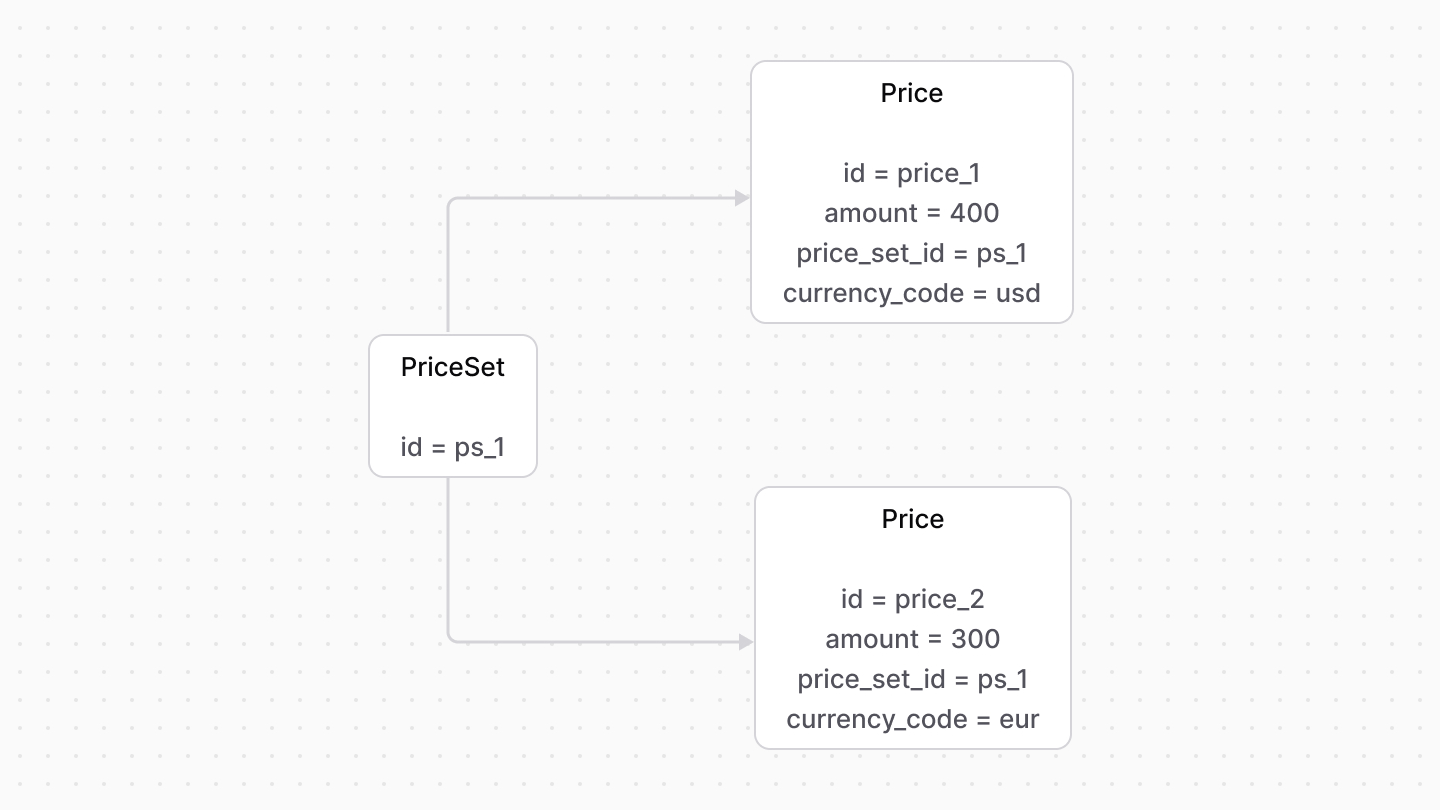 | |
| *** | |
| ## Price List | |
| A [PriceList](https://docs.medusajs.com/references/pricing/models/PriceList/index.html.md) is a group of prices only enabled if their conditions and rules are satisfied. | |
| A price list has optional `start_date` and `end_date` properties that indicate the date range in which a price list can be applied. | |
| Its associated prices are represented by the `Price` data model. | |
| # Prices Calculation | |
| In this document, you'll learn how prices are calculated when you use the [calculatePrices method](https://docs.medusajs.com/references/pricing/calculatePrices/index.html.md) of the Pricing Module's main service. | |
| ## calculatePrices Method | |
| The [calculatePrices method](https://docs.medusajs.com/references/pricing/calculatePrices/index.html.md) accepts as parameters the ID of one or more price sets and a context. | |
| It returns a price object with the best matching price for each price set. | |
| ### Calculation Context | |
| The calculation context is an optional object passed as a second parameter to the `calculatePrices` method. It accepts rules to restrict the selected prices in the price set. | |
| For example: | |
| ```ts | |
| const price = await pricingModuleService.calculatePrices( | |
| { id: [priceSetId] }, | |
| { | |
| context: { | |
| currency_code: currencyCode, | |
| region_id: "reg_123", | |
| }, | |
| } | |
| ) | |
| ``` | |
| In this example, you retrieve the prices in a price set for the specified currency code and region ID. | |
| ### Returned Price Object | |
| For each price set, the `calculatePrices` method selects two prices: | |
| - A calculated price: Either a price that belongs to a price list and best matches the specified context, or the same as the original price. | |
| - An original price, which is either: | |
| - The same price as the calculated price if the price list it belongs to is of type `override`; | |
| - Or a price that doesn't belong to a price list and best matches the specified context. | |
| Both prices are returned in an object that has the following properties: | |
| - id: (\`string\`) The ID of the price set from which the price was selected. | |
| - is\_calculated\_price\_price\_list: (\`boolean\`) Whether the calculated price belongs to a price list. | |
| - calculated\_amount: (\`number\`) The amount of the calculated price, or \`null\` if there isn't a calculated price. This is the amount shown to the customer. | |
| - is\_original\_price\_price\_list: (\`boolean\`) Whether the original price belongs to a price list. | |
| - original\_amount: (\`number\`) The amount of the original price, or \`null\` if there isn't an original price. This amount is useful to compare with the \`calculated\_amount\`, such as to check for discounted value. | |
| - currency\_code: (\`string\`) The currency code of the calculated price, or \`null\` if there isn't a calculated price. | |
| - is\_calculated\_price\_tax\_inclusive: (\`boolean\`) Whether the calculated price is tax inclusive. Learn more about tax-inclusivity in \[this document]\(../tax-inclusive-pricing/page.mdx) | |
| - is\_original\_price\_tax\_inclusive: (\`boolean\`) Whether the original price is tax inclusive. Learn more about tax-inclusivity in \[this document]\(../tax-inclusive-pricing/page.mdx) | |
| - calculated\_price: (\`object\`) The calculated price's price details. | |
| - id: (\`string\`) The ID of the price. | |
| - price\_list\_id: (\`string\`) The ID of the associated price list. | |
| - price\_list\_type: (\`string\`) The price list's type. For example, \`sale\`. | |
| - min\_quantity: (\`number\`) The price's min quantity condition. | |
| - max\_quantity: (\`number\`) The price's max quantity condition. | |
| - original\_price: (\`object\`) The original price's price details. | |
| - id: (\`string\`) The ID of the price. | |
| - price\_list\_id: (\`string\`) The ID of the associated price list. | |
| - price\_list\_type: (\`string\`) The price list's type. For example, \`sale\`. | |
| - min\_quantity: (\`number\`) The price's min quantity condition. | |
| - max\_quantity: (\`number\`) The price's max quantity condition. | |
| *** | |
| ## Examples | |
| Consider the following price set: | |
| ```ts | |
| const priceSet = await pricingModuleService.createPriceSets({ | |
| prices: [ | |
| // default price | |
| { | |
| amount: 500, | |
| currency_code: "EUR", | |
| rules: {}, | |
| }, | |
| // prices with rules | |
| { | |
| amount: 400, | |
| currency_code: "EUR", | |
| rules: { | |
| region_id: "reg_123", | |
| }, | |
| }, | |
| { | |
| amount: 450, | |
| currency_code: "EUR", | |
| rules: { | |
| city: "krakow", | |
| }, | |
| }, | |
| { | |
| amount: 500, | |
| currency_code: "EUR", | |
| rules: { | |
| city: "warsaw", | |
| region_id: "reg_123", | |
| }, | |
| }, | |
| ], | |
| }) | |
| ``` | |
| ### Default Price Selection | |
| ### Code | |
| ```ts | |
| const price = await pricingModuleService.calculatePrices( | |
| { id: [priceSet.id] }, | |
| { | |
| context: { | |
| currency_code: "EUR" | |
| } | |
| } | |
| ) | |
| ``` | |
| ### Result | |
| ### Calculate Prices with Rules | |
| ### Code | |
| ```ts | |
| const price = await pricingModuleService.calculatePrices( | |
| { id: [priceSet.id] }, | |
| { | |
| context: { | |
| currency_code: "EUR", | |
| region_id: "reg_123", | |
| city: "krakow" | |
| } | |
| } | |
| ) | |
| ``` | |
| ### Result | |
| ### Price Selection with Price List | |
| ### Code | |
| ```ts | |
| const priceList = pricingModuleService.createPriceLists([{ | |
| title: "Summer Price List", | |
| description: "Price list for summer sale", | |
| starts_at: Date.parse("01/10/2023").toString(), | |
| ends_at: Date.parse("31/10/2023").toString(), | |
| rules: { | |
| region_id: ['PL'] | |
| }, | |
| type: "sale", | |
| prices: [ | |
| { | |
| amount: 400, | |
| currency_code: "EUR", | |
| price_set_id: priceSet.id, | |
| }, | |
| { | |
| amount: 450, | |
| currency_code: "EUR", | |
| price_set_id: priceSet.id, | |
| }, | |
| ], | |
| }]); | |
| const price = await pricingModuleService.calculatePrices( | |
| { id: [priceSet.id] }, | |
| { | |
| context: { | |
| currency_code: "EUR", | |
| region_id: "PL", | |
| city: "krakow" | |
| } | |
| } | |
| ) | |
| ``` | |
| ### Result | |
| # Price Rules | |
| In this document, you'll learn about price rules for price sets and price lists. | |
| ## Price Rule | |
| You can restrict prices by rules. Each rule of a price is represented by the [PriceRule data model](https://docs.medusajs.com/references/pricing/models/PriceRule/index.html.md). | |
| The `Price` data model has a `rules_count` property, which indicates how many rules, represented by `PriceRule`, are applied to the price. | |
| For exmaple, you create a price restricted to `10557` zip codes. | |
| 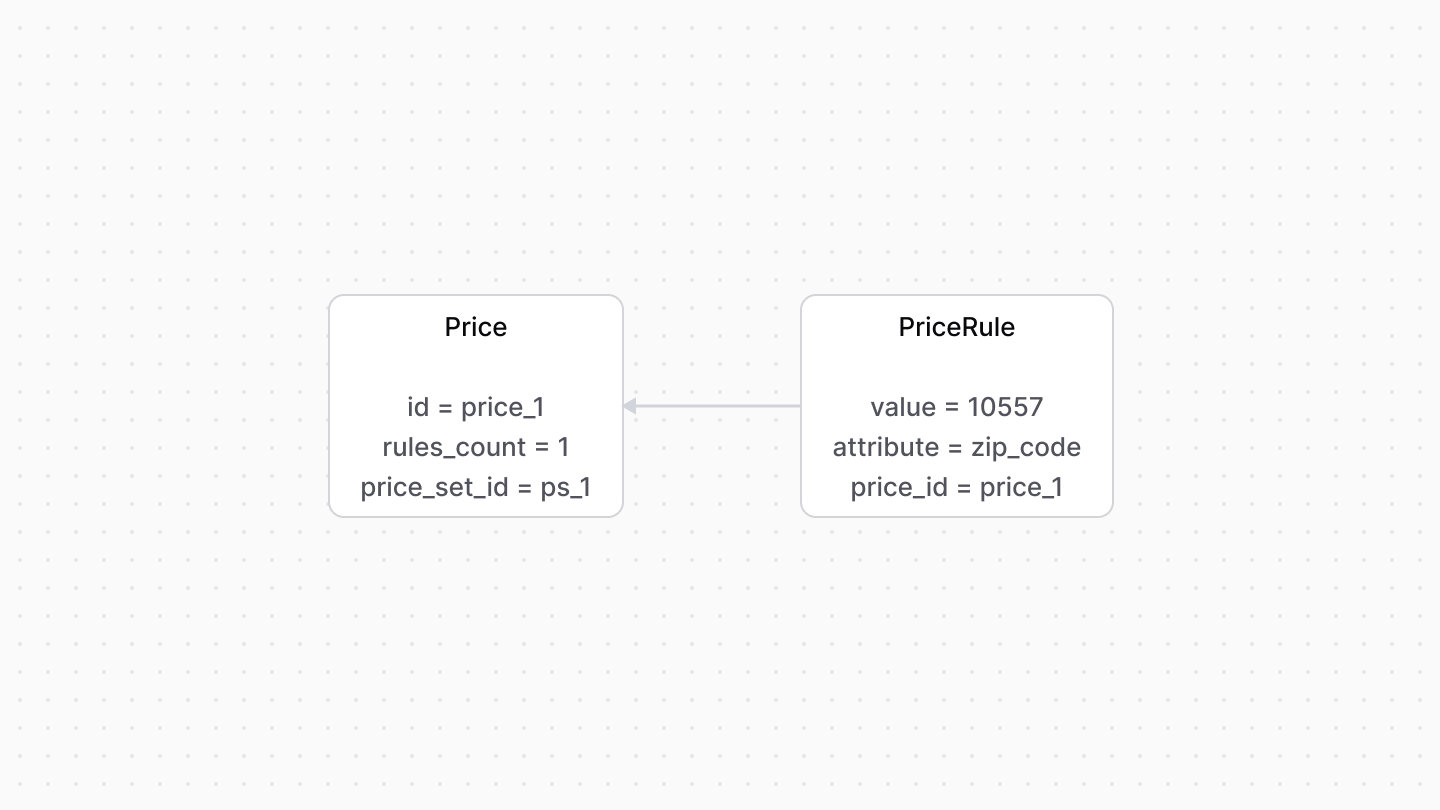 | |
| A price can have multiple price rules. | |
| For example, a price can be restricted by a region and a zip code. | |
| 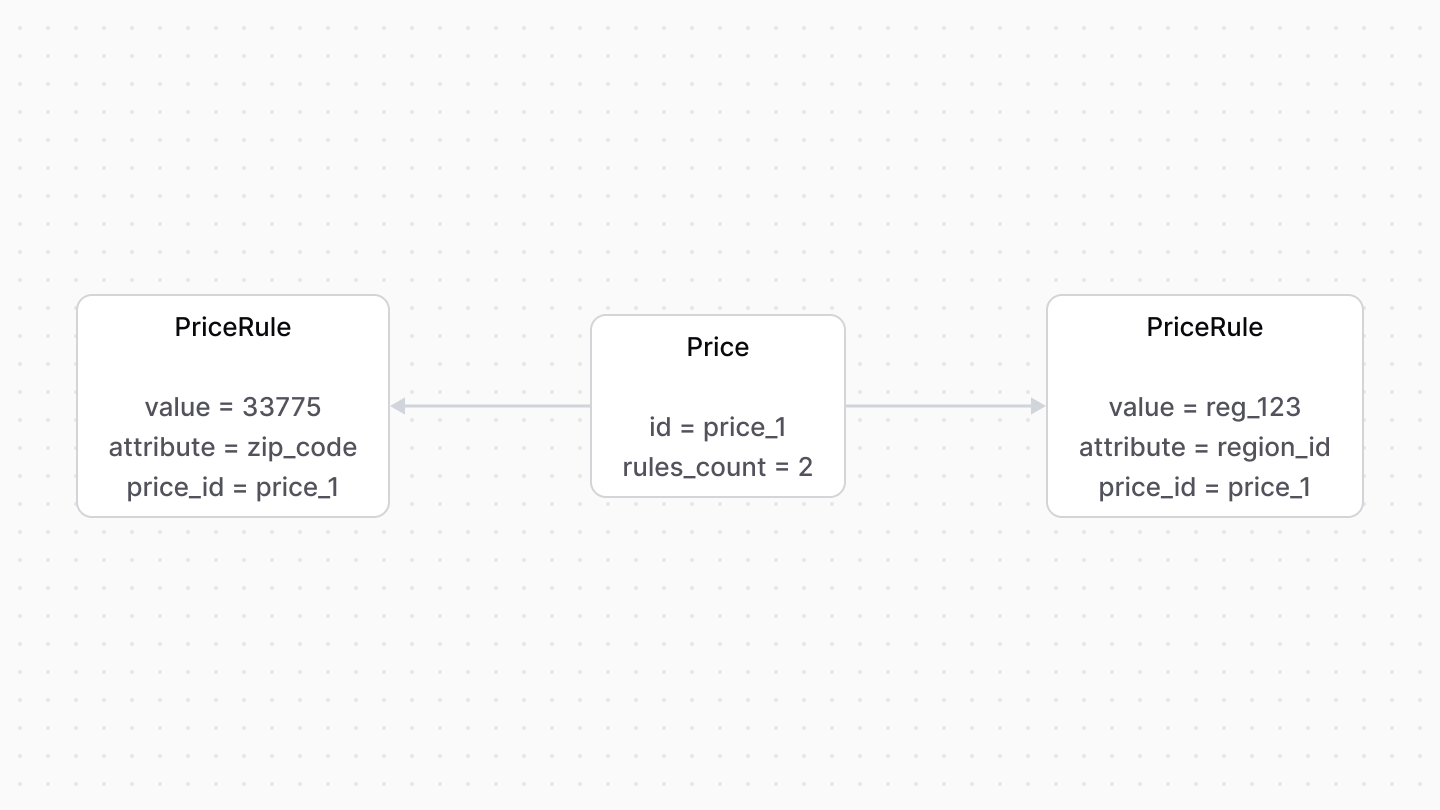 | |
| *** | |
| ## Price List Rules | |
| Rules applied to a price list are represented by the [PriceListRule data model](https://docs.medusajs.com/references/pricing/models/PriceListRule/index.html.md). | |
| The `rules_count` property of a `PriceList` indicates how many rules are applied to it. | |
| 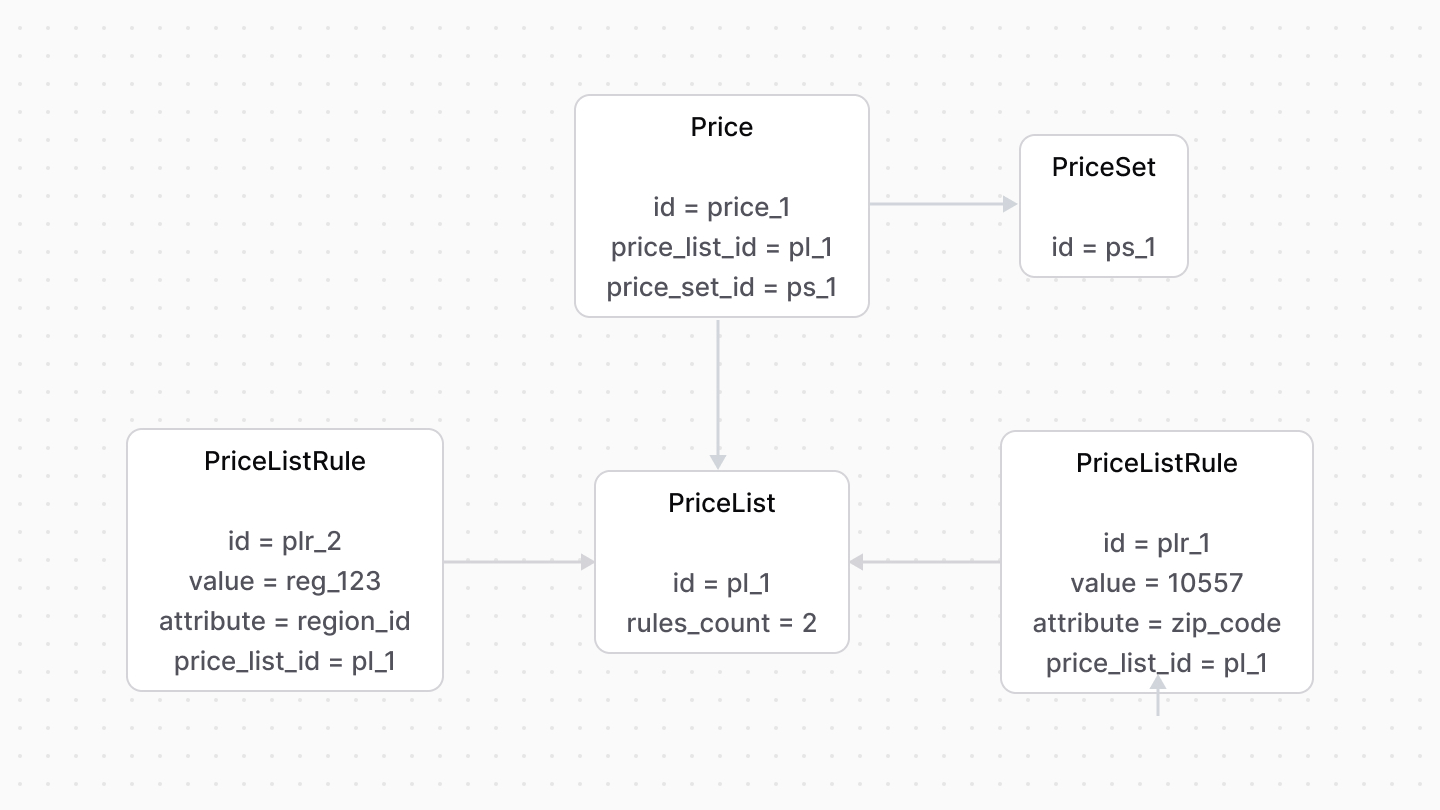 | |
| # Links between Payment Module and Other Modules | |
| This document showcases the module links defined between the Payment Module and other commerce modules. | |
| ## Summary | |
| The Payment Module has the following links to other modules: | |
| - [`Cart` data model of Cart Module \<> `PaymentCollection` data model](#cart-module). | |
| - [`Order` data model of Order Module \<> `PaymentCollection` data model](#order-module). | |
| - [`OrderClaim` data model of Order Module \<> `PaymentCollection` data model](#order-module). | |
| - [`OrderExchange` data model of Order Module \<> `PaymentCollection` data model](#order-module). | |
| - [`Region` data model of Region Module \<> `PaymentProvider` data model](#region-module). | |
| *** | |
| ## Cart Module | |
| The Cart Module provides cart-related features, but not payment processing. | |
| Medusa defines a link between the `Cart` and `PaymentCollection` data models. A cart has a payment collection which holds all the authorized payment sessions and payments made related to the cart. | |
| Learn more about this relation in [this documentation](https://docs.medusajs.com/Users/shahednasser/medusa/www/apps/resources/app/commerce-modules/payment/payment-collection#usage-with-the-cart-module/index.html.md). | |
| ### Retrieve with Query | |
| To retrieve the cart associated with the payment collection with [Query](https://docs.medusajs.com/docs/learn/fundamentals/module-links/query/index.html.md), pass `cart.*` in `fields`: | |
| ### query.graph | |
| ```ts | |
| const { data: paymentCollections } = await query.graph({ | |
| entity: "payment_collection", | |
| fields: [ | |
| "cart.*", | |
| ], | |
| }) | |
| // paymentCollections.cart | |
| ``` | |
| ### useQueryGraphStep | |
| ```ts | |
| import { useQueryGraphStep } from "@medusajs/medusa/core-flows" | |
| // ... | |
| const { data: paymentCollections } = useQueryGraphStep({ | |
| entity: "payment_collection", | |
| fields: [ | |
| "cart.*", | |
| ], | |
| }) | |
| // paymentCollections.cart | |
| ``` | |
| ### Manage with Link | |
| To manage the payment collection of a cart, use [Link](https://docs.medusajs.com/docs/learn/fundamentals/module-links/link/index.html.md): | |
| ### link.create | |
| ```ts | |
| import { Modules } from "@medusajs/framework/utils" | |
| // ... | |
| await link.create({ | |
| [Modules.CART]: { | |
| cart_id: "cart_123", | |
| }, | |
| [Modules.PAYMENT]: { | |
| payment_collection_id: "paycol_123", | |
| }, | |
| }) | |
| ``` | |
| ### createRemoteLinkStep | |
| ```ts | |
| import { createRemoteLinkStep } from "@medusajs/medusa/core-flows" | |
| // ... | |
| createRemoteLinkStep({ | |
| [Modules.CART]: { | |
| cart_id: "cart_123", | |
| }, | |
| [Modules.PAYMENT]: { | |
| payment_collection_id: "paycol_123", | |
| }, | |
| }) | |
| ``` | |
| *** | |
| ## Order Module | |
| An order's payment details are stored in a payment collection. This also applies for claims and exchanges. | |
| So, Medusa defines links between the `PaymentCollection` data model and the `Order`, `OrderClaim`, and `OrderExchange` data models. | |
|  | |
| ### Retrieve with Query | |
| To retrieve the order of a payment collection with [Query](https://docs.medusajs.com/docs/learn/fundamentals/module-links/query/index.html.md), pass `order.*` in `fields`: | |
| ### query.graph | |
| ```ts | |
| const { data: paymentCollections } = await query.graph({ | |
| entity: "payment_collection", | |
| fields: [ | |
| "order.*", | |
| ], | |
| }) | |
| // paymentCollections.order | |
| ``` | |
| ### useQueryGraphStep | |
| ```ts | |
| import { useQueryGraphStep } from "@medusajs/medusa/core-flows" | |
| // ... | |
| const { data: paymentCollections } = useQueryGraphStep({ | |
| entity: "payment_collection", | |
| fields: [ | |
| "order.*", | |
| ], | |
| }) | |
| // paymentCollections.order | |
| ``` | |
| ### Manage with Link | |
| To manage the payment collections of an order, use [Link](https://docs.medusajs.com/docs/learn/fundamentals/module-links/link/index.html.md): | |
| ### link.create | |
| ```ts | |
| import { Modules } from "@medusajs/framework/utils" | |
| // ... | |
| await link.create({ | |
| [Modules.ORDER]: { | |
| order_id: "order_123", | |
| }, | |
| [Modules.PAYMENT]: { | |
| payment_collection_id: "paycol_123", | |
| }, | |
| }) | |
| ``` | |
| ### createRemoteLinkStep | |
| ```ts | |
| import { Modules } from "@medusajs/framework/utils" | |
| import { createRemoteLinkStep } from "@medusajs/medusa/core-flows" | |
| // ... | |
| createRemoteLinkStep({ | |
| [Modules.ORDER]: { | |
| order_id: "order_123", | |
| }, | |
| [Modules.PAYMENT]: { | |
| payment_collection_id: "paycol_123", | |
| }, | |
| }) | |
| ``` | |
| *** | |
| ## Region Module | |
| You can specify for each region which payment providers are available. The Medusa application defines a link between the `PaymentProvider` and the `Region` data models. | |
| 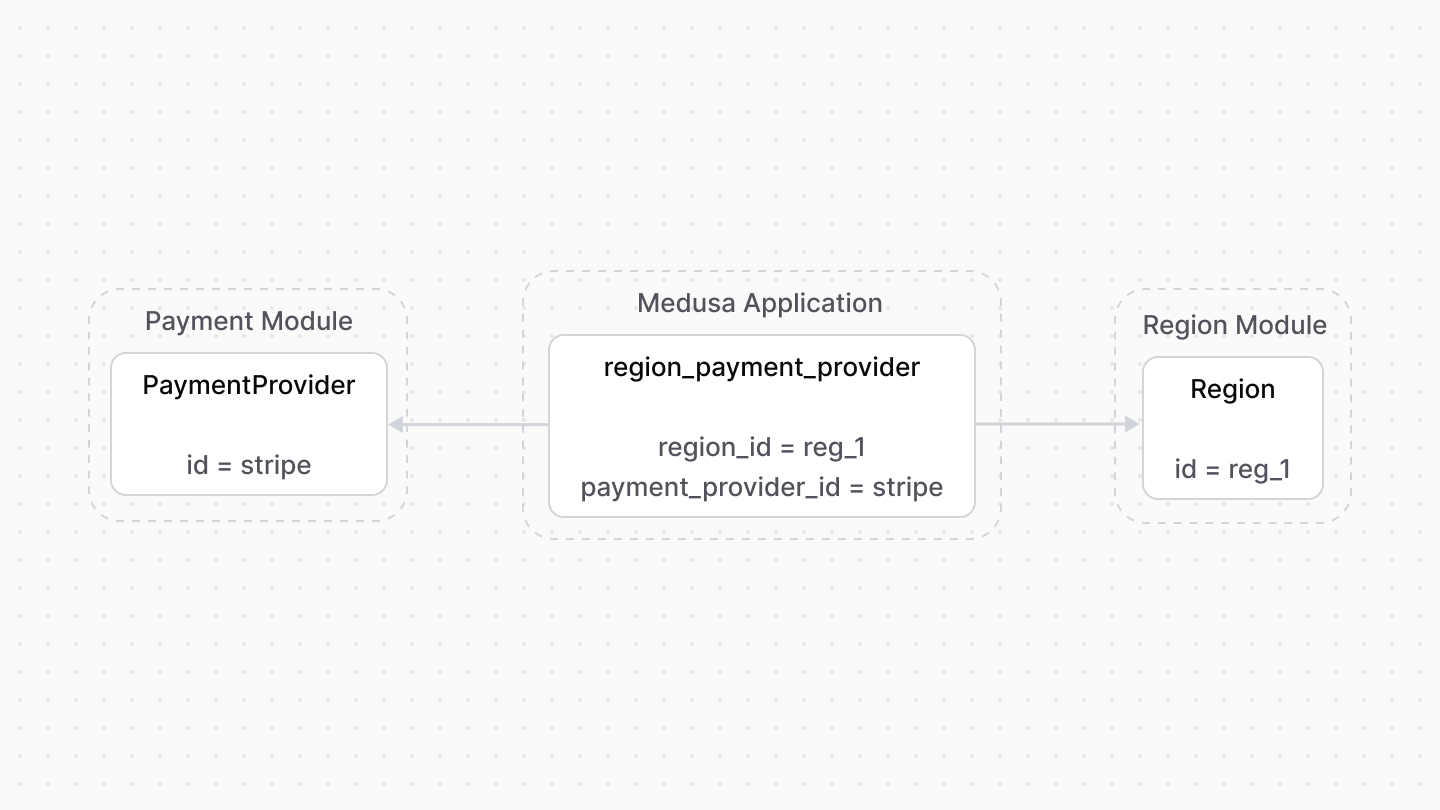 | |
| This increases the flexibility of your store. For example, you only show during checkout the payment providers associated with the cart's region. | |
| ### Retrieve with Query | |
| To retrieve the regions of a payment provider with [Query](https://docs.medusajs.com/docs/learn/fundamentals/module-links/query/index.html.md), pass `regions.*` in `fields`: | |
| ### query.graph | |
| ```ts | |
| const { data: paymentProviders } = await query.graph({ | |
| entity: "payment_provider", | |
| fields: [ | |
| "regions.*", | |
| ], | |
| }) | |
| // paymentProviders.regions | |
| ``` | |
| ### useQueryGraphStep | |
| ```ts | |
| import { useQueryGraphStep } from "@medusajs/medusa/core-flows" | |
| // ... | |
| const { data: paymentProviders } = useQueryGraphStep({ | |
| entity: "payment_provider", | |
| fields: [ | |
| "regions.*", | |
| ], | |
| }) | |
| // paymentProviders.regions | |
| ``` | |
| ### Manage with Link | |
| To manage the payment providers in a region, use [Link](https://docs.medusajs.com/docs/learn/fundamentals/module-links/link/index.html.md): | |
| ### link.create | |
| ```ts | |
| import { Modules } from "@medusajs/framework/utils" | |
| // ... | |
| await link.create({ | |
| [Modules.REGION]: { | |
| region_id: "reg_123", | |
| }, | |
| [Modules.PAYMENT]: { | |
| payment_provider_id: "pp_stripe_stripe", | |
| }, | |
| }) | |
| ``` | |
| ### createRemoteLinkStep | |
| ```ts | |
| import { Modules } from "@medusajs/framework/utils" | |
| import { createRemoteLinkStep } from "@medusajs/medusa/core-flows" | |
| // ... | |
| createRemoteLinkStep({ | |
| [Modules.REGION]: { | |
| region_id: "reg_123", | |
| }, | |
| [Modules.PAYMENT]: { | |
| payment_provider_id: "pp_stripe_stripe", | |
| }, | |
| }) | |
| ``` | |
| # Payment Module Options | |
| In this document, you'll learn about the options of the Payment Module. | |
| ## All Module Options | |
| |Option|Description|Required|Default| | |
| |---|---|---|---|---|---|---| | |
| |\`webhook\_delay\`|A number indicating the delay in milliseconds before processing a webhook event.|No|\`5000\`| | |
| |\`webhook\_retries\`|The number of times to retry the webhook event processing in case of an error.|No|\`3\`| | |
| |\`providers\`|An array of payment providers to install and register. Learn more |No|-| | |
| *** | |
| ## providers Option | |
| The `providers` option is an array of payment module providers. | |
| When the Medusa application starts, these providers are registered and can be used to process payments. | |
| For example: | |
| ```ts title="medusa-config.ts" | |
| import { Modules } from "@medusajs/framework/utils" | |
| // ... | |
| module.exports = defineConfig({ | |
| // ... | |
| modules: [ | |
| { | |
| resolve: "@medusajs/medusa/payment", | |
| options: { | |
| providers: [ | |
| { | |
| resolve: "@medusajs/medusa/payment-stripe", | |
| id: "stripe", | |
| options: { | |
| // ... | |
| }, | |
| }, | |
| ], | |
| }, | |
| }, | |
| ], | |
| }) | |
| ``` | |
| The `providers` option is an array of objects that accept the following properties: | |
| - `resolve`: A string indicating the package name of the module provider or the path to it relative to the `src` directory. | |
| - `id`: A string indicating the provider's unique name or ID. | |
| - `options`: An optional object of the module provider's options. | |
| # Payment | |
| In this document, you’ll learn what a payment is and how it's created, captured, and refunded. | |
| ## What's a Payment? | |
| When a payment session is authorized, a payment, represented by the [Payment data model](https://docs.medusajs.com/references/payment/models/Payment/index.html.md), is created. This payment can later be captured or refunded. | |
| A payment carries many of the data and relations of a payment session: | |
| - It belongs to the same payment collection. | |
| - It’s associated with the same payment provider, which handles further payment processing. | |
| - It stores the payment session’s `data` property in its `data` property, as it’s still useful for the payment provider’s processing. | |
| *** | |
| ## Capture Payments | |
| When a payment is captured, a capture, represented by the [Capture data model](https://docs.medusajs.com/references/payment/models/Capture/index.html.md), is created. It holds details related to the capture, such as the amount, the capture date, and more. | |
| The payment can also be captured incrementally, each time a capture record is created for that amount. | |
| 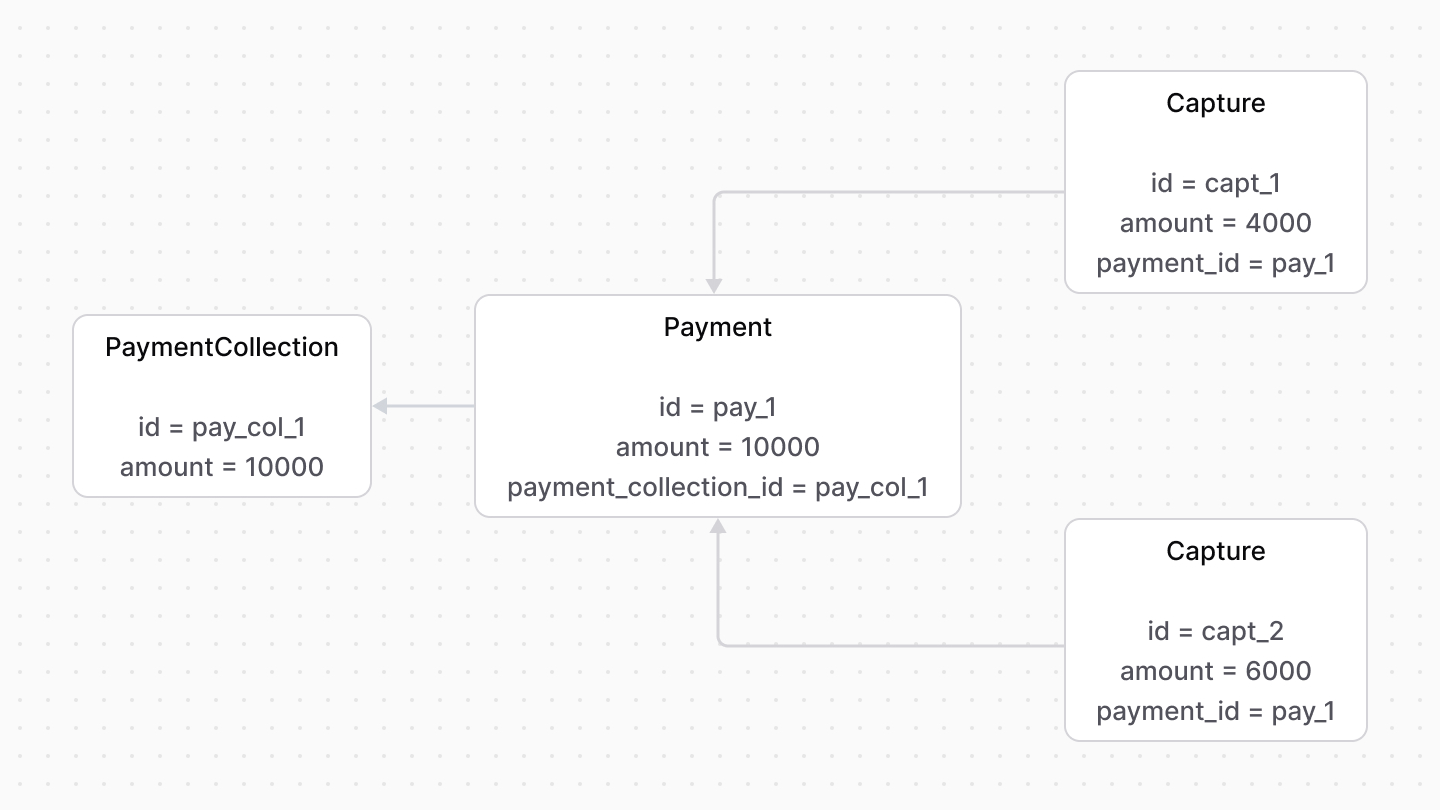 | |
| *** | |
| ## Refund Payments | |
| When a payment is refunded, a refund, represented by the [Refund data model](https://docs.medusajs.com/references/payment/models/Refund/index.html.md), is created. It holds details related to the refund, such as the amount, refund date, and more. | |
| A payment can be refunded multiple times, and each time a refund record is created. | |
| 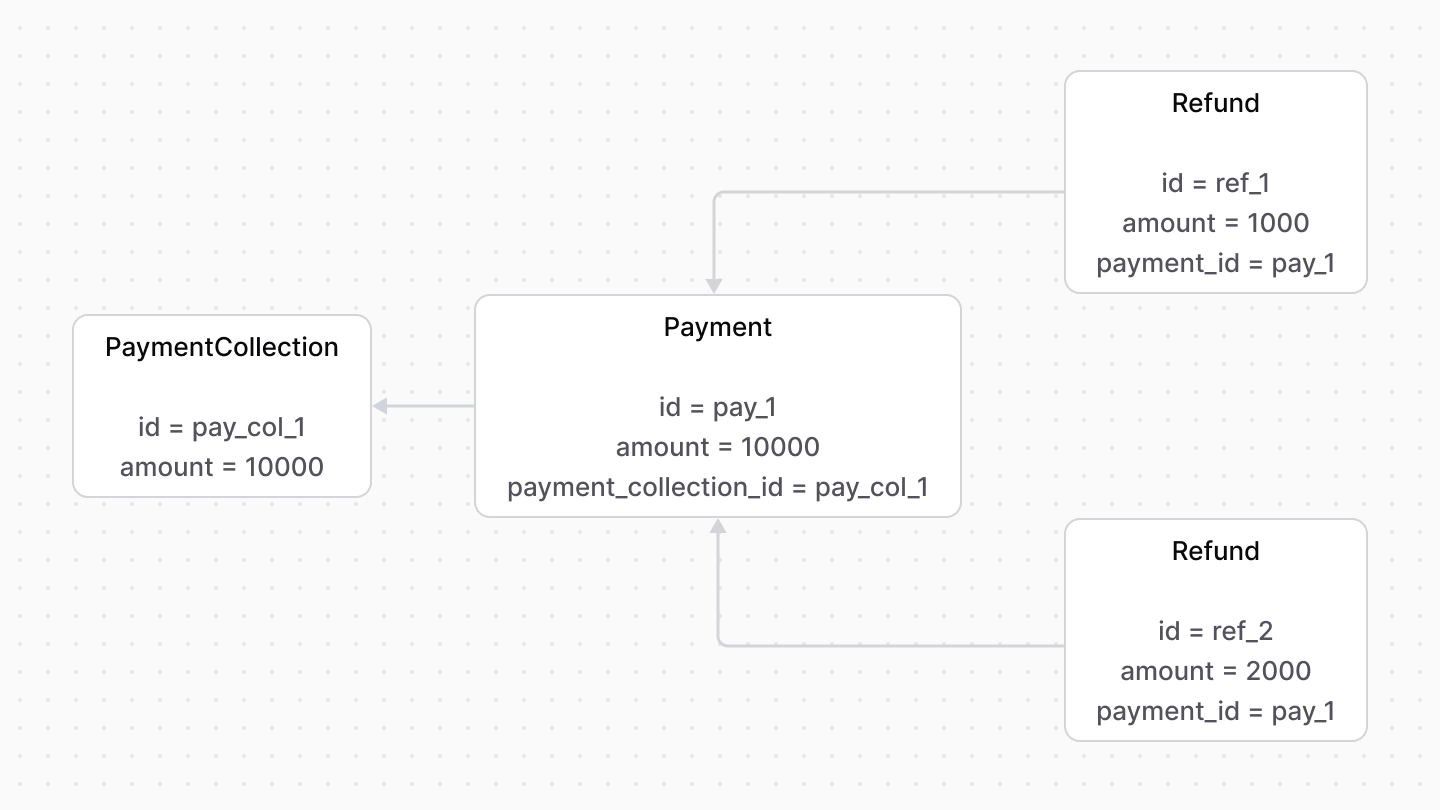 | |
| # Payment Collection | |
| In this document, you’ll learn what a payment collection is and how the Medusa application uses it with the Cart Module. | |
| ## What's a Payment Collection? | |
| A payment collection stores payment details related to a resource, such as a cart or an order. It’s represented by the [PaymentCollection data model](https://docs.medusajs.com/references/payment/models/PaymentCollection/index.html.md). | |
| Every purchase or request for payment starts with a payment collection. The collection holds details necessary to complete the payment, including: | |
| - The [payment sessions](https://docs.medusajs.com/Users/shahednasser/medusa/www/apps/resources/app/commerce-modules/payment/payment-session/index.html.md) that represents the payment amount to authorize. | |
| - The [payments](https://docs.medusajs.com/Users/shahednasser/medusa/www/apps/resources/app/commerce-modules/payment/payment/index.html.md) that are created when a payment session is authorized. They can be captured and refunded. | |
| - The [payment providers](https://docs.medusajs.com/Users/shahednasser/medusa/www/apps/resources/app/commerce-modules/payment/payment-provider/index.html.md) that handle the processing of each payment session, including the authorization, capture, and refund. | |
| *** | |
| ## Multiple Payments | |
| The payment collection supports multiple payment sessions and payments. | |
| You can use this to accept payments in increments or split payments across payment providers. | |
| 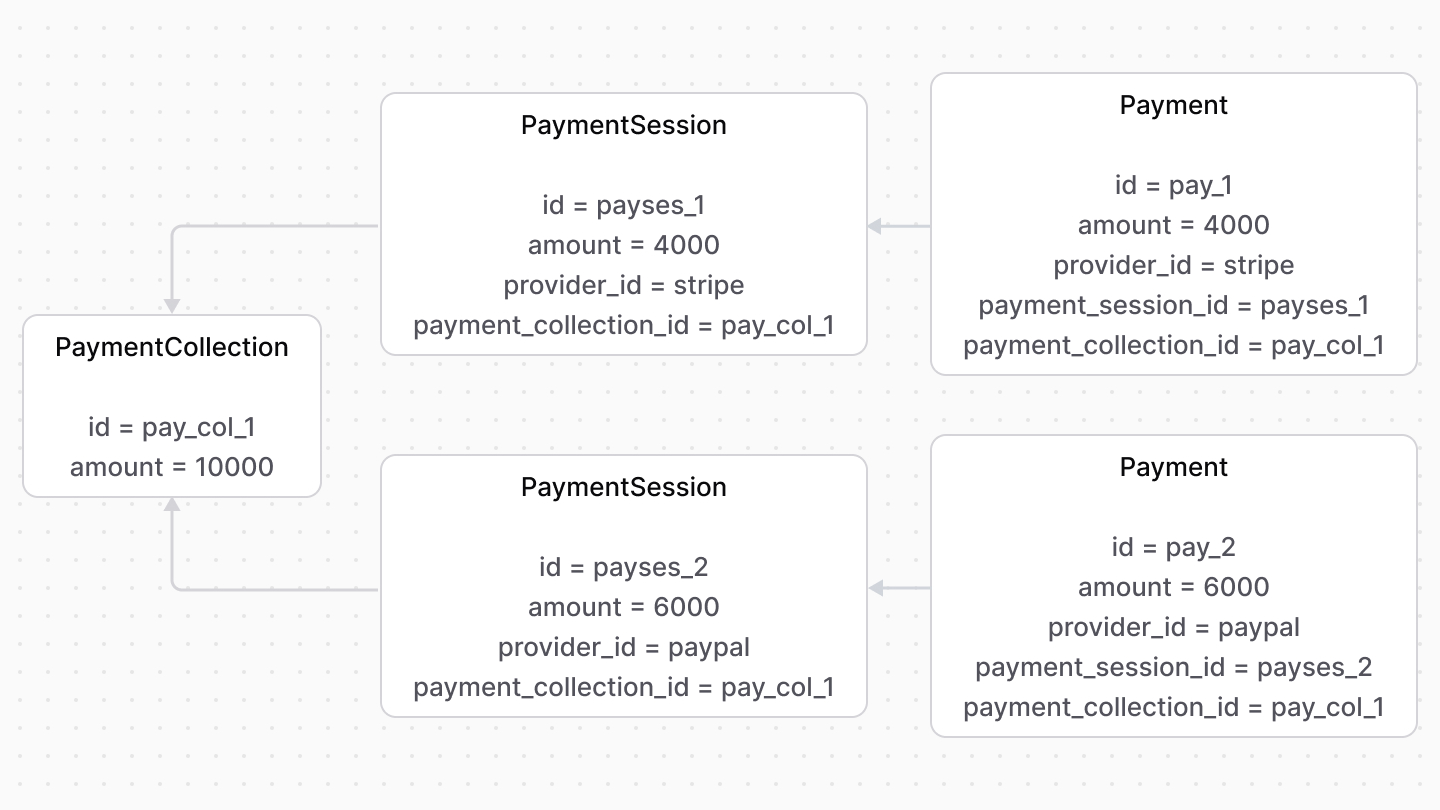 | |
| *** | |
| ## Usage with the Cart Module | |
| The Cart Module provides cart management features. However, it doesn’t provide any features related to accepting payment. | |
| During checkout, the Medusa application links a cart to a payment collection, which will be used for further payment processing. | |
| It also implements the payment flow during checkout as explained in [this documentation](https://docs.medusajs.com/Users/shahednasser/medusa/www/apps/resources/app/commerce-modules/payment/payment-flow/index.html.md). | |
|  | |
| # Accept Payment Flow | |
| In this document, you’ll learn how to implement an accept-payment flow using workflows or the Payment Module's main service. | |
| It's highly recommended to use Medusa's workflows to implement this flow. Use the Payment Module's main service for more complex cases. | |
| For a guide on how to implement this flow in the storefront, check out [this guide](https://docs.medusajs.com/Users/shahednasser/medusa/www/apps/resources/app/storefront-development/checkout/payment/index.html.md). | |
| ## Flow Overview | |
| 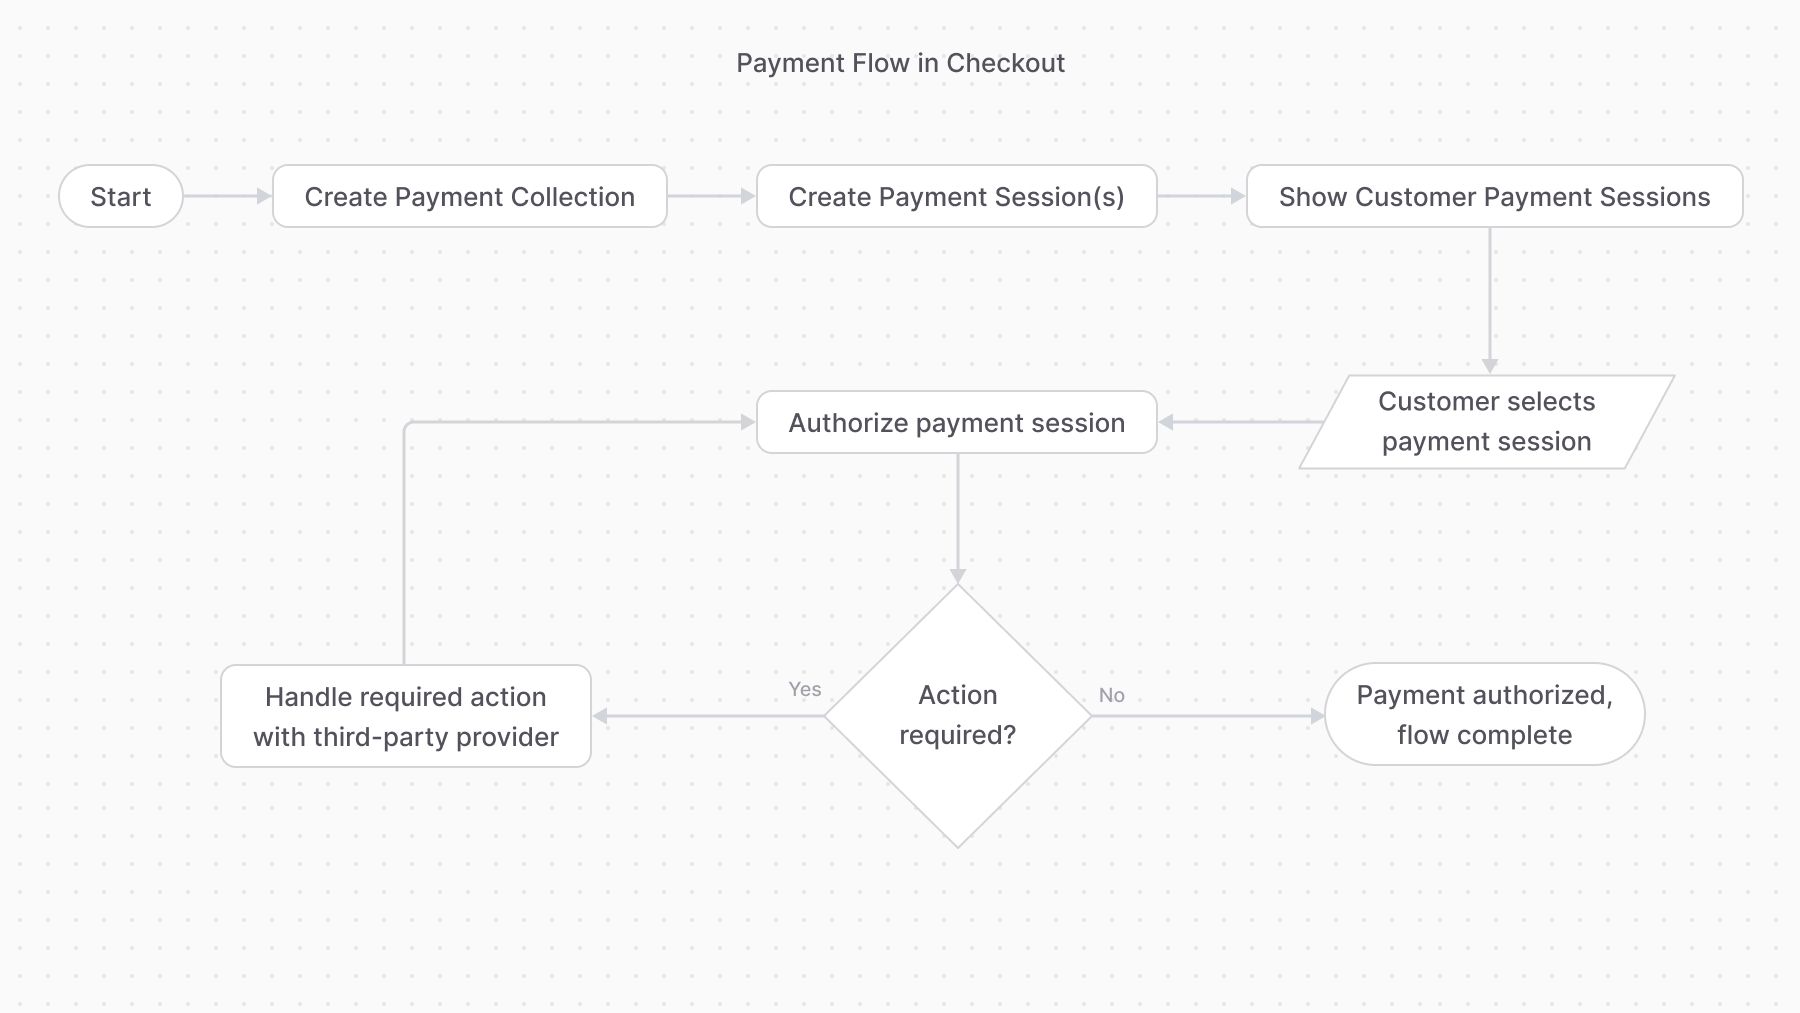 | |
| *** | |
| ## 1. Create a Payment Collection | |
| A payment collection holds all details related to a resource’s payment operations. So, you start off by creating a payment collection. | |
| For example: | |
| ### Using Workflow | |
| ```ts | |
| import { createPaymentCollectionForCartWorkflow } from "@medusajs/medusa/core-flows" | |
| // ... | |
| await createPaymentCollectionForCartWorkflow(req.scope) | |
| .run({ | |
| input: { | |
| cart_id: "cart_123", | |
| }, | |
| }) | |
| ``` | |
| ### Using Service | |
| ```ts | |
| const paymentCollection = | |
| await paymentModuleService.createPaymentCollections({ | |
| currency_code: "usd", | |
| amount: 5000, | |
| }) | |
| ``` | |
| *** | |
| ## 2. Create Payment Sessions | |
| The payment collection has one or more payment sessions, each being a payment amount to be authorized by a payment provider. | |
| So, after creating the payment collection, create at least one payment session for a provider. | |
| For example: | |
| ### Using Workflow | |
| ```ts | |
| import { createPaymentSessionsWorkflow } from "@medusajs/medusa/core-flows" | |
| // ... | |
| const { result: paymentSesion } = await createPaymentSessionsWorkflow(req.scope) | |
| .run({ | |
| input: { | |
| payment_collection_id: "paycol_123", | |
| provider_id: "stripe", | |
| }, | |
| }) | |
| ``` | |
| ### Using Service | |
| ```ts | |
| const paymentSession = | |
| await paymentModuleService.createPaymentSession( | |
| paymentCollection.id, | |
| { | |
| provider_id: "stripe", | |
| currency_code: "usd", | |
| amount: 5000, | |
| data: { | |
| // any necessary data for the | |
| // payment provider | |
| }, | |
| } | |
| ) | |
| ``` | |
| *** | |
| ## 3. Authorize Payment Session | |
| Once the customer chooses a payment session, start the authorization process. This may involve some action performed by the third-party payment provider, such as entering a 3DS code. | |
| For example: | |
| ### Using Step | |
| ```ts | |
| import { authorizePaymentSessionStep } from "@medusajs/medusa/core-flows" | |
| // ... | |
| authorizePaymentSessionStep({ | |
| id: "payses_123", | |
| context: {}, | |
| }) | |
| ``` | |
| ### Using Service | |
| ```ts | |
| const payment = authorizePaymentSessionStep({ | |
| id: "payses_123", | |
| context: {}, | |
| }) | |
| ``` | |
| When the payment authorization is successful, a payment is created and returned. | |
| ### Handling Additional Action | |
| If you used the `authorizePaymentSessionStep`, you don't need to implement this logic as it's implemented in the step. | |
| If the payment authorization isn’t successful, whether because it requires additional action or for another reason, the method updates the payment session with the new status and throws an error. | |
| In that case, you can catch that error and, if the session's `status` property is `requires_more`, handle the additional action, then retry the authorization. | |
| For example: | |
| ```ts | |
| try { | |
| const payment = | |
| await paymentModuleService.authorizePaymentSession( | |
| paymentSession.id, | |
| {} | |
| ) | |
| } catch (e) { | |
| // retrieve the payment session again | |
| const updatedPaymentSession = ( | |
| await paymentModuleService.listPaymentSessions({ | |
| id: [paymentSession.id], | |
| }) | |
| )[0] | |
| if (updatedPaymentSession.status === "requires_more") { | |
| // TODO perform required action | |
| // TODO authorize payment again. | |
| } | |
| } | |
| ``` | |
| *** | |
| ## 4. Payment Flow Complete | |
| The payment flow is complete once the payment session is authorized and the payment is created. | |
| You can then: | |
| - Capture the payment either using the [capturePaymentWorkflow](https://docs.medusajs.com/references/medusa-workflows/capturePaymentWorkflow/index.html.md) or [capturePayment method](https://docs.medusajs.com/references/payment/capturePayment/index.html.md). | |
| - Refund captured amounts using the [refundPaymentWorkflow](https://docs.medusajs.com/references/medusa-workflows/refundPaymentWorkflow/index.html.md) or [refundPayment method](https://docs.medusajs.com/references/payment/refundPayment/index.html.md). | |
| Some payment providers allow capturing the payment automatically once it’s authorized. In that case, you don’t need to do it manually. | |
| # Payment Module Provider | |
| In this document, you’ll learn what a payment module provider is. | |
| ## What's a Payment Module Provider? | |
| A payment module provider registers a payment provider that handles payment processing in the Medusa application. It integrates third-party payment providers, such as Stripe. | |
| To authorize a payment amount with a payment provider, a payment session is created and associated with that payment provider. The payment provider is then used to handle the authorization. | |
| After the payment session is authorized, the payment provider is associated with the resulting payment and handles its payment processing, such as to capture or refund payment. | |
| ### List of Payment Module Providers | |
| - [Stripe](https://docs.medusajs.com/commerce-modules/payment/payment-provider/stripe/index.html.md) | |
| *** | |
| ## System Payment Provider | |
| The Payment Module provides a `system` payment provider that acts as a placeholder payment provider. | |
| It doesn’t handle payment processing and delegates that to the merchant. It acts similarly to a cash-on-delivery (COD) payment method. | |
| *** | |
| ## How are Payment Providers Created? | |
| A payment provider is a module whose main service extends the `AbstractPaymentProvider` imported from `@medusajs/framework/utils`. | |
| Refer to [this guide](https://docs.medusajs.com/references/payment/provider/index.html.md) on how to create a payment provider for the Payment Module. | |
| *** | |
| ## Configure Payment Providers | |
| The Payment Module accepts a `providers` option that allows you to register providers in your application. | |
| Learn more about this option in [this documentation](https://docs.medusajs.com/Users/shahednasser/medusa/www/apps/resources/app/commerce-modules/payment/module-options#providers/index.html.md). | |
| *** | |
| ## PaymentProvider Data Model | |
| When the Medusa application starts and registers the payment providers, it also creates a record of the `PaymentProvider` data model if none exists. | |
| This data model is used to reference a payment provider and determine whether it’s installed in the application. | |
| # Payment Session | |
| In this document, you’ll learn what a payment session is. | |
| ## What's a Payment Session? | |
| A payment session, represented by the [PaymentSession data model](https://docs.medusajs.com/references/payment/models/PaymentSession/index.html.md), is a payment amount to be authorized. It’s associated with a payment provider that handles authorizing it. | |
| A payment collection can have multiple payment sessions. Using this feature, you can implement payment in installments or payments using multiple providers. | |
| 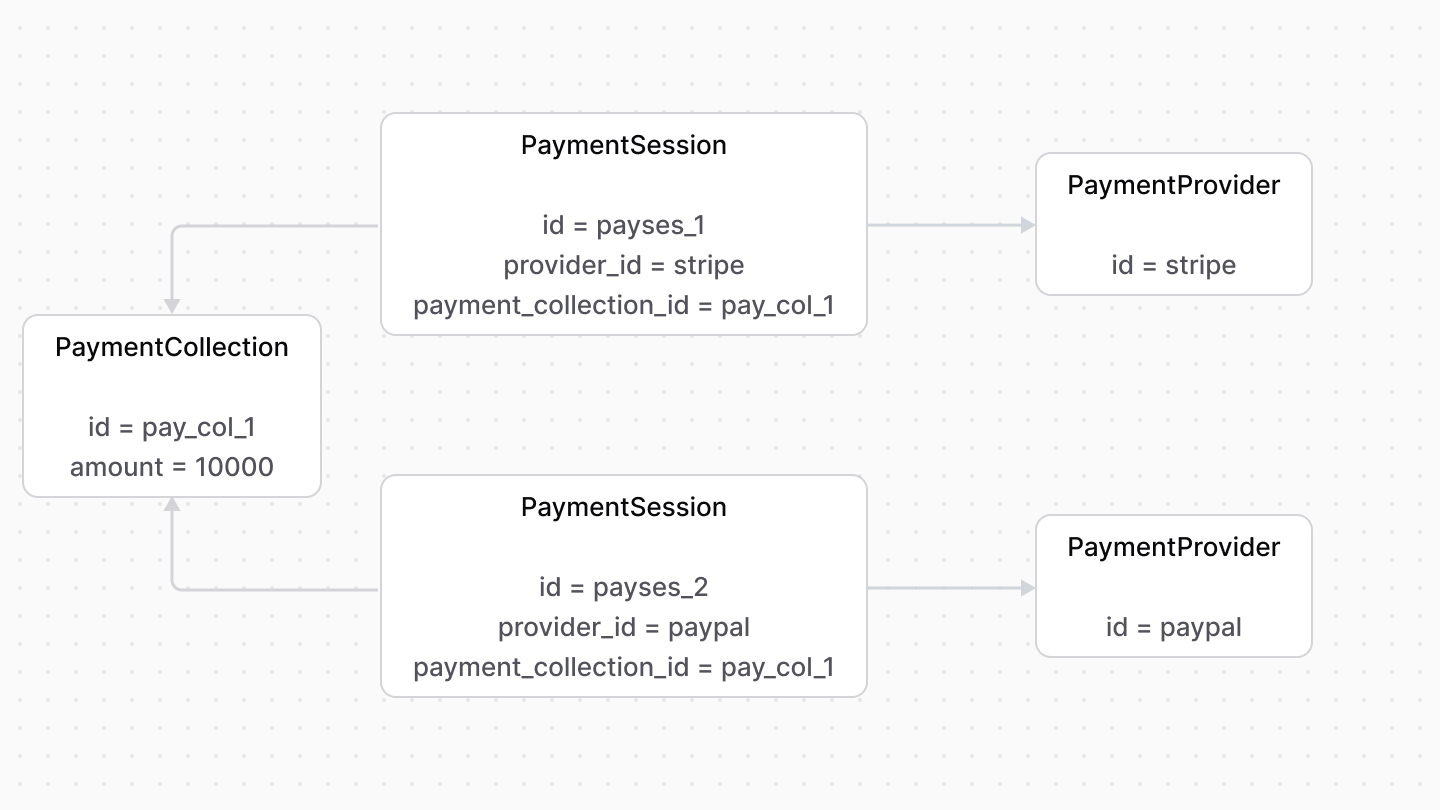 | |
| *** | |
| ## data Property | |
| Payment providers may need additional data to process the payment later. The `PaymentSession` data model has a `data` property used to store that data. | |
| For example, the customer's ID in Stripe is stored in the `data` property. | |
| *** | |
| ## Payment Session Status | |
| The `status` property of a payment session indicates its current status. Its value can be: | |
| - `pending`: The payment session is awaiting authorization. | |
| - `requires_more`: The payment session requires an action before it’s authorized. For example, to enter a 3DS code. | |
| - `authorized`: The payment session is authorized. | |
| - `error`: An error occurred while authorizing the payment. | |
| - `canceled`: The authorization of the payment session has been canceled. | |
| # Links between Pricing Module and Other Modules | |
| This document showcases the module links defined between the Pricing Module and other commerce modules. | |
| ## Summary | |
| The Pricing Module has the following links to other modules: | |
| - [`ShippingOption` data model of Fulfillment Module \<> `PriceSet` data model](#fulfillment-module). | |
| - [`ProductVariant` data model of Product Module \<> `PriceSet` data model](#product-module). | |
| *** | |
| ## Fulfillment Module | |
| The Fulfillment Module provides fulfillment-related functionalities, including shipping options that the customer chooses from when they place their order. However, it doesn't provide pricing-related functionalities for these options. | |
| Medusa defines a link between the `PriceSet` and `ShippingOption` data models. A shipping option's price is stored as a price set. | |
|  | |
| ### Retrieve with Query | |
| To retrieve the shipping option of a price set with [Query](https://docs.medusajs.com/docs/learn/fundamentals/module-links/query/index.html.md), pass `shipping_option.*` in `fields`: | |
| ### query.graph | |
| ```ts | |
| const { data: priceSets } = await query.graph({ | |
| entity: "price_set", | |
| fields: [ | |
| "shipping_option.*", | |
| ], | |
| }) | |
| // priceSets.shipping_option | |
| ``` | |
| ### useQueryGraphStep | |
| ```ts | |
| import { useQueryGraphStep } from "@medusajs/medusa/core-flows" | |
| // ... | |
| const { data: priceSets } = useQueryGraphStep({ | |
| entity: "price_set", | |
| fields: [ | |
| "shipping_option.*", | |
| ], | |
| }) | |
| // priceSets.shipping_option | |
| ``` | |
| ### Manage with Link | |
| To manage the price set of a shipping option, use [Link](https://docs.medusajs.com/docs/learn/fundamentals/module-links/link/index.html.md): | |
| ### link.create | |
| ```ts | |
| import { Modules } from "@medusajs/framework/utils" | |
| // ... | |
| await link.create({ | |
| [Modules.FULFILLMENT]: { | |
| shipping_option_id: "so_123", | |
| }, | |
| [Modules.PRICING]: { | |
| price_set_id: "pset_123", | |
| }, | |
| }) | |
| ``` | |
| ### createRemoteLinkStep | |
| ```ts | |
| import { Modules } from "@medusajs/framework/utils" | |
| import { createRemoteLinkStep } from "@medusajs/medusa/core-flows" | |
| // ... | |
| createRemoteLinkStep({ | |
| [Modules.FULFILLMENT]: { | |
| shipping_option_id: "so_123", | |
| }, | |
| [Modules.PRICING]: { | |
| price_set_id: "pset_123", | |
| }, | |
| }) | |
| ``` | |
| *** | |
| ## Product Module | |
| The Product Module doesn't store or manage the prices of product variants. | |
| Medusa defines a link between the `ProductVariant` and the `PriceSet`. A product variant’s prices are stored as prices belonging to a price set. | |
| 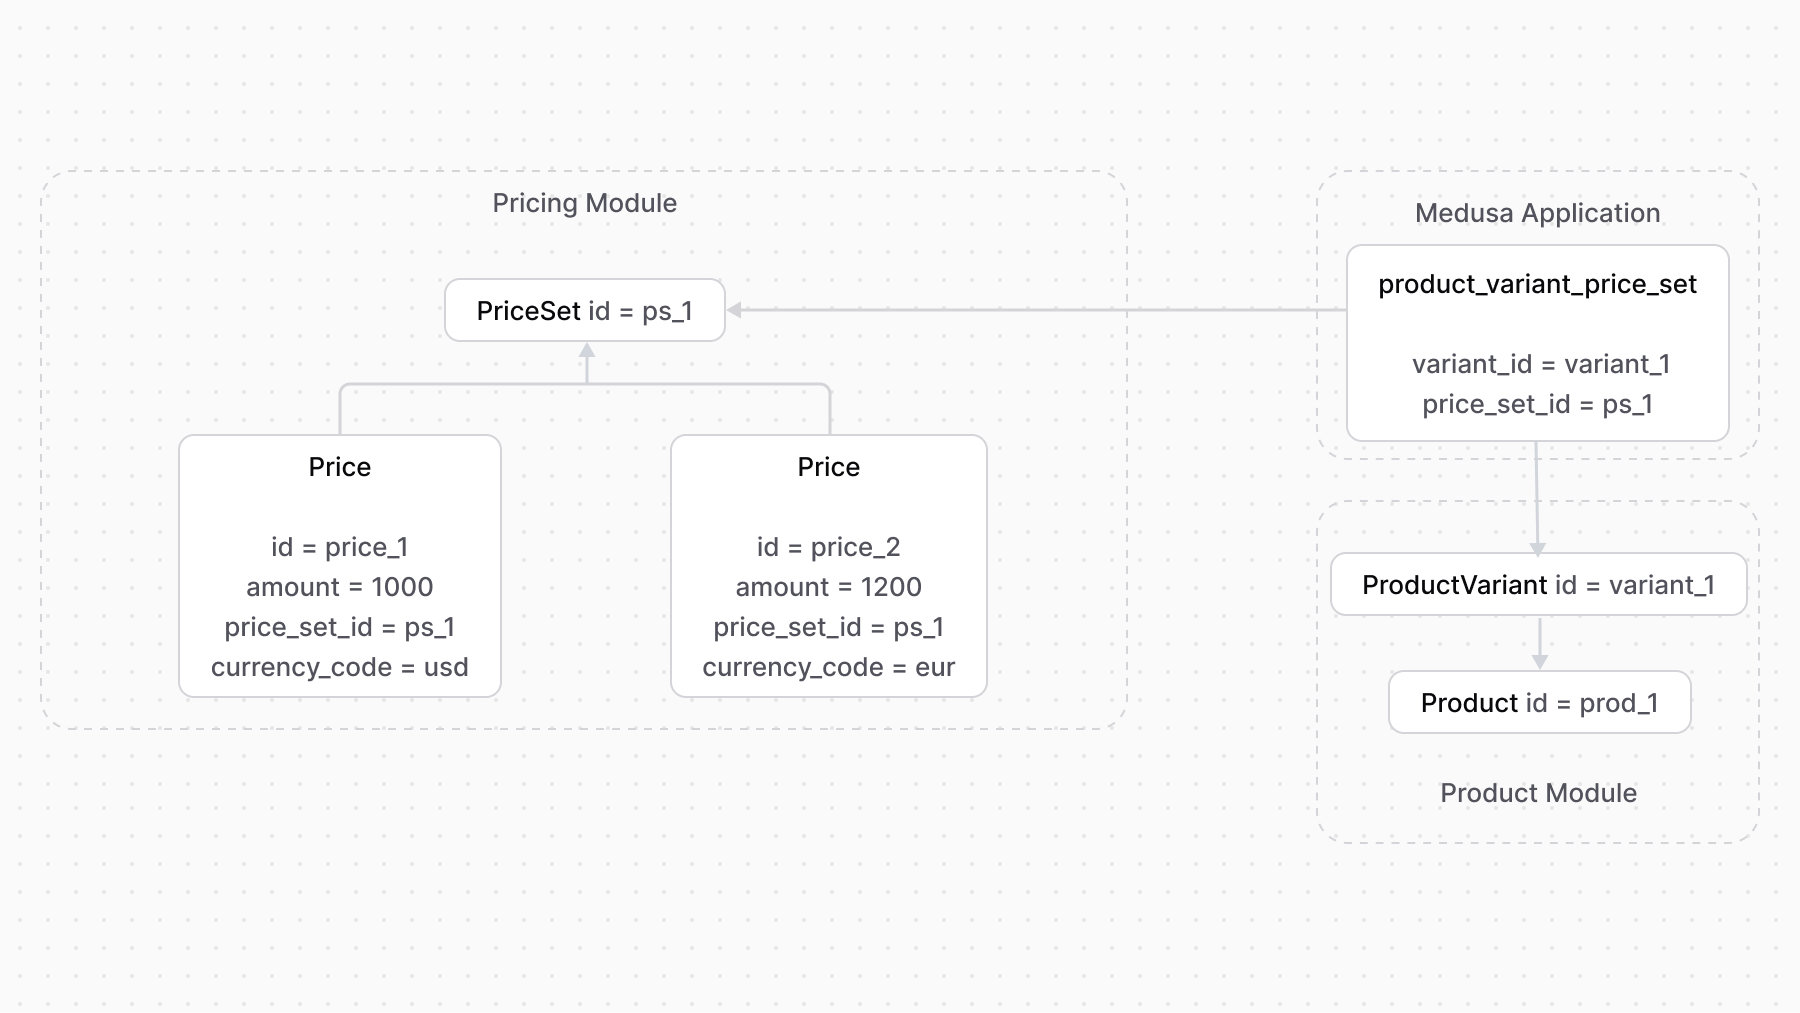 | |
| So, when you want to add prices for a product variant, you create a price set and add the prices to it. | |
| You can then benefit from adding rules to prices or using the `calculatePrices` method to retrieve the price of a product variant within a specified context. | |
| ### Retrieve with Query | |
| To retrieve the variant of a price set with [Query](https://docs.medusajs.com/docs/learn/fundamentals/module-links/query/index.html.md), pass `variant.*` in `fields`: | |
| ### query.graph | |
| ```ts | |
| const { data: priceSets } = await query.graph({ | |
| entity: "price_set", | |
| fields: [ | |
| "variant.*", | |
| ], | |
| }) | |
| // priceSets.variant | |
| ``` | |
| ### useQueryGraphStep | |
| ```ts | |
| import { useQueryGraphStep } from "@medusajs/medusa/core-flows" | |
| // ... | |
| const { data: priceSets } = useQueryGraphStep({ | |
| entity: "price_set", | |
| fields: [ | |
| "variant.*", | |
| ], | |
| }) | |
| // priceSets.variant | |
| ``` | |
| ### Manage with Link | |
| To manage the price set of a variant, use [Link](https://docs.medusajs.com/docs/learn/fundamentals/module-links/link/index.html.md): | |
| ### link.create | |
| ```ts | |
| import { Modules } from "@medusajs/framework/utils" | |
| // ... | |
| await link.create({ | |
| [Modules.PRODUCT]: { | |
| variant_id: "variant_123", | |
| }, | |
| [Modules.PRICING]: { | |
| price_set_id: "pset_123", | |
| }, | |
| }) | |
| ``` | |
| ### createRemoteLinkStep | |
| ```ts | |
| import { Modules } from "@medusajs/framework/utils" | |
| import { createRemoteLinkStep } from "@medusajs/medusa/core-flows" | |
| // ... | |
| createRemoteLinkStep({ | |
| [Modules.PRODUCT]: { | |
| variant_id: "variant_123", | |
| }, | |
| [Modules.PRICING]: { | |
| price_set_id: "pset_123", | |
| }, | |
| }) | |
| ``` | |
| # Webhook Events | |
| In this document, you’ll learn how the Payment Module supports listening to webhook events. | |
| ## What's a Webhook Event? | |
| A webhook event is sent from a third-party payment provider to your application. It indicates a change in a payment’s status. | |
| This is useful in many cases such as when a payment is being processed asynchronously or when a request is interrupted and the payment provider is sending details on the process later. | |
| *** | |
| ## getWebhookActionAndData Method | |
| The Payment Module’s main service has a [getWebhookActionAndData method](https://docs.medusajs.com/references/payment/getWebhookActionAndData/index.html.md) used to handle incoming webhook events from third-party payment services. The method delegates the handling to the associated payment provider, which returns the event's details. | |
| Medusa implements a webhook listener route at the `/hooks/payment/[identifier]_[provider]` API route, where: | |
| - `[identifier]` is the `identifier` static property defined in the payment provider. For example, `stripe`. | |
| - `[provider]` is the ID of the provider. For example, `stripe`. | |
| For example, when integrating basic Stripe payments with the [Stripe Module Provider](https://docs.medusajs.com/Users/shahednasser/medusa/www/apps/resources/app/commerce-modules/payment/payment-provider/stripe/index.html.md), the webhook listener route is `/hooks/payment/stripe_stripe`. If you're integrating Stripe's Bancontact payments, the webhook listener route is `/hooks/payment/stripe-bancontact_stripe`. | |
| Use that webhook listener in your third-party payment provider's configurations. | |
| 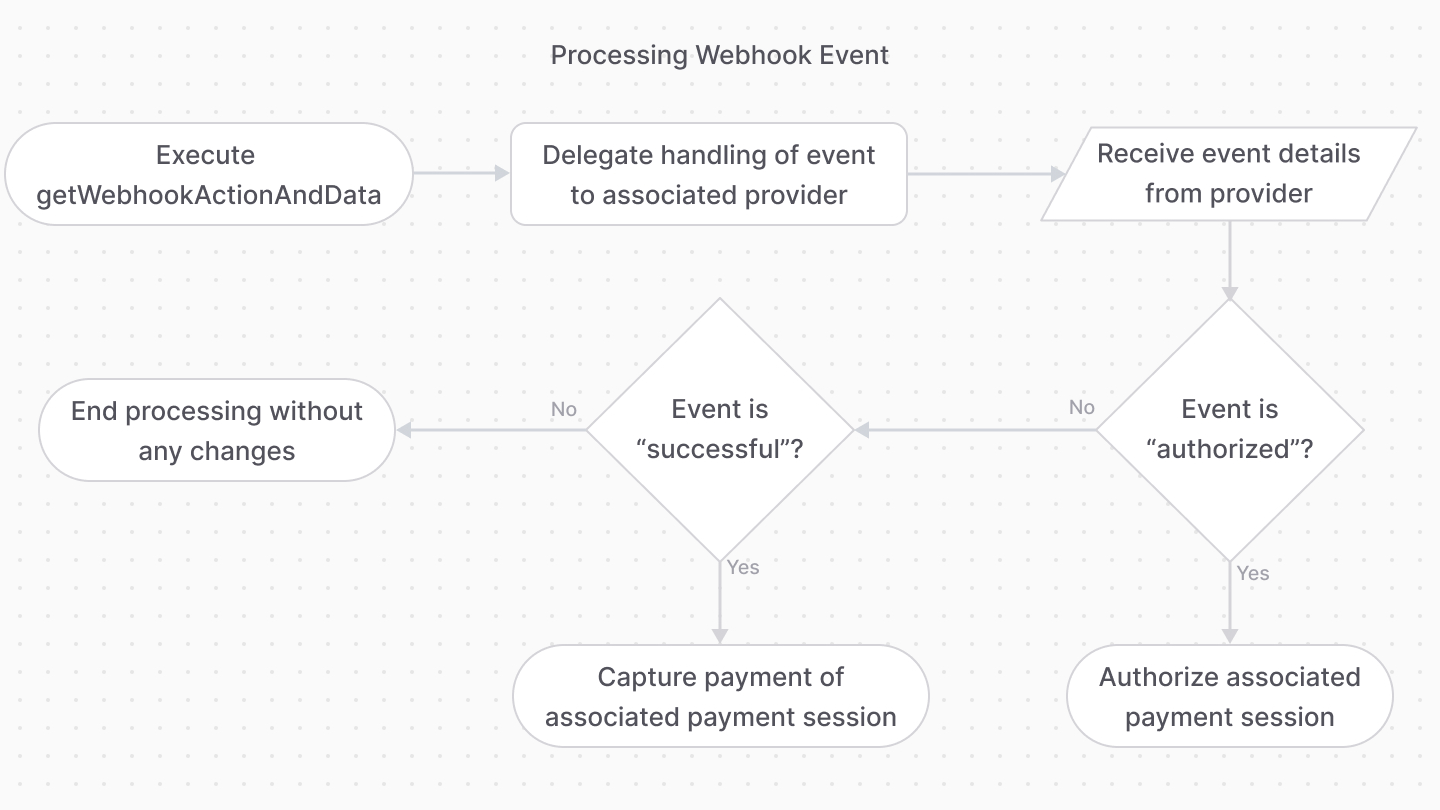 | |
| If the event's details indicate that the payment should be authorized, then the [authorizePaymentSession method of the main service](https://docs.medusajs.com/references/payment/authorizePaymentSession/index.html.md) is executed on the specified payment session. | |
| If the event's details indicate that the payment should be captured, then the [capturePayment method of the main service](https://docs.medusajs.com/references/payment/capturePayment/index.html.md) is executed on the payment of the specified payment session. | |
| ### Actions After Webhook Payment Processing | |
| After the payment webhook actions are processed and the payment is authorized or captured, the Medusa application completes the cart associated with the payment's collection if it's not completed yet. | |
| # Promotion Actions | |
| In this document, you’ll learn about promotion actions and how they’re computed using the [computeActions method](https://docs.medusajs.com/references/promotion/computeActions/index.html.md). | |
| ## computeActions Method | |
| The Promotion Module's main service has a [computeActions method](https://docs.medusajs.com/references/promotion/computeActions/index.html.md) that returns an array of actions to perform on a cart when one or more promotions are applied. | |
| Actions inform you what adjustment must be made to a cart item or shipping method. Each action is an object having the `action` property indicating the type of action. | |
| *** | |
| ## Action Types | |
| ### `addItemAdjustment` Action | |
| The `addItemAdjustment` action indicates that an adjustment must be made to an item. For example, removing $5 off its amount. | |
| This action has the following format: | |
| ```ts | |
| export interface AddItemAdjustmentAction { | |
| action: "addItemAdjustment" | |
| item_id: string | |
| amount: number | |
| code: string | |
| description?: string | |
| } | |
| ``` | |
| This action means that a new record should be created of the `LineItemAdjustment` data model in the Cart Module, or `OrderLineItemAdjustment` data model in the Order Module. | |
| Refer to [this reference](https://docs.medusajs.com/references/promotion/interfaces/promotion.AddItemAdjustmentAction/index.html.md) for details on the object’s properties. | |
| ### `removeItemAdjustment` Action | |
| The `removeItemAdjustment` action indicates that an adjustment must be removed from a line item. For example, remove the $5 discount. | |
| The `computeActions` method accepts any previous item adjustments in the `items` property of the second parameter. | |
| This action has the following format: | |
| ```ts | |
| export interface RemoveItemAdjustmentAction { | |
| action: "removeItemAdjustment" | |
| adjustment_id: string | |
| description?: string | |
| code: string | |
| } | |
| ``` | |
| This action means that a new record should be removed of the `LineItemAdjustment` (or `OrderLineItemAdjustment`) with the specified ID in the `adjustment_id` property. | |
| Refer to [this reference](https://docs.medusajs.com/references/promotion/interfaces/promotion.RemoveItemAdjustmentAction/index.html.md) for details on the object’s properties. | |
| ### `addShippingMethodAdjustment` Action | |
| The `addShippingMethodAdjustment` action indicates that an adjustment must be made on a shipping method. For example, make the shipping method free. | |
| This action has the following format: | |
| ```ts | |
| export interface AddShippingMethodAdjustment { | |
| action: "addShippingMethodAdjustment" | |
| shipping_method_id: string | |
| amount: number | |
| code: string | |
| description?: string | |
| } | |
| ``` | |
| This action means that a new record should be created of the `ShippingMethodAdjustment` data model in the Cart Module, or `OrderShippingMethodAdjustment` data model in the Order Module. | |
| Refer to [this reference](https://docs.medusajs.com/references/promotion/interfaces/promotion.AddShippingMethodAdjustment/index.html.md) for details on the object’s properties. | |
| ### `removeShippingMethodAdjustment` Action | |
| The `removeShippingMethodAdjustment` action indicates that an adjustment must be removed from a shipping method. For example, remove the free shipping discount. | |
| The `computeActions` method accepts any previous shipping method adjustments in the `shipping_methods` property of the second parameter. | |
| This action has the following format: | |
| ```ts | |
| export interface RemoveShippingMethodAdjustment { | |
| action: "removeShippingMethodAdjustment" | |
| adjustment_id: string | |
| code: string | |
| } | |
| ``` | |
| When the Medusa application receives this action type, it removes the `ShippingMethodAdjustment` (or `OrderShippingMethodAdjustment`) with the specified ID in the `adjustment_id` property. | |
| Refer to [this reference](https://docs.medusajs.com/references/promotion/interfaces/promotion.RemoveShippingMethodAdjustment/index.html.md) for details on the object’s properties. | |
| ### `campaignBudgetExceeded` Action | |
| When the `campaignBudgetExceeded` action is returned, the promotions within a campaign can no longer be used as the campaign budget has been exceeded. | |
| This action has the following format: | |
| ```ts | |
| export interface CampaignBudgetExceededAction { | |
| action: "campaignBudgetExceeded" | |
| code: string | |
| } | |
| ``` | |
| Refer to [this reference](https://docs.medusajs.com/references/promotion/interfaces/promotion.CampaignBudgetExceededAction/index.html.md) for details on the object’s properties. | |
| # Application Method | |
| In this document, you'll learn what an application method is. | |
| ## What is an Application Method? | |
| The [ApplicationMethod data model](https://docs.medusajs.com/references/promotion/models/ApplicationMethod/index.html.md) defines how a promotion is applied: | |
| |Property|Purpose| | |
| |---|---| | |
| |\`type\`|Does the promotion discount a fixed amount or a percentage?| | |
| |\`target\_type\`|Is the promotion applied on a cart item, shipping method, or the entire order?| | |
| |\`allocation\`|Is the discounted amount applied on each item or split between the applicable items?| | |
| ## Target Promotion Rules | |
| When the promotion is applied to a cart item or a shipping method, you can restrict which items/shipping methods the promotion is applied to. | |
| The `ApplicationMethod` data model has a collection of `PromotionRule` records to restrict which items or shipping methods the promotion applies to. The `target_rules` property represents this relation. | |
| 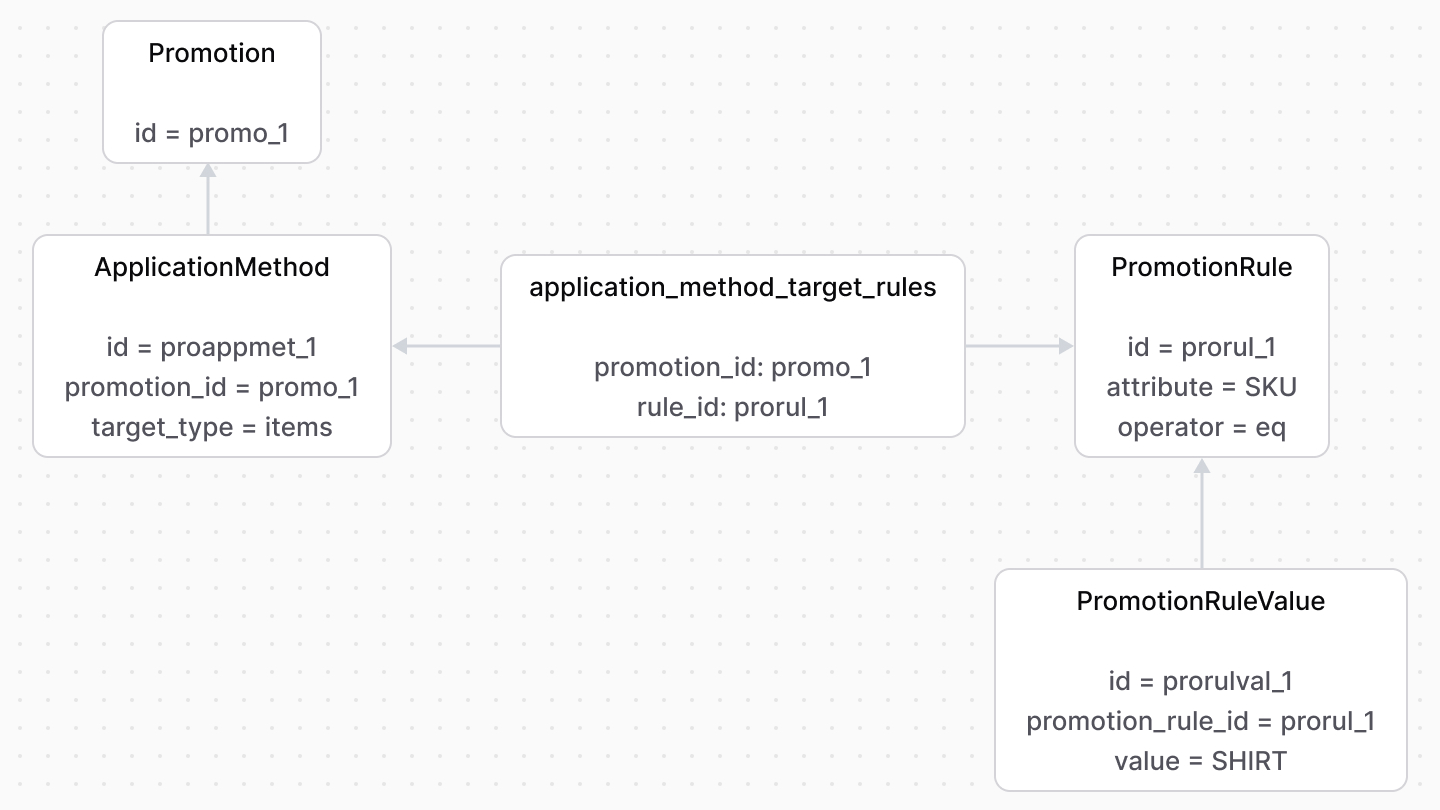 | |
| In this example, the promotion is only applied on products in the cart having the SKU `SHIRT`. | |
| *** | |
| ## Buy Promotion Rules | |
| When the promotion’s type is `buyget`, you must specify the “buy X” condition. For example, a cart must have two shirts before the promotion can be applied. | |
| The application method has a collection of `PromotionRule` items to define the “buy X” rule. The `buy_rules` property represents this relation. | |
| 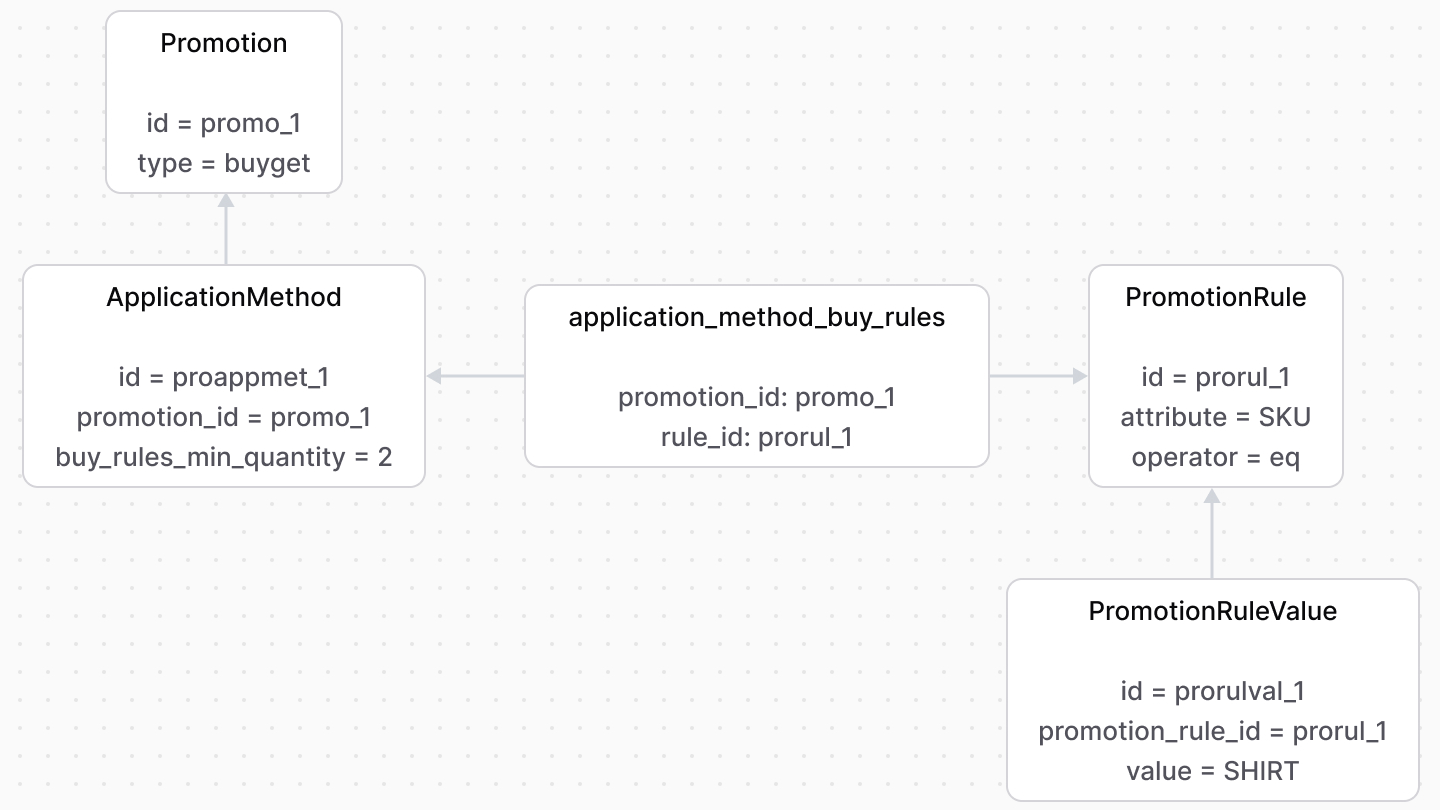 | |
| In this example, the cart must have two products with the SKU `SHIRT` for the promotion to be applied. | |
| # Campaign | |
| In this document, you'll learn about campaigns. | |
| ## What is a Campaign? | |
| A [Campaign](https://docs.medusajs.com/references/promotion/models/Campaign/index.html.md) combines promotions under the same conditions, such as start and end dates. | |
| 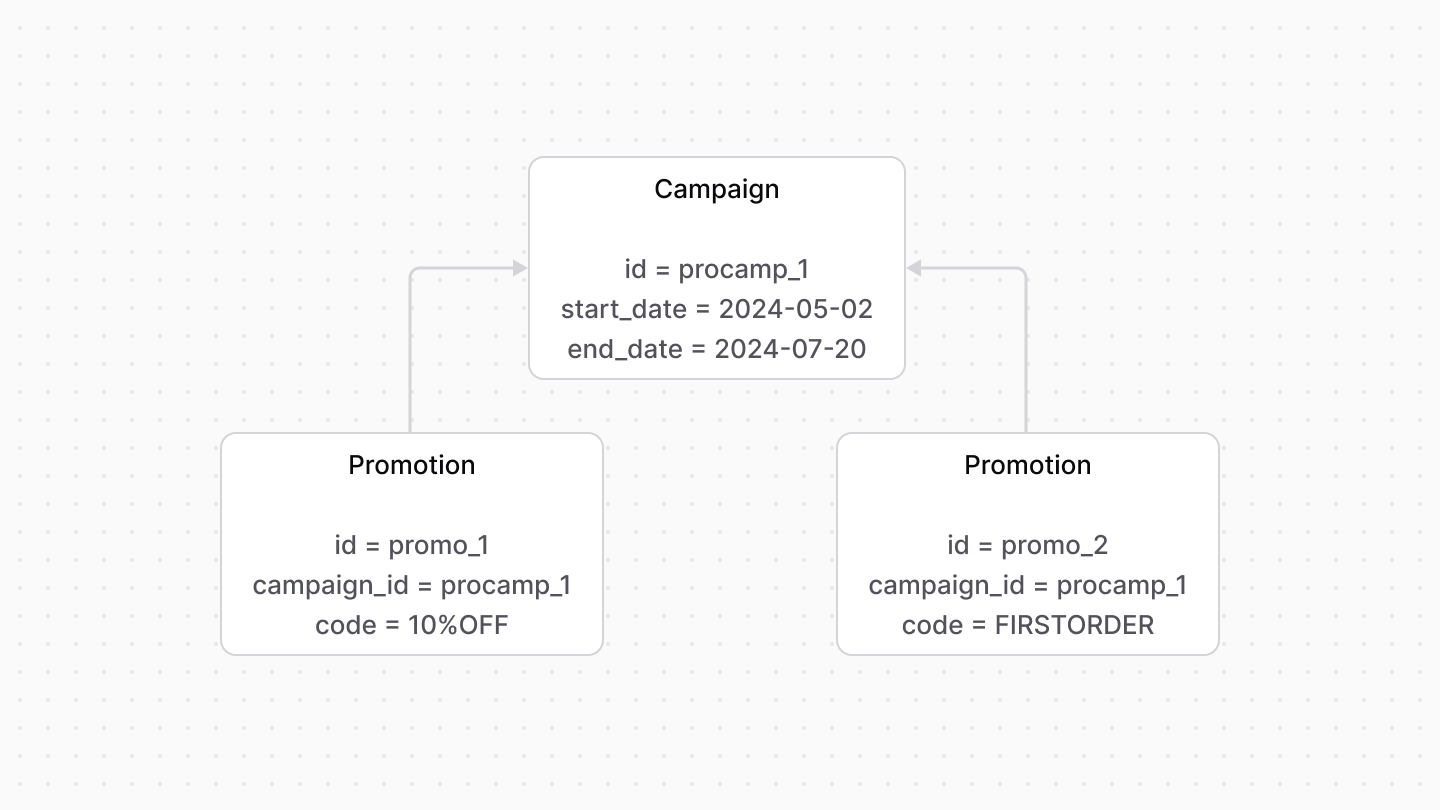 | |
| *** | |
| ## Campaign Limits | |
| Each campaign has a budget represented by the [CampaignBudget data model](https://docs.medusajs.com/references/promotion/models/CampaignBudget/index.html.md). The budget limits how many times the promotion can be used. | |
| There are two types of budgets: | |
| - `spend`: An amount that, when crossed, the promotion becomes unusable. For example, if the amount limit is set to `$100`, and the total amount of usage of this promotion crosses that threshold, the promotion can no longer be applied. | |
| - `usage`: The number of times that a promotion can be used. For example, if the usage limit is set to `10`, the promotion can be used only 10 times by customers. After that, it can no longer be applied. | |
| 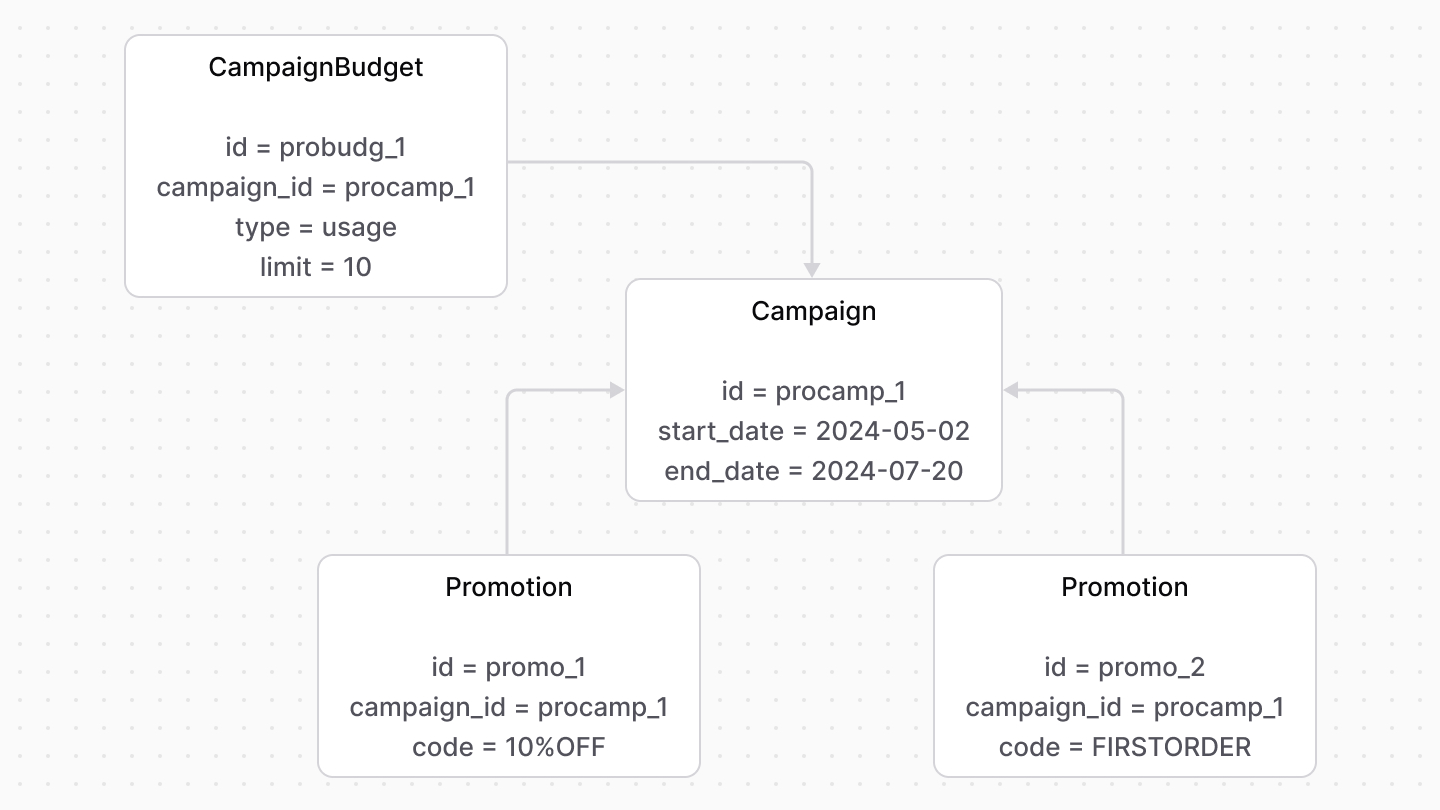 | |
| # Promotion Concepts | |
| In this document, you’ll learn about the main promotion and rule concepts in the Promotion Module. | |
| ## What is a Promotion? | |
| A promotion, represented by the [Promotion data model](https://docs.medusajs.com/references/promotion/models/Promotion/index.html.md), is a discount that can be applied on cart items, shipping methods, or entire orders. | |
| A promotion has two types: | |
| - `standard`: A standard promotion with rules. | |
| - `buyget`: “A buy X get Y” promotion with rules. | |
| |\`standard\`|\`buyget\`| | |
| |---|---| | |
| |A coupon code that gives customers 10% off their entire order.|Buy two shirts and get another for free.| | |
| |A coupon code that gives customers $15 off any shirt in their order.|Buy two shirts and get 10% off the entire order.| | |
| |A discount applied automatically for VIP customers that removes 10% off their shipping method’s amount.|Spend $100 and get free shipping.| | |
| The Medusa Admin UI may not provide a way to create each of these promotion examples. However, they are supported by the Promotion Module and Medusa's workflows and API routes. | |
| *** | |
| ## PromotionRule | |
| A promotion can be restricted by a set of rules, each rule is represented by the [PromotionRule data model](https://docs.medusajs.com/references/promotion/models/PromotionRule/index.html.md). | |
| For example, you can create a promotion that only customers of the `VIP` customer group can use. | |
| 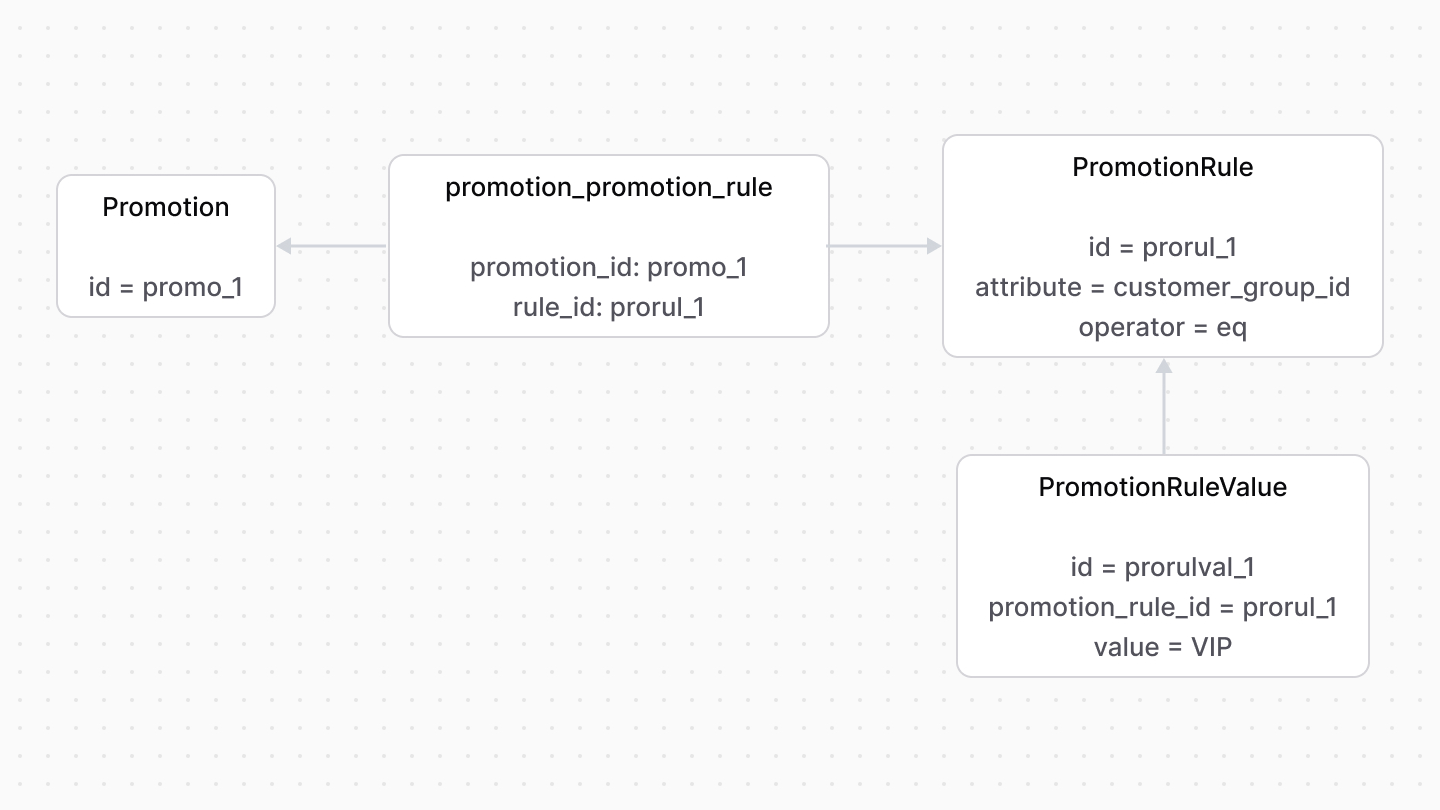 | |
| A `PromotionRule`'s `attribute` property indicates the property's name to which this rule is applied. | |
| For example, `customer_group_id`. Its value is stored in the `PromotionRuleValue` data model. So, a rule can have multiple values. | |
| When testing whether a promotion can be applied to a cart, the rule's `attribute` property and its values are tested on the cart itself. | |
| For example, the cart's customer must be part of the customer group(s) indicated in the promotion rule's value. | |
| *** | |
| ## Flexible Rules | |
| The `PromotionRule`'s `operator` property adds more flexibility to the rule’s condition rather than simple equality (`eq`). | |
| For example, to restrict the promotion to only `VIP` and `B2B` customer groups: | |
| - Add a `PromotionRule` record with its `attribute` property set to `customer_group_id` and `operator` property to `in`. | |
| - Add two `PromotionRuleValue` records associated with the rule: one with the value `VIP` and the other `B2B`. | |
| 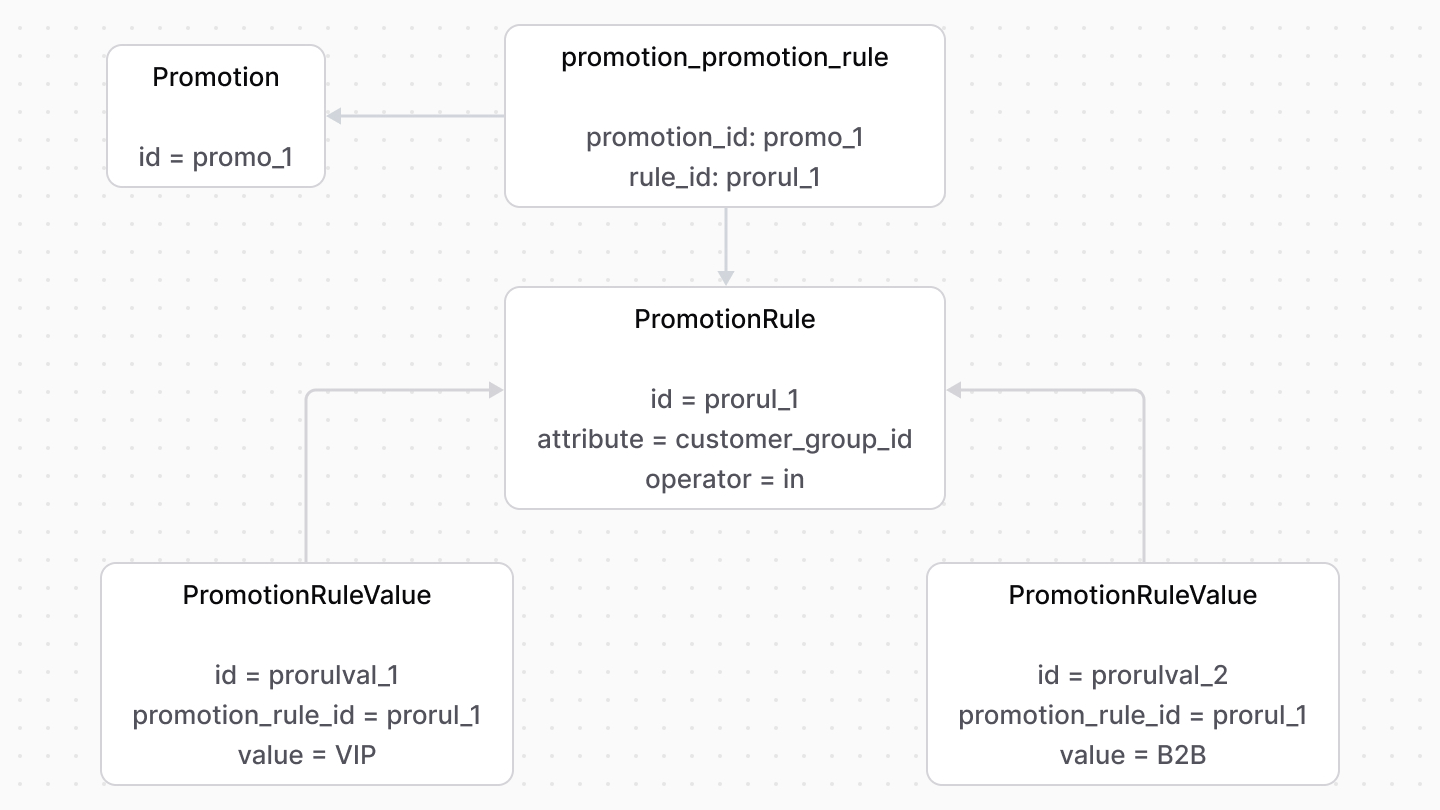 | |
| In this case, a customer’s group must be in the `VIP` and `B2B` set of values to use the promotion. | |
| # Links between Promotion Module and Other Modules | |
| This document showcases the module links defined between the Promotion Module and other commerce modules. | |
| ## Summary | |
| The Promotion Module has the following links to other modules: | |
| Read-only links are used to query data across modules, but the relations aren't stored in a pivot table in the database. | |
| - [`Cart` data model of the Cart Module \<> `Promotion` data model](#cart-module). | |
| - [`LineItemAdjustment` data model of the Cart Module \<> `Promotion` data model](#cart-module). (Read-only). | |
| - [`Order` data model of the Order Module \<> `Promotion` data model](#order-module). | |
| *** | |
| ## Cart Module | |
| A promotion can be applied on line items and shipping methods of a cart. Medusa defines a link between the `Cart` and `Promotion` data models. | |
|  | |
| Medusa also defines a read-only link between the `Promotion` data model and the [Cart Module](https://docs.medusajs.com/Users/shahednasser/medusa/www/apps/resources/app/commerce-modules/cart/index.html.md)'s `LineItemAdjustment` data model. This means you can retrieve the details of the promotion applied on a line item, but you don't manage the links in a pivot table in the database. The promotion of a line item is determined by the `promotion_id` property of the `LineItemAdjustment` data model. | |
| ### Retrieve with Query | |
| To retrieve the carts that a promotion is applied on with [Query](https://docs.medusajs.com/docs/learn/fundamentals/module-links/query/index.html.md), pass `carts.*` in `fields`: | |
| To retrieve the line item adjustments of a promotion, pass `line_item_adjustments.*` in `fields`. | |
| ### query.graph | |
| ```ts | |
| const { data: promotions } = await query.graph({ | |
| entity: "promotion", | |
| fields: [ | |
| "carts.*", | |
| ], | |
| }) | |
| // promotions.carts | |
| ``` | |
| ### useQueryGraphStep | |
| ```ts | |
| import { useQueryGraphStep } from "@medusajs/medusa/core-flows" | |
| // ... | |
| const { data: promotions } = useQueryGraphStep({ | |
| entity: "promotion", | |
| fields: [ | |
| "carts.*", | |
| ], | |
| }) | |
| // promotions.carts | |
| ``` | |
| ### Manage with Link | |
| To manage the promotions of a cart, use [Link](https://docs.medusajs.com/docs/learn/fundamentals/module-links/link/index.html.md): | |
| ### link.create | |
| ```ts | |
| import { Modules } from "@medusajs/framework/utils" | |
| // ... | |
| await link.create({ | |
| [Modules.CART]: { | |
| cart_id: "cart_123", | |
| }, | |
| [Modules.PROMOTION]: { | |
| promotion_id: "promo_123", | |
| }, | |
| }) | |
| ``` | |
| ### createRemoteLinkStep | |
| ```ts | |
| import { Modules } from "@medusajs/framework/utils" | |
| import { createRemoteLinkStep } from "@medusajs/medusa/core-flows" | |
| // ... | |
| createRemoteLinkStep({ | |
| [Modules.CART]: { | |
| cart_id: "cart_123", | |
| }, | |
| [Modules.PROMOTION]: { | |
| promotion_id: "promo_123", | |
| }, | |
| }) | |
| ``` | |
| *** | |
| ## Order Module | |
| An order is associated with the promotion applied on it. Medusa defines a link between the `Order` and `Promotion` data models. | |
|  | |
| ### Retrieve with Query | |
| To retrieve the orders a promotion is applied on with [Query](https://docs.medusajs.com/docs/learn/fundamentals/module-links/query/index.html.md), pass `orders.*` in `fields`: | |
| ### query.graph | |
| ```ts | |
| const { data: promotions } = await query.graph({ | |
| entity: "promotion", | |
| fields: [ | |
| "orders.*", | |
| ], | |
| }) | |
| // promotions.orders | |
| ``` | |
| ### useQueryGraphStep | |
| ```ts | |
| import { useQueryGraphStep } from "@medusajs/medusa/core-flows" | |
| // ... | |
| const { data: promotions } = useQueryGraphStep({ | |
| entity: "promotion", | |
| fields: [ | |
| "orders.*", | |
| ], | |
| }) | |
| // promotions.orders | |
| ``` | |
| ### Manage with Link | |
| To manage the promotion of an order, use [Link](https://docs.medusajs.com/docs/learn/fundamentals/module-links/link/index.html.md): | |
| ### link.create | |
| ```ts | |
| import { Modules } from "@medusajs/framework/utils" | |
| // ... | |
| await link.create({ | |
| [Modules.ORDER]: { | |
| order_id: "order_123", | |
| }, | |
| [Modules.PROMOTION]: { | |
| promotion_id: "promo_123", | |
| }, | |
| }) | |
| ``` | |
| ### createRemoteLinkStep | |
| ```ts | |
| import { Modules } from "@medusajs/framework/utils" | |
| import { createRemoteLinkStep } from "@medusajs/medusa/core-flows" | |
| // ... | |
| createRemoteLinkStep({ | |
| [Modules.ORDER]: { | |
| order_id: "order_123", | |
| }, | |
| [Modules.PROMOTION]: { | |
| promotion_id: "promo_123", | |
| }, | |
| }) | |
| ``` | |
| # Tax-Inclusive Pricing | |
| In this document, you’ll learn about tax-inclusive pricing and how it's used when calculating prices. | |
| ## What is Tax-Inclusive Pricing? | |
| A tax-inclusive price is a price of a resource that includes taxes. Medusa calculates the tax amount from the price rather than adds the amount to it. | |
| For example, if a product’s price is $50, the tax rate is 2%, and tax-inclusive pricing is enabled, then the product's price is $49, and the applied tax amount is $1. | |
| *** | |
| ## How is Tax-Inclusive Pricing Set? | |
| The [PricePreference data model](https://docs.medusajs.com/references/pricing/PricePreference/index.html.md) holds the tax-inclusive setting for a context. It has two properties that indicate the context: | |
| - `attribute`: The name of the attribute to compare against. For example, `region_id` or `currency_code`. | |
| - `value`: The attribute’s value. For example, `reg_123` or `usd`. | |
| Only `region_id` and `currency_code` are supported as an `attribute` at the moment. | |
| The `is_tax_inclusive` property indicates whether tax-inclusivity is enabled in the specified context. | |
| For example: | |
| ```json | |
| { | |
| "attribute": "currency_code", | |
| "value": "USD", | |
| "is_tax_inclusive": true, | |
| } | |
| ``` | |
| In this example, tax-inclusivity is enabled for the `USD` currency code. | |
| *** | |
| ## Tax-Inclusive Pricing in Price Calculation | |
| ### Tax Context | |
| As mentioned in the [Price Calculation documentation](https://docs.medusajs.com/Users/shahednasser/medusa/www/apps/resources/app/commerce-modules/pricing/price-calculation#calculation-context/index.html.md), The `calculatePrices` method accepts as a parameter a calculation context. | |
| To get accurate tax results, pass the `region_id` and / or `currency_code` in the calculation context. | |
| ### Returned Tax Properties | |
| The `calculatePrices` method returns two properties related to tax-inclusivity: | |
| Learn more about the returned properties in [this guide](https://docs.medusajs.com/Users/shahednasser/medusa/www/apps/resources/app/commerce-modules/pricing/price-calculation#returned-price-object/index.html.md). | |
| - `is_calculated_price_tax_inclusive`: Whether the selected `calculated_price` is tax-inclusive. | |
| - `is_original_price_tax_inclusive` : Whether the selected `original_price` is tax-inclusive. | |
| A price is considered tax-inclusive if: | |
| 1. It belongs to the region or currency code specified in the calculation context; | |
| 2. and the region or currency code has a price preference with `is_tax_inclusive` enabled. | |
| ### Tax Context Precedence | |
| A region’s price preference’s `is_tax_inclusive`'s value takes higher precedence in determining whether a price is tax-inclusive if: | |
| - both the `region_id` and `currency_code` are provided in the calculation context; | |
| - the selected price belongs to the region; | |
| - and the region has a price preference | |
| # Links between Region Module and Other Modules | |
| This document showcases the module links defined between the Region Module and other commerce modules. | |
| ## Summary | |
| The Region Module has the following links to other modules: | |
| Read-only links are used to query data across modules, but the relations aren't stored in a pivot table in the database. | |
| - [`Region` data model \<> `Cart` data model of the Cart Module](#cart-module). (Read-only) | |
| - [`Region` data model \<> `Order` data model of the Order Module](#order-module). (Read-only) | |
| - [`Region` data model \<> `PaymentProvider` data model of the Payment Module](#payment-module). | |
| *** | |
| ## Cart Module | |
| Medusa defines a read-only link between the `Region` data model and the [Cart Module](https://docs.medusajs.com/Users/shahednasser/medusa/www/apps/resources/app/commerce-modules/cart/index.html.md)'s `Cart` data model. This means you can retrieve the details of a region's carts, but you don't manage the links in a pivot table in the database. The region of a cart is determined by the `region_id` property of the `Cart` data model. | |
| ### Retrieve with Query | |
| To retrieve the carts of a region with [Query](https://docs.medusajs.com/docs/learn/fundamentals/module-links/query/index.html.md), pass `carts.*` in `fields`: | |
| ### query.graph | |
| ```ts | |
| const { data: regions } = await query.graph({ | |
| entity: "region", | |
| fields: [ | |
| "carts.*", | |
| ], | |
| }) | |
| // regions.carts | |
| ``` | |
| ### useQueryGraphStep | |
| ```ts | |
| import { useQueryGraphStep } from "@medusajs/medusa/core-flows" | |
| // ... | |
| const { data: regions } = useQueryGraphStep({ | |
| entity: "region", | |
| fields: [ | |
| "carts.*", | |
| ], | |
| }) | |
| // regions.carts | |
| ``` | |
| *** | |
| ## Order Module | |
| Medusa defines a read-only link between the `Region` data model and the [Cart Module](https://docs.medusajs.com/Users/shahednasser/medusa/www/apps/resources/app/commerce-modules/cart/index.html.md)'s `Cart` data model. This means you can retrieve the details of a region's orders, but you don't manage the links in a pivot table in the database. The region of an order is determined by the `region_id` property of the `Order` data model. | |
| ### Retrieve with Query | |
| To retrieve the orders of a region with [Query](https://docs.medusajs.com/docs/learn/fundamentals/module-links/query/index.html.md), pass `orders.*` in `fields`: | |
| ### query.graph | |
| ```ts | |
| const { data: regions } = await query.graph({ | |
| entity: "region", | |
| fields: [ | |
| "orders.*", | |
| ], | |
| }) | |
| // regions.orders | |
| ``` | |
| ### useQueryGraphStep | |
| ```ts | |
| import { useQueryGraphStep } from "@medusajs/medusa/core-flows" | |
| // ... | |
| const { data: regions } = useQueryGraphStep({ | |
| entity: "region", | |
| fields: [ | |
| "orders.*", | |
| ], | |
| }) | |
| // regions.orders | |
| ``` | |
| *** | |
| ## Payment Module | |
| You can specify for each region which payment providers are available for use. | |
| Medusa defines a module link between the `PaymentProvider` and the `Region` data models. | |
|  | |
| ### Retrieve with Query | |
| To retrieve the payment providers of a region with [Query](https://docs.medusajs.com/docs/learn/fundamentals/module-links/query/index.html.md), pass `payment_providers.*` in `fields`: | |
| ### query.graph | |
| ```ts | |
| const { data: regions } = await query.graph({ | |
| entity: "region", | |
| fields: [ | |
| "payment_providers.*", | |
| ], | |
| }) | |
| // regions.payment_providers | |
| ``` | |
| ### useQueryGraphStep | |
| ```ts | |
| import { useQueryGraphStep } from "@medusajs/medusa/core-flows" | |
| // ... | |
| const { data: regions } = useQueryGraphStep({ | |
| entity: "region", | |
| fields: [ | |
| "payment_providers.*", | |
| ], | |
| }) | |
| // regions.payment_providers | |
| ``` | |
| ### Manage with Link | |
| To manage the payment providers in a region, use [Link](https://docs.medusajs.com/docs/learn/fundamentals/module-links/link/index.html.md): | |
| ### link.create | |
| ```ts | |
| import { Modules } from "@medusajs/framework/utils" | |
| // ... | |
| await link.create({ | |
| [Modules.REGION]: { | |
| region_id: "reg_123", | |
| }, | |
| [Modules.PAYMENT]: { | |
| payment_provider_id: "pp_stripe_stripe", | |
| }, | |
| }) | |
| ``` | |
| ### createRemoteLinkStep | |
| ```ts | |
| import { Modules } from "@medusajs/framework/utils" | |
| import { createRemoteLinkStep } from "@medusajs/medusa/core-flows" | |
| // ... | |
| createRemoteLinkStep({ | |
| [Modules.REGION]: { | |
| region_id: "reg_123", | |
| }, | |
| [Modules.PAYMENT]: { | |
| payment_provider_id: "pp_stripe_stripe", | |
| }, | |
| }) | |
| ``` | |
| # Links between Sales Channel Module and Other Modules | |
| This document showcases the module links defined between the Sales Channel Module and other commerce modules. | |
| ## Summary | |
| The Sales Channel Module has the following links to other modules: | |
| Read-only links are used to query data across modules, but the relations aren't stored in a pivot table in the database. | |
| - [`ApiKey` data model of the API Key Module \<> `SalesChannel` data model](#api-key-module). | |
| - [`SalesChannel` data model \<> `Cart` data model of the Cart Module](#cart-module). (Read-only) | |
| - [`SalesChannel` data model \<> `Order` data model of the Order Module](#order-module). (Read-only) | |
| - [`Product` data model of the Product Module \<> `SalesChannel` data model](#product-module). | |
| - [`SalesChannel` data model \<> `StockLocation` data model of the Stock Location Module](#stock-location-module). | |
| *** | |
| ## API Key Module | |
| A publishable API key allows you to easily specify the sales channel scope in a client request. | |
| Medusa defines a link between the `ApiKey` and the `SalesChannel` data models. | |
|  | |
| ### Retrieve with Query | |
| To retrieve the API keys associated with a sales channel with [Query](https://docs.medusajs.com/docs/learn/fundamentals/module-links/query/index.html.md), pass `publishable_api_keys.*` in `fields`: | |
| ### query.graph | |
| ```ts | |
| const { data: salesChannels } = await query.graph({ | |
| entity: "sales_channel", | |
| fields: [ | |
| "publishable_api_keys.*", | |
| ], | |
| }) | |
| // salesChannels.publishable_api_keys | |
| ``` | |
| ### useQueryGraphStep | |
| ```ts | |
| import { useQueryGraphStep } from "@medusajs/medusa/core-flows" | |
| // ... | |
| const { data: salesChannels } = useQueryGraphStep({ | |
| entity: "sales_channel", | |
| fields: [ | |
| "publishable_api_keys.*", | |
| ], | |
| }) | |
| // salesChannels.publishable_api_keys | |
| ``` | |
| ### Manage with Link | |
| To manage the sales channels of an API key, use [Link](https://docs.medusajs.com/docs/learn/fundamentals/module-links/link/index.html.md): | |
| ### link.create | |
| ```ts | |
| import { Modules } from "@medusajs/framework/utils" | |
| // ... | |
| await link.create({ | |
| [Modules.API_KEY]: { | |
| api_key_id: "apk_123", | |
| }, | |
| [Modules.SALES_CHANNEL]: { | |
| sales_channel_id: "sc_123", | |
| }, | |
| }) | |
| ``` | |
| ### createRemoteLinkStep | |
| ```ts | |
| import { Modules } from "@medusajs/framework/utils" | |
| import { createRemoteLinkStep } from "@medusajs/medusa/core-flows" | |
| // ... | |
| createRemoteLinkStep({ | |
| [Modules.API_KEY]: { | |
| api_key_id: "apk_123", | |
| }, | |
| [Modules.SALES_CHANNEL]: { | |
| sales_channel_id: "sc_123", | |
| }, | |
| }) | |
| ``` | |
| *** | |
| ## Cart Module | |
| Medusa defines a read-only link between the `SalesChannel` data model and the [Cart Module](https://docs.medusajs.com/Users/shahednasser/medusa/www/apps/resources/app/commerce-modules/cart/index.html.md)'s `Cart` data model. This means you can retrieve the details of a sales channel's carts, but you don't manage the links in a pivot table in the database. The sales channel of a cart is determined by the `sales_channel_id` property of the `Cart` data model. | |
| ### Retrieve with Query | |
| To retrieve the carts of a sales channel with [Query](https://docs.medusajs.com/docs/learn/fundamentals/module-links/query/index.html.md), pass `carts.*` in `fields`: | |
| ### query.graph | |
| ```ts | |
| const { data: salesChannels } = await query.graph({ | |
| entity: "sales_channel", | |
| fields: [ | |
| "carts.*", | |
| ], | |
| }) | |
| // salesChannels.carts | |
| ``` | |
| ### useQueryGraphStep | |
| ```ts | |
| import { useQueryGraphStep } from "@medusajs/medusa/core-flows" | |
| // ... | |
| const { data: salesChannels } = useQueryGraphStep({ | |
| entity: "sales_channel", | |
| fields: [ | |
| "carts.*", | |
| ], | |
| }) | |
| // salesChannels.carts | |
| ``` | |
| *** | |
| ## Order Module | |
| Medusa defines a read-only link between the `SalesChannel` data model and the [Order Module](https://docs.medusajs.com/Users/shahednasser/medusa/www/apps/resources/app/commerce-modules/order/index.html.md)'s `Order` data model. This means you can retrieve the details of a sales channel's orders, but you don't manage the links in a pivot table in the database. The sales channel of an order is determined by the `sales_channel_id` property of the `Order` data model. | |
| ### Retrieve with Query | |
| To retrieve the orders of a sales channel with [Query](https://docs.medusajs.com/docs/learn/fundamentals/module-links/query/index.html.md), pass `orders.*` in `fields`: | |
| ### query.graph | |
| ```ts | |
| const { data: salesChannels } = await query.graph({ | |
| entity: "sales_channel", | |
| fields: [ | |
| "orders.*", | |
| ], | |
| }) | |
| // salesChannels.orders | |
| ``` | |
| ### useQueryGraphStep | |
| ```ts | |
| import { useQueryGraphStep } from "@medusajs/medusa/core-flows" | |
| // ... | |
| const { data: salesChannels } = useQueryGraphStep({ | |
| entity: "sales_channel", | |
| fields: [ | |
| "orders.*", | |
| ], | |
| }) | |
| // salesChannels.orders | |
| ``` | |
| *** | |
| ## Product Module | |
| A product has different availability for different sales channels. Medusa defines a link between the `Product` and the `SalesChannel` data models. | |
|  | |
| A product can be available in more than one sales channel. You can retrieve only the products of a sales channel. | |
| ### Retrieve with Query | |
| To retrieve the products of a sales channel with [Query](https://docs.medusajs.com/docs/learn/fundamentals/module-links/query/index.html.md), pass `products.*` in `fields`: | |
| ### query.graph | |
| ```ts | |
| const { data: salesChannels } = await query.graph({ | |
| entity: "sales_channel", | |
| fields: [ | |
| "products.*", | |
| ], | |
| }) | |
| // salesChannels.products | |
| ``` | |
| ### useQueryGraphStep | |
| ```ts | |
| import { useQueryGraphStep } from "@medusajs/medusa/core-flows" | |
| // ... | |
| const { data: salesChannels } = useQueryGraphStep({ | |
| entity: "sales_channel", | |
| fields: [ | |
| "products.*", | |
| ], | |
| }) | |
| // salesChannels.products | |
| ``` | |
| ### Manage with Link | |
| To manage the sales channels of a product, use [Link](https://docs.medusajs.com/docs/learn/fundamentals/module-links/link/index.html.md): | |
| ### link.create | |
| ```ts | |
| import { Modules } from "@medusajs/framework/utils" | |
| // ... | |
| await link.create({ | |
| [Modules.PRODUCT]: { | |
| product_id: "prod_123", | |
| }, | |
| [Modules.SALES_CHANNEL]: { | |
| sales_channel_id: "sc_123", | |
| }, | |
| }) | |
| ``` | |
| ### createRemoteLinkStep | |
| ```ts | |
| import { Modules } from "@medusajs/framework/utils" | |
| import { createRemoteLinkStep } from "@medusajs/medusa/core-flows" | |
| // ... | |
| createRemoteLinkStep({ | |
| [Modules.PRODUCT]: { | |
| product_id: "prod_123", | |
| }, | |
| [Modules.SALES_CHANNEL]: { | |
| sales_channel_id: "sc_123", | |
| }, | |
| }) | |
| ``` | |
| *** | |
| ## Stock Location Module | |
| A stock location is associated with a sales channel. This scopes inventory quantities associated with that stock location by the associated sales channel. | |
| Medusa defines a link between the `SalesChannel` and `StockLocation` data models. | |
| 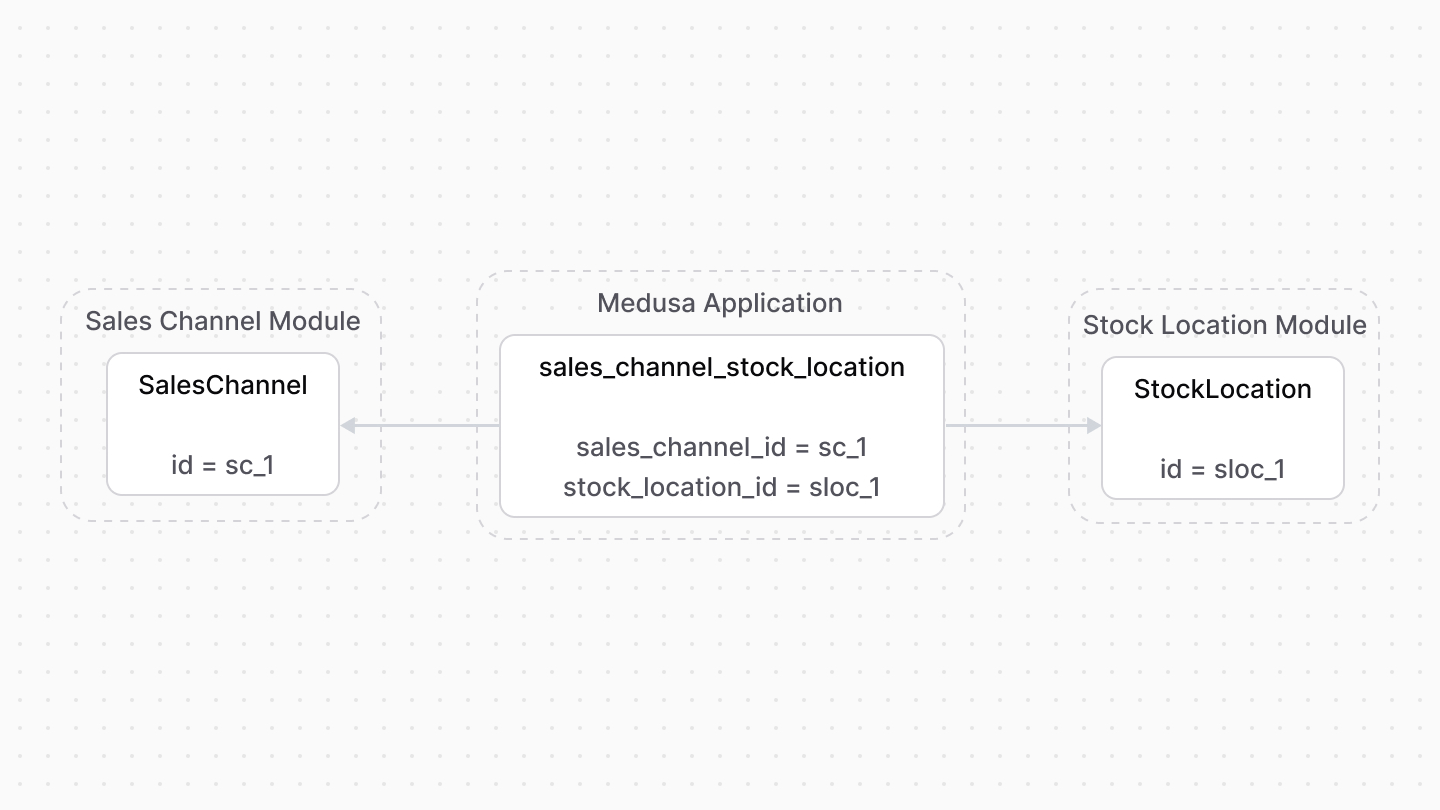 | |
| ### Retrieve with Query | |
| To retrieve the stock locations of a sales channel with [Query](https://docs.medusajs.com/docs/learn/fundamentals/module-links/query/index.html.md), pass `stock_locations.*` in `fields`: | |
| ### query.graph | |
| ```ts | |
| const { data: salesChannels } = await query.graph({ | |
| entity: "sales_channel", | |
| fields: [ | |
| "stock_locations.*", | |
| ], | |
| }) | |
| // salesChannels.stock_locations | |
| ``` | |
| ### useQueryGraphStep | |
| ```ts | |
| import { useQueryGraphStep } from "@medusajs/medusa/core-flows" | |
| // ... | |
| const { data: salesChannels } = useQueryGraphStep({ | |
| entity: "sales_channel", | |
| fields: [ | |
| "stock_locations.*", | |
| ], | |
| }) | |
| // salesChannels.stock_locations | |
| ``` | |
| ### Manage with Link | |
| To manage the stock locations of a sales channel, use [Link](https://docs.medusajs.com/docs/learn/fundamentals/module-links/link/index.html.md): | |
| ### link.create | |
| ```ts | |
| import { Modules } from "@medusajs/framework/utils" | |
| // ... | |
| await link.create({ | |
| [Modules.SALES_CHANNEL]: { | |
| sales_channel_id: "sc_123", | |
| }, | |
| [Modules.STOCK_LOCATION]: { | |
| sales_channel_id: "sloc_123", | |
| }, | |
| }) | |
| ``` | |
| ### createRemoteLinkStep | |
| ```ts | |
| import { Modules } from "@medusajs/framework/utils" | |
| import { createRemoteLinkStep } from "@medusajs/medusa/core-flows" | |
| // ... | |
| createRemoteLinkStep({ | |
| [Modules.SALES_CHANNEL]: { | |
| sales_channel_id: "sc_123", | |
| }, | |
| [Modules.STOCK_LOCATION]: { | |
| sales_channel_id: "sloc_123", | |
| }, | |
| }) | |
| ``` | |
| # Publishable API Keys with Sales Channels | |
| In this document, you’ll learn what publishable API keys are and how to use them with sales channels. | |
| ## Publishable API Keys with Sales Channels | |
| A publishable API key, provided by the API Key Module, is a client key scoped to one or more sales channels. | |
| When sending a request to a Store API route, you must pass a publishable API key in the header of the request: | |
| ```bash | |
| curl http://localhost:9000/store/products \ | |
| x-publishable-api-key: {your_publishable_api_key} | |
| ``` | |
| The Medusa application infers the associated sales channels and ensures that only data relevant to the sales channel are used. | |
| *** | |
| ## How to Create a Publishable API Key? | |
| To create a publishable API key, either use the Medusa Admin or the [Admin API Routes](https://docs.medusajs.com/api/admin#publishable-api-keys/index.html.md). | |
| # Links between Product Module and Other Modules | |
| This document showcases the module links defined between the Product Module and other commerce modules. | |
| ## Summary | |
| The Product Module has the following links to other modules: | |
| Read-only links are used to query data across modules, but the relations aren't stored in a pivot table in the database. | |
| - [`Product` data model \<> `Cart` data model of Cart Module](#cart-module). (Read-only). | |
| - [`ProductVariant` data model \<> `InventoryItem` data model of Inventory Module](#inventory-module). | |
| - [`Product` data model \<> `Order` data model of Order Module](#order-module). (Read-only). | |
| - [`ProductVariant` data model \<> `PriceSet` data model of Pricing Module](#pricing-module). | |
| - [`Product` data model \<> `SalesChannel` data model of Sales Channel Module](#sales-channel-module). | |
| *** | |
| ## Cart Module | |
| Medusa defines read-only links between: | |
| - The `Product` data model and the [Cart Module](https://docs.medusajs.com/Users/shahednasser/medusa/www/apps/resources/app/commerce-modules/cart/index.html.md)'s `LineItem` data model. This means you can retrieve the details of a line item's product, but you don't manage the links in a pivot table in the database. The product of a line item is determined by the `product_id` property of the `LineItem` data model. | |
| - The `ProductVariant` data model and the [Cart Module](https://docs.medusajs.com/Users/shahednasser/medusa/www/apps/resources/app/commerce-modules/cart/index.html.md)'s `LineItem` data model. This means you can retrieve the details of a line item's variant, but you don't manage the links in a pivot table in the database. The variant of a line item is determined by the `variant_id` property of the `LineItem` data model. | |
| ### Retrieve with Query | |
| To retrieve the line items of a variant with [Query](https://docs.medusajs.com/docs/learn/fundamentals/module-links/query/index.html.md), pass `line_items.*` in `fields`: | |
| To retrieve the line items of a product, pass `line_items.*` in `fields`. | |
| ### query.graph | |
| ```ts | |
| const { data: variants } = await query.graph({ | |
| entity: "variant", | |
| fields: [ | |
| "line_items.*", | |
| ], | |
| }) | |
| // variants.line_items | |
| ``` | |
| ### useQueryGraphStep | |
| ```ts | |
| import { useQueryGraphStep } from "@medusajs/medusa/core-flows" | |
| // ... | |
| const { data: variants } = useQueryGraphStep({ | |
| entity: "variant", | |
| fields: [ | |
| "line_items.*", | |
| ], | |
| }) | |
| // variants.line_items | |
| ``` | |
| *** | |
| ## Inventory Module | |
| The Inventory Module provides inventory-management features for any stock-kept item. | |
| Medusa defines a link between the `ProductVariant` and `InventoryItem` data models. Each product variant has different inventory details. | |
| 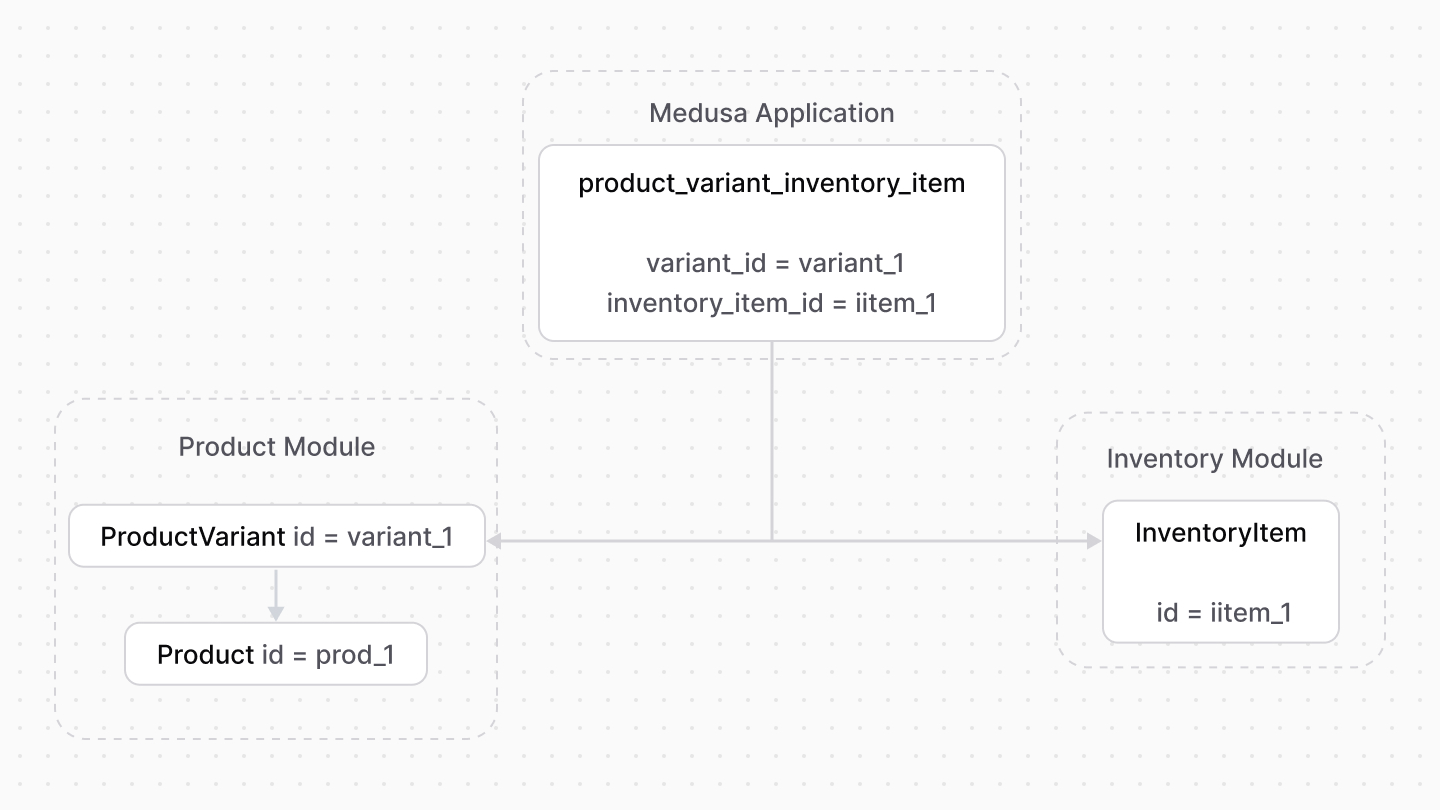 | |
| When the `manage_inventory` property of a product variant is enabled, you can manage the variant's inventory in different locations through this relation. | |
| Learn more about product variant's inventory management in [this guide](https://docs.medusajs.com/Users/shahednasser/medusa/www/apps/resources/app/commerce-modules/product/variant-inventory/index.html.md). | |
| ### Retrieve with Query | |
| To retrieve the inventory items of a product variant with [Query](https://docs.medusajs.com/docs/learn/fundamentals/module-links/query/index.html.md), pass `inventory_items.*` in `fields`: | |
| ### query.graph | |
| ```ts | |
| const { data: variants } = await query.graph({ | |
| entity: "variant", | |
| fields: [ | |
| "inventory_items.*", | |
| ], | |
| }) | |
| // variants.inventory_items | |
| ``` | |
| ### useQueryGraphStep | |
| ```ts | |
| import { useQueryGraphStep } from "@medusajs/medusa/core-flows" | |
| // ... | |
| const { data: variants } = useQueryGraphStep({ | |
| entity: "variant", | |
| fields: [ | |
| "inventory_items.*", | |
| ], | |
| }) | |
| // variants.inventory_items | |
| ``` | |
| ### Manage with Link | |
| To manage the inventory items of a variant, use [Link](https://docs.medusajs.com/docs/learn/fundamentals/module-links/link/index.html.md): | |
| ### link.create | |
| ```ts | |
| import { Modules } from "@medusajs/framework/utils" | |
| // ... | |
| await link.create({ | |
| [Modules.PRODUCT]: { | |
| variant_id: "variant_123", | |
| }, | |
| [Modules.INVENTORY]: { | |
| inventory_item_id: "iitem_123", | |
| }, | |
| }) | |
| ``` | |
| ### createRemoteLinkStep | |
| ```ts | |
| import { Modules } from "@medusajs/framework/utils" | |
| import { createRemoteLinkStep } from "@medusajs/medusa/core-flows" | |
| // ... | |
| createRemoteLinkStep({ | |
| [Modules.PRODUCT]: { | |
| variant_id: "variant_123", | |
| }, | |
| [Modules.INVENTORY]: { | |
| inventory_item_id: "iitem_123", | |
| }, | |
| }) | |
| ``` | |
| *** | |
| ## Order Module | |
| Medusa defines read-only links between: | |
| - the `Product` data model and the [Order Module](https://docs.medusajs.com/Users/shahednasser/medusa/www/apps/resources/app/commerce-modules/order/index.html.md)'s `OrderLineItem` data model. This means you can retrieve the details of a line item's product, but you don't manage the links in a pivot table in the database. The product of a line item is determined by the `product_id` property of the `OrderLineItem` data model. | |
| - the `ProductVariant` data model and the [Order Module](https://docs.medusajs.com/Users/shahednasser/medusa/www/apps/resources/app/commerce-modules/order/index.html.md)'s `OrderLineItem` data model. This means you can retrieve the details of a line item's variant, but you don't manage the links in a pivot table in the database. The variant of a line item is determined by the `variant_id` property of the `OrderLineItem` data model. | |
| ### Retrieve with Query | |
| To retrieve the order line items of a variant with [Query](https://docs.medusajs.com/docs/learn/fundamentals/module-links/query/index.html.md), pass `order_items.*` in `fields`: | |
| To retrieve a product's order line items, pass `order_items.*` in `fields`. | |
| ### query.graph | |
| ```ts | |
| const { data: variants } = await query.graph({ | |
| entity: "variant", | |
| fields: [ | |
| "order_items.*", | |
| ], | |
| }) | |
| // variants.order_items | |
| ``` | |
| ### useQueryGraphStep | |
| ```ts | |
| import { useQueryGraphStep } from "@medusajs/medusa/core-flows" | |
| // ... | |
| const { data: variants } = useQueryGraphStep({ | |
| entity: "variant", | |
| fields: [ | |
| "order_items.*", | |
| ], | |
| }) | |
| // variants.order_items | |
| ``` | |
| *** | |
| ## Pricing Module | |
| The Product Module doesn't provide pricing-related features. | |
| Instead, Medusa defines a link between the `ProductVariant` and the `PriceSet` data models. A product variant’s prices are stored belonging to a price set. | |
| 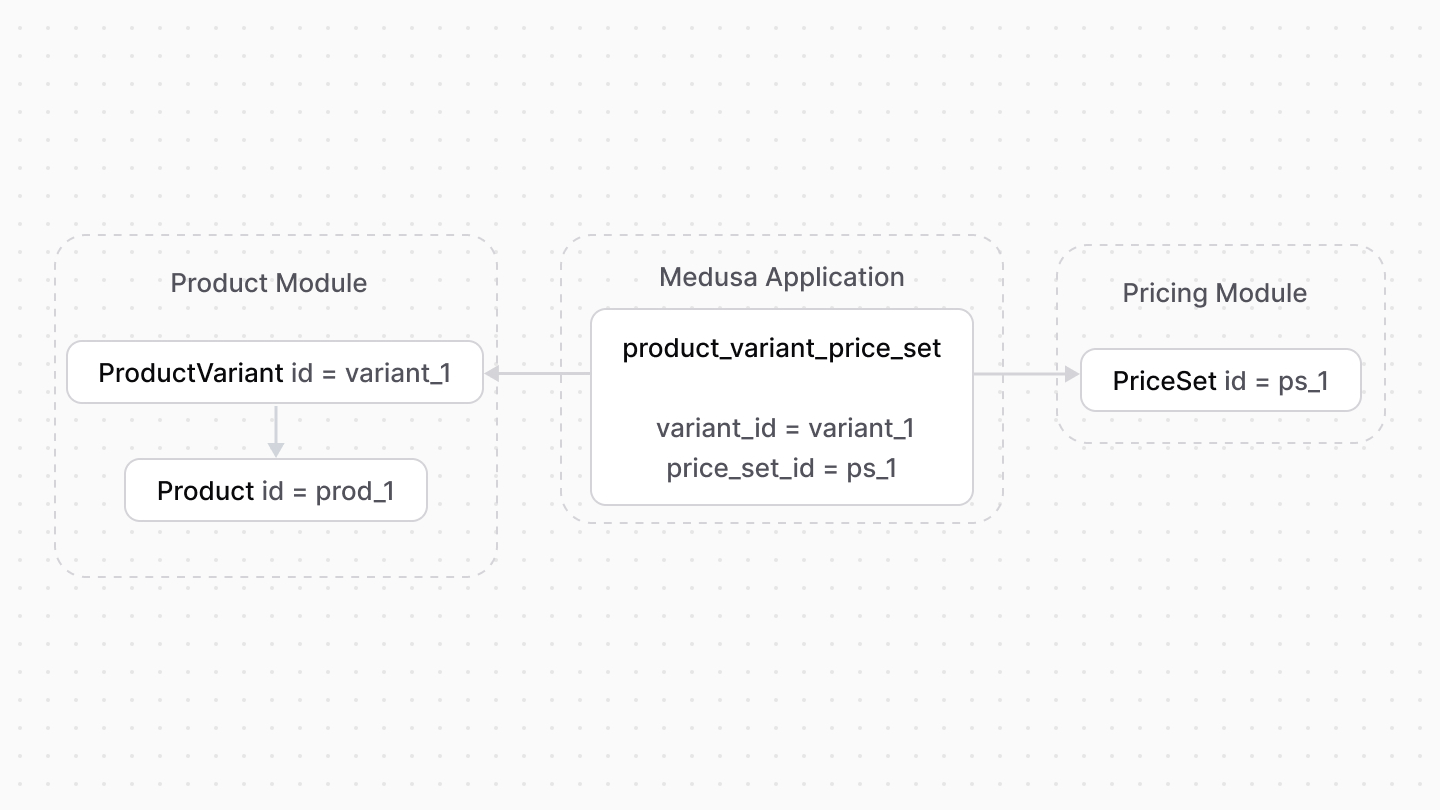 | |
| So, to add prices for a product variant, create a price set and add the prices to it. | |
| ### Retrieve with Query | |
| To retrieve the price set of a variant with [Query](https://docs.medusajs.com/docs/learn/fundamentals/module-links/query/index.html.md), pass `price_set.*` in `fields`: | |
| ### query.graph | |
| ```ts | |
| const { data: variants } = await query.graph({ | |
| entity: "variant", | |
| fields: [ | |
| "price_set.*", | |
| ], | |
| }) | |
| // variants.price_set | |
| ``` | |
| ### useQueryGraphStep | |
| ```ts | |
| import { useQueryGraphStep } from "@medusajs/medusa/core-flows" | |
| // ... | |
| const { data: variants } = useQueryGraphStep({ | |
| entity: "variant", | |
| fields: [ | |
| "price_set.*", | |
| ], | |
| }) | |
| // variants.price_set | |
| ``` | |
| ### Manage with Link | |
| To manage the price set of a variant, use [Link](https://docs.medusajs.com/docs/learn/fundamentals/module-links/link/index.html.md): | |
| ### link.create | |
| ```ts | |
| import { Modules } from "@medusajs/framework/utils" | |
| // ... | |
| await link.create({ | |
| [Modules.PRODUCT]: { | |
| variant_id: "variant_123", | |
| }, | |
| [Modules.PRICING]: { | |
| price_set_id: "pset_123", | |
| }, | |
| }) | |
| ``` | |
| ### createRemoteLinkStep | |
| ```ts | |
| import { Modules } from "@medusajs/framework/utils" | |
| import { createRemoteLinkStep } from "@medusajs/medusa/core-flows" | |
| // ... | |
| createRemoteLinkStep({ | |
| [Modules.PRODUCT]: { | |
| variant_id: "variant_123", | |
| }, | |
| [Modules.PRICING]: { | |
| price_set_id: "pset_123", | |
| }, | |
| }) | |
| ``` | |
| *** | |
| ## Sales Channel Module | |
| The Sales Channel Module provides functionalities to manage multiple selling channels in your store. | |
| Medusa defines a link between the `Product` and `SalesChannel` data models. A product can have different availability in different sales channels. | |
| 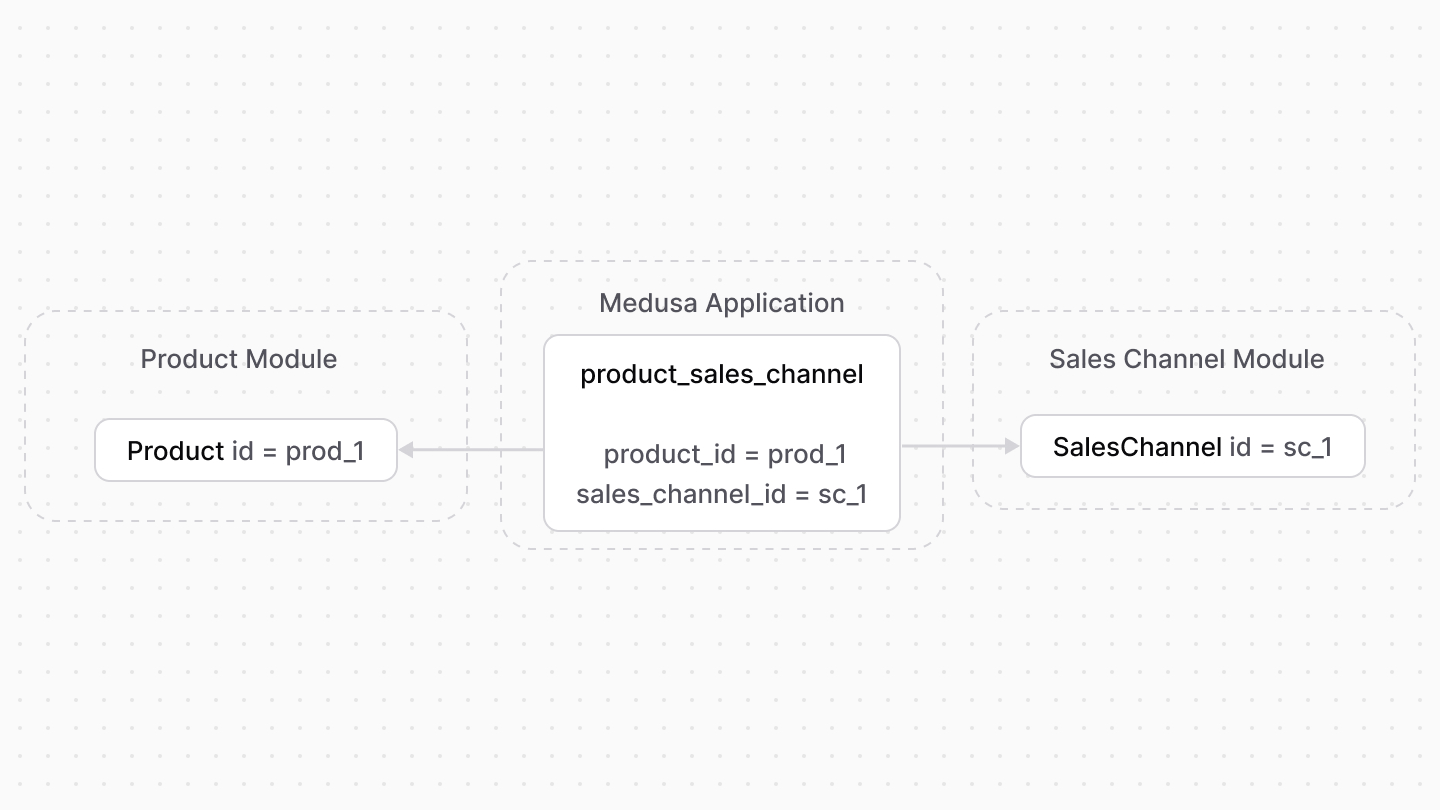 | |
| ### Retrieve with Query | |
| To retrieve the sales channels of a product with [Query](https://docs.medusajs.com/docs/learn/fundamentals/module-links/query/index.html.md), pass `sales_channels.*` in `fields`: | |
| ### query.graph | |
| ```ts | |
| const { data: products } = await query.graph({ | |
| entity: "product", | |
| fields: [ | |
| "sales_channels.*", | |
| ], | |
| }) | |
| // products.sales_channels | |
| ``` | |
| ### useQueryGraphStep | |
| ```ts | |
| import { useQueryGraphStep } from "@medusajs/medusa/core-flows" | |
| // ... | |
| const { data: products } = useQueryGraphStep({ | |
| entity: "product", | |
| fields: [ | |
| "sales_channels.*", | |
| ], | |
| }) | |
| // products.sales_channels | |
| ``` | |
| ### Manage with Link | |
| To manage the sales channels of a product, use [Link](https://docs.medusajs.com/docs/learn/fundamentals/module-links/link/index.html.md): | |
| ### link.create | |
| ```ts | |
| import { Modules } from "@medusajs/framework/utils" | |
| // ... | |
| await link.create({ | |
| [Modules.PRODUCT]: { | |
| product_id: "prod_123", | |
| }, | |
| [Modules.SALES_CHANNEL]: { | |
| sales_channel_id: "sc_123", | |
| }, | |
| }) | |
| ``` | |
| ### createRemoteLinkStep | |
| ```ts | |
| import { Modules } from "@medusajs/framework/utils" | |
| import { createRemoteLinkStep } from "@medusajs/medusa/core-flows" | |
| // ... | |
| createRemoteLinkStep({ | |
| [Modules.PRODUCT]: { | |
| product_id: "prod_123", | |
| }, | |
| [Modules.SALES_CHANNEL]: { | |
| sales_channel_id: "sc_123", | |
| }, | |
| }) | |
| ``` | |
| # Product Variant Inventory | |
| # Product Variant Inventory | |
| In this guide, you'll learn about the inventory management features related to product variants. | |
| ## Configure Inventory Management of Product Variants | |
| A product variant, represented by the [ProductVariant](https://docs.medusajs.com/references/product/models/ProductVariant/index.html.md) data model, has a `manage_inventory` field that's disabled by default. This field indicates whether you'll manage the inventory quantity of the product variant. | |
| The Product Module doesn't provide inventory-management features. Instead, the Medusa application uses the [Inventory Module](https://docs.medusajs.com/Users/shahednasser/medusa/www/apps/resources/app/commerce-modules/inventory/index.html.md) to manage inventory for products and variants. When `manage_inventory` is disabled, the Medusa application always considers the product variant to be in stock. This is useful if your product's variants aren't items that can be stocked, such as digital products, or they don't have a limited stock quantity. | |
| When `manage_inventory` is enabled, the Medusa application tracks the inventory of the product variant using the [Inventory Module](https://docs.medusajs.com/Users/shahednasser/medusa/www/apps/resources/app/commerce-modules/inventory/index.html.md). For example, when a customer purchases a product variant, the Medusa application decrements the stocked quantity of the product variant. | |
| *** | |
| ## How the Medusa Application Manages Inventory | |
| When a product variant has `manage_inventory` enabled, the Medusa application creates an inventory item using the [Inventory Module](https://docs.medusajs.com/Users/shahednasser/medusa/www/apps/resources/app/commerce-modules/inventory/index.html.md) and links it to the product variant. | |
|  | |
| The inventory item has one or more locations, called inventory levels, that represent the stock quantity of the product variant at a specific location. This allows you to manage inventory across multiple warehouses, such as a warehouse in the US and another in Europe. | |
| 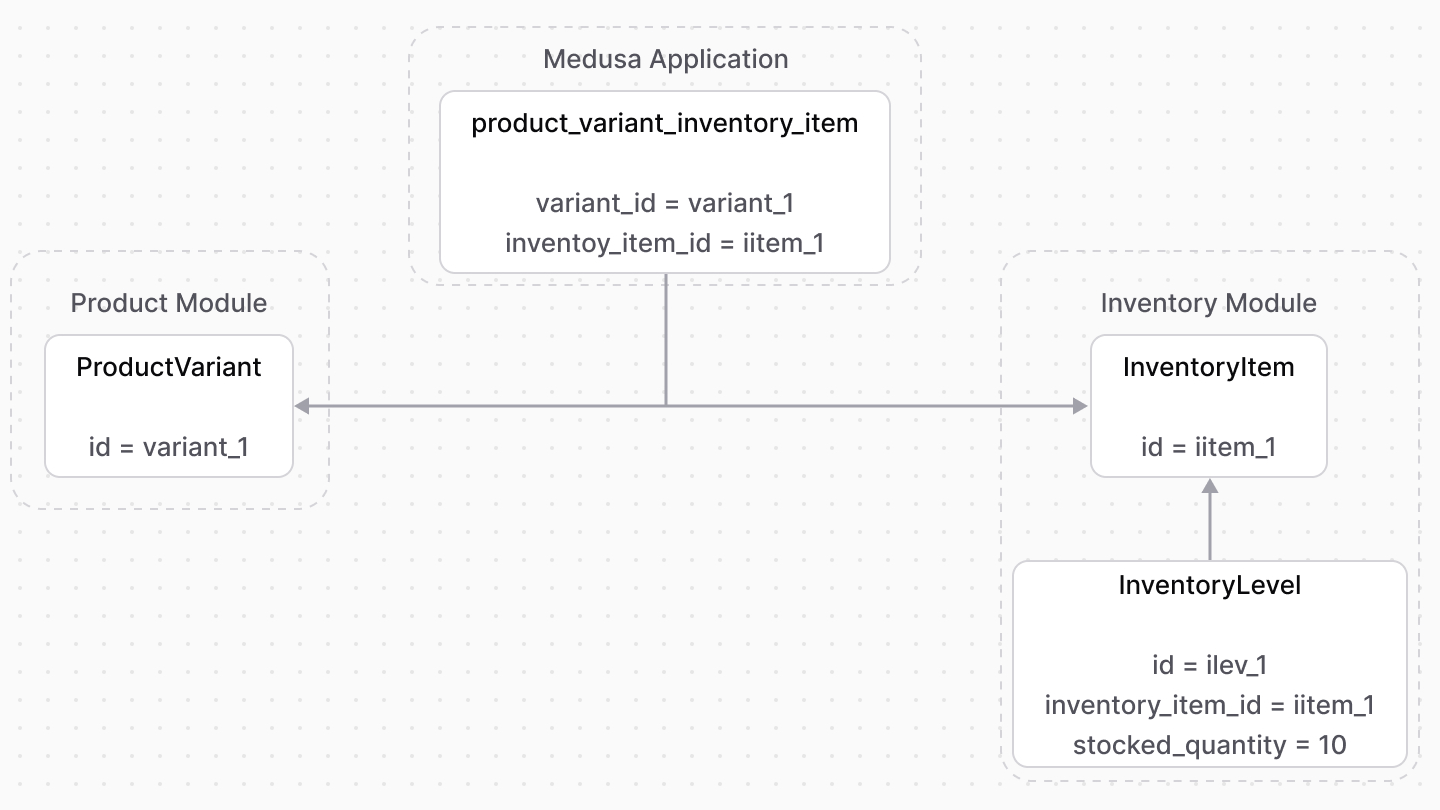 | |
| Learn more about inventory concepts in the [Inventory Module's documentation](https://docs.medusajs.com/Users/shahednasser/medusa/www/apps/resources/app/commerce-modules/inventory/concepts/index.html.md). | |
| The Medusa application represents and manages stock locations using the [Stock Location Module](https://docs.medusajs.com/Users/shahednasser/medusa/www/apps/resources/app/commerce-modules/stock-location/index.html.md). It creates a read-only link between the `InventoryLevel` and `StockLocation` data models so that it can retrieve the stock location of an inventory level. | |
| 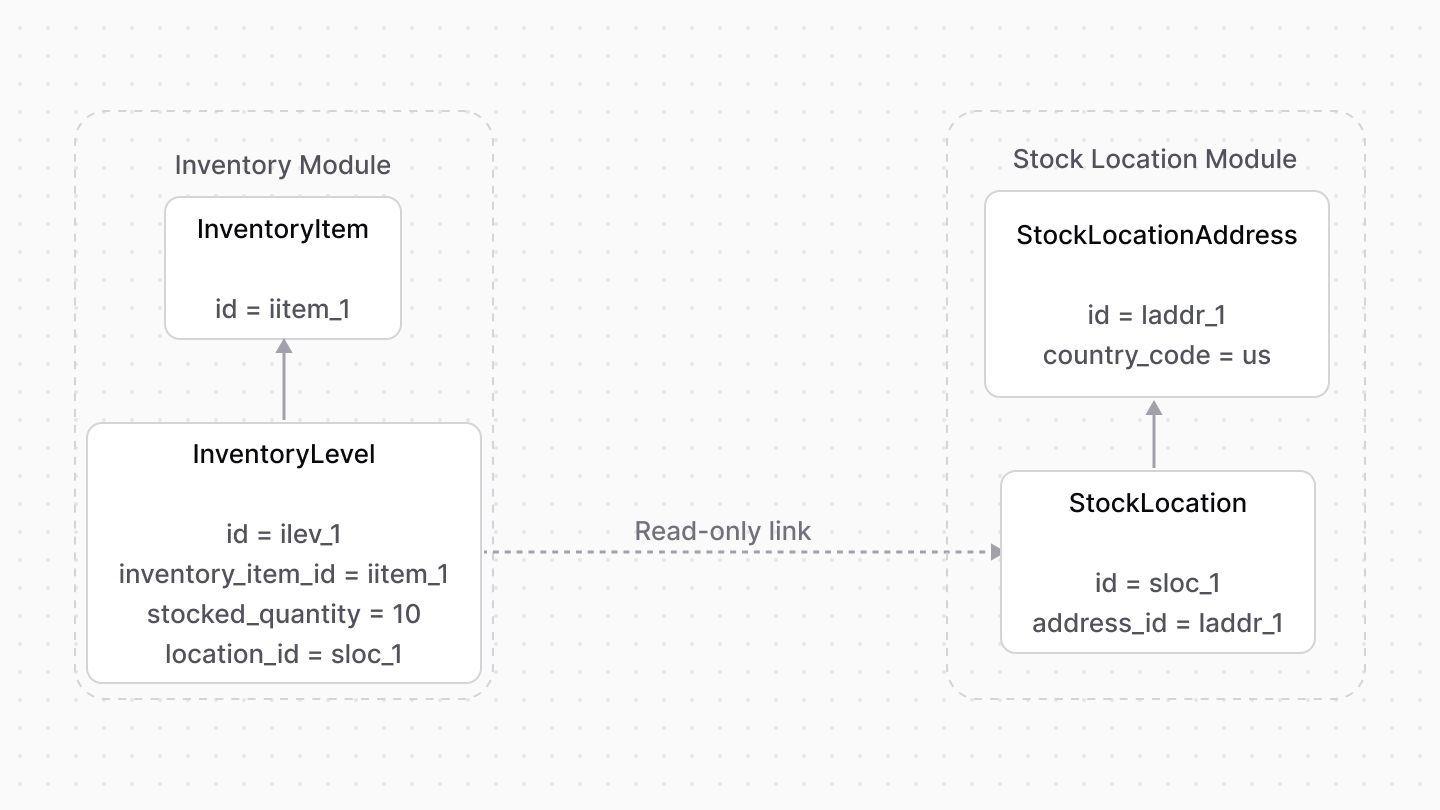 | |
| Learn more about the Stock Location Module in the [Stock Location Module's documentation](https://docs.medusajs.com/Users/shahednasser/medusa/www/apps/resources/app/commerce-modules/stock-location/concepts/index.html.md). | |
| ### Product Inventory in Storefronts | |
| When a storefront sends a request to the Medusa application, it must always pass a [publishable API key](https://docs.medusajs.com/Users/shahednasser/medusa/www/apps/resources/app/commerce-modules/sales-channel/publishable-api-keys/index.html.md) in the request header. This API key specifies the sales channels, available through the [Sales Channel Module](https://docs.medusajs.com/Users/shahednasser/medusa/www/apps/resources/app/commerce-modules/sales-channel/index.html.md), of the storefront. | |
| The Medusa application links sales channels to stock locations, indicating the locations available for a specific sales channel. So, all inventory-related operations are scoped by the sales channel and its associated stock locations. | |
| For example, the availability of a product variant is determined by the `stocked_quantity` of its inventory level at the stock location linked to the storefront's sales channel. | |
| 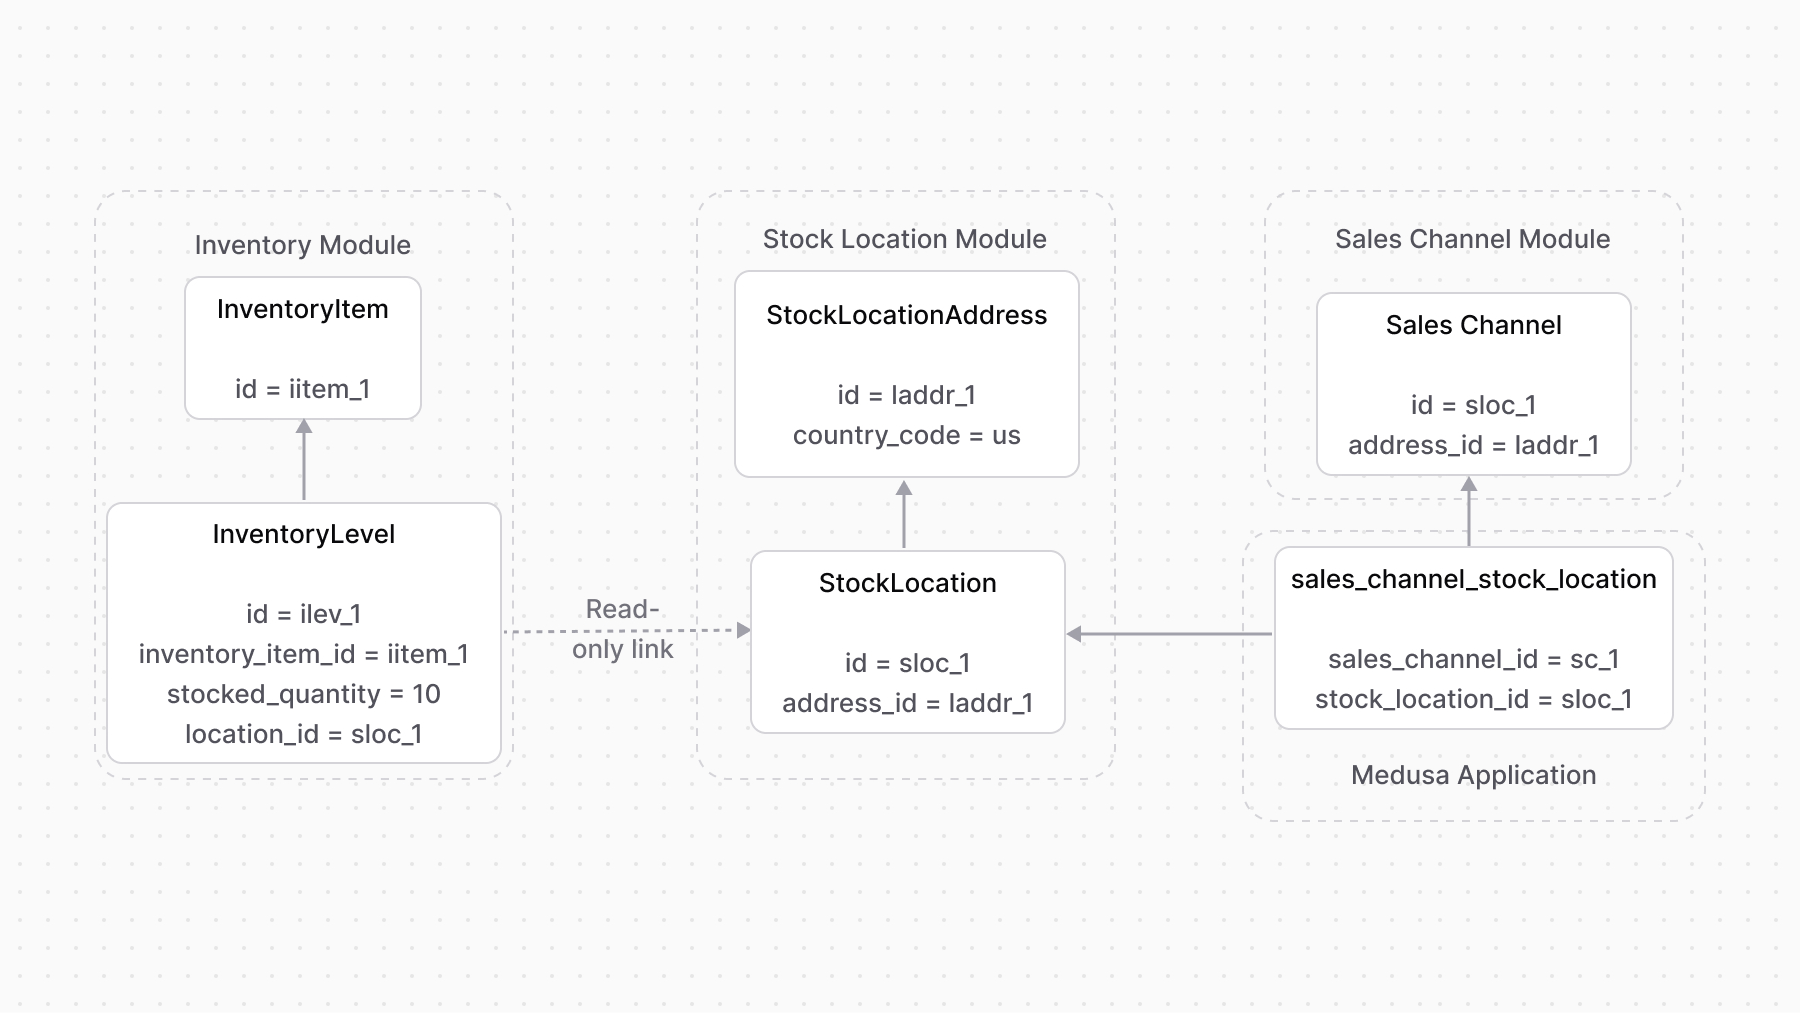 | |
| *** | |
| ## Variant Back Orders | |
| Product variants have an `allow_backorder` field that's disabled by default. When enabled, the Medusa application allows customers to purchase the product variant even when it's out of stock. Use this when your product variant is available through on-demand or pre-order purchase. | |
| You can also allow customers to subscribe to restock notifications of a product variant as explained in [this guide](https://docs.medusajs.com/Users/shahednasser/medusa/www/apps/resources/app/recipes/commerce-automation/restock-notification/index.html.md). | |
| *** | |
| ## Additional Resources | |
| The following guides provide more details on inventory management in the Medusa application: | |
| - [Inventory Kits in the Inventory Module](https://docs.medusajs.com/Users/shahednasser/medusa/www/apps/resources/app/commerce-modules/inventory/inventory-kit/index.html.md): Learn how you can implement bundled or multi-part products through the Inventory Module. | |
| - [Inventory in Flows](https://docs.medusajs.com/Users/shahednasser/medusa/www/apps/resources/app/commerce-modules/inventory/inventory-in-flows/index.html.md): Learn how Medusa utilizes inventory management in different flows. | |
| - [Storefront guide: how to retrieve a product variant's inventory details](https://docs.medusajs.com/resources/storefront-development/products/inventory/index.html.md). | |
| # Stock Location Concepts | |
| In this document, you’ll learn about the main concepts in the Stock Location Module. | |
| ## Stock Location | |
| A stock location, represented by the `StockLocation` data model, represents a location where stock items are kept. For example, a warehouse. | |
| Medusa uses stock locations to provide inventory details, from the Inventory Module, per location. | |
| *** | |
| ## StockLocationAddress | |
| The `StockLocationAddress` data model belongs to the `StockLocation` data model. It provides more detailed information of the location, such as country code or street address. | |
| # Links between Stock Location Module and Other Modules | |
| This document showcases the module links defined between the Stock Location Module and other commerce modules. | |
| ## Summary | |
| The Stock Location Module has the following links to other modules: | |
| Read-only links are used to query data across modules, but the relations aren't stored in a pivot table in the database. | |
| - [`FulfillmentSet` data model of the Fulfillment Module \<> `StockLocation` data model](#fulfillment-module). | |
| - [`FulfillmentProvider` data model of the Fulfillment Module \<> `StockLocation` data model](#fulfillment-module). | |
| - [`StockLocation` data model \<> `Inventory` data model of the Inventory Module](#inventory-module). | |
| - [`SalesChannel` data model of the Sales Channel Module \<> `StockLocation` data model](#sales-channel-module). | |
| *** | |
| ## Fulfillment Module | |
| A fulfillment set can be conditioned to a specific stock location. | |
| Medusa defines a link between the `FulfillmentSet` and `StockLocation` data models. | |
|  | |
| Medusa also defines a link between the `FulfillmentProvider` and `StockLocation` data models to indicate the providers that can be used in a location. | |
|  | |
| ### Retrieve with Query | |
| To retrieve the fulfillment sets of a stock location with [Query](https://docs.medusajs.com/docs/learn/fundamentals/module-links/query/index.html.md), pass `fulfillment_sets.*` in `fields`: | |
| To retrieve the fulfillment providers, pass `fulfillment_providers.*` in `fields`. | |
| ### query.graph | |
| ```ts | |
| const { data: stockLocations } = await query.graph({ | |
| entity: "stock_location", | |
| fields: [ | |
| "fulfillment_sets.*", | |
| ], | |
| }) | |
| // stockLocations.fulfillment_sets | |
| ``` | |
| ### useQueryGraphStep | |
| ```ts | |
| import { useQueryGraphStep } from "@medusajs/medusa/core-flows" | |
| // ... | |
| const { data: stockLocations } = useQueryGraphStep({ | |
| entity: "stock_location", | |
| fields: [ | |
| "fulfillment_sets.*", | |
| ], | |
| }) | |
| // stockLocations.fulfillment_sets | |
| ``` | |
| ### Manage with Link | |
| To manage the stock location of a fulfillment set, use [Link](https://docs.medusajs.com/docs/learn/fundamentals/module-links/link/index.html.md): | |
| ### link.create | |
| ```ts | |
| import { Modules } from "@medusajs/framework/utils" | |
| // ... | |
| await link.create({ | |
| [Modules.STOCK_LOCATION]: { | |
| stock_location_id: "sloc_123", | |
| }, | |
| [Modules.FULFILLMENT]: { | |
| fulfillment_set_id: "fset_123", | |
| }, | |
| }) | |
| ``` | |
| ### createRemoteLinkStep | |
| ```ts | |
| import { Modules } from "@medusajs/framework/utils" | |
| import { createRemoteLinkStep } from "@medusajs/medusa/core-flows" | |
| // ... | |
| createRemoteLinkStep({ | |
| [Modules.STOCK_LOCATION]: { | |
| stock_location_id: "sloc_123", | |
| }, | |
| [Modules.FULFILLMENT]: { | |
| fulfillment_set_id: "fset_123", | |
| }, | |
| }) | |
| ``` | |
| *** | |
| ## Inventory Module | |
| Medusa defines a read-only link between the `StockLocation` data model and the [Inventory Module](https://docs.medusajs.com/Users/shahednasser/medusa/www/apps/resources/app/commerce-modules/inventory/index.html.md)'s `InventoryLevel` data model. This means you can retrieve the details of a stock location's inventory levels, but you don't manage the links in a pivot table in the database. The stock location of an inventory level is determined by the `location_id` property of the `InventoryLevel` data model. | |
| ### Retrieve with Query | |
| To retrieve the inventory levels of a stock location with [Query](https://docs.medusajs.com/docs/learn/fundamentals/module-links/query/index.html.md), pass `inventory_levels.*` in `fields`: | |
| ### query.graph | |
| ```ts | |
| const { data: stockLocations } = await query.graph({ | |
| entity: "stock_location", | |
| fields: [ | |
| "inventory_levels.*", | |
| ], | |
| }) | |
| // stockLocations.inventory_levels | |
| ``` | |
| ### useQueryGraphStep | |
| ```ts | |
| import { useQueryGraphStep } from "@medusajs/medusa/core-flows" | |
| // ... | |
| const { data: stockLocations } = useQueryGraphStep({ | |
| entity: "stock_location", | |
| fields: [ | |
| "inventory_levels.*", | |
| ], | |
| }) | |
| // stockLocations.inventory_levels | |
| ``` | |
| *** | |
| ## Sales Channel Module | |
| A stock location is associated with a sales channel. This scopes inventory quantities in a stock location by the associated sales channel. | |
| Medusa defines a link between the `SalesChannel` and `StockLocation` data models. | |
|  | |
| ### Retrieve with Query | |
| To retrieve the sales channels of a stock location with [Query](https://docs.medusajs.com/docs/learn/fundamentals/module-links/query/index.html.md), pass `sales_channels.*` in `fields`: | |
| ### query.graph | |
| ```ts | |
| const { data: stockLocations } = await query.graph({ | |
| entity: "stock_location", | |
| fields: [ | |
| "sales_channels.*", | |
| ], | |
| }) | |
| // stockLocations.sales_channels | |
| ``` | |
| ### useQueryGraphStep | |
| ```ts | |
| import { useQueryGraphStep } from "@medusajs/medusa/core-flows" | |
| // ... | |
| const { data: stockLocations } = useQueryGraphStep({ | |
| entity: "stock_location", | |
| fields: [ | |
| "sales_channels.*", | |
| ], | |
| }) | |
| // stockLocations.sales_channels | |
| ``` | |
| ### Manage with Link | |
| To manage the stock locations of a sales channel, use [Link](https://docs.medusajs.com/docs/learn/fundamentals/module-links/link/index.html.md): | |
| ### link.create | |
| ```ts | |
| import { Modules } from "@medusajs/framework/utils" | |
| // ... | |
| await link.create({ | |
| [Modules.SALES_CHANNEL]: { | |
| sales_channel_id: "sc_123", | |
| }, | |
| [Modules.STOCK_LOCATION]: { | |
| sales_channel_id: "sloc_123", | |
| }, | |
| }) | |
| ``` | |
| ### createRemoteLinkStep | |
| ```ts | |
| import { Modules } from "@medusajs/framework/utils" | |
| import { createRemoteLinkStep } from "@medusajs/medusa/core-flows" | |
| // ... | |
| createRemoteLinkStep({ | |
| [Modules.SALES_CHANNEL]: { | |
| sales_channel_id: "sc_123", | |
| }, | |
| [Modules.STOCK_LOCATION]: { | |
| sales_channel_id: "sloc_123", | |
| }, | |
| }) | |
| ``` | |
| # Links between Store Module and Other Modules | |
| This document showcases the module links defined between the Store Module and other commerce modules. | |
| ## Summary | |
| The Store Module has the following links to other modules: | |
| Read-only links are used to query data across modules, but the relations aren't stored in a pivot table in the database. | |
| - [`Currency` data model \<> `Currency` data model of Currency Module](#currency-module). (Read-only). | |
| *** | |
| ## Currency Module | |
| The Store Module has a `Currency` data model that stores the supported currencies of a store. However, these currencies don't hold all the details of a currency, such as its name or symbol. | |
| Instead, Medusa defines a read-only link between the [Currency Module](https://docs.medusajs.com/Users/shahednasser/medusa/www/apps/resources/app/commerce-modules/currency/index.html.md)'s `Currency` data model and the Store Module's `Currency` data model. This means you can retrieve the details of a store's supported currencies, but you don't manage the links in a pivot table in the database. The currencies of a store are determined by the `currency_code` of the `Currency` data model in the Store Module. | |
| ### Retrieve with Query | |
| To retrieve the details of a store's currencies with [Query](https://docs.medusajs.com/docs/learn/fundamentals/module-links/query/index.html.md), pass `supported_currencies.currency.*` in `fields`: | |
| ### query.graph | |
| ```ts | |
| const { data: stores } = await query.graph({ | |
| entity: "store", | |
| fields: [ | |
| "supported_currencies.currency.*", | |
| ], | |
| }) | |
| // stores.supported_currencies | |
| ``` | |
| ### useQueryGraphStep | |
| ```ts | |
| import { useQueryGraphStep } from "@medusajs/medusa/core-flows" | |
| // ... | |
| const { data: stores } = useQueryGraphStep({ | |
| entity: "store", | |
| fields: [ | |
| "supported_currencies.currency.*", | |
| ], | |
| }) | |
| // stores.supported_currencies | |
| ``` | |
| # Tax Module Options | |
| In this document, you'll learn about the options of the Tax Module. | |
| ## providers | |
| The `providers` option is an array of either tax module providers or path to a file that defines a tax provider. | |
| When the Medusa application starts, these providers are registered and can be used to retrieve tax lines. | |
| ```ts title="medusa-config.ts" | |
| import { Modules } from "@medusajs/framework/utils" | |
| // ... | |
| module.exports = defineConfig({ | |
| // ... | |
| modules: [ | |
| { | |
| resolve: "@medusajs/tax", | |
| options: { | |
| providers: [ | |
| { | |
| resolve: "./path/to/my-provider", | |
| id: "my-provider", | |
| options: { | |
| // ... | |
| }, | |
| }, | |
| ], | |
| }, | |
| }, | |
| ], | |
| }) | |
| ``` | |
| The objects in the array accept the following properties: | |
| - `resolve`: A string indicating the package name of the module provider or the path to it. | |
| - `id`: A string indicating the provider's unique name or ID. | |
| - `options`: An optional object of the module provider's options. | |
| # Tax Calculation with the Tax Provider | |
| In this document, you’ll learn how tax lines are calculated and what a tax provider is. | |
| ## Tax Lines Calculation | |
| Tax lines are calculated and retrieved using the [getTaxLines method of the Tax Module’s main service](https://docs.medusajs.com/references/tax/getTaxLines/index.html.md). It accepts an array of line items and shipping methods, and the context of the calculation. | |
| For example: | |
| ```ts | |
| const taxLines = await taxModuleService.getTaxLines( | |
| [ | |
| { | |
| id: "cali_123", | |
| product_id: "prod_123", | |
| unit_price: 1000, | |
| quantity: 1, | |
| }, | |
| { | |
| id: "casm_123", | |
| shipping_option_id: "so_123", | |
| unit_price: 2000, | |
| }, | |
| ], | |
| { | |
| address: { | |
| country_code: "us", | |
| }, | |
| } | |
| ) | |
| ``` | |
| The context object is used to determine which tax regions and rates to use in the calculation. It includes properties related to the address and customer. | |
| The example above retrieves the tax lines based on the tax region for the United States. | |
| The method returns tax lines for the line item and shipping methods. For example: | |
| ```json | |
| [ | |
| { | |
| "line_item_id": "cali_123", | |
| "rate_id": "txr_1", | |
| "rate": 10, | |
| "code": "XXX", | |
| "name": "Tax Rate 1" | |
| }, | |
| { | |
| "shipping_line_id": "casm_123", | |
| "rate_id": "txr_2", | |
| "rate": 5, | |
| "code": "YYY", | |
| "name": "Tax Rate 2" | |
| } | |
| ] | |
| ``` | |
| *** | |
| ## Using the Tax Provider in the Calculation | |
| The tax lines retrieved by the `getTaxLines` method are actually retrieved from the tax region’s provider. | |
| A tax module provider whose main service implements the logic to shape tax lines. Each tax region has a tax provider. | |
| The Tax Module provides a `system` tax provider that only transforms calculated item and shipping tax rates into the required return type. | |
| {/* --- | |
| TODO add once tax provider guide is updated + add module providers match other modules. | |
| ## Create Tax Provider | |
| Refer to [this guide](/modules/tax/provider) to learn more about creating a tax provider. */} | |
| # Tax Rates and Rules | |
| In this document, you’ll learn about tax rates and rules. | |
| ## What are Tax Rates? | |
| A tax rate is a percentage amount used to calculate the tax amount for each taxable item’s price, such as line items or shipping methods, in a cart. The sum of all calculated tax amounts are then added to the cart’s total as a tax total. | |
| Each tax region has a default tax rate. This tax rate is applied to all taxable items of a cart in that region. | |
| ### Combinable Tax Rates | |
| Tax regions can have parent tax regions. To inherit the tax rates of the parent tax region, set the `is_combinable` of the child’s tax rates to `true`. | |
| Then, when tax rates are retrieved for a taxable item in the child region, both the child and the parent tax regions’ applicable rates are returned. | |
| *** | |
| ## Override Tax Rates with Rules | |
| You can create tax rates that override the default for specific conditions or rules. | |
| For example, you can have a default tax rate is 10%, but for products of type “Shirt” is %15. | |
| A tax region can have multiple tax rates, and each tax rate can have multiple tax rules. The [TaxRateRule data model](https://docs.medusajs.com/references/tax/models/TaxRateRule/index.html.md) represents a tax rate’s rule. | |
| 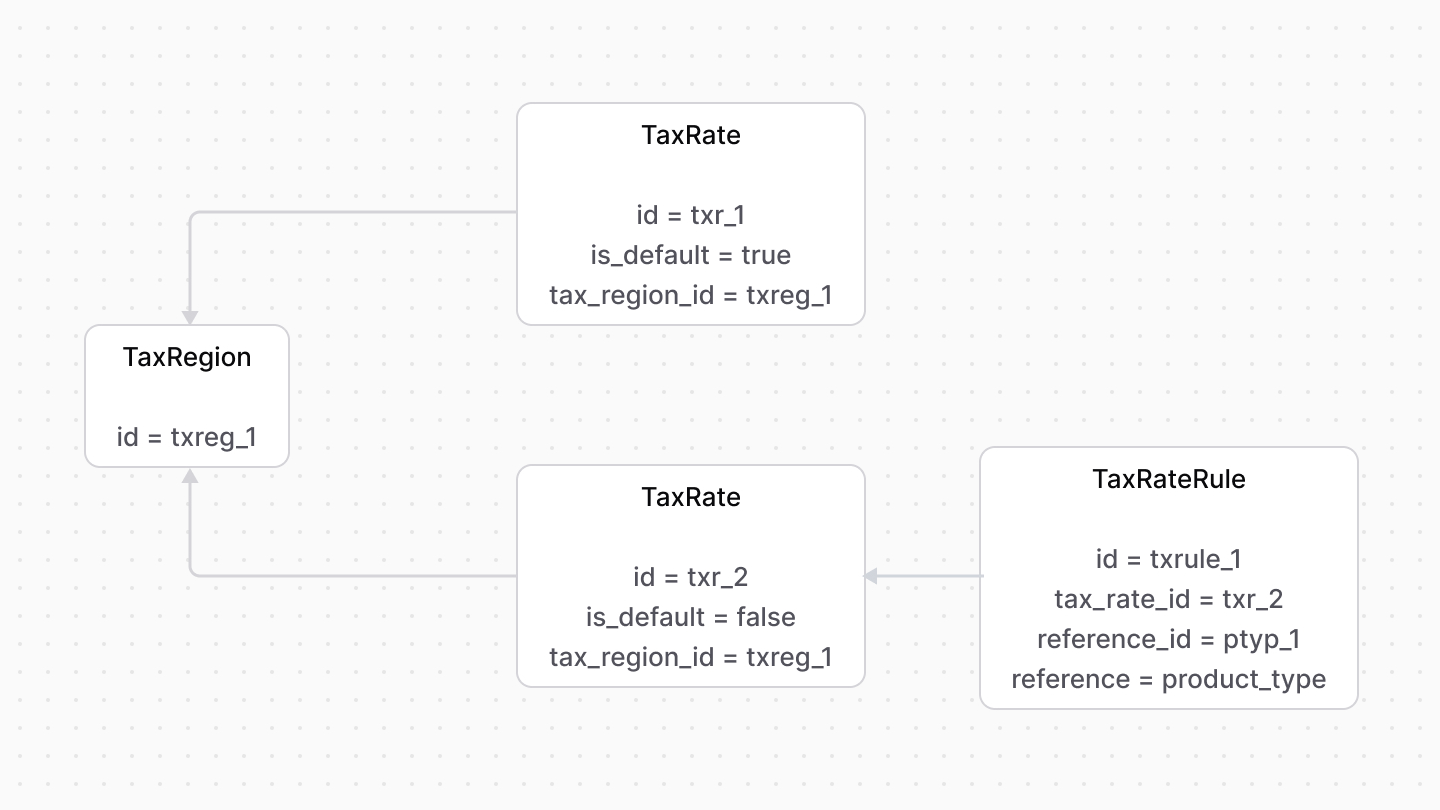 | |
| These two properties of the data model identify the rule’s target: | |
| - `reference`: the name of the table in the database that this rule points to. For example, `product_type`. | |
| - `reference_id`: the ID of the data model’s record that this points to. For example, a product type’s ID. | |
| So, to override the default tax rate for product types “Shirt”, you create a tax rate and associate with it a tax rule whose `reference` is `product_type` and `reference_id` the ID of the “Shirt” product type. | |
| # Tax Region | |
| In this document, you’ll learn about tax regions and how to use them with the Region Module. | |
| ## What is a Tax Region? | |
| A tax region, represented by the [TaxRegion data model](https://docs.medusajs.com/references/tax/models/TaxRegion/index.html.md), stores tax settings related to a region that your store serves. | |
| Tax regions can inherit settings and rules from a parent tax region. | |
| Each tax region has tax rules and a tax provider. | |
| # User Module Options | |
| In this document, you'll learn about the options of the User Module. | |
| ## Module Options | |
| ```ts title="medusa-config.ts" | |
| import { Modules } from "@medusajs/framework/utils" | |
| // ... | |
| module.exports = defineConfig({ | |
| // ... | |
| modules: [ | |
| { | |
| resolve: "@medusajs/user", | |
| options: { | |
| jwt_secret: process.env.JWT_SECRET, | |
| }, | |
| }, | |
| ], | |
| }) | |
| ``` | |
| |Option|Description|Required| | |
| |---|---|---|---|---| | |
| |\`jwt\_secret\`|A string indicating the secret used to sign the invite tokens.|Yes| | |
| ### Environment Variables | |
| Make sure to add the necessary environment variables for the above options in `.env`: | |
| ```bash | |
| JWT_SECRET=supersecret | |
| ``` | |
| # User Creation Flows | |
| In this document, learn the different ways to create a user using the User Module. | |
| ## Straightforward User Creation | |
| To create a user, use the [create method of the User Module’s main service](https://docs.medusajs.com/references/user/create/index.html.md): | |
| ```ts | |
| const user = await userModuleService.createUsers({ | |
| email: "[email protected]", | |
| }) | |
| ``` | |
| You can pair this with the Auth Module to allow the user to authenticate, as explained in a [later section](#create-identity-with-the-auth-module). | |
| *** | |
| ## Invite Users | |
| To create a user, you can create an invite for them using the [createInvites method](https://docs.medusajs.com/references/user/createInvites/index.html.md) of the User Module's main service: | |
| ```ts | |
| const invite = await userModuleService.createInvites({ | |
| email: "[email protected]", | |
| }) | |
| ``` | |
| Later, you can accept the invite and create a new user for them: | |
| ```ts | |
| const invite = | |
| await userModuleService.validateInviteToken("secret_123") | |
| await userModuleService.updateInvites({ | |
| id: invite.id, | |
| accepted: true, | |
| }) | |
| const user = await userModuleService.createUsers({ | |
| email: invite.email, | |
| }) | |
| ``` | |
| ### Invite Expiry | |
| An invite has an expiry date. You can renew the expiry date and refresh the token using the [refreshInviteTokens method](https://docs.medusajs.com/references/user/refreshInviteTokens/index.html.md): | |
| ```ts | |
| await userModuleService.refreshInviteTokens(["invite_123"]) | |
| ``` | |
| *** | |
| ## Create Identity with the Auth Module | |
| By combining the User and Auth Modules, you can use the Auth Module for authenticating users, and the User Module to manage those users. | |
| So, when a user is authenticated, and you receive the `AuthIdentity` object, you can use it to create a user if it doesn’t exist: | |
| ```ts | |
| const { success, authIdentity } = | |
| await authModuleService.authenticate("emailpass", { | |
| // ... | |
| }) | |
| const [, count] = await userModuleService.listAndCountUsers({ | |
| email: authIdentity.entity_id, | |
| }) | |
| if (!count) { | |
| const user = await userModuleService.createUsers({ | |
| email: authIdentity.entity_id, | |
| }) | |
| } | |
| ``` | |
| # Emailpass Auth Module Provider | |
| In this document, you’ll learn about the Emailpass auth module provider and how to install and use it in the Auth Module. | |
| Using the Emailpass auth module provider, you allow users to register and login with an email and password. | |
| *** | |
| ## Register the Emailpass Auth Module Provider | |
| The Emailpass auth provider is registered by default with the Auth Module. | |
| If you want to pass options to the provider, add the provider to the `providers` option of the Auth Module: | |
| ```ts title="medusa-config.ts" | |
| import { Modules, ContainerRegistrationKeys } from "@medusajs/framework/utils" | |
| // ... | |
| module.exports = defineConfig({ | |
| // ... | |
| modules: [ | |
| { | |
| resolve: "@medusajs/medusa/auth", | |
| dependencies: [Modules.CACHE, ContainerRegistrationKeys.LOGGER], | |
| options: { | |
| providers: [ | |
| // other providers... | |
| { | |
| resolve: "@medusajs/medusa/auth-emailpass", | |
| id: "emailpass", | |
| options: { | |
| // options... | |
| }, | |
| }, | |
| ], | |
| }, | |
| }, | |
| ], | |
| }) | |
| ``` | |
| ### Module Options | |
| |Configuration|Description|Required|Default| | |
| |---|---|---|---|---|---|---| | |
| |\`hashConfig\`|An object of configurations to use when hashing the user's | |
| password. Refer to |No|\`\`\`ts | |
| const hashConfig = \{ | |
|   logN: 15, | |
|   r: 8, | |
|   p: 1 | |
| } | |
| \`\`\`| | |
| *** | |
| ## Related Guides | |
| - [How to register a customer using email and password](https://docs.medusajs.com/Users/shahednasser/medusa/www/apps/resources/app/storefront-development/customers/register/index.html.md) | |
| # Google Auth Module Provider | |
| In this document, you’ll learn about the Google Auth Module Provider and how to install and use it in the Auth Module. | |
| The Google Auth Module Provider authenticates users with their Google account. | |
| Learn about the authentication flow for third-party providers in [this guide](https://docs.medusajs.com/Users/shahednasser/medusa/www/apps/resources/app/commerce-modules/auth/authentication-route#2-third-party-service-authenticate-flow/index.html.md). | |
| *** | |
| ## Register the Google Auth Module Provider | |
| ### Prerequisites | |
| - [Create a project in Google Cloud.](https://cloud.google.com/resource-manager/docs/creating-managing-projects) | |
| - [Create authorization credentials. When setting the Redirect Uri, set it to a URL in your frontend that later uses Medusa's callback route to validate the authentication.](https://developers.google.com/identity/protocols/oauth2/web-server#creatingcred) | |
| Add the module to the array of providers passed to the Auth Module: | |
| ```ts title="medusa-config.ts" | |
| import { Modules, ContainerRegistrationKeys } from "@medusajs/framework/utils" | |
| // ... | |
| module.exports = defineConfig({ | |
| // ... | |
| modules: [ | |
| { | |
| // ... | |
| [Modules.AUTH]: { | |
| resolve: "@medusajs/medusa/auth", | |
| dependencies: [Modules.CACHE, ContainerRegistrationKeys.LOGGER], | |
| options: { | |
| providers: [ | |
| // other providers... | |
| { | |
| resolve: "@medusajs/medusa/auth-google", | |
| id: "google", | |
| options: { | |
| clientId: process.env.GOOGLE_CLIENT_ID, | |
| clientSecret: process.env.GOOGLE_CLIENT_SECRET, | |
| callbackUrl: process.env.GOOGLE_CALLBACK_URL, | |
| }, | |
| }, | |
| ], | |
| }, | |
| }, | |
| }, | |
| ], | |
| }) | |
| ``` | |
| ### Environment Variables | |
| Make sure to add the necessary environment variables for the above options in `.env`: | |
| ```plain | |
| GOOGLE_CLIENT_ID=<YOUR_GOOGLE_CLIENT_ID> | |
| GOOGLE_CLIENT_SECRET=<YOUR_GOOGLE_CLIENT_SECRET> | |
| GOOGLE_CALLBACK_URL=<YOUR_GOOGLE_CALLBACK_URL> | |
| ``` | |
| ### Module Options | |
| |Configuration|Description|Required| | |
| |---|---|---|---|---| | |
| |\`clientId\`|A string indicating the |Yes| | |
| |\`clientSecret\`|A string indicating the |Yes| | |
| |\`callbackUrl\`|A string indicating the URL to redirect to in your frontend after the user completes their authentication in Google.|Yes| | |
| *** | |
| *** | |
| ## Override Callback URL During Authentication | |
| In many cases, you may have different callback URL for actor types. For example, you may redirect admin users to a different URL than customers after authentication. | |
| The [Authenticate or Login API Route](https://docs.medusajs.com/Users/shahednasser/medusa/www/apps/resources/app/commerce-modules/auth/authentication-route#login-route/index.html.md) can accept a `callback_url` body parameter to override the provider's `callbackUrl` option. Learn more in [this documentation](https://docs.medusajs.com/Users/shahednasser/medusa/www/apps/resources/app/commerce-modules/auth/authentication-route#login-route/index.html.md). | |
| *** | |
| ## Examples | |
| - [How to implement Google social login in the storefront](https://docs.medusajs.com/Users/shahednasser/medusa/www/apps/resources/app/storefront-development/customers/third-party-login/index.html.md). | |
| # GitHub Auth Module Provider | |
| In this document, you’ll learn about the GitHub Auth Module Provider and how to install and use it in the Auth Module. | |
| The Github Auth Module Provider authenticates users with their GitHub account. | |
| Learn about the authentication flow in [this guide](https://docs.medusajs.com/Users/shahednasser/medusa/www/apps/resources/app/commerce-modules/auth/authentication-route/index.html.md). | |
| *** | |
| ## Register the Github Auth Module Provider | |
| ### Prerequisites | |
| - [Register GitHub App. When setting the Callback URL, set it to a URL in your frontend that later uses Medusa's callback route to validate the authentication.](https://docs.github.com/en/apps/creating-github-apps/setting-up-a-github-app/creating-a-github-app) | |
| - [Retrieve the client ID and client secret of your GitHub App](https://docs.github.com/en/rest/authentication/authenticating-to-the-rest-api?apiVersion=2022-11-28#using-basic-authentication) | |
| Add the module to the array of providers passed to the Auth Module: | |
| ```ts title="medusa-config.ts" | |
| import { Modules, ContainerRegistrationKeys } from "@medusajs/framework/utils" | |
| // ... | |
| module.exports = defineConfig({ | |
| // ... | |
| modules: [ | |
| { | |
| resolve: "@medusajs/medusa/auth", | |
| dependencies: [Modules.CACHE, ContainerRegistrationKeys.LOGGER], | |
| options: { | |
| providers: [ | |
| // other providers... | |
| { | |
| resolve: "@medusajs/medusa/auth-github", | |
| id: "github", | |
| options: { | |
| clientId: process.env.GITHUB_CLIENT_ID, | |
| clientSecret: process.env.GITHUB_CLIENT_SECRET, | |
| callbackUrl: process.env.GITHUB_CALLBACK_URL, | |
| }, | |
| }, | |
| ], | |
| }, | |
| }, | |
| ], | |
| }) | |
| ``` | |
| ### Environment Variables | |
| Make sure to add the necessary environment variables for the above options in `.env`: | |
| ```plain | |
| GITHUB_CLIENT_ID=<YOUR_GITHUB_CLIENT_ID> | |
| GITHUB_CLIENT_SECRET=<YOUR_GITHUB_CLIENT_SECRET> | |
| GITHUB_CALLBACK_URL=<YOUR_GITHUB_CALLBACK_URL> | |
| ``` | |
| ### Module Options | |
| |Configuration|Description|Required| | |
| |---|---|---|---|---| | |
| |\`clientId\`|A string indicating the client ID of your GitHub app.|Yes| | |
| |\`clientSecret\`|A string indicating the client secret of your GitHub app.|Yes| | |
| |\`callbackUrl\`|A string indicating the URL to redirect to in your frontend after the user completes their authentication in GitHub.|Yes| | |
| *** | |
| ## Override Callback URL During Authentication | |
| In many cases, you may have different callback URL for actor types. For example, you may redirect admin users to a different URL than customers after authentication. | |
| The [Authenticate or Login API Route](https://docs.medusajs.com/Users/shahednasser/medusa/www/apps/resources/app/commerce-modules/auth/authentication-route#login-route/index.html.md) can accept a `callback_url` body parameter to override the provider's `callbackUrl` option. Learn more in [this documentation](https://docs.medusajs.com/Users/shahednasser/medusa/www/apps/resources/app/commerce-modules/auth/authentication-route#login-route/index.html.md). | |
| *** | |
| ## Examples | |
| - [How to implement third-party / social login in the storefront.](https://docs.medusajs.com/Users/shahednasser/medusa/www/apps/resources/app/storefront-development/customers/third-party-login/index.html.md). | |
| # Stripe Module Provider | |
| In this document, you’ll learn about the Stripe Module Provider and how to configure it in the Payment Module. | |
| ## Register the Stripe Module Provider | |
| ### Prerequisites | |
| - [Stripe account](https://stripe.com/) | |
| - [Stripe Secret API Key](https://support.stripe.com/questions/locate-api-keys-in-the-dashboard) | |
| - [For deployed Medusa applications, a Stripe webhook secret. Refer to the end of this guide for details on the URL and events.](https://docs.stripe.com/webhooks#add-a-webhook-endpoint) | |
| The Stripe Module Provider is installed by default in your application. To use it, add it to the array of providers passed to the Payment Module in `medusa-config.ts`: | |
| ```ts title="medusa-config.ts" | |
| import { Modules } from "@medusajs/framework/utils" | |
| // ... | |
| module.exports = defineConfig({ | |
| // ... | |
| modules: [ | |
| { | |
| resolve: "@medusajs/medusa/payment", | |
| options: { | |
| providers: [ | |
| { | |
| resolve: "@medusajs/medusa/payment-stripe", | |
| id: "stripe", | |
| options: { | |
| apiKey: process.env.STRIPE_API_KEY, | |
| }, | |
| }, | |
| ], | |
| }, | |
| }, | |
| ], | |
| }) | |
| ``` | |
| ### Environment Variables | |
| Make sure to add the necessary environment variables for the above options in `.env`: | |
| ```bash | |
| STRIPE_API_KEY=<YOUR_STRIPE_API_KEY> | |
| ``` | |
| ### Module Options | |
| |Option|Description|Required|Default| | |
| |---|---|---|---|---|---|---| | |
| |\`apiKey\`|A string indicating the Stripe Secret API key.|Yes|-| | |
| |\`webhookSecret\`|A string indicating the Stripe webhook secret. This is only useful for deployed Medusa applications.|Yes|-| | |
| |\`capture\`|Whether to automatically capture payment after authorization.|No|\`false\`| | |
| |\`automatic\_payment\_methods\`|A boolean value indicating whether to enable Stripe's automatic payment methods. This is useful if you integrate services like Apple pay or Google pay.|No|\`false\`| | |
| |\`payment\_description\`|A string used as the default description of a payment if none is available in cart.context.payment\_description.|No|-| | |
| *** | |
| ## Setup Stripe Webhooks | |
| For production applications, you must set up webhooks in Stripe that inform Medusa of changes and updates to payments. Refer to [Stripe's documentation](https://docs.stripe.com/webhooks#add-a-webhook-endpoint) on how to setup webhooks. | |
| ### Webhook URL | |
| Medusa has a `{server_url}/hooks/payment/{provider_id}` API route that you can use to register webhooks in Stripe, where: | |
| - `{server_url}` is the URL to your deployed Medusa application in server mode. | |
| - `{provider_id}` is the ID of the provider, such as `stripe_stripe` for basic payments. | |
| The Stripe Module Provider supports the following payment types, and the webhook endpoint URL is different for each: | |
| |Stripe Payment Type|Webhook Endpoint URL| | |
| |---|---|---| | |
| |Basic Stripe Payment|\`\{server\_url}/hooks/payment/stripe\_stripe\`| | |
| |Bancontact Payments|\`\{server\_url}/hooks/payment/stripe-bancontact\_stripe\`| | |
| |BLIK Payments|\`\{server\_url}/hooks/payment/stripe-blik\_stripe\`| | |
| |giropay Payments|\`\{server\_url}/hooks/payment/stripe-giropay\_stripe\`| | |
| |iDEAL Payments|\`\{server\_url}/hooks/payment/stripe-ideal\_stripe\`| | |
| |Przelewy24 Payments|\`\{server\_url}/hooks/payment/stripe-przelewy24\_stripe\`| | |
| |PromptPay Payments|\`\{server\_url}/hooks/payment/stripe-promptpay\_stripe\`| | |
| ### Webhook Events | |
| When you set up the webhook in Stripe, choose the following events to listen to: | |
| - `payment_intent.amount_capturable_updated` | |
| - `payment_intent.succeeded` | |
| - `payment_intent.payment_failed` | |
| *** | |
| ## Useful Guides | |
| - [Storefront guide: Add Stripe payment method during checkout](https://docs.medusajs.com/Users/shahednasser/medusa/www/apps/resources/app/storefront-development/checkout/payment/stripe/index.html.md). | |
| - [Integrate in Next.js Starter](https://docs.medusajs.com/Users/shahednasser/medusa/www/apps/resources/app/nextjs-starter#stripe-integration/index.html.md). | |
| - [Customize Stripe Integration in Next.js Starter](https://docs.medusajs.com/Users/shahednasser/medusa/www/apps/resources/app/nextjs-starter/guides/customize-stripe/index.html.md). | |
| # Get Product Variant Prices using Query | |
| In this document, you'll learn how to retrieve product variant prices in the Medusa application using [Query](https://docs.medusajs.com/docs/learn/fundamentals/module-links/query/index.html.md). | |
| The Product Module doesn't provide pricing functionalities. The Medusa application links the Product Module's `ProductVariant` data model to the Pricing Module's `PriceSet` data model. | |
| So, to retrieve data across the linked records of the two modules, you use Query. | |
| ## Retrieve All Product Variant Prices | |
| To retrieve all product variant prices, retrieve the product using Query and include among its fields `variants.prices.*`. | |
| For example: | |
| ```ts highlights={[["6"]]} | |
| const { data: products } = await query.graph({ | |
| entity: "product", | |
| fields: [ | |
| "*", | |
| "variants.*", | |
| "variants.prices.*", | |
| ], | |
| filters: { | |
| id: [ | |
| "prod_123", | |
| ], | |
| }, | |
| }) | |
| ``` | |
| Each variant in the retrieved products has a `prices` array property with all the product variant prices. Each price object has the properties of the [Pricing Module's Price data model](https://docs.medusajs.com/references/pricing/models/Price/index.html.md). | |
| *** | |
| ## Retrieve Calculated Price for a Context | |
| The Pricing Module can calculate prices of a variant based on a [context](https://docs.medusajs.com/Users/shahednasser/medusa/www/apps/resources/app/commerce-modules/pricing/price-calculation#calculation-context/index.html.md), such as the region ID or the currency code. | |
| Learn more about prices calculation in [this Pricing Module documentation](https://docs.medusajs.com/Users/shahednasser/medusa/www/apps/resources/app/commerce-modules/pricing/price-calculation/index.html.md). | |
| To retrieve calculated prices of variants based on a context, retrieve the products using Query and: | |
| - Pass `variants.calculated_price.*` in the `fields` property. | |
| - Pass a `context` property in the object parameter. Its value is an object of objects that sets the context for the retrieved fields. | |
| For example: | |
| ```ts highlights={[["10"], ["15"], ["16"], ["17"], ["18"], ["19"], ["20"], ["21"], ["22"]]} | |
| import { QueryContext } from "@medusajs/framework/utils" | |
| // ... | |
| const { data: products } = await query.graph({ | |
| entity: "product", | |
| fields: [ | |
| "*", | |
| "variants.*", | |
| "variants.calculated_price.*", | |
| ], | |
| filters: { | |
| id: "prod_123", | |
| }, | |
| context: { | |
| variants: { | |
| calculated_price: QueryContext({ | |
| region_id: "reg_01J3MRPDNXXXDSCC76Y6YCZARS", | |
| currency_code: "eur", | |
| }), | |
| }, | |
| }, | |
| }) | |
| ``` | |
| For the context of the product variant's calculated price, you pass an object to `context` with the property `variants`, whose value is another object with the property `calculated_price`. | |
| `calculated_price`'s value is created using `QueryContext` from the Modules SDK, passing it a [calculation context object](https://docs.medusajs.com/Users/shahednasser/medusa/www/apps/resources/app/commerce-modules/pricing/price-calculation#calculation-context/index.html.md). | |
| Each variant in the retrieved products has a `calculated_price` object. Learn more about its properties in [this Pricing Module guide](https://docs.medusajs.com/Users/shahednasser/medusa/www/apps/resources/app/commerce-modules/pricing/price-calculation#returned-price-object/index.html.md). | |
| # Calculate Product Variant Price with Taxes | |
| In this document, you'll learn how to calculate a product variant's price with taxes. | |
| ## Step 0: Resolve Resources | |
| You'll need the following resources for the taxes calculation: | |
| 1. [Query](https://docs.medusajs.com/docs/learn/fundamentals/module-links/query/index.html.md) to retrieve the product's variants' prices for a context. Learn more about that in [this guide](https://docs.medusajs.com/Users/shahednasser/medusa/www/apps/resources/app/commerce-modules/product/guides/price/index.html.md). | |
| 2. The Tax Module's main service to get the tax lines for each product. | |
| ```ts | |
| // other imports... | |
| import { | |
| Modules, | |
| ContainerRegistrationKeys, | |
| } from "@medusajs/framework/utils" | |
| // In an API route, workflow step, etc... | |
| const query = container.resolve(ContainerRegistrationKeys.QUERY) | |
| const taxModuleService = container.resolve( | |
| Modules.TAX | |
| ) | |
| ``` | |
| *** | |
| ## Step 1: Retrieve Prices for a Context | |
| After resolving the resources, use Query to retrieve the products with the variants' prices for a context: | |
| Learn more about retrieving product variants' prices for a context in [this guide](https://docs.medusajs.com/Users/shahednasser/medusa/www/apps/resources/app/commerce-modules/product/guides/price/index.html.md). | |
| ```ts | |
| import { QueryContext } from "@medusajs/framework/utils" | |
| // ... | |
| const { data: products } = await query.graph({ | |
| entity: "product", | |
| fields: [ | |
| "*", | |
| "variants.*", | |
| "variants.calculated_price.*", | |
| ], | |
| filters: { | |
| id: "prod_123", | |
| }, | |
| context: { | |
| variants: { | |
| calculated_price: QueryContext({ | |
| region_id: "region_123", | |
| currency_code: "usd", | |
| }), | |
| }, | |
| }, | |
| }) | |
| ``` | |
| *** | |
| ## Step 2: Get Tax Lines for Products | |
| To retrieve the tax line of each product, first, add the following utility method: | |
| ```ts | |
| // other imports... | |
| import { | |
| HttpTypes, | |
| TaxableItemDTO, | |
| } from "@medusajs/framework/types" | |
| // ... | |
| const asTaxItem = (product: HttpTypes.StoreProduct): TaxableItemDTO[] => { | |
| return product.variants | |
| ?.map((variant) => { | |
| if (!variant.calculated_price) { | |
| return | |
| } | |
| return { | |
| id: variant.id, | |
| product_id: product.id, | |
| product_name: product.title, | |
| product_categories: product.categories?.map((c) => c.name), | |
| product_category_id: product.categories?.[0]?.id, | |
| product_sku: variant.sku, | |
| product_type: product.type, | |
| product_type_id: product.type_id, | |
| quantity: 1, | |
| unit_price: variant.calculated_price.calculated_amount, | |
| currency_code: variant.calculated_price.currency_code, | |
| } | |
| }) | |
| .filter((v) => !!v) as unknown as TaxableItemDTO[] | |
| } | |
| ``` | |
| This formats the products as items to calculate tax lines for. | |
| Then, use it when retrieving the tax lines of the products retrieved earlier: | |
| ```ts | |
| // other imports... | |
| import { | |
| ItemTaxLineDTO, | |
| } from "@medusajs/framework/types" | |
| // ... | |
| const taxLines = (await taxModuleService.getTaxLines( | |
| products.map(asTaxItem).flat(), | |
| { | |
| // example of context properties. You can pass other ones. | |
| address: { | |
| country_code, | |
| }, | |
| } | |
| )) as unknown as ItemTaxLineDTO[] | |
| ``` | |
| You use the Tax Module's main service's [getTaxLines method](https://docs.medusajs.com/references/tax/getTaxLines/index.html.md) to retrieve the tax line. | |
| For the first parameter, you use the `asTaxItem` function to format the products as expected by the `getTaxLines` method. | |
| For the second parameter, you pass the current context. You can pass other details such as the customer's ID. | |
| Learn about the other context properties to pass in [the getTaxLines method's reference](https://docs.medusajs.com/references/tax/getTaxLines/index.html.md). | |
| *** | |
| ## Step 3: Calculate Price with Tax for Variant | |
| To calculate the price with and without taxes for a variant, first, group the tax lines retrieved in the previous step by variant IDs: | |
| ```ts highlights={taxLineHighlights} | |
| const taxLinesMap = new Map<string, ItemTaxLineDTO[]>() | |
| taxLines.forEach((taxLine) => { | |
| const variantId = taxLine.line_item_id | |
| if (!taxLinesMap.has(variantId)) { | |
| taxLinesMap.set(variantId, []) | |
| } | |
| taxLinesMap.get(variantId)?.push(taxLine) | |
| }) | |
| ``` | |
| Notice that the variant's ID is stored in the `line_item_id` property of a tax line since tax lines are used for line items in a cart. | |
| Then, loop over the products and their variants to retrieve the prices with and without taxes: | |
| ```ts highlights={calculateTaxHighlights} | |
| // other imports... | |
| import { | |
| calculateAmountsWithTax, | |
| } from "@medusajs/framework/utils" | |
| // ... | |
| products.forEach((product) => { | |
| product.variants?.forEach((variant) => { | |
| if (!variant.calculated_price) { | |
| return | |
| } | |
| const taxLinesForVariant = taxLinesMap.get(variant.id) || [] | |
| const { priceWithTax, priceWithoutTax } = calculateAmountsWithTax({ | |
| taxLines: taxLinesForVariant, | |
| amount: variant.calculated_price!.calculated_amount!, | |
| includesTax: | |
| variant.calculated_price!.is_calculated_price_tax_inclusive!, | |
| }) | |
| // do something with prices... | |
| }) | |
| }) | |
| ``` | |
| For each product variant, you: | |
| 1. Retrieve its tax lines from the `taxLinesMap`. | |
| 2. Calculate its prices with and without taxes using the `calculateAmountsWithTax` from the Medusa Framework. | |
| 3. The `calculateAmountsWithTax` function returns an object having two properties: | |
| - `priceWithTax`: The variant's price with the taxes applied. | |
| - `priceWithoutTax`: The variant's price without taxes applied. | |
| ## Workflows | |
| - [createApiKeysWorkflow](https://docs.medusajs.com/references/medusa-workflows/createApiKeysWorkflow/index.html.md) | |
| - [linkSalesChannelsToApiKeyWorkflow](https://docs.medusajs.com/references/medusa-workflows/linkSalesChannelsToApiKeyWorkflow/index.html.md) | |
| - [revokeApiKeysWorkflow](https://docs.medusajs.com/references/medusa-workflows/revokeApiKeysWorkflow/index.html.md) | |
| - [updateApiKeysWorkflow](https://docs.medusajs.com/references/medusa-workflows/updateApiKeysWorkflow/index.html.md) | |
| - [deleteApiKeysWorkflow](https://docs.medusajs.com/references/medusa-workflows/deleteApiKeysWorkflow/index.html.md) | |
| - [generateResetPasswordTokenWorkflow](https://docs.medusajs.com/references/medusa-workflows/generateResetPasswordTokenWorkflow/index.html.md) | |
| - [addShippingMethodToCartWorkflow](https://docs.medusajs.com/references/medusa-workflows/addShippingMethodToCartWorkflow/index.html.md) | |
| - [addToCartWorkflow](https://docs.medusajs.com/references/medusa-workflows/addToCartWorkflow/index.html.md) | |
| - [completeCartWorkflow](https://docs.medusajs.com/references/medusa-workflows/completeCartWorkflow/index.html.md) | |
| - [confirmVariantInventoryWorkflow](https://docs.medusajs.com/references/medusa-workflows/confirmVariantInventoryWorkflow/index.html.md) | |
| - [createPaymentCollectionForCartWorkflow](https://docs.medusajs.com/references/medusa-workflows/createPaymentCollectionForCartWorkflow/index.html.md) | |
| - [listShippingOptionsForCartWithPricingWorkflow](https://docs.medusajs.com/references/medusa-workflows/listShippingOptionsForCartWithPricingWorkflow/index.html.md) | |
| - [createCartWorkflow](https://docs.medusajs.com/references/medusa-workflows/createCartWorkflow/index.html.md) | |
| - [refreshCartShippingMethodsWorkflow](https://docs.medusajs.com/references/medusa-workflows/refreshCartShippingMethodsWorkflow/index.html.md) | |
| - [listShippingOptionsForCartWorkflow](https://docs.medusajs.com/references/medusa-workflows/listShippingOptionsForCartWorkflow/index.html.md) | |
| - [refreshCartItemsWorkflow](https://docs.medusajs.com/references/medusa-workflows/refreshCartItemsWorkflow/index.html.md) | |
| - [refreshPaymentCollectionForCartWorkflow](https://docs.medusajs.com/references/medusa-workflows/refreshPaymentCollectionForCartWorkflow/index.html.md) | |
| - [transferCartCustomerWorkflow](https://docs.medusajs.com/references/medusa-workflows/transferCartCustomerWorkflow/index.html.md) | |
| - [updateLineItemInCartWorkflow](https://docs.medusajs.com/references/medusa-workflows/updateLineItemInCartWorkflow/index.html.md) | |
| - [updateCartPromotionsWorkflow](https://docs.medusajs.com/references/medusa-workflows/updateCartPromotionsWorkflow/index.html.md) | |
| - [updateCartWorkflow](https://docs.medusajs.com/references/medusa-workflows/updateCartWorkflow/index.html.md) | |
| - [updateTaxLinesWorkflow](https://docs.medusajs.com/references/medusa-workflows/updateTaxLinesWorkflow/index.html.md) | |
| - [validateExistingPaymentCollectionStep](https://docs.medusajs.com/references/medusa-workflows/validateExistingPaymentCollectionStep/index.html.md) | |
| - [batchLinksWorkflow](https://docs.medusajs.com/references/medusa-workflows/batchLinksWorkflow/index.html.md) | |
| - [createLinksWorkflow](https://docs.medusajs.com/references/medusa-workflows/createLinksWorkflow/index.html.md) | |
| - [updateLinksWorkflow](https://docs.medusajs.com/references/medusa-workflows/updateLinksWorkflow/index.html.md) | |
| - [dismissLinksWorkflow](https://docs.medusajs.com/references/medusa-workflows/dismissLinksWorkflow/index.html.md) | |
| - [createCustomerAccountWorkflow](https://docs.medusajs.com/references/medusa-workflows/createCustomerAccountWorkflow/index.html.md) | |
| - [createCustomerAddressesWorkflow](https://docs.medusajs.com/references/medusa-workflows/createCustomerAddressesWorkflow/index.html.md) | |
| - [createCustomersWorkflow](https://docs.medusajs.com/references/medusa-workflows/createCustomersWorkflow/index.html.md) | |
| - [deleteCustomersWorkflow](https://docs.medusajs.com/references/medusa-workflows/deleteCustomersWorkflow/index.html.md) | |
| - [deleteCustomerAddressesWorkflow](https://docs.medusajs.com/references/medusa-workflows/deleteCustomerAddressesWorkflow/index.html.md) | |
| - [removeCustomerAccountWorkflow](https://docs.medusajs.com/references/medusa-workflows/removeCustomerAccountWorkflow/index.html.md) | |
| - [updateCustomerAddressesWorkflow](https://docs.medusajs.com/references/medusa-workflows/updateCustomerAddressesWorkflow/index.html.md) | |
| - [updateCustomersWorkflow](https://docs.medusajs.com/references/medusa-workflows/updateCustomersWorkflow/index.html.md) | |
| - [createDefaultsWorkflow](https://docs.medusajs.com/references/medusa-workflows/createDefaultsWorkflow/index.html.md) | |
| - [batchInventoryItemLevelsWorkflow](https://docs.medusajs.com/references/medusa-workflows/batchInventoryItemLevelsWorkflow/index.html.md) | |
| - [createInventoryItemsWorkflow](https://docs.medusajs.com/references/medusa-workflows/createInventoryItemsWorkflow/index.html.md) | |
| - [bulkCreateDeleteLevelsWorkflow](https://docs.medusajs.com/references/medusa-workflows/bulkCreateDeleteLevelsWorkflow/index.html.md) | |
| - [createInventoryLevelsWorkflow](https://docs.medusajs.com/references/medusa-workflows/createInventoryLevelsWorkflow/index.html.md) | |
| - [deleteInventoryItemWorkflow](https://docs.medusajs.com/references/medusa-workflows/deleteInventoryItemWorkflow/index.html.md) | |
| - [deleteInventoryLevelsWorkflow](https://docs.medusajs.com/references/medusa-workflows/deleteInventoryLevelsWorkflow/index.html.md) | |
| - [updateInventoryItemsWorkflow](https://docs.medusajs.com/references/medusa-workflows/updateInventoryItemsWorkflow/index.html.md) | |
| - [updateInventoryLevelsWorkflow](https://docs.medusajs.com/references/medusa-workflows/updateInventoryLevelsWorkflow/index.html.md) | |
| - [validateInventoryLevelsDelete](https://docs.medusajs.com/references/medusa-workflows/validateInventoryLevelsDelete/index.html.md) | |
| - [deleteCustomerGroupsWorkflow](https://docs.medusajs.com/references/medusa-workflows/deleteCustomerGroupsWorkflow/index.html.md) | |
| - [createCustomerGroupsWorkflow](https://docs.medusajs.com/references/medusa-workflows/createCustomerGroupsWorkflow/index.html.md) | |
| - [linkCustomerGroupsToCustomerWorkflow](https://docs.medusajs.com/references/medusa-workflows/linkCustomerGroupsToCustomerWorkflow/index.html.md) | |
| - [linkCustomersToCustomerGroupWorkflow](https://docs.medusajs.com/references/medusa-workflows/linkCustomersToCustomerGroupWorkflow/index.html.md) | |
| - [updateCustomerGroupsWorkflow](https://docs.medusajs.com/references/medusa-workflows/updateCustomerGroupsWorkflow/index.html.md) | |
| - [deleteFilesWorkflow](https://docs.medusajs.com/references/medusa-workflows/deleteFilesWorkflow/index.html.md) | |
| - [uploadFilesWorkflow](https://docs.medusajs.com/references/medusa-workflows/uploadFilesWorkflow/index.html.md) | |
| - [deleteLineItemsWorkflow](https://docs.medusajs.com/references/medusa-workflows/deleteLineItemsWorkflow/index.html.md) | |
| - [createPaymentSessionsWorkflow](https://docs.medusajs.com/references/medusa-workflows/createPaymentSessionsWorkflow/index.html.md) | |
| - [createRefundReasonsWorkflow](https://docs.medusajs.com/references/medusa-workflows/createRefundReasonsWorkflow/index.html.md) | |
| - [deletePaymentSessionsWorkflow](https://docs.medusajs.com/references/medusa-workflows/deletePaymentSessionsWorkflow/index.html.md) | |
| - [updateRefundReasonsWorkflow](https://docs.medusajs.com/references/medusa-workflows/updateRefundReasonsWorkflow/index.html.md) | |
| - [deleteRefundReasonsWorkflow](https://docs.medusajs.com/references/medusa-workflows/deleteRefundReasonsWorkflow/index.html.md) | |
| - [acceptOrderTransferValidationStep](https://docs.medusajs.com/references/medusa-workflows/acceptOrderTransferValidationStep/index.html.md) | |
| - [addOrderLineItemsWorkflow](https://docs.medusajs.com/references/medusa-workflows/addOrderLineItemsWorkflow/index.html.md) | |
| - [archiveOrderWorkflow](https://docs.medusajs.com/references/medusa-workflows/archiveOrderWorkflow/index.html.md) | |
| - [acceptOrderTransferWorkflow](https://docs.medusajs.com/references/medusa-workflows/acceptOrderTransferWorkflow/index.html.md) | |
| - [beginClaimOrderValidationStep](https://docs.medusajs.com/references/medusa-workflows/beginClaimOrderValidationStep/index.html.md) | |
| - [beginClaimOrderWorkflow](https://docs.medusajs.com/references/medusa-workflows/beginClaimOrderWorkflow/index.html.md) | |
| - [beginExchangeOrderWorkflow](https://docs.medusajs.com/references/medusa-workflows/beginExchangeOrderWorkflow/index.html.md) | |
| - [beginOrderEditOrderWorkflow](https://docs.medusajs.com/references/medusa-workflows/beginOrderEditOrderWorkflow/index.html.md) | |
| - [beginOrderEditValidationStep](https://docs.medusajs.com/references/medusa-workflows/beginOrderEditValidationStep/index.html.md) | |
| - [beginReceiveReturnValidationStep](https://docs.medusajs.com/references/medusa-workflows/beginReceiveReturnValidationStep/index.html.md) | |
| - [beginReceiveReturnWorkflow](https://docs.medusajs.com/references/medusa-workflows/beginReceiveReturnWorkflow/index.html.md) | |
| - [beginOrderExchangeValidationStep](https://docs.medusajs.com/references/medusa-workflows/beginOrderExchangeValidationStep/index.html.md) | |
| - [beginReturnOrderValidationStep](https://docs.medusajs.com/references/medusa-workflows/beginReturnOrderValidationStep/index.html.md) | |
| - [beginReturnOrderWorkflow](https://docs.medusajs.com/references/medusa-workflows/beginReturnOrderWorkflow/index.html.md) | |
| - [cancelBeginOrderClaimWorkflow](https://docs.medusajs.com/references/medusa-workflows/cancelBeginOrderClaimWorkflow/index.html.md) | |
| - [cancelBeginOrderClaimValidationStep](https://docs.medusajs.com/references/medusa-workflows/cancelBeginOrderClaimValidationStep/index.html.md) | |
| - [cancelBeginOrderEditValidationStep](https://docs.medusajs.com/references/medusa-workflows/cancelBeginOrderEditValidationStep/index.html.md) | |
| - [cancelBeginOrderExchangeValidationStep](https://docs.medusajs.com/references/medusa-workflows/cancelBeginOrderExchangeValidationStep/index.html.md) | |
| - [cancelBeginOrderExchangeWorkflow](https://docs.medusajs.com/references/medusa-workflows/cancelBeginOrderExchangeWorkflow/index.html.md) | |
| - [cancelClaimValidateOrderStep](https://docs.medusajs.com/references/medusa-workflows/cancelClaimValidateOrderStep/index.html.md) | |
| - [cancelBeginOrderEditWorkflow](https://docs.medusajs.com/references/medusa-workflows/cancelBeginOrderEditWorkflow/index.html.md) | |
| - [cancelExchangeValidateOrder](https://docs.medusajs.com/references/medusa-workflows/cancelExchangeValidateOrder/index.html.md) | |
| - [cancelOrderChangeWorkflow](https://docs.medusajs.com/references/medusa-workflows/cancelOrderChangeWorkflow/index.html.md) | |
| - [cancelOrderExchangeWorkflow](https://docs.medusajs.com/references/medusa-workflows/cancelOrderExchangeWorkflow/index.html.md) | |
| - [cancelOrderFulfillmentValidateOrder](https://docs.medusajs.com/references/medusa-workflows/cancelOrderFulfillmentValidateOrder/index.html.md) | |
| - [cancelOrderFulfillmentWorkflow](https://docs.medusajs.com/references/medusa-workflows/cancelOrderFulfillmentWorkflow/index.html.md) | |
| - [cancelOrderClaimWorkflow](https://docs.medusajs.com/references/medusa-workflows/cancelOrderClaimWorkflow/index.html.md) | |
| - [cancelOrderTransferRequestWorkflow](https://docs.medusajs.com/references/medusa-workflows/cancelOrderTransferRequestWorkflow/index.html.md) | |
| - [cancelOrderWorkflow](https://docs.medusajs.com/references/medusa-workflows/cancelOrderWorkflow/index.html.md) | |
| - [cancelReceiveReturnValidationStep](https://docs.medusajs.com/references/medusa-workflows/cancelReceiveReturnValidationStep/index.html.md) | |
| - [cancelRequestReturnValidationStep](https://docs.medusajs.com/references/medusa-workflows/cancelRequestReturnValidationStep/index.html.md) | |
| - [cancelReturnRequestWorkflow](https://docs.medusajs.com/references/medusa-workflows/cancelReturnRequestWorkflow/index.html.md) | |
| - [cancelReturnReceiveWorkflow](https://docs.medusajs.com/references/medusa-workflows/cancelReturnReceiveWorkflow/index.html.md) | |
| - [cancelReturnValidateOrder](https://docs.medusajs.com/references/medusa-workflows/cancelReturnValidateOrder/index.html.md) | |
| - [cancelReturnWorkflow](https://docs.medusajs.com/references/medusa-workflows/cancelReturnWorkflow/index.html.md) | |
| - [cancelTransferOrderRequestValidationStep](https://docs.medusajs.com/references/medusa-workflows/cancelTransferOrderRequestValidationStep/index.html.md) | |
| - [confirmClaimRequestValidationStep](https://docs.medusajs.com/references/medusa-workflows/confirmClaimRequestValidationStep/index.html.md) | |
| - [completeOrderWorkflow](https://docs.medusajs.com/references/medusa-workflows/completeOrderWorkflow/index.html.md) | |
| - [cancelValidateOrder](https://docs.medusajs.com/references/medusa-workflows/cancelValidateOrder/index.html.md) | |
| - [confirmClaimRequestWorkflow](https://docs.medusajs.com/references/medusa-workflows/confirmClaimRequestWorkflow/index.html.md) | |
| - [confirmExchangeRequestWorkflow](https://docs.medusajs.com/references/medusa-workflows/confirmExchangeRequestWorkflow/index.html.md) | |
| - [confirmOrderEditRequestValidationStep](https://docs.medusajs.com/references/medusa-workflows/confirmOrderEditRequestValidationStep/index.html.md) | |
| - [confirmExchangeRequestValidationStep](https://docs.medusajs.com/references/medusa-workflows/confirmExchangeRequestValidationStep/index.html.md) | |
| - [confirmOrderEditRequestWorkflow](https://docs.medusajs.com/references/medusa-workflows/confirmOrderEditRequestWorkflow/index.html.md) | |
| - [confirmReceiveReturnValidationStep](https://docs.medusajs.com/references/medusa-workflows/confirmReceiveReturnValidationStep/index.html.md) | |
| - [confirmReturnReceiveWorkflow](https://docs.medusajs.com/references/medusa-workflows/confirmReturnReceiveWorkflow/index.html.md) | |
| - [confirmReturnRequestValidationStep](https://docs.medusajs.com/references/medusa-workflows/confirmReturnRequestValidationStep/index.html.md) | |
| - [confirmReturnRequestWorkflow](https://docs.medusajs.com/references/medusa-workflows/confirmReturnRequestWorkflow/index.html.md) | |
| - [createAndCompleteReturnOrderWorkflow](https://docs.medusajs.com/references/medusa-workflows/createAndCompleteReturnOrderWorkflow/index.html.md) | |
| - [createClaimShippingMethodValidationStep](https://docs.medusajs.com/references/medusa-workflows/createClaimShippingMethodValidationStep/index.html.md) | |
| - [createClaimShippingMethodWorkflow](https://docs.medusajs.com/references/medusa-workflows/createClaimShippingMethodWorkflow/index.html.md) | |
| - [createCompleteReturnValidationStep](https://docs.medusajs.com/references/medusa-workflows/createCompleteReturnValidationStep/index.html.md) | |
| - [createFulfillmentValidateOrder](https://docs.medusajs.com/references/medusa-workflows/createFulfillmentValidateOrder/index.html.md) | |
| - [createExchangeShippingMethodValidationStep](https://docs.medusajs.com/references/medusa-workflows/createExchangeShippingMethodValidationStep/index.html.md) | |
| - [createExchangeShippingMethodWorkflow](https://docs.medusajs.com/references/medusa-workflows/createExchangeShippingMethodWorkflow/index.html.md) | |
| - [createOrUpdateOrderPaymentCollectionWorkflow](https://docs.medusajs.com/references/medusa-workflows/createOrUpdateOrderPaymentCollectionWorkflow/index.html.md) | |
| - [createOrderChangeActionsWorkflow](https://docs.medusajs.com/references/medusa-workflows/createOrderChangeActionsWorkflow/index.html.md) | |
| - [createOrderChangeWorkflow](https://docs.medusajs.com/references/medusa-workflows/createOrderChangeWorkflow/index.html.md) | |
| - [createOrderEditShippingMethodValidationStep](https://docs.medusajs.com/references/medusa-workflows/createOrderEditShippingMethodValidationStep/index.html.md) | |
| - [createOrderEditShippingMethodWorkflow](https://docs.medusajs.com/references/medusa-workflows/createOrderEditShippingMethodWorkflow/index.html.md) | |
| - [createOrderFulfillmentWorkflow](https://docs.medusajs.com/references/medusa-workflows/createOrderFulfillmentWorkflow/index.html.md) | |
| - [createOrderPaymentCollectionWorkflow](https://docs.medusajs.com/references/medusa-workflows/createOrderPaymentCollectionWorkflow/index.html.md) | |
| - [createOrderShipmentWorkflow](https://docs.medusajs.com/references/medusa-workflows/createOrderShipmentWorkflow/index.html.md) | |
| - [createOrderWorkflow](https://docs.medusajs.com/references/medusa-workflows/createOrderWorkflow/index.html.md) | |
| - [createReturnShippingMethodWorkflow](https://docs.medusajs.com/references/medusa-workflows/createReturnShippingMethodWorkflow/index.html.md) | |
| - [createReturnShippingMethodValidationStep](https://docs.medusajs.com/references/medusa-workflows/createReturnShippingMethodValidationStep/index.html.md) | |
| - [createOrdersWorkflow](https://docs.medusajs.com/references/medusa-workflows/createOrdersWorkflow/index.html.md) | |
| - [createShipmentValidateOrder](https://docs.medusajs.com/references/medusa-workflows/createShipmentValidateOrder/index.html.md) | |
| - [declineOrderTransferRequestWorkflow](https://docs.medusajs.com/references/medusa-workflows/declineOrderTransferRequestWorkflow/index.html.md) | |
| - [declineOrderChangeWorkflow](https://docs.medusajs.com/references/medusa-workflows/declineOrderChangeWorkflow/index.html.md) | |
| - [declineTransferOrderRequestValidationStep](https://docs.medusajs.com/references/medusa-workflows/declineTransferOrderRequestValidationStep/index.html.md) | |
| - [deleteOrderChangeActionsWorkflow](https://docs.medusajs.com/references/medusa-workflows/deleteOrderChangeActionsWorkflow/index.html.md) | |
| - [deleteOrderChangeWorkflow](https://docs.medusajs.com/references/medusa-workflows/deleteOrderChangeWorkflow/index.html.md) | |
| - [deleteOrderPaymentCollections](https://docs.medusajs.com/references/medusa-workflows/deleteOrderPaymentCollections/index.html.md) | |
| - [dismissItemReturnRequestValidationStep](https://docs.medusajs.com/references/medusa-workflows/dismissItemReturnRequestValidationStep/index.html.md) | |
| - [dismissItemReturnRequestWorkflow](https://docs.medusajs.com/references/medusa-workflows/dismissItemReturnRequestWorkflow/index.html.md) | |
| - [exchangeAddNewItemValidationStep](https://docs.medusajs.com/references/medusa-workflows/exchangeAddNewItemValidationStep/index.html.md) | |
| - [getOrderDetailWorkflow](https://docs.medusajs.com/references/medusa-workflows/getOrderDetailWorkflow/index.html.md) | |
| - [exchangeRequestItemReturnValidationStep](https://docs.medusajs.com/references/medusa-workflows/exchangeRequestItemReturnValidationStep/index.html.md) | |
| - [getOrdersListWorkflow](https://docs.medusajs.com/references/medusa-workflows/getOrdersListWorkflow/index.html.md) | |
| - [orderClaimAddNewItemValidationStep](https://docs.medusajs.com/references/medusa-workflows/orderClaimAddNewItemValidationStep/index.html.md) | |
| - [markPaymentCollectionAsPaid](https://docs.medusajs.com/references/medusa-workflows/markPaymentCollectionAsPaid/index.html.md) | |
| - [markOrderFulfillmentAsDeliveredWorkflow](https://docs.medusajs.com/references/medusa-workflows/markOrderFulfillmentAsDeliveredWorkflow/index.html.md) | |
| - [orderClaimAddNewItemWorkflow](https://docs.medusajs.com/references/medusa-workflows/orderClaimAddNewItemWorkflow/index.html.md) | |
| - [orderClaimItemValidationStep](https://docs.medusajs.com/references/medusa-workflows/orderClaimItemValidationStep/index.html.md) | |
| - [orderClaimItemWorkflow](https://docs.medusajs.com/references/medusa-workflows/orderClaimItemWorkflow/index.html.md) | |
| - [orderClaimRequestItemReturnValidationStep](https://docs.medusajs.com/references/medusa-workflows/orderClaimRequestItemReturnValidationStep/index.html.md) | |
| - [orderClaimRequestItemReturnWorkflow](https://docs.medusajs.com/references/medusa-workflows/orderClaimRequestItemReturnWorkflow/index.html.md) | |
| - [orderEditAddNewItemWorkflow](https://docs.medusajs.com/references/medusa-workflows/orderEditAddNewItemWorkflow/index.html.md) | |
| - [orderEditAddNewItemValidationStep](https://docs.medusajs.com/references/medusa-workflows/orderEditAddNewItemValidationStep/index.html.md) | |
| - [orderEditUpdateItemQuantityValidationStep](https://docs.medusajs.com/references/medusa-workflows/orderEditUpdateItemQuantityValidationStep/index.html.md) | |
| - [orderEditUpdateItemQuantityWorkflow](https://docs.medusajs.com/references/medusa-workflows/orderEditUpdateItemQuantityWorkflow/index.html.md) | |
| - [orderExchangeRequestItemReturnWorkflow](https://docs.medusajs.com/references/medusa-workflows/orderExchangeRequestItemReturnWorkflow/index.html.md) | |
| - [orderExchangeAddNewItemWorkflow](https://docs.medusajs.com/references/medusa-workflows/orderExchangeAddNewItemWorkflow/index.html.md) | |
| - [orderFulfillmentDeliverablilityValidationStep](https://docs.medusajs.com/references/medusa-workflows/orderFulfillmentDeliverablilityValidationStep/index.html.md) | |
| - [receiveAndCompleteReturnOrderWorkflow](https://docs.medusajs.com/references/medusa-workflows/receiveAndCompleteReturnOrderWorkflow/index.html.md) | |
| - [receiveCompleteReturnValidationStep](https://docs.medusajs.com/references/medusa-workflows/receiveCompleteReturnValidationStep/index.html.md) | |
| - [receiveItemReturnRequestWorkflow](https://docs.medusajs.com/references/medusa-workflows/receiveItemReturnRequestWorkflow/index.html.md) | |
| - [receiveItemReturnRequestValidationStep](https://docs.medusajs.com/references/medusa-workflows/receiveItemReturnRequestValidationStep/index.html.md) | |
| - [removeAddItemClaimActionWorkflow](https://docs.medusajs.com/references/medusa-workflows/removeAddItemClaimActionWorkflow/index.html.md) | |
| - [removeClaimItemActionValidationStep](https://docs.medusajs.com/references/medusa-workflows/removeClaimItemActionValidationStep/index.html.md) | |
| - [removeClaimShippingMethodValidationStep](https://docs.medusajs.com/references/medusa-workflows/removeClaimShippingMethodValidationStep/index.html.md) | |
| - [removeClaimAddItemActionValidationStep](https://docs.medusajs.com/references/medusa-workflows/removeClaimAddItemActionValidationStep/index.html.md) | |
| - [removeClaimShippingMethodWorkflow](https://docs.medusajs.com/references/medusa-workflows/removeClaimShippingMethodWorkflow/index.html.md) | |
| - [removeExchangeItemActionValidationStep](https://docs.medusajs.com/references/medusa-workflows/removeExchangeItemActionValidationStep/index.html.md) | |
| - [removeExchangeShippingMethodWorkflow](https://docs.medusajs.com/references/medusa-workflows/removeExchangeShippingMethodWorkflow/index.html.md) | |
| - [removeExchangeShippingMethodValidationStep](https://docs.medusajs.com/references/medusa-workflows/removeExchangeShippingMethodValidationStep/index.html.md) | |
| - [removeItemClaimActionWorkflow](https://docs.medusajs.com/references/medusa-workflows/removeItemClaimActionWorkflow/index.html.md) | |
| - [removeItemExchangeActionWorkflow](https://docs.medusajs.com/references/medusa-workflows/removeItemExchangeActionWorkflow/index.html.md) | |
| - [removeItemOrderEditActionWorkflow](https://docs.medusajs.com/references/medusa-workflows/removeItemOrderEditActionWorkflow/index.html.md) | |
| - [removeItemReceiveReturnActionValidationStep](https://docs.medusajs.com/references/medusa-workflows/removeItemReceiveReturnActionValidationStep/index.html.md) | |
| - [removeItemReceiveReturnActionWorkflow](https://docs.medusajs.com/references/medusa-workflows/removeItemReceiveReturnActionWorkflow/index.html.md) | |
| - [removeOrderEditShippingMethodValidationStep](https://docs.medusajs.com/references/medusa-workflows/removeOrderEditShippingMethodValidationStep/index.html.md) | |
| - [removeItemReturnActionWorkflow](https://docs.medusajs.com/references/medusa-workflows/removeItemReturnActionWorkflow/index.html.md) | |
| - [removeOrderEditItemActionValidationStep](https://docs.medusajs.com/references/medusa-workflows/removeOrderEditItemActionValidationStep/index.html.md) | |
| - [removeOrderEditShippingMethodWorkflow](https://docs.medusajs.com/references/medusa-workflows/removeOrderEditShippingMethodWorkflow/index.html.md) | |
| - [removeReturnItemActionValidationStep](https://docs.medusajs.com/references/medusa-workflows/removeReturnItemActionValidationStep/index.html.md) | |
| - [removeReturnShippingMethodValidationStep](https://docs.medusajs.com/references/medusa-workflows/removeReturnShippingMethodValidationStep/index.html.md) | |
| - [removeReturnShippingMethodWorkflow](https://docs.medusajs.com/references/medusa-workflows/removeReturnShippingMethodWorkflow/index.html.md) | |
| - [requestItemReturnValidationStep](https://docs.medusajs.com/references/medusa-workflows/requestItemReturnValidationStep/index.html.md) | |
| - [requestItemReturnWorkflow](https://docs.medusajs.com/references/medusa-workflows/requestItemReturnWorkflow/index.html.md) | |
| - [requestOrderEditRequestValidationStep](https://docs.medusajs.com/references/medusa-workflows/requestOrderEditRequestValidationStep/index.html.md) | |
| - [requestOrderEditRequestWorkflow](https://docs.medusajs.com/references/medusa-workflows/requestOrderEditRequestWorkflow/index.html.md) | |
| - [requestOrderTransferValidationStep](https://docs.medusajs.com/references/medusa-workflows/requestOrderTransferValidationStep/index.html.md) | |
| - [requestOrderTransferWorkflow](https://docs.medusajs.com/references/medusa-workflows/requestOrderTransferWorkflow/index.html.md) | |
| - [updateClaimAddItemValidationStep](https://docs.medusajs.com/references/medusa-workflows/updateClaimAddItemValidationStep/index.html.md) | |
| - [throwUnlessStatusIsNotPaid](https://docs.medusajs.com/references/medusa-workflows/throwUnlessStatusIsNotPaid/index.html.md) | |
| - [throwUnlessPaymentCollectionNotPaid](https://docs.medusajs.com/references/medusa-workflows/throwUnlessPaymentCollectionNotPaid/index.html.md) | |
| - [updateClaimAddItemWorkflow](https://docs.medusajs.com/references/medusa-workflows/updateClaimAddItemWorkflow/index.html.md) | |
| - [updateClaimItemValidationStep](https://docs.medusajs.com/references/medusa-workflows/updateClaimItemValidationStep/index.html.md) | |
| - [updateClaimShippingMethodWorkflow](https://docs.medusajs.com/references/medusa-workflows/updateClaimShippingMethodWorkflow/index.html.md) | |
| - [updateClaimItemWorkflow](https://docs.medusajs.com/references/medusa-workflows/updateClaimItemWorkflow/index.html.md) | |
| - [updateClaimShippingMethodValidationStep](https://docs.medusajs.com/references/medusa-workflows/updateClaimShippingMethodValidationStep/index.html.md) | |
| - [updateExchangeAddItemValidationStep](https://docs.medusajs.com/references/medusa-workflows/updateExchangeAddItemValidationStep/index.html.md) | |
| - [updateExchangeShippingMethodValidationStep](https://docs.medusajs.com/references/medusa-workflows/updateExchangeShippingMethodValidationStep/index.html.md) | |
| - [updateExchangeAddItemWorkflow](https://docs.medusajs.com/references/medusa-workflows/updateExchangeAddItemWorkflow/index.html.md) | |
| - [updateExchangeShippingMethodWorkflow](https://docs.medusajs.com/references/medusa-workflows/updateExchangeShippingMethodWorkflow/index.html.md) | |
| - [updateOrderChangeActionsWorkflow](https://docs.medusajs.com/references/medusa-workflows/updateOrderChangeActionsWorkflow/index.html.md) | |
| - [updateOrderChangesWorkflow](https://docs.medusajs.com/references/medusa-workflows/updateOrderChangesWorkflow/index.html.md) | |
| - [updateOrderEditAddItemValidationStep](https://docs.medusajs.com/references/medusa-workflows/updateOrderEditAddItemValidationStep/index.html.md) | |
| - [updateOrderEditAddItemWorkflow](https://docs.medusajs.com/references/medusa-workflows/updateOrderEditAddItemWorkflow/index.html.md) | |
| - [updateOrderEditItemQuantityValidationStep](https://docs.medusajs.com/references/medusa-workflows/updateOrderEditItemQuantityValidationStep/index.html.md) | |
| - [updateOrderEditShippingMethodWorkflow](https://docs.medusajs.com/references/medusa-workflows/updateOrderEditShippingMethodWorkflow/index.html.md) | |
| - [updateOrderEditShippingMethodValidationStep](https://docs.medusajs.com/references/medusa-workflows/updateOrderEditShippingMethodValidationStep/index.html.md) | |
| - [updateOrderEditItemQuantityWorkflow](https://docs.medusajs.com/references/medusa-workflows/updateOrderEditItemQuantityWorkflow/index.html.md) | |
| - [updateOrderTaxLinesWorkflow](https://docs.medusajs.com/references/medusa-workflows/updateOrderTaxLinesWorkflow/index.html.md) | |
| - [updateOrderValidationStep](https://docs.medusajs.com/references/medusa-workflows/updateOrderValidationStep/index.html.md) | |
| - [updateReceiveItemReturnRequestValidationStep](https://docs.medusajs.com/references/medusa-workflows/updateReceiveItemReturnRequestValidationStep/index.html.md) | |
| - [updateOrderWorkflow](https://docs.medusajs.com/references/medusa-workflows/updateOrderWorkflow/index.html.md) | |
| - [updateReceiveItemReturnRequestWorkflow](https://docs.medusajs.com/references/medusa-workflows/updateReceiveItemReturnRequestWorkflow/index.html.md) | |
| - [updateRequestItemReturnValidationStep](https://docs.medusajs.com/references/medusa-workflows/updateRequestItemReturnValidationStep/index.html.md) | |
| - [updateRequestItemReturnWorkflow](https://docs.medusajs.com/references/medusa-workflows/updateRequestItemReturnWorkflow/index.html.md) | |
| - [updateReturnShippingMethodValidationStep](https://docs.medusajs.com/references/medusa-workflows/updateReturnShippingMethodValidationStep/index.html.md) | |
| - [updateReturnShippingMethodWorkflow](https://docs.medusajs.com/references/medusa-workflows/updateReturnShippingMethodWorkflow/index.html.md) | |
| - [updateReturnValidationStep](https://docs.medusajs.com/references/medusa-workflows/updateReturnValidationStep/index.html.md) | |
| - [updateReturnWorkflow](https://docs.medusajs.com/references/medusa-workflows/updateReturnWorkflow/index.html.md) | |
| - [batchShippingOptionRulesWorkflow](https://docs.medusajs.com/references/medusa-workflows/batchShippingOptionRulesWorkflow/index.html.md) | |
| - [calculateShippingOptionsPricesWorkflow](https://docs.medusajs.com/references/medusa-workflows/calculateShippingOptionsPricesWorkflow/index.html.md) | |
| - [cancelFulfillmentWorkflow](https://docs.medusajs.com/references/medusa-workflows/cancelFulfillmentWorkflow/index.html.md) | |
| - [createFulfillmentWorkflow](https://docs.medusajs.com/references/medusa-workflows/createFulfillmentWorkflow/index.html.md) | |
| - [createReturnFulfillmentWorkflow](https://docs.medusajs.com/references/medusa-workflows/createReturnFulfillmentWorkflow/index.html.md) | |
| - [createServiceZonesWorkflow](https://docs.medusajs.com/references/medusa-workflows/createServiceZonesWorkflow/index.html.md) | |
| - [createShipmentWorkflow](https://docs.medusajs.com/references/medusa-workflows/createShipmentWorkflow/index.html.md) | |
| - [createShippingOptionsWorkflow](https://docs.medusajs.com/references/medusa-workflows/createShippingOptionsWorkflow/index.html.md) | |
| - [createShippingProfilesWorkflow](https://docs.medusajs.com/references/medusa-workflows/createShippingProfilesWorkflow/index.html.md) | |
| - [deleteFulfillmentSetsWorkflow](https://docs.medusajs.com/references/medusa-workflows/deleteFulfillmentSetsWorkflow/index.html.md) | |
| - [markFulfillmentAsDeliveredWorkflow](https://docs.medusajs.com/references/medusa-workflows/markFulfillmentAsDeliveredWorkflow/index.html.md) | |
| - [deleteShippingOptionsWorkflow](https://docs.medusajs.com/references/medusa-workflows/deleteShippingOptionsWorkflow/index.html.md) | |
| - [deleteServiceZonesWorkflow](https://docs.medusajs.com/references/medusa-workflows/deleteServiceZonesWorkflow/index.html.md) | |
| - [updateFulfillmentWorkflow](https://docs.medusajs.com/references/medusa-workflows/updateFulfillmentWorkflow/index.html.md) | |
| - [updateServiceZonesWorkflow](https://docs.medusajs.com/references/medusa-workflows/updateServiceZonesWorkflow/index.html.md) | |
| - [updateShippingOptionsWorkflow](https://docs.medusajs.com/references/medusa-workflows/updateShippingOptionsWorkflow/index.html.md) | |
| - [updateShippingProfilesWorkflow](https://docs.medusajs.com/references/medusa-workflows/updateShippingProfilesWorkflow/index.html.md) | |
| - [validateFulfillmentDeliverabilityStep](https://docs.medusajs.com/references/medusa-workflows/validateFulfillmentDeliverabilityStep/index.html.md) | |
| - [createPricePreferencesWorkflow](https://docs.medusajs.com/references/medusa-workflows/createPricePreferencesWorkflow/index.html.md) | |
| - [deletePricePreferencesWorkflow](https://docs.medusajs.com/references/medusa-workflows/deletePricePreferencesWorkflow/index.html.md) | |
| - [updatePricePreferencesWorkflow](https://docs.medusajs.com/references/medusa-workflows/updatePricePreferencesWorkflow/index.html.md) | |
| - [batchPriceListPricesWorkflow](https://docs.medusajs.com/references/medusa-workflows/batchPriceListPricesWorkflow/index.html.md) | |
| - [createPriceListPricesWorkflow](https://docs.medusajs.com/references/medusa-workflows/createPriceListPricesWorkflow/index.html.md) | |
| - [removePriceListPricesWorkflow](https://docs.medusajs.com/references/medusa-workflows/removePriceListPricesWorkflow/index.html.md) | |
| - [deletePriceListsWorkflow](https://docs.medusajs.com/references/medusa-workflows/deletePriceListsWorkflow/index.html.md) | |
| - [createPriceListsWorkflow](https://docs.medusajs.com/references/medusa-workflows/createPriceListsWorkflow/index.html.md) | |
| - [updatePriceListPricesWorkflow](https://docs.medusajs.com/references/medusa-workflows/updatePriceListPricesWorkflow/index.html.md) | |
| - [updatePriceListsWorkflow](https://docs.medusajs.com/references/medusa-workflows/updatePriceListsWorkflow/index.html.md) | |
| - [batchLinkProductsToCollectionWorkflow](https://docs.medusajs.com/references/medusa-workflows/batchLinkProductsToCollectionWorkflow/index.html.md) | |
| - [batchProductVariantsWorkflow](https://docs.medusajs.com/references/medusa-workflows/batchProductVariantsWorkflow/index.html.md) | |
| - [batchLinkProductsToCategoryWorkflow](https://docs.medusajs.com/references/medusa-workflows/batchLinkProductsToCategoryWorkflow/index.html.md) | |
| - [batchProductsWorkflow](https://docs.medusajs.com/references/medusa-workflows/batchProductsWorkflow/index.html.md) | |
| - [createCollectionsWorkflow](https://docs.medusajs.com/references/medusa-workflows/createCollectionsWorkflow/index.html.md) | |
| - [createProductOptionsWorkflow](https://docs.medusajs.com/references/medusa-workflows/createProductOptionsWorkflow/index.html.md) | |
| - [createProductTagsWorkflow](https://docs.medusajs.com/references/medusa-workflows/createProductTagsWorkflow/index.html.md) | |
| - [createProductsWorkflow](https://docs.medusajs.com/references/medusa-workflows/createProductsWorkflow/index.html.md) | |
| - [createProductVariantsWorkflow](https://docs.medusajs.com/references/medusa-workflows/createProductVariantsWorkflow/index.html.md) | |
| - [createProductTypesWorkflow](https://docs.medusajs.com/references/medusa-workflows/createProductTypesWorkflow/index.html.md) | |
| - [deleteCollectionsWorkflow](https://docs.medusajs.com/references/medusa-workflows/deleteCollectionsWorkflow/index.html.md) | |
| - [deleteProductTagsWorkflow](https://docs.medusajs.com/references/medusa-workflows/deleteProductTagsWorkflow/index.html.md) | |
| - [deleteProductTypesWorkflow](https://docs.medusajs.com/references/medusa-workflows/deleteProductTypesWorkflow/index.html.md) | |
| - [deleteProductOptionsWorkflow](https://docs.medusajs.com/references/medusa-workflows/deleteProductOptionsWorkflow/index.html.md) | |
| - [deleteProductVariantsWorkflow](https://docs.medusajs.com/references/medusa-workflows/deleteProductVariantsWorkflow/index.html.md) | |
| - [deleteProductsWorkflow](https://docs.medusajs.com/references/medusa-workflows/deleteProductsWorkflow/index.html.md) | |
| - [exportProductsWorkflow](https://docs.medusajs.com/references/medusa-workflows/exportProductsWorkflow/index.html.md) | |
| - [importProductsWorkflow](https://docs.medusajs.com/references/medusa-workflows/importProductsWorkflow/index.html.md) | |
| - [updateCollectionsWorkflow](https://docs.medusajs.com/references/medusa-workflows/updateCollectionsWorkflow/index.html.md) | |
| - [updateProductTypesWorkflow](https://docs.medusajs.com/references/medusa-workflows/updateProductTypesWorkflow/index.html.md) | |
| - [updateProductOptionsWorkflow](https://docs.medusajs.com/references/medusa-workflows/updateProductOptionsWorkflow/index.html.md) | |
| - [updateProductTagsWorkflow](https://docs.medusajs.com/references/medusa-workflows/updateProductTagsWorkflow/index.html.md) | |
| - [updateProductVariantsWorkflow](https://docs.medusajs.com/references/medusa-workflows/updateProductVariantsWorkflow/index.html.md) | |
| - [updateProductsWorkflow](https://docs.medusajs.com/references/medusa-workflows/updateProductsWorkflow/index.html.md) | |
| - [upsertVariantPricesWorkflow](https://docs.medusajs.com/references/medusa-workflows/upsertVariantPricesWorkflow/index.html.md) | |
| - [validateProductInputStep](https://docs.medusajs.com/references/medusa-workflows/validateProductInputStep/index.html.md) | |
| - [createProductCategoriesWorkflow](https://docs.medusajs.com/references/medusa-workflows/createProductCategoriesWorkflow/index.html.md) | |
| - [updateProductCategoriesWorkflow](https://docs.medusajs.com/references/medusa-workflows/updateProductCategoriesWorkflow/index.html.md) | |
| - [deleteProductCategoriesWorkflow](https://docs.medusajs.com/references/medusa-workflows/deleteProductCategoriesWorkflow/index.html.md) | |
| - [updateRegionsWorkflow](https://docs.medusajs.com/references/medusa-workflows/updateRegionsWorkflow/index.html.md) | |
| - [createRegionsWorkflow](https://docs.medusajs.com/references/medusa-workflows/createRegionsWorkflow/index.html.md) | |
| - [deleteRegionsWorkflow](https://docs.medusajs.com/references/medusa-workflows/deleteRegionsWorkflow/index.html.md) | |
| - [addOrRemoveCampaignPromotionsWorkflow](https://docs.medusajs.com/references/medusa-workflows/addOrRemoveCampaignPromotionsWorkflow/index.html.md) | |
| - [batchPromotionRulesWorkflow](https://docs.medusajs.com/references/medusa-workflows/batchPromotionRulesWorkflow/index.html.md) | |
| - [createPromotionsWorkflow](https://docs.medusajs.com/references/medusa-workflows/createPromotionsWorkflow/index.html.md) | |
| - [createCampaignsWorkflow](https://docs.medusajs.com/references/medusa-workflows/createCampaignsWorkflow/index.html.md) | |
| - [createPromotionRulesWorkflow](https://docs.medusajs.com/references/medusa-workflows/createPromotionRulesWorkflow/index.html.md) | |
| - [deleteCampaignsWorkflow](https://docs.medusajs.com/references/medusa-workflows/deleteCampaignsWorkflow/index.html.md) | |
| - [deletePromotionsWorkflow](https://docs.medusajs.com/references/medusa-workflows/deletePromotionsWorkflow/index.html.md) | |
| - [deletePromotionRulesWorkflow](https://docs.medusajs.com/references/medusa-workflows/deletePromotionRulesWorkflow/index.html.md) | |
| - [updateCampaignsWorkflow](https://docs.medusajs.com/references/medusa-workflows/updateCampaignsWorkflow/index.html.md) | |
| - [updatePromotionRulesWorkflow](https://docs.medusajs.com/references/medusa-workflows/updatePromotionRulesWorkflow/index.html.md) | |
| - [updatePromotionsStatusWorkflow](https://docs.medusajs.com/references/medusa-workflows/updatePromotionsStatusWorkflow/index.html.md) | |
| - [updatePromotionsWorkflow](https://docs.medusajs.com/references/medusa-workflows/updatePromotionsWorkflow/index.html.md) | |
| - [updatePromotionsValidationStep](https://docs.medusajs.com/references/medusa-workflows/updatePromotionsValidationStep/index.html.md) | |
| - [createReservationsWorkflow](https://docs.medusajs.com/references/medusa-workflows/createReservationsWorkflow/index.html.md) | |
| - [deleteReservationsByLineItemsWorkflow](https://docs.medusajs.com/references/medusa-workflows/deleteReservationsByLineItemsWorkflow/index.html.md) | |
| - [deleteReservationsWorkflow](https://docs.medusajs.com/references/medusa-workflows/deleteReservationsWorkflow/index.html.md) | |
| - [updateReservationsWorkflow](https://docs.medusajs.com/references/medusa-workflows/updateReservationsWorkflow/index.html.md) | |
| - [createReturnReasonsWorkflow](https://docs.medusajs.com/references/medusa-workflows/createReturnReasonsWorkflow/index.html.md) | |
| - [updateReturnReasonsWorkflow](https://docs.medusajs.com/references/medusa-workflows/updateReturnReasonsWorkflow/index.html.md) | |
| - [deleteReturnReasonsWorkflow](https://docs.medusajs.com/references/medusa-workflows/deleteReturnReasonsWorkflow/index.html.md) | |
| - [createSalesChannelsWorkflow](https://docs.medusajs.com/references/medusa-workflows/createSalesChannelsWorkflow/index.html.md) | |
| - [updateSalesChannelsWorkflow](https://docs.medusajs.com/references/medusa-workflows/updateSalesChannelsWorkflow/index.html.md) | |
| - [deleteSalesChannelsWorkflow](https://docs.medusajs.com/references/medusa-workflows/deleteSalesChannelsWorkflow/index.html.md) | |
| - [linkProductsToSalesChannelWorkflow](https://docs.medusajs.com/references/medusa-workflows/linkProductsToSalesChannelWorkflow/index.html.md) | |
| - [acceptInviteWorkflow](https://docs.medusajs.com/references/medusa-workflows/acceptInviteWorkflow/index.html.md) | |
| - [createInvitesWorkflow](https://docs.medusajs.com/references/medusa-workflows/createInvitesWorkflow/index.html.md) | |
| - [deleteInvitesWorkflow](https://docs.medusajs.com/references/medusa-workflows/deleteInvitesWorkflow/index.html.md) | |
| - [refreshInviteTokensWorkflow](https://docs.medusajs.com/references/medusa-workflows/refreshInviteTokensWorkflow/index.html.md) | |
| - [processPaymentWorkflow](https://docs.medusajs.com/references/medusa-workflows/processPaymentWorkflow/index.html.md) | |
| - [capturePaymentWorkflow](https://docs.medusajs.com/references/medusa-workflows/capturePaymentWorkflow/index.html.md) | |
| - [refundPaymentWorkflow](https://docs.medusajs.com/references/medusa-workflows/refundPaymentWorkflow/index.html.md) | |
| - [refundPaymentsWorkflow](https://docs.medusajs.com/references/medusa-workflows/refundPaymentsWorkflow/index.html.md) | |
| - [validatePaymentsRefundStep](https://docs.medusajs.com/references/medusa-workflows/validatePaymentsRefundStep/index.html.md) | |
| - [validateRefundStep](https://docs.medusajs.com/references/medusa-workflows/validateRefundStep/index.html.md) | |
| - [createLocationFulfillmentSetWorkflow](https://docs.medusajs.com/references/medusa-workflows/createLocationFulfillmentSetWorkflow/index.html.md) | |
| - [createStockLocationsWorkflow](https://docs.medusajs.com/references/medusa-workflows/createStockLocationsWorkflow/index.html.md) | |
| - [deleteStockLocationsWorkflow](https://docs.medusajs.com/references/medusa-workflows/deleteStockLocationsWorkflow/index.html.md) | |
| - [linkSalesChannelsToStockLocationWorkflow](https://docs.medusajs.com/references/medusa-workflows/linkSalesChannelsToStockLocationWorkflow/index.html.md) | |
| - [updateStockLocationsWorkflow](https://docs.medusajs.com/references/medusa-workflows/updateStockLocationsWorkflow/index.html.md) | |
| - [createTaxRateRulesWorkflow](https://docs.medusajs.com/references/medusa-workflows/createTaxRateRulesWorkflow/index.html.md) | |
| - [createTaxRatesWorkflow](https://docs.medusajs.com/references/medusa-workflows/createTaxRatesWorkflow/index.html.md) | |
| - [createTaxRegionsWorkflow](https://docs.medusajs.com/references/medusa-workflows/createTaxRegionsWorkflow/index.html.md) | |
| - [deleteTaxRateRulesWorkflow](https://docs.medusajs.com/references/medusa-workflows/deleteTaxRateRulesWorkflow/index.html.md) | |
| - [deleteTaxRatesWorkflow](https://docs.medusajs.com/references/medusa-workflows/deleteTaxRatesWorkflow/index.html.md) | |
| - [deleteTaxRegionsWorkflow](https://docs.medusajs.com/references/medusa-workflows/deleteTaxRegionsWorkflow/index.html.md) | |
| - [maybeListTaxRateRuleIdsStep](https://docs.medusajs.com/references/medusa-workflows/maybeListTaxRateRuleIdsStep/index.html.md) | |
| - [updateTaxRegionsWorkflow](https://docs.medusajs.com/references/medusa-workflows/updateTaxRegionsWorkflow/index.html.md) | |
| - [setTaxRateRulesWorkflow](https://docs.medusajs.com/references/medusa-workflows/setTaxRateRulesWorkflow/index.html.md) | |
| - [updateTaxRatesWorkflow](https://docs.medusajs.com/references/medusa-workflows/updateTaxRatesWorkflow/index.html.md) | |
| - [createUserAccountWorkflow](https://docs.medusajs.com/references/medusa-workflows/createUserAccountWorkflow/index.html.md) | |
| - [createUsersWorkflow](https://docs.medusajs.com/references/medusa-workflows/createUsersWorkflow/index.html.md) | |
| - [deleteUsersWorkflow](https://docs.medusajs.com/references/medusa-workflows/deleteUsersWorkflow/index.html.md) | |
| - [removeUserAccountWorkflow](https://docs.medusajs.com/references/medusa-workflows/removeUserAccountWorkflow/index.html.md) | |
| - [updateUsersWorkflow](https://docs.medusajs.com/references/medusa-workflows/updateUsersWorkflow/index.html.md) | |
| - [deleteStoresWorkflow](https://docs.medusajs.com/references/medusa-workflows/deleteStoresWorkflow/index.html.md) | |
| - [createStoresWorkflow](https://docs.medusajs.com/references/medusa-workflows/createStoresWorkflow/index.html.md) | |
| - [updateStoresWorkflow](https://docs.medusajs.com/references/medusa-workflows/updateStoresWorkflow/index.html.md) | |
| - [deleteShippingProfileWorkflow](https://docs.medusajs.com/references/medusa-workflows/deleteShippingProfileWorkflow/index.html.md) | |
| ## Steps | |
| - [createApiKeysStep](https://docs.medusajs.com/references/medusa-workflows/steps/createApiKeysStep/index.html.md) | |
| - [deleteApiKeysStep](https://docs.medusajs.com/references/medusa-workflows/steps/deleteApiKeysStep/index.html.md) | |
| - [linkSalesChannelsToApiKeyStep](https://docs.medusajs.com/references/medusa-workflows/steps/linkSalesChannelsToApiKeyStep/index.html.md) | |
| - [revokeApiKeysStep](https://docs.medusajs.com/references/medusa-workflows/steps/revokeApiKeysStep/index.html.md) | |
| - [updateApiKeysStep](https://docs.medusajs.com/references/medusa-workflows/steps/updateApiKeysStep/index.html.md) | |
| - [validateSalesChannelsExistStep](https://docs.medusajs.com/references/medusa-workflows/steps/validateSalesChannelsExistStep/index.html.md) | |
| - [addShippingMethodToCartStep](https://docs.medusajs.com/references/medusa-workflows/steps/addShippingMethodToCartStep/index.html.md) | |
| - [confirmInventoryStep](https://docs.medusajs.com/references/medusa-workflows/steps/confirmInventoryStep/index.html.md) | |
| - [createCartsStep](https://docs.medusajs.com/references/medusa-workflows/steps/createCartsStep/index.html.md) | |
| - [createLineItemsStep](https://docs.medusajs.com/references/medusa-workflows/steps/createLineItemsStep/index.html.md) | |
| - [createLineItemAdjustmentsStep](https://docs.medusajs.com/references/medusa-workflows/steps/createLineItemAdjustmentsStep/index.html.md) | |
| - [createPaymentCollectionsStep](https://docs.medusajs.com/references/medusa-workflows/steps/createPaymentCollectionsStep/index.html.md) | |
| - [createShippingMethodAdjustmentsStep](https://docs.medusajs.com/references/medusa-workflows/steps/createShippingMethodAdjustmentsStep/index.html.md) | |
| - [findOneOrAnyRegionStep](https://docs.medusajs.com/references/medusa-workflows/steps/findOneOrAnyRegionStep/index.html.md) | |
| - [findOrCreateCustomerStep](https://docs.medusajs.com/references/medusa-workflows/steps/findOrCreateCustomerStep/index.html.md) | |
| - [findSalesChannelStep](https://docs.medusajs.com/references/medusa-workflows/steps/findSalesChannelStep/index.html.md) | |
| - [getActionsToComputeFromPromotionsStep](https://docs.medusajs.com/references/medusa-workflows/steps/getActionsToComputeFromPromotionsStep/index.html.md) | |
| - [getLineItemActionsStep](https://docs.medusajs.com/references/medusa-workflows/steps/getLineItemActionsStep/index.html.md) | |
| - [getPromotionCodesToApply](https://docs.medusajs.com/references/medusa-workflows/steps/getPromotionCodesToApply/index.html.md) | |
| - [getVariantPriceSetsStep](https://docs.medusajs.com/references/medusa-workflows/steps/getVariantPriceSetsStep/index.html.md) | |
| - [getVariantsStep](https://docs.medusajs.com/references/medusa-workflows/steps/getVariantsStep/index.html.md) | |
| - [prepareAdjustmentsFromPromotionActionsStep](https://docs.medusajs.com/references/medusa-workflows/steps/prepareAdjustmentsFromPromotionActionsStep/index.html.md) | |
| - [removeShippingMethodFromCartStep](https://docs.medusajs.com/references/medusa-workflows/steps/removeShippingMethodFromCartStep/index.html.md) | |
| - [removeLineItemAdjustmentsStep](https://docs.medusajs.com/references/medusa-workflows/steps/removeLineItemAdjustmentsStep/index.html.md) | |
| - [reserveInventoryStep](https://docs.medusajs.com/references/medusa-workflows/steps/reserveInventoryStep/index.html.md) | |
| - [removeShippingMethodAdjustmentsStep](https://docs.medusajs.com/references/medusa-workflows/steps/removeShippingMethodAdjustmentsStep/index.html.md) | |
| - [retrieveCartStep](https://docs.medusajs.com/references/medusa-workflows/steps/retrieveCartStep/index.html.md) | |
| - [setTaxLinesForItemsStep](https://docs.medusajs.com/references/medusa-workflows/steps/setTaxLinesForItemsStep/index.html.md) | |
| - [updateCartsStep](https://docs.medusajs.com/references/medusa-workflows/steps/updateCartsStep/index.html.md) | |
| - [updateCartPromotionsStep](https://docs.medusajs.com/references/medusa-workflows/steps/updateCartPromotionsStep/index.html.md) | |
| - [updateLineItemsStep](https://docs.medusajs.com/references/medusa-workflows/steps/updateLineItemsStep/index.html.md) | |
| - [updateShippingMethodsStep](https://docs.medusajs.com/references/medusa-workflows/steps/updateShippingMethodsStep/index.html.md) | |
| - [validateAndReturnShippingMethodsDataStep](https://docs.medusajs.com/references/medusa-workflows/steps/validateAndReturnShippingMethodsDataStep/index.html.md) | |
| - [validateCartPaymentsStep](https://docs.medusajs.com/references/medusa-workflows/steps/validateCartPaymentsStep/index.html.md) | |
| - [validateCartShippingOptionsStep](https://docs.medusajs.com/references/medusa-workflows/steps/validateCartShippingOptionsStep/index.html.md) | |
| - [validateCartShippingOptionsPriceStep](https://docs.medusajs.com/references/medusa-workflows/steps/validateCartShippingOptionsPriceStep/index.html.md) | |
| - [validateCartStep](https://docs.medusajs.com/references/medusa-workflows/steps/validateCartStep/index.html.md) | |
| - [validateLineItemPricesStep](https://docs.medusajs.com/references/medusa-workflows/steps/validateLineItemPricesStep/index.html.md) | |
| - [validateVariantPricesStep](https://docs.medusajs.com/references/medusa-workflows/steps/validateVariantPricesStep/index.html.md) | |
| - [createRemoteLinkStep](https://docs.medusajs.com/references/medusa-workflows/steps/createRemoteLinkStep/index.html.md) | |
| - [dismissRemoteLinkStep](https://docs.medusajs.com/references/medusa-workflows/steps/dismissRemoteLinkStep/index.html.md) | |
| - [emitEventStep](https://docs.medusajs.com/references/medusa-workflows/steps/emitEventStep/index.html.md) | |
| - [removeRemoteLinkStep](https://docs.medusajs.com/references/medusa-workflows/steps/removeRemoteLinkStep/index.html.md) | |
| - [useQueryGraphStep](https://docs.medusajs.com/references/medusa-workflows/steps/useQueryGraphStep/index.html.md) | |
| - [validatePresenceOfStep](https://docs.medusajs.com/references/medusa-workflows/steps/validatePresenceOfStep/index.html.md) | |
| - [useRemoteQueryStep](https://docs.medusajs.com/references/medusa-workflows/steps/useRemoteQueryStep/index.html.md) | |
| - [updateRemoteLinksStep](https://docs.medusajs.com/references/medusa-workflows/steps/updateRemoteLinksStep/index.html.md) | |
| - [setAuthAppMetadataStep](https://docs.medusajs.com/references/medusa-workflows/steps/setAuthAppMetadataStep/index.html.md) | |
| - [createCustomerAddressesStep](https://docs.medusajs.com/references/medusa-workflows/steps/createCustomerAddressesStep/index.html.md) | |
| - [createCustomersStep](https://docs.medusajs.com/references/medusa-workflows/steps/createCustomersStep/index.html.md) | |
| - [deleteCustomerAddressesStep](https://docs.medusajs.com/references/medusa-workflows/steps/deleteCustomerAddressesStep/index.html.md) | |
| - [deleteCustomersStep](https://docs.medusajs.com/references/medusa-workflows/steps/deleteCustomersStep/index.html.md) | |
| - [maybeUnsetDefaultBillingAddressesStep](https://docs.medusajs.com/references/medusa-workflows/steps/maybeUnsetDefaultBillingAddressesStep/index.html.md) | |
| - [maybeUnsetDefaultShippingAddressesStep](https://docs.medusajs.com/references/medusa-workflows/steps/maybeUnsetDefaultShippingAddressesStep/index.html.md) | |
| - [updateCustomerAddressesStep](https://docs.medusajs.com/references/medusa-workflows/steps/updateCustomerAddressesStep/index.html.md) | |
| - [updateCustomersStep](https://docs.medusajs.com/references/medusa-workflows/steps/updateCustomersStep/index.html.md) | |
| - [validateCustomerAccountCreation](https://docs.medusajs.com/references/medusa-workflows/steps/validateCustomerAccountCreation/index.html.md) | |
| - [createDefaultStoreStep](https://docs.medusajs.com/references/medusa-workflows/steps/createDefaultStoreStep/index.html.md) | |
| - [deleteFilesStep](https://docs.medusajs.com/references/medusa-workflows/steps/deleteFilesStep/index.html.md) | |
| - [uploadFilesStep](https://docs.medusajs.com/references/medusa-workflows/steps/uploadFilesStep/index.html.md) | |
| - [adjustInventoryLevelsStep](https://docs.medusajs.com/references/medusa-workflows/steps/adjustInventoryLevelsStep/index.html.md) | |
| - [createInventoryLevelsStep](https://docs.medusajs.com/references/medusa-workflows/steps/createInventoryLevelsStep/index.html.md) | |
| - [createInventoryItemsStep](https://docs.medusajs.com/references/medusa-workflows/steps/createInventoryItemsStep/index.html.md) | |
| - [attachInventoryItemToVariants](https://docs.medusajs.com/references/medusa-workflows/steps/attachInventoryItemToVariants/index.html.md) | |
| - [deleteInventoryItemStep](https://docs.medusajs.com/references/medusa-workflows/steps/deleteInventoryItemStep/index.html.md) | |
| - [updateInventoryItemsStep](https://docs.medusajs.com/references/medusa-workflows/steps/updateInventoryItemsStep/index.html.md) | |
| - [deleteInventoryLevelsStep](https://docs.medusajs.com/references/medusa-workflows/steps/deleteInventoryLevelsStep/index.html.md) | |
| - [updateInventoryLevelsStep](https://docs.medusajs.com/references/medusa-workflows/steps/updateInventoryLevelsStep/index.html.md) | |
| - [validateInventoryDeleteStep](https://docs.medusajs.com/references/medusa-workflows/steps/validateInventoryDeleteStep/index.html.md) | |
| - [validateInventoryLocationsStep](https://docs.medusajs.com/references/medusa-workflows/steps/validateInventoryLocationsStep/index.html.md) | |
| - [validateInventoryItemsForCreate](https://docs.medusajs.com/references/medusa-workflows/steps/validateInventoryItemsForCreate/index.html.md) | |
| - [deleteInvitesStep](https://docs.medusajs.com/references/medusa-workflows/steps/deleteInvitesStep/index.html.md) | |
| - [refreshInviteTokensStep](https://docs.medusajs.com/references/medusa-workflows/steps/refreshInviteTokensStep/index.html.md) | |
| - [validateTokenStep](https://docs.medusajs.com/references/medusa-workflows/steps/validateTokenStep/index.html.md) | |
| - [createInviteStep](https://docs.medusajs.com/references/medusa-workflows/steps/createInviteStep/index.html.md) | |
| - [notifyOnFailureStep](https://docs.medusajs.com/references/medusa-workflows/steps/notifyOnFailureStep/index.html.md) | |
| - [sendNotificationsStep](https://docs.medusajs.com/references/medusa-workflows/steps/sendNotificationsStep/index.html.md) | |
| - [cancelFulfillmentStep](https://docs.medusajs.com/references/medusa-workflows/steps/cancelFulfillmentStep/index.html.md) | |
| - [createFulfillmentSets](https://docs.medusajs.com/references/medusa-workflows/steps/createFulfillmentSets/index.html.md) | |
| - [buildPriceSet](https://docs.medusajs.com/references/medusa-workflows/steps/buildPriceSet/index.html.md) | |
| - [calculateShippingOptionsPricesStep](https://docs.medusajs.com/references/medusa-workflows/steps/calculateShippingOptionsPricesStep/index.html.md) | |
| - [createFulfillmentStep](https://docs.medusajs.com/references/medusa-workflows/steps/createFulfillmentStep/index.html.md) | |
| - [createReturnFulfillmentStep](https://docs.medusajs.com/references/medusa-workflows/steps/createReturnFulfillmentStep/index.html.md) | |
| - [createShippingOptionRulesStep](https://docs.medusajs.com/references/medusa-workflows/steps/createShippingOptionRulesStep/index.html.md) | |
| - [createServiceZonesStep](https://docs.medusajs.com/references/medusa-workflows/steps/createServiceZonesStep/index.html.md) | |
| - [createShippingOptionsPriceSetsStep](https://docs.medusajs.com/references/medusa-workflows/steps/createShippingOptionsPriceSetsStep/index.html.md) | |
| - [createShippingProfilesStep](https://docs.medusajs.com/references/medusa-workflows/steps/createShippingProfilesStep/index.html.md) | |
| - [deleteServiceZonesStep](https://docs.medusajs.com/references/medusa-workflows/steps/deleteServiceZonesStep/index.html.md) | |
| - [deleteFulfillmentSetsStep](https://docs.medusajs.com/references/medusa-workflows/steps/deleteFulfillmentSetsStep/index.html.md) | |
| - [deleteShippingOptionsStep](https://docs.medusajs.com/references/medusa-workflows/steps/deleteShippingOptionsStep/index.html.md) | |
| - [deleteShippingOptionRulesStep](https://docs.medusajs.com/references/medusa-workflows/steps/deleteShippingOptionRulesStep/index.html.md) | |
| - [setShippingOptionsPricesStep](https://docs.medusajs.com/references/medusa-workflows/steps/setShippingOptionsPricesStep/index.html.md) | |
| - [updateShippingOptionRulesStep](https://docs.medusajs.com/references/medusa-workflows/steps/updateShippingOptionRulesStep/index.html.md) | |
| - [updateServiceZonesStep](https://docs.medusajs.com/references/medusa-workflows/steps/updateServiceZonesStep/index.html.md) | |
| - [updateFulfillmentStep](https://docs.medusajs.com/references/medusa-workflows/steps/updateFulfillmentStep/index.html.md) | |
| - [updateShippingProfilesStep](https://docs.medusajs.com/references/medusa-workflows/steps/updateShippingProfilesStep/index.html.md) | |
| - [upsertShippingOptionsStep](https://docs.medusajs.com/references/medusa-workflows/steps/upsertShippingOptionsStep/index.html.md) | |
| - [deleteLineItemsStep](https://docs.medusajs.com/references/medusa-workflows/steps/deleteLineItemsStep/index.html.md) | |
| - [validateShipmentStep](https://docs.medusajs.com/references/medusa-workflows/steps/validateShipmentStep/index.html.md) | |
| - [validateShippingOptionPricesStep](https://docs.medusajs.com/references/medusa-workflows/steps/validateShippingOptionPricesStep/index.html.md) | |
| - [listLineItemsStep](https://docs.medusajs.com/references/medusa-workflows/steps/listLineItemsStep/index.html.md) | |
| - [updateLineItemsStepWithSelector](https://docs.medusajs.com/references/medusa-workflows/steps/updateLineItemsStepWithSelector/index.html.md) | |
| - [addOrderTransactionStep](https://docs.medusajs.com/references/medusa-workflows/steps/addOrderTransactionStep/index.html.md) | |
| - [cancelOrderChangeStep](https://docs.medusajs.com/references/medusa-workflows/steps/cancelOrderChangeStep/index.html.md) | |
| - [archiveOrdersStep](https://docs.medusajs.com/references/medusa-workflows/steps/archiveOrdersStep/index.html.md) | |
| - [cancelOrderExchangeStep](https://docs.medusajs.com/references/medusa-workflows/steps/cancelOrderExchangeStep/index.html.md) | |
| - [cancelOrderClaimStep](https://docs.medusajs.com/references/medusa-workflows/steps/cancelOrderClaimStep/index.html.md) | |
| - [cancelOrderReturnStep](https://docs.medusajs.com/references/medusa-workflows/steps/cancelOrderReturnStep/index.html.md) | |
| - [cancelOrdersStep](https://docs.medusajs.com/references/medusa-workflows/steps/cancelOrdersStep/index.html.md) | |
| - [completeOrdersStep](https://docs.medusajs.com/references/medusa-workflows/steps/completeOrdersStep/index.html.md) | |
| - [cancelOrderFulfillmentStep](https://docs.medusajs.com/references/medusa-workflows/steps/cancelOrderFulfillmentStep/index.html.md) | |
| - [createOrderClaimItemsFromActionsStep](https://docs.medusajs.com/references/medusa-workflows/steps/createOrderClaimItemsFromActionsStep/index.html.md) | |
| - [createOrderChangeStep](https://docs.medusajs.com/references/medusa-workflows/steps/createOrderChangeStep/index.html.md) | |
| - [createCompleteReturnStep](https://docs.medusajs.com/references/medusa-workflows/steps/createCompleteReturnStep/index.html.md) | |
| - [createOrderClaimsStep](https://docs.medusajs.com/references/medusa-workflows/steps/createOrderClaimsStep/index.html.md) | |
| - [createOrderExchangeItemsFromActionsStep](https://docs.medusajs.com/references/medusa-workflows/steps/createOrderExchangeItemsFromActionsStep/index.html.md) | |
| - [createOrderExchangesStep](https://docs.medusajs.com/references/medusa-workflows/steps/createOrderExchangesStep/index.html.md) | |
| - [createOrderLineItemsStep](https://docs.medusajs.com/references/medusa-workflows/steps/createOrderLineItemsStep/index.html.md) | |
| - [createOrdersStep](https://docs.medusajs.com/references/medusa-workflows/steps/createOrdersStep/index.html.md) | |
| - [createReturnsStep](https://docs.medusajs.com/references/medusa-workflows/steps/createReturnsStep/index.html.md) | |
| - [declineOrderChangeStep](https://docs.medusajs.com/references/medusa-workflows/steps/declineOrderChangeStep/index.html.md) | |
| - [deleteClaimsStep](https://docs.medusajs.com/references/medusa-workflows/steps/deleteClaimsStep/index.html.md) | |
| - [deleteExchangesStep](https://docs.medusajs.com/references/medusa-workflows/steps/deleteExchangesStep/index.html.md) | |
| - [de |
Sign up for free
to join this conversation on GitHub.
Already have an account?
Sign in to comment