In the terminal
git config --global user.name "FIRST_NAME LAST_NAME"

git config --global user.email "[email protected]"
cd ~
touch .gitignore_global
code .gitignore_global.DS_Storegit config -- global core.excludesfile ~/.gitignore_globalWe will follow the instructions from the GitHub documentation:
Install osxkeychain helper and setup Git to use it.
- Check if the
osxkeychain helperis installed:
git credential-osxkeychain

# If installed should return:
# > Usage: git credential-osxkeychain <get|store|erase>- Tell Git to use
osxkeychain helperusing the globalcredential.helperconfig:
git config --global credential.helper osxkeychain
# Set git to use the osxkeychain credential helper
The next time you clone an HTTPS URL that requires a password, you'll be prompted for your username and password, and to grant access to the OSX keychain. After you've done this, the username and password are stored in your keychain and you won't be required to type them in to Git again.
Turn on the credential helper so that Git will save your password in memory for some time. By default, Git will cache your password for 15 minutes.
$ git config --global credential.helper 'cache --timeout=3600'
# Set the cache to (a custom) timeout after 1 hour (setting is in seconds)
# 28800 - 8 hours
# 43200 - 12 hours
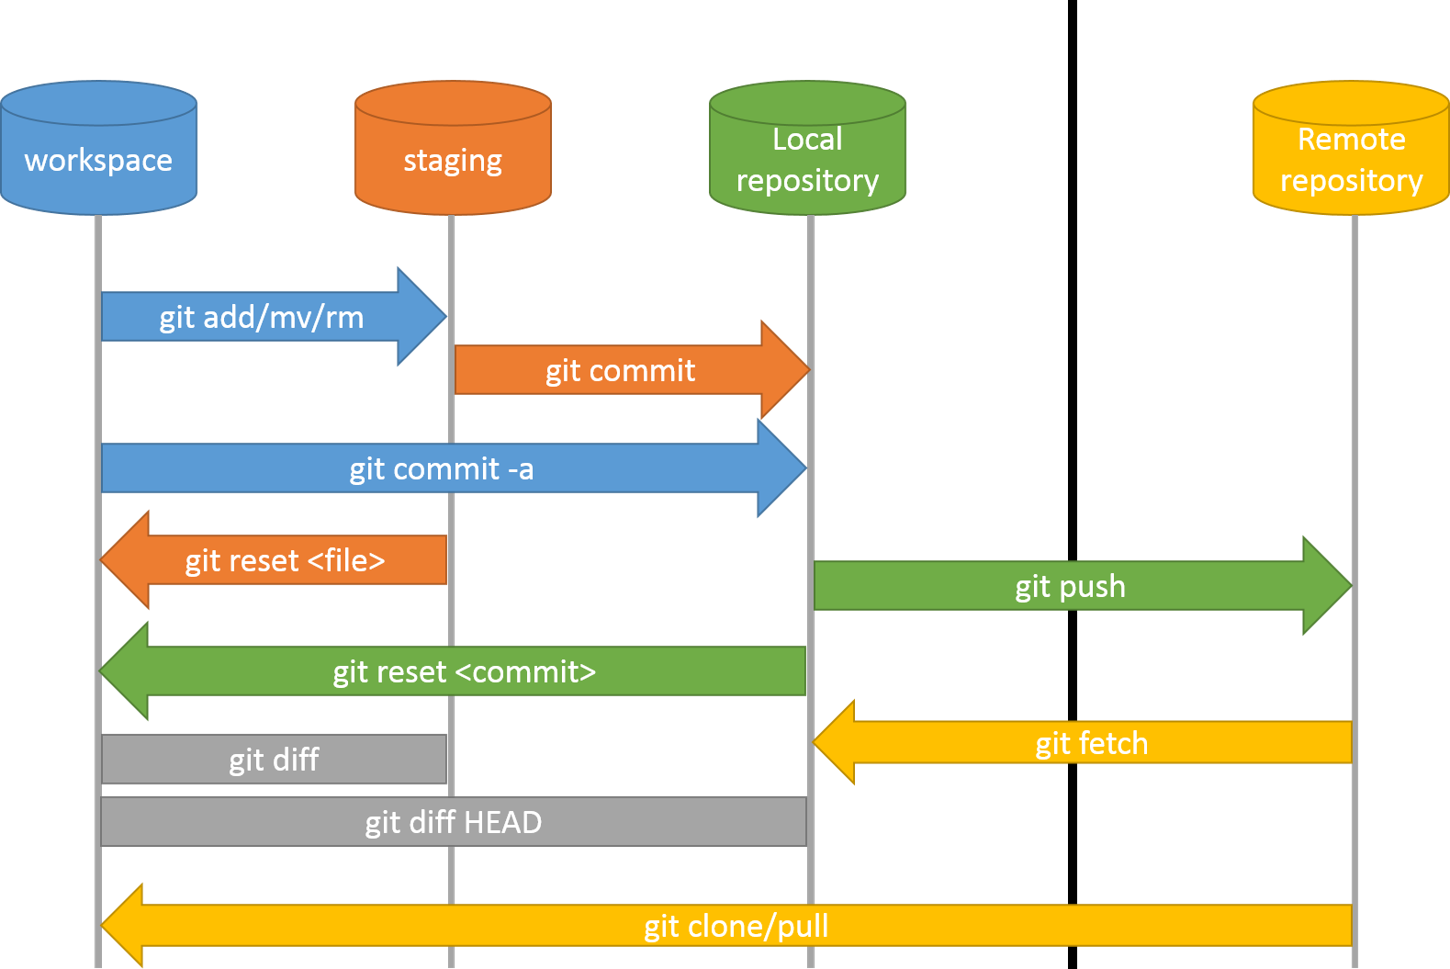
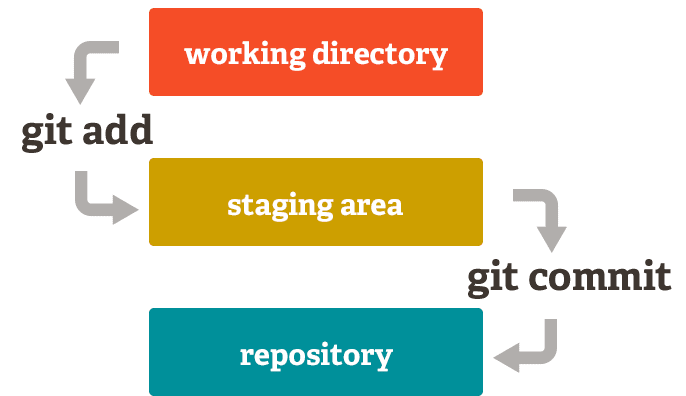
# 86400 - 24 hours- Working directory (files we modify)
- Stagging area (also called index)
- Local repository (.git)
mkdir 00-git-lecture

cd 00-git-lecture

touch a.js b.js c.js x.js y.js z.js

# Initialize git in the current project
git init

# Open the code editor
code .The files that are in the stagging area are prepared for the next commit.
Stagging area is a box in which we put all the files that we want to include in a commit.
# Add 3 files to the stagging area
git add a.js b.js. c.js

# Check the status of the `staggin area` and the `working directory`
git statusStagging area is often refered to as index (you may find this name when reading online documentation).
Stagging area keeps the hashed representation of the staged files. Theses are not the actual files, but just a hash that represents the file that was staged.
We can see this by running the below command which shows the last stagged files:
git ls-files -sWe can save all the files from the stagging area to the repo history. This is called a commit.
A commit is a snapshot in the point of history, including the changed files (the changes) and the description.
When we commit we take everything that is present in the stagging area and save it as a snapshot.
git commit -m 'Add files a b c'

# The files from the stagging area are now saved to the local git repositoryAdditionaly we could add and commit all the files by running git commit -a. However this command adds and commits right away all the tracked and modified files without allowing you to specify which file you want to change.
When writting commit messages we must use the following rules:
- Commit message should have Headline which is up to 72 characters.
- Write your commit message in the imperative:
- "Fix bug" and not "Fixed bug" or "Fixes bug." This convention matches up with commit messages generated by commands like git merge and git revert.
- Use a blank line to separate the message headline from the body.
Example:
# Modify a file x.js


# Add the file to the stagging area
git add .


# Create a commit with a message containing headline and the body
# separated by an empty line
git commit -m "Edit the file x.js to add the initial content.

- Initial content added to the file."To unstage the files that were added to the staging area we can use 2 commands:
git reset -- <file name>(Executes the full commandgit reset HEAD --mixed)git restore --staged <filename>
# Modify files a and b


# Add the files to the stagging area
git add .

git status


# Unstage file `a` using `git reset -- <file name>`
git reset -- a.js

git status


# Stage all the modified files again
git add .

git status


# Unstage file `b` using `git restore --staged <file name>`
git restore --staged b.js

git statusWe can use git log to get the list of past commits
git log --onelineEach commit has a unique SHA-1 identifying hash, used to travel through the committed timeline and revisit commits.
git log --graph --oneline --all --decorateWhen we checkout to previous commit the HEAD pointer is in the "detached head state".
git checkout <commit>
This makes your working directory match the exact state of the a1e8fb5 commit. You can look at files, compile the project, run tests, and even edit files without worrying about losing the current state of the project. Nothing you do in here will be saved in your repository. To continue developing, you need to get back to the “current” state of your project:
git checkout masterIn a detached state, any new commits you make will be orphaned when you change branches back to an established branch. Orphaned commits are up for deletion by Git's garbage collector.
The garbage collector runs on a configured interval and permanently destroys orphaned commits. To prevent orphaned commits from being garbage collected, we need to ensure we are on a branch.
From the detached HEAD state, we can execute either git checkout -b new_branch_name or git switch -c new_branch_name. This creates a new timeline.
Git revert is used to undo the last commit. It takes the commit before the last and creates a new commit using the same snapshot, effectively reverting to the previous commit while still keeping the wrong commit intact.
revert undoes a single commit.
mkdir 01_git_revert && cd 01_git_revert

touch my_file

git init


code .


# Create the initial commit with text content
echo "0 - initial content" >> my_file
git add .
git commit -m 'Initial commit'


# Update the file and create new commit
echo "1 - Line one" >> my_file
git add .
git commit -m 'add new content to my_file'


# Update the file again and create another commit
echo "2 - Line two, ajlf3fsdlfkj" >> my_file
git add .
git commit -m 'append more content to my_file'


# Check the commit history
git log --oneline


# Undo the last commit by using `git revert`
git revert HEAD
git diff is used to check the changes in the files in the working directory vs the last commit
In the same example for git revert you can update the file my_file and then run the git diff command.
# Update the file again and create another commit
echo 'Git is so cool' >> my_file

# Check what changed compared to the last commit
git diff my_file


# When ready commit the changes
git add .

git commit -m 'add happy text to my_file'


# Check the commit history
git log --oneline