There are big benefits to using serverless architectures in continuous integration & deployment (CI/CD) processes. We'll show you why, and how to do it.
Published on Dec. 6th, 2017 at https://serverless.com/blog/ci-cd-workflow-serverless-apps-with-circleci/

I had previously written a post defining the CI/CD process, discussing various deployment patterns, creating a NodeJS app and automating the end-to-end CI flow.
In this post, I will jump straight into creating a Python app and go over the end-to-end process for automating the CI flow.
We will cover:
- Creating a Python app
- Writing testable code
- Prepare for CI automation
- Implement the CI workflow
To recap, we will do a quick overview of the CI/CD process.
If you already know some CI/CD basics, then you'll probably want to skip straight to the creating the app section.
In an agile development environment, small teams work autonomously and add a lot of churn to the code base. Each developer works on different aspects of the project and commits code frequently.
This is a healthy practice, but it comes with some challenges. Without close watch and proper communication about changes, the updates can cause existing code to break. To minimize manual scrutiny and redundant communication across teams, we need to invest in automating CI/CD processes.

The CI/CD Process Flow
The CI process starts with the developer checking code into a code repository. The developer makes their code changes in a local branch, then adds units tests and integration tests. They ensure that the tests don't lower the overall code coverage. It's possible to automate this process by having a common script that can run the unit tests, integration tests and code coverage.
Once the code is tested in the context of the local branch, the developer needs to merge the master branch into their local branch, and then run the tests/code coverage again. The above process happens repeatedly for every code commit and thereby continuously integrates the new code changes into the existing codebase.
Now that we've gone over some basics, let's get started!
We will not go over the basics of creating a serverless Python app but you can get an idea by reading my post about ETL job processing.
Let's cut to the chase and install the sample app from the source repo using the Serverless Framework like so:
$ sls install --url https://github.com/rupakg/python-ci
$ cd python-ci
Having proper tests in place safeguards against subsequent code updates. We'd like to run tests and code coverage against our code. If the tests pass, we'll deploy our app.
It's this—running tests against our code whenever new code is committed—that allows for continuous integration.
We have some tests that we'll run as part of the testing phase. Notice that we have a test that tests if our function is being called.
We are also separating out the actual testable logic of our function into a class:
# hw/helloworld.py

class HelloWorld:
    def say_hello(self, event):
        return {
            "message": "Go Serverless v1.0! Your function executed successfully!",
            "input": event
        }
The handler.py code is refactored to use the above say_hello method from the HelloWorld class:
# handler.py

from hw.helloworld import HelloWorld
import json

def hello_world(event, context):
    world = HelloWorld()

    response = {
        "statusCode": 200,
        "body": json.dumps(world.say_hello(event))
    }

    return response
This makes testing the core logic of the app easy and also decouples it from the provider-specific function signature.
Now that we've got our tests written up, let's run them locally before we include them as part of our CI/CD process. For running tests we will use nose. We add the --with-coverage flag to run the test with code coverage. Remember you will need coverage.js installed to use coverage.
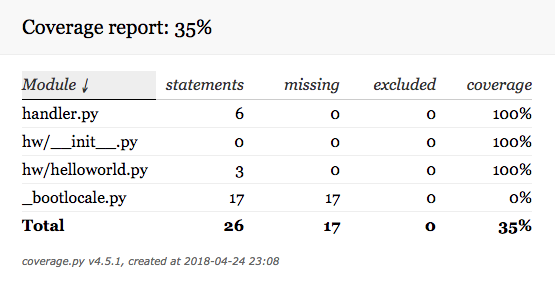
$ nosetests --with-coverageThe tests results looks like this on the terminal:
..
Name               Stmts   Miss  Cover
--------------------------------------
handler.py             6      0   100%
hw/__init__.py         0      0   100%
hw/helloworld.py       3      0   100%
_bootlocale.py        17     17     0%
--------------------------------------
TOTAL                 26     17    35%
----------------------------------------------------------------------
Ran 2 tests in 0.061s

OK
Alternatively, you could also run code coverage with the --cover-html flag to get a nice visual chart of the code coverage as shown below:
$ nosetests --with-coverage --cover-htmlThe above command creates a html representation of the coverage metrics in the default folder cover and looks like so:
Visual code coverage results
After running the tests, you should see that a .coverage folder has been created. If you run the visual code coverage command, the cover folder will be created as well. You'll also have a .circleci folder—that one is required to enable build automation with CircleCI.
When we deploy our serverless app via the Serverless Framework, all the files in your current folder will be zipped up and be part of the deployment to AWS.
Since the coverage, cover and .circleci files are not necessary for running our app, let's exclude them from our final deployment by excluding them in our serverless.yml file:
# exclude the code coverage files and circle ci files
package:
  exclude:
  - .coverage
  - cover/**
  - .circleci/**
See more details on packaging options with the Serverless Framework.
We'll be using CircleCI for automating the CI/CD pipeline for our python-ci app.
Let's get everything ready to go.
Sign up for a CircleCI account if you don't already have one. As part of the sign-up process, we'll authorize CircleCI to access our public Github repo so that it can run builds.
It is a good practice to have a separate IAM user just for the CI build process. We'll create a new IAM user called circleci in the AWS console. Give the user programmatic access and save the AWS credentials, which we'll use later to configure our project in CircleCI.
Note: More on setting up IAM users here.
We have to configure AWS credentials with CircleCI in order to deploy our app to AWS.
Go to your project python-ci -> Project Settings -> AWS Permissions, and add your AWS credentials for the circleci IAM user we created earlier.

Adding AWS credentials
Now that we've completed our CircleCI setup, let's work on implementing the CI/CD workflow for our project.
We'll configure CircleCI via a config file named config.yml and keep it in the .circleci directory. Explanation of how CircleCI works is out of scope for this article, but we'll look at the steps needed to automate our deployments.
If you want some further reading, CircleCI introduces concepts of Jobs, Steps and Workflows.
To keep things simple and get started, we'll use a simple configuration wherein everything we do will be in one job and under one step. CircleCI allows for multiple jobs with multiple steps all orchestrated via a workflow.
Here is a snippet of the config file that we'll use:
# Javascript Node CircleCI 2.0 configuration file

version: 2
jobs:
  build:
    working_directory: ~/python-ci

    docker:
      # specify the version you desire here
      - image: circleci/python:3.6.1

    steps:
      - checkout

      # Download and cache dependencies
      - restore_cache:
          keys:
            - dependencies-node-{{ checksum "package.json" }}
            # fallback to using the latest cache if no exact match is found
            - dependencies-node

      - run:
          name: Install python test dependencies
          command: |
            sudo pip install nose
            sudo pip install coverage

      # this is slow. build a custom docker image and use that
      - run:
          name: Install node and npm
          command: |
            curl -sL https://deb.nodesource.com/setup_6.x | sudo -E bash -
            sudo apt-get install -y nodejs
            node --version && npm -v

      - run:
          name: Install Serverless CLI and dependencies
          command: |
            sudo npm i -g serverless
            npm install

      - save_cache:
          paths:
            - node_modules
          key: dependencies-node-{{ checksum "package.json" }}

      # run tests
      - run:
          name: Run tests with code coverage
          command: |
            nosetests --with-coverage

      # deploy app
      - run:
          name: Deploy application
          command: sls deploy -v
We have a job named build, and we have a few steps. The checkout step will check out the files from the attached source repo. We also have a few run steps that just execute bash commands.
We'll install the serverless cli and the project dependencies, then run our tests with code coverage enabled, and finally deploy the application.
Note: The save_cache and restore_cache sections in the above config file, allows for caching the node_modules between builds, as long as the package.json file has not changed. It significantly reduces build times.
Note: You can review the full config file for our app. And you can review a full CircleCI sample configuration file with more options as well.
To add our app project to CircleCI, do the following:
- Push the local app from your machine to your Github account or fork the sample project on your Github account.
- Go to Projects -> Add Projects, and click the 'Setup project' button next to your project. Make sure the 'Show forks' checkbox is checked.
- Since we have our CircleCI config file already placed at the root of our project, some of the configuration is picked up automatically:
- Pick 'Linux' as the Operating System.
- Pick '2.0' as the Platform.
- Pick 'Node' as the Language.
- Skip steps 1-4. Click on 'Start building'.
You'll see the system running the build for your project.

Build running on CircleCI
You can drill down to see the steps on the UI that matches our steps in the config file. While it is executing each step, you can see the activity.

Build steps for the project
You can see the tests running as part of the 'Run tests with code coverage' step.

Running tests for the project
And finally, you see that our app has been deployed under the 'Deploy application' step.

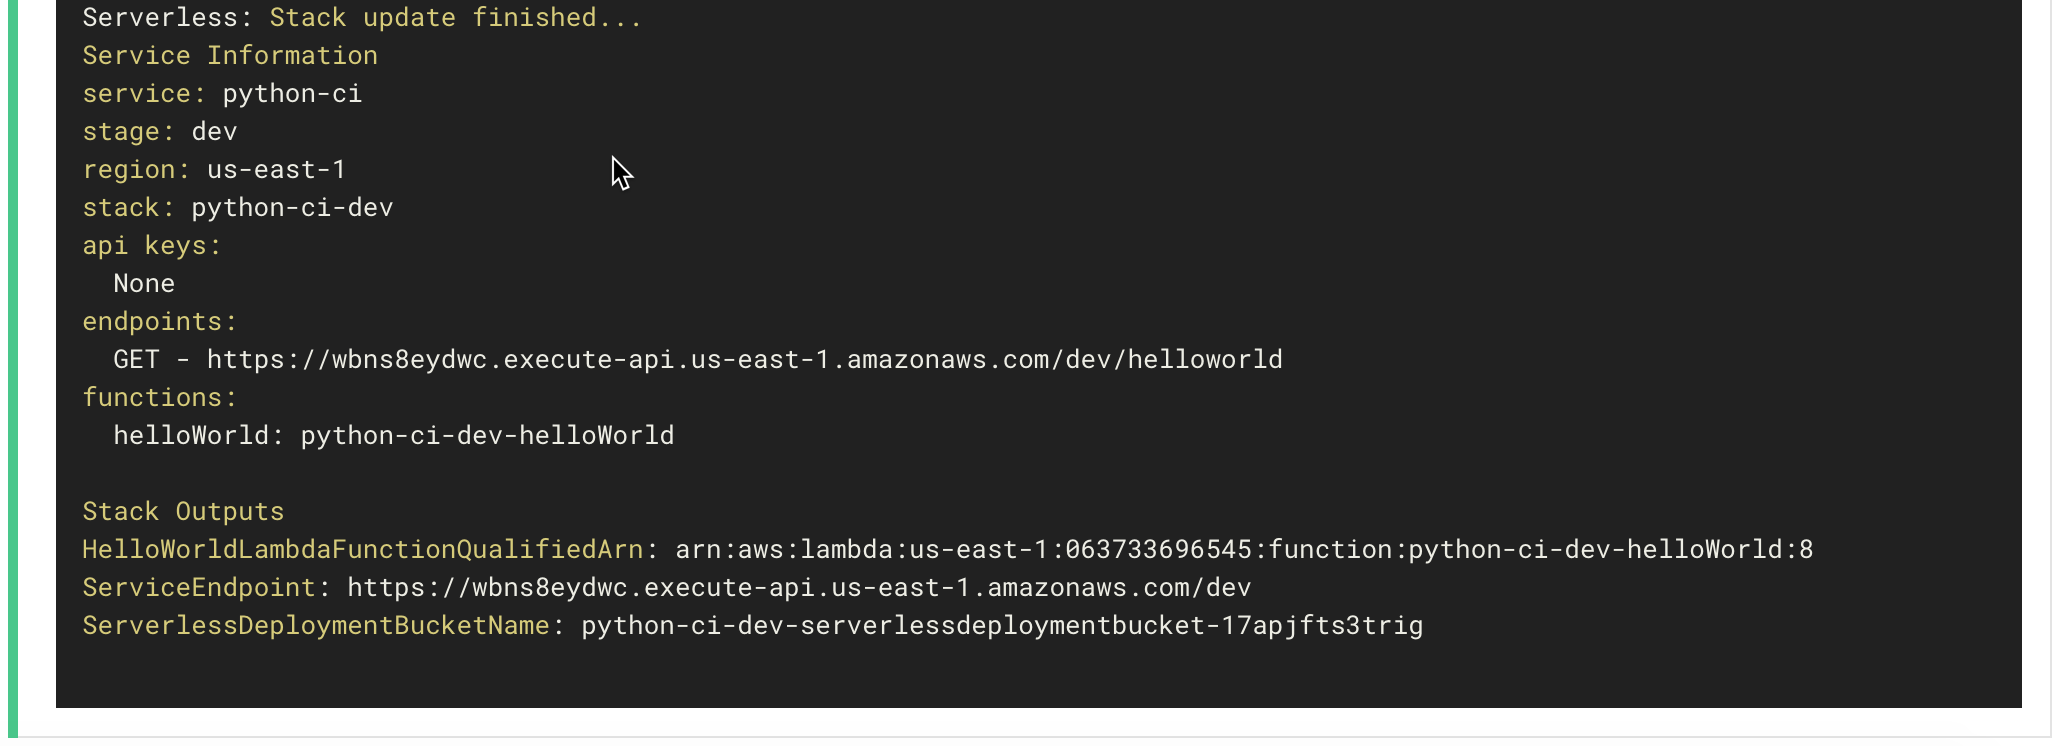
Deploying the project
Last but not least, we can copy the endpoint shown in the output onto a browser and see the app run!

Running the app
Hopefully, the full rundown of the process and its implementation on a CI/CD platform such as CircleCI gives you a better understanding of automating your own applications.
In this post, we looked at the overall CI/CD process flow, and created a serverless application in Python.
We refactored the code to be testable, then ran the tests and code coverage locally to make sure our code was working. Once we had our app running locally, we set up an automated CI workflow for our app on CircleCI.
Any comments or questions? Drop them below!