- Enable natural scrolling
- Enable folder path location
Install Softwares
- chrome
- vscode
- node.js
- npm
- git
- slack
- camtasia
- displayslink
- ruller app (https://apps.apple.com/ie/app/free-ruler/id1483172210?mt=12)
- home brew (https://gist.github.com/rupeshtiwari/9cfa26e3b06f2b0911bc42771a576b7c)
- zsh (https://gist.github.com/rupeshtiwari/e83d15baee60fa26f38bfd2fcd81ea70)
- rectangle
- synology drive
- todoist
- setup backup to nas by time machine
- PDF Editor https://www.pdfgear.com/ PDFGEAR Free Mac software for pdf. You can delete add pages also this is highly recommended tool.
- Select the text you want to change
- Choose Edit > Substitutions > Show Substitutions
- Select the Text Replacement checkbox
- Click Replace in Selection to apply the replacement to part of the document, or Replace All to apply it to the entire document
git config --global user.name "Rupesh Tiwari"
git config --global user.email "[email protected]"https://www.youtube.com/watch?v=6_kMJQggKUw&ab_channel=MikeFaucher
Time Machine will allow you to use multiple backup destinations. So if you can access shared folders on the NAS in question, then you can just create a shared folder on the NAS for Time Machine backups , go to System Preferences > Time Machine, unlock the panel if needed, click Add or Remove Backup Disk, and then select the shared folder on the NAS to back up to it. https://discussions.apple.com/thread/253635742?sortBy=best https://support.apple.com/en-us/102423
https://www.youtube.com/watch?v=EtYOaH7deeo&ab_channel=Kevin%27sGuides https://github.com/debauchee/barrier https://kevinsguides.com/guides/utilities/barrier-mac-windows
# on server machine do this.
cd  "~/library/Application Support/barrier/ssl"
openssl req -new -x509 -sha256 -days 999 -nodes -out Barrier.pem -keyout Barrier.pem
rm -rf yourdirname
- Delete a file:
CMD + Backspace - Empty Recycle bin:
CMD + Shift + Backspace
https://gist.github.com/rupeshtiwari/9cfa26e3b06f2b0911bc42771a576b7c
All steps are mentioned here
# step1:
# Create a folder to download git project
mkdir repos
cd repos
git clone https://github.com/lysyi3m/macos-terminal-themes.git
# Step2: Open Finder and go to themes/ folder
cd macos-terminal-themes/themesStep3: Select your fav theme min one is VS Code Dark Plus.terminal
Step4: Set the theme as the default one with Shell -> Use Settings as Default
# installing curl
brew install curl

# installing git
brew install git
In your browser, download the macOS pkg file: https://awscli.amazonaws.com/AWSCLIV2.pkg
aws --version
It will install python3 by default
There are 2 options to install docker:
Option1: Using Docker Desktop you can install on macos
Option2: If you have Homebrew installed in your macos then follow below instruction to install docker using cli.
# -cask tells home brew that docker is an opensearch project and not maintained by home brew developers.

brew install docker --cask
- go to settings
- go to mouse
- un-select
Scroll direction: Natural
# open .zshrc

open ~/.zshrc

# add this line for Terminal autocomplete fix
autoload -Uz compinit && compinit
save it and you should be good.
Show hidden files in macOS
Open the folder where you want to search for hidden files.
Press the “Command” + “Shift” + “.” (period) keys at the same time.
The hidden files will show up as translucent in the folder.
- Pull down the Apple menu and choose ‘System Preferences’
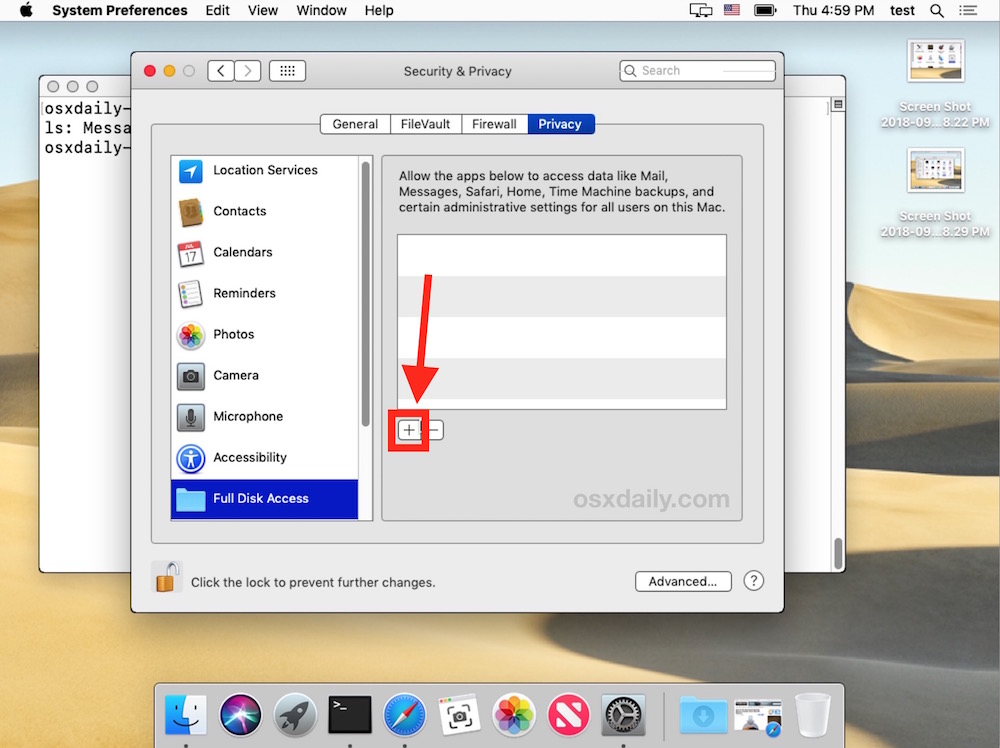
- Choose “Security & Privacy” control panel
- Now select the “Privacy” tab, then from the left-side menu select “Full Disk Access”
- Click the lock icon in the lower left corner of the preference panel and authenticate with an admin level login
- Now click the [+] plus button to add an application with full disk access
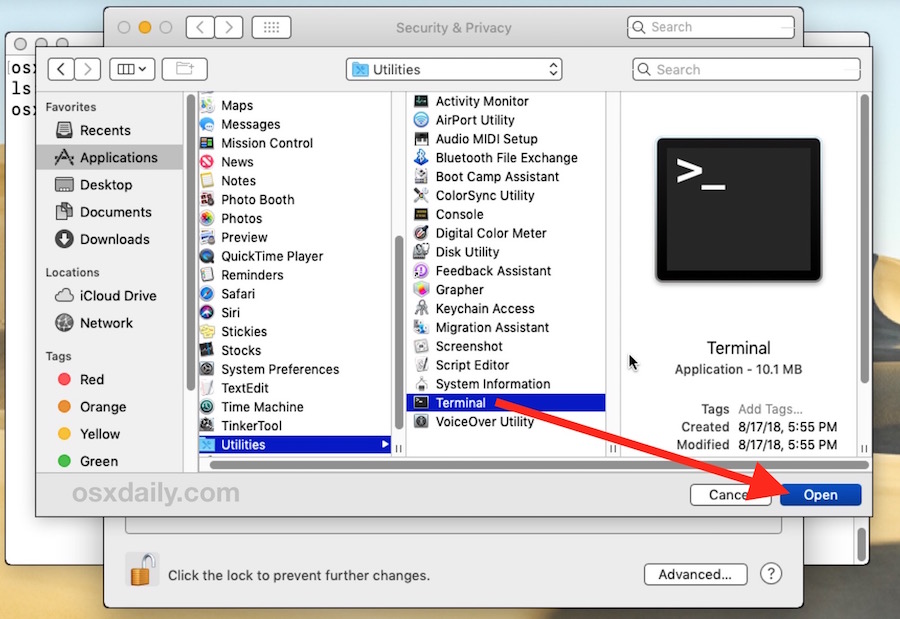
- Navigate to the /Applications/Utilities/ folder and choose “Terminal” to grant Terminal with Full Disk Access privileges
- Relaunch Terminal, the “Operation not permitted” error messages will be gone
Apple Silicon CPU is ARM architecture.
- Install UTM
- Download Ubuntu ARM architecture
- Run UTM select
virtualize - Choose
LinuxOperating System - Select only
apple virtualization
- For RAM select
4096MB - Storage
64GB - Shared dir select as
Downloadsfolder - Give name
ubuntu - Open the UTM settings menu and set the display to Retina so it's nice and sharp.

- Hit the play button and start it up!


- Choose the first option it won't wipe your main macOS hard drive so don't worry! It's only using the virtual machine storage.

- Create your user details. Remember credentials
- Restart VM again
- Next update the ubuntu
sudo apt update
sudo apt upgrade
- Download and install Visual Studio Code. Download and install the latest version of Visual Studio Code and make sure that it is the Linux version that has the .deb file extension at the end https://code.visualstudio.com/.
- Install git
sudo apt install git - Install
zshby runningsudo apt install zsh - Install
curlby runningsudo apt install curl - Install
oh my zshby runningsh -c "$(curl -fsSL https://raw.githubusercontent.com/ohmyzsh/ohmyzsh/master/tools/install.sh)" - Install
node.jschange version number and runcurl -fsSL https://deb.nodesource.com/setup_19.x | sudo -E bash - &&\ sudo apt-get install -y nodejs
brew install sox
sox ./*.wav merged.wav
Changing sample rate to 48KH script.
sox merged.wav -r 48000 merged48k.wav
Install command:
brew install ffmpegRun below to convert mp4 to wav
ffmpeg -i "1. installing linux on windows 11".mp4 test.wav

To achieve the task of converting all .mp4 files in the current directory to .wav files using ffmpeg, where each output .wav file has the same name as its corresponding input .mp4 file (but with the .wav extension), you can use the following Bash script:
#!/bin/bash

# Loop through all .mp4 files in the current directory
for file in *.mp4; do
  # Use parameter expansion to strip the file extension
  base_name="${file%.mp4}"

  # Run ffmpeg command using the base name for both input and output files
  ffmpeg -i "$file" "${base_name}.wav"
done
Here's what the script does:
- It loops through all files with a
.mp4extension in the current directory. - For each file, it extracts the base name (name without the
.mp4extension) using parameter expansion. - It then calls
ffmpegto convert the.mp4file to a.wavfile, using the base name for the output file but changing the extension to.wav.
To use this script:
- Save the script to a file, for example,
convert_to_wav.sh. - Make the script executable by running
chmod +x convert_to_wav.shin the terminal. - Run the script in the directory with your
.mp4files by typing./convert_to_wav.sh.
Ensure you have ffmpeg installed on your system for this script to work. If ffmpeg is not installed, you can typically install it via your operating system's package manager, for example, sudo apt install ffmpeg on Debian/Ubuntu or brew install ffmpeg on macOS.
https://www.amazon.com/gp/product/B098JCTY32/ref=ox_sc_act_title_1?smid=A2FQQGLEBZFB7A&psc=1
https://www.amazon.com/gp/product/B01HCF13U6/ref=ppx_yo_dt_b_asin_title_o00_s00?ie=UTF8&psc=1
Logitech


