Skip to content

Instantly share code, notes, and snippets.

@thomasheller
Last active November 1, 2024 15:26
Show Gist options
  • Save thomasheller/5b9b18917bbaabceb4f629b793428ee2 to your computer and use it in GitHub Desktop.
Save thomasheller/5b9b18917bbaabceb4f629b793428ee2 to your computer and use it in GitHub Desktop.
Install Arch Linux in VirtualBox VM

Install Arch Linux in VirtualBox

Quick install guide for Arch -- if you're looking for an automated installer, consider Arch Anywhere.

Download

Download the latest version from: https://www.archlinux.org/download/

Verify checksums.

Prepare VM

Create a new VM, choose type Linux and version Arch Linux (64-bit). Allocate a reasonable amount of RAM and create a new hard disk.

Make sure the VM has two network adapters enabled: Adapter 1 attached to NAT and Adapter 2 attached to Host-only adapter vboxnet0 if you have multiple VMs inside a host-only network.

Attach the ISO image to your VM and boot into Arch's live system.

Pre-flight checks

Check network: ping archlinux.org

Installation

Partition the disk:

  1. fdisk /dev/sda
  2. n -- new partition
  3. (enter) (p -- primary disk)
  4. (enter) (1 -- partition number)
  5. (enter) set first sector
  6. (enter) set last sector (use whole disk)
  7. w -- write partition table and quit

Format partition:
mkfs.ext4 /dev/sda1

Mount the filesystem:
mount /dev/sda1 /mnt

Install the base packages:
pacstrap /mnt base

Generate /etc/fstab:
genfstab -U /mnt >>/mnt/etc/fstab

Change root to the newly created system:
arch-chroot /mnt

Set the timezone, e.g.:
ln -sf /usr/share/zoneinfo/America/Los_Angeles /etc/localtime

Generate /etc/adjtime:
hwclock --systohc

Enable locale:

  1. Uncomment your preferred locale (e.g. en_US.UTF-8 UTF-8) in /etc/locale.gen using vi.
  2. Run locale-gen.
  3. Put the corresponding LANG variable (e.g. LANG=en_US.UTF-8) in /etc/locale.conf:
    echo 'LANG=en_US.UTF-8' >/etc/locale.conf

Set hostname (e.g. arch):
echo arch >/etc/hostname

Enable DHCP client daemon:
systemctl enable dhcpcd

Set root password:
passwd
(your password)
(your password)

Install GRUB:

  1. pacman -S grub
  2. grub-install --target=i386-pc /dev/sda
  3. grub-mkconfig -o /boot/grub/grub.cfg

Reboot:

  1. exit
  2. umount -R /mnt
  3. reboot

Now boot from the first hard disk.

Post-installation steps

Login as root using your password.

Add non-root user with sudo permissions and Zsh as the default shell:

  1. Install sudo and Zsh:
    pacman -S sudo zsh
  2. Add user (e.g. John):
    useradd -m -g users -s /usr/bin/zsh john
  3. Set password:
    passwd john
    (your password)
    (your password)
  4. Edit /etc/sudoers using EDITOR=vi visudo and add permissions, e.g.:
    john ALL=(ALL) ALL

Setup swap:

  1. Install systemd-swap:
    pacman -S systemd-swap
  2. Enable the swap daemon:
    systemctl enable systemd-swap

Install X11:

  1. Install required packages:
    pacman -S xorg-server xorg-server-utils xorg-xinit xorg-apps xterm
  2. Install video driver:
    pacman -S xf86-video-vesa
  3. Install default terminal:
    pacman -S xterm
  4. Install some popular fonts:
    pacman -S ttf-dejavu ttf-droid ttf-inconsolata

Update the system:
pacman -Syu

Optional steps

  • Install your window manager of choice.
  • Activate bi-directional clipboard in the VM settings and install the Guest Additions.
  • Switch to linux-lts kernel.
Copy link

ghost commented Jan 26, 2023

Hi, when I reboot my PC after removing the hard disk, I've got grub CLI. This is normal?
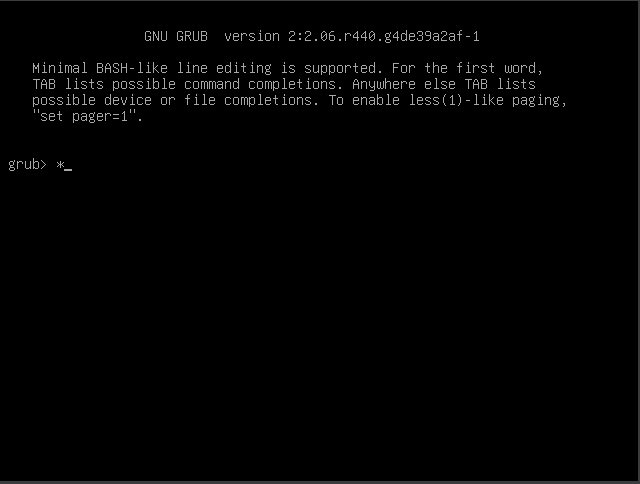
How can I boot in grub cli?
image

@b65deck
Copy link

b65deck commented Jan 27, 2023

Hi @iZel345 That is not normal. You will not be able to boot because there was an installation problem.

This step pacstrap /mnt base does not install the linux kernel. Run pacstrap /mnt base linux (or linux-lts) instead. You can recover your installation if you add back the archlinux iso and reboot from the disk. Then rerun:

mount /dev/sda1 /mnt
pacstrap /mnt linux
arch-chroot /mnt
grub-mkconfig -o /boot/grub/grub.cfg

You should see this in the output of grub-mkconfig:

Found lunux image: /boot/vmlinuz-linux
Found initrd image: /boot/initramfs-linux.img

Reboot and it should work.

Copy link

ghost commented Jan 27, 2023

Perfect, it works ! Thank you.

@kanehekili
Copy link

kanehekili commented Mar 25, 2023

I had 3 problems:

  1. After chroot, there was no vi. pacman -Syu nano solved it.
  2. Could not activate the dhcpcd service, since it didn't exist.
  3. After reboot the linux kernel was missing. You should update your instructions (seems to happen to others as well)

There is no xorg-server-utils (anymore), neither are xorg-apps

Otherwise thanks for this really straightforward installation guide.

@gamer2vr
Copy link

ping: archlinux.org: Temporary failure in name resolution
can't download pacman files.

@bhavyakukkar
Copy link

bhavyakukkar commented Apr 17, 2023

@gamer2vr are you sure you did this step?

Make sure the VM has two network adapters enabled: Adapter 1 attached to NAT and Adapter 2 attached to Host-only adapter vboxnet0 if you have multiple VMs inside a host-only network.

The NAT network adapter can only be enabled on the first adapter after creating one in VirtualBox from the menu in Tools > Network > 'NAT Networks' section > Create (from the top bar). After this it will show up and can be selected in the settings of your Arch VM under the Networks tab. That fixed the problem for me.

@ShalimRazzak
Copy link

ping: archlinux.org: Temporary failure in name resolution can't download pacman files.

Had the same problem I tried to install debian and had no connection to the internet either, it turned out I had to disable my VPN no problems after that.

Also used archinstall command for auto configuration

If you want to automate most of the process these 3 commands worked for me.

  1. ping archlinux.org
  2. pacman -Sy archlinux-keyring
  3. archinstall

Hope it helps any new users following this guide.

@Shiromori-Isao
Copy link

Welp.. I'm only getting errors whenever I try to do most of the post-installation steps.. they all just fail to retrieve

@bhavyakukkar
Copy link

ping: archlinux.org: Temporary failure in name resolution can't download pacman files.

Had the same problem I tried to install debian and had no connection to the internet either, it turned out I had to disable my VPN no problems after that.

Also used archinstall command for auto configuration

If you want to automate most of the process these 3 commands worked for me.

  1. ping archlinux.org
  2. pacman -Sy archlinux-keyring
  3. archinstall

Hope it helps any new users following this guide.

I'd also like to add that if you ever run into exceptions in archinstall you should try to do a pacman -S archinstall before step 3 since archinstall is often behind on the liveISO.

@hopeseekr
Copy link

You can download a VirtualBox or VMWare image of Arch Linux over here: https://www.osboxes.org/arch-linux/

@EnriqueDev2002
Copy link

EnriqueDev2002 commented Mar 21, 2024

if you are having grub issue:
image

mount the iso again and type this commands from the instalation terminal:

mount /dev/sda1 /mnt
arch-chroot /mnt
pacman -S linux dhcpcd
systemctl enable dhcpcd
grub-mkconfig -o /boot/grub/grub.cfg
exit
reboot

after the reboot remove the iso and arch should allow you to log as root.

@TehPuertoRicanSpartan
Copy link

image
what

@bhavyakukkar
Copy link

image what

you're either not connected to the internet or don't have a nameserver configured that will fetch all the hostnames. check the contents of /etc/hosts

Sign up for free to join this conversation on GitHub. Already have an account? Sign in to comment