Skip to content

Instantly share code, notes, and snippets.

@1oh1
Last active November 11, 2024 19:40
Show Gist options
  • Save 1oh1/c095b0808627ef1cf2c887ce17a4681d to your computer and use it in GitHub Desktop.
Save 1oh1/c095b0808627ef1cf2c887ce17a4681d to your computer and use it in GitHub Desktop.
Dell OptiPlex 3060 - Enable NVMe Gen 3 speeds (Enable PCIe 3.0)

Enable PCIe 3.0 speeds for NVMe SSDs on Dell OptiPlex 3060

Out of the box, any M.2 NVMe SSDs connected to the Dell OptiPlex 3060 runs at PCIe Gen 2.0 speeds (Max 5 GT/s; 2 GB/s) so the speed tests look like this:

screen1

However, after this BIOS mod, the SSD can reach PCIe Gen 3.0 speeds (Max 8 GT/s; 3.9 GB/s) so the speed tests look like this:

screen2

Steps to enable PCIe 3.0

Click here to watch a video tutorial

  1. Disable Secure Boot in the BIOS:

    SettingsSecure BootSecure Boot Enable → select Disabled

  2. Download the latest version of RU.EFI from http://ruexe.blogspot.com/

  3. Format a USB pen drive as FAT32 using MBR partitioning

  4. Copy RU.EFI to the root of the pen drive (e.g. D:\RU.EFI)

  5. Reboot the OptiPlex 3060 with the pen drive plugged in and enter BIOS by pressing F2

  6. Under Settings → General → Boot Sequence click on Add Boot Option

  7. Under File System List select your USB pen drive. It has a name like

    PciRoot(0x0)/Pci(0x14,0x0)/USB(0x7,0x0)/HD(1.MBR,0x52DED30C)

  8. Click on the 3 dots ... and select RU.EFI from the list of files

  9. For Boot Option Name enter a name and click OK. This will be displayed on the boot selection screen (e.g. RU.EFI)

  10. Click Apply and select Save as Custom User Settings and click OK

  11. Click Exit

  12. The system will now reboot. Repeatedly press F12 until you get to the boot device selection screen

  13. Under UEFI BOOT: select the boot device with the name you entered in Step 8 (e.g. RU.EFI) and press Enter

  14. Press Enter to dismiss the RU.EFI splash screen

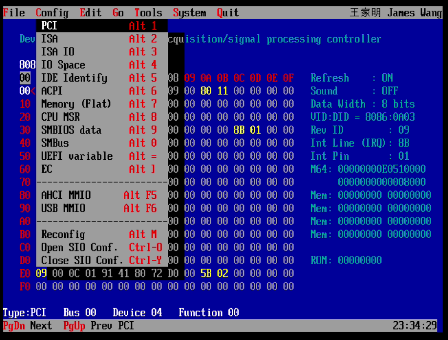
  15. Press Alt+= to get to the UEFI variable editor screen

  16. Press the key until you get to the Setup UEFI variable and press Enter

  17. Press Ctrl+PgDown keys until you see 0C40 on the left

  18. Press until your cursor is at the first number in the 0C40 row

  19. Press Enter and press 0 and 3 and press Enter again to update the first number in the row from 02 to 03

  20. Change all 02 to 03 in line 0C40 and 0C50

  21. Press Ctrl+W to write changes and press Alt+Q to exit and reboot

Test the change

Besides the obvious speed difference that can be noticed in a CrystalDiskMark benchmark, you can also check to see if the PCIe version reported in HWiNFO has changed

Before

After

Credit

https://github.com/Lorys89/DELL_OPTIPLEX_3060_MFF

@BeegDeek
Copy link

I have 10 of the Dell Optiplex 3060 Small Form Factors with I5-8500 3.0 Ghz cpu with 16gb of memory. & Micron 256 gb m.2 ssd

I want to upgrade to a larger and hopefully faster m.2 drive I looked at a local retailer at the samsung 980 Pro 2tb internal gaming ssd PCIe Gen 4x4 NVMe , the 990PPro 2tb internal SSD PCIe GTen 4x4 NVMe and 970EVO Plus 2tb Internal SSD PCIe GEn 3x4 NVMe which one would be best to install for these computers (assuming that 2tb versions will work. I saw the conversation from the dell forum that brought me here and this looks like a excellent performance enhancement. Thanks for all the hard work. the 1st 2 that I am going to do is for a system that I'll be doing all kings of things on and the other is for a Mass Spectrometer this drive will have Windows 10 Pro and the Mass Spec software 16gb ram and I have to add a additional network port. I would appreciate any input on what drive would be best for each of these I have had wonderful luck with the samsung m.2 drives but I have always used Asus boards but I have to put these in these in The dell 3060's Thank you for your help and all the great videos and documentation and I appreciate in advance the advice as to which drive to install or if none of the above then which one to get

I would get the 4x4 NVMe because its backwards compatible and if the 3060 dies you'll have the drive for the next computer

@1oh1
Copy link
Author

1oh1 commented May 1, 2023

No problem @1oh1 do you think I can add support to 9th gen with the same program? Other people did it for other versions of the same gen. I could also pay you a bounty to figure it out? Because we want to add the i9 in all our systems

Sorry, I know nothing about modding BIOSes. I think your best best is to approach the same guy who modded the 7060 BIOS to support 9th gen Intel microcodes: https://www.bios-mods.com/forum/archive/index.php?thread-35134-4.html

@fightforlife
Copy link

Did someone else notice a 1-2W higher idle power consumption after switching to pcie gene?

@dinjojo
Copy link

dinjojo commented May 28, 2023

Shouldnt be I tested it with power meter Infact the power usage should go down.

@concatime
Copy link

My two cents:

  1. Update the BIOS.
  2. Disable Secure boot.
  3. Use RU version 5.32.0423 because 5.33.0425 does not work.
  4. You don't need to mess with boot options, all you have to do is copy RU.efi as \EFI\BOOT\BOOTx64.EFI in a FAT32 parition.
  5. Spam F12 on OptiPlex boot, and choose UEFI: xxx entry.

Here are Linux instructions:

  1. Format your USB drive (GPT+FAT32).
printf "label: gpt\ntype=EBD0A0A2-B9E5-4433-87C0-68B6B72699C7\n" | sudo sfdisk /dev/sdX
sudo mkfs -t fat -F 32 /dev/sdX1
  1. Mount and copy.
sudo mount -m /dev/sdX1 /mnt/usb
sudo install -D ./RU.efi /mnt/usb/EFI/BOOT/BOOTx64.EFI && sync
sudo umount /mnt/usb

@BeegDeek
Copy link

I had to reinstall Windows 11 and it went back to 2.0 so I've come to the conclusion these Dell Optiplexes are junk

@robh946
Copy link

robh946 commented Sep 9, 2023

Thanks so much! Worked fine on my 3060 - my read speeds are up but the write speeds are down. Can anyone perhaps help?

SSD Speedtest
SSD Speedtest-3 0

@Hygens
Copy link

Hygens commented Oct 5, 2023

Great Gist, thank you very much!
Please what editions I can execute on BIOS to use processor i7-8700 with 3060m?

Best,

@Hygens
Copy link

Hygens commented Oct 5, 2023

I had to reinstall Windows 11 and it went back to 2.0 so I've come to the conclusion these Dell Optiplexes are junk

Really your comment is correct dell is a junk. I have one lenovo thinkcentre 12th that was with i5-12400T and only put there i5-12600K and replace PSU to 230W and is working perfect. I haven't any blocking on BIOS but dell optiplex all time you have blocking on various resources on BIOS.

@MichaelMebert
Copy link

hello. just find your amazing work. as i had successfully patched some optiplex biosses for nvme boot support i am not completely new in this topic.
but here i understand that this changes had to be done in a special area of the bios, which -i guess- is different on every machine/bios.
so my question is.
could this be done on a optiplex 5050 series too?
if yes, how i can find and identify which bytes have to be changed on other optiplex bios ( especially the 5050 SFF as i have a bunch of those).
thanks for your help michael

@cheese-leopard
Copy link

Thanks so much, I haven't found any other work forcusing on how to converting pcie smaller gen. to larger gen., which almost made me give up. People who comes up with this idea is literally genius!

@1oh1
Copy link
Author

1oh1 commented Oct 25, 2023

I just wanted to mention that none of this is my work. I simply made it somewhat easier to follow along for beginners. Thanks to Lorys89 who figured this out. You can check out their work here: https://github.com/Lorys89/DELL_OPTIPLEX_3060_MFF

@ripka-sam
Copy link

ripka-sam commented Dec 19, 2023

Thank you so much! Now it's working much better!
2
3
I also did the following and got a better result:
Bios settings:
Enable:
SATA Operation : AHCI
Fastboot : Thorough
Integrated NIC : Enable
Disable :
Secure Boot
Absolute
Intel SGX
Enable UEFI Network Stack
And got this result
4

@Joergen8
Copy link

Worked great on my 3060 Micro and Samsung 970 EVO Plus 1TB. Thanks!

Might add a note about european/other kb layouts, that RU.EXE defaults to the US keyboard layout, so "Alt" + "=" is "Alt" + "whatever is immediately left of backspace". Things like this are not obvious to people who aren't used to text-based interfaces and tools.

Also, hitting "Alt"+"Q" quit and went into the HP support assistant, then hitting ESC shuts down the PC. Not "to quit and reboot".
Sams_PCI2_default_CrystalDiskMark_20240119185336
Sams_PCI3_mod_CrystalDiskMark_20240119201455

@Joergen8
Copy link

Thanks so much! Worked fine on my 3060 - my read speeds are up but the write speeds are down. Can anyone perhaps help?

SSD Speedtest SSD Speedtest-3 0

The SSD might be heat throttling on the PCIe 3.0 speeds under the stress of the test. Try changing the number of tests from 5 to 1 to see if that helps.

@robh946
Copy link

robh946 commented Jan 20, 2024

Thanks Joergen - write speeds did improve

@DocYoda47
Copy link

I have two Dell 3060 micros. 1 with 8100T and one with 8700. Planning to get more of the 3060 coz it is selling like pancakes here. Looking for a copper heatsinks to replace to the stock CPU heatsink. Care to share links where to buy? Thanks

@ElitSnip
Copy link

Thanks, it works great with my Kingston SNV2S500G SSD !

SSD

@TimH990
Copy link

TimH990 commented Jul 9, 2024

Thanks, this looks very promising. However I myself have a Dell Optiplex 3070. Anyone know or tried it on a 3070 whether this works?
Based on https://www.reddit.com/r/Dell/comments/iifyp8/getting_pcie_gen_2_speeds_instead_of_gen_3/ I noticed that the 3070 has the same limitation.

@1oh1
Copy link
Author

1oh1 commented Jul 9, 2024

It should work fine on a 3070 SFF as well.

@TimH990
Copy link

TimH990 commented Jul 9, 2024

Thank you for your quick reply, I have a 3070 MFF, I assume that works at well?

@1oh1
Copy link
Author

1oh1 commented Jul 9, 2024

I don't have one so I can't say for sure. You could try it out and report back if it worked for you. I'm fairly confident that it might.

@TimH990
Copy link

TimH990 commented Jul 11, 2024

I just followed the steps, it works! Thank you!

Dell Optiplex 3070 MFF
i3-9100T
16GB RAM
WD Black SN770 1TB

Before:
CrystalDiskMark_20240711200703
After:
CrystalDiskMark_20240711203601

@alex-pt-0
Copy link

Hello, dear author. When using version RU.EFI 5.32.0423, at step 14 (Press Alt+= to get to the UEFI variable editor screen) when using the European layout, I cannot enter the UEFI variable editor screen. Maybe you know how to get through this step? Thank you very much.
PXL_20240901_181309603

@1oh1
Copy link
Author

1oh1 commented Sep 6, 2024

when using the European layout, I cannot enter the UEFI variable editor screen

Looks like the UEFI variable editor shows up in the Config menu so you could try pressing Alt+C and selecting it from the list.

@firdaussimbolon
Copy link

Following this mod BIOS and it improved my NVMe performance Read (the write is still same, but OK)
CrystalDiskMark_20240918184328

OOT : is it possible to enabling 'Above 4G Decode' feature in Optiplex 3060 to enable 'ReBAR Support'? I was following this tutorial (https://github.com/xCuri0/ReBarUEFI/wiki/Enabling-hidden-4G-decoding) and try to extract the BIOS but it always give me error. I hope you or someone here can help me about this.

@bluedabadee
Copy link

bluedabadee commented Oct 9, 2024

Has anyone tried this on dell inspiron laptops? Specifically the dell inspiron 15 5570? It's running gt2 power saving mode but it doesn't even register on crystal disk, gets like 1800mbps, I'm seeing a physical limitation on the manual saying it runs gen3x2, so I'm guessing they disabled two lanes to qualify it for power consumption.

Now that I think of it, it probably won't work because it's a gen3x2. The issue with the optiplex was it was a gen2x4 to gen3x4.

@durakkerem
Copy link

My two cents:

  1. Update the BIOS.
  2. Disable Secure boot.
  3. Use RU version 5.32.0423 because 5.33.0425 does not work.
  4. You don't need to mess with boot options, all you have to do is copy RU.efi as \EFI\BOOT\BOOTx64.EFI in a FAT32 parition.
  5. Spam F12 on OptiPlex boot, and choose UEFI: xxx entry.

Here are Linux instructions:

  1. Format your USB drive (GPT+FAT32).
printf "label: gpt\ntype=EBD0A0A2-B9E5-4433-87C0-68B6B72699C7\n" | sudo sfdisk /dev/sdX
sudo mkfs -t fat -F 32 /dev/sdX1
  1. Mount and copy.
sudo mount -m /dev/sdX1 /mnt/usb
sudo install -D ./RU.efi /mnt/usb/EFI/BOOT/BOOTx64.EFI && sync
sudo umount /mnt/usb

Thank you! Latest version of ru.efi did not work for me either but using the previous version worked like a charm!

@frauseo
Copy link

frauseo commented Nov 11, 2024

Hello, dear author. When using version RU.EFI 5.32.0423, at step 14 (Press Alt+= to get to the UEFI variable editor screen) when using the European layout, I cannot enter the UEFI variable editor screen. Maybe you know how to get through this step? Thank you very much.

Just use the ANSI layout. It works on a CH-DE keyboard no issue ("=" is closest to the backspace)

Sign up for free to join this conversation on GitHub. Already have an account? Sign in to comment