
The Pencil Method/Pencil Bypass is an unenrollment vulnerability for Chromebooks. Specifically, it allows disabling hardware write protection regardless of FWMP state by physically powering the write-protect pin on the security chip, usually to set GBB flags while still enrolled. The guides I've seen about this aren't bad, but they involve taking a lot of risk, some of which can be lessened if you have the right tools. So here's how you do it!
Caution
This method is very, very risky. I do not advise doing this unless you know that you know what you're doing, as messing up on anything can & will permanently brick your device. If you:
- Completely understand what each step says what to do & what it entails, without having to look anything up.
- Have experience with all of the materials & equipment in this guide.
...then you probably have enough knowledge and confidence to do this. Otherwise, close this tab right now. Either way, I am not responsible for the consequences of following this guide, and you agree to those terms by following this guide.
- Scissors
- Insulated non-jumper wires
- Wire strippers
- A Phillips screwdriver, plus whatever you need to open the shell of your device
- Soldering equipment (soldering iron, solder, flux, wet sponge, etc.)
- Desoldering equipment (soldersucker/desoldering wick)
- A good quality multimeter that supports (preferrably audio-)continuity mode and has needle probes
- Electrical tape
- Helping hands (either the thing with the metal arms, or an IRL friend with tweezers), for holding the bridge in place as you solder it down
- A USB/(micro)SD card flashed with a recent version of legacy SH1MMER
Important
This guide uses a method that I feel is the safest, because it allows you to check what pins are bridged before powering on the device, and solders the bridge in place so that it doesn't slip. The downside to this is is that if you do not have these materials, this guide is no longer the best one for you to follow. If you don't have the necessary materials for this guide, either get them (which I highly recommend), or follow Darkn's guide. Please, do not follow this guide if you don't have all of the necessary materials!
Warning
This guide is specifically for Cr50 Chromebooks (which tend to be older models). If your device has a Ti50 security chip (usually on newer models), you should instead use Pencil Sharpener. To check what security chip your device uses, boot into Recovery Mode (esc+refresh+power). If you see an ugly plain white screen with an image telling you to insert a recovery drive, your device is definitely Cr50, and you can safely proceed with this guide. If you see a more polished grey interface, your device most likely uses Ti50, but you should do some research to find out yourself.
- Completely power off your device and unplug everything from the ports. Open the shell and gently unplug any ribbon cables and unscrew any screws required to completely remove the motherboard from the device, making especially sure that the battery is unplugged. Place the motherboard on your soldering workspace, and keep all screws and loose components in a safe place.
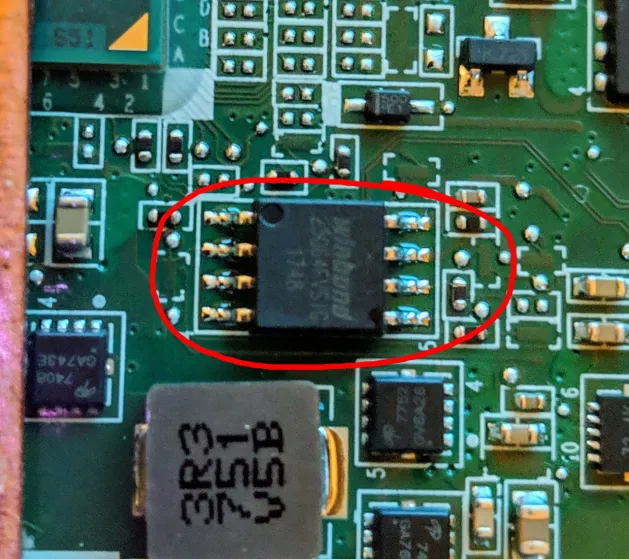
- Locate a small chip that matches one of these images (it may be on the underside):
SOIC-8 Chip (easier):
WSON-8 Chip (more difficult due to smaller pins):
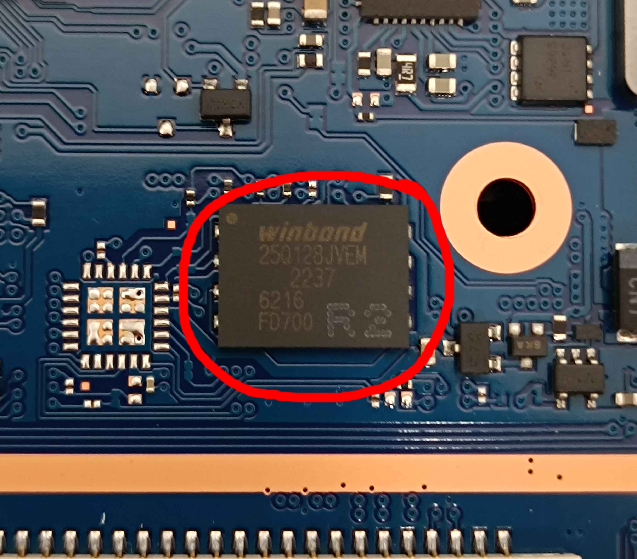
- Remove any tape surrounding the chip. Rotate the motherboard so that when you look at the chip, the small circular indent/marker is at the top-left of the chip. From here, the pins are:
1 -|•‾‾‾‾‾‾‾‾‾‾‾|- 8
2 -|⠀⠀⠀⠀⠀⠀⠀⠀ |- 7
3 -|⠀⠀⠀⠀⠀⠀⠀⠀ |- 6
4 -|_____________|- 5
The pinout is the same for both chip models
The pins we care about are pin 3 (WP/write-protect), pin 4 (GND/ground), and pin 8 (VCC/voltage):
- Our goal is to bridge pin 3 to pin 8, meaning that whenever the board receives power, pin 8's voltage will power pin 3, disabling hardware write protection even though
FWMPis enabled. - We also want to avoid providing power to anything else, which could cause a malfunction. We want to be especially careful about not letting the pin 3 side of the bridge slip to pin 4; doing so (connecting
VCCdirectly toGND) results in a classic short-circuit, completely frying your chip. - We can check that the correct pins and only the correct pins are bridged using a multimeter's continuity mode.
- If you haven't done so already, heat up your soldering iron to standard soldering temperature. Meanwhile, prepare your bridge; snip a piece of insulated wire that's around half a centimeter longer than the length from pin 3 to pin 8 (no longer, no shorter) and strip a small bit of insulation off of each end.
- Bend the exposed ends of the wire down at approximately 90°. Touch the wire to either pin 3 or pin 8, and push it up against the housing of the chip. Secure it in place with your helping hands. (Keep the other end of the wire out of the way for now.)
- Using as little solder as possible to prevent it leeking onto the board or other pins, solder the wire to the pin. Let it cool down before proceeding.
- Repeat steps 5 & 6 on the other pin.
- Turn your multimeter to (audible) continuity mode and touch one end to pin 3 and the other to pin 8 (it doesn't matter which probe touches which pin). Don't touch the solder or the wire, only the end of each pin. The multimeter should beep (or if it doesn't have audible mode, the display should read a low value instead of "Open Line"/"OL") if the pins are successfully bridged. Do this test on each of pin 3's neighbors (pins 2 & 8 and pins 4 & 8); this time, the meter should not beep, and should report an open line. If something that wasn't supposed to be bridged got bridged, desolder & resolder as necessary.
Tip
If in doubt, desolder the bridge completely and try again, and again, and again, until you feel confident that you did it right.
- Once the bridge is fully cooled, bend the bridge sideways so that it sits flush against the chip and tape it down with electrical tape. Reassemble completely.
- Once the battery is plugged in, boot into Recovery Mode. Switch to Developer Mode (ctrl+d, then enter). You should see a screen similar to the Recovery Mode screen, saying that Developer Mode is disabled by system policy. Re-enter recovery mode. (Yes, all of this is necessary.)
- Plug in your SH1MMER USB/(micro)SD card and let it sit for a while until it gets to a TUI containing a list of options. Choose "Deprovision" (it might fail, and that's OK). Next, choose to open a BASH shell. Run this command:
flashrom --wp-disable- Next, you can set your GBB flags, which are a set of options for the security chip. If you don't know what GBB flags are, it is reccomended that you go with
0x8021(reduces the "OS Verification is Off" screen to just two seconds before automatically booting, allows you to roll back to any version regardless of your kernel version, and ignoresFWMP). If you would like to customize your flags, use the GBB-Flaginator; select "Decode flags", put0x8020in the box, and reselect "Select flags". At this point, you can customize your GBB flags (but make sure not to deselect the ones that are already there, unless you want to do all of this over again).
Note
These flags persist through powerwashes, toggling OS Verification, and booting shims. To change/reset them, you must disable hardware write protection (which is a lot easier when unenrolled; usually just involves disconnecting the battery or using closed-case debugging), or via a chipflasher. This means that once you've unenrolled and set these once, you've "unlocked" your device in a way that lets you unenroll at any other time, no matter what.
Important
Some of these flags are dangerous. If you don't know what a flag does, it's best to leave it off, or even safer, use the recommended 0x8021 flags provided.
- Once you've decided what flags to use, run this command, typing your flags (including the
0x) instead of<flags>:
/usr/share/vboot/bin/set_gbb_flags.sh <flags>You can then check if the flags were set successfully by running:
/usr/share/vboot/bin/get_gbb_flags.sh...which should return the flags you just set. 14. At this point, you're done with the risky part! Exit SH1MMER via the menu option and boot normally. (Press ctrl+d to get past the "OS Verification is Off" screen.) It is highly recommended that you power off, unplug everything, take out the motherboard, and desolder the bridge & excess solder; there's always a chance that the chip will short in the future if you leave the bridge there (plus, leaving write protect off indefinitely is generally a bad idea for security reasons).
But you're not completely done yet! You've technically allowed yourself to unenroll at any time, but you are still technically enrolled. Don't go through the OOBE (setup process) yet!!! If you do, your district will receive a notification on the Admin Console that your device is in Developer Mode. Instead, you have a couple other choices:
- Install Modmium, a mod for ChromeOS that allows you to do everything you could do in Developer Mode (edit policies, install anything, etc.) while still technically being enrolled in Verified Mode. (I highly recommend this, even if you have experience with being freely unenrolled in Developer Mode.)
- Stay unenrolled and in Developer Mode, where you can do whatever you want.
If you choose to install Modmium, make sure that you are on at least v131 (if not, flash the latest ChromeOS image for your board to a USB/(micro)SD card and recover with it). You can then follow Modmium's installation guide.
If you choose to stay unenrolled and use actual Developer Mode, prepare a USB/(micro)SD card containing ChromeOS v123 (or earlier) for your board and recover with it. Afterward, boot back into SH1MMER, and run these commands:
tpm_manager_client take_ownership
cryptohome --action=remove_firmware_management_parameters
Exit SH1MMER via the menu option and boot normally. You may want to set up a password for the virtual terminals (otherwise, anyone could get into your device and run any commands they want with root permissions). In that case, select "Enable debugging features" and go through the process; your device will reboot, and you will see options to set the password for the root user.
Warning
Using the "Enable debugging features" option turns off RootFS Verification; doing so allows writing to any file via the root user, but it also means that you must recover ChromeOS in order to switch back to Verified Mode. There's a trade-off!
If you wish to stay on the ChromeOS version you just flashed (which, at this point, is very outdated), open VT-2, log in as root (if you set a password just now, you will be prompted to enter it), and run this command (you will have to do this every time you reboot your device, but there are other methods):
initctl stop update-engineYou can then close VT-2 and proceed through the OOBE, choosing to use this device as a personal device.
That's it, I've got nothing else to say!!
All in all, just don’t do this shit. If your Chromebook bricks, that’s on you. But if you do this and your Chromebook ends up being unenrolled, then congratulations. You took the risk for a huge reward, and now you can do whatever the hell you want on that Chromebook.
-Darkn