Below steps allow you to setup Websocket support for your Bitwarden_rs installation running on Synology Diskstation. You can do all steps using the GUI so there is no SSH Access needed.
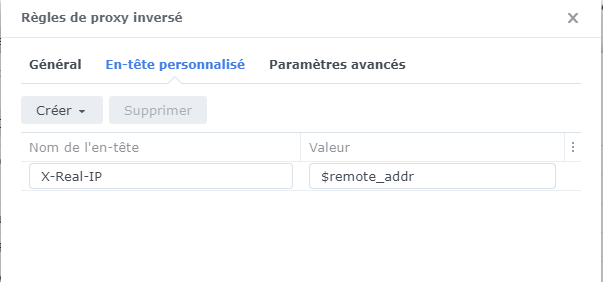
- Working HTTPS Reverse proxy Setup (Control Panel -> Application Portal -> Reverse Proxy)
- Set Enviourment Variable
WEBSOCKET_ENABLED=truein your Bitwarden container and expose the container port3012to a local port, in my case5556.
- Download enable_ws.sh
- Upload the script "enable_ws.sh" onto your Diskstation. I would recommand putting it in your Bitwarden directory. In my case
/volume1/docker/bitwarden
Control Panel -> Task Scheduler -> Create -> Scheduled Task -> User-defined Script
Make sure to amend the command according to your setup.
/volume1/docker/bitwarden/enable_ws.sh= Full path to previously uploaded scriptvault.example.com= Hostname of your Bitwarden_rs as configured in the Reverse Proxy5555= Exposed ROCKET_PORT by Docker (The same as in your Reverse Proxy setup)5556= Exposed WEBSOCKET_PORT by Docker
Run Command (My example):
bash /volume1/docker/bitwarden/enable_ws.sh vault.example.com 5555 5556
  General Settings
      Task -> Enable BW WS
      User -> root
      Enabled -> Tick
  Schedule
      Run on the following days -> Daily
      Frequency -> Every hour
  Task Settings:
      (Optional) Enable Notifications
      Run Command: <Paste Command Crafted Above>
Save and run the new task by selecting Run. Login into your Webvault and confirm in your web browsers developer console that the connection to wss:// succeded.